Refer to
Ignition System

and
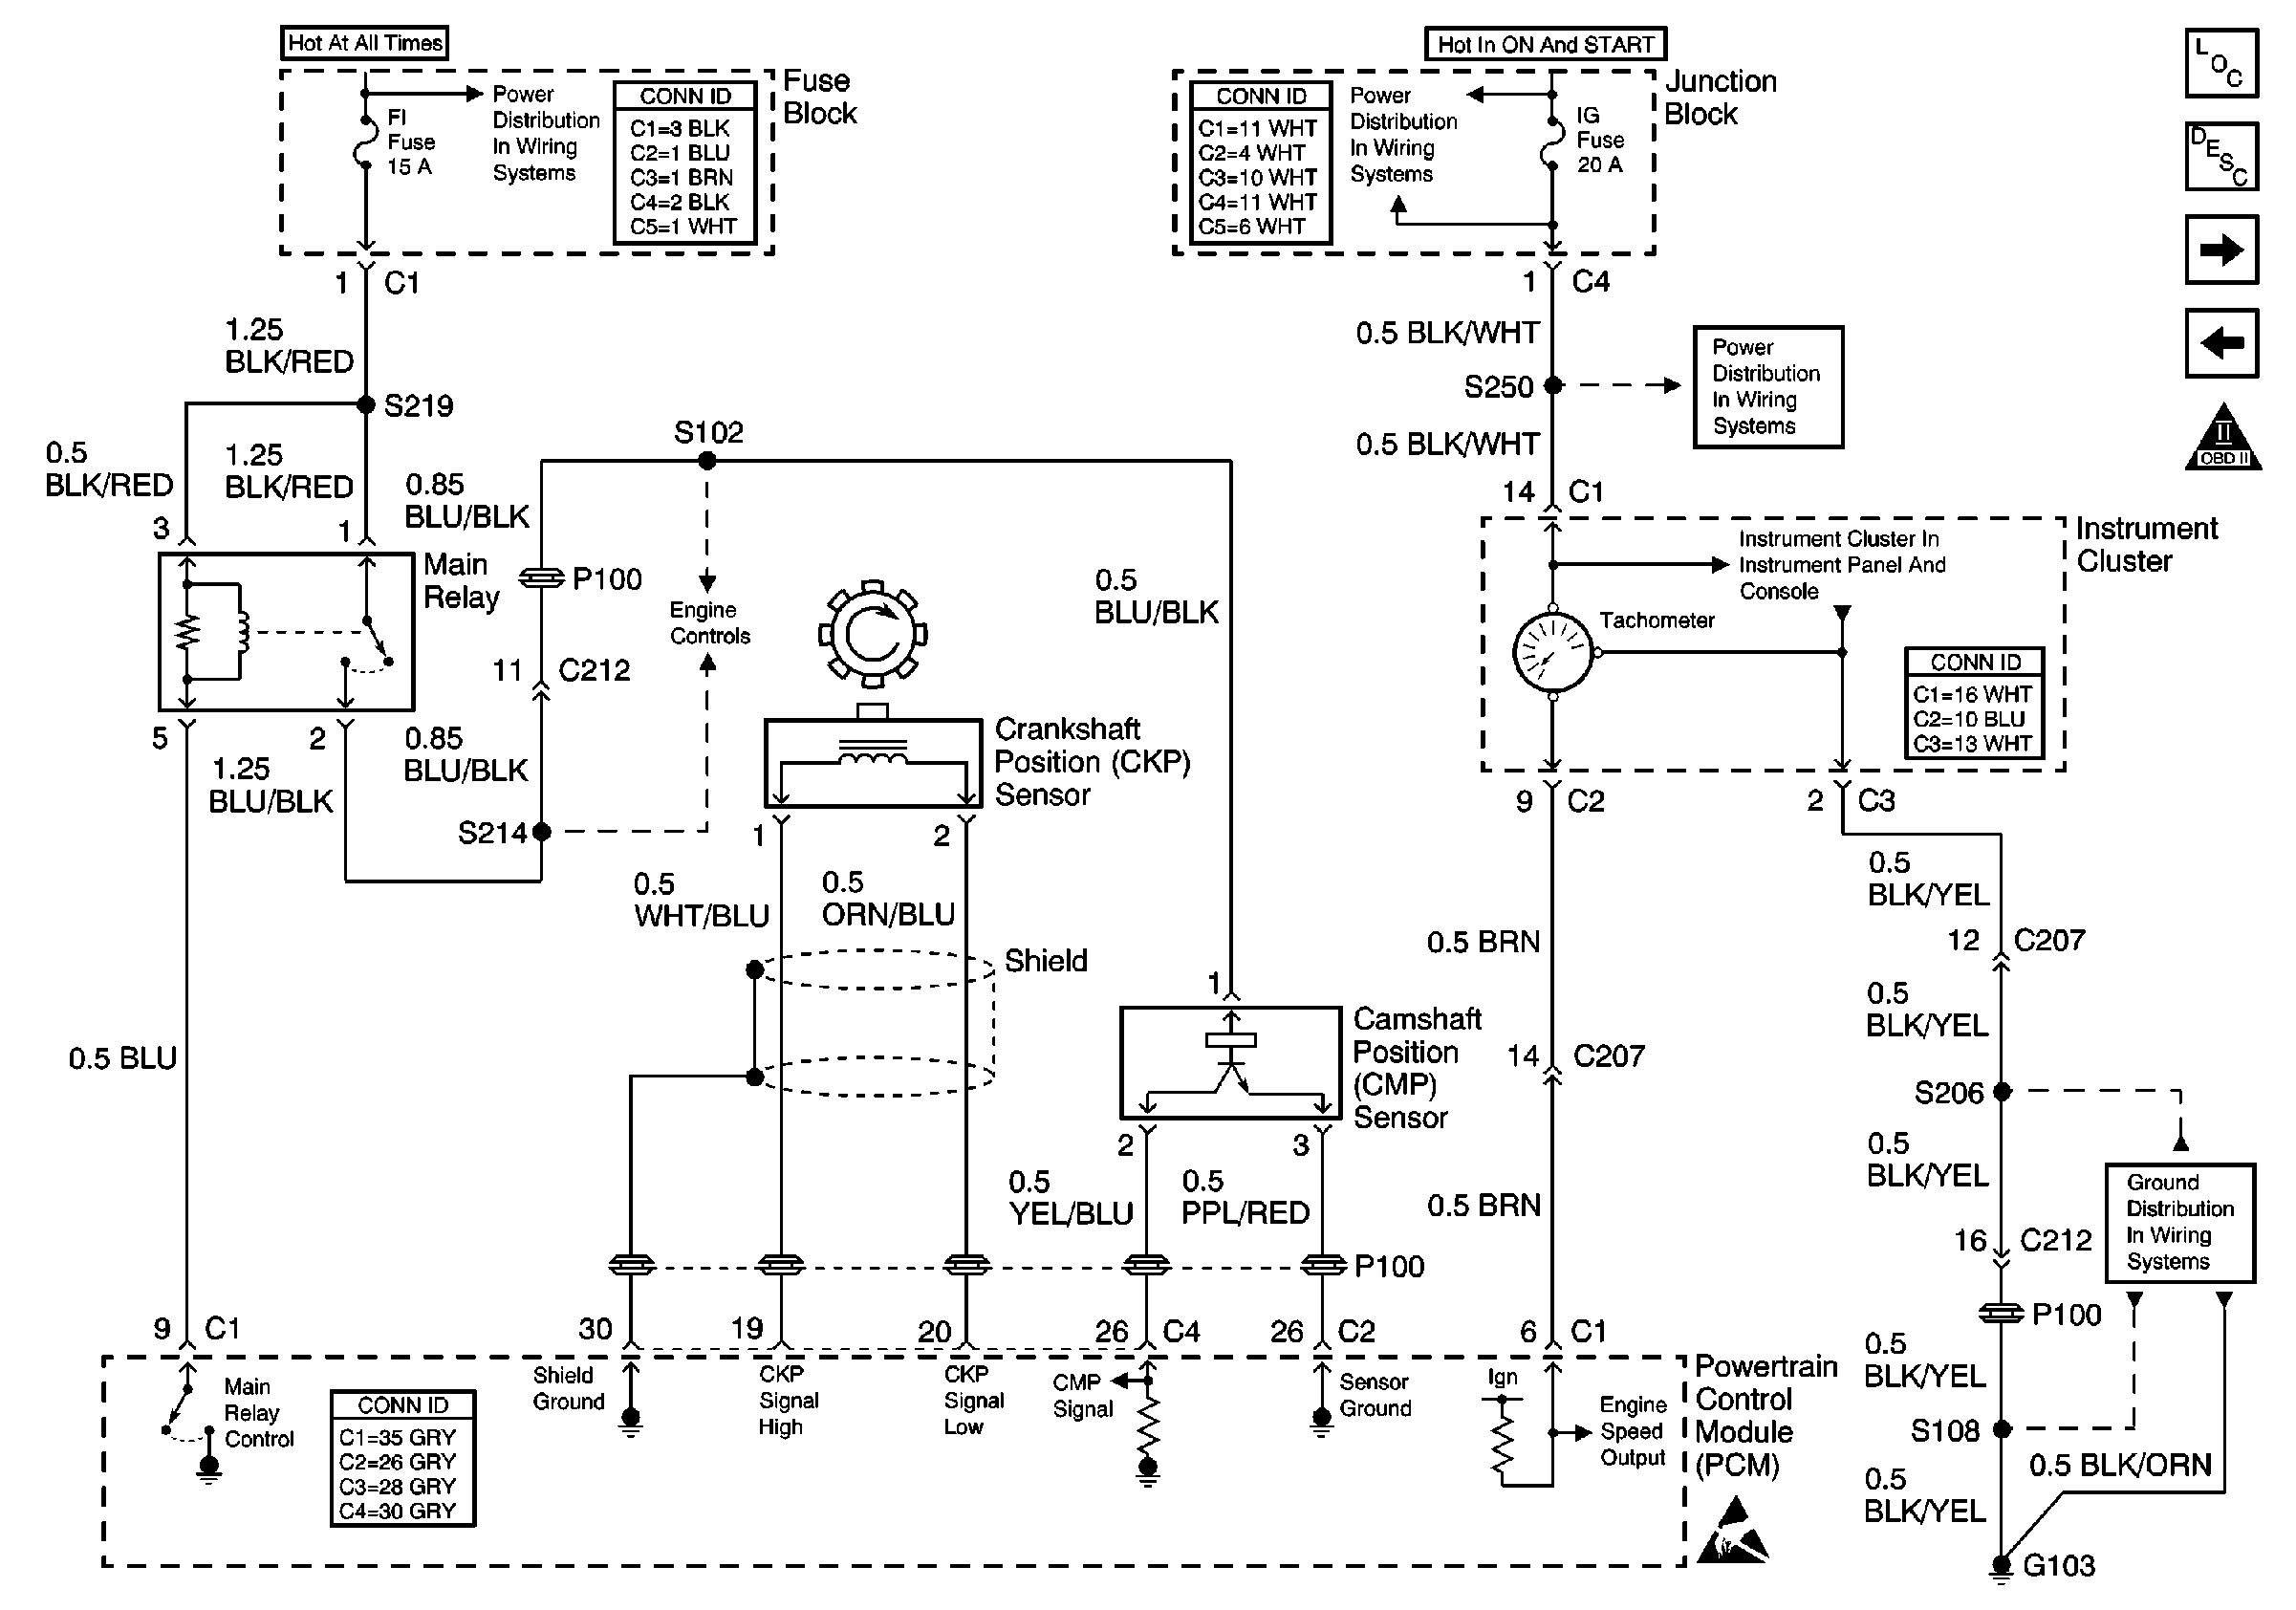
CMP and CKP Sensors
.
Circuit Description
The battery voltage is applied to the ignition coils when the ignition switch is turned to the ON or START positions. The ignition control module circuitry within the coil assemblies toggles the primary windings of the ignition coil in order to induce a high voltage in the secondary windings of the ignition coil. The powertrain control module (PCM) controls the ignition event based on numerous inputs including the crankshaft position sensor. The high voltage induced in the secondary windings of the ignition coils is applied through the spark plug wires and coil boots to the spark plugs.
In order for the engine to start and run the correct amount of good quality fuel must be properly delivered to each cylinder. The timing of the valve train operation in relation to piston position is also critical, as is the mechanical compression of the air/fuel mixture.
Diagnostic Aids
Check for any of the following conditions:
| • | Check the battery condition and the engine cranking speed. The engine will not start, and an improper diagnosis may occur if the cranking system is not operating to necessary levels. Refer to Engine Cranks/Cranks Slowly, but Does Not Start . |
| • | Water or foreign material can cause a no start during freezing weather. The engine may start after 5 or 6 minutes in a heated shop. The malfunction may not reoccur until the vehicle is parked overnight in freezing temperatures. |
| • | The PCM relies on the CMP sensor for engine reference. Without continuous accurate reference signals, there is no reliable spark or fuel injector pulse. The scan tool engine speed display should be about 260 RPM while cranking. If erratic values, such as sudden spikes in engine speed are displayed, the engine reference signal may not be stable enough for the engine to start and run properly. Inspect the CMP sensor signal circuit for EMI or poor electrical connections. |
| • | A vehicle that starts and runs after being brought to the shop for an Engine Cranks But Will Not Run complaint, may have an ignition system that is susceptible to moisture. Spray water on the ignition system components and the wiring in order to check for an engine miss or stall. |
| • | A vehicle that starts and runs only when holding the accelerator pedal down slightly, may have a fault in the IAC system. Turn OFF the ignition and disconnect the IAC valve. If the engine will now start and stay running refer to Idle Air Control (IAC) System Diagnosis . |
| • | Low fuel pressure can result in a very lean air/fuel mixture which may be difficult to ignite. Refer to Fuel System Diagnosis . |
| • | Fouled or damaged spark plugs may cause an engine cranks but will not run condition. Refer to Spark Plug Visual Diagnosis in Engine Electrical. |
| • | Check for a malfunctioning main relay. A faulty main relay can cause no MIL and an engine that cranks but will not run. Refer to Main Relay Circuit Diagnosis . |
| • | Check for a faulty IG fuse. |
An intermittent malfunction may be caused by a problem in the ignition system electrical circuit. Inspect the wiring harness and components for any of the following conditions:
| • | Backed out terminals |
| • | Improper mating of terminals |
| • | Broken electrical connector locks |
| • | Improperly formed or damaged terminals |
| • | Faulty terminal to wiring connections |
| • | Physical damage to the wiring harness |
| • | Broken conductor inside the wire insulation |
| • | Corrosion of electrical connections, splices, or terminals |
Test Description
The numbers below refer to the step numbers in the diagnostic table.
-
The Powertrain OBD System Check prompts the technician to complete some basic checks and stores the Freeze Frame data on the scan tool if applicable. This creates an electronic copy of the data taken when the fault occurred. The information is then stored in the scan tool for later reference.
-
The PCM relies on the CMP sensor for engine reference. Without engine reference signals there is no spark and no fuel injector pulse. A DTC P0340 sets after 3 seconds when cranking the engine if no CMP sensor signal is present.
-
This step checks the TP sensor, the ECT sensor, and the MAP sensor for a faulty signal. A faulty sensor input to the PCM may cause a fueling condition that results in a no start.
-
This step checks for adequate secondary ignition voltage at the spark plugs.
-
This step checks to see if fuel system pressure is within specifications with the ignition ON and the fuel pump running. The fuel pump may be operated with the scan tool Output Control feature when the fuel level is more than 20 percent.
-
Fouled or contaminated spark plugs indicate that another malfunction exists. If the engine starts and runs after cleaning or replacing the spark plugs, inspect for the cause of the spark plug condition. Road testing the vehicle and inspecting the vehicle performance with a scan tool can prevent a no start from reoccurring.
-
This step checks for faulty secondary ignition wires.
-
This step checks for proper resistance of the ignition coil secondary windings.
Step | Action | Value(s) | Yes | No | ||||||||||||||||||
|---|---|---|---|---|---|---|---|---|---|---|---|---|---|---|---|---|---|---|---|---|---|---|
Did you perform the Powertrain On-Board Diagnostic (OBD) System Check? | -- | |||||||||||||||||||||
Check for DTCs with a scan tool. Is a DTC P0340 set? | -- | |||||||||||||||||||||
Was a repair necessary? | -- | |||||||||||||||||||||
Did the test of each cylinder indicate a good crisp blue spark while cranking the engine? | -- | |||||||||||||||||||||
Important: In order to obtain maximum fuel pressure it may be necessary to cycle the ignition ON to OFF to ON more than once. Is the fuel pressure indicated within the specified values? | 250-300 kPa (36 to 43 psi) | |||||||||||||||||||||
6 |
Did the fuel pressure gauge indicate any pressure more than the specified value? | 0.0-7.0 kPa (0 to 1.0 psi) | Go to Fuel System Diagnosis | |||||||||||||||||||
7 |
Was a repair necessary? | -- | ||||||||||||||||||||
Did the engine start? | -- | |||||||||||||||||||||
9 |
Did the injector test lamp flash for each injector while cranking the engine? | -- | ||||||||||||||||||||
10 | Check for faulty fuel injectors. Refer to Fuel Injector Solenoid Coil Test - Engine Coolant Temperature Between 10-35 Degrees C (50-95 Degrees F) and Fuel Injector Balance Test . Did you find and replace a faulty fuel injector ? | -- | ||||||||||||||||||||
Measure the resistance of each spark plug wire. Is the resistance within the specified values? | 1.2k-3.0k ohms per ft | |||||||||||||||||||||
12 |
Was a repair necessary? | -- | ||||||||||||||||||||
Was the ignition coil resistance within the specified value? | 8.5k-11.5k ohms at 20°C (68°F) | |||||||||||||||||||||
14 |
Did the test lamp illuminate? | -- | ||||||||||||||||||||
15 | Connect a test lamp from B+ to the ground circuit of the ignition coil (harness side). Did the test lamp illuminate? | -- | ||||||||||||||||||||
16 |
Did the test indicate a good crisp blue spark while cranking the engine? | -- | ||||||||||||||||||||
17 | Repair the open or the faulty connection in the ignition coil ground circuit. Refer to Wiring Repairs in Wiring Systems. Is the action complete? | -- | -- | |||||||||||||||||||
18 | Repair the open in the ignition feed circuit of the ignition coil. Refer to Wiring Repairs in Wiring Systems. Is the action complete? | -- | -- | |||||||||||||||||||
19 |
Was a repair necessary? | -- | ||||||||||||||||||||
20 |
Was a repair necessary? | -- | ||||||||||||||||||||
21 |
Important: The replacement PCM must be programmed. Replace the PCM. Refer to Powertrain Control Module Replacement/Programming . Is the action complete? | -- | -- | |||||||||||||||||||
22 | Replace the faulty ignition coil. Refer to Ignition Coil Replacement . Is the action complete? | -- | -- | |||||||||||||||||||
23 |
Did you find and repair a basic engine mechanical problem? | -- | Go to Diagnostic Aids | |||||||||||||||||||
24 | Replace any faulty spark plug wires. Is the action complete? | -- | -- | |||||||||||||||||||
25 | Start the vehicle and observe the MIL. Does the MIL turn OFF approximately 1 to 2 seconds after the engine is started? | -- | System OK |
