Starter Inhibit Relay Circuit Diagnosis Crank Relay Functional Test
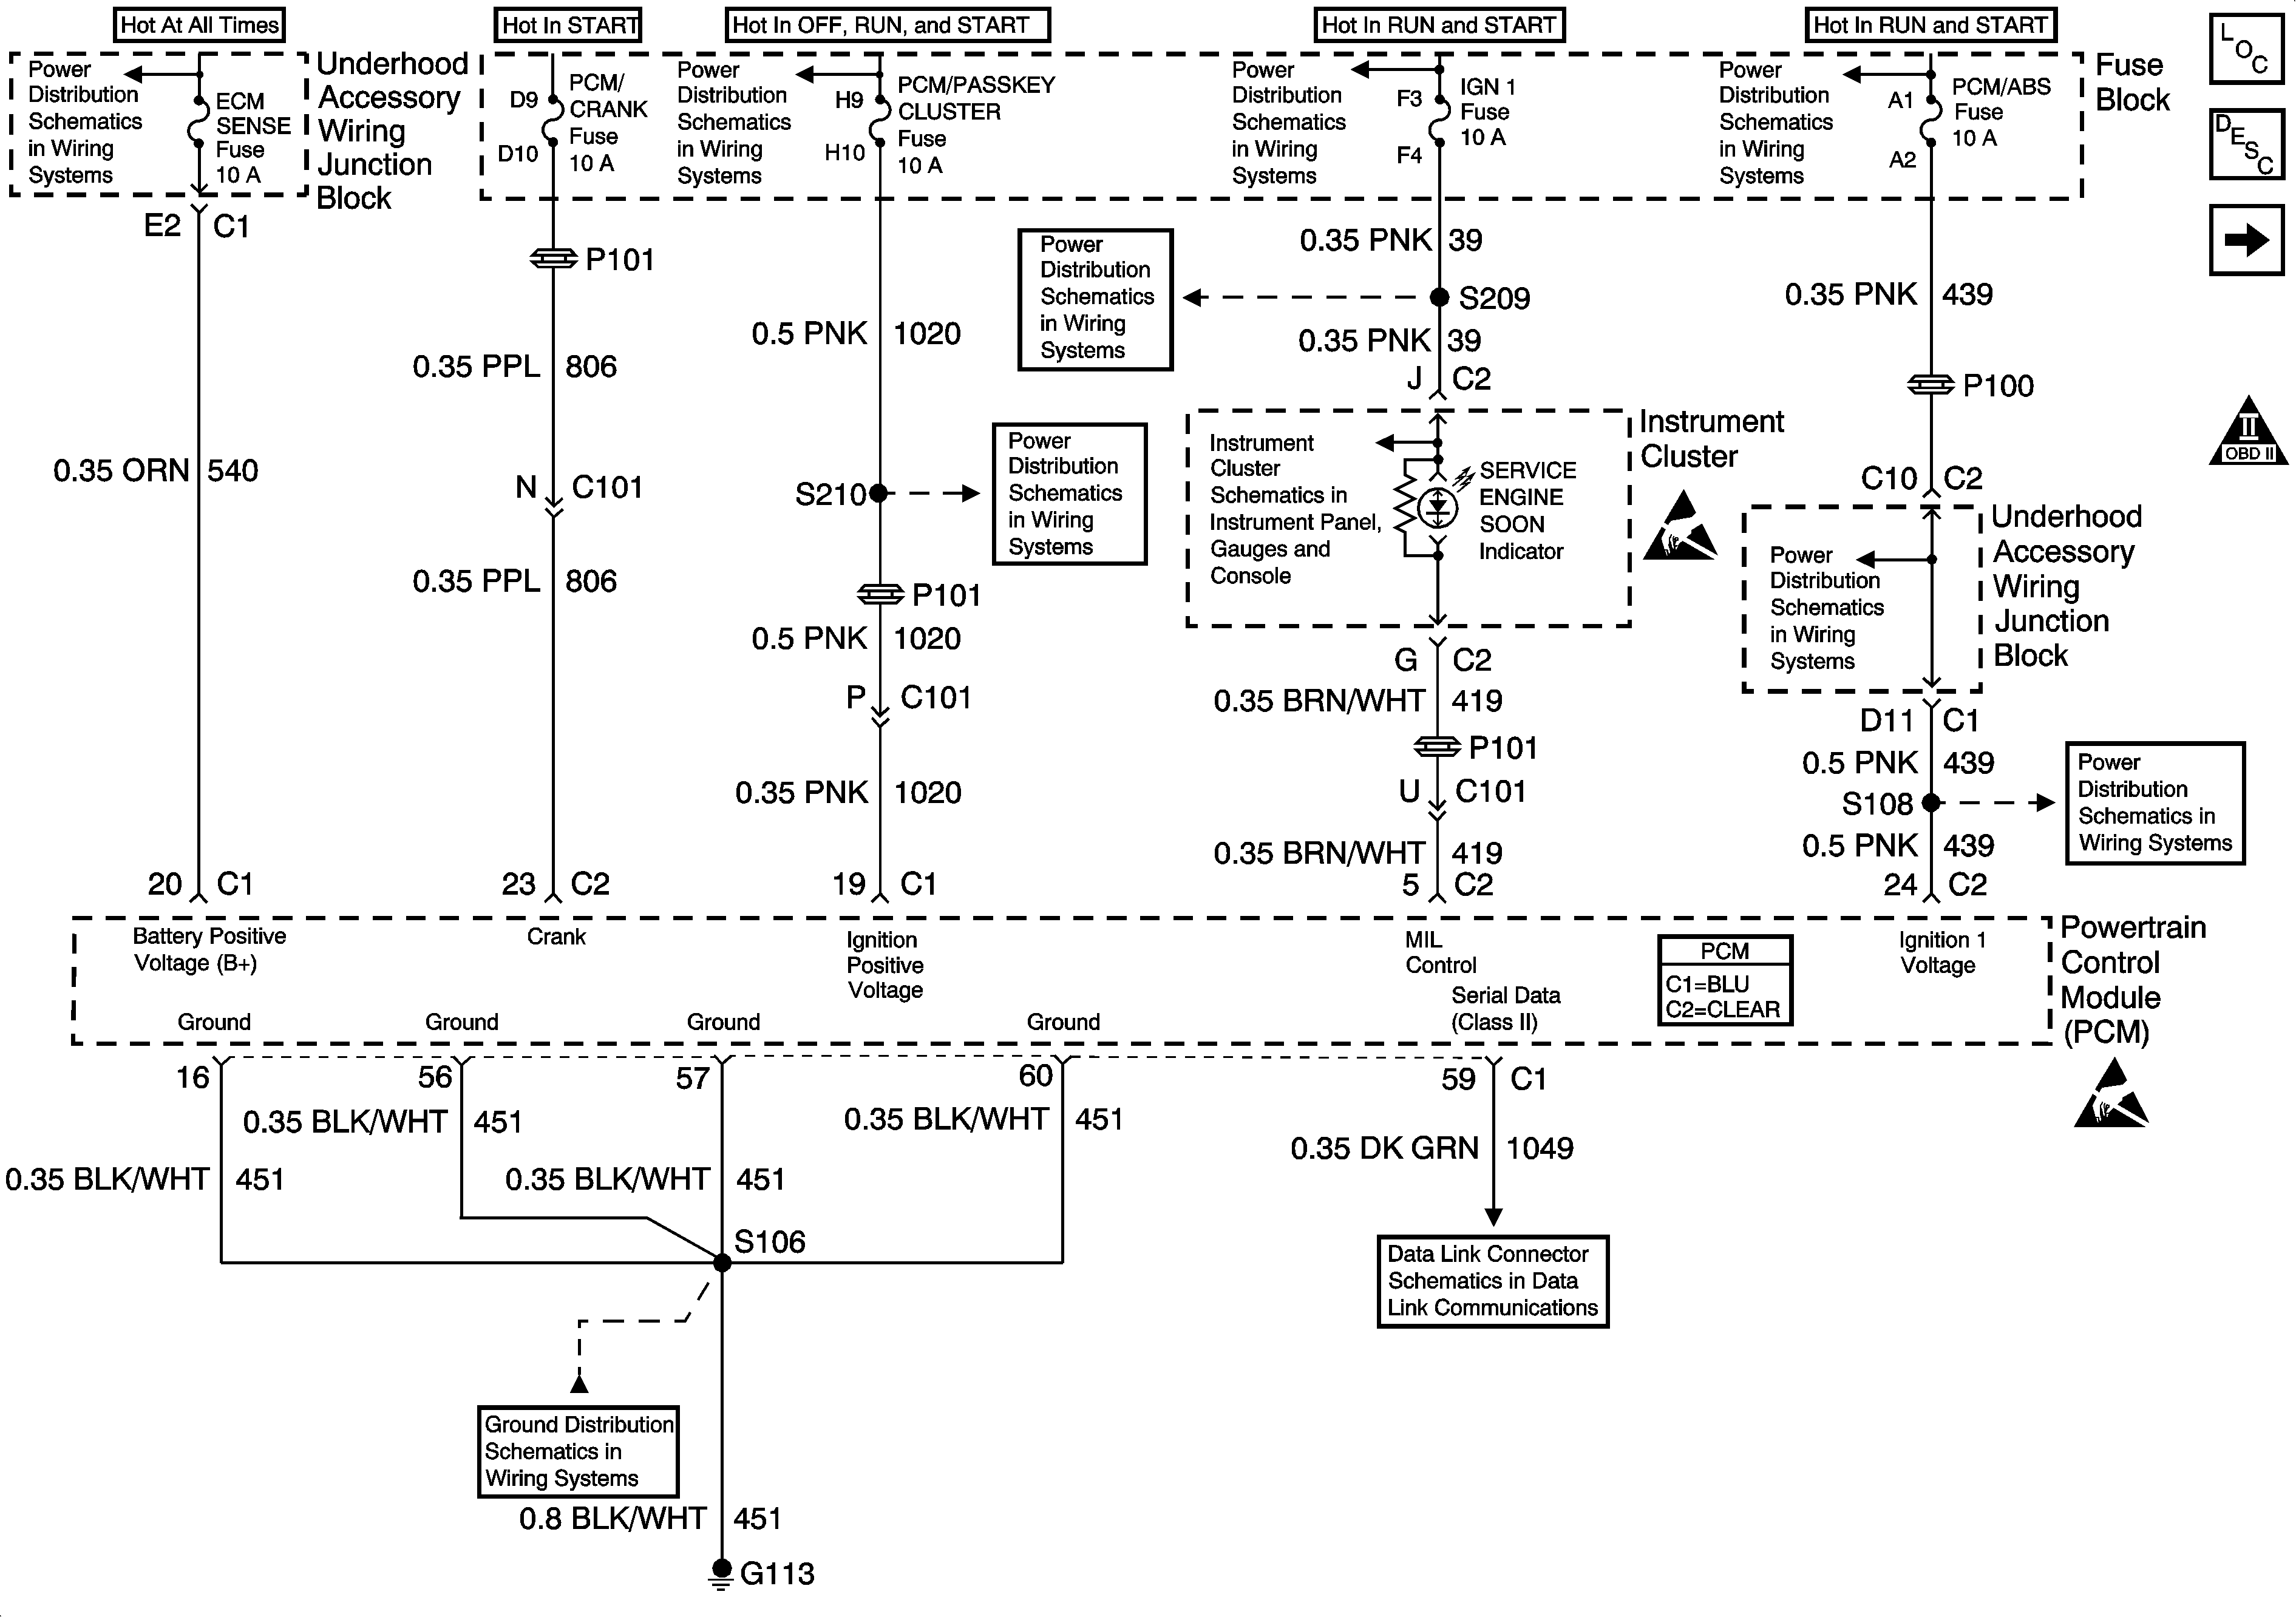
Refer to Engine Controls Schematics
Power, Ground, MIL, DLC
,
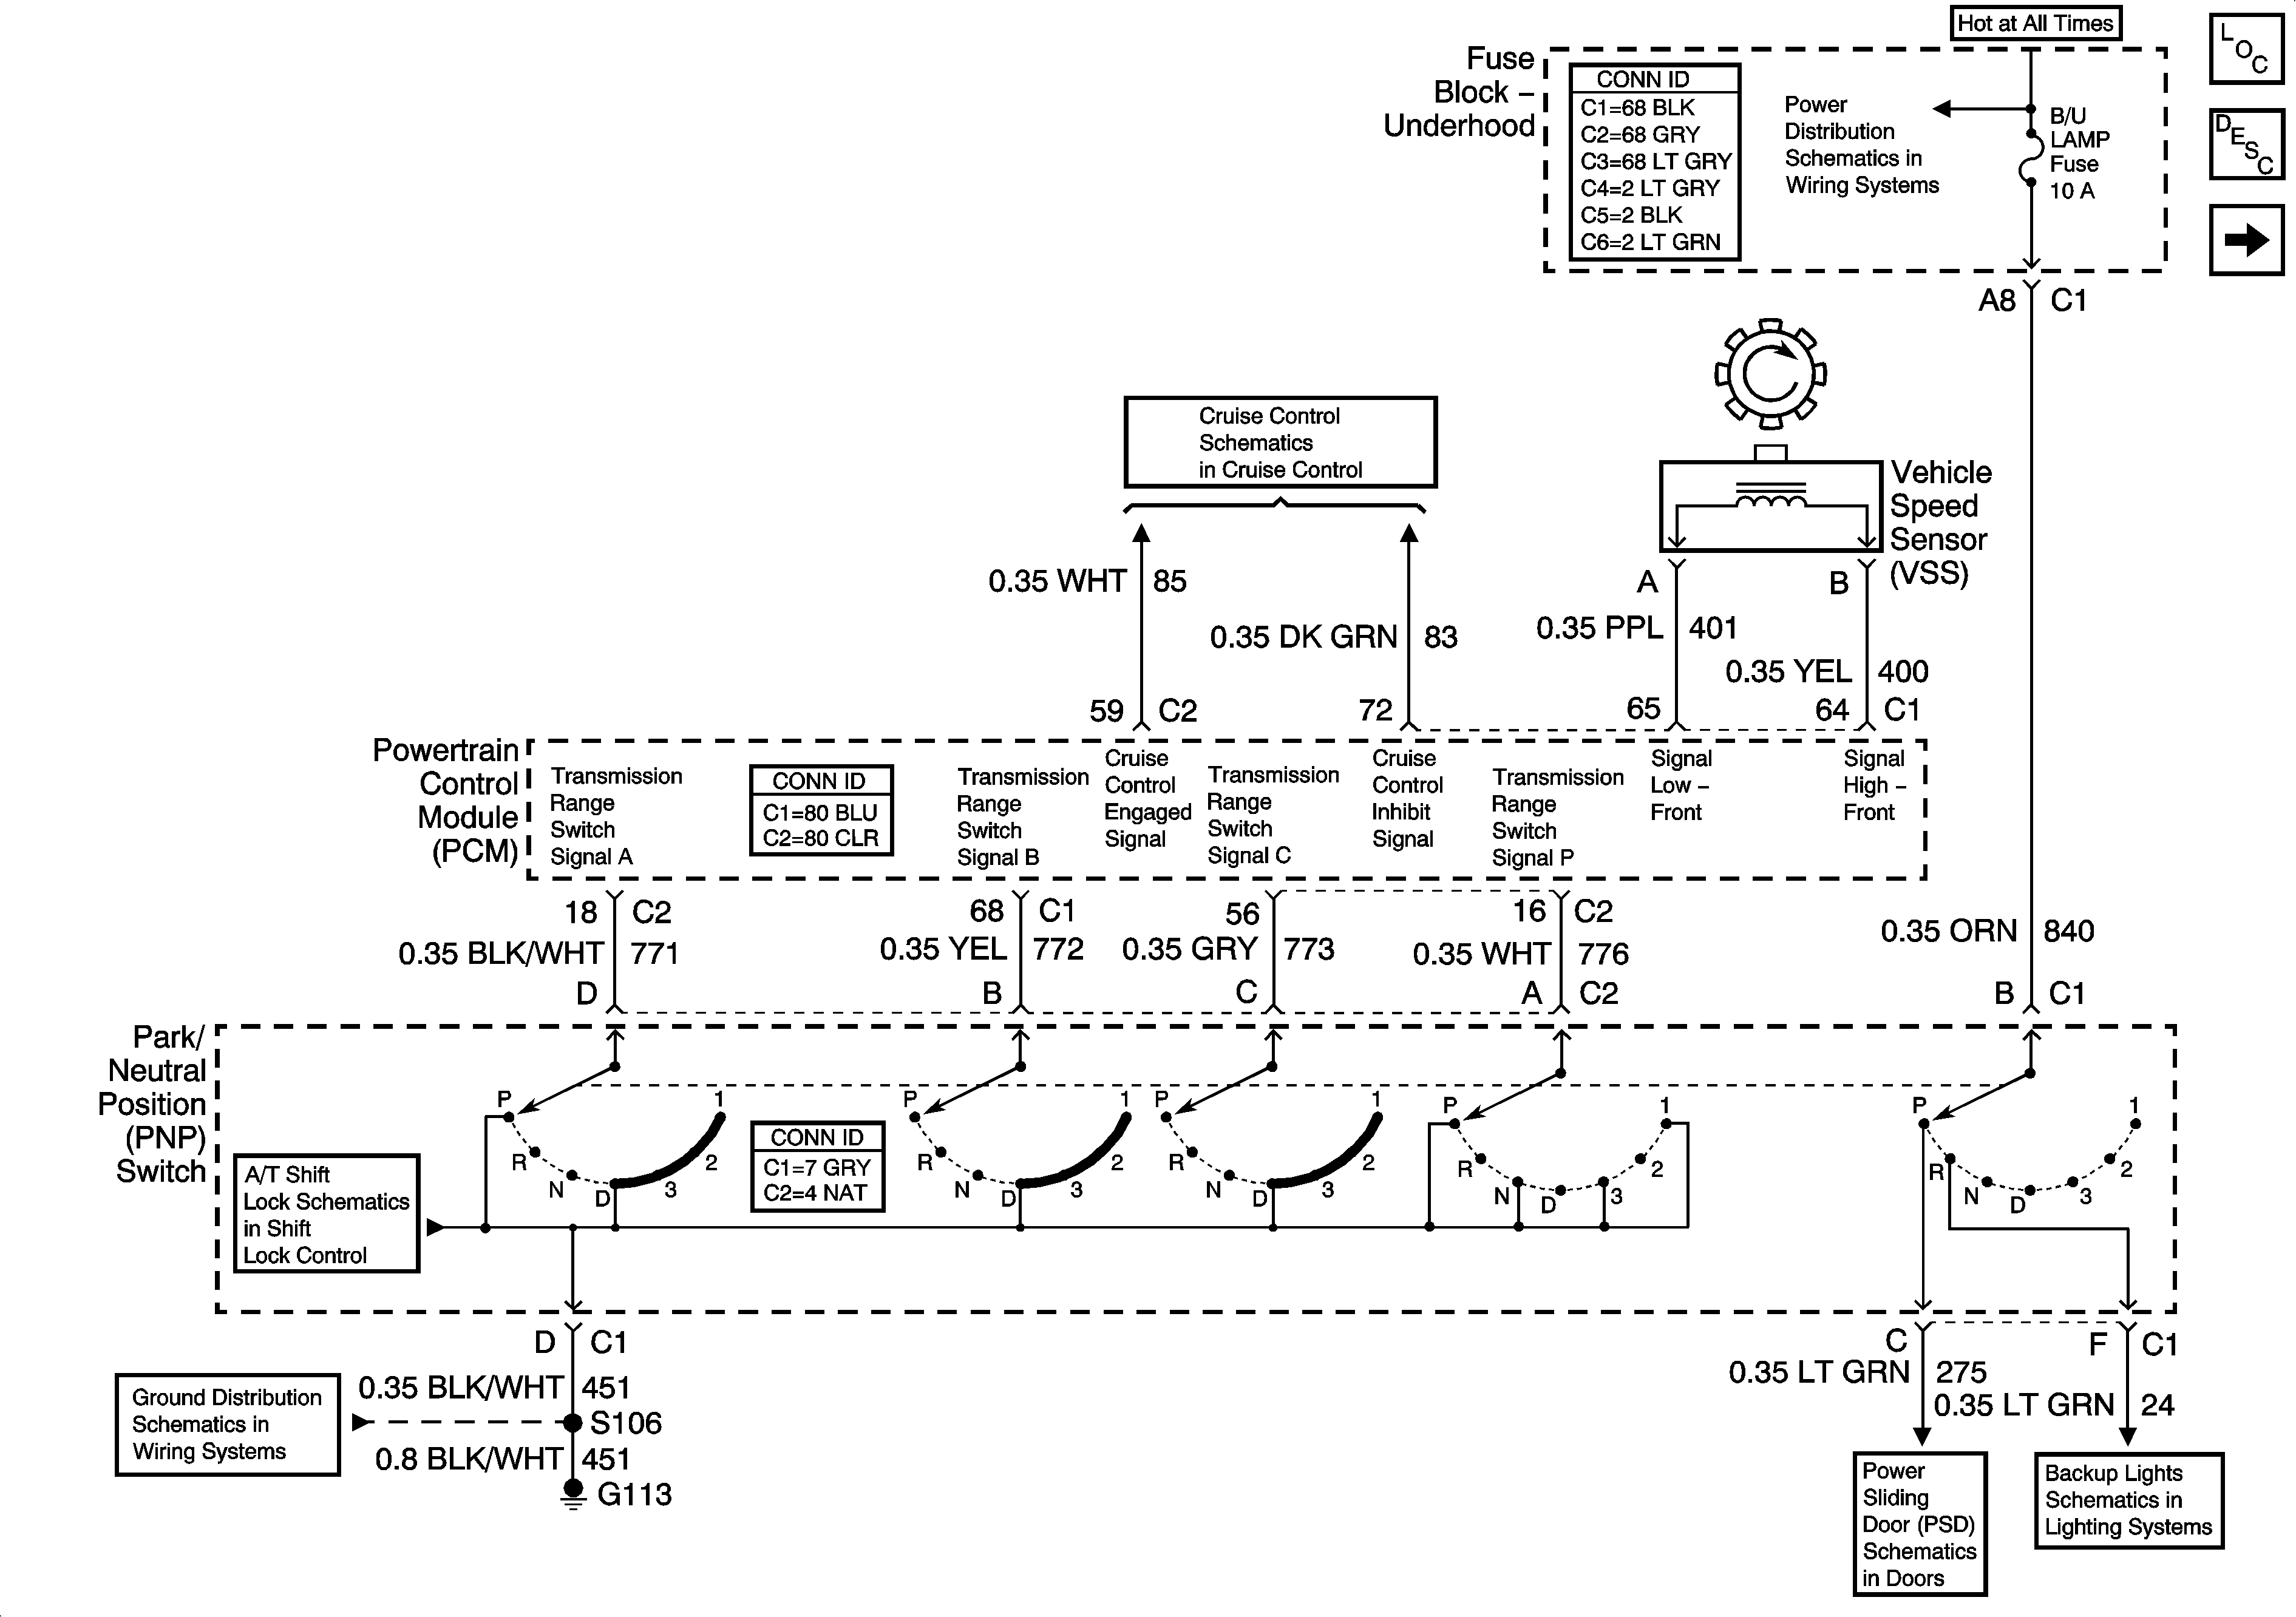
Transaxle Range Switch
, and
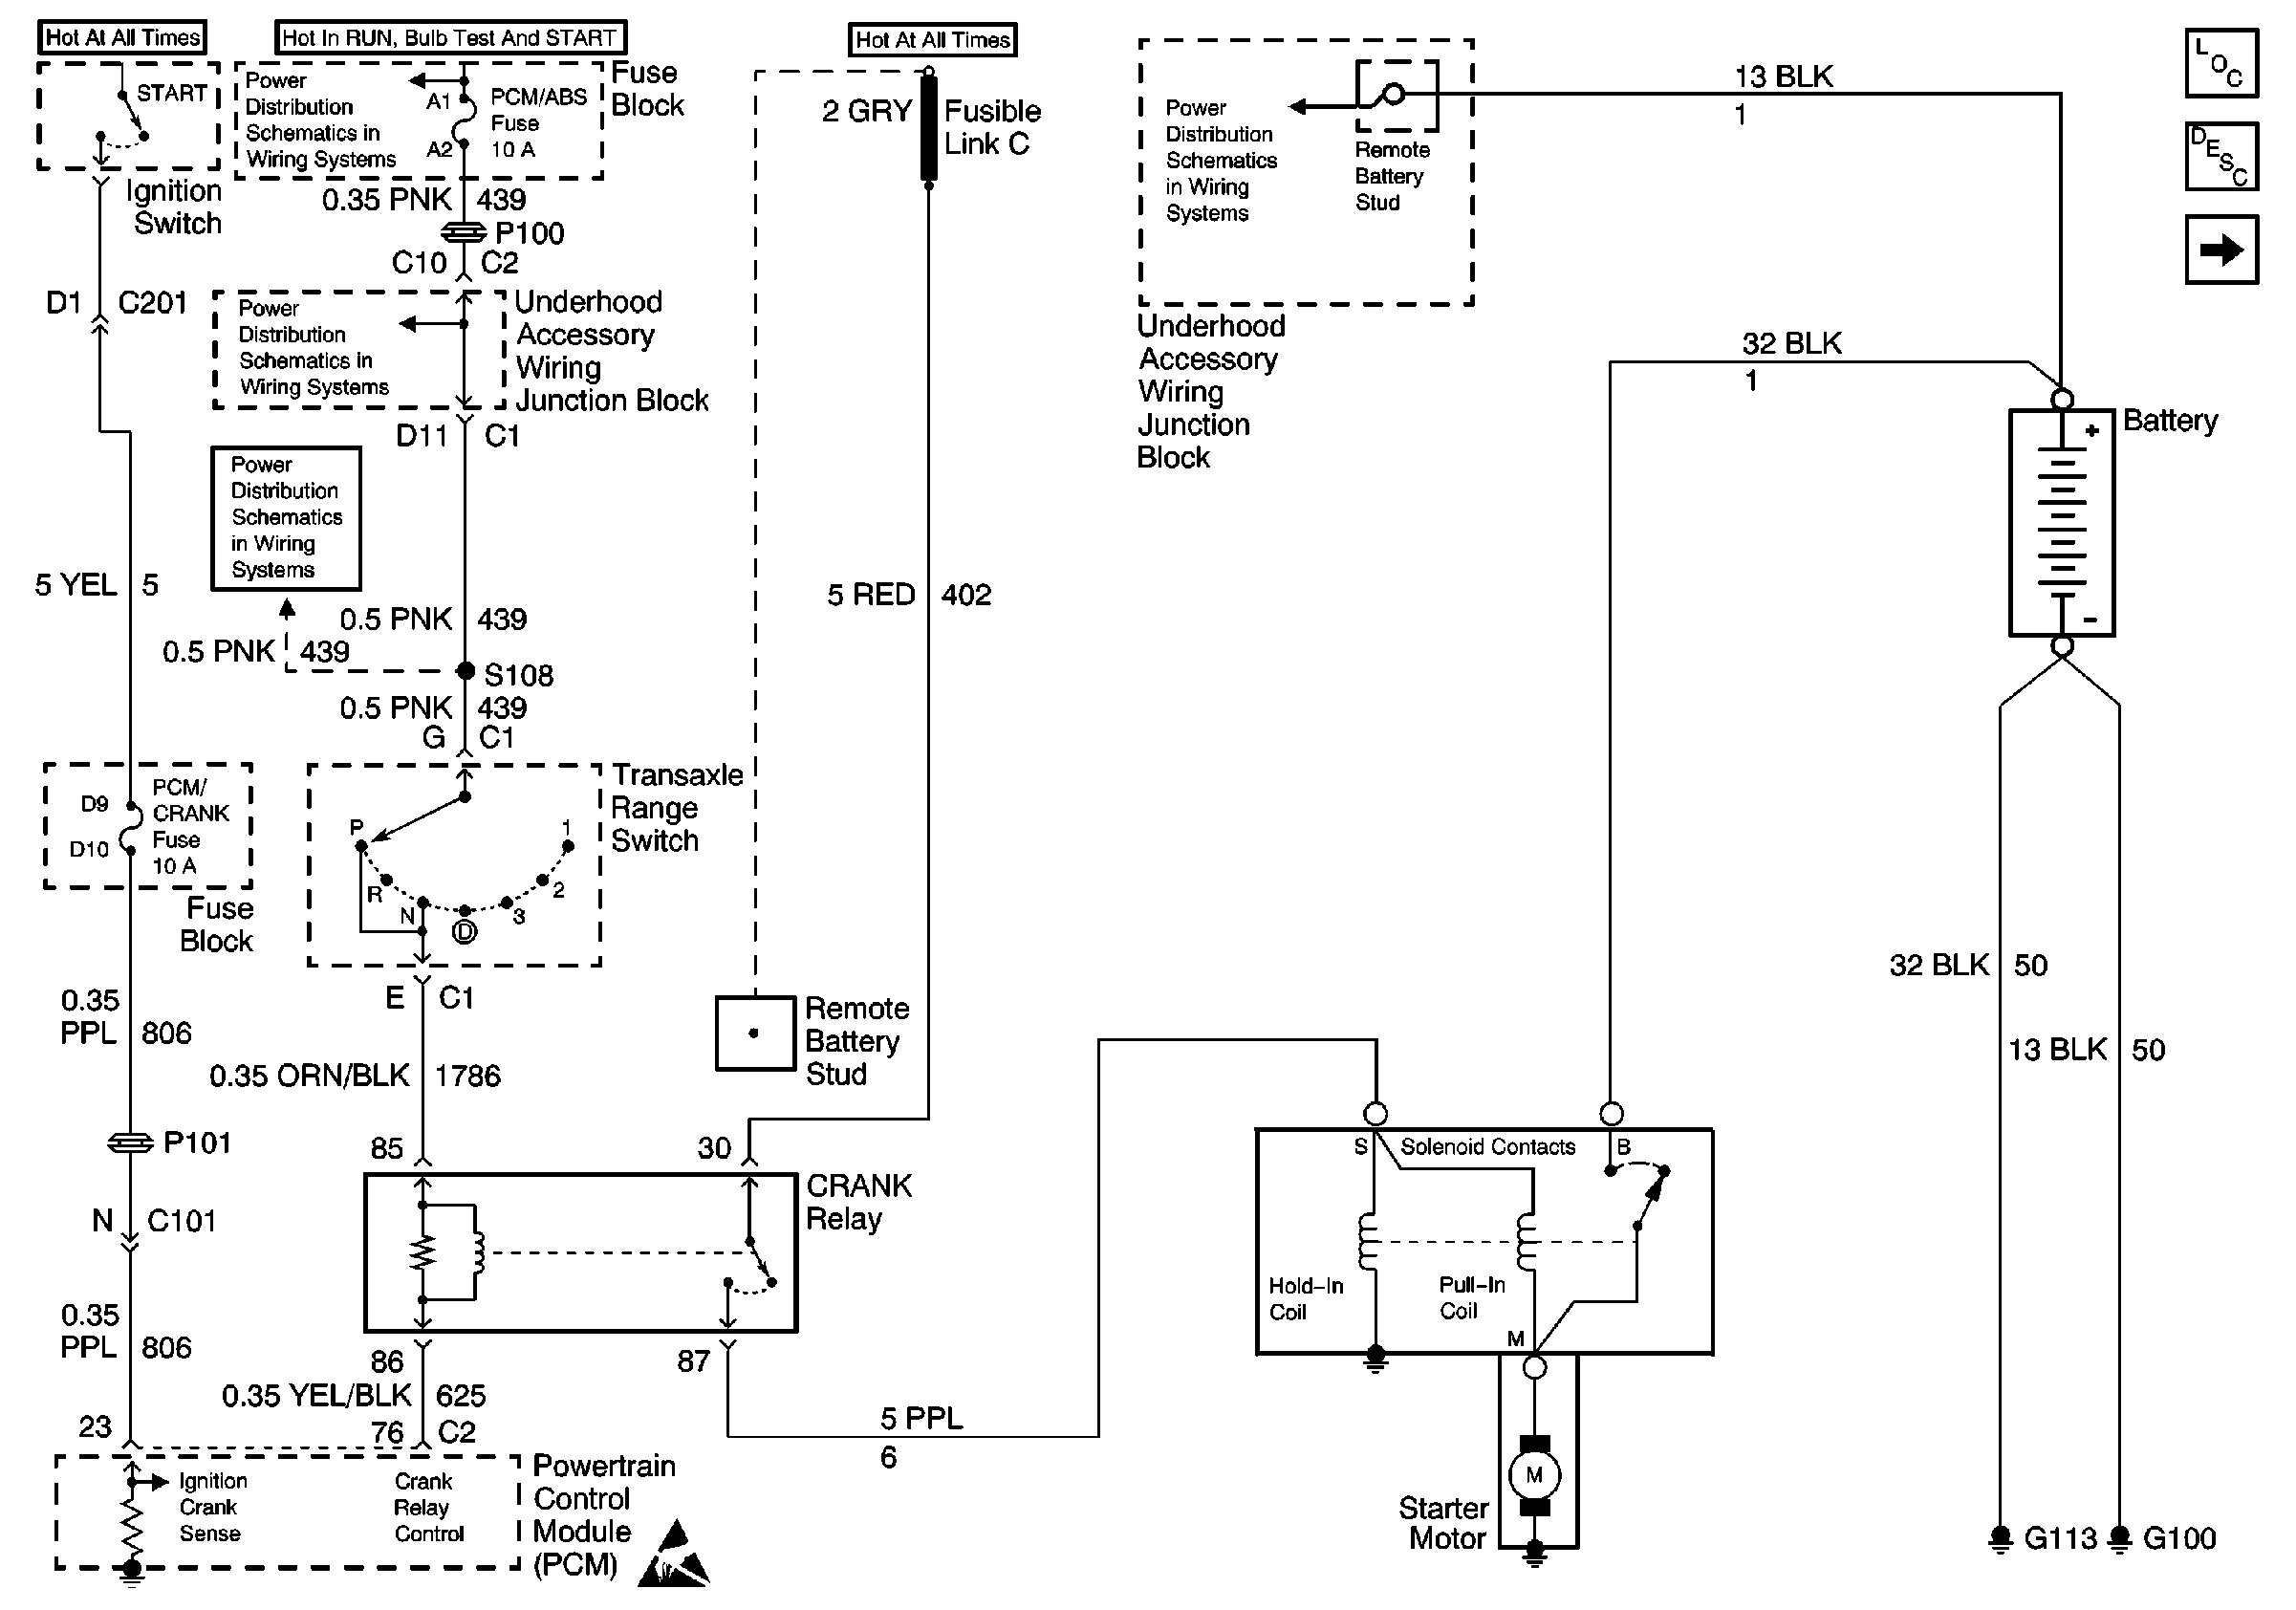
Starting
in Engine Electrical.
Circuit Description
The Ignition Switch provides ignition positive voltage to the PCM while in the Crank position. When the PCM receives the Crank signal, it then determines if the Theft Deterrent Fuel Enable Signal is correct and received in time. If the signal is accepted then the PCM provides a ground path for the Crank Relay Control Circuit, which closes the Crank Relay contacts and provides battery positive voltage to the Starter Solenoid.
The PCM has the ability to disable the Crank Relay if a short to ignition or battery positive voltage is evident on the Crank Signal circuit, or if the Ignition Switch is left in the crank position for an extended period of time (approximately 5-8 seconds) with the engine running. The Crank Relay will also be disabled if the engine is running, a correct theft deterrent password is not received or if the vehicle is started while not in Park/Neutral position.
The PCM controlled starter system consists of the following components:
| • | The Ignition Switch |
| • | The Crank Signal |
| • | The PCM |
| • | The Crank Relay Control Circuit |
| • | The Transaxle Range/Park Neutral Position Switch |
| • | The Crank Relay |
| • | The Starter Solenoid |
| • | The Starter Motor |
Diagnostic Aids
The Crank Relay Functional test is intended to identify electrical malfunctions that can occur with the PCM Control Starter System. For additional system diagnosis, refer to Diagnostic System Check - Engine Electrical in Engine Electrical.
Inspect for the following conditions:
Many situations may lead to an intermittent condition. Perform each inspection or test as directed.
Important: : Remove any debris from the connector surfaces before servicing a component. Inspect the connector gaskets when diagnosing or replacing a component. Ensure that the gaskets are installed correctly. The gaskets prevent contaminate intrusion.
| • | Loose terminal connection |
| - | Use a corresponding mating terminal to test for proper tension. Refer to Testing for Intermittent Conditions and Poor Connections , and to Connector Repairs in Wiring Systems for diagnosis and repair. |
| - | Inspect the harness connectors for backed out terminals, improper mating, broken locks, improperly formed or damaged terminals, and faulty terminal to wire connection. Refer to Testing for Intermittent Conditions and Poor Connections , and to Connector Repairs in Wiring Systems for diagnosis and repair. |
| • | Damaged harness--Inspect the wiring harness for damage. If the harness inspection does not reveal a problem, observe the display on the scan tool while moving connectors and wiring harnesses related to the sensor. A change in the scan tool display may indicate the location of the fault. Refer to Wiring Repairs in Wiring Systems for diagnosis and repair. |
| • | Inspect the powertrain control module (PCM) and the engine grounds for clean and secure connections. Refer to Wiring Repairs in Wiring Systems for diagnosis and repair. |
If the condition is determined to be intermittent, reviewing the Snapshot or Freeze Frame/Failure Records may be useful in determining when the DTC or condition was identified.
Test Description
Numbers below refer to step numbers in the diagnostic table:
-
Important: The Starter is capable of engaging with the ignition OFF, or while in gear.
This test determines if the Starter is cranking with the ignition OFF.
-
If the Crank Signal circuit is shorted to battery or ignition positive voltage and the ignition is on the Crank Relay will be commanded ON at ignition power up, and will be disabled after the engine is running.
Step | Action | Values | Yes | No |
|---|---|---|---|---|
1 | Did you perform the Powertrain On Board Diagnostic (OBD) System Check? | -- | ||
2 | With a scan tool observe DTCs. Are any U-type DTCs, Theft Deterrent DTCs, or DTC P1626/P1631 set? | -- | Go to Applicable DTC | |
|
Important: : The Starter is capable of engaging with the ignition OFF, or while in
gear. Ensure the following conditions are met before proceeding:
Turn OFF the ignition. Does the Starter continue to crank the engine? | -- | |||
Turn on the ignition leaving the engine off. Does the starter crank the engine and then turn off after the engine is running? | -- | |||
5 | Ignition is still on. Does the starter crank the engine at all times with the ignition on? | -- | ||
6 | With a scan tool observe the TR SW parameter while selecting each transmission range with the shift lever. Does each transmission range match the scan tool? | -- | Go to Transmission Range Switch Circuit Electrical in Automatic Transaxle - 4T65 E | |
7 | Attempt to start the engine. Does the starter crank the engine? | -- | ||
8 |
Does the starter engage correctly? | -- |
Starter Inhibit Relay Circuit Diagnosis Starter Cranks with Ignition Off
Refer to
Engine Controls Schematics
.
Power, Ground, MIL, DLC
,
Transaxle Range Switch
, and
Starting
in
Engine Electrical.
Circuit Description
The Crank Relay Functional Test should be the starting point to determine which diagnosis to perform based on the symptom of the starting system. This diagnosis determines if the Crank Relay or the starter solenoid feed circuit is operating properly.
Diagnostic Aids
For additional system diagnosis, refer to Diagnostic System Check - Engine Electrical in Engine Electrical.
Inspect for the following conditions:
Many situations may lead to an intermittent condition. Perform each inspection or test as directed.
Important: : Remove any debris from the connector surfaces before servicing a component. Inspect the connector gaskets when diagnosing or replacing a component. Ensure that the gaskets are installed correctly. The gaskets prevent contaminate intrusion.
| • | Loose terminal connection |
| - | Use a corresponding mating terminal to test for proper tension. Refer to Testing for Intermittent Conditions and Poor Connections , and to Connector Repairs in Wiring Systems for diagnosis and repair. |
| - | Inspect the harness connectors for backed out terminals, improper mating, broken locks, improperly formed or damaged terminals, and faulty terminal to wire connection. Refer to Testing for Intermittent Conditions and Poor Connections , and to Connector Repairs in Wiring Systems for diagnosis and repair. |
| • | Damaged harness--Inspect the wiring harness for damage. If the harness inspection does not reveal a problem, observe the display on the scan tool while moving connectors and wiring harnesses related to the sensor. A change in the scan tool display may indicate the location of the fault. Refer to Wiring Repairs in Wiring Systems for diagnosis and repair. |
| • | Inspect the powertrain control module (PCM) and the engine grounds for clean and secure connections. Refer to Wiring Repairs in Wiring Systems for diagnosis and repair. |
If the condition is determined to be intermittent, reviewing the Snapshot or Freeze Frame/Failure Records may be useful in determining when the DTC or condition was identified.
Test Description
Numbers below refer to step numbers in the diagnostic table:
Step | Action | Values | Yes | No |
|---|---|---|---|---|
1 | Did you perform the Crank Relay Functional Test? | -- | ||
2 |
Does the Starter continue to crank the engine? | -- | ||
Test the starter solenoid feed circuit for a short to battery positive voltage. Refer to Wiring Repairs in Wiring Systems. Did you find and correct the condition? | -- | |||
4 | Replace the Crank Relay. Did you complete the replacement? | -- | -- |
Starter Inhibit Relay Circuit Diagnosis Starter Cranks with Ignition On
Refer to
Engine Controls Schematics
Power, Ground, MIL, DLC
,
Transaxle Range Switch
, and
Starting
in
Engine Electrical.
Circuit Description
The Crank Relay Functional Test should be the starting point to determine which diagnosis to perform based on the symptom of the starting system. This diagnosis determines if the Crank Signal circuit is operating properly.
Diagnostic Aids
For additional system diagnosis, refer to Diagnostic System Check - Engine Electrical in Engine Electrical.
Inspect for the following conditions:
Many situations may lead to an intermittent condition. Perform each inspection or test as directed.
Important: : Remove any debris from the connector surfaces before servicing a component. Inspect the connector gaskets when diagnosing or replacing a component. Ensure that the gaskets are installed correctly. The gaskets prevent contaminate intrusion.
| • | Loose terminal connection |
| - | Use a corresponding mating terminal to test for proper tension. Refer to Testing for Intermittent Conditions and Poor Connections , and to Connector Repairs in Wiring Systems for diagnosis and repair. |
| - | Inspect the harness connectors for backed out terminals, improper mating, broken locks, improperly formed or damaged terminals, and faulty terminal to wire connection. Refer to Testing for Intermittent Conditions and Poor Connections , and to Connector Repairs in Wiring Systems for diagnosis and repair. |
| • | Damaged harness--Inspect the wiring harness for damage. If the harness inspection does not reveal a problem, observe the display on the scan tool while moving connectors and wiring harnesses related to the sensor. A change in the scan tool display may indicate the location of the fault. Refer to Wiring Repairs in Wiring Systems for diagnosis and repair. |
| • | Inspect the powertrain control module (PCM) and the engine grounds for clean and secure connections. Refer to Wiring Repairs in Wiring Systems for diagnosis and repair. |
If the condition is determined to be intermittent, reviewing the Snapshot or Freeze Frame/Failure Records may be useful in determining when the DTC or condition was identified.
Test Description
Numbers below refer to step numbers in the diagnostic table:
Step | Action | Values | Yes | No |
|---|---|---|---|---|
1 | Did you perform the Crank Relay Functional Test? | -- | ||
Test the Crank Signal circuit for a short to battery or ignition positive voltage. Refer to Circuit Testing , and Wiring Repairs in Wiring Systems. Did you find and correct the condition? | -- | |||
3 |
Important : The replacement PCM must be programmed. Replace the PCM. Refer to Powertrain Control Module Replacement/Programming .Did you complete the replacement? | -- | -- |
Starter Inhibit Relay Circuit Diagnosis Starter Cranks with Engine Running
Refer to
Engine Controls Schematics
Power, Ground, MIL, DLC
,
Transaxle Range Switch
, and
Starting
in
Engine Electrical.
Circuit Description
The Crank Relay Functional Test should be the starting point to determine which diagnosis to perform based on the symptom of the starting system. This diagnosis determines if the Crank Relay Control circuit or the Starter Solenoid feed circuit is operating properly.
Diagnostic Aids
For additional system diagnosis, refer to Diagnostic System Check - Engine Electrical in Engine Electrical.
Inspect for the following conditions:
Many situations may lead to an intermittent condition. Perform each inspection or test as directed.
Important: : Remove any debris from the connector surfaces before servicing a component. Inspect the connector gaskets when diagnosing or replacing a component. Ensure that the gaskets are installed correctly. The gaskets prevent contaminate intrusion.
| • | Loose terminal connection |
| - | Use a corresponding mating terminal to test for proper tension. Refer to Testing for Intermittent Conditions and Poor Connections , and to Connector Repairs in Wiring Systems for diagnosis and repair. |
| - | Inspect the harness connectors for backed out terminals, improper mating, broken locks, improperly formed or damaged terminals, and faulty terminal to wire connection. Refer to Testing for Intermittent Conditions and Poor Connections , and to Connector Repairs in Wiring Systems for diagnosis and repair. |
| • | Damaged harness--Inspect the wiring harness for damage. If the harness inspection does not reveal a problem, observe the display on the scan tool while moving connectors and wiring harnesses related to the sensor. A change in the scan tool display may indicate the location of the fault. Refer to Wiring Repairs in Wiring Systems for diagnosis and repair. |
| • | Inspect the powertrain control module (PCM) and the engine grounds for clean and secure connections. Refer to Wiring Repairs in Wiring Systems for diagnosis and repair. |
If the condition is determined to be intermittent, reviewing the Snapshot or Freeze Frame/Failure Records may be useful in determining when the DTC or condition was identified.
Step | Action | Values | Yes | No |
|---|---|---|---|---|
1 | Did you perform the Crank Relay Functional Test? | -- | ||
2 |
Does the starter crank the engine? | -- | ||
3 |
Did the test lamp illuminate? | -- | ||
4 |
Did the test lamp illuminate? | -- | ||
5 | Test the Crank Relay Control circuit for a short to ground. Refer to Circuit Testing , and Wiring Repairs in Wiring Systems. Did you find and correct the condition? | -- | ||
6 | Test the Starter Solenoid Feed circuit for a short to battery positive voltage. Refer to Circuit Testing , and Wiring Repairs in Wiring Systems. Did you complete the repair? | -- | -- | |
7 | Replace the Crank Relay. Did you complete the replacement? | -- | -- | |
8 |
Important: : The replacement PCM must be programmed. Replace the PCM. Refer to Powertrain Control Module Replacement/Programming . | -- | -- |
Starter Inhibit Relay Circuit Diagnosis Starter Does Not Crank
Refer to
Engine Controls Schematics
Power, Ground, MIL, DLC
,
Transaxle Range Switch
, and
Starting
in
Engine Electrical.
Circuit Description
The Crank Relay Functional Test should be the starting point to determine which diagnosis to perform based on the symptom of the starting system. This diagnosis determines if the Crank Signal circuit, Crank Relay, Crank Relay feed circuit, or the Starter Solenoid feed circuit is operating properly.
Diagnostic Aids
For additional system diagnosis, refer to Diagnostic System Check - Engine Electrical in Engine Electrical.
Inspect for the following conditions:
Many situations may lead to an intermittent condition. Perform each inspection or test as directed.
Important: : Remove any debris from the connector surfaces before servicing a component. Inspect the connector gaskets when diagnosing or replacing a component. Ensure that the gaskets are installed correctly. The gaskets prevent contaminate intrusion.
| • | Loose terminal connection |
| - | Use a corresponding mating terminal to test for proper tension. Refer to Testing for Intermittent Conditions and Poor Connections , and to Connector Repairs in Wiring Systems for diagnosis and repair. |
| - | Inspect the harness connectors for backed out terminals, improper mating, broken locks, improperly formed or damaged terminals, and faulty terminal to wire connection. Refer to Testing for Intermittent Conditions and Poor Connections , and to Connector Repairs in Wiring Systems for diagnosis and repair. |
| • | Damaged harness--Inspect the wiring harness for damage. If the harness inspection does not reveal a problem, observe the display on the scan tool while moving connectors and wiring harnesses related to the sensor. A change in the scan tool display may indicate the location of the fault. Refer to Wiring Repairs in Wiring Systems for diagnosis and repair. |
| • | Inspect the powertrain control module (PCM) and the engine grounds for clean and secure connections. Refer to Wiring Repairs in Wiring Systems for diagnosis and repair. |
If the condition is determined to be intermittent, reviewing the Snapshot or Freeze Frame/Failure Records may be useful in determining when the DTC or condition was identified.
Step | Action | Values | Yes | No | ||||
|---|---|---|---|---|---|---|---|---|
1 | Did you perform the Crank Relay Functional Test? | -- | ||||||
2 |
Did the test lamp illuminate? | -- | ||||||
3 |
Did the test lamp illuminate? | -- | ||||||
4 |
Did the test lamp illuminate? | -- | ||||||
5 |
Did the test lamp illuminate? | -- | ||||||
6 |
Did the test lamp illuminate? | -- | Go to Starter Solenoid Clicks, Engine Does Not Crank in Engine Electrical | |||||
7 |
Does the Commanded Starter parameter indicate Enabled while in the crank mode? | -- | ||||||
8 | Inspect the PCM/Crank fuse? Is the fuse open? | -- | ||||||
9 |
Did you complete the repair? | -- | -- | |||||
10 | Test the Test the Crank Signal ignition positive voltage feed circuit for an open. Refer to Circuit Testing , and Wiring Repairs in Wiring System. Did you find and correct the condition? | -- | ||||||
11 |
Did you find and correct the condition? | -- | ||||||
12 |
Did you find and correct the condition? | -- | ||||||
13 |
Did you complete the repair? | -- | -- | |||||
14 |
Did you complete the repair? | -- | -- | |||||
15 |
Did you find and correct the condition? | -- | ||||||
16 |
Did you find and correct the condition? | -- | Go to Diagnostic System Check - Engine Electrical in Engine Electrical | |||||
17 | Test the Starter Solenoid feed circuit for an open. Refer to Circuit Testing , and Wiring Repairs in Wiring System. Did you find and correct the condition? | -- | ||||||
18 |
Did you find and correct the condition? | |||||||
19 | Replace the Transaxle Range Switch. Refer to Park/Neutral Position Switch Replacement in Automatic Transaxle 4T65-E. Did you complete the repair? | -- | -- | |||||
20 |
Important: : The replacement PCM must be programmed. Replace the PCM. Refer to Powertrain Control Module Replacement/Programming . | -- | -- |
