Transmission Replacement Front Wheel Drive
Removal Procedure
- Remove the air cleaner assembly. Refer to Air Cleaner Assembly Replacement .
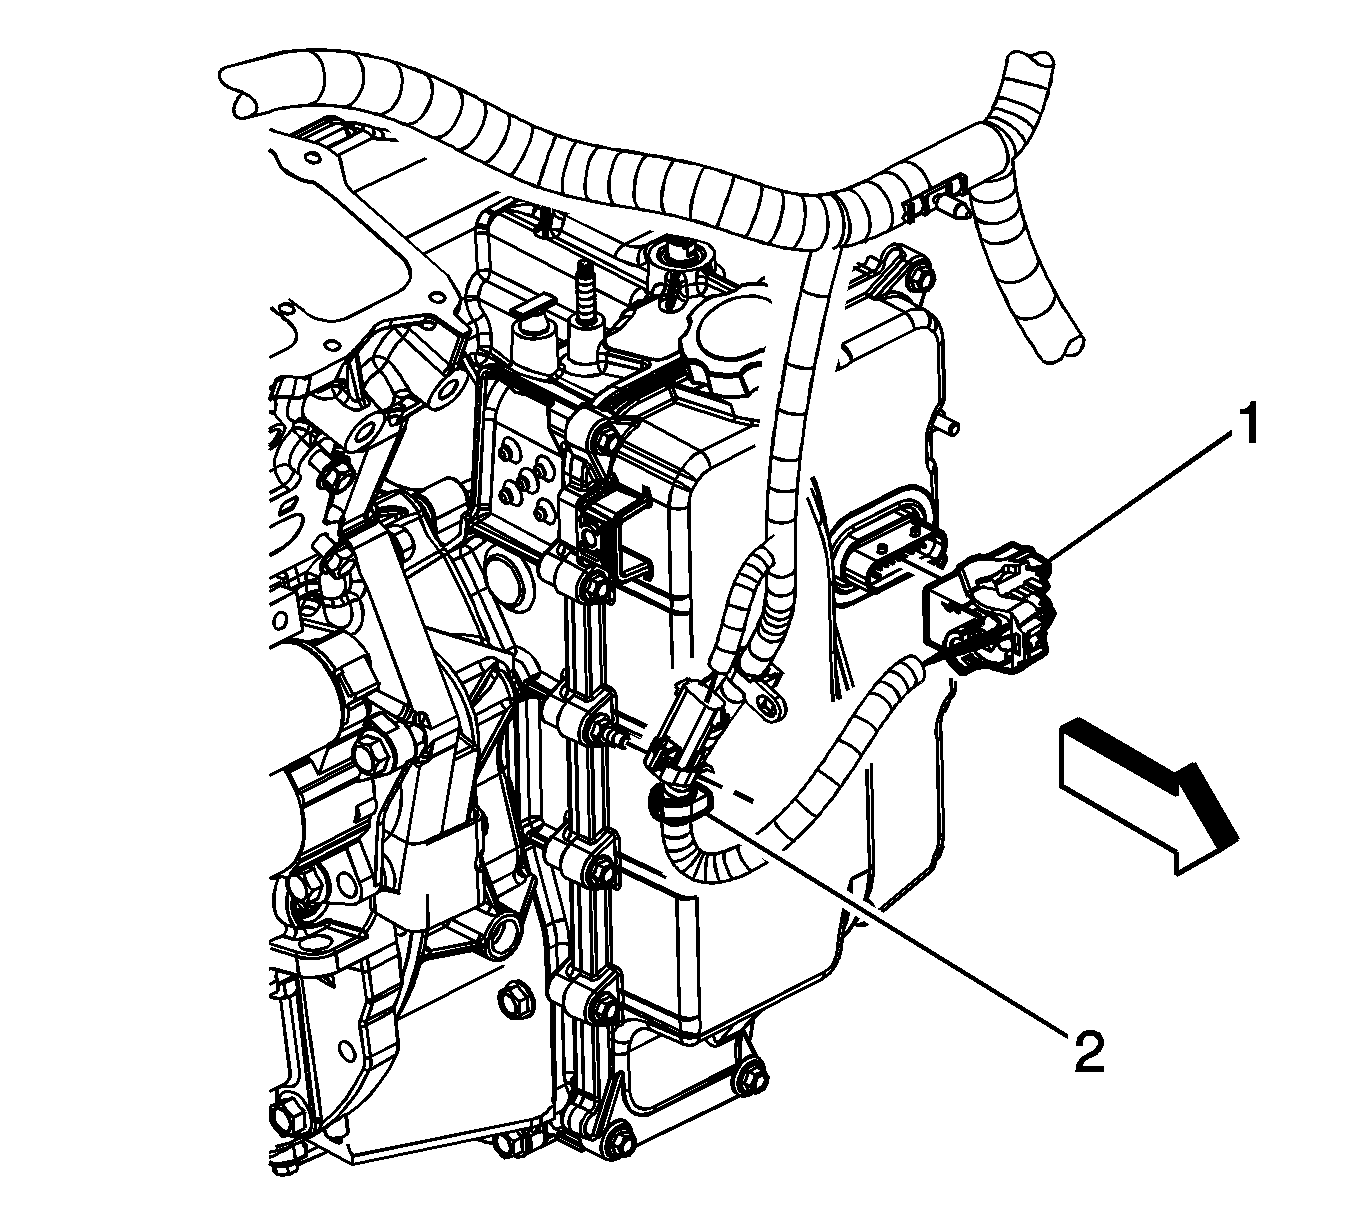
- Remove the wire harness retainer (2) from the control valve body cover stud.
- Disconnect the control valve body transmission control module (TCM) electrical connector (1).
- Disconnect the transmission range selector lever cable terminal (1) from the transmission manual shift lever pin (5).
- Remove the retainer (2) from the transmission range selector lever cable.
- Press the locking tabs inward in order to release the transmission range selector lever cable (3) from the cable bracket (4).
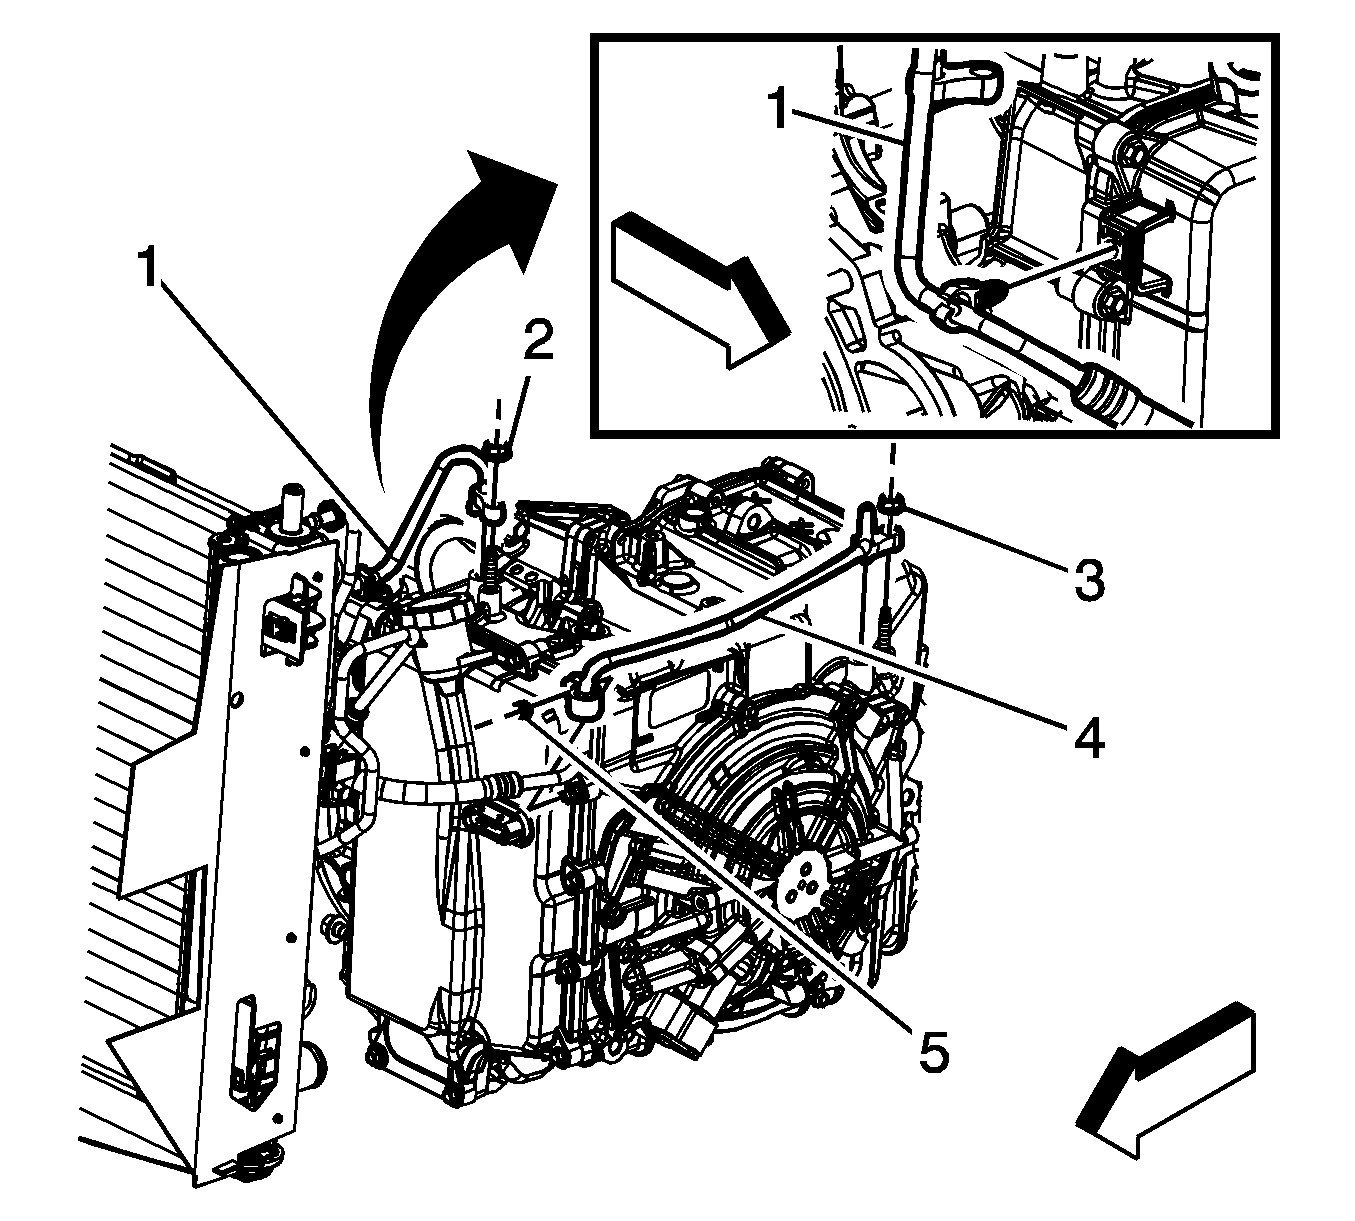
- Release the transmission fluid cooler inlet pipe retainer from the transmission control valve body cover.
- Remove the transmission fluid cooler inlet pipe nut (2).
- Remove the transmission fluid cooler inlet pipe (1) and seal from the transmission.
- Remove the oil cooler outlet pipe retainer nut (5) and retainer from the transmission control valve body cover.
- Remove the transmission fluid cooler outlet pipe nut (3).
- Remove the transmission fluid cooler outlet pipe (4) and seal from the transmission.
- Plug and/or cap both fluid cooler pipes and transmission to prevent contamination.
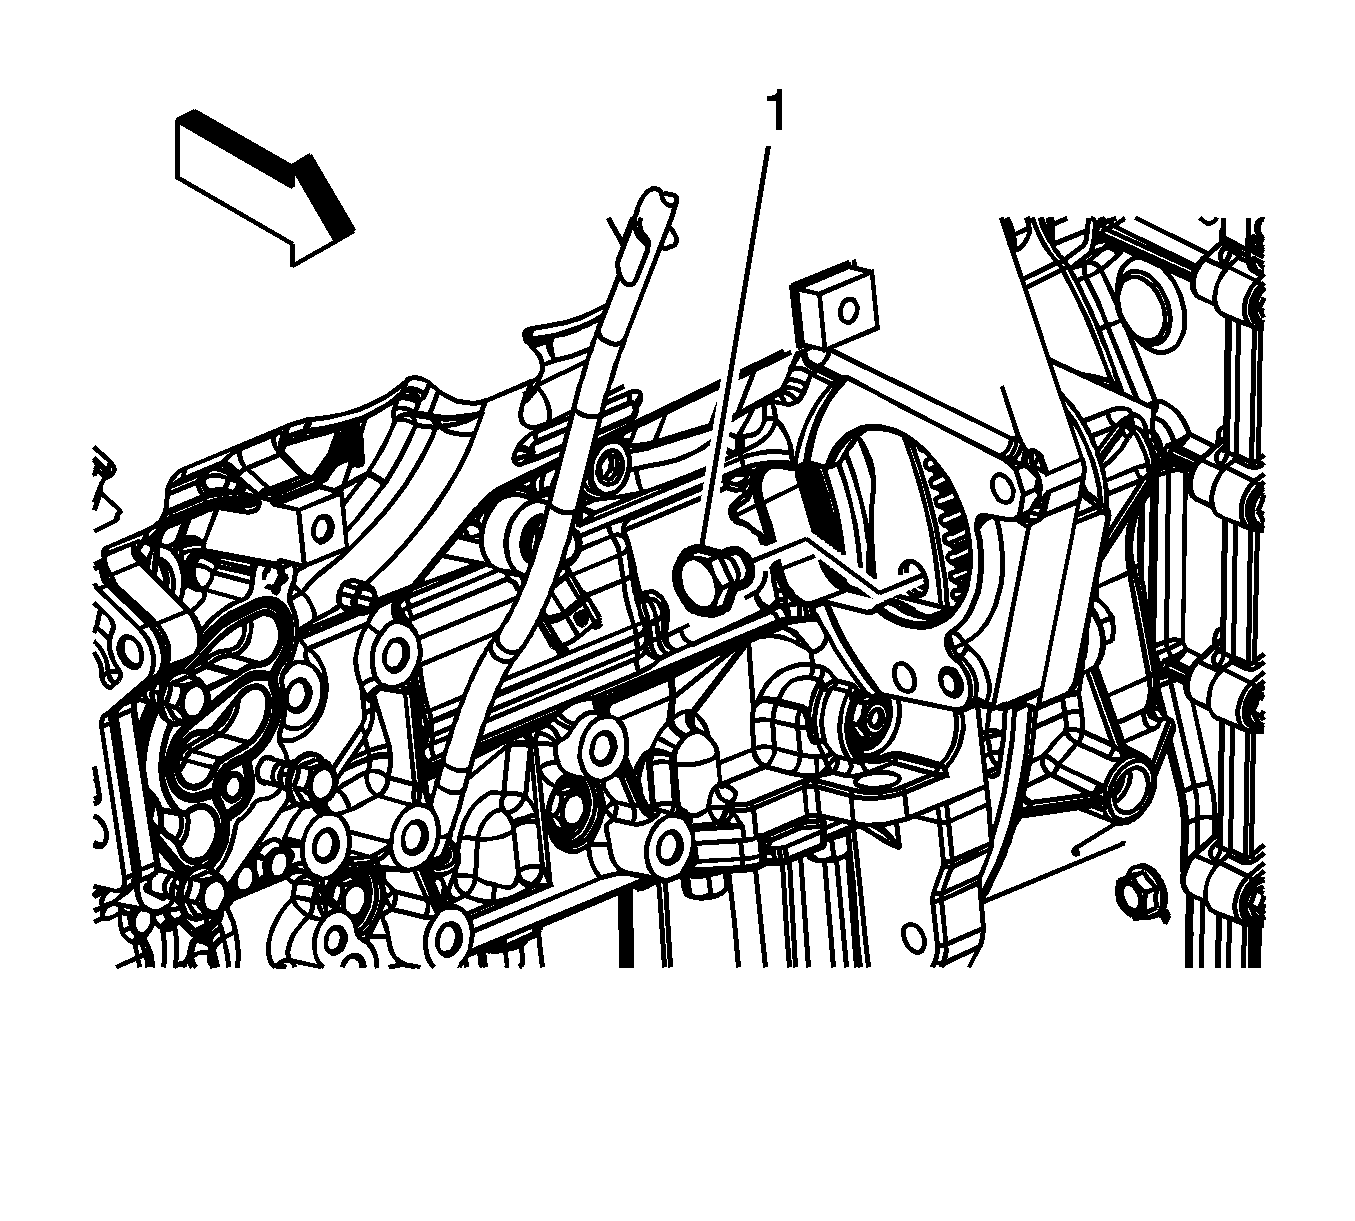
- Remove the upper transmission to engine bolts (1, 2).
- Install the engine support fixture. Refer to Engine Support Fixture .
- Raise and support the vehicle. Refer to Engine Support Fixture .
- Remove the frame. Refer to Front Frame Replacement .
- Disconnect the left wheel drive shaft from the transmission. Refer to Front Wheel Drive Shaft Replacement .
- Remove the intermediate drive shaft. Refer to Intermediate Drive Shaft Replacement .
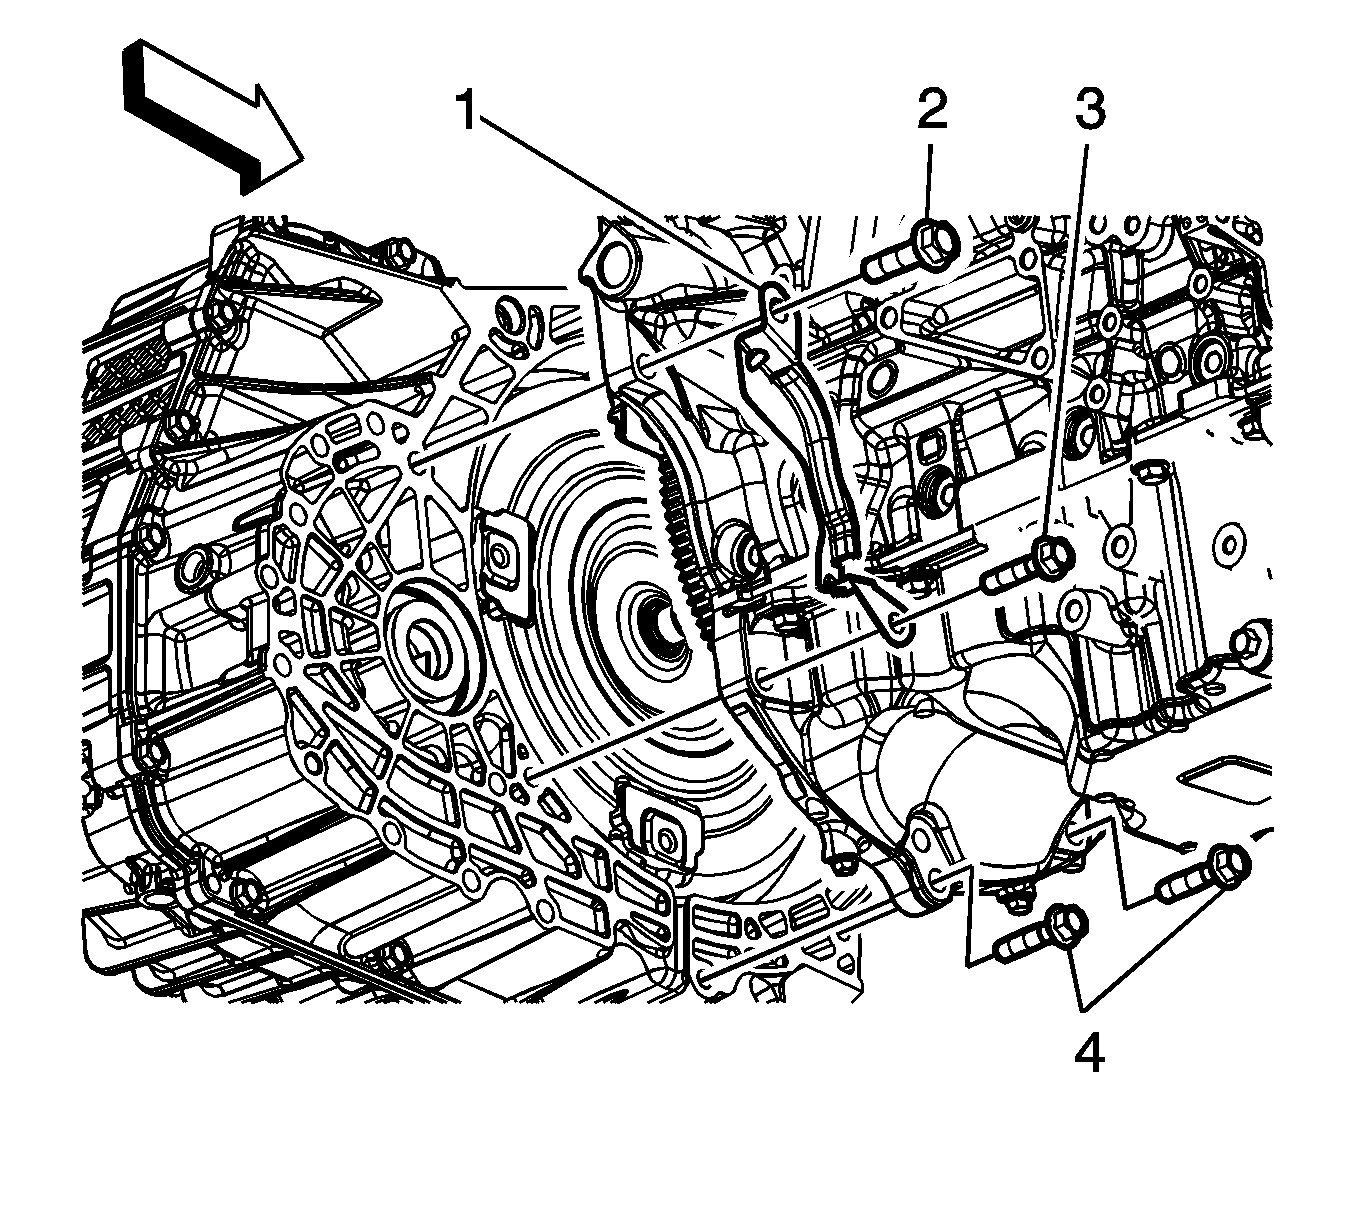
- Remove the transmission brace bolts.
- Remove the transmission brace.
- Remove the left transmission mount bracket from the transmission. Refer to Transmission Mount Bracket Replacement - Left Side .
- Remove the starter. Refer to Starter Motor Replacement .
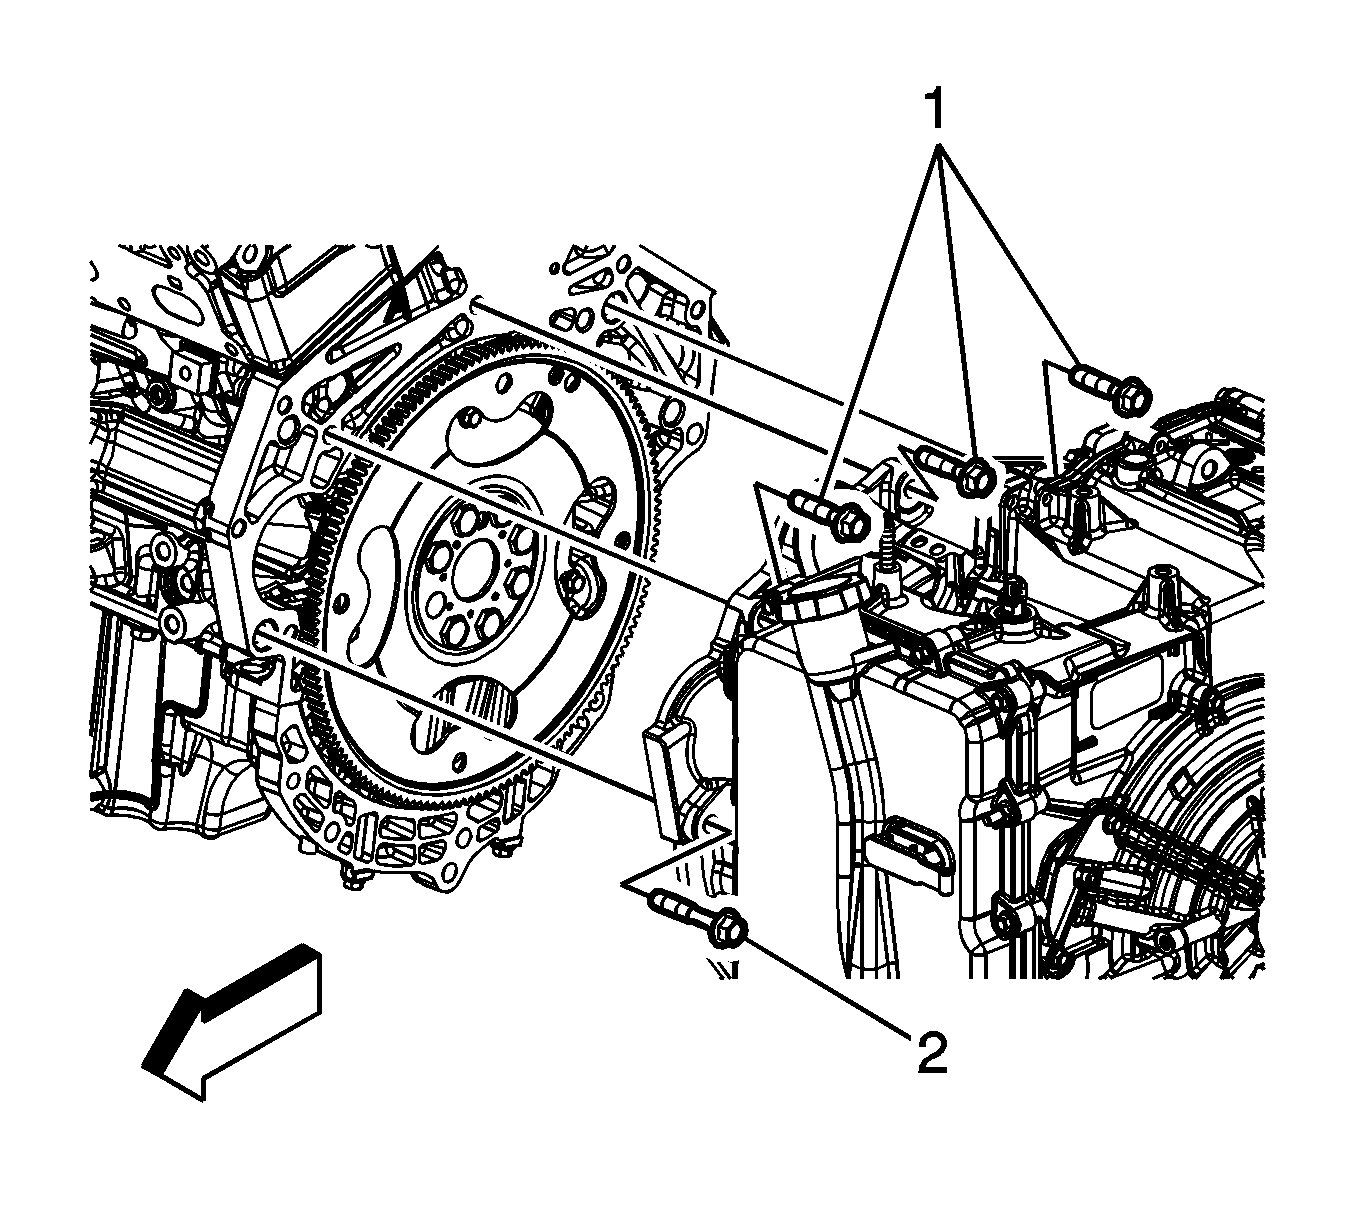
- Mark the relationship of the flywheel to the torque converter for reassembly.
- Remove the 4 torque converter to flywheel bolts (1).
- Use a transmission jack in order to support the transmission.
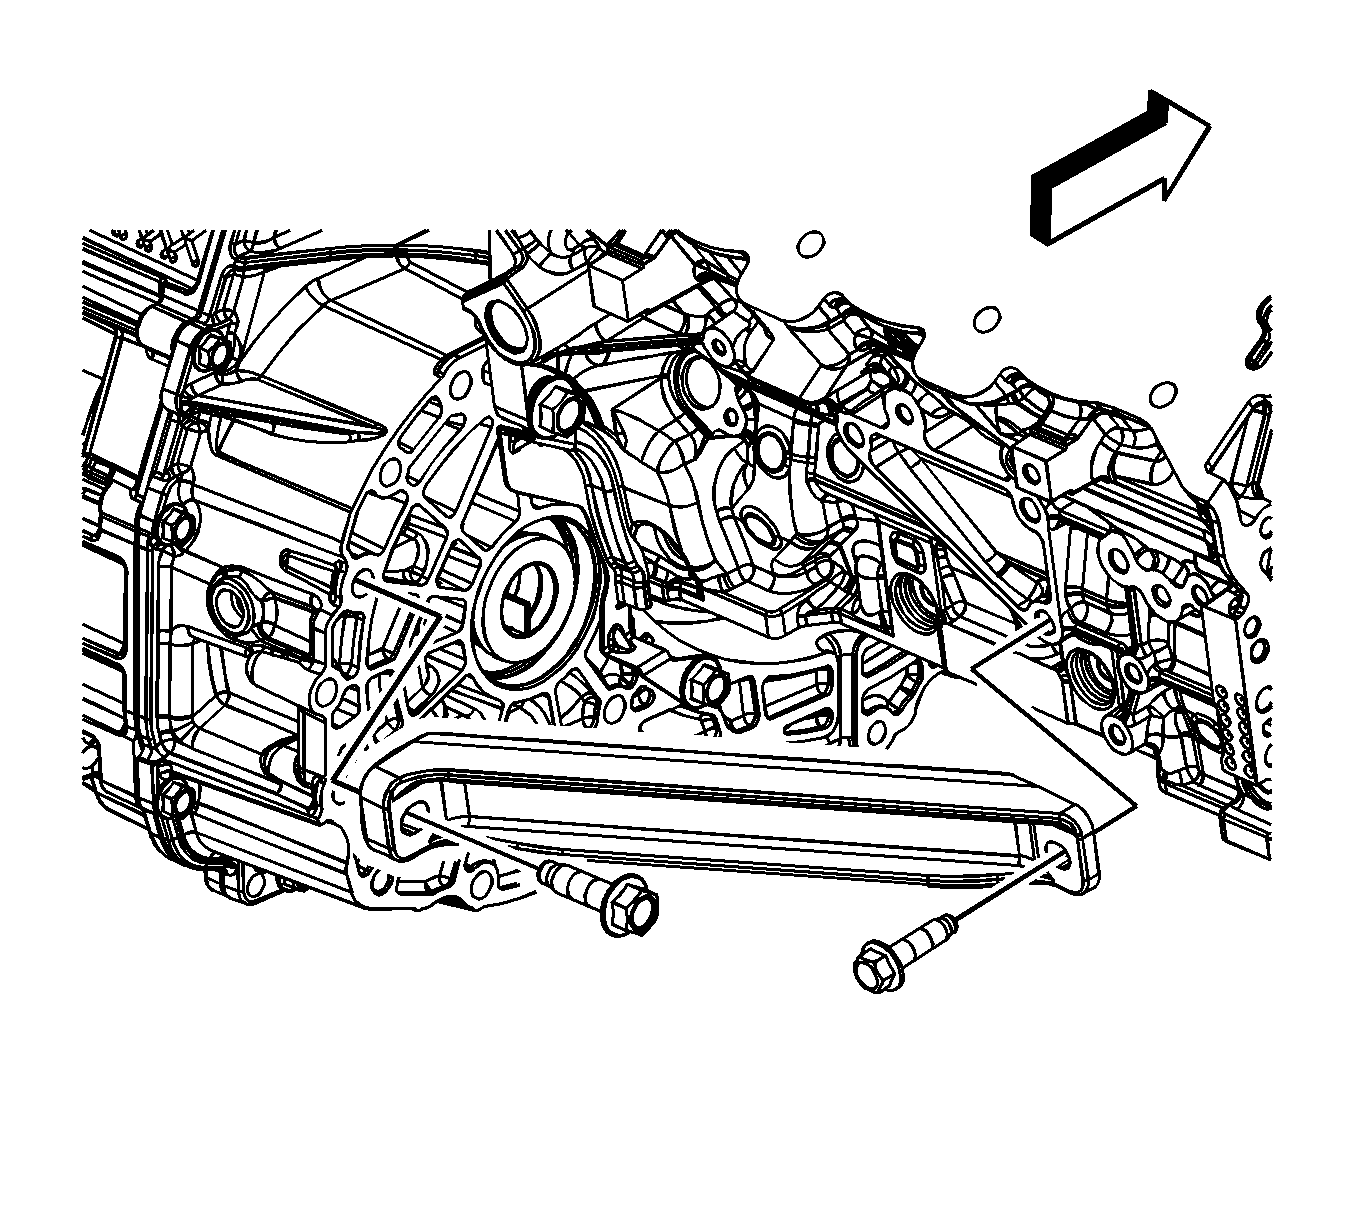
- Remove the flywheel inspection cover bolts (2, 3).
- Remove the flywheel inspection cover (1).
- Remove the remaining transmission bolts (4).
- Separate the transmission from the engine.
- Lower the transmission with the transmission jack far enough to remove the transmission.

Installation Procedure
- Raise the transmission with the transmission jack and position the transmission to the engine.
- Install the transmission bolts (4).
- Install the flywheel inspection cover (1).
- Install the flywheel inspection cover bolts (2, 3).
- Remove the transmission jack.
- Install the 4 torque converter to flywheel bolts (1).
- Install the starter. Refer to Starter Motor Replacement .
- Install the left transmission mount bracket to the transmission. Refer to Transmission Mount Bracket Replacement - Left Side .
- Install the transmission brace.
- Install the transmission brace bolts.
- Install the intermediate drive shaft. Refer to Intermediate Drive Shaft Replacement .
- Install the left wheel drive shaft to the transmission. Refer to Front Wheel Drive Shaft Replacement .
- Install the frame. Refer to Front Frame Replacement .
- Lower the vehicle.
- Remove the engine support fixture.
- Install the upper transmission to engine bolt (1, 2).
- Install the transmission fluid cooler outlet pipe (4) and seal to the transmission.
- Install the transmission fluid cooler outlet pipe nut (3).
- Install the oil cooler outlet pipe retainer and nut (5) to the transmission control valve body cover.
- Install the transmission fluid cooler inlet pipe (1) and seal to the transmission.
- Install the transmission fluid cooler inlet pipe nut (2).
- Install the transmission fluid cooler inlet pipe retainer to the transmission control valve body cover.
- Install the transmission range selector lever cable (3) to the cable bracket (4).
- Install the retainer (2) to the transmission range selector lever cable.
- Connect the transmission range selector lever cable terminal (1) to the transmission manual shift lever pin (5).
- Connect the control valve body TCM electrical connector (1).
- Install the wire harness retainer (2) to the control valve body cover stud.
- Adjust the automatic transmission range selector lever cable. Refer to Range Selector Lever Cable Adjustment .
- Verify the proper fluid level of the transmission. Refer to Transmission Fluid Check .
- Install the air cleaner assembly. Refer to Air Cleaner Assembly Replacement .
- For transmission control module programming and setup, refer to Control Module References .
- Perform the service fast learn adapt procedure. Refer to Service Fast Learn Adapts .
- Road test the vehicle.
Notice: Refer to Fastener Notice in the Preface section.
Tighten
Tighten the bolt to 75 N·m (55 lb ft).
Tighten
Tighten the bolt to 75 N·m (55 lb ft).
Tighten
Tighten the bolts to 62 N·m (46 lb ft).
Tighten
Tighten the bolt/stud to 50 N·m (37 lb ft).
Tighten
Tighten the bolt to 75 N·m (55 lb ft).
Tighten
Tighten the nut to 22 N·m (16 lb ft).
Tighten
Tighten the nut to 12 N·m (106 lb in).
Tighten
Tighten the nut to 22 N·m (16 lb ft).
Tighten
Tighten the nut to 12 N·m (106 lb in).
Important: After an internal transmission repair or internal part replacement the service fast learn adapt procedure should be performed.
Transmission Replacement All Wheel Drive
Removal Procedure
- Remove the air cleaner assembly. Refer to Air Cleaner Assembly Replacement .
- Remove the wire harness retainer (2) from the control valve body cover stud.
- Disconnect the control valve body transmission control module (TCM) electrical connector (1).
- Disconnect the transmission range selector lever cable terminal (1) from the transmission manual shift lever pin (5).
- Remove the retainer (2) from the transmission range selector lever cable.
- Press the locking tabs inward in order to release the transmission range selector lever cable (3) from the cable bracket (4).
- Release the transmission fluid cooler inlet pipe retainer from the transmission control valve body cover.
- Remove the transmission fluid cooler inlet pipe nut (2).
- Remove the transmission fluid cooler inlet pipe (1) and seal from the transmission.
- Remove the oil cooler outlet pipe retainer nut (5) and retainer from the transmission control valve body cover.
- Remove the transmission fluid cooler outlet pipe nut (3).
- Remove the transmission fluid cooler outlet pipe (4) and seal from the transmission.
- Plug and/or cap both fluid cooler pipes and transmission to prevent contamination.
- Remove the upper transmission to engine bolts (1, 2).
- Install the engine support fixture. Refer to Engine Support Fixture .
- Raise and support the vehicle. Refer to Engine Support Fixture .
- Remove the frame. Refer to Front Frame Replacement .
- Disconnect the left wheel drive shaft from the transmission. Refer to Front Wheel Drive Shaft Replacement .
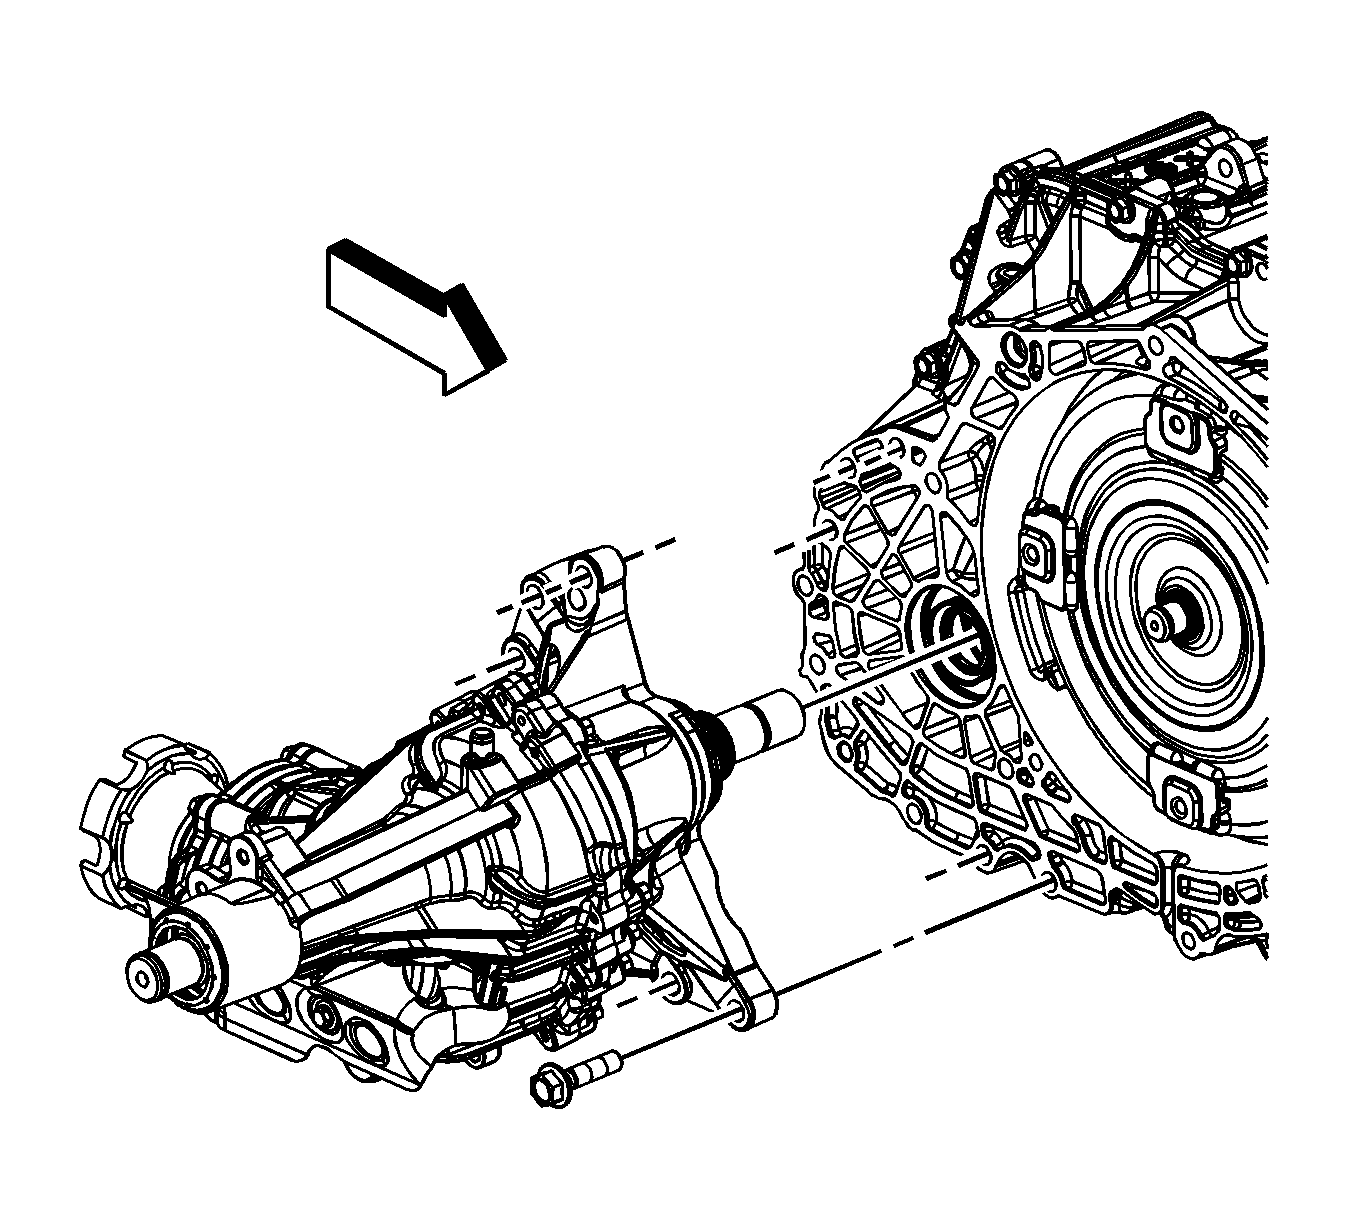
- Remove the transfer case. Refer to Transfer Case Assembly Replacement .
- Remove the left transmission mount bracket from the transmission. Refer to Transmission Mount Bracket Replacement - Left Side .
- Remove the starter. Refer to Starter Motor Replacement .
- Mark the relationship of the flywheel to the torque converter for reassembly.
- Remove the 4 torque converter to flywheel bolts (1).
- Use a transmission jack in order to support the transmission.
- Remove the remaining transmission bolts (2-4).
- Separate the transmission from the engine.
- Lower the transmission with the transmission jack far enough to remove the transmission.
Installation Procedure
- Raise the transmission with the transmission jack and position the transmission to the engine.
- Install the transmission bolts (2-4).
- Remove the transmission jack.
- Install the 4 torque converter to flywheel bolts (1).
- Install the starter. Refer to Starter Motor Replacement .
- Install the left transmission mount bracket to the transmission. Refer to Transmission Mount Bracket Replacement - Left Side .
- Install the transfer case. Refer to Transfer Case Assembly Replacement .
- Install the left wheel drive shaft to the transmission. Refer to Front Wheel Drive Shaft Replacement .
- Install the frame. Refer to Front Frame Replacement .
- Lower the vehicle.
- Remove the engine support fixture.
- Install the upper transmission to engine bolt (1, 2).
- Install the transmission fluid cooler outlet pipe (4) and seal to the transmission.
- Install the transmission fluid cooler outlet pipe nut (3).
- Install the oil cooler outlet pipe retainer and nut (5) to the transmission control valve body cover.
- Install the transmission fluid cooler inlet pipe (1) and seal to the transmission.
- Install the transmission fluid cooler inlet pipe nut (2).
- Install the transmission fluid cooler inlet pipe retainer to the transmission control valve body cover.
- Install the transmission range selector lever cable (3) to the cable bracket (4).
- Install the retainer (2) to the transmission range selector lever cable.
- Connect the transmission range selector lever cable terminal (1) to the transmission manual shift lever pin (5).
- Connect the control valve body TCM electrical connector (1).
- Install the wire harness retainer (2) to the control valve body cover stud.
- Adjust the automatic transmission range selector lever cable. Refer to Range Selector Lever Cable Adjustment .
- Verify the proper fluid level of the transmission. Refer to Transmission Fluid Check .
- Install the air cleaner assembly. Refer to Air Cleaner Assembly Replacement .
- For transmission control module programming and setup, refer to Control Module References .
- Perform the service fast learn adapt procedure. Refer to Service Fast Learn Adapts .
- Road test the vehicle.
Notice: Refer to Fastener Notice in the Preface section.
Tighten
Tighten the bolt to 75 N·m (55 lb ft).
Tighten
Tighten the bolts to 62 N·m (46 lb ft).
Tighten
Tighten the bolt to 75 N·m (55 lb ft).
Tighten
Tighten the nut to 22 N·m (16 lb ft).
Tighten
Tighten the nut to 12 N·m (106 lb in).
Tighten
Tighten the nut to 22 N·m (16 lb ft).
Tighten
Tighten the nut to 12 N·m (106 lb in).
Important: After an internal transmission repair or internal part replacement the service fast learn adapt procedure should be performed.
