Circuit Description
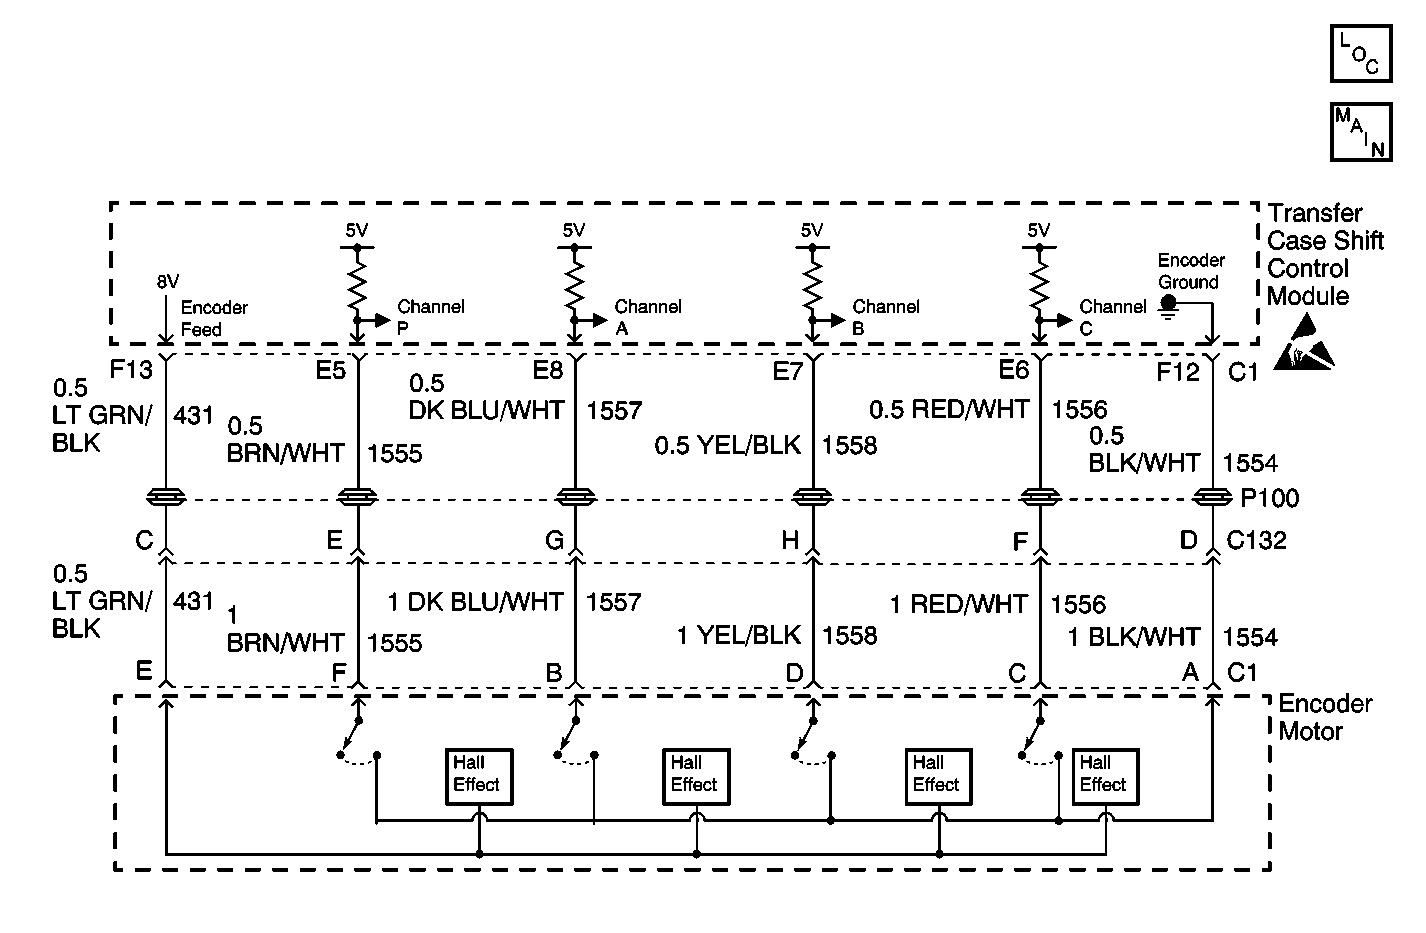
The transfer Case Encoder is a switch that converts a shaft position, representing a mode or range position, into electrical signals for use by the transfer case shift control module. The encoder houses 4 Hall effect sensors that are used for channels P, A, B, and C. These sensors provide a path to ground, when a magnet, (part of the Motor Encoder), passes over them.
The transfer case shift control module supplies an 8 V reference and a ground circuit for the encoder Hall effect sensors to function.
The transfer case shift control module supplies current limited 5 V on all the channels, thus as these channels are pulled to ground, the module can interpret the location of the transfer case shift position.
This DTC detects an open, short to ground, or a short to voltage (12 V) in the encoder feed circuit, an open in the signal ground circuit, an open, short to ground, or short to voltage (12 V) in the Encoder channel circuits.
Conditions for Setting the DTC
The transfer case shift control module reads back all high or low voltage on the Encoder channel circuits.
Action Taken When the DTC Sets
| • | All motor activity will stop and the Transfer Case Lock engaged. |
| • | A default rail to rail shift may be allowed, (toggle between 4H and 2H). |
| • | The SERVICE indicator (4WD/AWD) lamp will be latched on for the remainder of the current ignition cycle. |
Conditions for Clearing the DTC
| • | The transfer case shift control module will clear the DTC if the condition for setting the DTC no longer exists. |
| • | A history DTC will clear after 100 consecutive ignition cycles without a fault present. |
| • | History DTCs can be cleared using a scan tool. |
Test Description
The number(s) below refer to the step number(s) on the diagnostic table.
-
Tests the operation of the system.
-
Helps determine if the encoder has supply voltage.
-
Tests the encoder channels for proper reference voltage.
-
Tests the encoder channels for an open or a short to power.
-
Measures the voltage from the Encoder Feed reference circuit to the Encoder Signal Ground circuit.
-
Tests for two or more encoder channels shorted together.
-
Bypasses the encoder and tests each encoder channel individually. Helps isolate between encoder and module malfunctions.
-
Tests the suspect encoder channel(s) for an open.
-
Tests the encoder channels for proper reference voltage.
-
Helps determine if the circuit is shorted to voltage.
-
Tests the Encoder Feed circuit for a short to voltage.
-
Tests the Encoder Signal Ground circuit for high resistance or an open.
-
Tests the Encoder Feed circuit for an open.
-
Repairs shorted condition between the circuits that were simultaneously turned ON in Step 6.
-
Tests the encoder channel(s) that are not within the specified range previously tested in Step 9 for an open circuit.
Step | Action | Value(s) | Yes | No |
|---|---|---|---|---|
1 | Was the Transfer Case Diagnostic System Check performed? | -- | Go to Step 2 | Go to Diagnostic System Check |
|
Important:: NEUTRAL range will only be obtained by pressing and holding both the 2 HI and 4 LO buttons simultaneously for 10 seconds. Refer to Circuit Description.
Does the state change with the press of any of the Mode/Range buttons? | -- | Go to Testing for Intermittent Conditions and Poor Connections | Go to Step 3 | |
Do all the circuits display OFF? | -- | Go to Step 6 | Go to Step 4 | |
Is the voltage reading within the specified values? | 4.8-5.1 V | Go to Step 17 | Go to Step 5 | |
Test the suspect circuit(s) for an open or a short to power. Refer to Circuit Testing and Wiring Repairs in Wiring Systems. Was the condition found and corrected? | -- | Go to Step 19 | Go to Step 18 | |
Is the voltage reading within the specified values? | 7-9 V | Go to Step 7 | Go to Step 11 | |
Does more than one Encoder Channels display ON simultaneously? | -- | Go to Step 15 | Go to Step 8 | |
Do each of the circuits display ON when their individual circuit is jumpered to the Encoder Signal Ground circuit? | -- | Go to Step 10 | Go to Step 9 | |
Was the condition found and corrected? | -- | Go to Step 19 | Go to Step 18 | |
Measure the voltage between the transfer case encoder circuit channels P, A, B, and C to the Encoder Signal Ground circuit (the harness side at the transfer case). Is the voltage reading within the specified values? | 4.8-5.1 V | Go to Step 17 | Go to Step 16 | |
Was the voltage reading measured in Step 6 greater than the specified value? | 9 V | Go to Step 12 | Go to Step 13 | |
Was the condition found and corrected? | -- | Go to Step 19 | Go to Step 18 | |
Test the Encoder Signal Ground circuit for high resistance or an open. Refer to Circuit Testing and Wiring Repairs in Wiring Systems. Was the condition found and corrected? | -- | Go to Step 19 | Go to Step 14 | |
Was the condition found and corrected? | -- | Go to Step 19 | Go to Step 18 | |
Repair the shorted condition between the circuits that were simultaneously turned ON in Step 7. Refer to Wiring Repairs in Wiring Systems. Is the repair complete? | -- | Go to Step 19 | -- | |
Test the encoder channel(s) that are not within the specified range previously tested in Step 10 for an open circuit. Refer to Circuit Testing and Wiring Repairs in Wiring Systems. Was the condition found and corrected? | -- | Go to Step 19 | Go to Step 18 | |
17 | Replace the encoder motor. Refer to Motor/Encoder Replacement . Is the replacement complete? | -- | Go to Step 19 | -- |
18 | Replace the transfer case shift control module. Refer to Transfer Case Shift Control Module Replacement . Is the replacement complete? | -- | Go to Step 19 | -- |
19 |
Does the DTC reset? | -- | Go to Step 2 | System OK |
