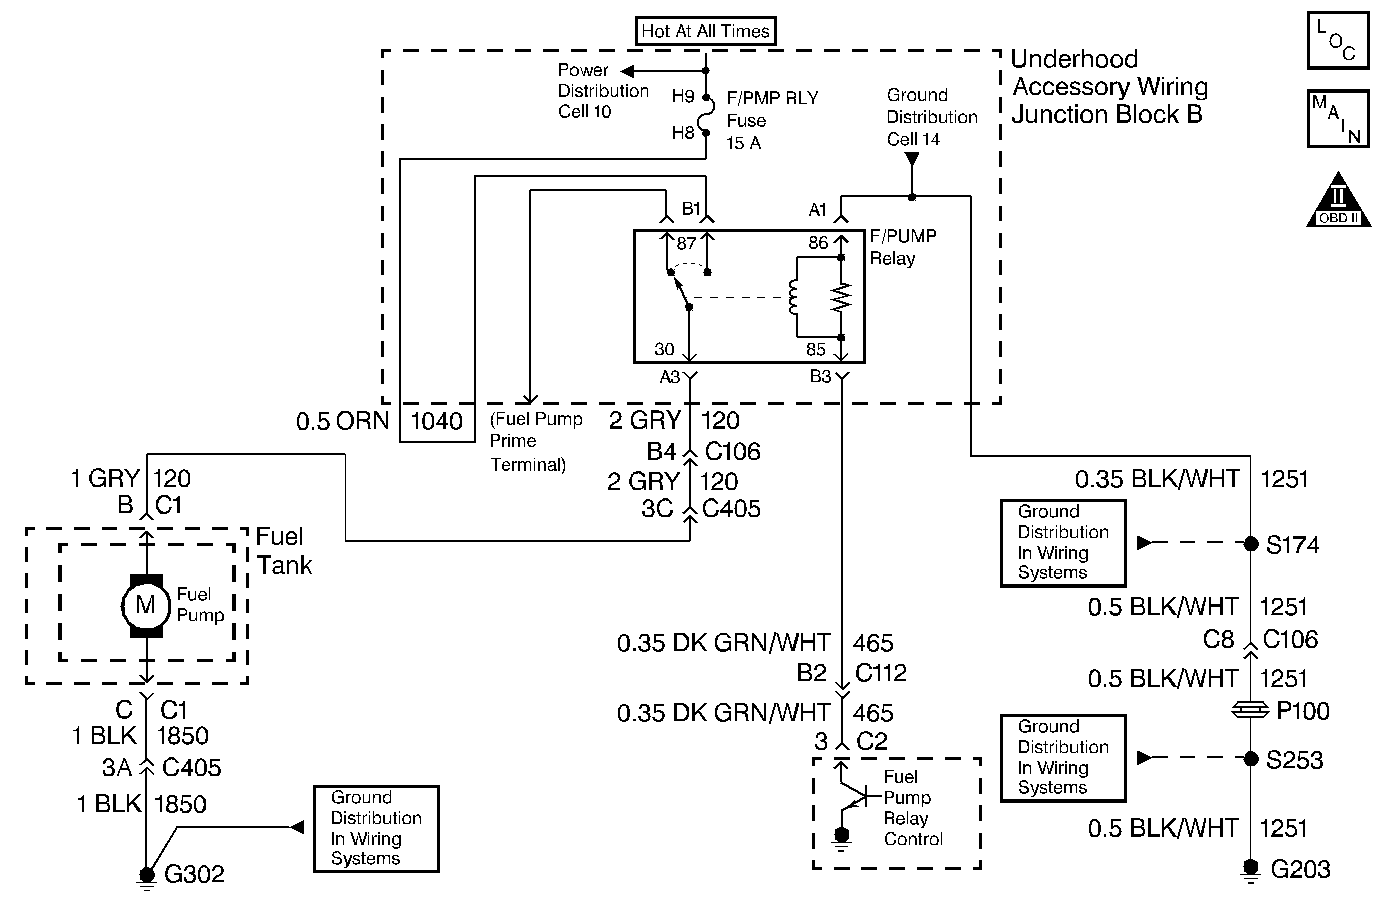
Circuit Description
When the ignition is first turned ON, the Powertrain Control Module (PCM) energizes the fuel pump relay which applies power to the in-tank fuel pump. The fuel pump relay will remain ON as long as the engine is running or cranking and the PCM is receiving reference pulses. If no reference pulses are present, the PCM de-energizes the fuel pump relay within 2 seconds after the ignition is turned ON or the engine is stopped.
The fuel pump delivers fuel to the fuel rail and injectors, then to the fuel pressure regulator. The fuel pressure regulator controls fuel pressure by allowing excess fuel to be returned to the fuel tank.
Diagnostic Aids
Inspect for the following conditions:
Many situations may lead to an intermittent condition. Perform each inspection or test as directed.
Important: : Remove any debris from the connector surfaces before servicing a component. Inspect the connector gaskets when diagnosing or replacing a component. Ensure that the gaskets are installed correctly. The gaskets prevent contaminate intrusion.
| • | Loose terminal connection |
| - | Use a corresponding mating terminal to test for proper tension. Refer to Testing for Intermittent Conditions and Poor Connections , and to Connector Repairs in Wiring Systems for diagnosis and repair. |
| - | Inspect the harness connectors for backed out terminals, improper mating, broken locks, improperly formed or damaged terminals, and faulty terminal to wire connection. Refer to Testing for Intermittent Conditions and Poor Connections , and to Connector Repairs in Wiring Systems for diagnosis and repair. |
| • | Damaged harness--Inspect the wiring harness for damage. If the harness inspection does not reveal a problem, observe the display on the scan tool while moving connectors and wiring harnesses related to the sensor. A change in the scan tool display may indicate the location of the fault. Refer to Wiring Repairs in Wiring Systems for diagnosis and repair. |
| • | Inspect the powertrain control module (PCM) and the engine grounds for clean and secure connections. Refer to Wiring Repairs in Wiring Systems for diagnosis and repair. |
If the condition is determined to be intermittent, reviewing the Snapshot or Freeze Frame/Failure Records may be useful in determining when the DTC or condition was identified.
Test Description
The numbers below refer to the step numbers on the diagnostic table.
-
Command both the ON and OFF states. Repeat the commands as necessary.
-
This step determines the condition is located on the coil side or the switch side of the circuit.
-
This step verifies that the powertrain control module (PCM) is providing voltage to the fuel pump relay.
-
This step tests for an open in the ground circuit to the fuel pump relay.
-
This step determines if a voltage is constantly being applied to the fuel pump relay.
-
This step tests for a grounded fuel pump supply circuit between the fuel pump and the fuel pump fuse.
-
This step determines if the condition with the circuit is intermittent. If the fuse does not open, inspect the supply voltage between the fuse and the fuel pump for an intermittent condition.
-
This step jumps the fuel pump relay in order to bypass the fuel pump relay and activate the fuel pump.
-
This step tests the fuel pump supply circuit between the fuel pump and the fuel pump relay for an open or high resistance.
-
This step tests the fuel pump ground circuit for an open or high resistance.
Step | Action | Yes | No |
|---|---|---|---|
1 | Did you Perform the Powertrain On-Board Diagnostic (OBD) System Check? | ||
Does the fuel pump relay turn ON and OFF? | Go to Intermittent Conditions | ||
With a scan tool, command the fuel pump ON and OFF. Do you hear a click from the relay when you command the fuel pump ON and OFF? | |||
Does the test lamp turn ON and OFF? | |||
Does the test lamp turn ON and OFF? | |||
Does the test lamp remain illuminated with each command? | |||
7 |
Did you find and correct the condition? | ||
8 |
Did you find and correct the condition? | ||
9 | Turn ON the ignition, with the engine OFF. Does the fuel pump operate continuously? | ||
10 |
Does the fuel pump operate continuously? | ||
11 | Is the fuel pump fuse open? | ||
Did you find and correct the condition? | |||
Is the fuel pump fuse open? | Go to Intermittent Conditions | ||
14 |
Does the test lamp illuminate? | ||
Connect a 10 amp fused jumper wire between the switch circuit of the fuel pump relay and the supply circuit of the fuel pump relay. Does the fuel pump operate? | |||
Did you find and correct the condition? | |||
|
Important: Visually and physically inspect the ground circuit for being tight, corrosion on terminals or damage to the wiring harness. Test the ground circuit of the fuel pump for an open or high resistance. Refer to Circuit Testing and Wiring Repairs in Wiring Systems. Did you find and correct the condition? | |||
18 | Inspect for poor connections at the fuel pump. Refer to Testing for Intermittent Conditions and Poor Connections and Connector Repairs in Wiring Systems. Did you find and correct the condition? | ||
19 | Inspect for poor connections at the fuel pump relay. Refer to Testing for Intermittent Conditions and Poor Connections and Connector Repairs in Wiring Systems. Did you find and correct the condition? | ||
20 | Inspect for poor connections at the harness connector of the PCM. Refer to Testing for Intermittent Conditions and Poor Connections and Connector Repairs in Wiring Systems. Did you find and correct the condition? | ||
21 | Repair the supply voltage circuit of the fuel pump for a short to voltage. Refer to Wiring Repairs in Wiring Systems. Did you complete the repair? | -- | |
22 | Repair the ground circuit of the fuel pump relay for an open. Refer to Wiring Repairs in Wiring Systems. Did you complete the repair? | -- | |
23 | Repair the switch voltage circuit of the fuel pump relay. Refer to Wiring Repairs in Wiring Systems. Did you complete the repair? | -- | |
24 |
Important: Inspect for poor connections at the fuel pump, within the fuel tank, before replacing the fuel pump.
Did you complete the replacement? | -- | |
25 | Replace the fuel pump relay. Refer to Fuel Pump Relay Replacement . Did you complete the replacement? | -- | |
26 |
Important: The replacement PCM must be programed. Replace the PCM. Refer to Powertrain Control Module Replacement/Programming . | -- | |
27 | Operate the system in order to verify the repair. Did you correct the condition? | System OK |
