For 1990-2009 cars only
Removal Procedure
- Remove the radiator air baffle and deflector. Refer to Radiator Air Upper Baffle and Deflector Replacement.
- Remove the air cleaner assembly. Refer to Air Cleaner Assembly Replacement.
- Remove the charge air cooler inlet pipe. Refer to Charge Air Cooler Inlet Pipe Replacement.
- Remove the oil level indicator tube. Refer to Oil Level Indicator and Tube Replacement.
- Disconnect the fuel feed line quick connect fitting to the fuel rail. Refer to Metal Collar Quick Connect Fitting Service.
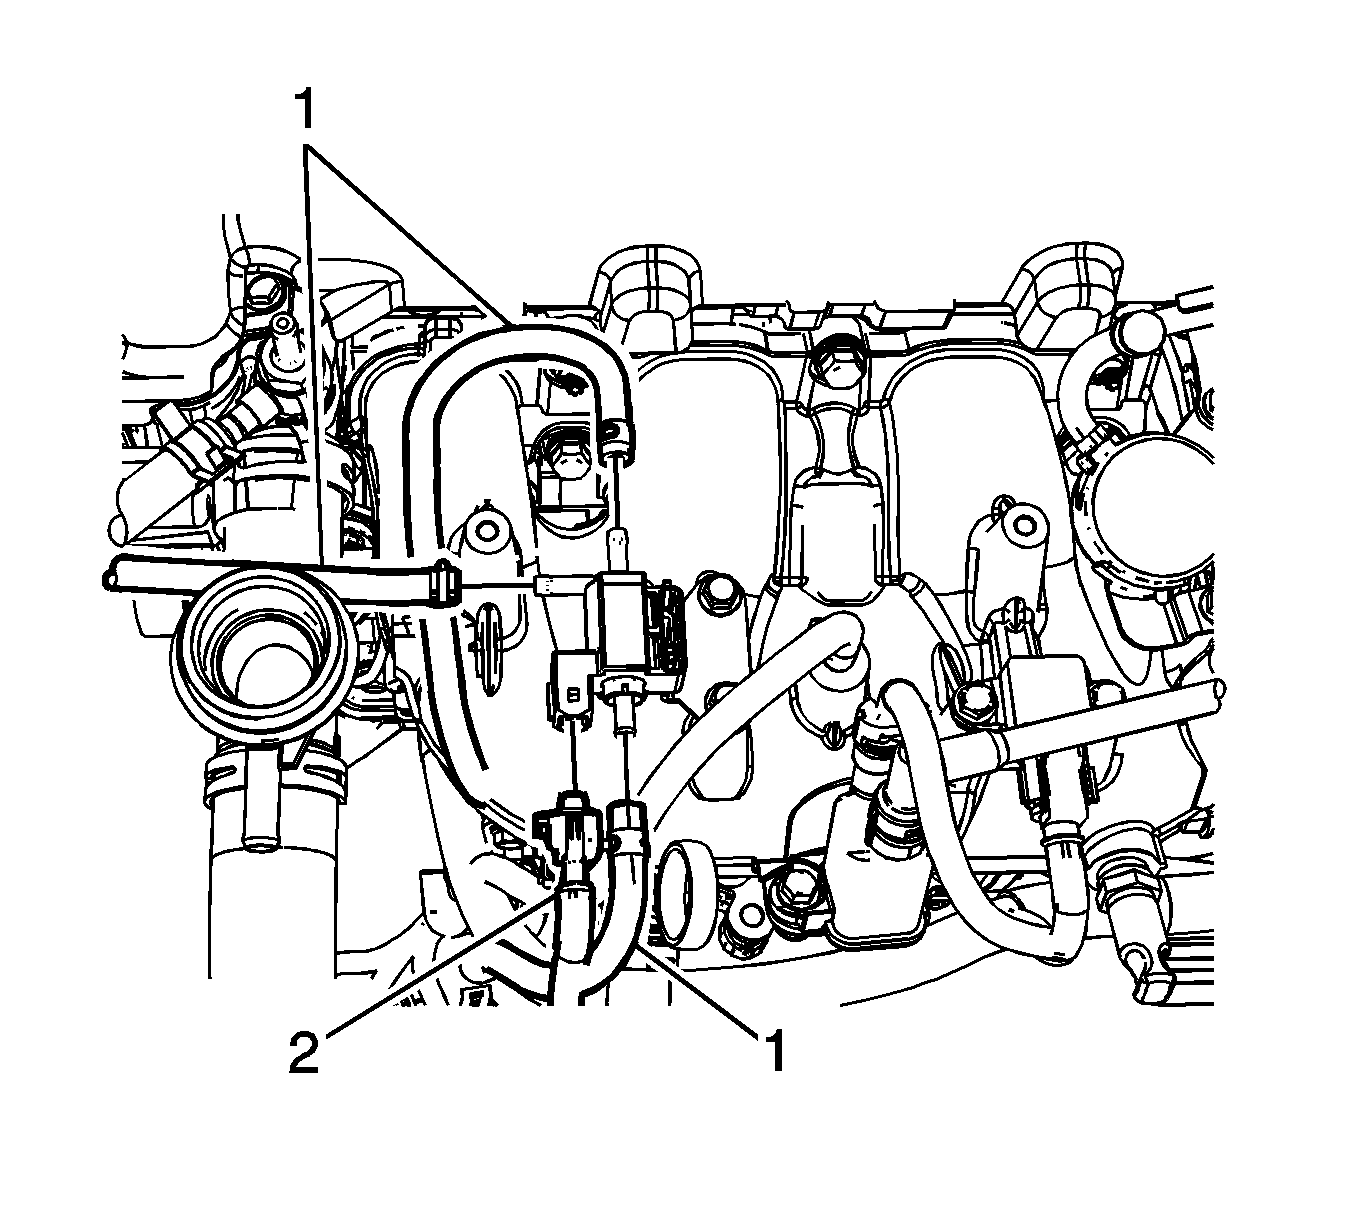
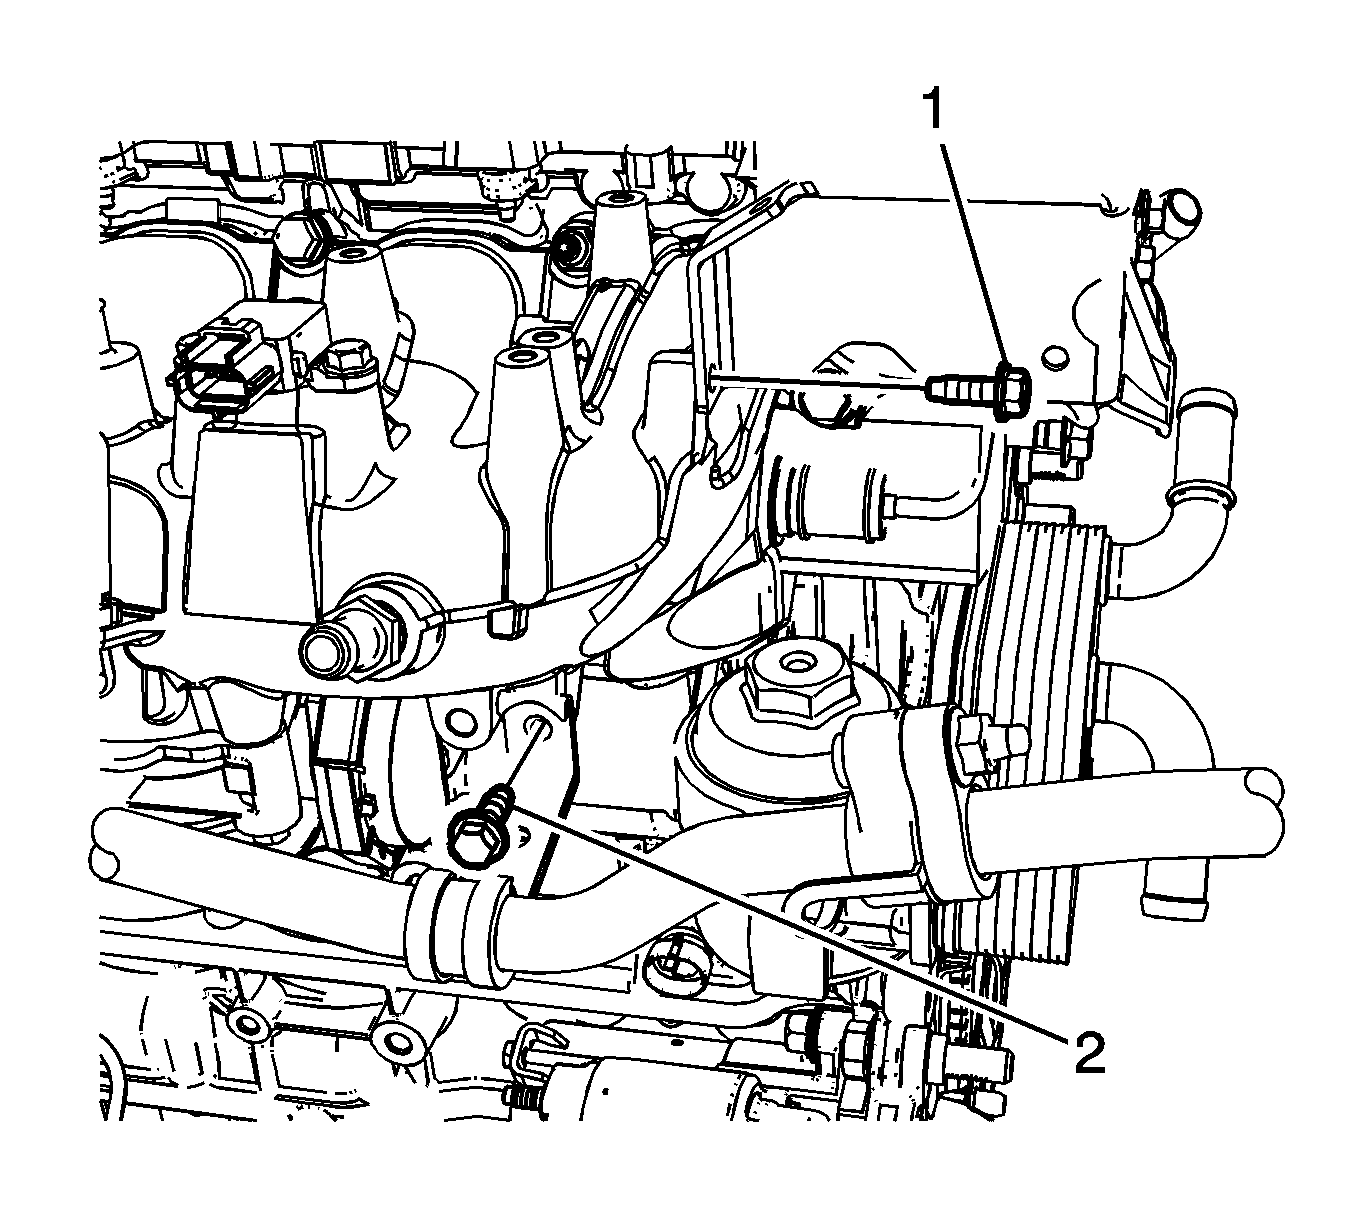
- Disconnect the charge air valve solenoid vacuum lines (1).
- Disconnect the charge air valve solenoid vacuum electrical connector (2).
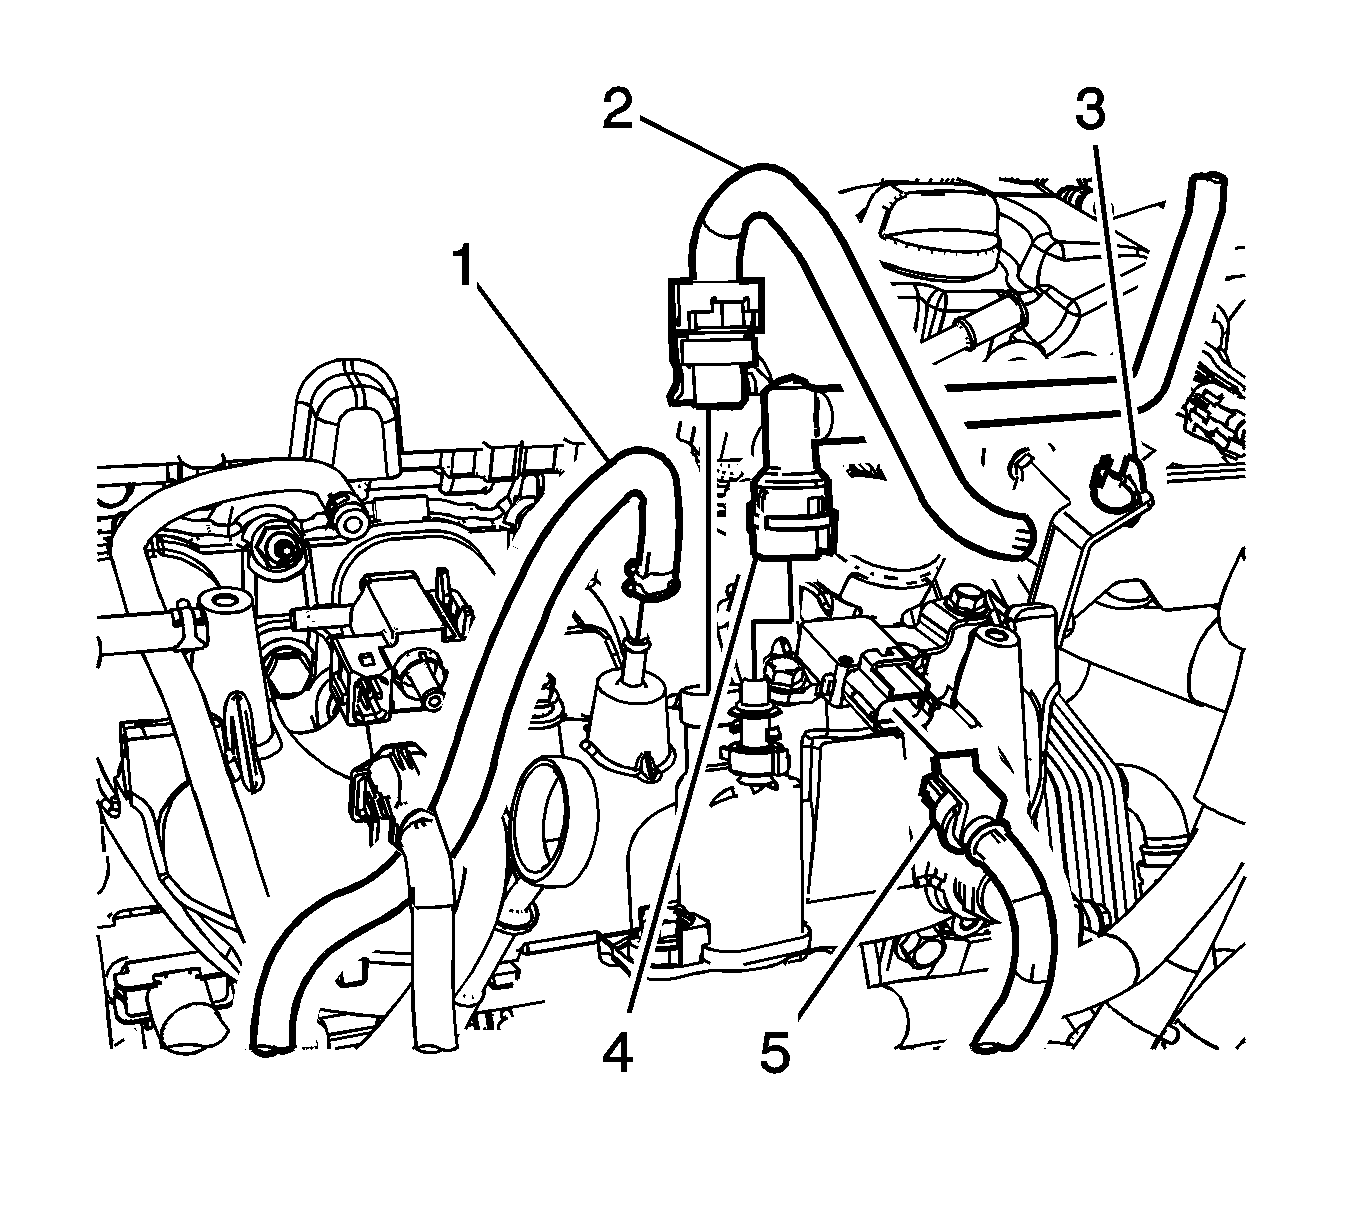
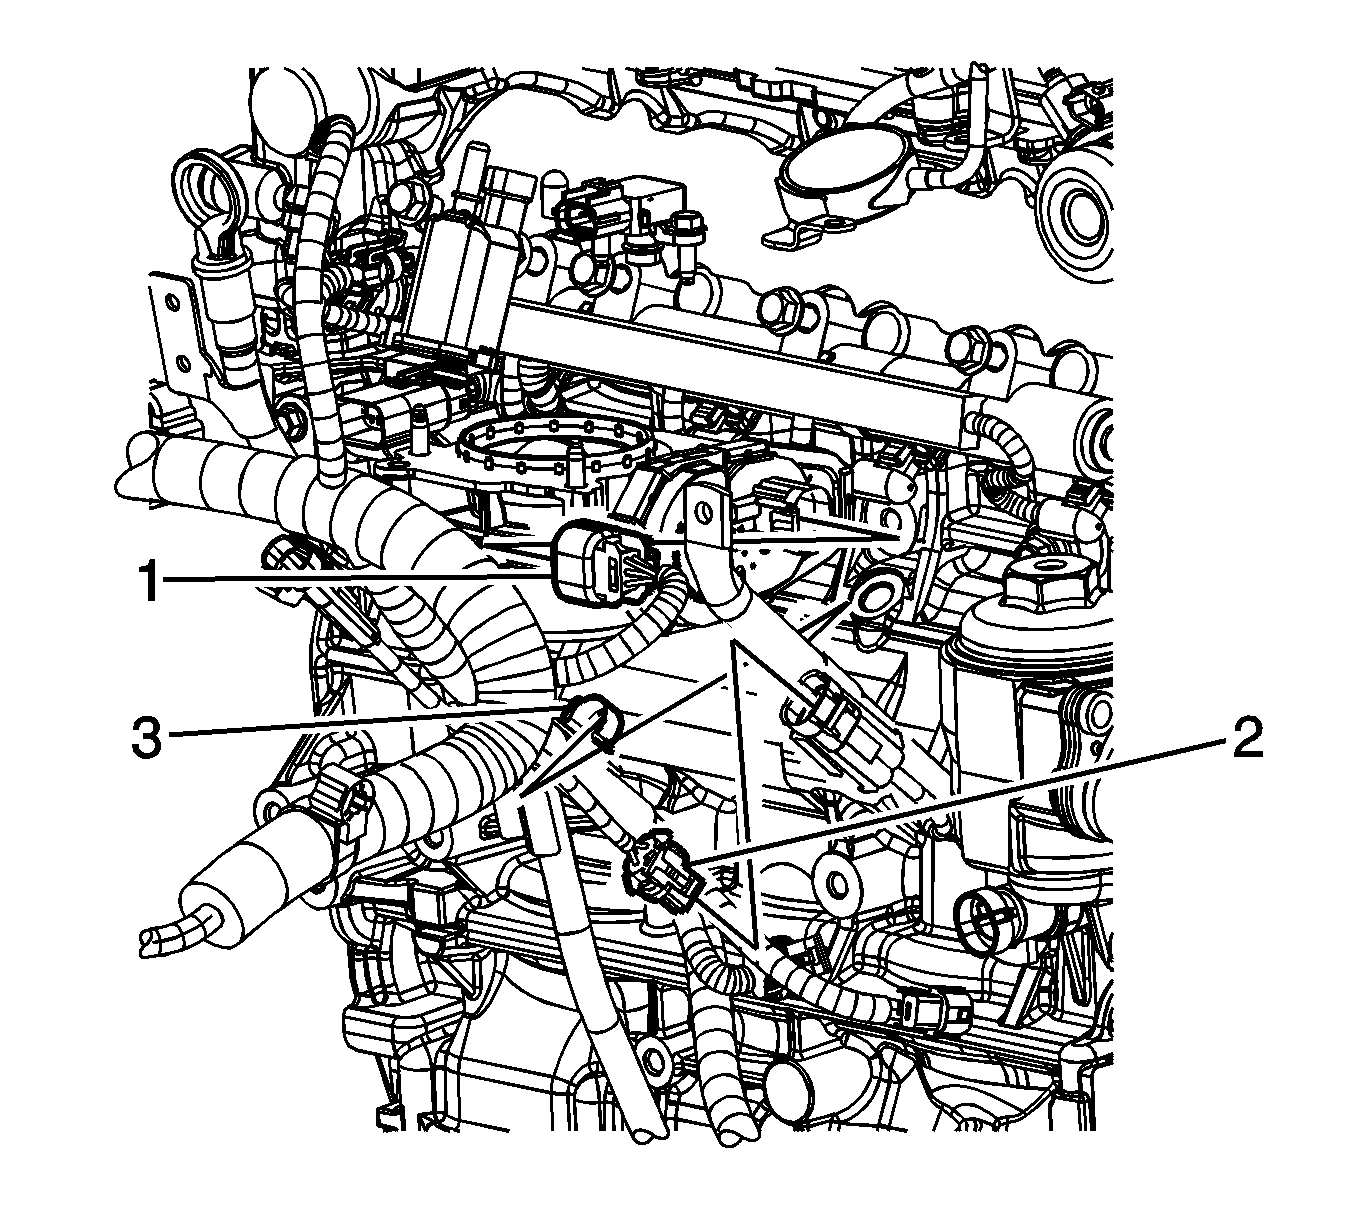
- Disconnect the charge air bypass valve vacuum line (1).
- Disconnect the evaporative emission (EVAP) electrical connector (2) from the EVAP purge solenoid.
- Remove the (EVAP) hose from the (EVAP) hose clip (3).
- Disconnect the evaporative emission (EVAP) line quick connect fitting (4) from the EVAP purge solenoid. Refer to Plastic Collar Quick Connect Fitting Service.
- Disconnect the manifold absolute pressure (MAP) sensor electrical connector (5).
- Reposition the brake booster vacuum hose clamp at the intake manifold.
- Remove the knock sensor electrical connector (2) clip from the oil level indicator tube bracket.
- Remove the brake booster hose from the intake manifold.
- Disconnect the engine wiring harness electrical connector (1) from the throttle actuator control (TAC) module.
- Remove the charge air bypass valve solenoid bolts.
- Reposition the charge air bypass valve solenoid assembly out of the way.
- Disconnect the fuel feed pipe fitting from the fuel pump.
- Remove the fuel feed pipe bolts.
- Remove the fuel feed pipe.
- Inspect the fuel feed pipe nut for damaged threads.
- Inspect the fuel feed pipe sealing bail for damage or debris.
- Replace the fuel feed pipe if any damage is found.
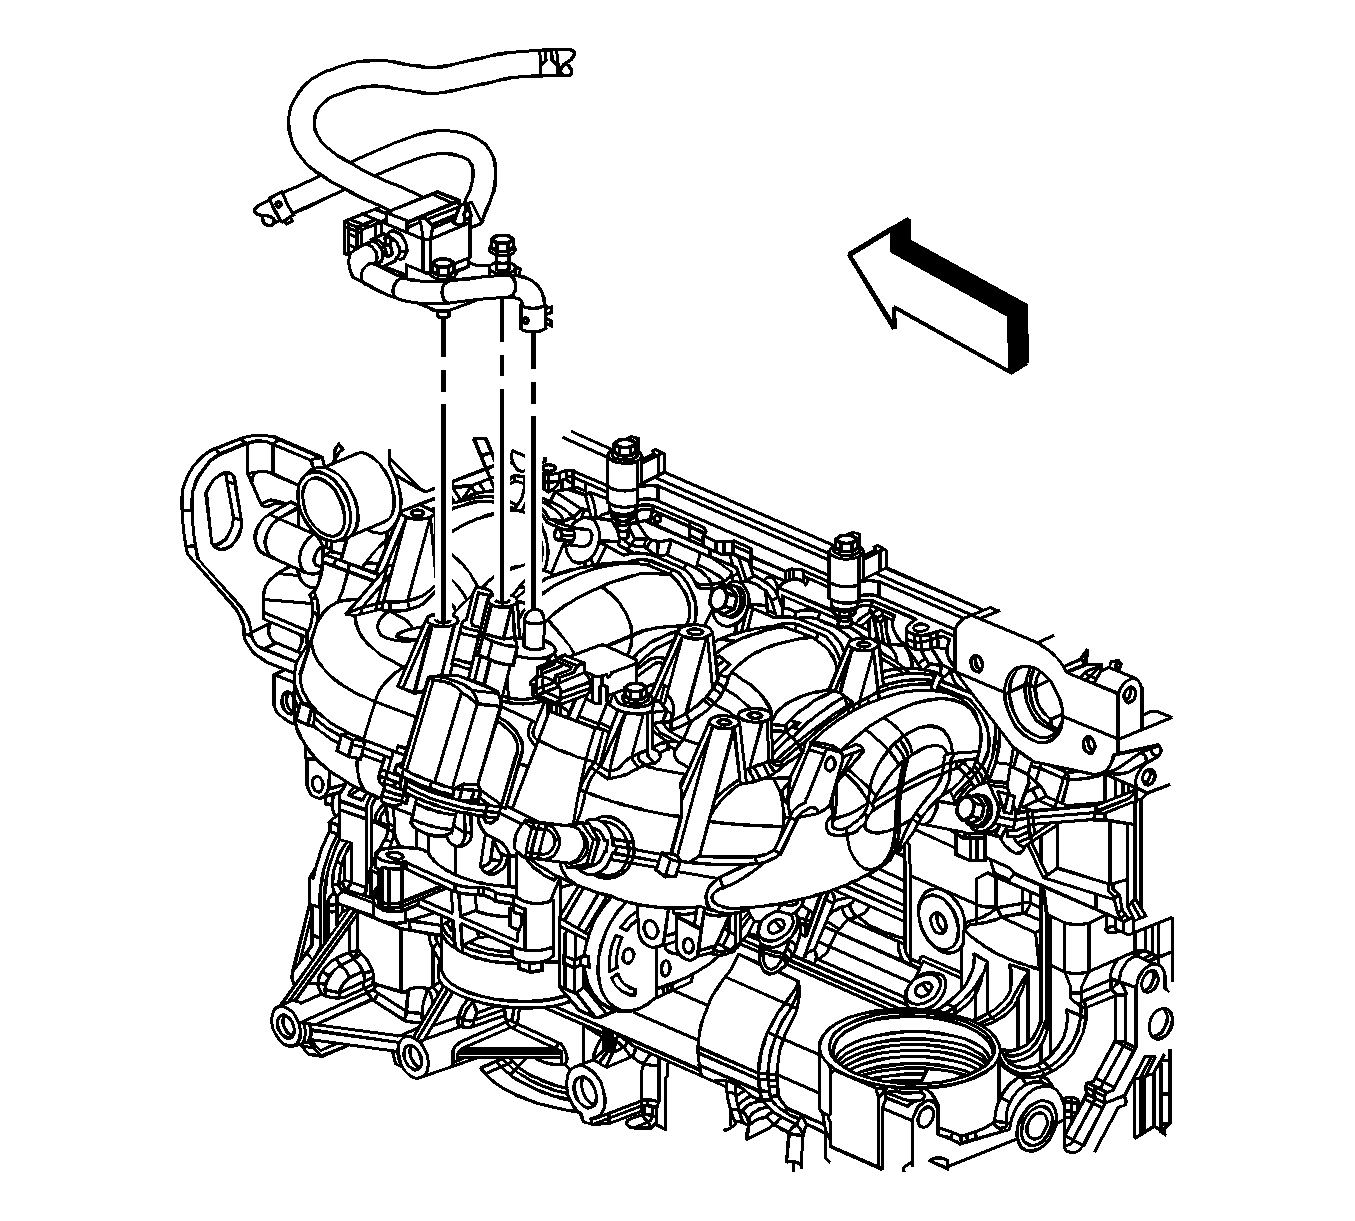
- Remove the charge air bypass vacuum tank. Refer to Charge Air Bypass Valve Vacuum Tank Replacement.
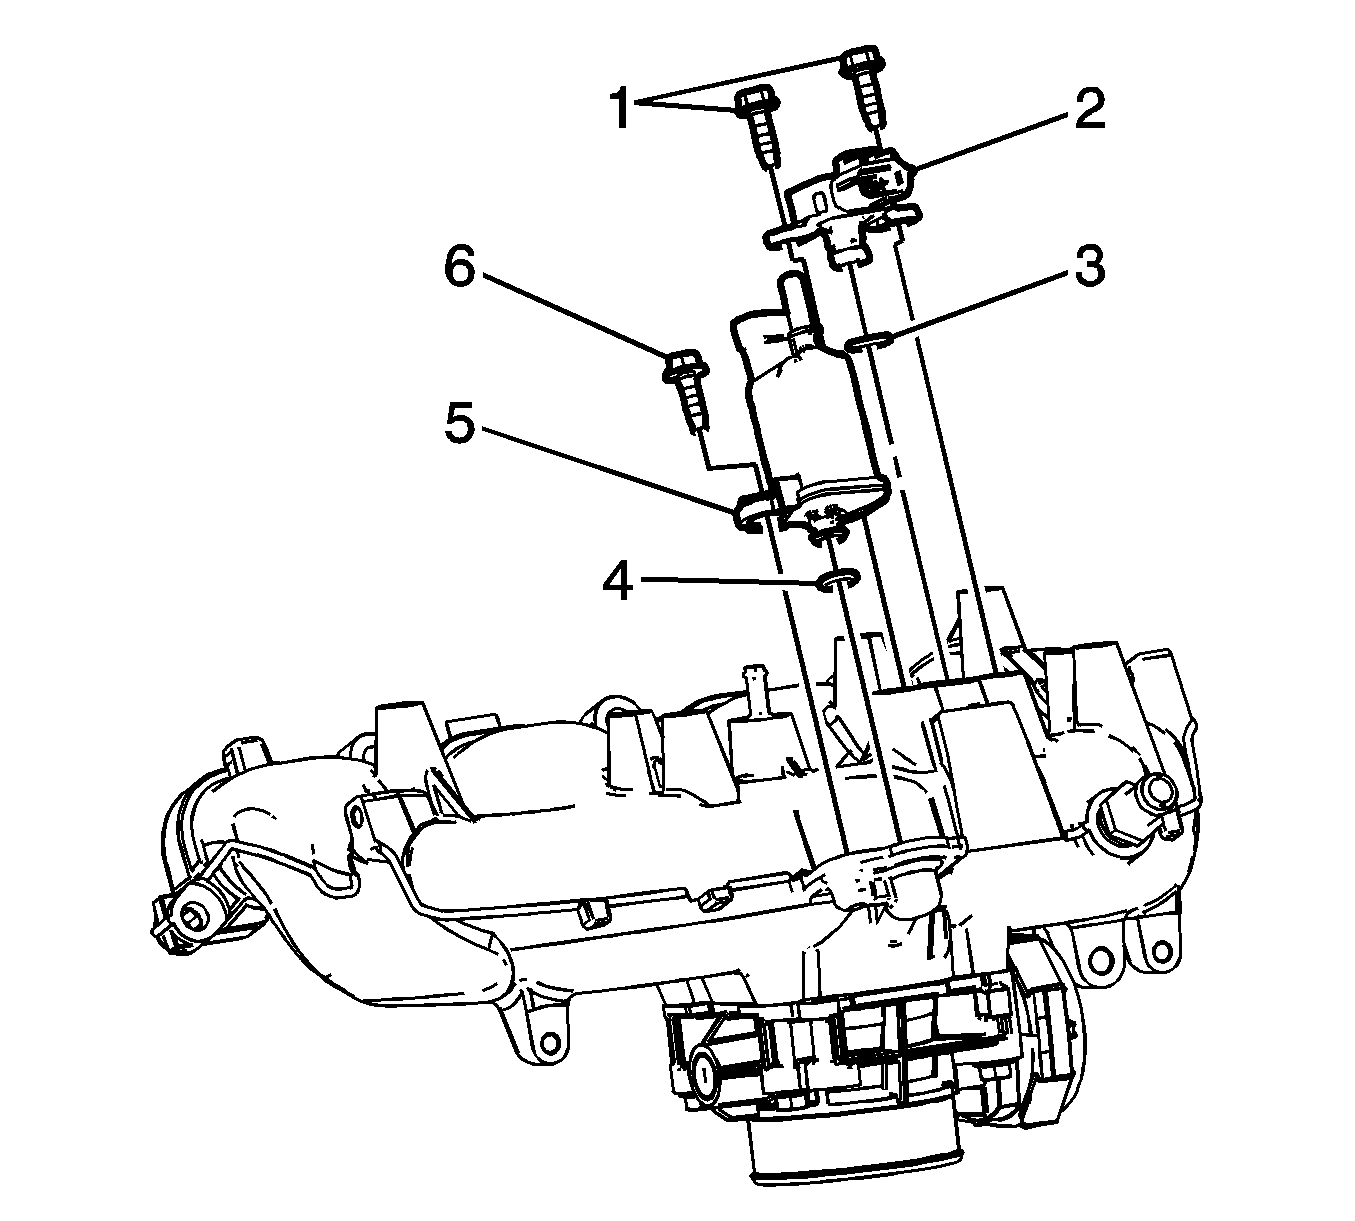
- Remove the wiring harness connector (1) from the intake manifold brace.
- Remove the charge air bypass vacuum tank bolt (2) and nut (3).
- Remove the charge air bypass vacuum tank brace (4).
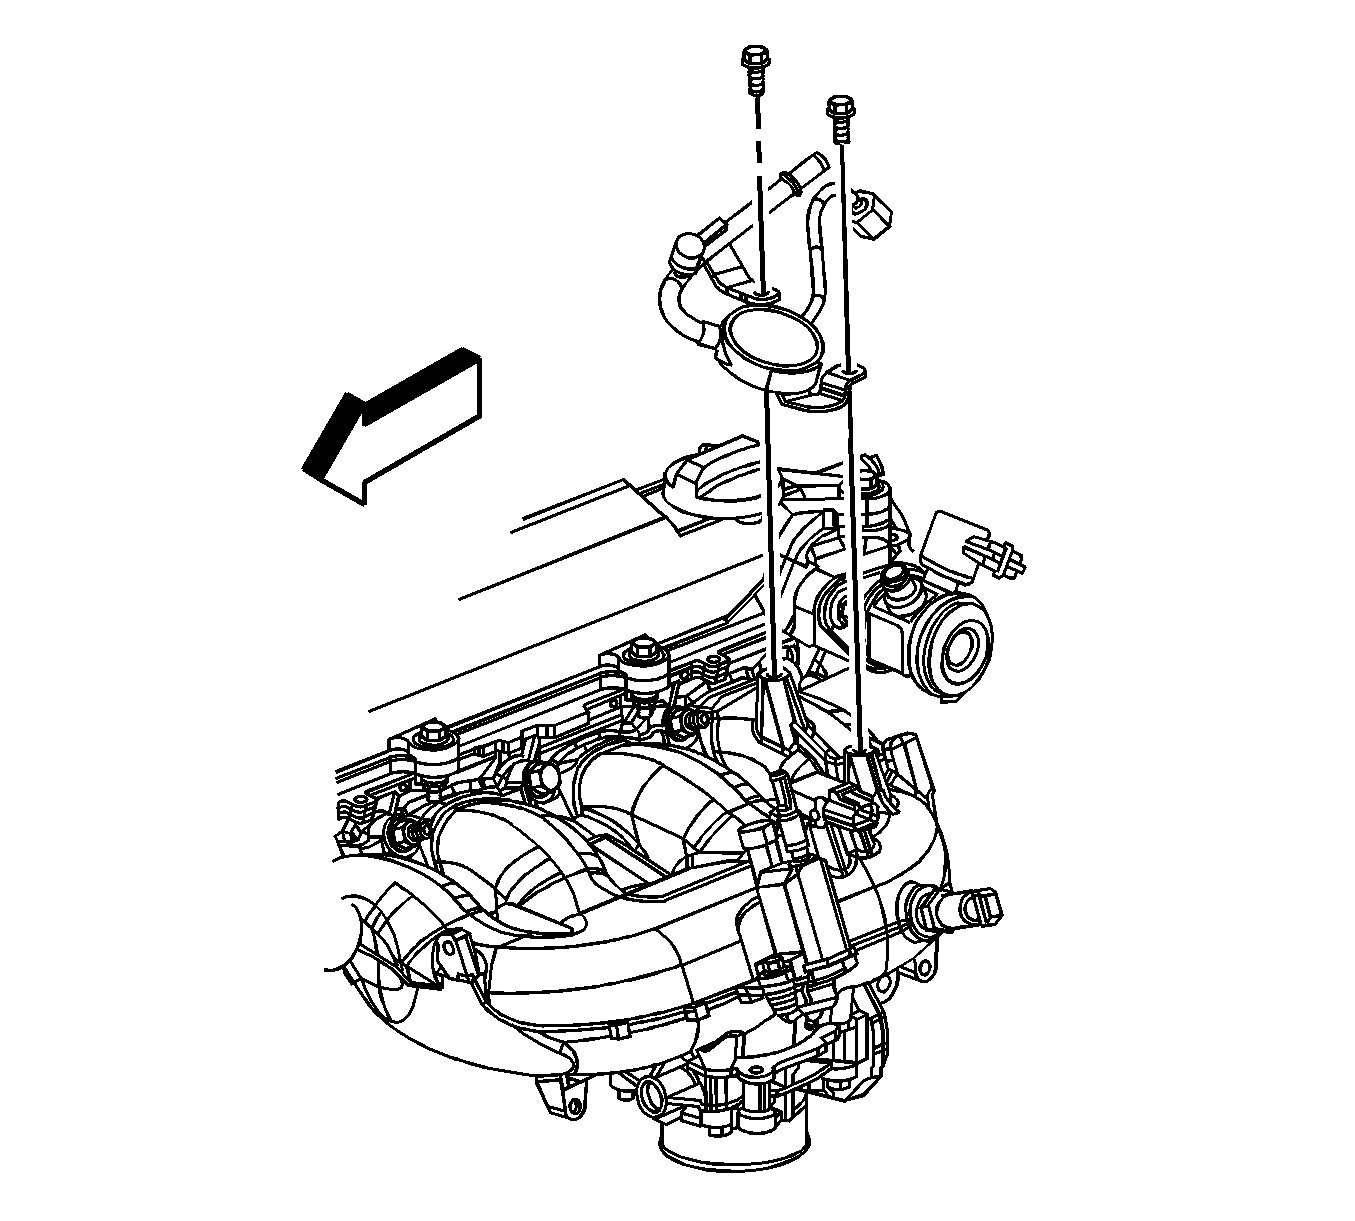
- Remove the intake manifold brace bolt (1).
- Remove the intake manifold brace (2).
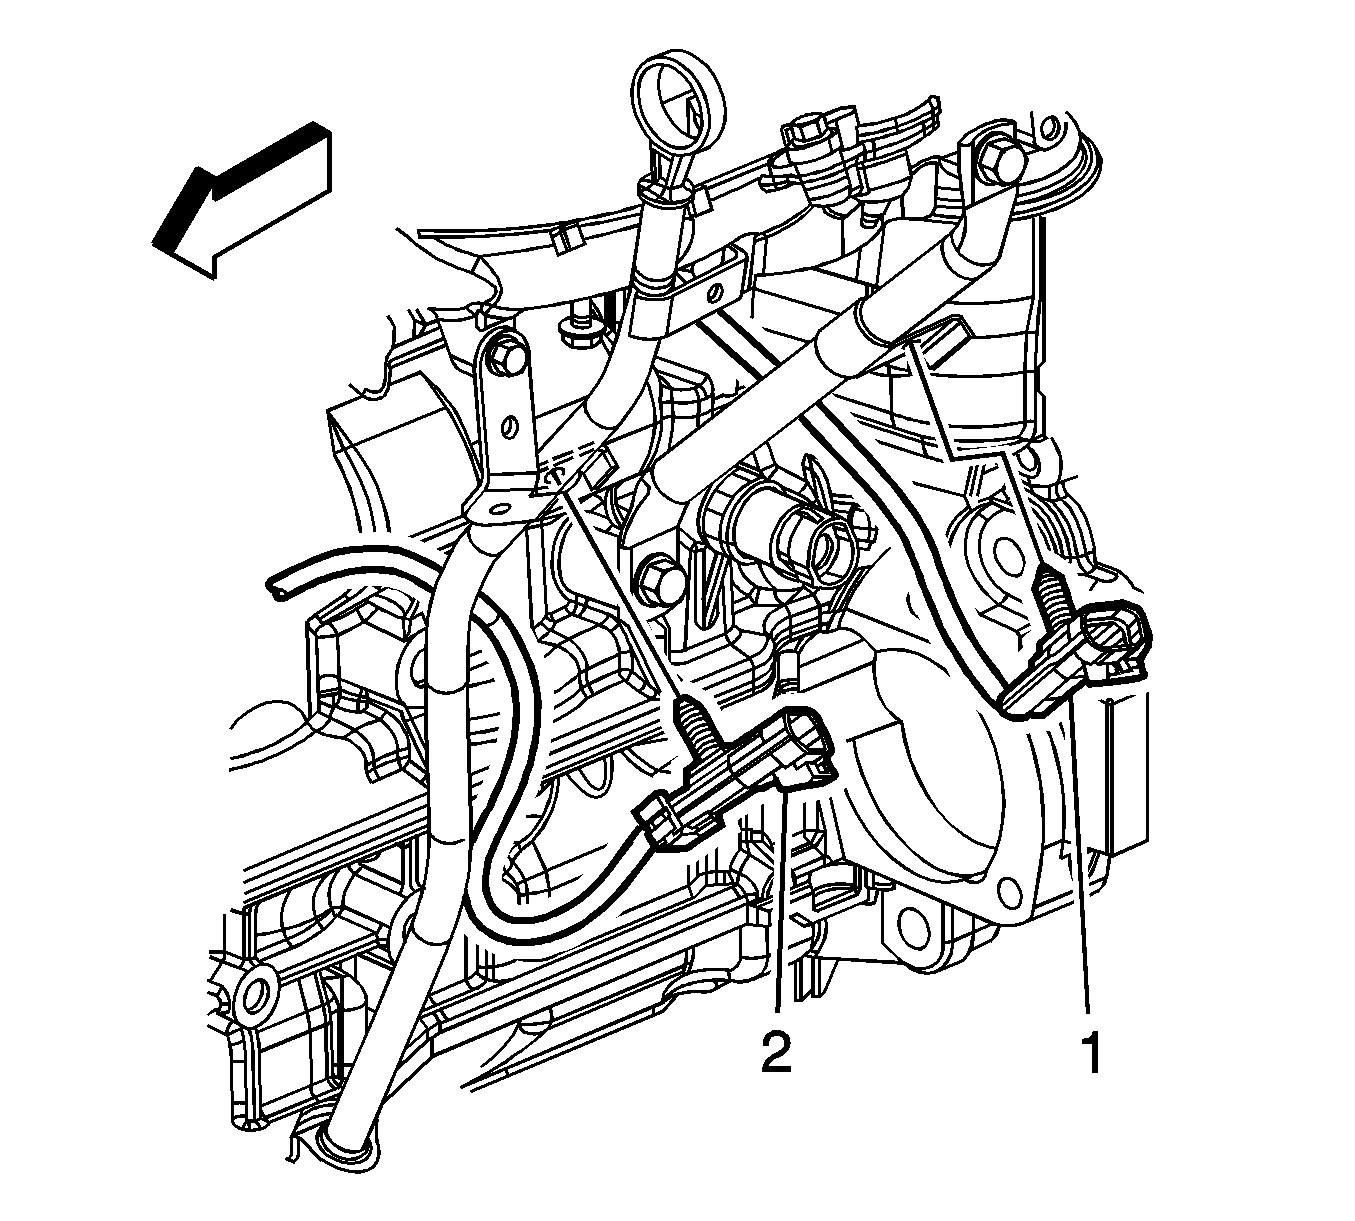
- Remove the high pressure fuel pump bracket bolt (1).
- Remove the A/C line bracket bolt (2).
- Remove the intake manifold bolts and nuts.
- Remove the intake manifold and place on a clean work surface.
- Remove the intake manifold gasket and discard.
- If replacing the intake manifold perform the following steps, otherwise proceed to step 11 in the installation procedure.
- Remove the MAP sensor bolts (1).
- Remove the MAP sensor (2), ensure that the O-ring seal (3) is still attached on the sensor, if not remove the O-ring seal from the intake manifold.
- Remove the EVAP purge solenoid bolt (6).
- Remove the EVAP purge solenoid (5), ensure that the O-ring seal (4) is still attached on the sensor, if not remove the O-ring seal from the intake manifold.
- Turn the intake manifold up side down.
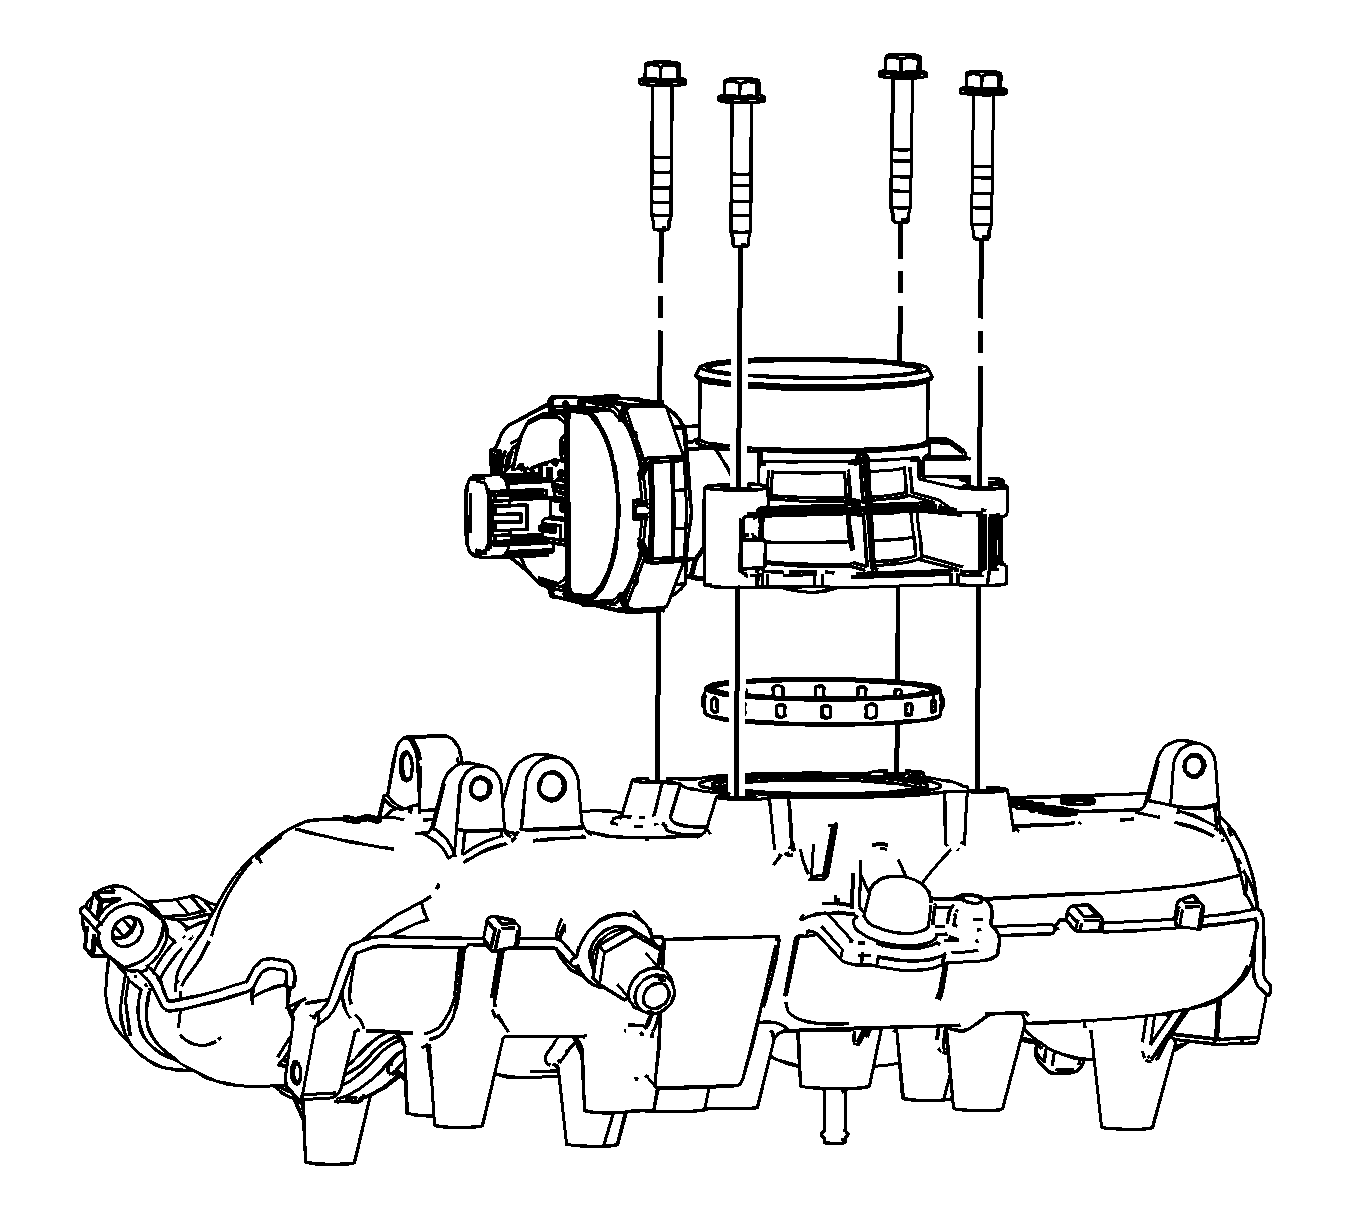
- Remove the throttle body bolts.
- Remove the throttle body and seal.

Installation Procedure
- If replacing the intake manifold perform the following steps, otherwise proceed to step 11.
- Inspect the throttle body seal and replace if necessary.
- Install the throttle body seal and position the throttle body.
- Install the throttle body bolts and tighten to 10 N·m (89 lb in).
- Turn the intake manifold right side up.
- Inspect the EVAP purge solenoid and MAP sensor O-ring seals, replace if necessary.
- Ensure that the EVAP purge solenoid O-ring seal (4) is installed on the EVAP purge solenoid (5).
- Install the EVAP purge solenoid (5) and bolt (6) and tighten the bolt to 10 N·m (89 lb in).
- Ensure that the MAP sensor O-ring seal (3) is installed on the MAP sensor (2).
- Install the MAP sensor (2) and bolts (1) and tighten the bolts to 10 N·m (89 lb in).
- Install a NEW intake manifold gasket.
- Install the intake manifold to the studs.
- Install the intake manifold bolts and nuts and tighten the bolts/nuts to 22 N·m (16 lb ft).
- Install the A/C line bracket bolt (2) and tighten to 10 N·m (89 lb in).
- Install the high pressure fuel pump bracket bolt (1) and tighten to 10 N·m (89 lb in).
- Install the intake manifold brace (2).
- Loosely install the intake manifold brace bolt (1).
- Tighten the intake manifold brace bolt (1) and tighten to 25 N·m (18 lb ft).
- Install the charge air bypass vacuum tank brace (4).
- Install the charge air bypass vacuum tank nut (3) and bolt (2) and tighten to 22 N·m (16 lb ft).
- Install the wiring harness connector (1) to the intake manifold brace.
- Install the charge air bypass vacuum tank. Refer to Charge Air Bypass Valve Vacuum Tank Replacement.
- Lubricate the high pressure fuel pump fuel feed pipe connection threads with silicon free engine oil GM P/N 12345610 (Canadian P/N 993193) or equivalent.
- Place the fuel feed pipe on top of the intake manifold.
- Connect the fuel feed pipe fitting to the high pressure fuel pump.
- Install the fuel feed pipe bolts and tighten.
- Install the charge air bypass valve solenoid bolts and tighten to 10 N·m (89 lb in).
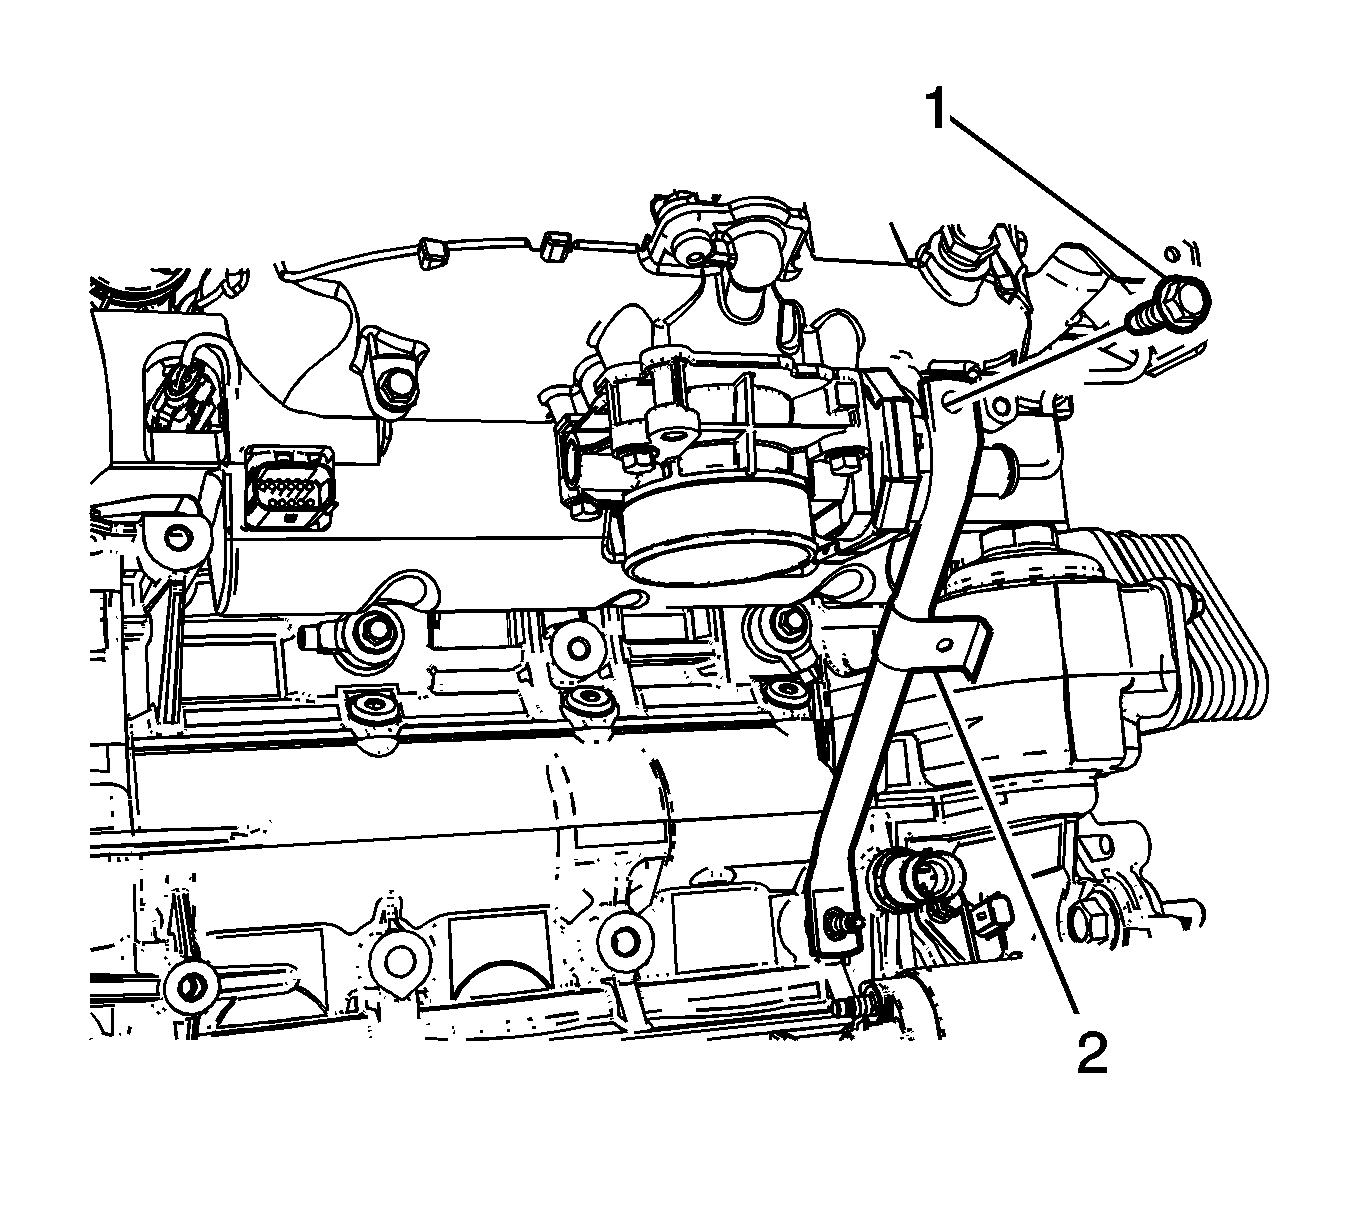
- Connect the engine wiring harness electrical connector (1) to the TAC module.
- Install the knock sensor electrical connector (1) clip to the intake manifold brace.
- Install the brake booster hose to the intake manifold.
- Position the brake booster vacuum hose clamp at the intake manifold.
- Connect the manifold absolute pressure (MAP) sensor electrical connector (5).
- Connect the (EVAP) line quick connect fitting (4) from the EVAP purge solenoid. Refer to Plastic Collar Quick Connect Fitting Service.
- Install the (EVAP) hose from the (EVAP) hose clip (3).
- Connect the (EVAP) electrical connector (2) from the EVAP purge solenoid.
- Connect the charge air bypass valve vacuum line (1).
- Connect the charge air valve solenoid vacuum electrical connector (2).
- Connect the charge air valve solenoid vacuum lines (1).
- Connect the fuel feed line quick connect fitting to the fuel rail. Refer to Metal Collar Quick Connect Fitting Service.
- Install the oil level indicator tube. Refer to Oil Level Indicator and Tube Replacement.
- Install the charge air cooler inlet pipe. Refer to Charge Air Cooler Inlet Pipe Replacement.
- Install the air cleaner assembly. Refer to Air Cleaner Assembly Replacement.
- Install the radiator air baffle and deflector. Refer to Radiator Air Upper Baffle and Deflector Replacement.
Caution: Refer to Fastener Caution in the Preface section.
| • | Tighten the bolts to 10 N·m (89 lb in). |
| • | Tighten the fitting to 30 N·m (22 lb ft). |
