Radiator Replacement Diesel
Special Tools
J 38185 Hose Clamp Pliers
Removal Procedure
Important: Always install a new set of insulators when replacing a radiator. Used insulators may be worn or too large for the new radiator. These conditions may cause the new radiator to be loose.
- Remove the air cleaner assembly. Refer to Air Cleaner Assembly Replacement .
- Remove the upper radiator baffle.
- Remove the surge tank. Refer to Radiator Surge Tank Replacement .
- Remove battery. Refer to Battery Replacement .
- Remove the charged air cooler inlet hose/pipe. Refer to Charged Air Cooler Hoses/Pipes Replacement .
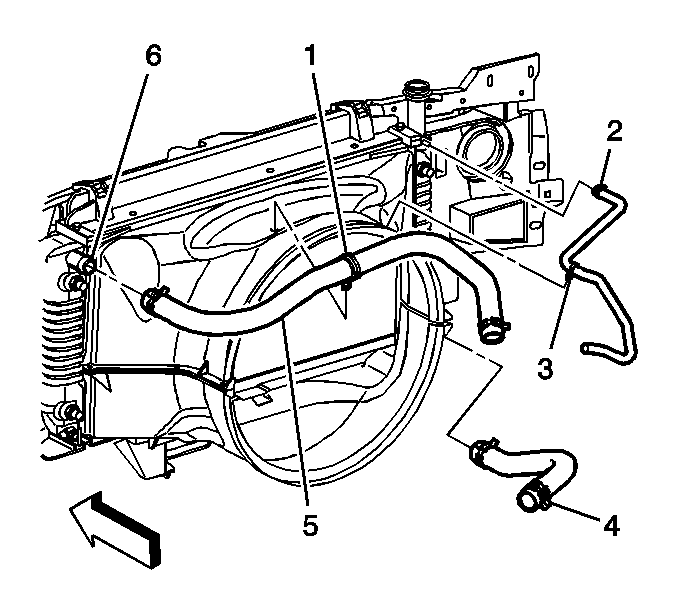
- Remove the clamp at the radiator inlet using the J 38185 .
- Remove the radiator inlet hose (5) from the radiator.
- Remove the outlet heater hose clamp at the radiator using the J 38185 .
- Remove the outlet heater hose (2) from the radiator.
- Remove the automatic transmission cooler lines. Refer to Transmission Fluid Cooler Hose/Pipe Quick-Connect Fitting Disconnection and Connection for the 4L60-E/4L65-E/4L70-E transmissions or Transmission Fluid Cooler Hose/Pipe Quick-Connect Fitting Disconnection and Connection for the 4L80-E/4L85-E transmissions.
- Remove the engine oil cooler lines. Refer to Engine Oil Cooler Pipe/Hose Quick Connect Fitting .
- Remove the engine oil fill tube. Refer to Oil Filler Tube Replacement .
- Remove intake manifold tube. Refer to Intake Manifold Tube Replacement .
- Remove the upper radiator baffle.
- Remove the fan shroud bolts (3) from the sides of the fan shroud.
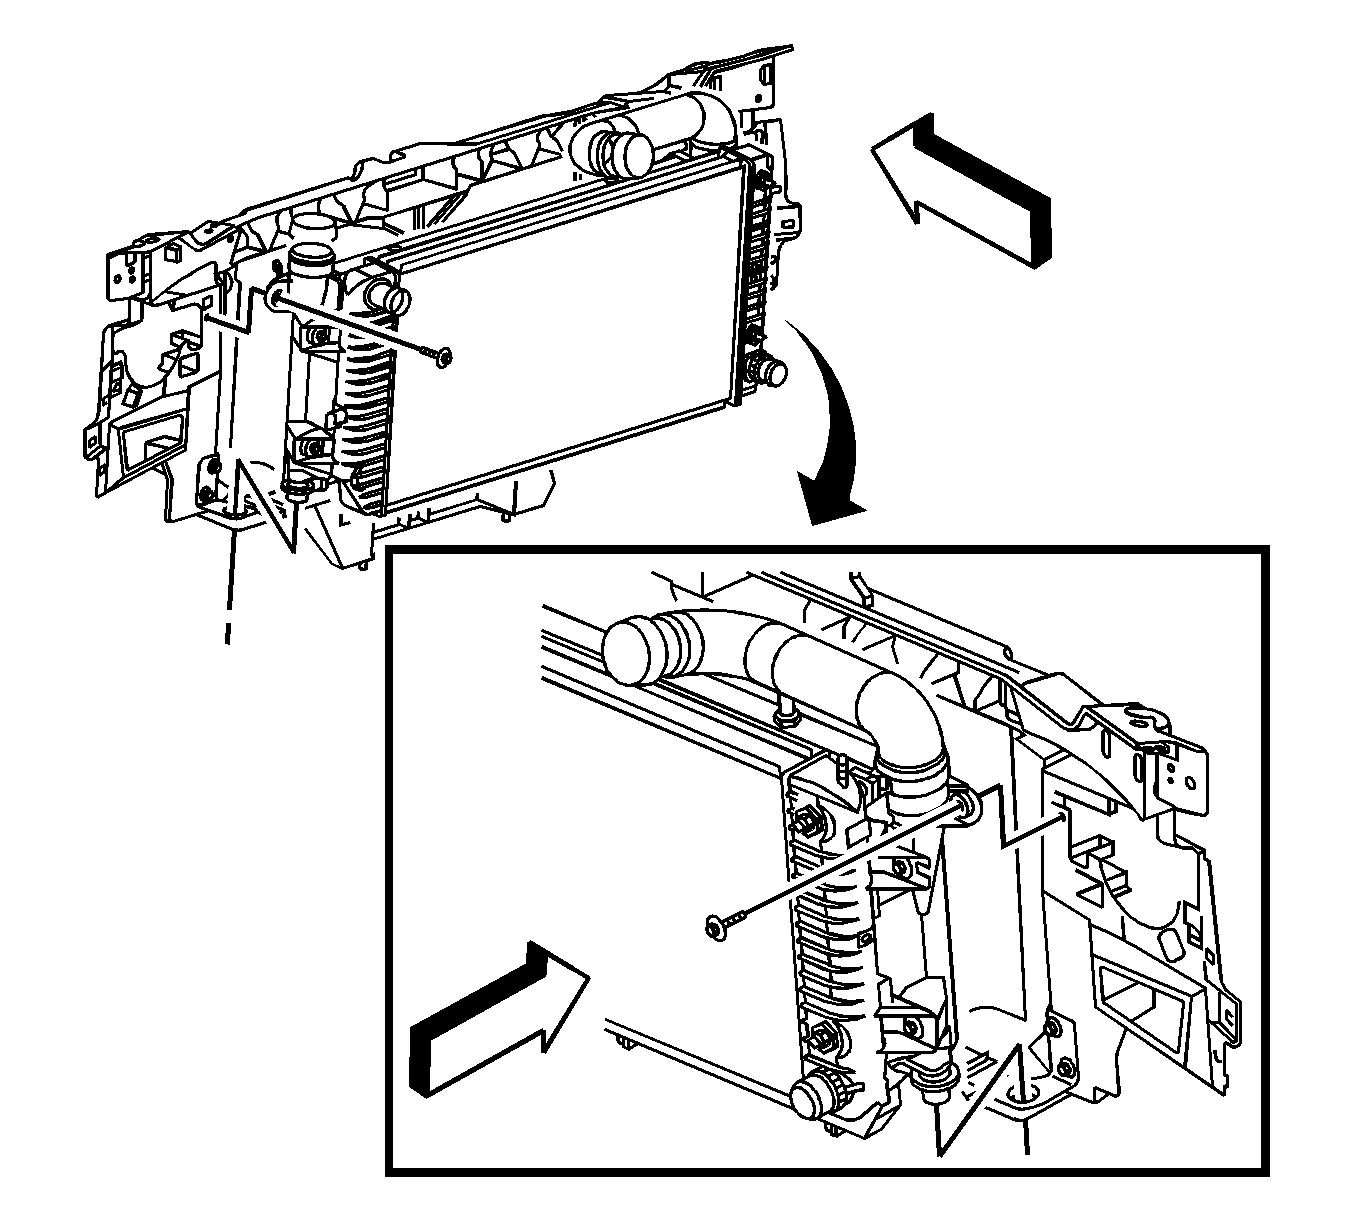
- Remove the radiator mounting bolts from the charged air cooler.
- Remove the charge air cooler bolts to core support.
- Remove the radiator and charge air cooler as assembly.
- Remove radiator bolts to charge air cooler.
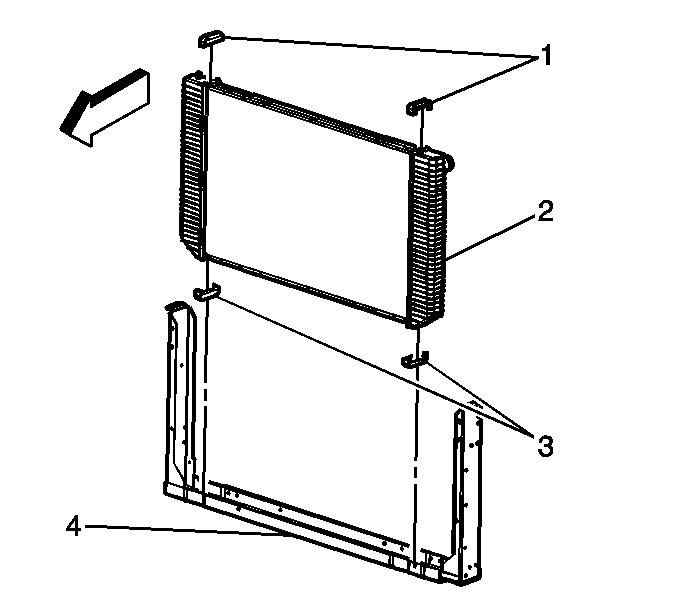
- Remove the radiator insulators.
- Inspect the following components:

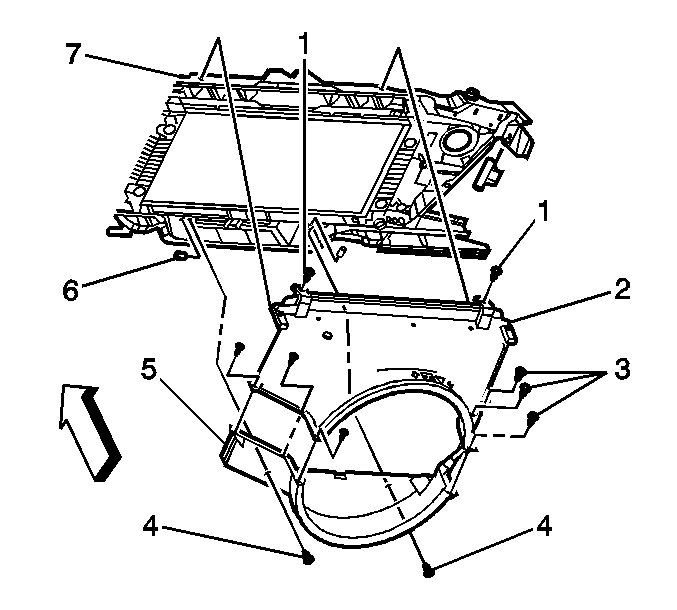
Remove the fan shroud bolts (1) from the top of the radiator support.
| • | The radiator |
| • | The insulators |
| • | The hoses and clamps |
| • | The mounting hardware |
| • | Replace the components as necessary. |
Installation Procedure
- Install the radiator insulators.
- Install the radiator to the charge air cooler.
- Install the radiator and charge air cooler as an assembly.
- Install the radiator mounting bolts to the charged air cooler.
- Install the fan shroud bolts (1) to the top of the radiator support.
- Install the fan shroud bolts (3) to the sides of the fan shroud.
- Install the engine oil cooler lines. Refer to Engine Oil Cooler Pipe/Hose Quick Connect Fitting .
- Install the automatic transmission oil cooler lines. Refer to Transmission Fluid Cooler Hose/Pipe Quick-Connect Fitting Disconnection and Connection for the 4L60-E/4L65-E/4L70-E transmissions or Transmission Fluid Cooler Hose/Pipe Quick-Connect Fitting Disconnection and Connection for the 4L80-E/4L85-E transmissions.
- Install the radiator inlet hose (5) to the radiator.
- Install the hose clamp at the radiator inlet housing using the J 38185 .
- Install the outlet heater hose (2).
- Install the outlet heater hose clamp using the J 39529 .
- Install the intake manifold tube. Refer to Intake Manifold Tube Replacement .
- Install oil fill tube. Oil Filler Tube Replacement .
- Install the upper radiator baffle.
- Install the battery. Refer to Battery Replacement .
- Install the charged air cooler hose/pipe. Refer to Charged Air Cooler Hoses/Pipes Replacement .
- Install the surge tank assembly. Refer to Radiator Surge Tank Replacement .
- Install the air cleaner assembly. Refer to Air Cleaner Assembly Replacement .
- Install the upper radiator baffle.
- Inspect the automatic transmission fluid level. Refer to Approximate Fluid Capacities .
- Inspect the engine oil level. Refer to Approximate Fluid Capacities .
Notice: Refer to Fastener Notice in the Preface section.
Tighten
Tighten the bolts to 6 N·m (53 lb in).
Tighten
Tighten the bolts to 6 N·m (53 lb in).
Tighten
Tighten the bolts to 6 N·m (53 lb in).
Tighten
Tighten the bolts to 6 N·m (53 lb in).
Radiator Replacement Gas
Special Tools
J 38185 Hose Clamp Pliers
Removal Procedure
Important: Always install a new set of insulators when replacing a radiator. Used insulators may be worn or too large for the new radiator. These conditions may cause the new radiator to be loose.
- Remove the air cleaner assembly. Refer to Air Cleaner Assembly Replacement for the 4.8L, 5.3L, 6.0L, 6.2L, 7.0L engines or Air Cleaner Assembly Replacement for the 4.3L engine.
- Remove the coolant recovery reservoir. Refer to Coolant Recovery Reservoir Replacement .
- Remove the clamp at the radiator inlet using the J 38185 .
- Remove the radiator inlet hose (5) from the radiator.
- Remove the outlet heater hose clamp at the radiator using the J 38185 .
- Remove the outlet heater hose (2) from the radiator.
- Remove the automatic transmission cooler lines. Refer to Transmission Fluid Cooler Hose/Pipe Quick-Connect Fitting Disconnection and Connection for the 4L60-E/4L65-E/4L70-E transmission or Transmission Fluid Cooler Hose/Pipe Quick-Connect Fitting Disconnection and Connection for the 4L80-E/4L85-E transmission.
- Remove the engine oil cooler lines. Refer to Engine Oil Cooler Pipe/Hose Quick Connect Fitting .
- Remove the fan shroud bolts (1) from the top of the radiator support.
- Remove the fan shroud bolts (3) from the sides of the fan shroud.
- Remove the radiator (2).
- Remove the radiator insulators (1, 3).
- Inspect the following components:
| • | The radiator |
| • | The insulators |
| • | The hoses and clamps |
| • | The mounting hardware |
| • | Replace the components as necessary. |
Installation Procedure
- Install the radiator insulators (1, 3).
- Install the radiator (2).
- Install the fan shroud bolts (1) to the top of the radiator support.
- Install the fan shroud bolts (3) to the sides of the fan shroud.
- Install the engine oil cooler lines. Refer to Engine Oil Cooler Pipe/Hose Quick Connect Fitting .
- Install the automatic transmission oil cooler lines. Refer to Transmission Fluid Cooler Hose/Pipe Quick-Connect Fitting Disconnection and Connection for the 4L60-E/4L65-E/4L70-E transmission or Transmission Fluid Cooler Hose/Pipe Quick-Connect Fitting Disconnection and Connection for the 4L80-E/4L85-E transmission.
- Install the radiator inlet hose (5) to the radiator.
- Install the hose clamp at the radiator inlet housing using the J 38185 .
- Install the outlet heater hose (2).
- Install the outlet heater hose clamp using the J 39529 .
- Install the coolant recovery reservoir. Refer to Coolant Recovery Reservoir Replacement .
- Install the air cleaner assembly. Refer to Air Cleaner Assembly Replacement for the 4.8L, 5.3L, 6.0L, 6.2L, 7.0L engines or Air Cleaner Assembly Replacement for the 4.3L engine.
- Inspect the automatic transmission fluid level. Refer to Approximate Fluid Capacities .
- Inspect the engine oil level. Refer to Approximate Fluid Capacities .
Notice: Use the correct fastener in the correct location. Replacement fasteners must be the correct part number for that application. Fasteners requiring replacement or fasteners requiring the use of thread locking compound or sealant are identified in the service procedure. Do not use paints, lubricants, or corrosion inhibitors on fasteners or fastener joint surfaces unless specified. These coatings affect fastener torque and joint clamping force and may damage the fastener. Use the correct tightening sequence and specifications when installing fasteners in order to avoid damage to parts and systems.
Tighten
Tighten the bolts to 6 N·m (53 lb in).
Tighten
Tighten the bolts to 6 N·m (53 lb in).
