Removal Procedure
- Relieve the fuel system pressure. Refer to
Fuel Pressure Relief
.
- Drain the fuel tank. Refer to
Fuel Tank Draining
.
- Raise and support the vehicle, high enough to access the top of the fuel
tank through the wheelhouse liner. Refer to
Lifting and Jacking the Vehicle
in General Information.
- Remove the left pickup box wheelhouse liner. Refer to
Pickup Box Wheelhouse Liner Replacement
in Body Rear End.
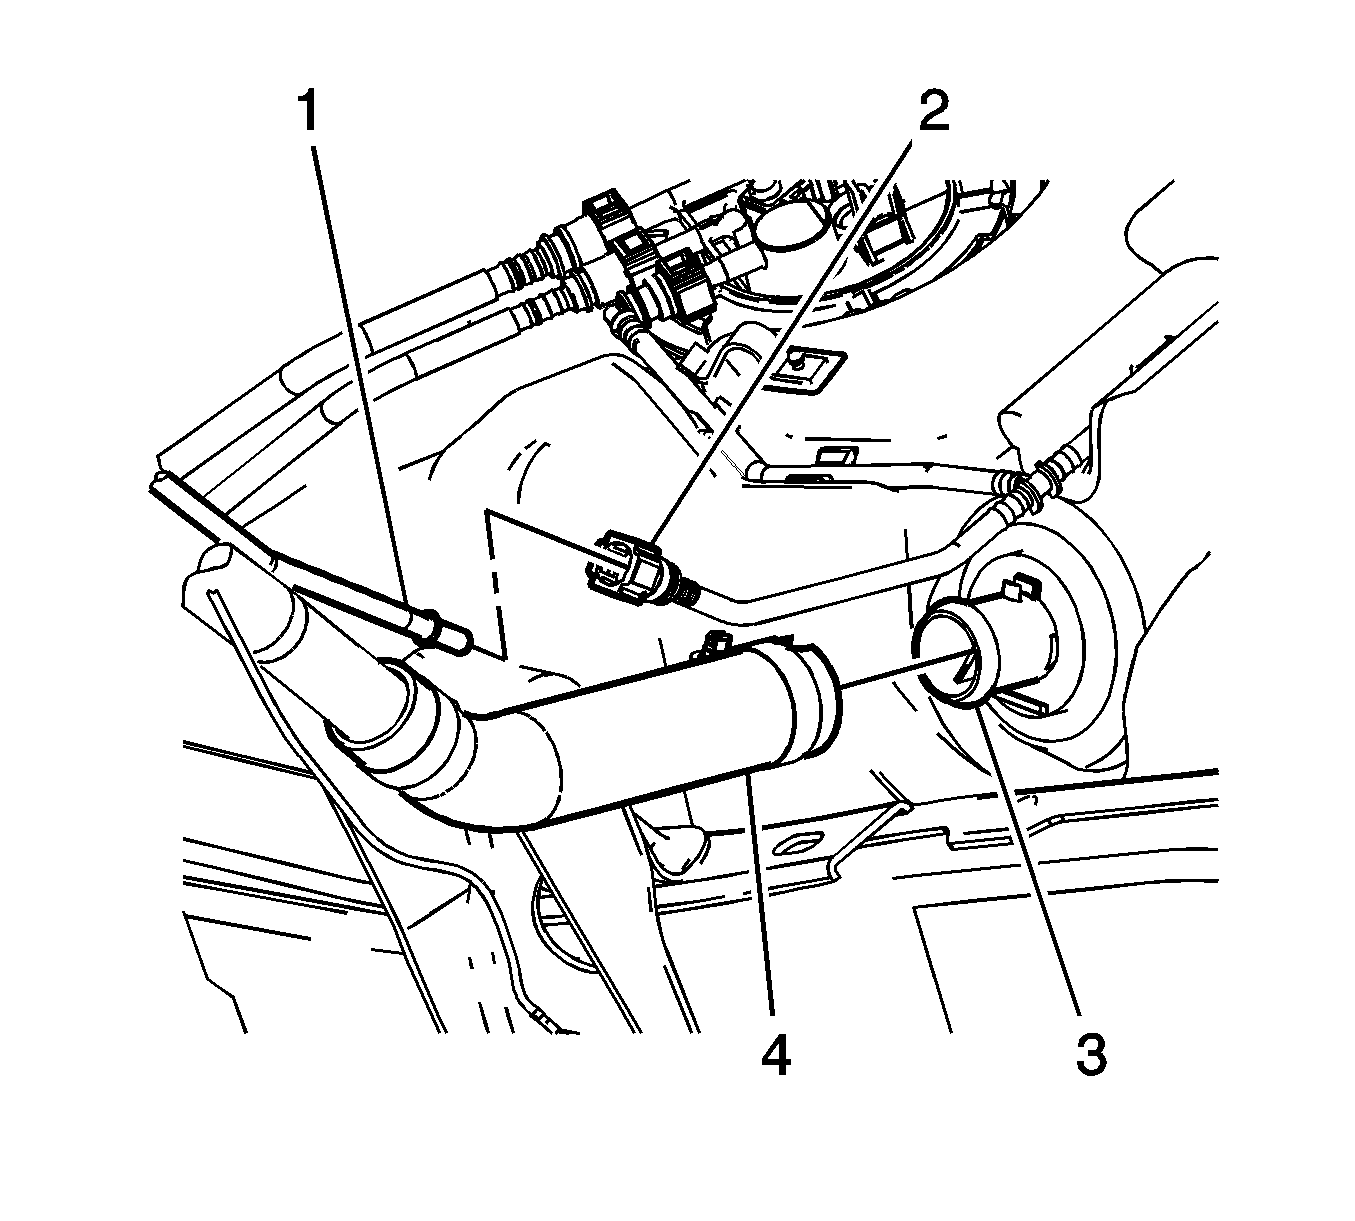
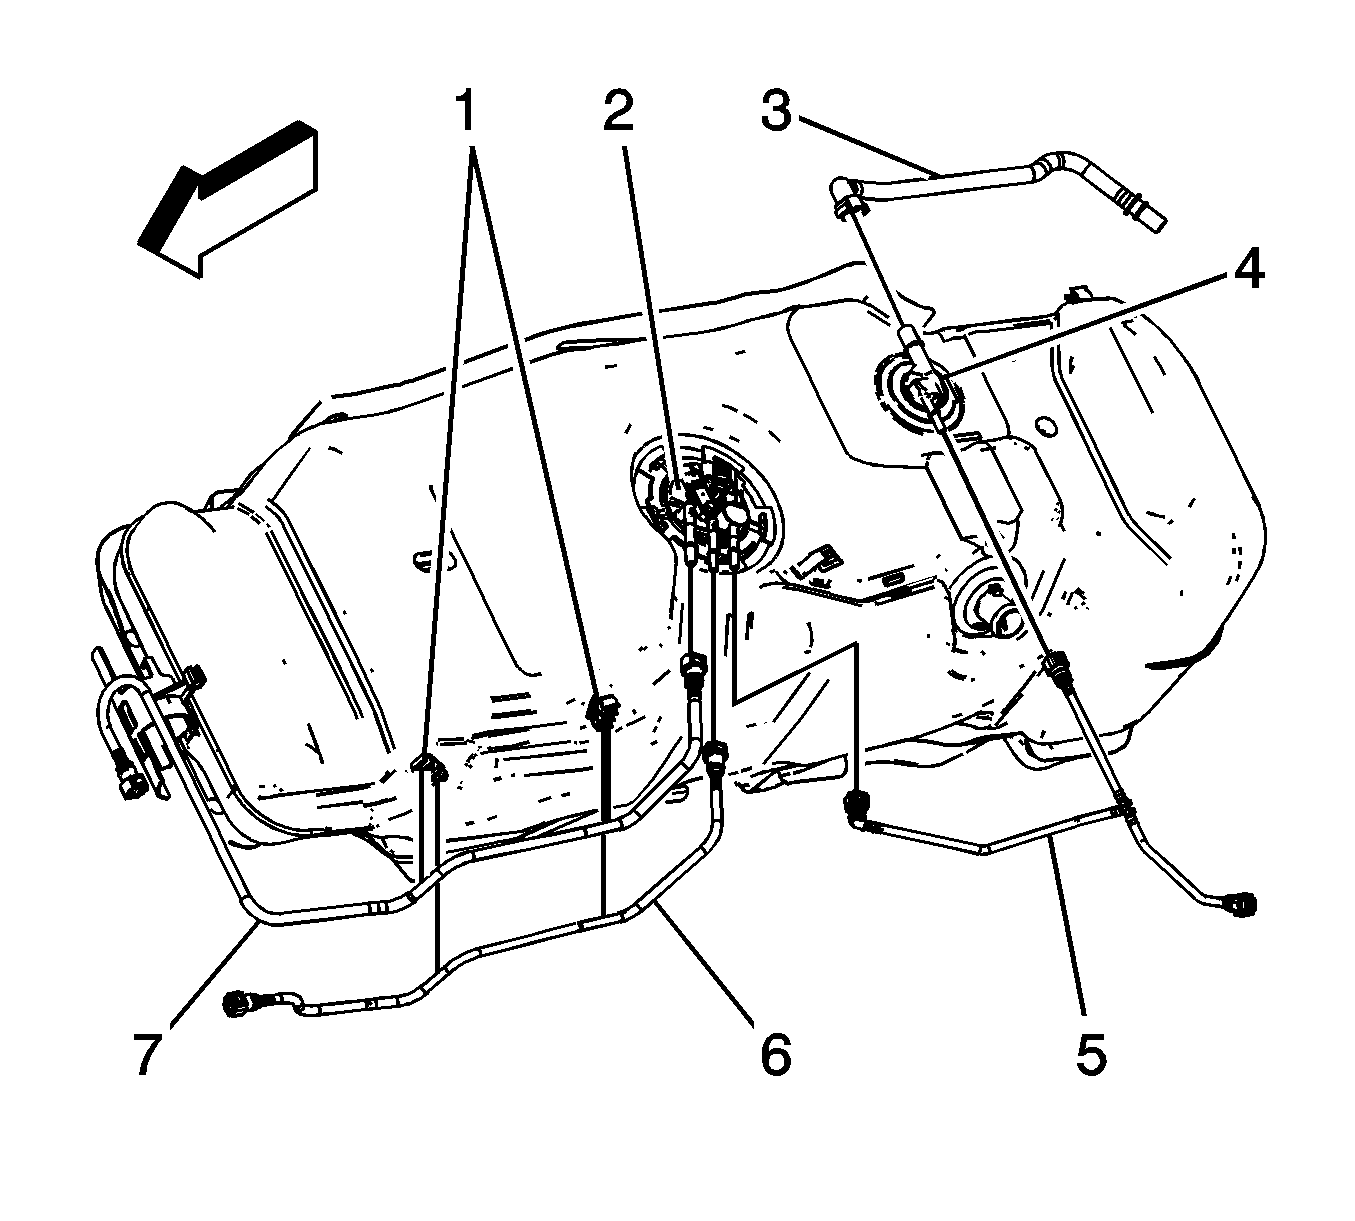
- Disconnect the fuel filler hose (4) from the fuel
tank (3).
- Disconnect the evaporative emission (EVAP) hose (2) from the filler
vent tube (1). Refer to
Plastic Collar Quick Connect Fitting Service
.
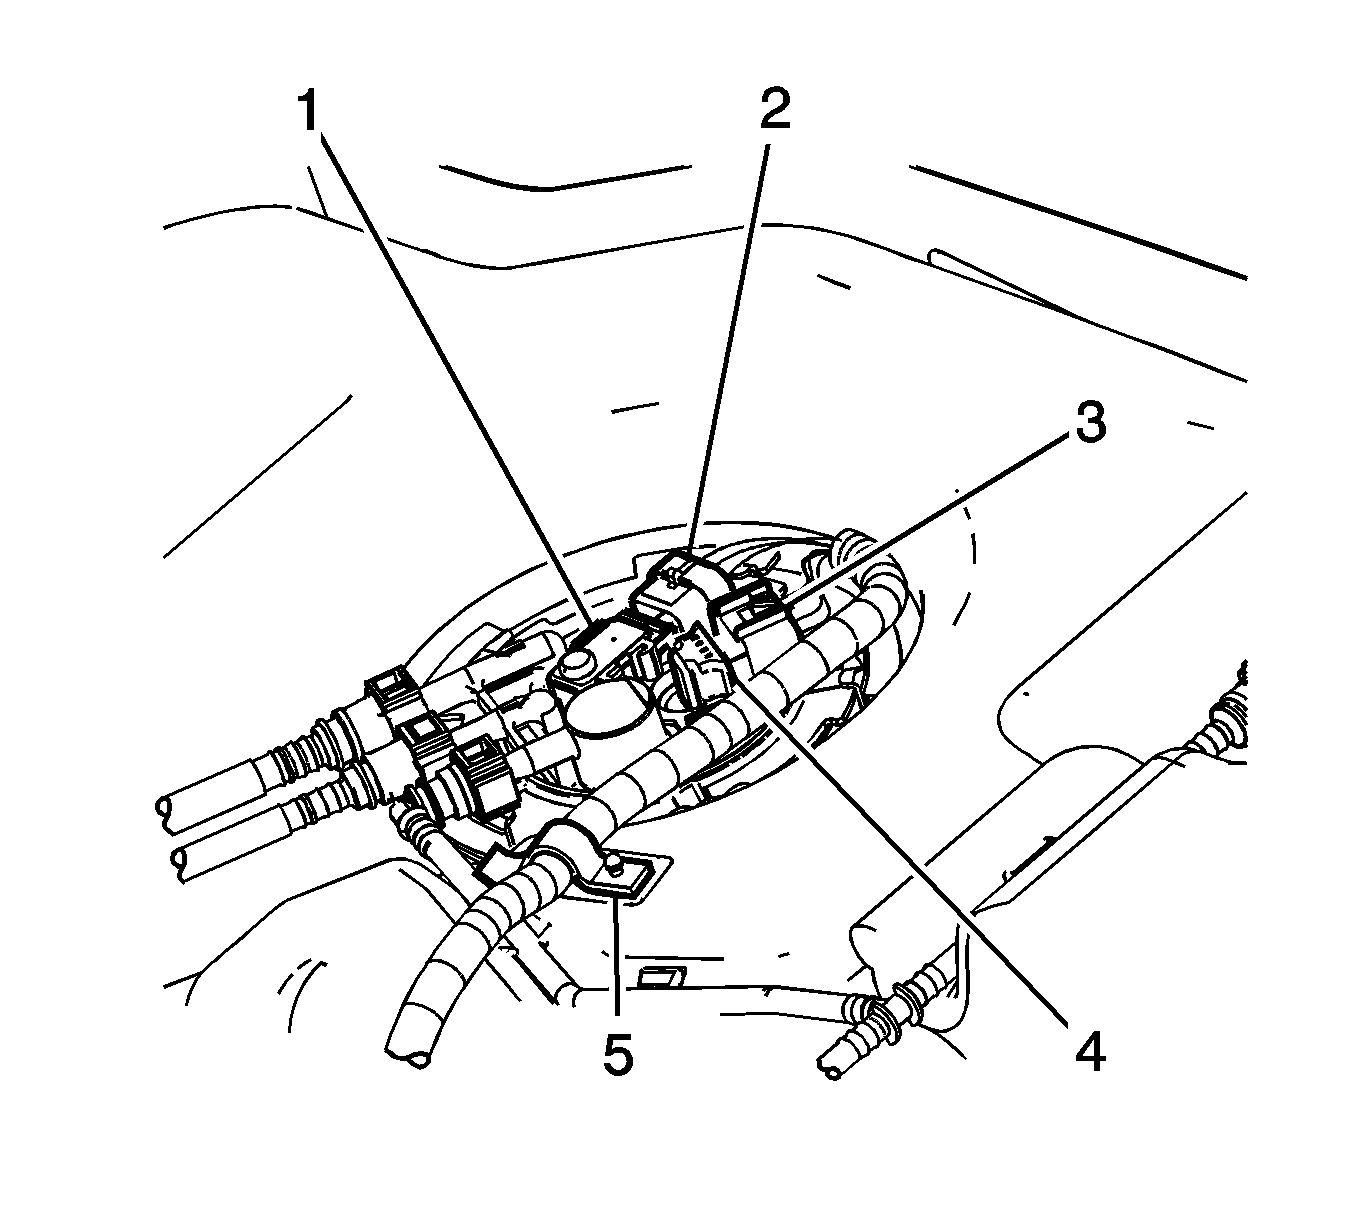
- Disconnect the following electrical connectors from the
fuel tank:
| • | The fuel tank pressure sensor (2) |
| • | The fuel tank module (3) |
- Disengage the fuel wiring harness from the retainer (5) on the
fuel tank.
- Raise the vehicle fully.
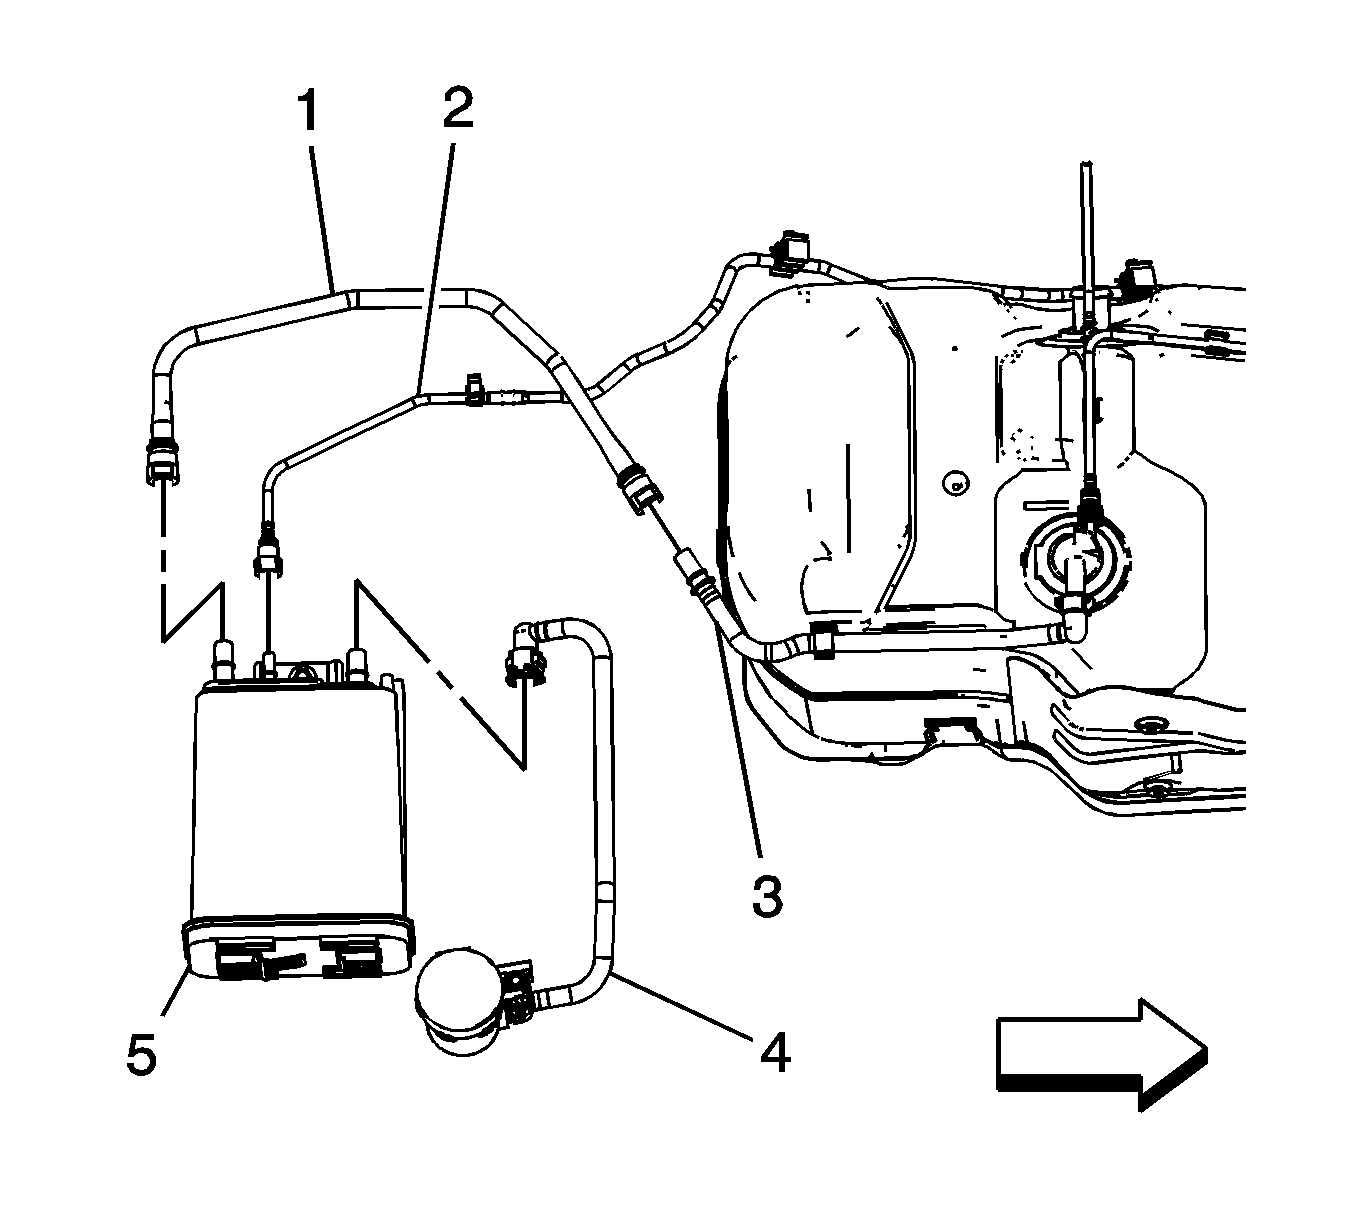
- Disconnect the middle of the EVAP vapor pipe (1, 3)
located between the fuel tank and the EVAP canister. Refer to
Plastic Collar Quick Connect Fitting Service
.
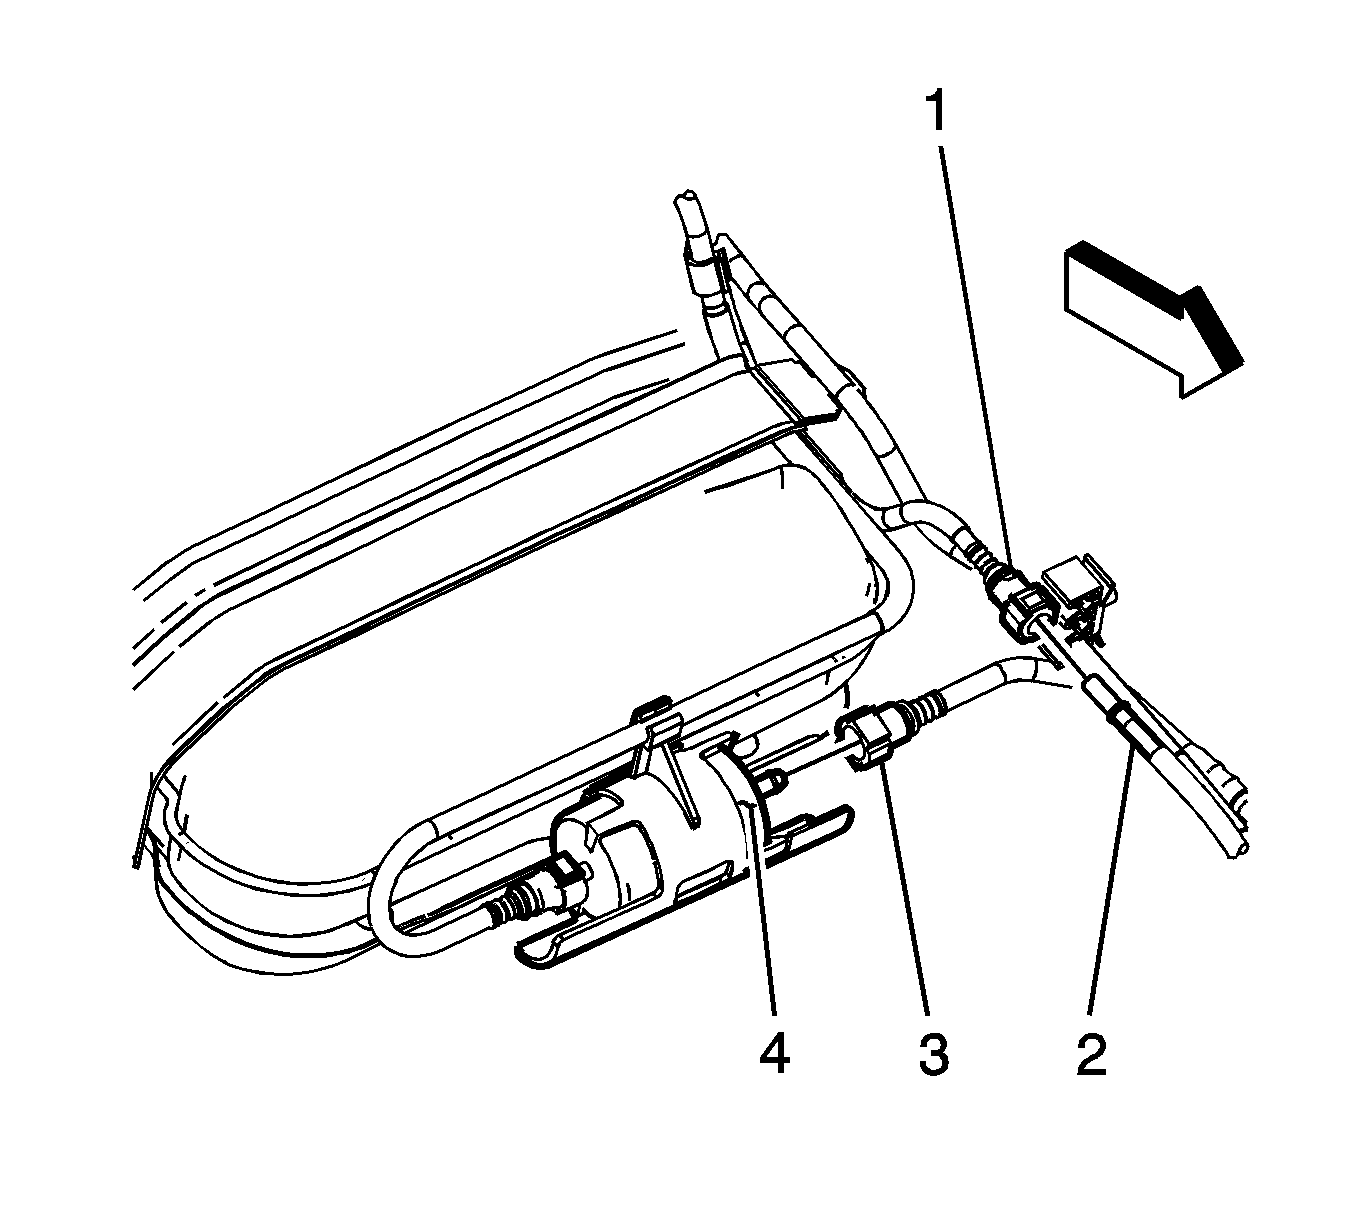
- Refer to
Plastic Collar Quick Connect Fitting Service
in order to disconnect the following from the chassis bundle (2, 3):
| • | The fuel return hose (1) |
Notice: Do not bend the fuel tank straps. Bending the fuel tank straps may damage
the straps.
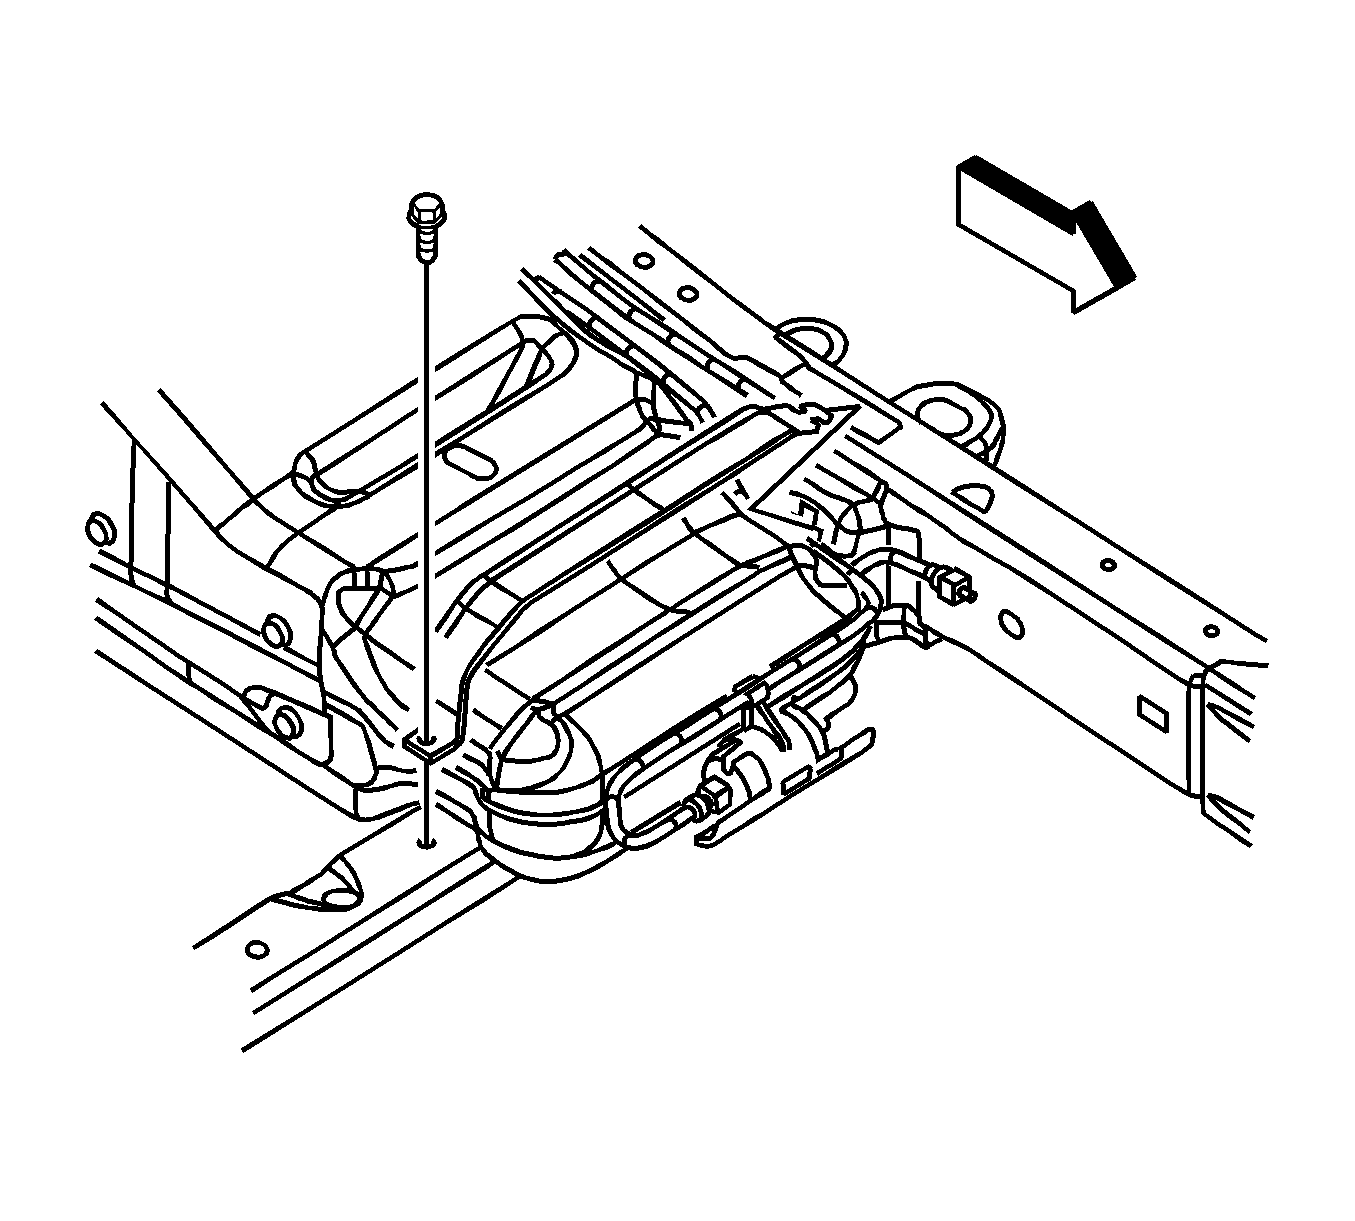
- Remove the upper fuel tank strap bolt.
- Remove the upper fuel tank strap.
- Support the fuel tank.
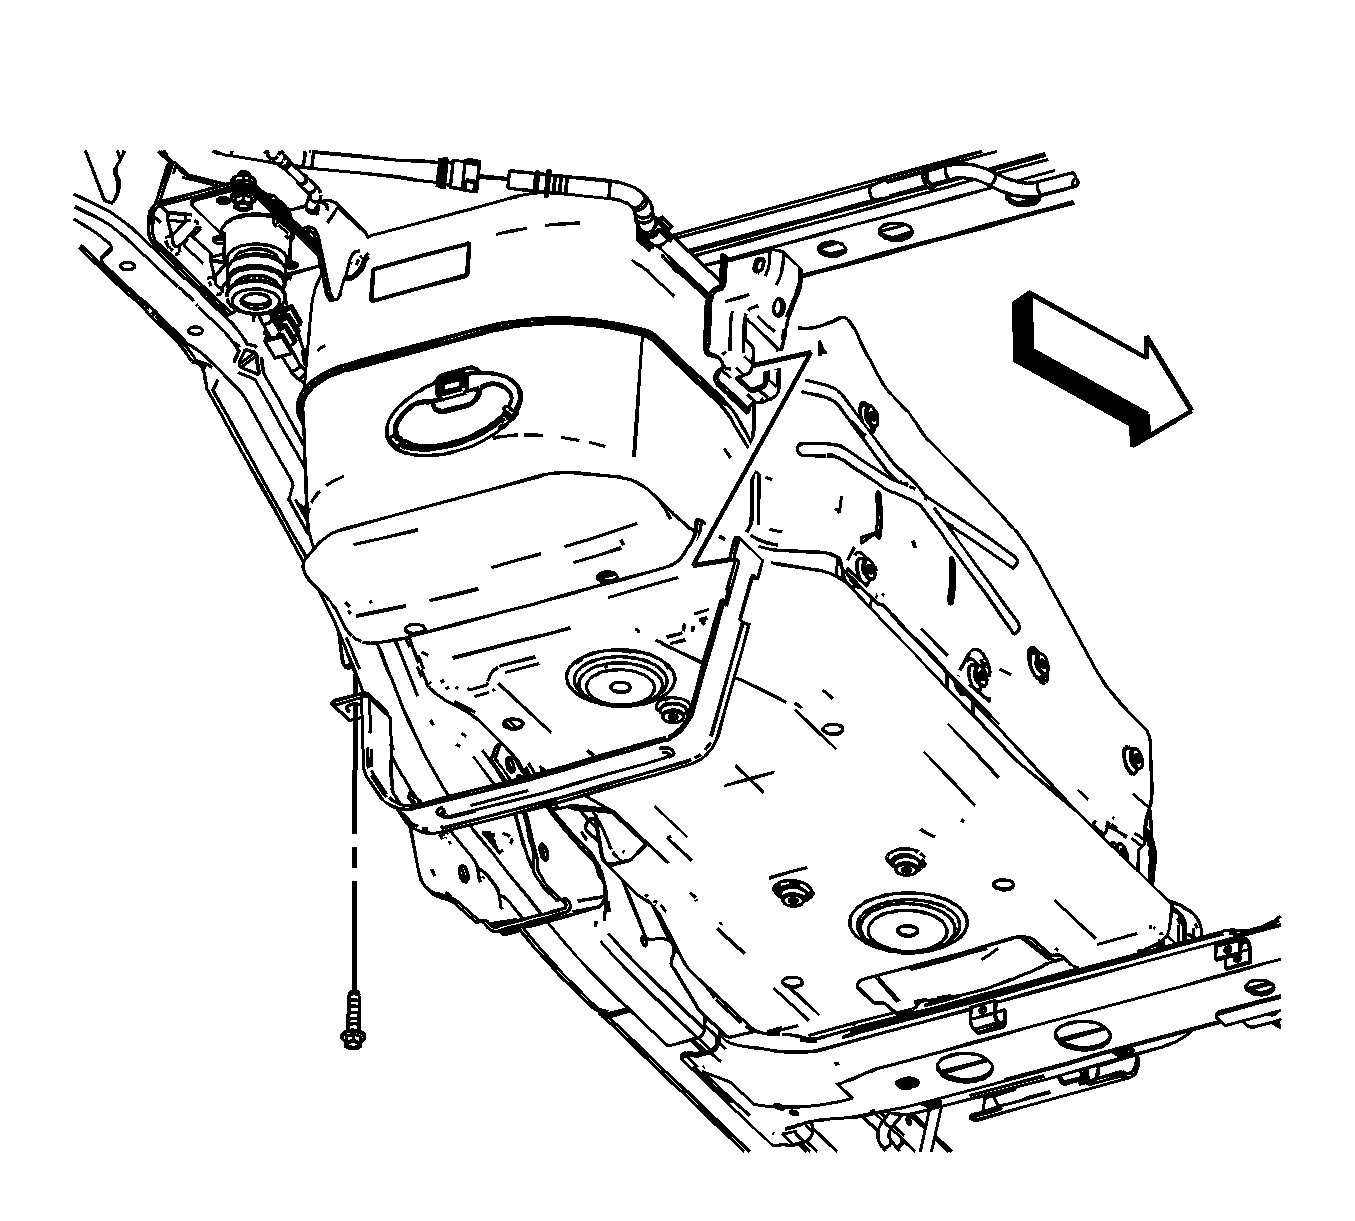
- Remove the lower
fuel tank strap bolt.
- Remove the lower fuel tank strap.
- With the aid of an assistant, carefully lower the fuel tank from the vehicle.
- Place the fuel tank in a suitable work area.
- If the fuel tank is not being replaced, go to the Installation Procedure.
Disassembly Procedure
- Remove the fuel filter. Refer to
Fuel Filter Replacement
.
- Refer to
Plastic Collar Quick Connect Fitting Service
in order to disconnect the following from the fuel tank module (2):
| • | The fuel return pipe (6) |
- Disconnect the EVAP pipes (3, 5) from the vent valve (4).
Refer to
Plastic Collar Quick Connect Fitting Service
.
- Disengage the following from the retaining clips (1):
| • | The fuel return pipe (6) |
- Disengage the EVAP pipe (5) from the retaining features molded
into the fuel tank.
- Remove the fuel tank module from the fuel tank. Refer to
Fuel Tank Module Replacement
.
Assembly Procedure
- Install the fuel tank module into the fuel tank. Refer to
Fuel Tank Module Replacement
.
- Secure the EVAP pipe (5) to the retaining features molded into the fuel
tank.
- Secure the following to the retaining clips (1):
| • | The fuel return pipe (6) |
- Connect the EVAP pipes (3, 5) to the vent valve (4).
Refer to
Plastic Collar Quick Connect Fitting Service
.
- Refer to
Plastic Collar Quick Connect Fitting Service
in order to connect the following to the fuel tank module (2):
| • | The fuel return pipe (6) |
- Install the fuel filter. Refer to
Fuel Filter Replacement
.
Installation Procedure
- With the aid of
an assistant, carefully position and support the fuel tank to the vehicle.
- Install the lower fuel tank strap.
- Install the lower fuel tank strap bolt.
Do not tighten at this time.
- Install the upper
fuel tank strap.
Notice: Refer to Fastener Notice in the Preface section.
- Install the upper fuel tank strap bolt.
Tighten
Tighten the fuel tank strap bolts to 32 N·m (24 lb ft).
- Refer to
Plastic Collar Quick Connect Fitting Service
in order to connect the following to the chassis bundle (2, 3):
| • | The fuel return hose (1) |
- Connect the middle of the EVAP vapor pipe (1, 3)
located between the fuel tank and the EVAP canister. Refer to
Plastic Collar Quick Connect Fitting Service
.
- Lower the vehicle only enough to gain access the fuel tank through the
wheelhouse.
- Connect the following electrical connectors to the fuel
tank:
| • | The fuel tank pressure sensor (2) |
| • | The fuel tank module (3) |
- Secure the fuel tank wiring harness to the retainer (5) on the
fuel tank.
- Connect the fuel filler hose (4) to the fuel tank (3).
Tighten
Tighten the fuel filler hose clamp to 2.5 N·m (22 lb in).
- Connect the EVAP hose (2) to the filler vent tube (1). Refer
to
Plastic Collar Quick Connect Fitting Service
.
- Install the left pickup box wheelhouse liner. Refer to
Pickup Box Wheelhouse Liner Replacement
in Body Rear End.
- Lower the vehicle.
- Refill the fuel tank.
- Install the fuel filler cap.
- Inspect for leaks.
| 17.1. | Turn ON the ignition, with the engine OFF for 10 seconds. |
| 17.2. | Turn OFF the ignition for 10 seconds. |
| 17.3. | Turn ON the ignition, with the engine OFF. |
| 17.4. | Inspect for fuel leaks. |
