Steering Column Replacement Electronic Power Steering
Important: Remove the steering column only if:
| • | The steering column requires replacement. |
| • | The steering and the ignition lock housing require replacement. |
| • | Another operation requires the removal of the steering column. |
Removal Procedure
- Turn the steering wheel to the straight-ahead position.
- Remove the following components. Refer to
Ignition and Start Switch Replacement.
| 2.1. | The steering wheel inflatable restraint module |
| 2.3. | The hood primary latch release cable handle |
| 2.4. | The driver knee bolster |
| 2.5. | The steering column lower trim cover |
| 2.6. | The steering column upper trim cover |
| 2.7. | The inflatable restraint steering wheel module coil |
| 2.8. | The turn signal multifunction switch |
| 2.9. | The windshield wiper and washer switch |
| 2.10. | The turn signal switch bracket. |
| 2.11. | The ignition and start switch housing |
- Remove the driver knee bolster reinforcement. Refer to
Driver Knee Bolster Reinforcement Replacement.
- Disconnect any electrical connectors as needed.
- Remove the ignition lock cylinder. Refer to
Ignition Lock Cylinder Replacement.
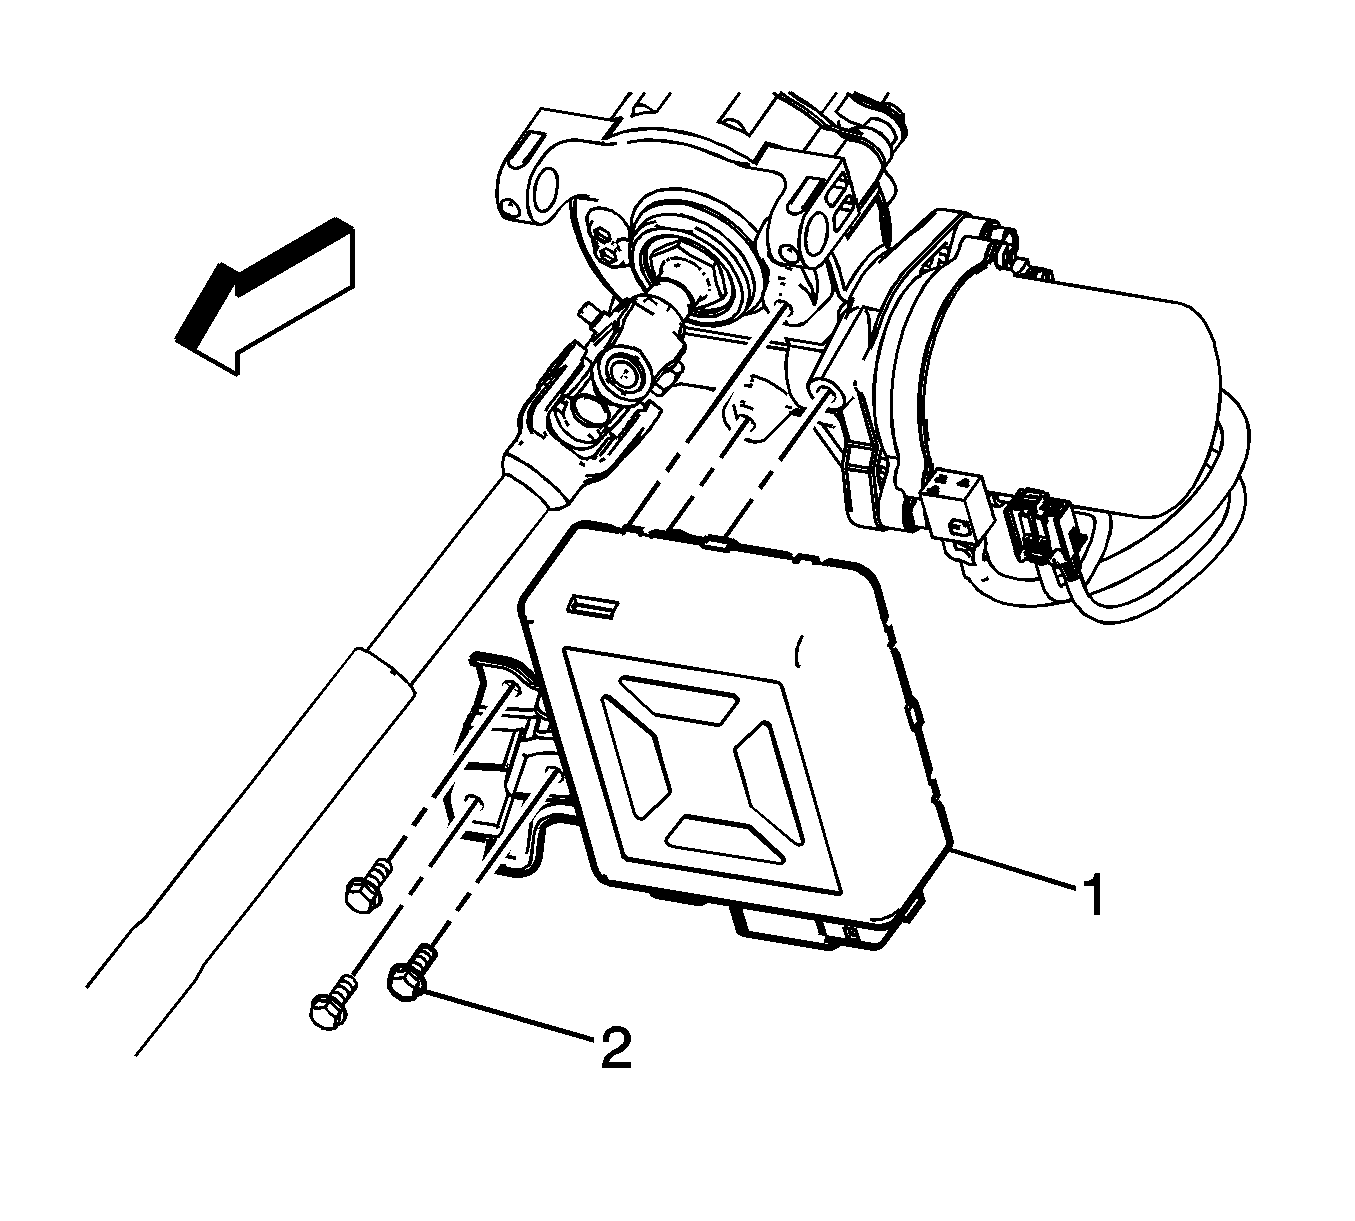
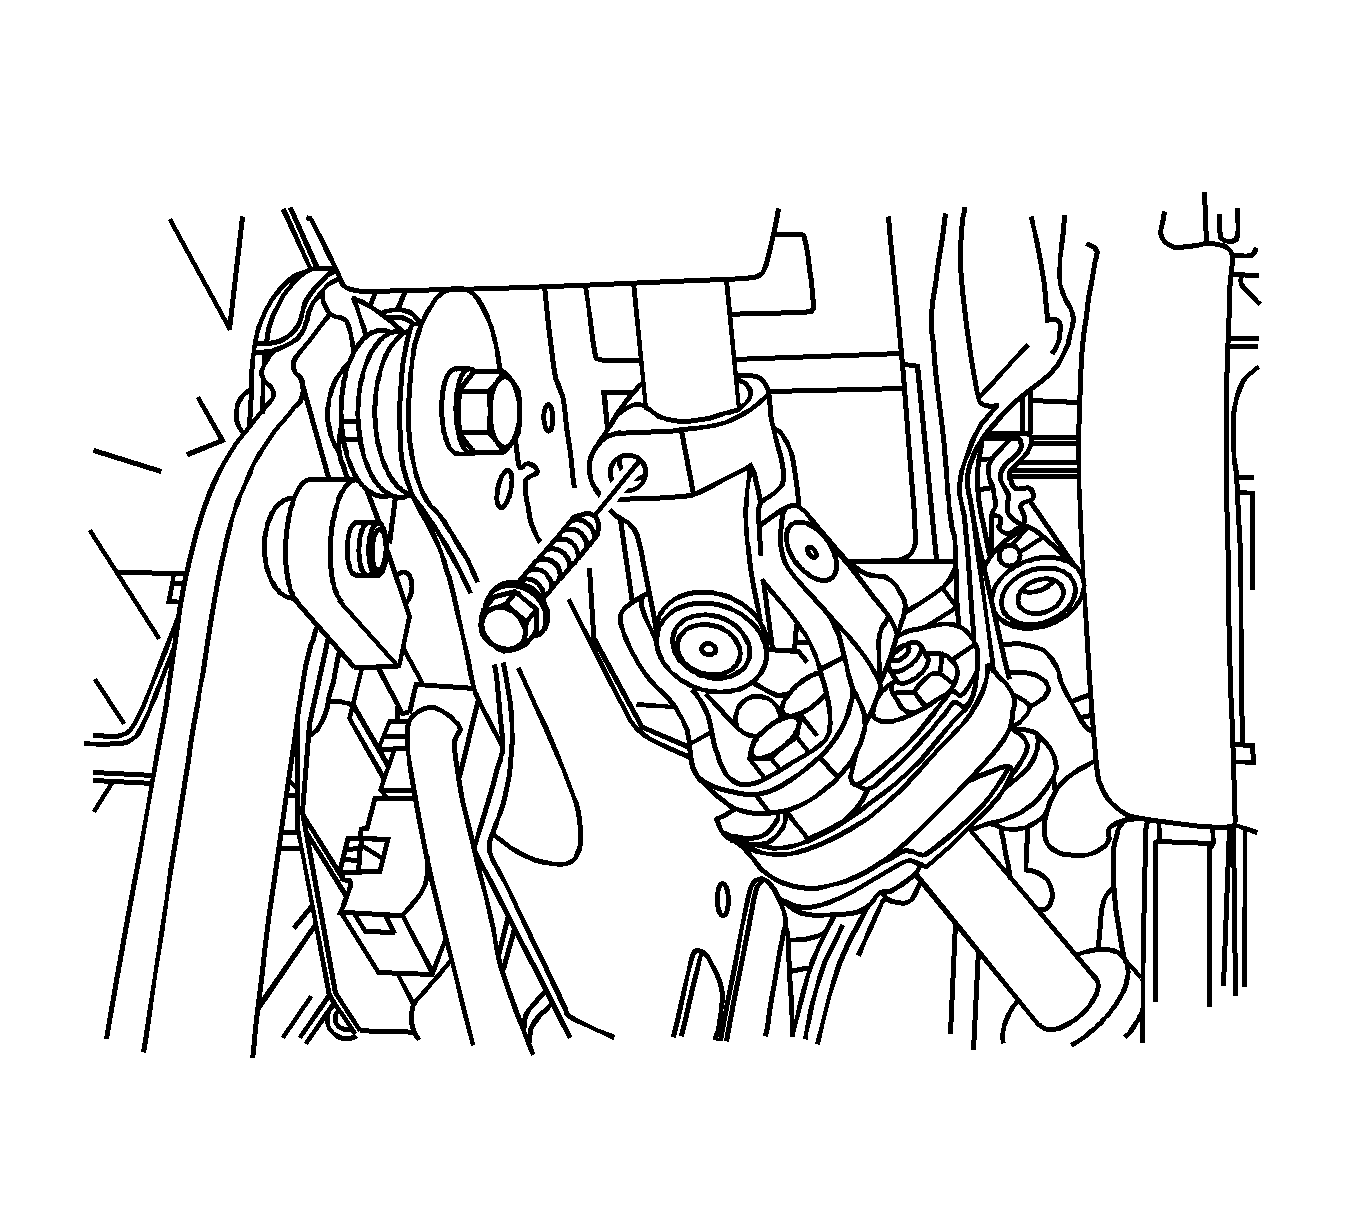
- Remove the 3 electronic power steering motor control module bracket bolts (2) and the electronic power steering motor
control module bracket assembly (1).
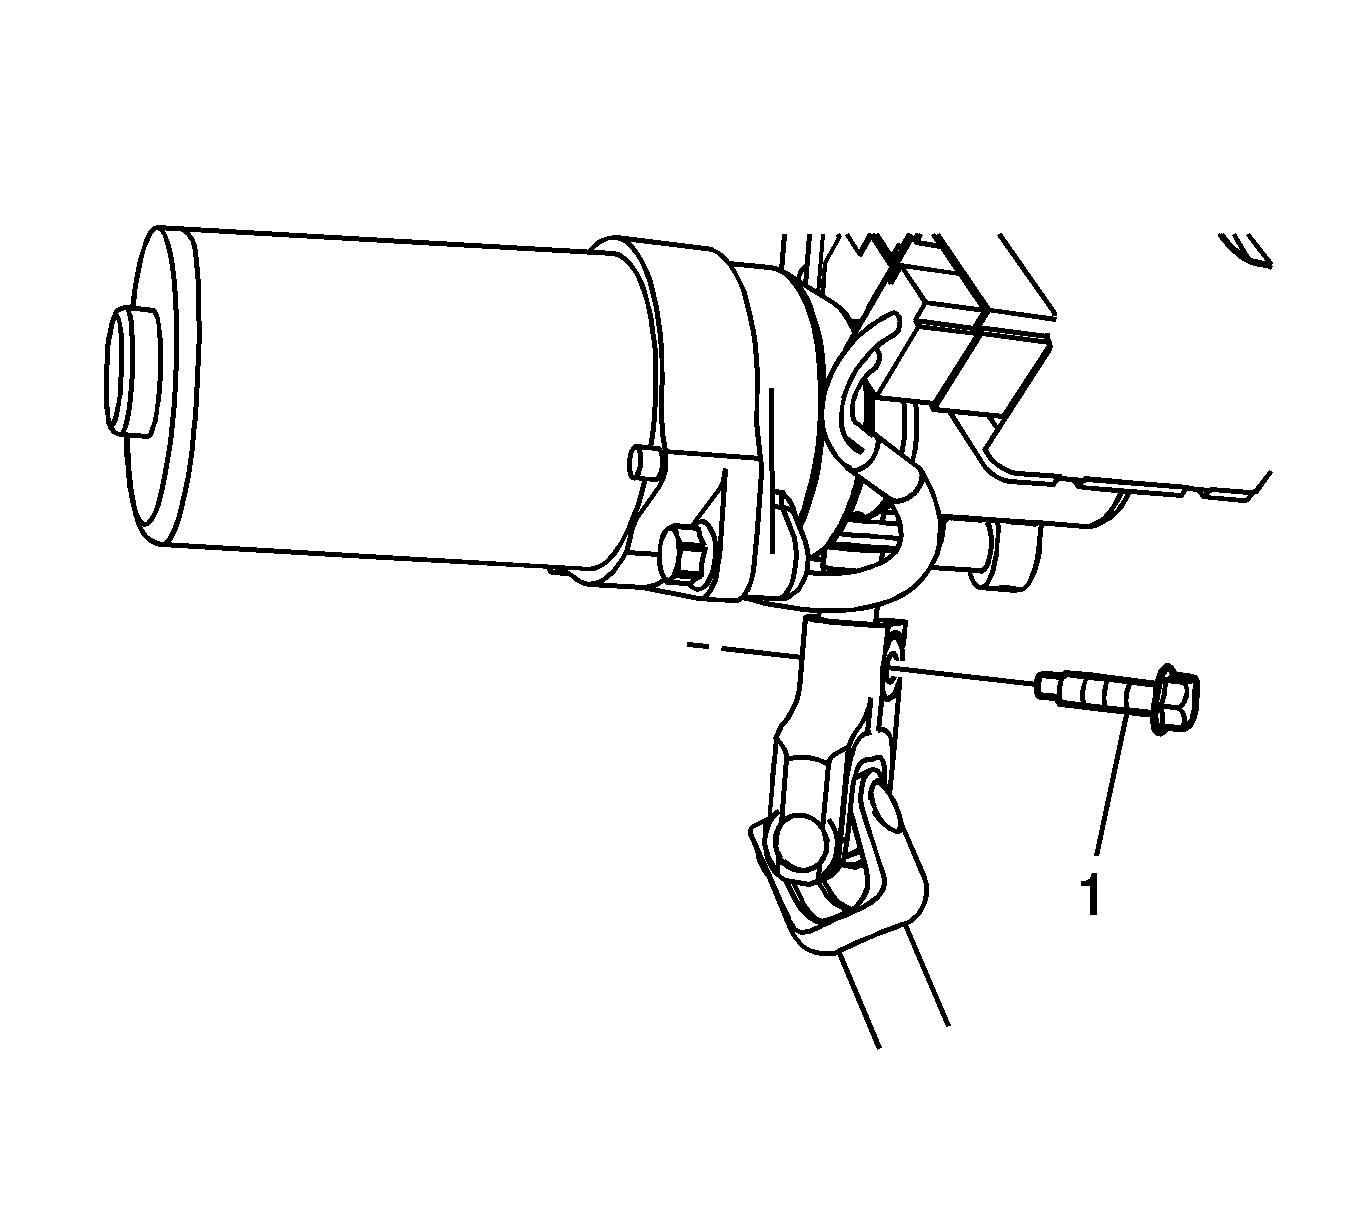
- Use paint in order place match marks on the steering shaft coupling and on the lower portion of the steering column shaft.
- Remove the steering shaft coupling bolt (1).
Discard the bolt.
- Separate the steering shaft coupling from the steering column shaft.
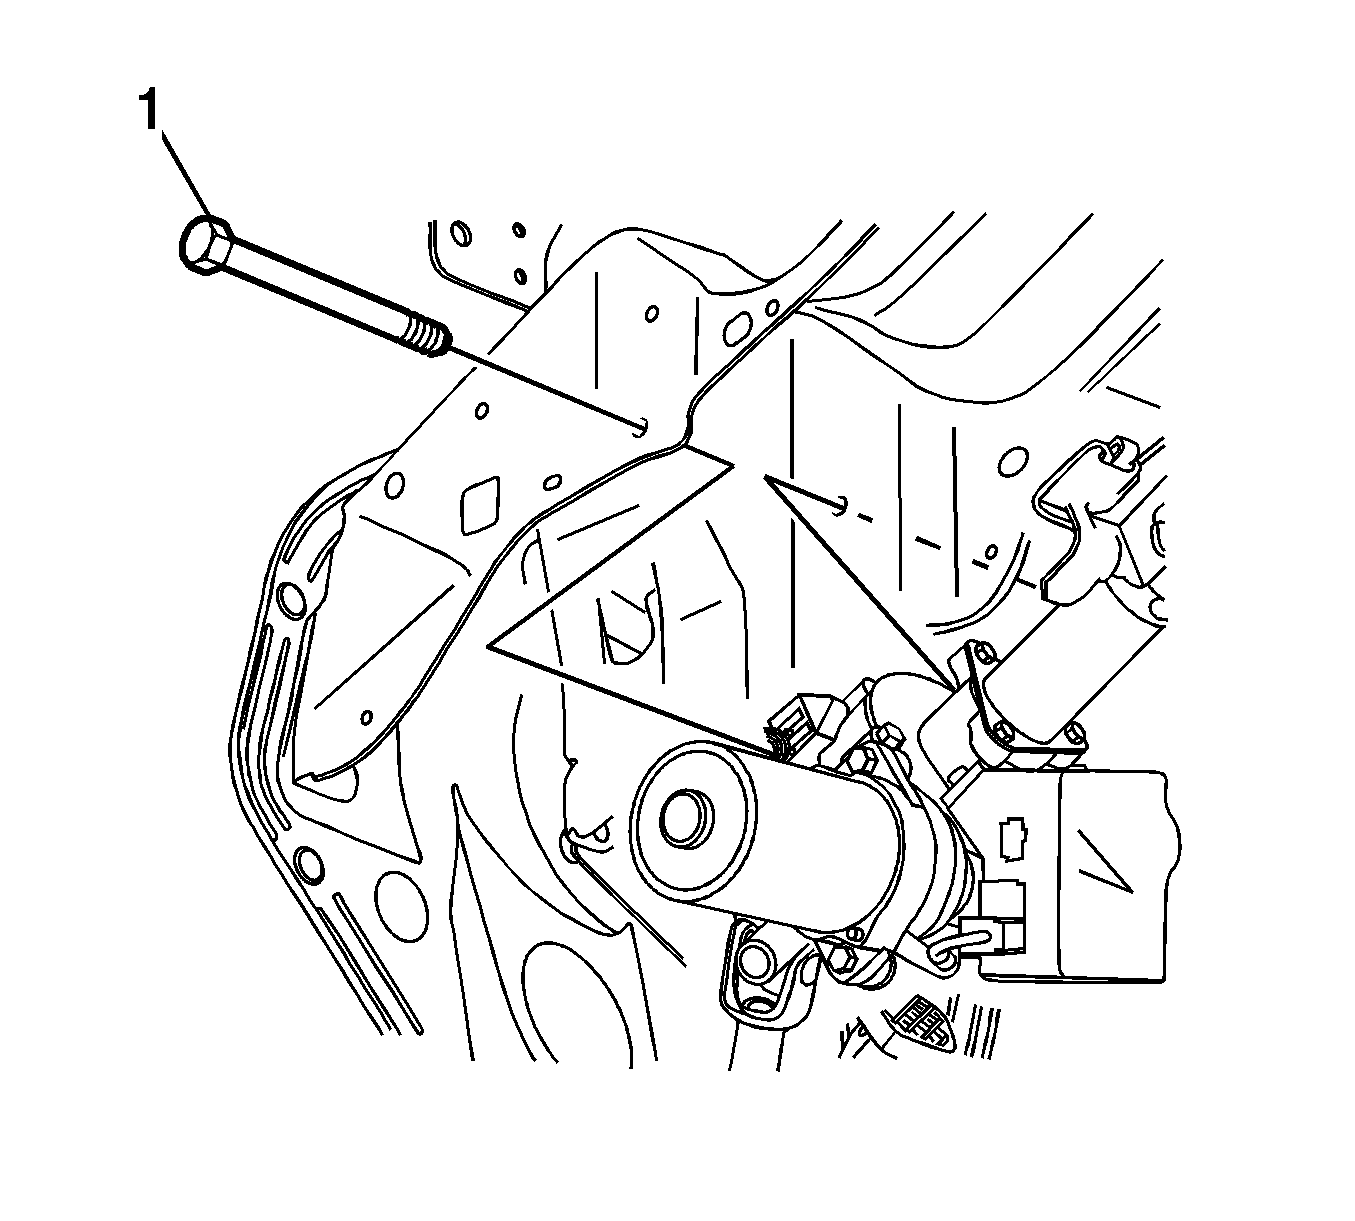
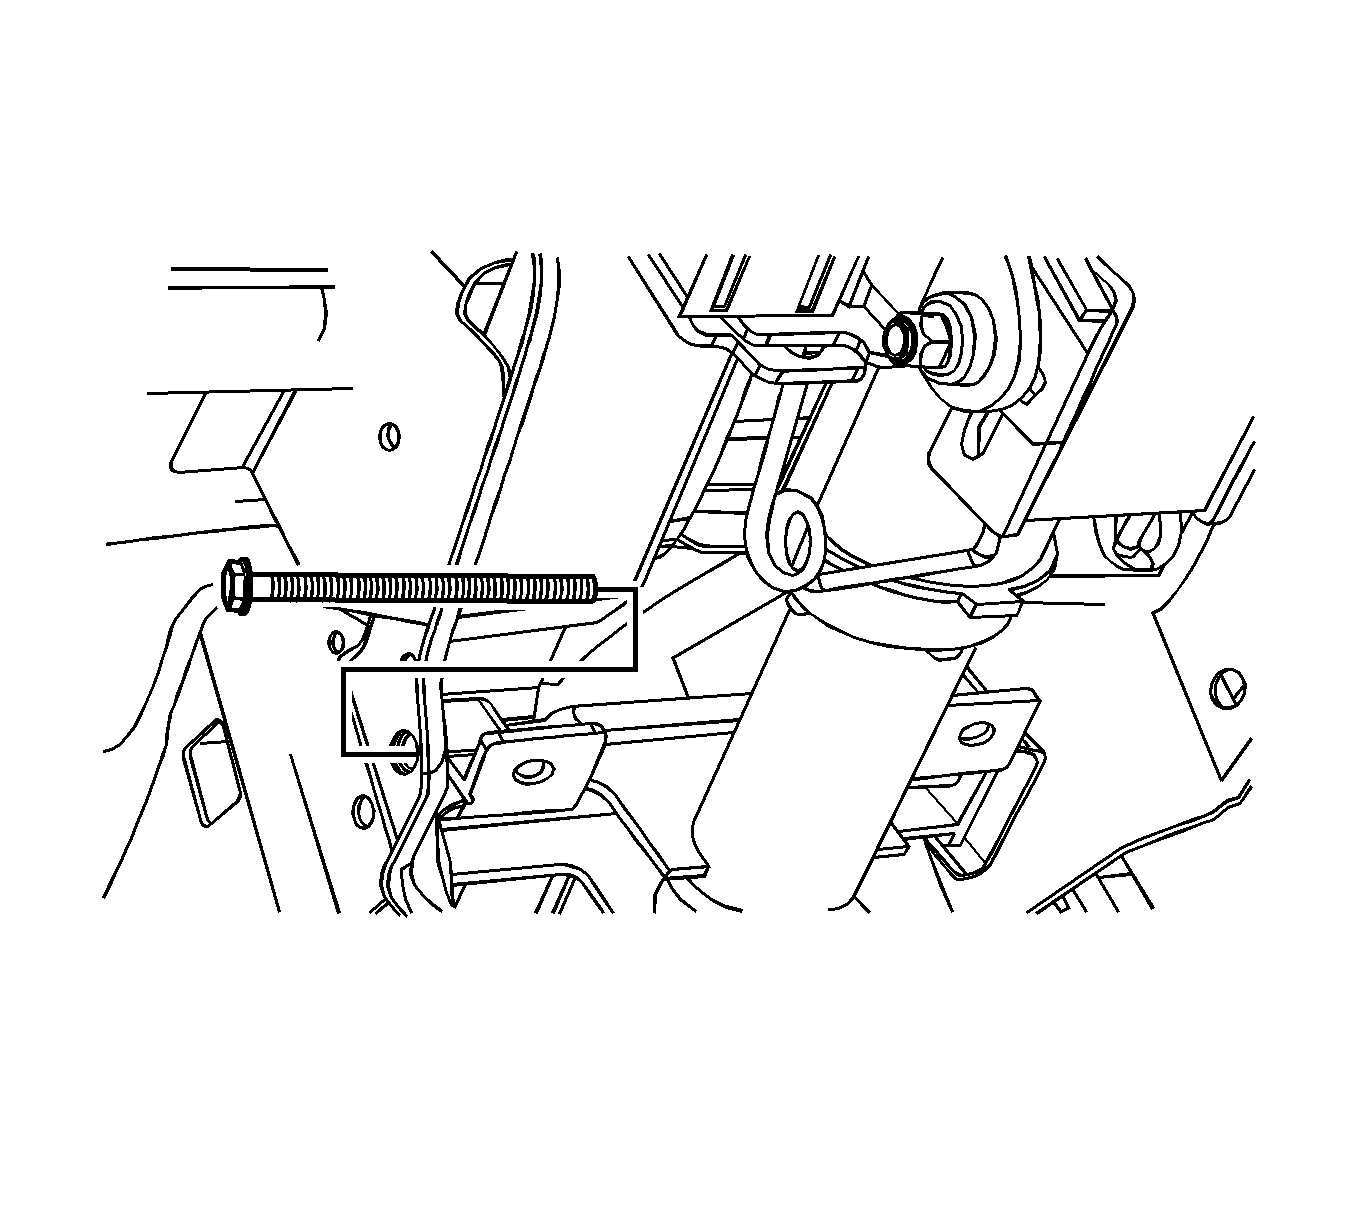
- Remove the steering column lower support bracket bolt (1).
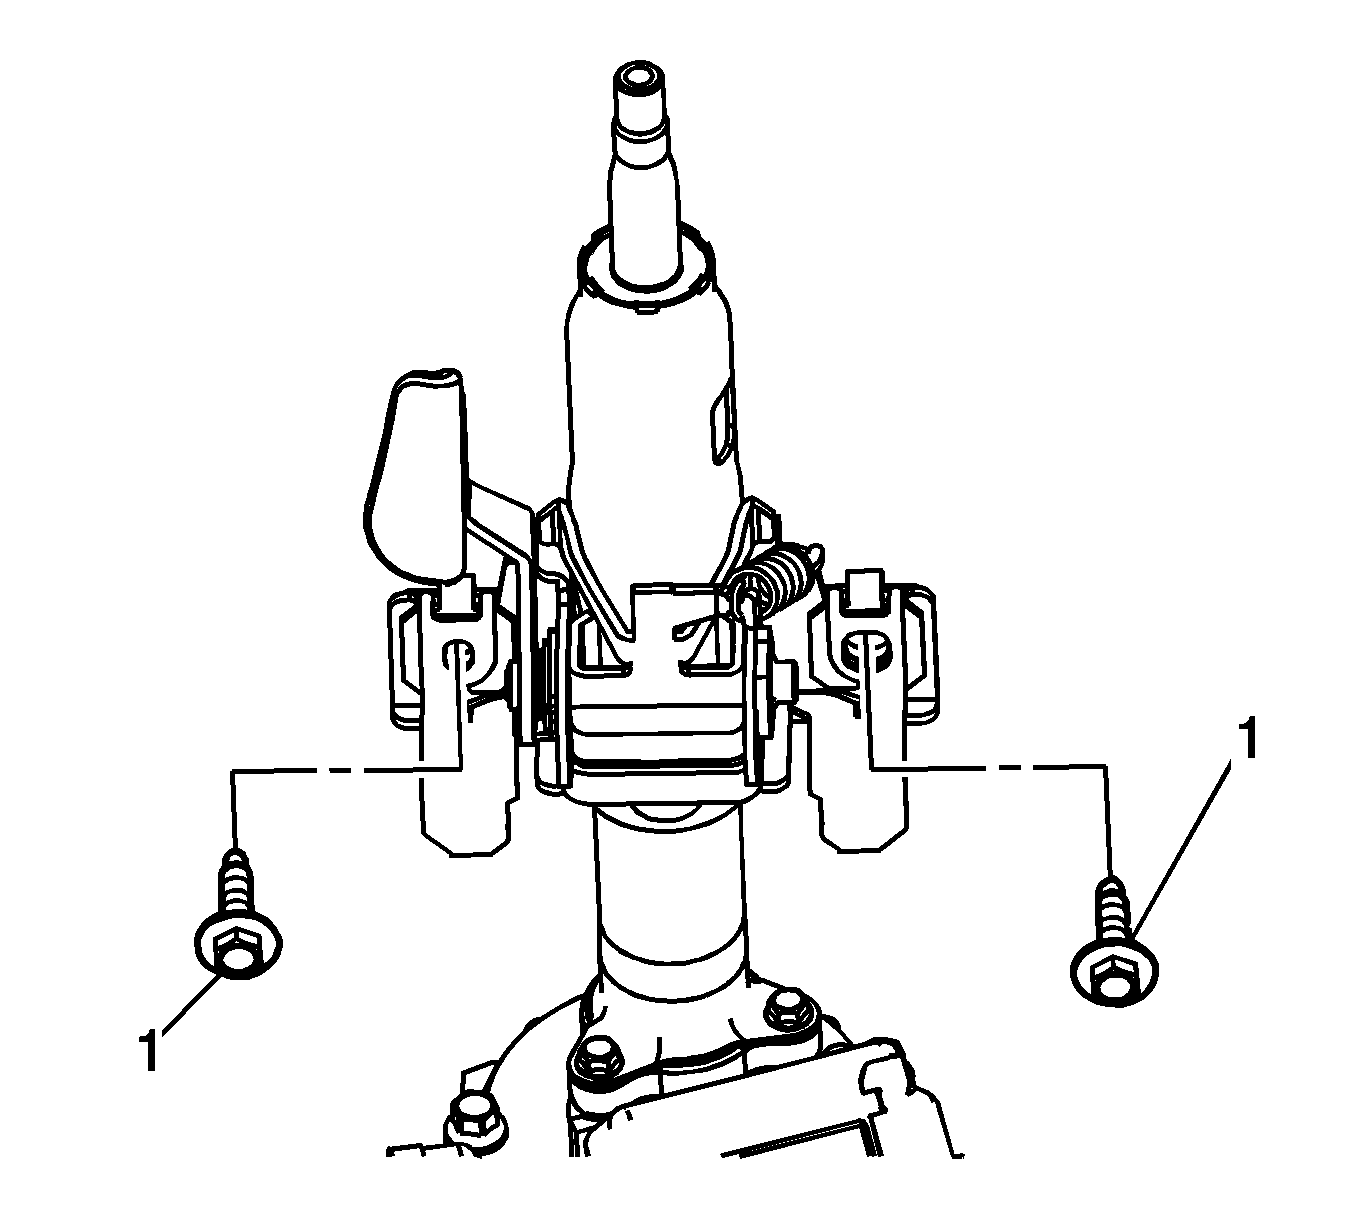
- Remove the steering column upper support bracket bolts (1).
- Remove the steering column from the vehicle.
Installation Procedure
- Verify the front tires are in the straight-ahead position.
- If you are replacing the steering column, copy the match marks from the old column to the new column and transfer any parts as necessary.
- Position the steering column in the vehicle.
Important: Provide support for the steering column assembly until the mounting bolts are fastened. Do not let the steering column assembly hang unsupported.
- Align the match marks and carefully guide the steering shaft coupling onto the steering column shaft.
Notice: Refer to Fastener Notice in the Preface section.
- Install a NEW steering shaft coupling bolt (1).
Tighten
Tighten the steering shaft coupling bolt to 34 N·m (25 lb ft).
Important: Hand tighten all steering column support bracket bolts before tightening the bolts to the specifications.
- Install the steering column upper support bracket bolts (1).
Tighten
Tighten the steering column upper support bracket bolts to 25 N·m (18 lb ft)
- Install the steering column lower support bracket bolt (1).
Tighten
Tighten the steering column lower support bracket bolt to 25 N·m (18 lb ft)
- Install the electronic power steering motor control module bracket assembly (1) and the 3 electronic power steering
motor control module bracket bolts (1).
Tighten
Tighten the bolts to 11.5 N·m (102 lb in).
- Install the ignition lock cylinder. Refer to
Ignition Lock Cylinder Replacement.
- Connect the electrical connectors as necessary.
- Install the driver knee bolster reinforcement. Refer to
Driver Knee Bolster Reinforcement Replacement.
- Center the inflatable restraint module coil. Refer to
Inflatable Restraint Steering Wheel Module Coil Centering.
- Install the following components. Refer to
Ignition and Start Switch Replacement.
| 13.1. | The ignition and start switch housing |
| 13.2. | The turn signal switch bracket. |
| 13.3. | The windshield wiper and washer switch |
| 13.4. | The turn signal multifunction switch |
| 13.5. | The inflatable restraint steering wheel module coil |
| 13.6. | The steering column upper trim cover |
| 13.7. | The steering column lower trim cover |
| 13.8. | The driver knee bolster |
| 13.9. | The hood primary latch release cable handle |
| 13.10. | The steering wheel |
| 13.11. | The steering wheel inflatable restraint module |
Important: If you are installing a NEW EPS column, use the Saturn Service Stall (SSS) in order to program the EPS controller on the column.
- Refer to
Control Module References for programming and setup information.
Steering Column Replacement Hydraulic Power Steering
Important: Remove the steering column only if:
| • | The steering column requires replacement. |
| • | The steering and the ignition lock housing require replacement. |
| • | Another operation requires the removal of the steering column. |
Removal Procedure
- Turn the steering wheel to the straight-ahead position.
- Remove the following components. Refer to
Steering Column Upper Trim Cover Replacement.
| 2.1. | The steering wheel inflatable restraint module |
| 2.3. | The hood primary latch release cable handle |
| 2.4. | The driver knee bolster |
| 2.5. | The steering column lower trim cover |
| 2.6. | The steering column upper trim cover |
- Remove the driver knee bolster reinforcement. Refer to
Driver Knee Bolster Reinforcement Replacement.
- Disconnect the electrical connectors as necessary.
- Remove the turn signal and headlamp switch. Refer to
Turn Signal Multifunction Switch Replacement.
- Remove the windshield wiper and washer switch. Refer to
Windshield Wiper and Washer Switch Replacement.
- Remove the steering wheel inflatable restraint module coil. Refer to
Steering Wheel Inflatable Restraint Module Coil Replacement.
- Remove the ignition lock cylinder. Refer to
Ignition Lock Cylinder Replacement.
- Use paint in order place match marks on the steering shaft coupling and on the lower portion of the steering column shaft.
- Remove the steering shaft coupling pinch bolt.
- Separate the steering shaft coupling from the steering column shaft.
- Remove the steering column assembly lower bracket bolt.
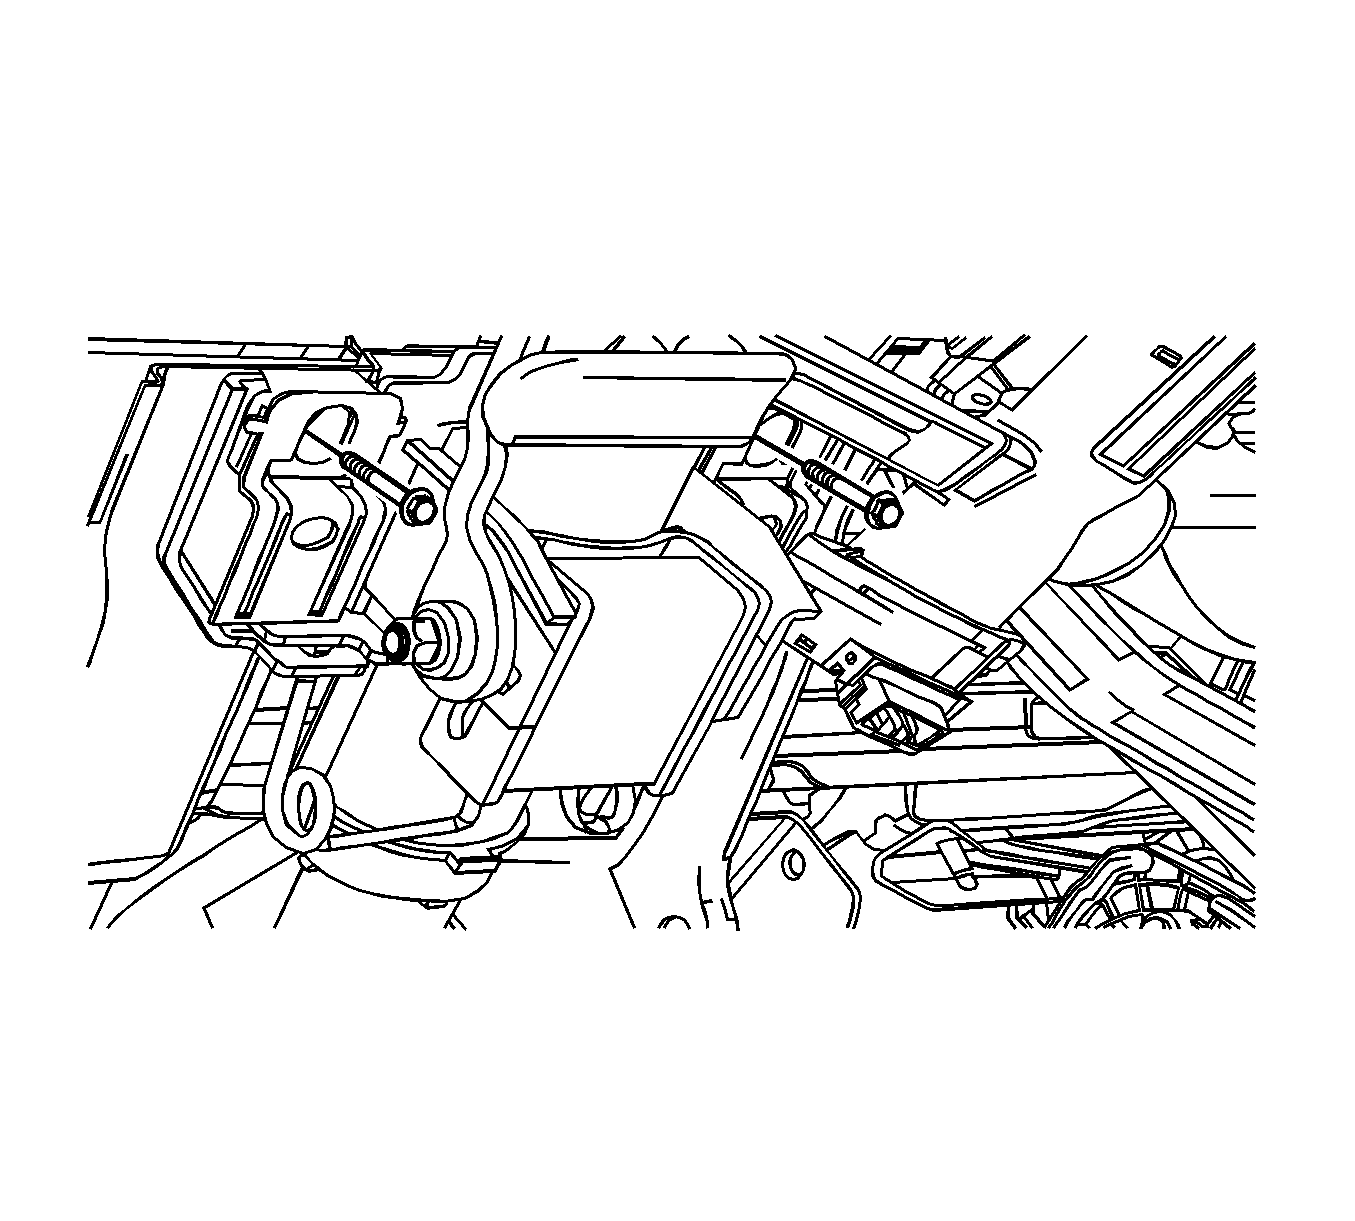
- Remove the steering column assembly upper bracket bolts.
Notice: Once the steering column is removed from the vehicle, the column is
extremely susceptible to damage. Dropping the column assembly on the end could
collapse the steering shaft or loosen the plastic injections, which maintain
column rigidity. Leaning on the column assembly could cause the jacket to
bend or deform. Any of the above damage could impair the columns collapsible
design. Do NOT hammer on the end of the shaft, because hammering could loosen
the plastic injections, which maintain column rigidity. If you need to remove
the steering wheel, refer to the Steering Wheel Replacement procedure in this
section.
- Remove the steering column assembly from the vehicle.
- Remove the steering angle sensor from the steering column shaft. Refer to
Steering Angle Sensor Replacement.
Installation Procedure
- Verify the front tires are in the straight-ahead position.
- If you are replacing the steering column, copy the match marks from the old column to the new column and transfer any parts as necessary.
- Install the steering angle sensor to the steering column shaft. Refer to
Steering Angle Sensor Replacement.
- Position the steering column in the vehicle.
Important: Provide support for the steering column assembly until the mounting bolts are fastened. Do not let the steering column assembly hang unsupported.
- Align the match marks and carefully guide the steering shaft coupling onto the steering column shaft.
Notice: Refer to Fastener Notice in the Preface section.
- Install the pinch bolt into the steering shaft coupling.
Tighten
Tighten the steering shaft coupling bolt to 30 N·m (22 lb ft).
Important: Hand tighten all steering column support bracket bolts before tightening the bolts to the specifications.
- Install the steering column assembly lower bracket bolt.
Tighten
Tighten the steering column assembly lower bracket bolt to 25 N·m (18 lb ft).
- Install the upper bracket bolts.
Tighten
Tighten the steering column assembly upper bracket bolts to 25 N·m (18 lb ft).
- Install the ignition lock cylinder. Refer to
Ignition Lock Cylinder Replacement.
- Center the inflatable restraint module coil. Refer to
Inflatable Restraint Steering Wheel Module Coil Centering.
- Install the inflatable restraint module coil. Refer to
Steering Wheel Inflatable Restraint Module Coil Replacement.
- Install the windshield wiper and washer switch. Refer to
Windshield Wiper and Washer Switch Replacement.
- Install the turn signal and headlamp switch. Refer to
Turn Signal Multifunction Switch Replacement.
- Connect the electrical connectors as necessary.
- Install the driver knee bolster reinforcement. Refer to
Driver Knee Bolster Reinforcement Replacement.
- Install the following components. Refer to
Steering Column Upper Trim Cover Replacement.
| 16.1. | The steering column upper trim cover |
| 16.2. | The steering column lower trim cover |
| 16.3. | The driver knee bolster |
| 16.4. | The hood primary latch release cable handle |
| 16.6. | The steering wheel inflatable restraint module |
- Perform the steering angle sensor centering procedure. Refer to
Steering Angle Sensor Centering.
