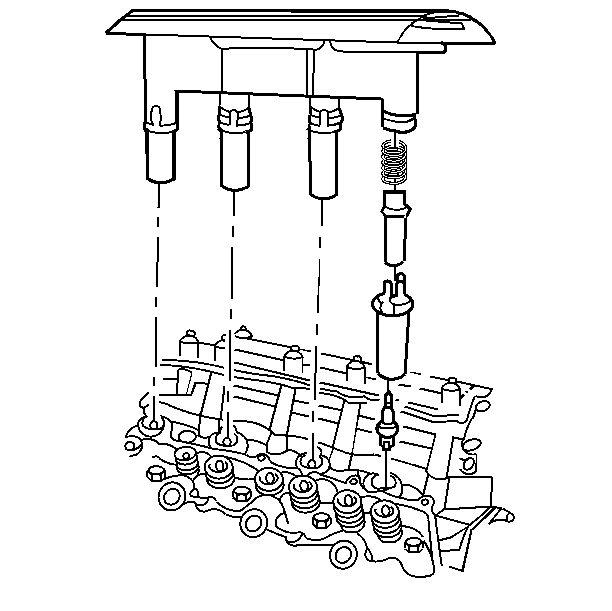
Spark Plug Replacement 2.4L
Tools Required
J 36011 Spark Plug Boot Insulator Remover
Notice: The recommended change interval for the platinum tip spark plugs is 100000 miles. If a spark plug is removed from the engine and there is no malfunction associated with the plug, reinstall the old plug in the engine.
Notice: This engine has aluminum cylinder heads. Do not remove the spark plugs from a hot engine, allow it to cool first. Removing the spark plugs from a hot engine may cause spark plug thread damage or cylinder head damage.
Removal Procedure
- Turn OFF the ignition.
- Remove 4 bolts and the connector from the electronic ignition module assembly.
- Pull straight up on the module assembly housing. Remove the module assembly.
- Use the J 36011 in order to remove any connector assemblies stuck to the spark plugs.
- Remove debris from the area around the spark plugs.
- Remove the spark plugs using a spark plug socket.

Use the J 36011 by first twisting and then pulling up on the connector assembly.
Installation Procedure
- Adjust the spark plug gap using a round wire type spark plug gap gauge.
- Hand start the spark plugs into the cylinder head, then tighten the plugs.
- Apply dielectric lubricant GM P/N 12345579 or equivalent to the insulator boots.
- Reinstall onto the module assembly any spark plug boot connector assembly that stuck to a spark plug. Verify that the spring terminal is inside the boot.
- Place the module assembly directly over the spark plugs. Push straight down.
- Remove any lubricant that is present on the module-assembly-to-cam-housing bolts.
- Apply threadlocker GM P/N 12345382 or equivalent onto the module-assembly-to-cam-housing bolts.
- Install the bolts.
- Connect the electrical connector.

Important: While gapping the plug, ensure that the platinum pads remain aligned. Failure to keep the pads aligned will shorten the plug life.
Gap
| • | For 2.4L - Allow a gap of 1.27 mm (0.050 in). |
| • | For 3.4L - Allow a gap of 1.52 mm (0.060 in). |
Notice: Use the correct fastener in the correct location. Replacement fasteners must be the correct part number for that application. Fasteners requiring replacement or fasteners requiring the use of thread locking compound or sealant are identified in the service procedure. Do not use paints, lubricants, or corrosion inhibitors on fasteners or fastener joint surfaces unless specified. These coatings affect fastener torque and joint clamping force and may damage the fastener. Use the correct tightening sequence and specifications when installing fasteners in order to avoid damage to parts and systems.
Tighten
Tighten the spark plugs to 18 N·m (13 lb ft).
Important: Hand start the module-assembly-to-cam-housing bolts.
Tighten
Tighten the bolts to 22 N·m (16 lb ft).
Spark Plug Replacement 3.4L
Notice: The recommended change interval for the platinum tip spark plugs is 100000 miles. If a spark plug is removed from the engine and there is no malfunction associated with the plug, reinstall the old plug in the engine.
Notice: This engine has aluminum cylinder heads. Do not remove the spark plugs from a hot engine, allow it to cool first. Removing the spark plugs from a hot engine may cause spark plug thread damage or cylinder head damage.
Removal Procedure
- Turn OFF the ignition.
- Remove debris from the area around the spark plug holes.
- Disconnect the spark plug wires. Refer to Spark Plug Wire Harness Replacement .
- Remove the spark plugs using a spark plug socket.
Notice: Pull on the spark plug boot, the heat shield or use an approved spark plug boot removal tool, twisting a half-turn to release the seal while removing. Do not pull on the spark plug wire or it may be damaged.
Installation Procedure
Specification
Spark Plug Gap 1.52mm.(.060in.)
- Adjust the spark plug gap using a round wire type spark plug gap gauge.
- Hand start the spark plugs into the cylinder head, then tighten the plugs.
- Apply dielectric lubricant GM P/N 12345579 to the insulator boots.
- Istall the spark plug wires. Refer to Spark Plug Wire Harness Replacement In Engine Electrical
Important: While gapping the plug, ensure that the platinum pads remain aligned. Failure to keep the pads aligned will shorten the plug life.
Notice: Use the correct fastener in the correct location. Replacement fasteners must be the correct part number for that application. Fasteners requiring replacement or fasteners requiring the use of thread locking compound or sealant are identified in the service procedure. Do not use paints, lubricants, or corrosion inhibitors on fasteners or fastener joint surfaces unless specified. These coatings affect fastener torque and joint clamping force and may damage the fastener. Use the correct tightening sequence and specifications when installing fasteners in order to avoid damage to parts and systems.
Tighten
Tighten the spark plugs to 20 N·m (15 lb ft).
