System Description
An ignition voltage circuit and a ground circuit are supplied to the fuel pump control module. When the ignition switch is in the ON position, the fuel pump control module turns ON the fuel pump to full power within 24 ms. This facilitates rapid fuel prime for 500 ms. The engine control module (ECM) supplies a pulse width modulated (PWM) signal to the fuel pump control module on the fuel pump control circuit. The fuel pump control module varies the voltage to the fuel pump based on the signal from the ECM. If the fuel pump control module receives no fuel pump control signal from the ECM within 500 ms, the fuel pump control module will turn OFF output to the fuel pump.
At idle speed, the fuel pump control module sets the voltage potential to the fuel pump to 9.5 volts. This reduces fuel pump noise and the vehicle system power requirements. When higher fuel volume is required, such as engine operation above idle, the fuel pump control module increases the voltage potential to the fuel pump to battery voltage.
The fuel pump control module also supplies the fuel pump supply voltage circuit and the fuel pump motor low reference circuit, which allows for enhanced fuel pump diagnostics. Therefore, the fuel pump control module is capable of diagnosing itself, the fuel pump control circuit, and the fuel pump performance. The diagnostic information is communicated from the fuel pump control module to the ECM through the fuel pump diagnostic signal circuit.
The fuel system is a returnless on-demand design. The fuel pressure regulator is a part of the fuel tank module, eliminating the need for a return pipe from the engine. A returnless fuel system reduces the internal temperature of the fuel tank by not returning hot fuel from the engine to the fuel tank. Reducing the internal temperature of the fuel tank results in lower evaporative emissions.
Two fuel tanks store the fuel supply. An electric turbine style fuel pump attaches to the fuel tank module inside the left fuel tank. The fuel pump supplies high pressure fuel through the fuel filter and the fuel feed pipe to the fuel injection system. The fuel pump provides fuel at a higher rate of flow than is needed by the fuel injection system. The fuel pump also supplies fuel to a Venturi pump located on the bottom of the left fuel tank module. The function of the Venturi pump is to fill the left fuel tank module reservoir. The primary fuel pressure regulator, a part of the left fuel tank module, maintains the correct fuel pressure to the fuel injection system. The left fuel tank module contains a reverse flow check valve. The check valve, the primary fuel pressure regulator, and the secondary fuel pressure regulator maintain fuel pressure in the fuel feed pipe and the fuel rail in order to prevent long cranking times.
The fuel pump also supplies a small amount of pressurized fuel through the auxiliary fuel feed pipe to the siphon jet pump inside the right fuel tank. The pressurized fuel creates a Venturi action inside the siphon jet pump. The Venturi action causes the fuel to be drawn out of the right fuel tank. The fuel transfers from the right fuel tank to the left fuel tank through the auxiliary fuel return pipe. The auxiliary fuel return pipe inside the left fuel tank contains an anti-siphon hole in order to prevent fuel from siphoning from the left fuel tank into the right fuel tank. Both the auxiliary fuel feed pipe and the auxiliary fuel return pipe are located inside the convoluted stainless steel crossover hose.
The right fuel tank module contains a secondary fuel pressure regulator. The secondary fuel pressure regulator has a lower set point than the primary regulator in order to allow fuel to flow to the siphon jet pump on the right fuel tank module. When the engine is shut off, the pressure in the feed pipes immediately drops to the secondary regulator set point. This prevents the siphon jet pump from operating and in turn prevents the equalization of the left and right fuel tanks. The secondary fuel pressure regulator maintains fuel pressure in the auxiliary fuel feed pipe which reduces the time to prime the siphon jet pump. The pressurization also reduces fuel vaporization and boiling in the auxiliary fuel feed pipe.
Step | Action | Value(s) | Yes | No | ||||
|---|---|---|---|---|---|---|---|---|
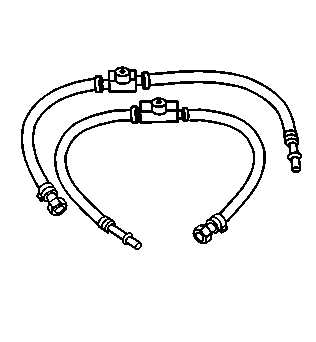
Schematic Reference: Fuel Hose/Pipes Routing Diagram | ||||||||
1 | Did you perform the Diagnostic System Check-Vehicle? | -- | Go to Step 2 | Go to Diagnostic System Check - Vehicle in Vehicle DTC Information | ||||
2 | Observe the Fuel Level Sensor Left and Right parameters with a scan tool. Is the Fuel Level Sensor Left parameter less than the specified value? | 0.8 V | Go to Step 3 | Go to Step 4 | ||||
3 |
Important: Venting of fuel vapors during refueling is done through the fill limiter vent valve (FLVV) located on the right fuel tank. The fuel system may be difficult to fill if the Fuel Level Sensor Right parameter is more than 2.3 volts, indicating that the right fuel tank is full. The addition of fuel may be easier when done at a slow rate with a portable gasoline container. Add the specified amount of fuel. Did you complete the action? | 15 L (4 gal) | Go to Step 4 | -- | ||||
4 |
Important: The engine coolant temperature must be below the operating temperature in order to avoid irregular fuel pressure readings due to hot soak fuel boiling. Important: The fuel pump may need to be commanded ON a few times in order to obtain the highest possible fuel pressure. Is the fuel pressure within the specified value? | 380-427 kPa (55-62 psi) | Go to Step 5 | Go to Step 12 | ||||
5 |
Important: The fuel pressure will decrease when the fuel pump stops operating. After the fuel pump stops operating, the fuel pressure should stabilize and remain constant. Observe the J 34730-1A for 5 minutes. Does the fuel pressure decrease to less than the specified value? | 350 kPa (51 psi) | Go to Step 11 | Go to Step 6 | ||||
6 | Observe the Fuel Level Sensor Right parameter. Is the Fuel Level Sensor Right parameter less than the specified value? | 1 V | Go to Step 7 | Go to Step 9 | ||||
7 | Fill the fuel system until the Fuel Level Sensor Right parameter is more than the specified value. Did you complete the action? | 1 V | Go to Step 8 | -- | ||||
8 | Drain the left fuel tank until the Fuel Level Sensor Left parameter is less than the specified value. Refer to Fuel Tank Draining . Did you complete the action? | 1.5 V | Go to Step 9 | -- | ||||
9 |
Does the Fuel Level Sensor Right parameter decrease while the Fuel Level Sensor Left parameter increases? | -- | Go to Step 10 | Go to Step 15 | ||||
10 |
Do the scan tool parameters indicate a lean condition? | -- | Go to Step 13 | |||||
11 |
Does the fuel pressure remain constant? | -- | Go to Step 21 | Go to Step 28 | ||||
12 | Is the fuel pressure more than the specified value? | 427 kPa (62 psi) | Go to Step 29 | Go to Step 13 | ||||
13 | Inspect the following components for a restriction:
Did you find and correct the condition? | -- | Go to Step 32 | Go to Step 14 | ||||
14 | Inspect the harness connectors, the circuits of the fuel pump, and the fuel pump control module for high resistance. Refer to Circuit Testing in Wiring Systems. Did you find and correct the condition? | -- | Go to Step 32 | Go to Step 21 | ||||
15 |
Did you find and correct the condition? | -- | Go to Step 32 | Go to Step 16 | ||||
16 |
Does the flow meter indicate a leak? | -- | Go to Step 31 | Go to Step 17 | ||||
17 |
Does the flow meter indicate a leak? | -- | Go to Step 31 | Go to Step 18 | ||||
18 | Inspect for damaged O-rings at the crossover hose to fuel tank connections. Did you find and correct the condition? | -- | Go to Step 32 | Go to Step 19 | ||||
19 |
Does the flow meter indicate a leak? | -- | Go to Step 26 | Go to Step 20 | ||||
20 |
Does the flow meter indicate a leak? | -- | Go to Step 27 | Go to Step 30 | ||||
21 |
Does the flow meter indicate a leak? | -- | Go to Step 31 | Go to Step 22 | ||||
22 |
Does the flow meter indicate a leak? | -- | Go to Step 31 | Go to Step 23 | ||||
23 | Inspect for damaged O-rings at the crossover hose to fuel tank connections. Did you find and correct the condition? | -- | Go to Step 32 | Go to Step 24 | ||||
24 |
Does the flow meter indicate a leak? | -- | Go to Step 27 | Go to Step 25 | ||||
25 |
Does the flow meter indicate a leak? | -- | Go to Step 26 | Go to Step 29 | ||||
26 |
Did you find and correct the condition? | -- | Go to Step 32 | Go to Step 29 | ||||
27 |
Did you find and correct the condition? | -- | Go to Step 32 | Go to Step 30 | ||||
28 |
Did you complete the replacement? | -- | Go to Step 32 | -- | ||||
29 | Replace the left fuel tank module. Refer to Fuel Tank Fuel Pump Module Replacement - Left Side . Did you complete the replacement? | -- | Go to Step 32 | -- | ||||
30 | Replace the right fuel tank module. Refer to Fuel Tank Fuel Pump Module Replacement - Right Side . Did you complete the replacement? | -- | Go to Step 32 | -- | ||||
31 | Replace the fuel tank crossover tube/hose. Refer to Fuel Tank Crossover Tube Replacement . Did you complete the replacement? | -- | Go to Step 32 | -- | ||||
32 | Operate the system in order to verify the repair. Did you correct the condition? | -- | System OK | Go to Step 4 | ||||
