Console Replacement w/o UV8
Removal Procedure
Caution: Refer to SIR Handling Caution in the Preface section.
- Disable the SIR. Refer to Disabling the SIR System in SIR.
- Set the parking brake.
- Remove the storage bins or the CD changer as needed. Refer to Front Floor Console Compartment Replacement or Remote CD Changer Replacement in Entertainment.
- Remove the console trim plate. Refer to Console Trim Plate Replacement .
- Remove the left console trim panel. Refer to Front Floor Console Side Trim Panel Replacement - Left Side .
- Remove the right console trim panel. Refer to Front Floor Console Side Trim Panel Replacement - Right Side .
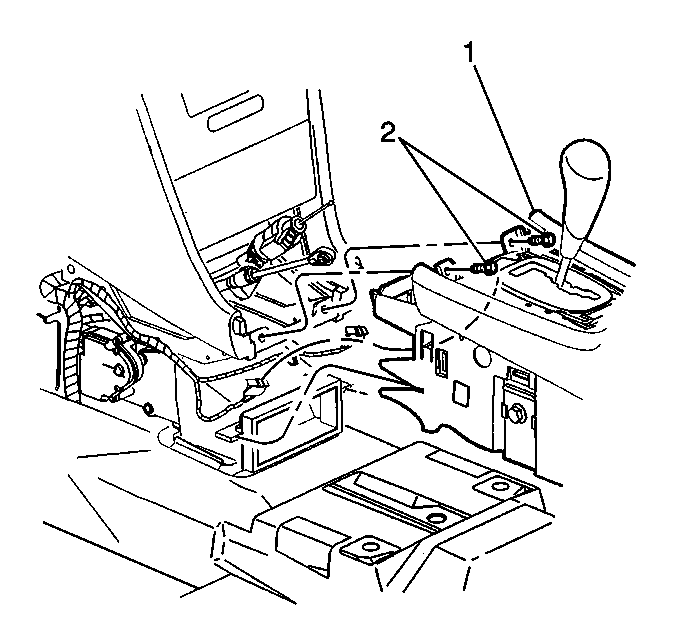
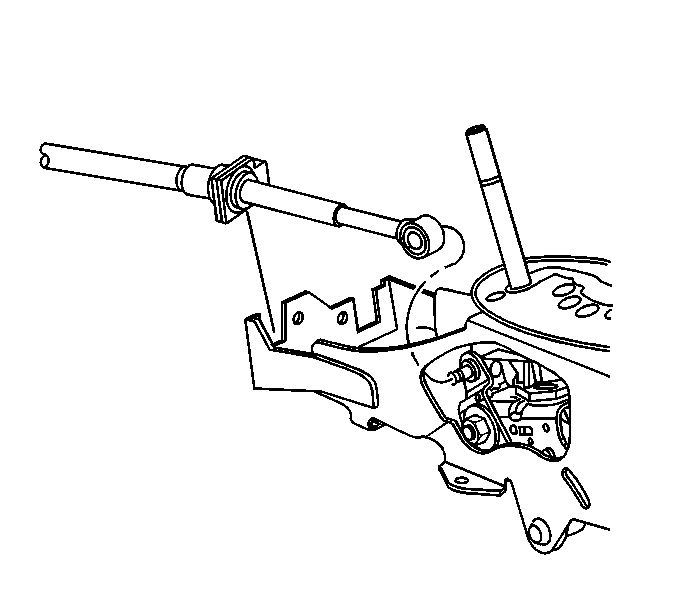
- Disconnect the shifter cable from the shifter. Refer to Range Selector Lever Cable Replacement in Automatic Transmission.
- Disconnect the park lock cable from the shifter. Refer to Park Lock Cable Replacement in Automatic Transmission.
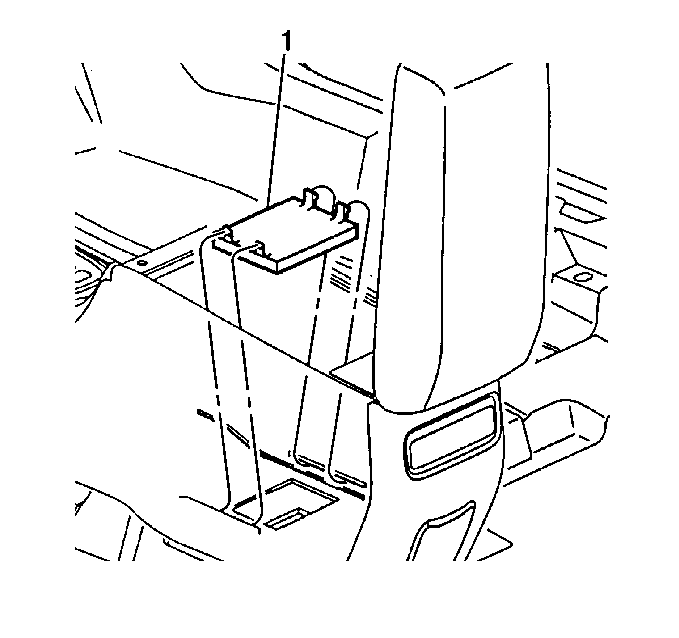
- Remove the cover (1) from the floor of the storage bin.
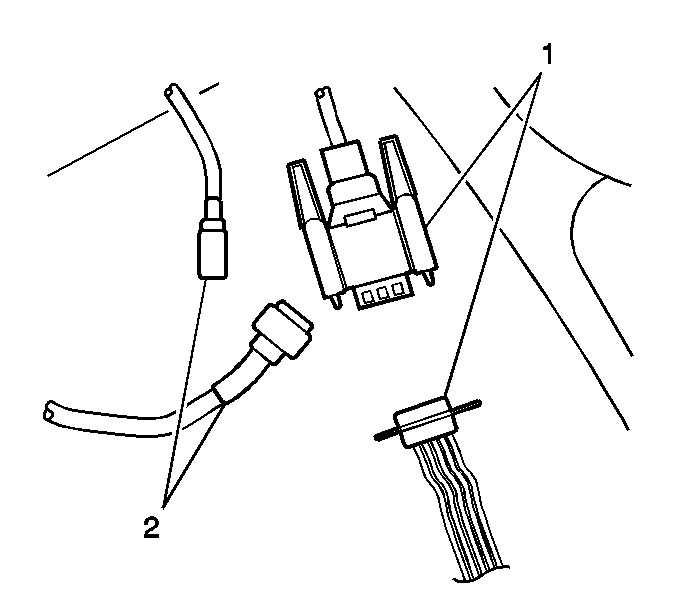
- Disconnect the electrical connectors (1,2,3) from the center console.
- Move both front seats to the rear in order to access the front console to floor fasteners.
- Remove the 2 fasteners (1) that secure the metal bracket arms to the floor.
- Remove the 2 nuts (2) from the console rear to the floor pan.
- Remove the 2 fasteners (2) from the console (1) to the lower instrument panel (IP).
- Lift up the rear of the console and slide the console rearward.
- Remove the center console from the vehicle.


Notice: When removing or installing the center console, do not allow the metal brackets to scrape the seats and damage the material.
Installation Procedure
- Position the console assembly on the floor in the vehicle.
- Connect the console electrical connectors.
- Lift up on the rear of the center console and slide the center console (1) forward in order to align the front edges of the center console with the lower IP.
- Install the 2 fasteners (2) from the center console (1) to lower IP.
- Install the 2 nuts (2) to the floor studs in the center console compartment.
- Install the fasteners (1) to the metal bracket arms on the console.
- Connect the electrical connectors (1,2,3) on both sides of the console.
- Install the cover (1) to the floor of the storage bin.
- Install the park lock cable to the shifter. Refer to Park Lock Cable Replacement in Automatic Transmission.
- Connect the shift cable to the shifter. Refer to Range Selector Lever Cable Replacement in Automatic Transmission.
- Install the left console panel. Refer to Front Floor Console Side Trim Panel Replacement - Left Side .
- Install the right console panel. Refer to Front Floor Console Side Trim Panel Replacement - Right Side .
- Install the console trim plate. Refer to Console Trim Plate Replacement .
- Install the storage bins or the CD changer as needed. Refer to Front Floor Console Compartment Replacement or Remote CD Changer Replacement in Entertainment.
- Enable the SIR. Refer to Enabling the SIR System in SIR.
Place the rear of the center console (1) onto the rear studs.
Notice: Refer to Fastener Notice in the Preface section.
Tighten
Tighten the fasteners (2) to 2 N·m (18 lb in).
Tighten
Tighten the fasteners (2) to 10 N·m (89 lb in).
Tighten
Tighten the fasteners (1) to 10 N·m (89 lb in).
Console Replacement with UV8
Removal Procedure
Caution: Refer to SIR Handling Caution in the Preface section.
- Disable the SIR. Refer to Disabling the SIR System in SIR.
- Set the parking brake.
- Remove the console trim plate. Refer to Console Trim Plate Replacement .
- Remove the left console trim panel. Refer to Front Floor Console Side Trim Panel Replacement - Left Side .
- Remove the right console trim panel. Refer to Front Floor Console Side Trim Panel Replacement - Right Side .
- Disconnect the shift cable from the shift lever pin and the shift bracket. Refer to Range Selector Lever Cable Replacement in Automatic Transmission.
- Disconnect the park lock cable from the shifter. Refer to Park Lock Cable Replacement in Automatic Transmission.
- Remove the storage bins or the CD changer. Refer to Front Floor Console Compartment Replacement or Remote CD Changer Replacement in Entertainment.
- Remove the cover (1) from the floor of the storage bin.
- Disconnect the floor console electrical connectors (1,2,3).
- Move both front seats to the rear in order to access the front console to floor bolts.
- Remove the bolts (1) that secure the metal bracket arms to the floor.
- Remove the nuts (2) from the console rear to the floor pan.
- Remove the screws (2) from the console (1) to the lower instrument panel (IP).
- Lift up the rear of the floor console to access the cellular phone connections.
- Disconnect the cellular phone electrical connector (1).
- Disconnect the cellular phone coaxial cable (2).
- Lift up the rear of the console and slide the console rearward.
- Remove the floor console from the vehicle.
Notice: When removing or installing the center console, do not allow the metal brackets to scrape the seats and damage the material.
Installation Procedure
- Partially install the floor console.
- Lift up the rear of the floor console to access the cellular phone connections.
- Connect the cellular phone electrical connector (1).
- Connect the cellular phone coaxial cable (2).
- Connect the floor console electrical connectors.
- Lift up on the rear of the floor console (1) and slide the console forward in order to align the front edges of the floor console with the lower IP.
- Install the screws (2) through the floor console (1) to lower IP.
- Install the nuts (2) to the studs.
- Install the bolts (1).
- Connect the electrical connectors (1,2,3) on both sides of the console.
- Install the cover (1) to the floor of the storage bin.
- Install the park lock cable to the shifter. Refer to Park Lock Cable Replacement in Automatic Transmission.
- Install the shift cable. Refer to Range Selector Lever Cable Replacement in Automatic Transmission.
- Install the left console trim panel. Refer to Front Floor Console Side Trim Panel Replacement - Left Side .
- Install the right console trim panel. Refer to Front Floor Console Side Trim Panel Replacement - Right Side .
- Install the console trim plate. Refer to Console Trim Plate Replacement .
- Install the storage bins or the CD changer as needed. Refer to Front Floor Console Compartment Replacement or Remote CD Changer Replacement in Entertainment.
- Enable the SIR. Refer to Enabling the SIR System in SIR.
Notice: When removing or installing the center console, do not allow the metal brackets to scrape the seats and damage the material.
Place the rear of the floor console onto the rear studs.
Tighten
Tighten the screws (2) to 2 N·m (18 lb in).
Tighten
Tighten the nuts (2) to 10 N·m (89 lb in).
Tighten
Tighten the bolts (1) to 10 N·m (89 lb in).
