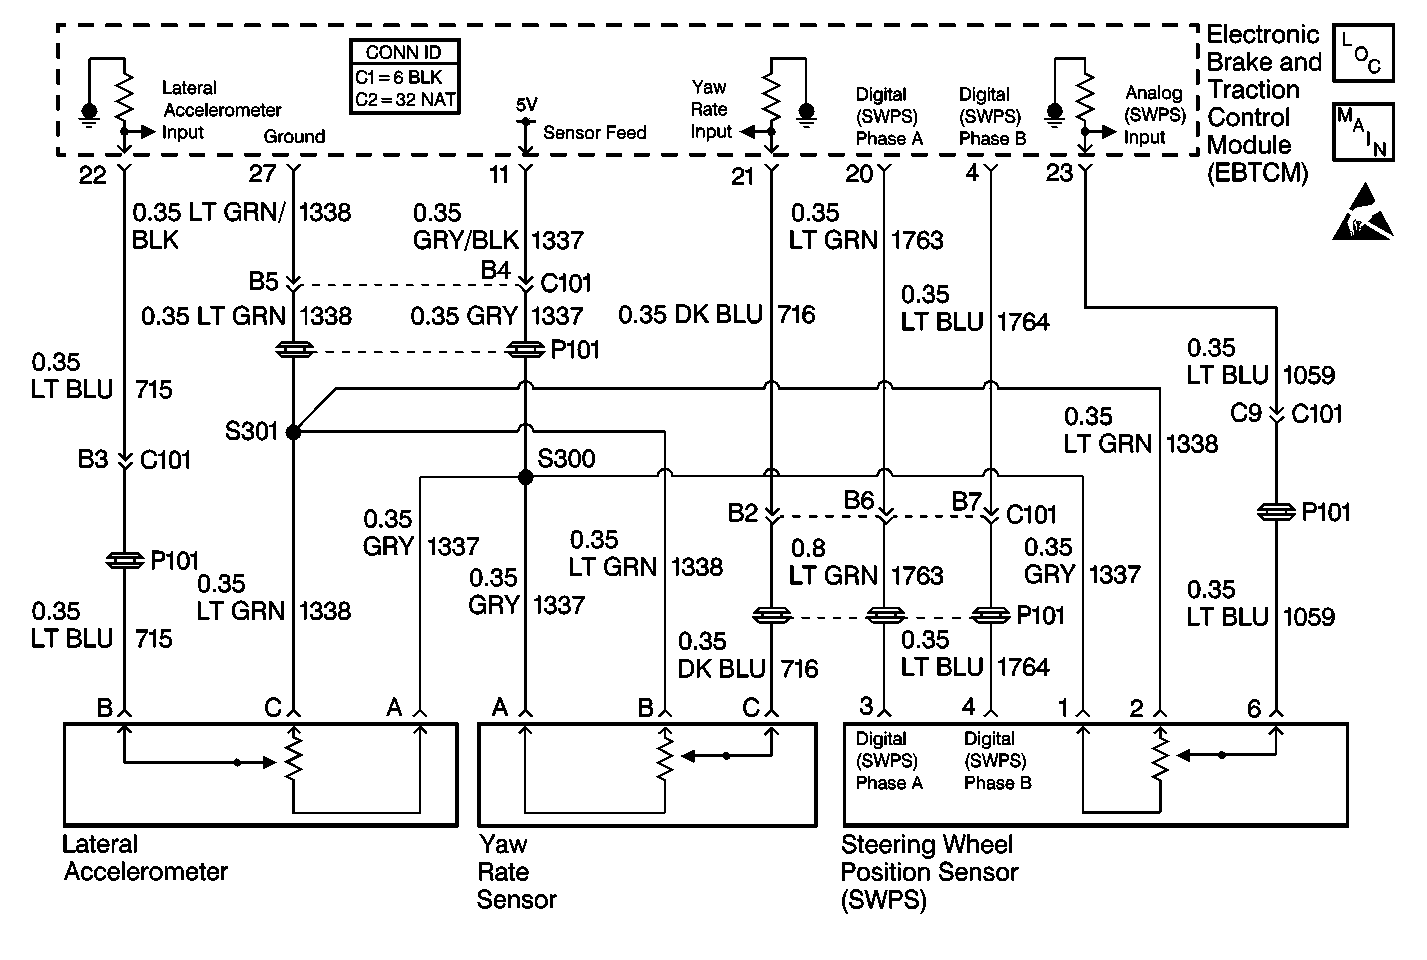
Circuit Description
When the ignition is ON and the vehicle is stationary, the yaw rate bias is calculated by the EBTCM. This value is used to compensate for offsets in the yaw rate sensor output due to temperature changes and manufacturing differences. If the yaw rate bias is greater than 0.196 volts (5 degrees/second), the yaw rate sensor is assumed to be bad and this DTC sets. With no offset bias, the scan tool will report a zero yaw rate value of 2.5 volts (0 degrees/second).
Conditions for Setting the DTC
One of the following conditions occur:
| • | After the steering angle has been centered, the yaw rate sensor voltage is less than 0.15 volts (-67 degrees/second) or greater than 4.85 volts (67 degrees/second). |
| • | The measured yaw rate changes by more than 390 degrees/second in less than 1 second. |
Action Taken When the DTC Sets
| • | A malfunction DTC is stored. |
| • | Stabilitrak® is disabled. |
| • | The DIC displays the SERVICE STABILITY SYS message. |
| • | The ABS/TCS remain functional. |
Conditions for Clearing the DTC
| • | The condition for DTC is no longer present and you used scan tool Clear DTCs function. |
| • | The condition for DTC is no longer present and you used the On-Board Clear DTCs function. |
| • | The EBTCM does not detect the DTC in 50 drive cycles. |
Diagnostic Aids
| • | During diagnosis, park the vehicle on a level surface. |
| • | Find out from the driver under what conditions the DTC was set (when the DIC displayed the SERVICE STABILITY SYS message). This information will help to duplicate the failure. |
| • | Thoroughly inspect the wiring and the connectors. An incomplete inspection of the wiring and the connectors may result in a misdiagnosis, causing a part replacement with the reappearance of the malfunction. |
| • | Poor connections, broken insulation, or a break in the wire inside the insulation may cause an intermittent malfunction. |
| • | If an intermittent malfunction exists, refer to Intermittents and Poor Connections Diagnosis in Wiring Systems. |
Step | Action | Value(s) | Yes | No |
|---|---|---|---|---|
1 | Did you perform the ABS Diagnostic System Check? | -- | Go to Step 2 | |
2 |
Is the resistance within the specified range? | OL (infinite) | Go to Step 4 | Go to Step 3 |
3 | Repair the short to ground in CKT 716. Refer to Wiring Repairs in Wiring Systems. Did you complete the repair? | -- | -- | |
4 | Use a J 39200 DMM in order to measure the resistance between the J 39700 terminal 11 and terminal B. Is the resistance within the specified range? | OL (infinite) | Go to Step 6 | Go to Step 5 |
5 | Repair the short to ground in CKT 1337. Refer to Wiring Repairs in Wiring Systems. Did you complete the repair? | -- | -- | |
6 | Use a J 39200 DMM in order to measure the resistance between the J 39700 terminal 27 and terminal B. Is the resistance within the specified range? | OL (infinite) | Go to Step 8 | Go to Step 7 |
7 | Repair the short to ground in CKT 1338. Refer to Wiring Repairs in Wiring Systems. Did you complete the repair? | -- | -- | |
8 | Use a J 39200 DMM in order to measure the resistance between the J 39700 terminal 11 and terminal 27. Is the resistance within the specified range? | OL (infinite) | Go to Step 10 | Go to Step 9 |
9 | Repair the short between CKT 1337 and CKT 1338. Refer to Wiring Repairs in Wiring Systems. Did you complete the repair? | -- | -- | |
10 | Use a J 39200 DMM in order to measure the resistance between the J 39700 terminal 11 and terminal 21. Is the resistance within the specified range? | OL (infinite) | Go to Step 12 | Go to Step 11 |
11 | Repair the short between CKT 1337 and CKT 716. Refer to Wiring Repairs in Wiring Systems. Did you complete the repair? | -- | -- | |
12 | Use a J 39200 DMM in order to measure the resistance between the J 39700 terminal 27 and terminal 21. Is the resistance within the specified range? | OL (infinite) | Go to Step 14 | Go to Step 13 |
13 | Repair the short between CKT 1338 and CKT 716. Refer to Wiring Repairs in Wiring Systems. Did you complete the repair? | -- | -- | |
14 |
Is the voltage greater than the specified value? | 1 V | Go to Step 15 | Go to Step 16 |
15 | Repair the short to voltage in CKT 716. Refer to Wiring Repairs in Wiring Systems. Did you complete the repair? | -- | -- | |
16 | Use a J 39200 DMM in order to measure the voltage between the J 39700 terminal 11 and terminal B. Is the voltage greater than the specified value? | 1 V | Go to Step 17 | Go to Step 18 |
17 | Repair the short to voltage in CKT 1337. Refer to Wiring Repairs in Wiring Systems. Did you complete the repair? | -- | -- | |
18 | Use a J 39200 DMM in order to measure the voltage between the J 39700 terminal 27 and terminal B. Is the voltage greater than the specified value? | 1 V | Go to Step 19 | Go to Step 20 |
19 | Repair the short to voltage in CKT 1338. Refer to Wiring Repairs in Wiring Systems. Did you complete the repair? | -- | -- | |
20 |
Is the resistance less than the specified value? | 2 ohms | Go to Step 22 | Go to Step 21 |
21 | Repair the open in CKT 716. Refer to Wiring Repairs in Wiring Systems. Did you complete the repair? | -- | -- | |
22 |
Is the resistance less than the specified value? | 2 ohms | Go to Step 24 | Go to Step 23 |
23 | Repair the open in CKT 1338. Refer to Wiring Repairs in Wiring Systems. Did you complete the repair? | -- | -- | |
24 |
Is the resistance less than the specified value? | 2 ohms | Go to Step 26 | Go to Step 25 |
25 | Repair the open in CKT 1337. Refer to Wiring Repairs in Wiring Systems. Did you complete the repair? | -- | -- | |
26 |
Is the voltage within the specified range? | 4.5-5.5 V | Go to Step 27 | Go to Step 32 |
27 | Use a J 39200 DMM in order to measure the voltage between the J 39700 terminal 21 and terminal B. Is the voltage within the specified range? | 2.35-2.65 V | Go to Step 28 | Go to Step 30 |
28 | Use a J 39200 DMM in order to measure the voltage between the J 39700 terminal 21 and terminal 27. Is the voltage within the specified range? | 2.35-2.65 V | Go to Step 29 | Go to Step 30 |
29 |
Is the voltage within the specified range? | 2.3-2.7 V | Go to Step 31 | Go to Step 30 |
30 | Replace the yaw rate sensor. Refer to Vehicle Yaw Sensor Replacement . Did you complete the repair? | -- | Go to Step 31 | -- |
31 |
Did DTC C1282 set as a current DTC while the vehicle was being driven? | -- | Go to Step 32 | |
32 | Replace the EBTCM. Refer to Electronic Brake Control Module Replacement . Did you complete the repair? | -- | -- |
