Rear Disc Brake Hardware Replacement JL9, JE5
Warning: Refer to Brake Dust Warning in the Preface section.
Removal Procedure
- Inspect the fluid level in the brake master cylinder reservoir.
- If the brake fluid level is midway between the maximum-full point and the minimum allowable level, then no brake fluid needs to be removed from the reservoir before proceeding. If the brake fluid level is higher than midway between the maximum-full point and the minimum allowable level, then remove brake fluid to the midway point before proceeding.
- Raise and support the vehicle. Refer to Lifting and Jacking the Vehicle.
- Using a C-clamp installed to the center of the outer brake pad and the back of the caliper, slowly compress the caliper piston into its bore just enough to remove the caliper from the mounting bracket.
- To loosen the brake caliper pin bolts, hold the brake caliper guide pin with a wrench.
- Remove the brake caliper bolts.
- Remove the brake caliper from the mounting bracket.
- Remove the brake pads from the disc brake caliper bracket.
- Remove the brake pad retainers from the disc brake caliper bracket.
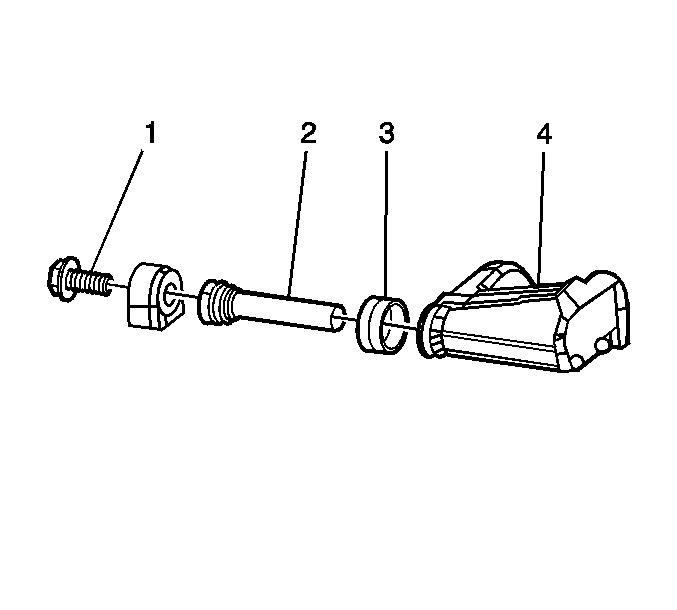
- Remove the brake caliper guide pins (2) from the brake caliper mounting bracket (4).
- Remove the caliper pin boots (3) from the brake caliper mounting bracket (4).
Caution: Support the brake caliper with heavy mechanic wire, or equivalent, whenever it is separated from its mount and the hydraulic flexible brake hose is still connected. Failure to support the caliper in this manner will cause the flexible brake hose to bear the weight of the caliper, which may cause damage to the brake hose and in turn may cause a brake fluid leak.

Installation Procedure
- Apply a thin coat of high temperature silicone lube to the brake caliper guide pin boots.
- Using a suitable tool press the brake caliper pin boots (3) to the brake caliper mounting bracket (4). Do not hammer the boots into the bracket.
- Install the brake caliper guide pins (2) to the brake caliper mounting bracket (4).
- Install the brake pad retainers to the brake caliper bracket.
- Install the brake pads to the brake caliper bracket.
- Install the brake caliper to the mounting bracket.
- Prepare the bolts and the threaded holes for assembly:
- Install the brake caliper bolts (1) and tighten to 60 N·m (44 lb ft).
- Install the tire and wheel. Refer to Tire and Wheel Removal and Installation.
- Lower the vehicle.
- Fill the master cylinder to the proper level. Refer to Master Cylinder Reservoir Filling.
Note: If reusing the caliper pin bolts, the threads of the caliper pin bolts and the threads of the caliper bracket mounting holes must be free of residue and debris prior to application of threadlocker in order to ensure proper adhesion and fastener retention.
| 7.1. | Thoroughly clean the residue from the bolt threads by using denatured alcohol or equivalent and allow to dry. |
| 7.2. | Thoroughly clean the residue from the threaded holes by using denatured alcohol or equivalent and allow to dry. |
| 7.3. | Apply threadlocker GM P/N 12345493 (Canada P/N 10953488), or equivalent to 2/3 of the threaded length of the lower caliper bracket bolts. Ensure that there are no gaps in the threadlocker along the length of the filled area of the bolts. |
| 7.4. | Allow the threadlocker to cure approximately 10 minutes before installation. |
| 7.5. | Apply a thin coat of high temperature silicone lube to the brake caliper guide pins. |
Caution: Refer to Fastener Caution in the Preface section.
Rear Disc Brake Hardware Replacement J56
Removal Procedure
- Inspect the fluid level in the brake master cylinder reservoir.
- If the brake fluid level is midway between the maximum-full point and the minimum allowable level, then no brake fluid needs to be removed from the reservoir before proceeding. If the brake fluid level is higher than midway between the maximum-full point and the minimum allowable level, then remove brake fluid to the midway point before proceeding.
- Raise and support the vehicle. Refer to Lifting and Jacking the Vehicle.
- Remove the tire and wheel. Refer to Tire and Wheel Removal and Installation.
- Carefully insert a plastic flat-bladed trim tool between the rotor and inboard brake pad.
- Carefully apply pressure to the inboard brake pad until both caliper inner pistons are fully compressed into the caliper piston bores.
- Carefully insert a plastic flat-bladed trim tool between the rotor and outboard brake pad.
- Carefully apply pressure to the outboard brake pad until both caliper outer pistons are fully compressed into the bores.
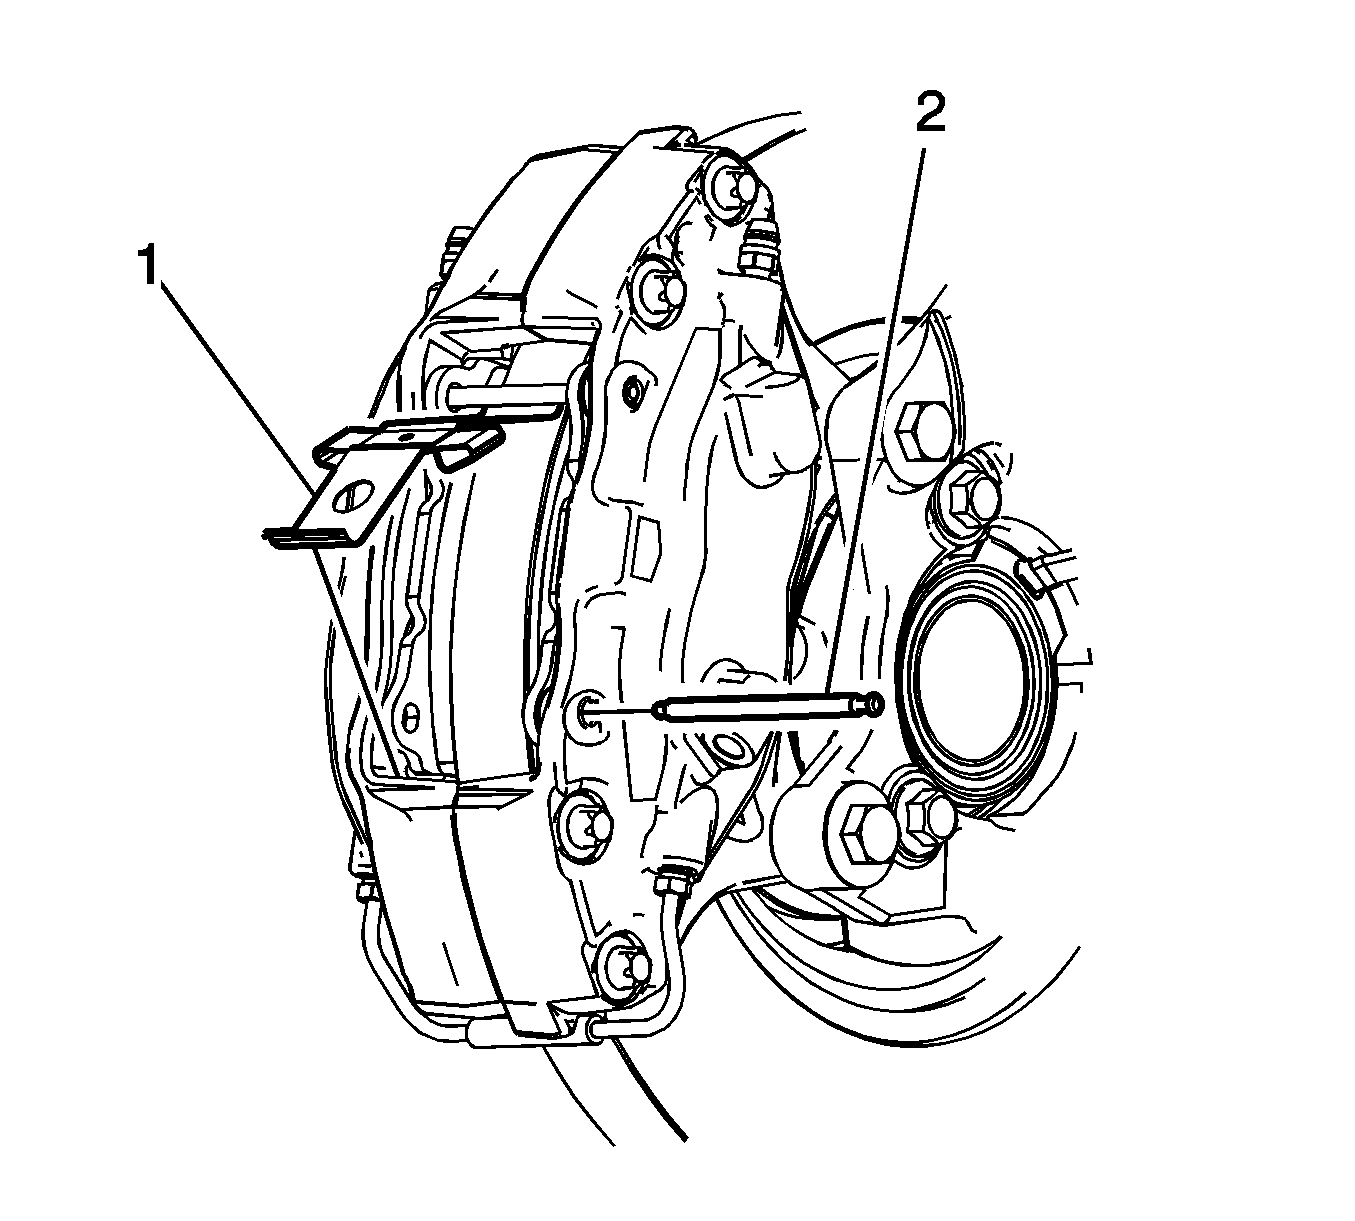
- Holding the lower end of the retainer (1) down and using a hammer and punch carefully tap the lower caliper guide pin (2) inward out of the caliper.
- Carefully rotate the brake pad retainer upward.
- Carefully remove the brake pad retainer.
- Using a hammer and punch tap the upper caliper to brake pad mounting pin (2) inward out of the caliper.
Warning: Refer to Brake Dust Warning in the Preface section.
Note: Use ONLY a plastic flat-bladed trim tool and/or another suitable soft tool when compressing the caliper pistons into the caliper piston bores. Never use any type of metal tool between the brake rotor and brake pads to compress the caliper pistons into the bores.

Installation Procedure
- Inspect the brake caliper guide pins. If damaged, or corroded replace the guide pin. Do not attempt to clean away any corrosion.
- Install the upper caliper guide pin (2) through the caliper, inner and outer brake pads.
- Using a hammer and punch seat the upper guide pin to the outer caliper half. Ensure the caliper guide pin is seated into the outer caliper pin seat.
- Install the brake pad retainer (1) under the upper caliper pin assembly.
- Rotate brake pad retainer down.
- Carefully apply pressure downward on the lower end of the brake pad retainer.
- Carefully install the lower caliper guide pin (2) through the caliper, inner and outer brake pads.
- Using a hammer and punch seat the lower guide pin to the outer caliper half. Ensure that the caliper guide pin is seated into the outer caliper pin seat. Ensure the brake pad retainer is centered retaining both brake pads.
- Install the tire and wheel. Refer to Tire and Wheel Removal and Installation.
- Lower the vehicle.
- With the engine OFF, gradually apply the brake pedal to approximately 2/3 of its travel distance.
- Slowly release the brake pedal.
- Wait 15 seconds, then repeat steps 11 and 12 until a firm brake pedal apply is obtained. This will properly seat the brake caliper pistons and brake pads.
- Fill the brake master cylinder reservoir to the proper level. Refer to Master Cylinder Reservoir Filling.
