Special Tools
J 21366 Converter Holding Strap
Removal Procedure
- Perform the high voltage disabling. Refer to High Voltage Disabling.
- Remove the 3 phase cables from the power inverter module and from the under hood cable bracket. Refer to Generator Control Module 3-Phase Cable Assembly Replacement.
- Raise and support the vehicle. Refer to Lifting and Jacking the Vehicle.
- Remove the auxiliary fluid pump from the transmission and position aside. Refer to Auxiliary Fluid Pump and Gasket Replacement.
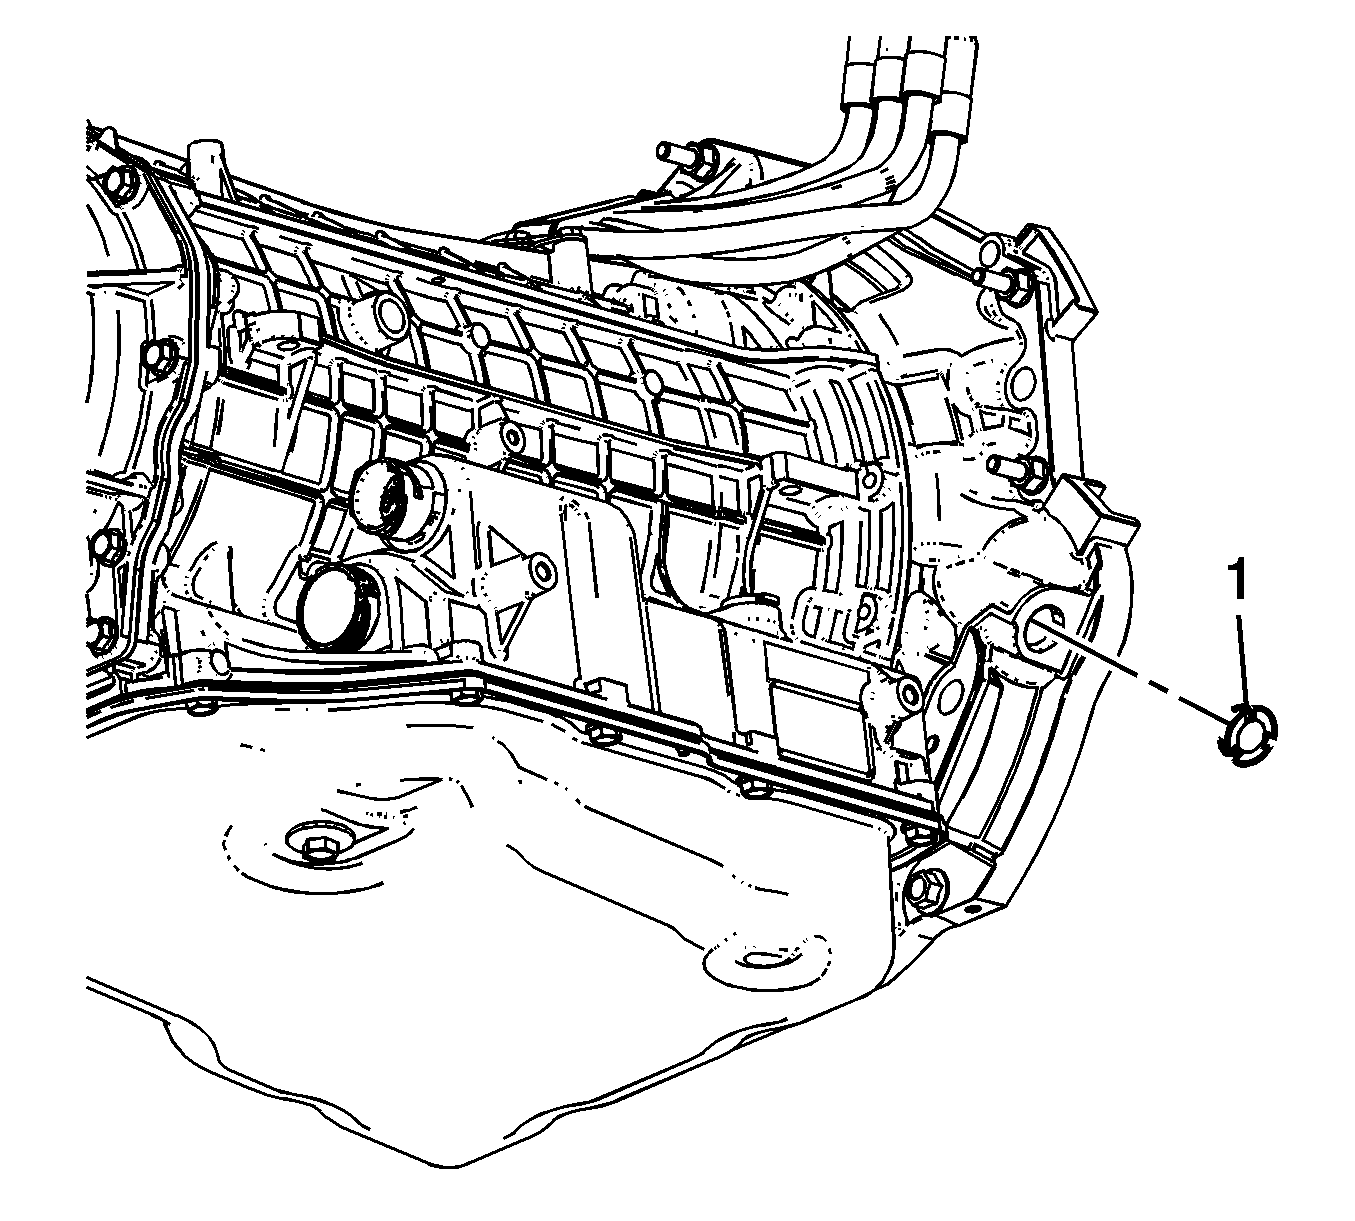
- Remove the torque dampener access plug (1).
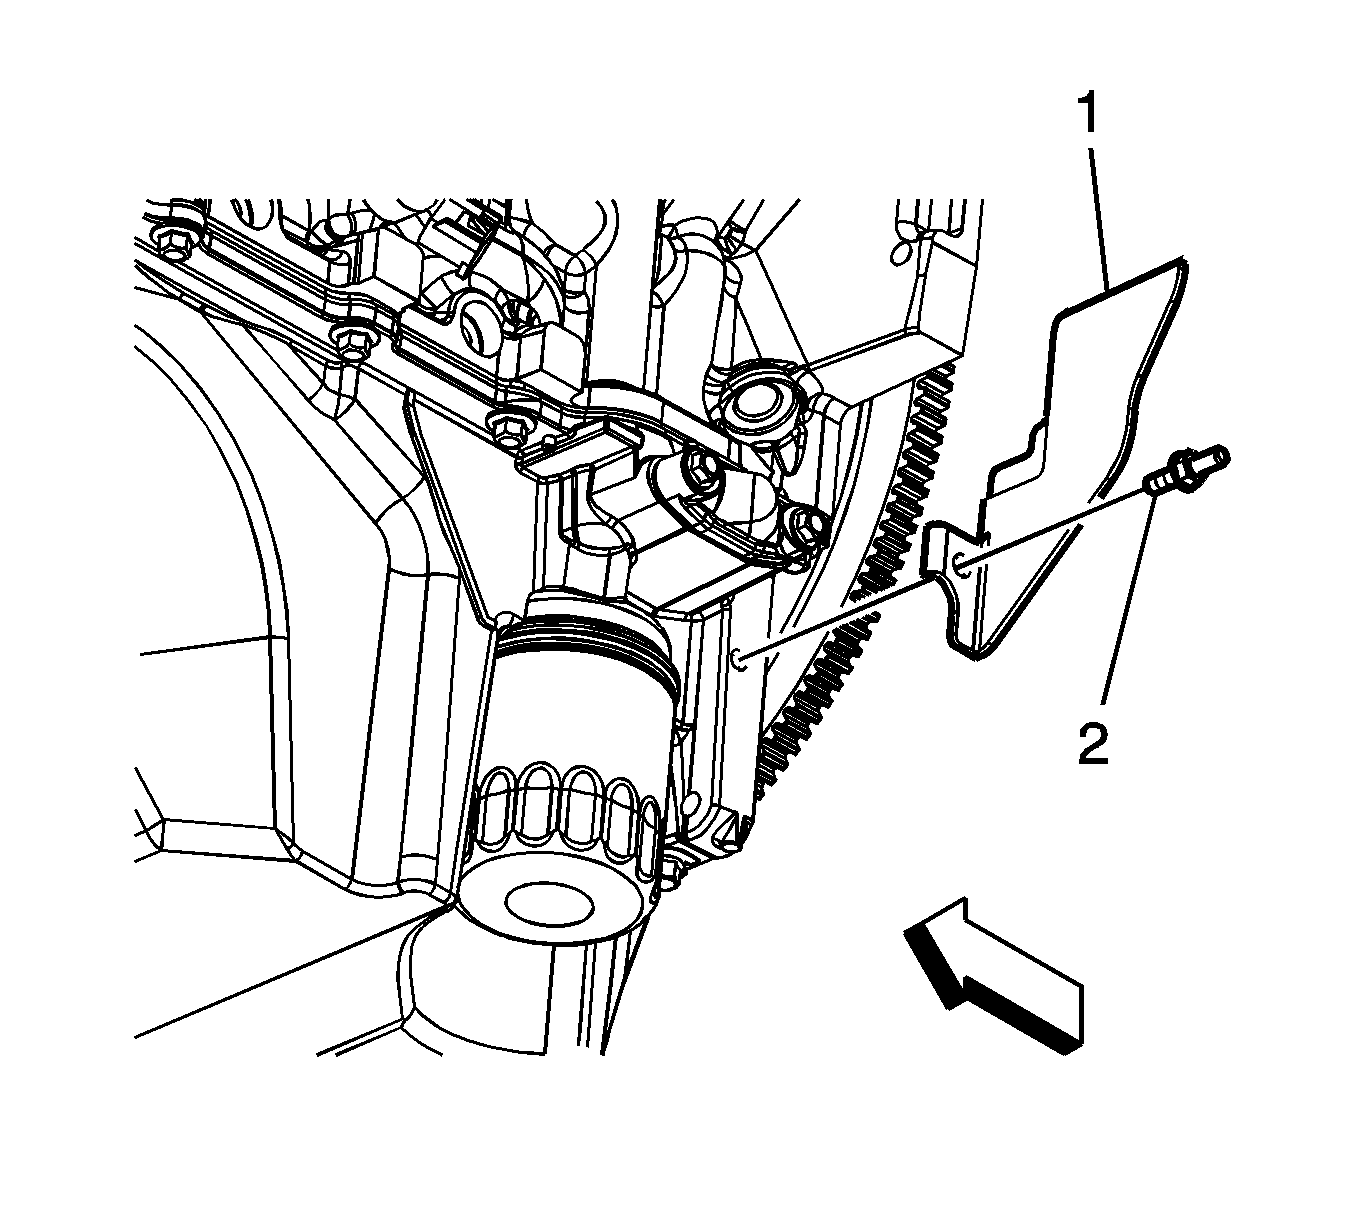
- Remove the left flex plate inspection cover stud (2).
- Remove the left flex plate inspection cover (1).
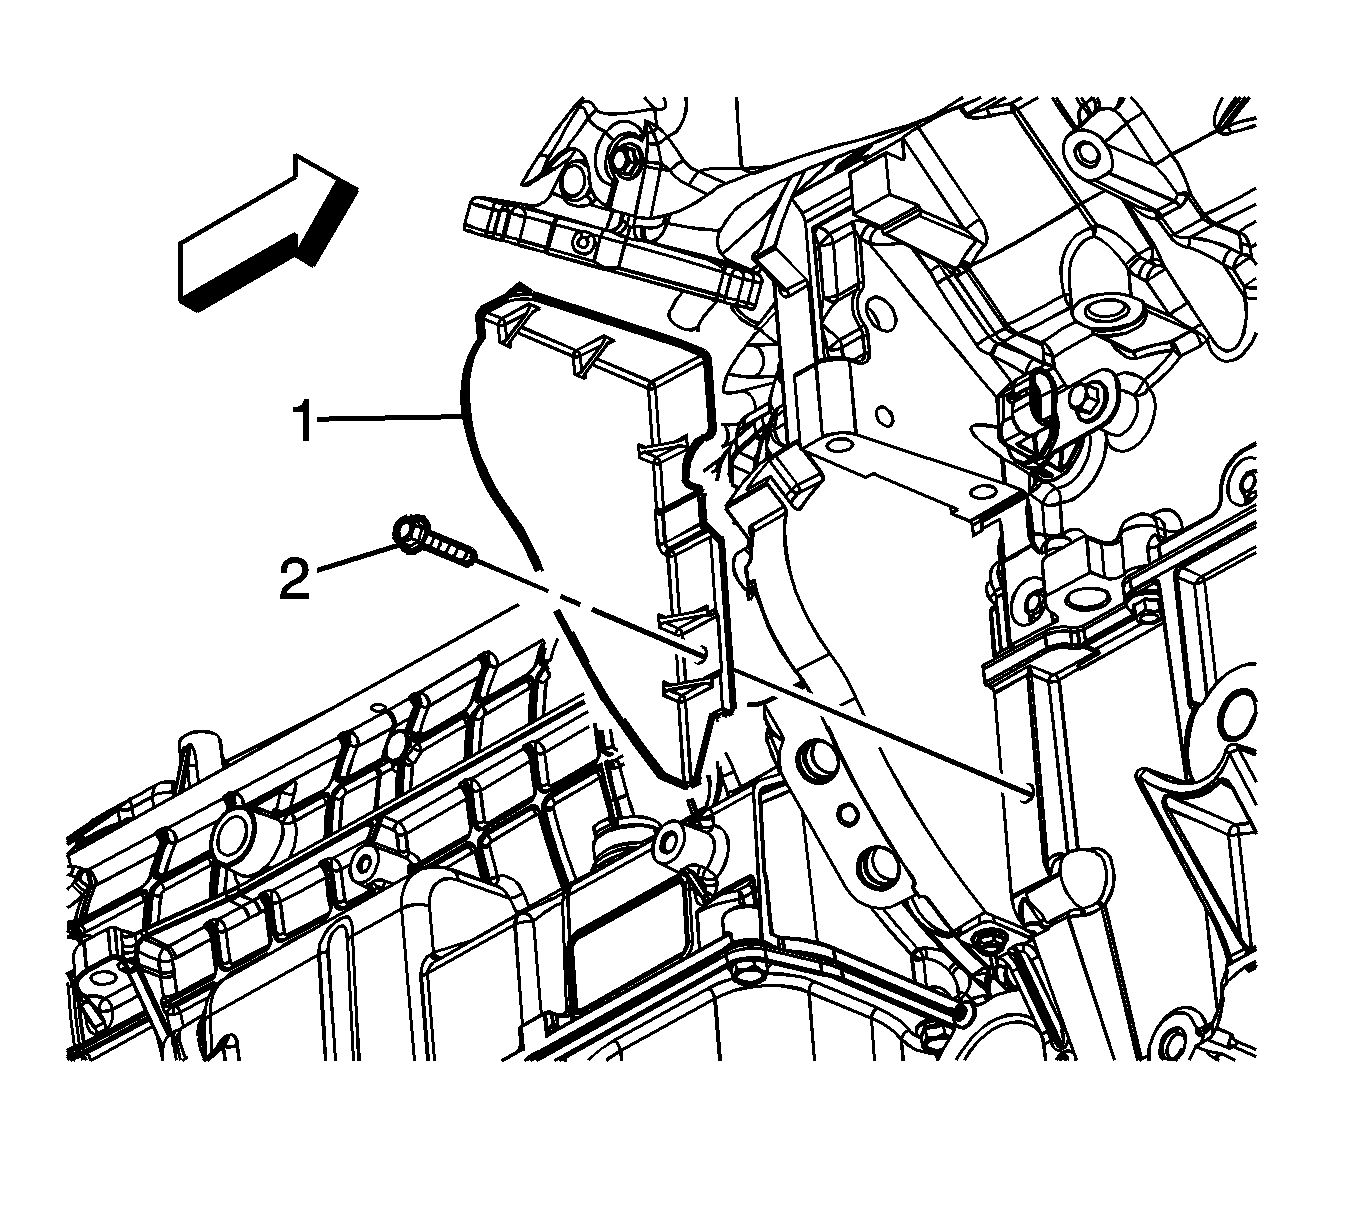
- Remove the right flex plate inspection cover bolt (2).
- Remove the right flex plate inspection cover (1).
- Mark the torque dampener relationship to the flex plate.
- Remove the engine shield. Refer to Engine Shield Replacement.
- Rotate the engine crank bolt clockwise in order to access the torque dampener bolts.
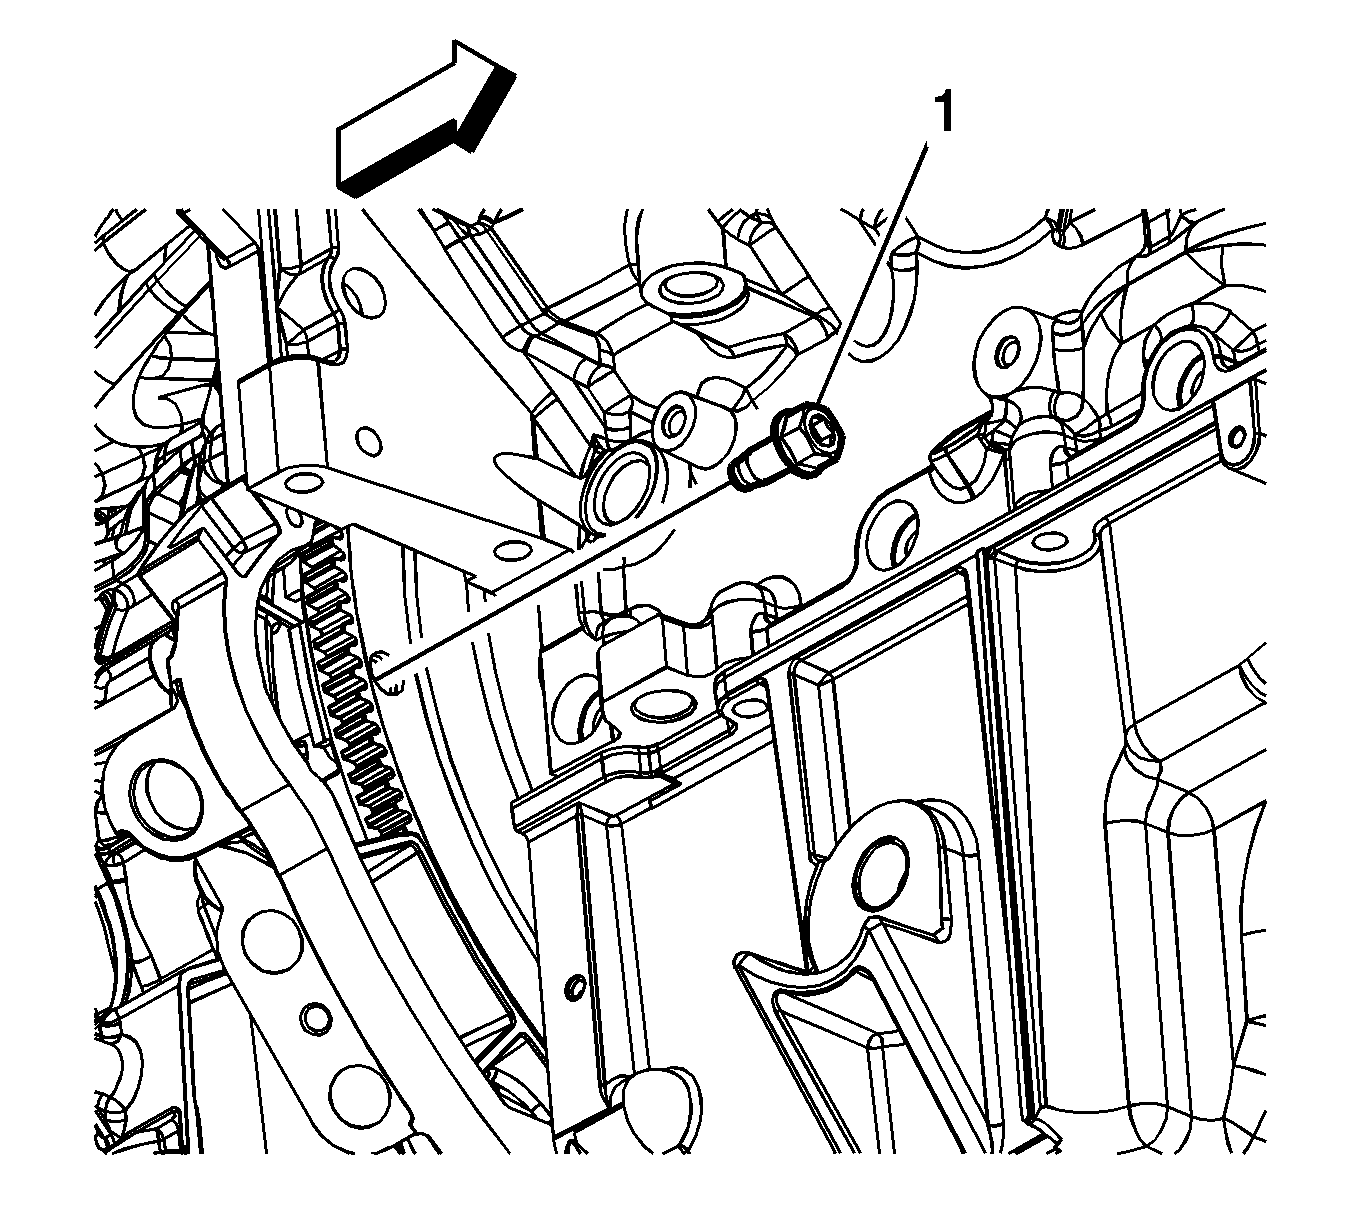
- Remove the 6 flex plate to torque dampener bolts (1).
- Remove the rear propeller shaft. Refer to Rear Propeller Shaft Replacement.
- Remove the front propeller shaft, if equipped. Refer to Front Propeller Shaft Replacement.
- Support the transmission with a transmission jack.
- Remove the transmission support crossmember. Refer to Transmission Support Crossmember Replacement.
- Remove the transmission mount. Refer to Transmission Mount Replacement.
- Remove the catalytic converter. Refer to Catalytic Converter Replacement.
- Lower the transmission to gain access to the top and sides of the transmission.
- Remove the vent hoses from the transmission and transfer case. Refer to Vent Hose Replacement.
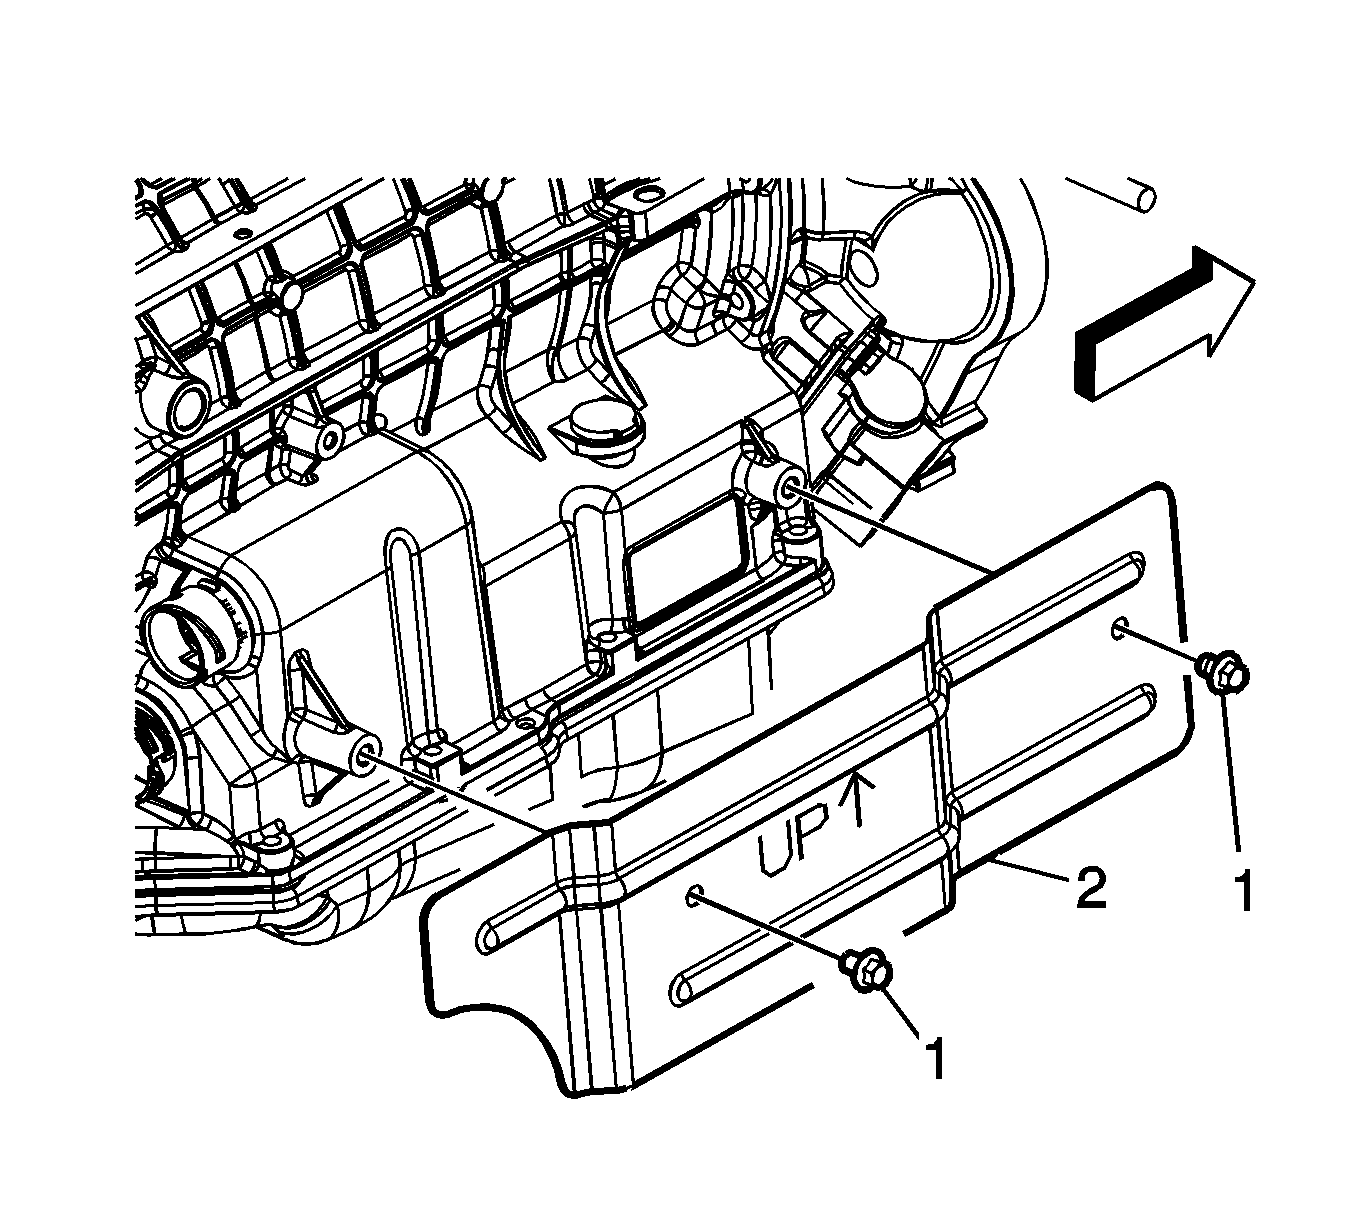
- Remove the transmission heat shield bolts (1).
- Remove the transmission heat shield (2).
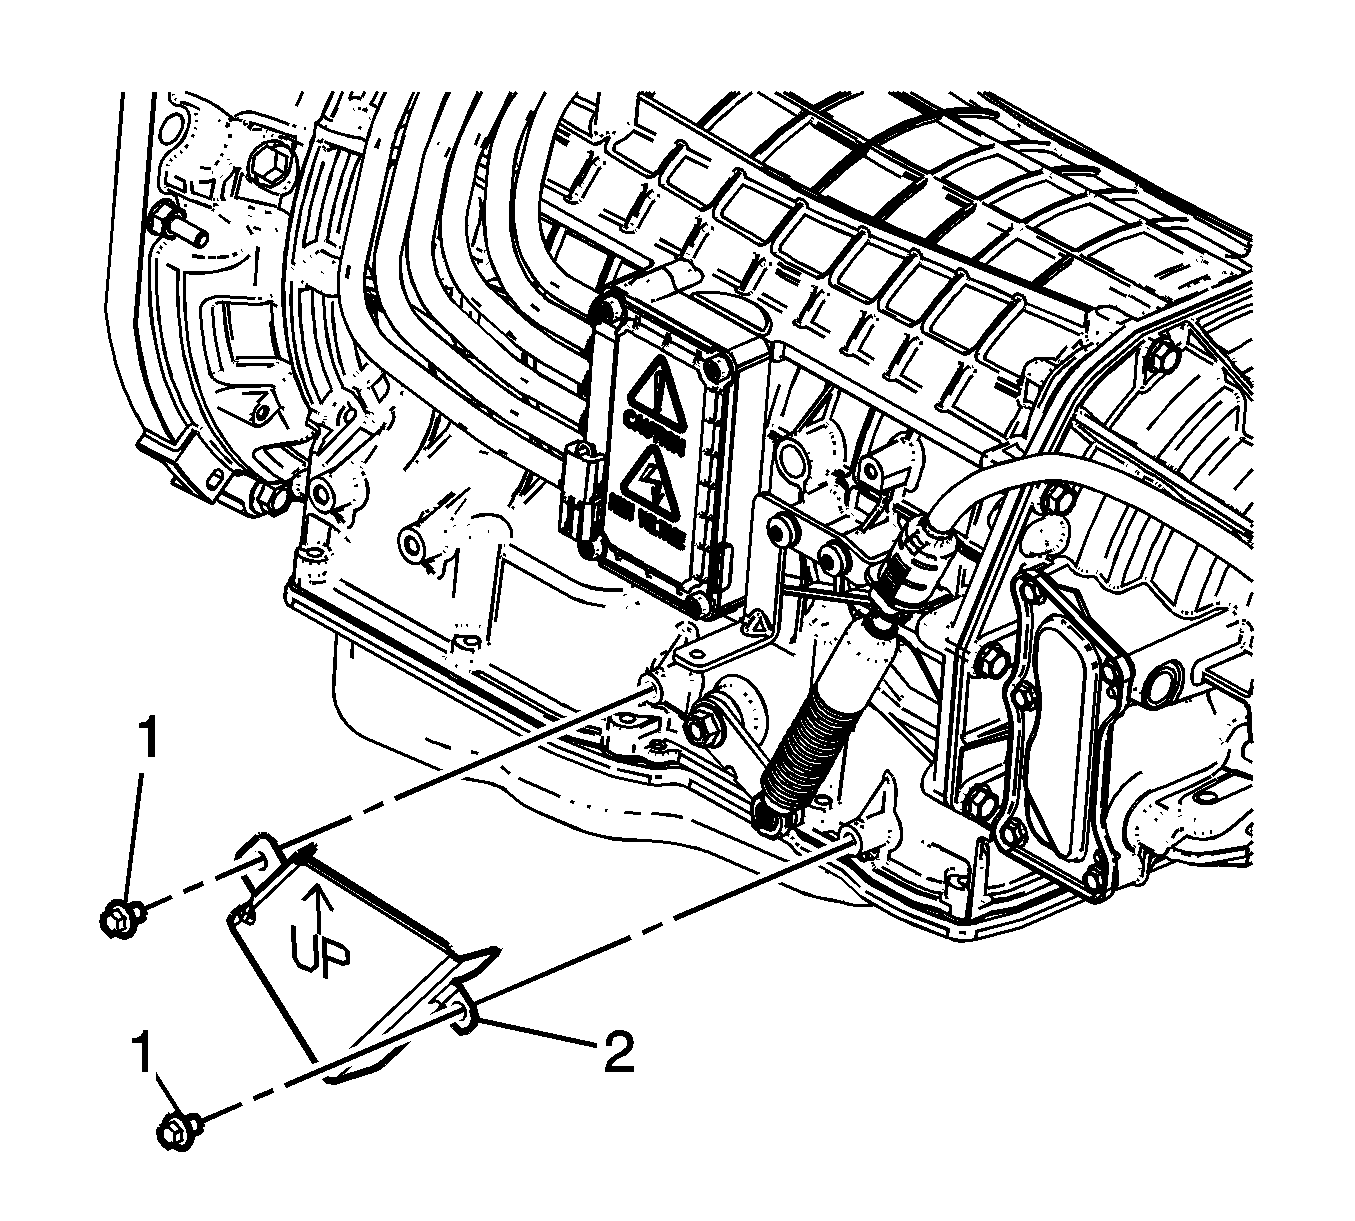
- Remove the range selector lever cable heat shield bolts (1).
- Remove the range selector lever cable heat shield (2).
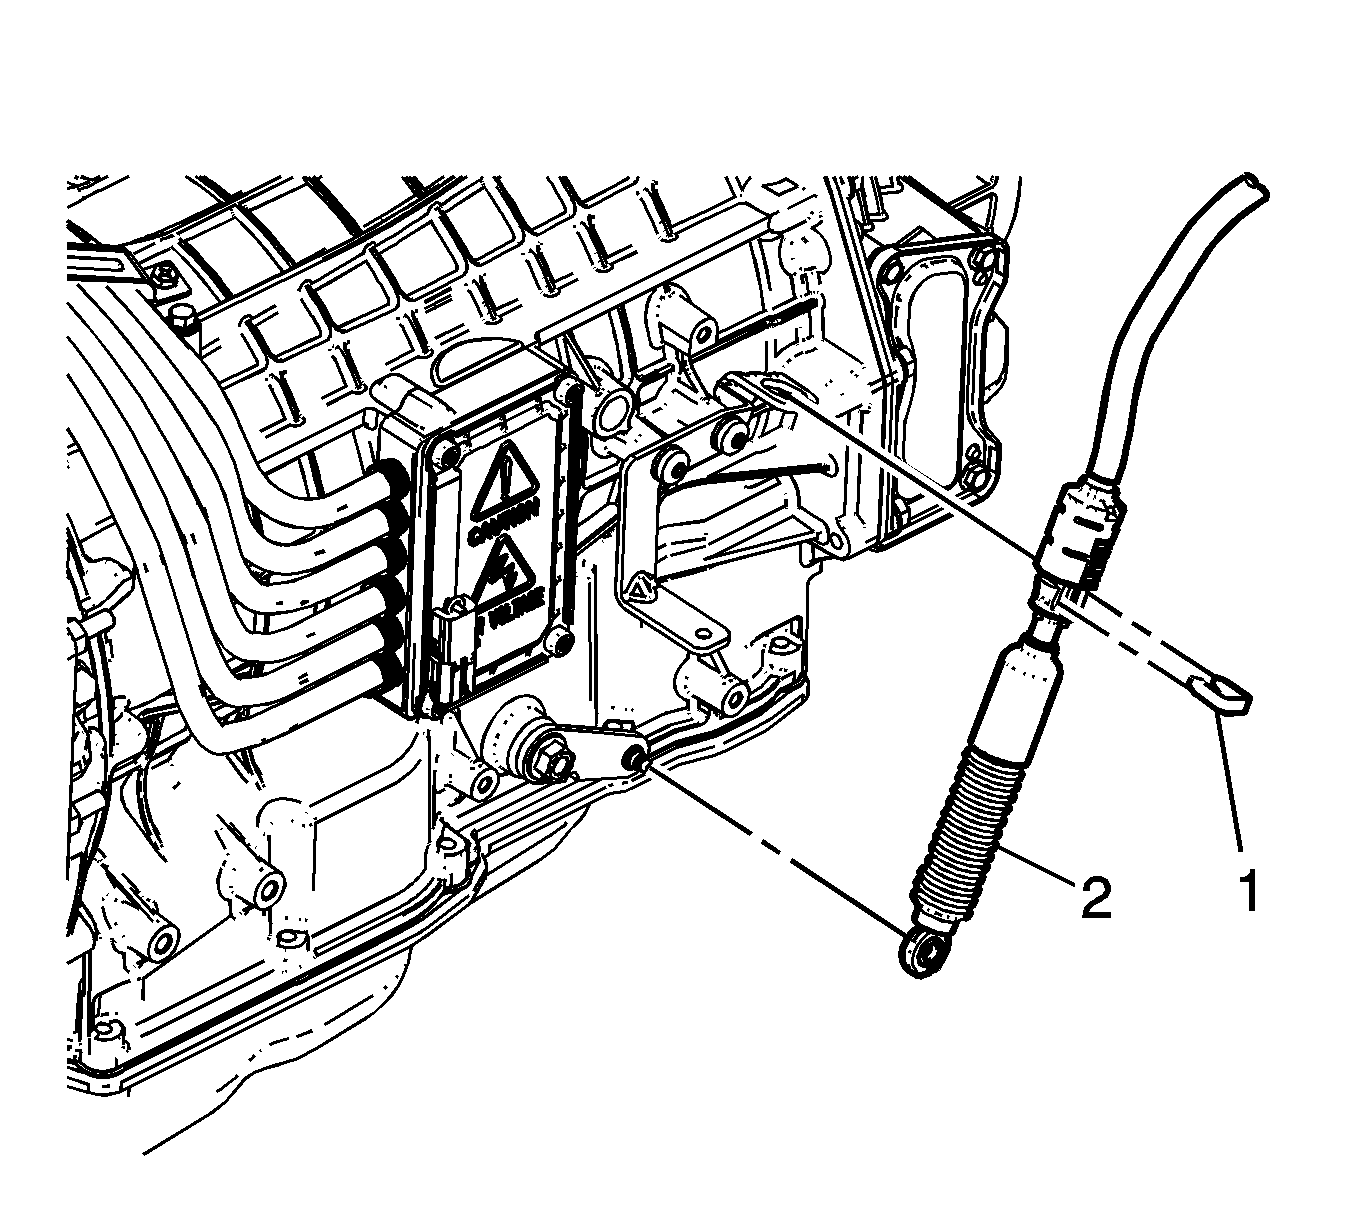
- Disconnect the range selector lever cable (2) from the range select lever.
- Remove the range selector lever cable retainer (1).
- Remove the range selector lever cable (2) from the cable bracket.
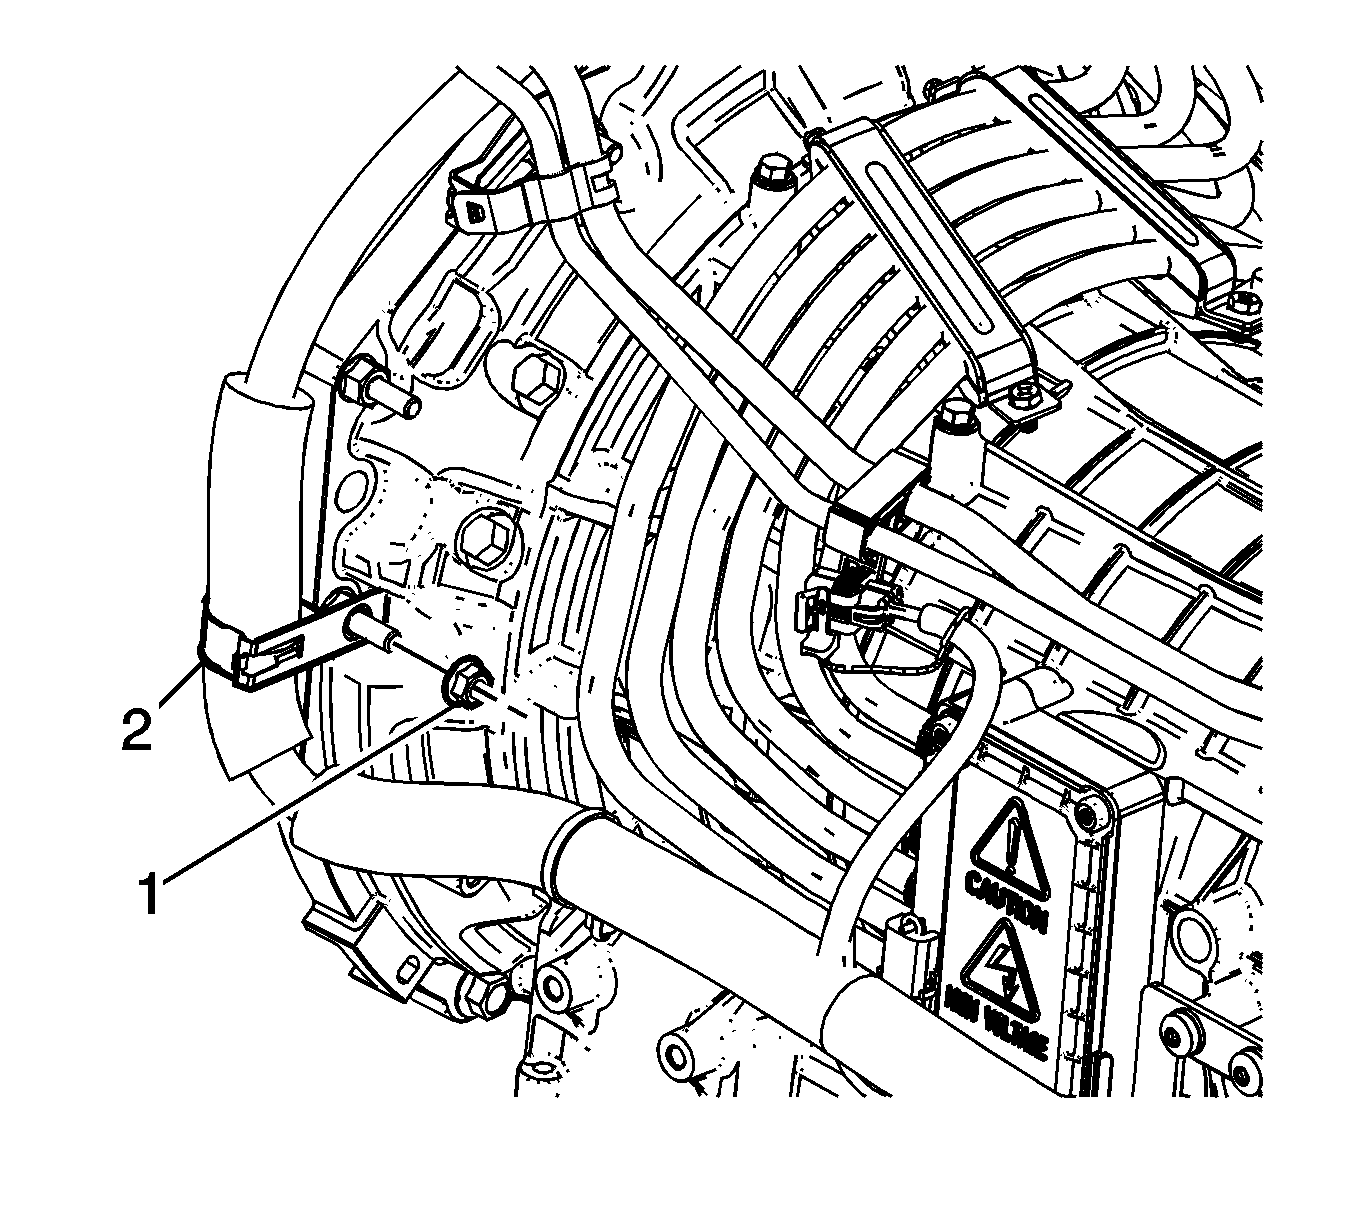
- Remove the transmission electrical harness retainer nut (1).
- Disconnect the oxygen sensor electrical connector (1) from the transmission electrical harness connector (2).
- Remove the oxygen sensor electrical connector (1) from the fuel pipe bracket.
- Disconnect the transmission electrical harness connector (7) from the transmission cover terminal housing.
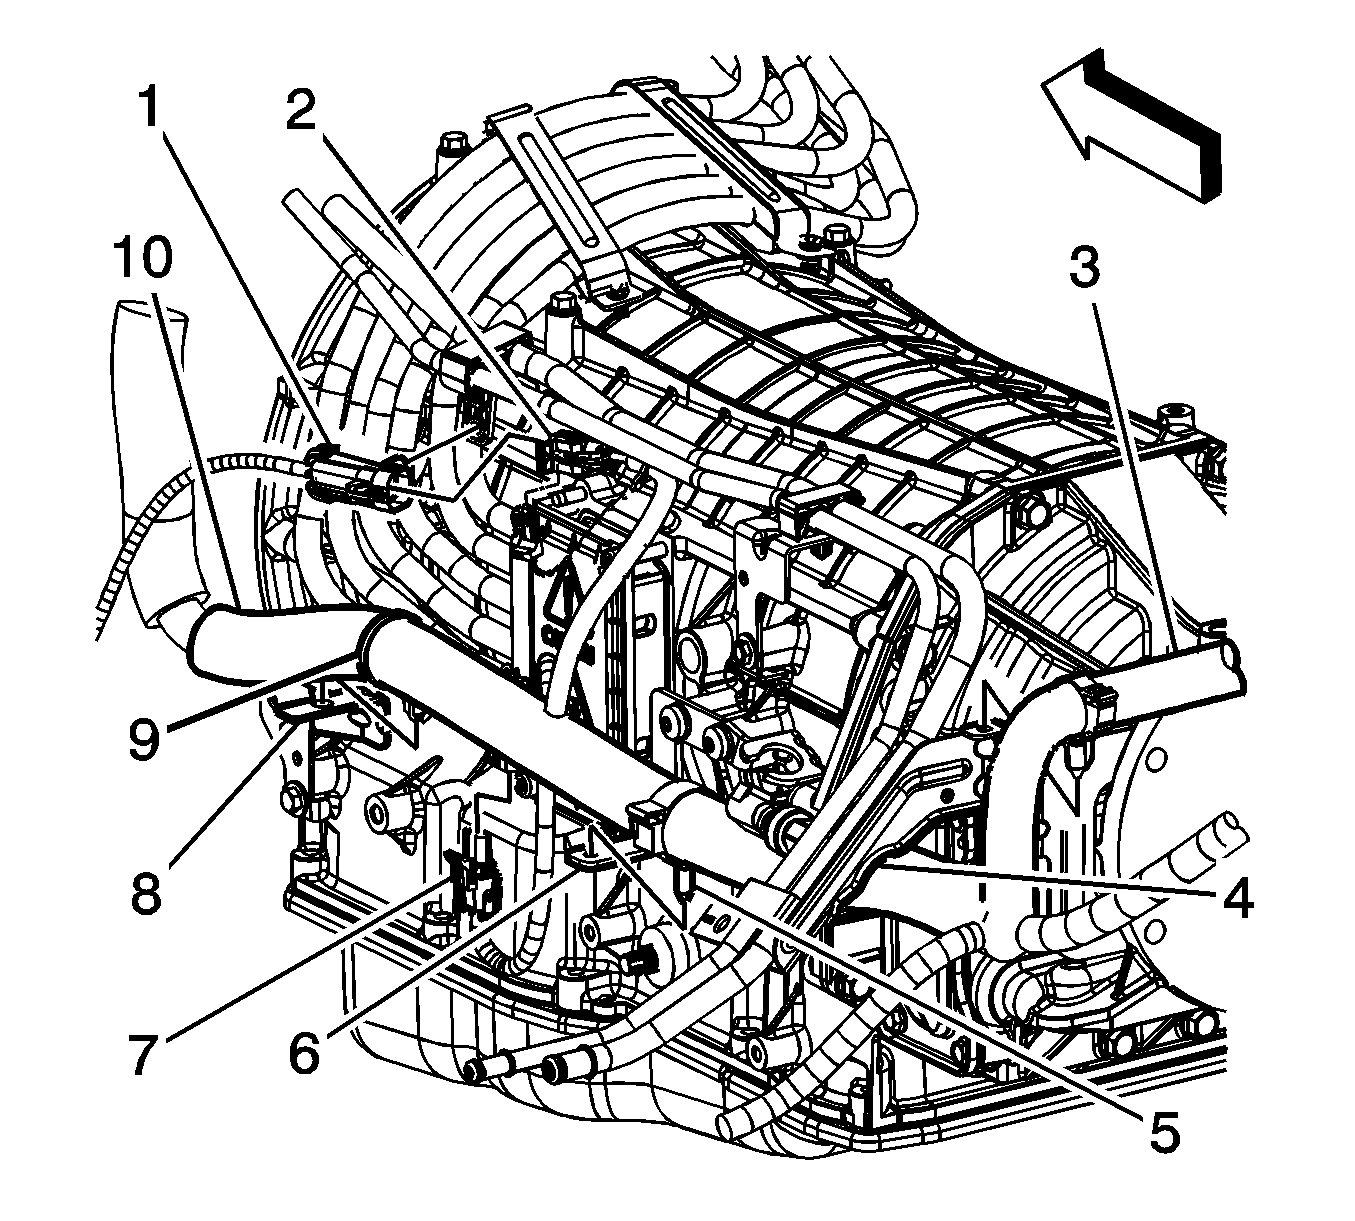
- Remove the transmission electrical harness retaining clip (9) from the bracket (8).
- Remove the transmission electrical harness retaining clip (5) from the bracket (6).
- Remove the transmission electrical harness retaining clip (3) from the bracket (4).
- Position the transmission electrical harness (10) to avoid interference while removing the transmission.
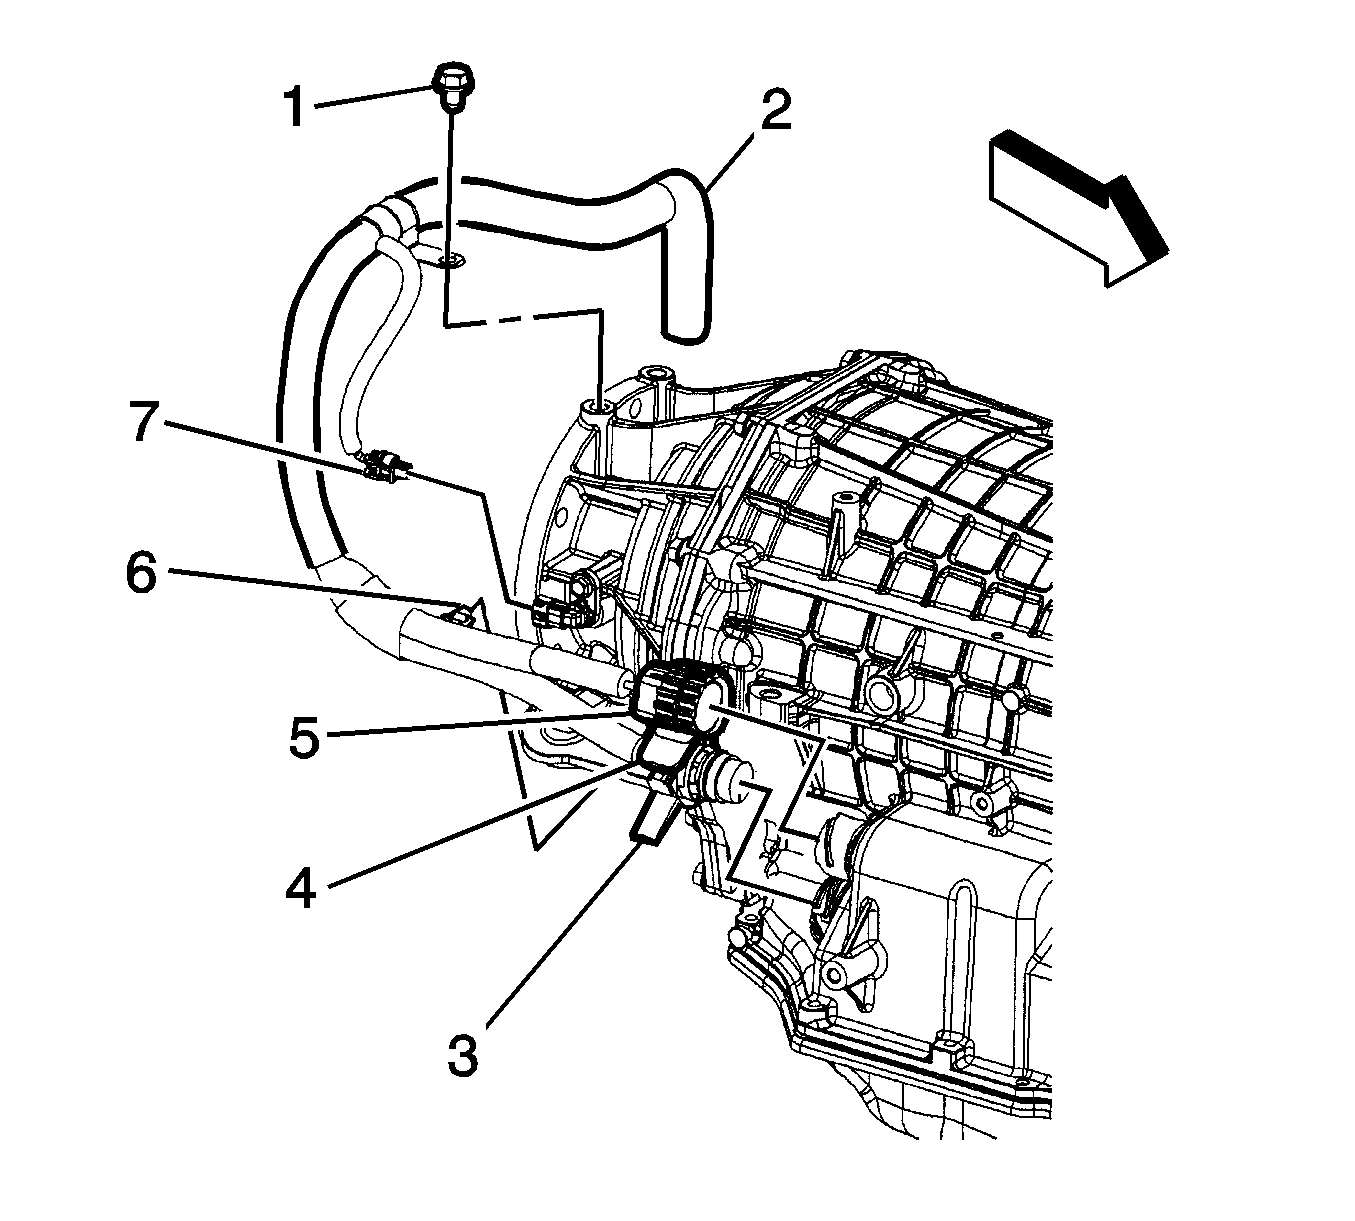
- Remove the transmission electrical harness retaining bolt (1).
- Disconnect the transmission electrical harness connector (7) from the vehicle speed sensor (5).
- Disconnect the transmission electrical harness connector (4) from the transmission.
- Disconnect the transmission electrical harness connector (5) from the transmission.
- Remove the transmission electrical harness retaining clip (6) from the transmission.
- Position the transmission electrical harness (2) to avoid interference while removing the transmission.
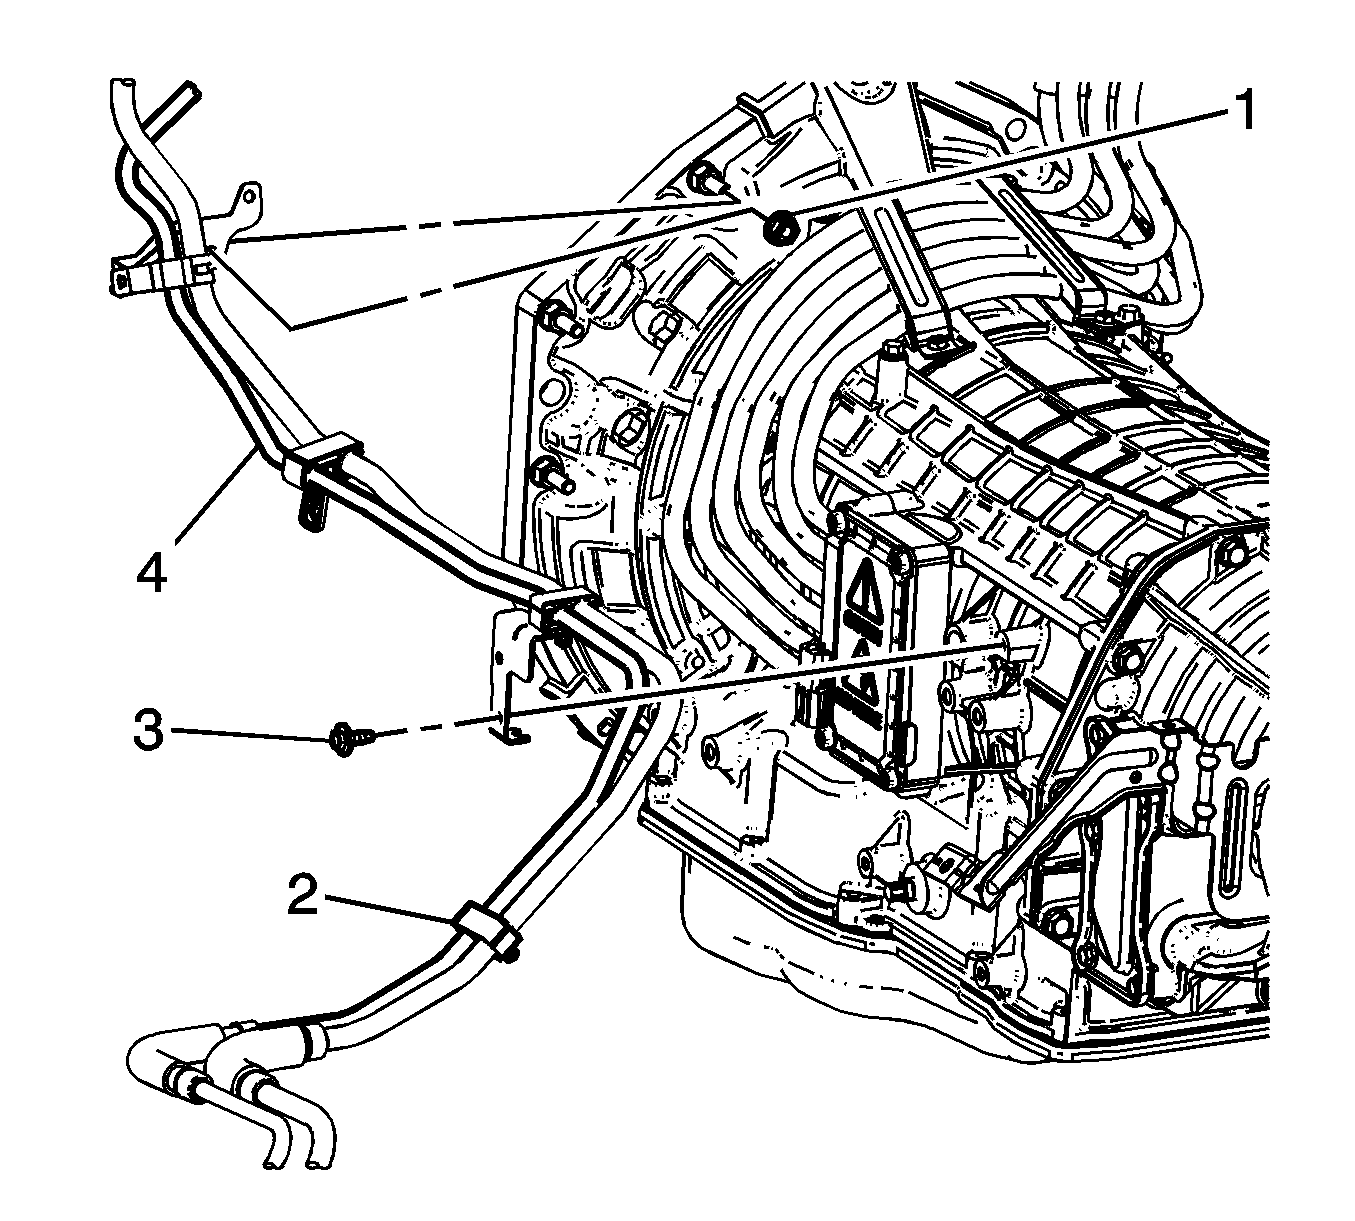
- Remove the fuel pipe bracket nut (1).
- Remove the fuel pipe bracket screw (3).
- Remove the fuel pipe retainer (2).
- Position the fuel pipes (4) to avoid interference while removing the transmission.
- Remove the transfer case, if equipped. Refer to Transfer Case Assembly Replacement.
- Perform the following 2 steps if equipped with 2WD:
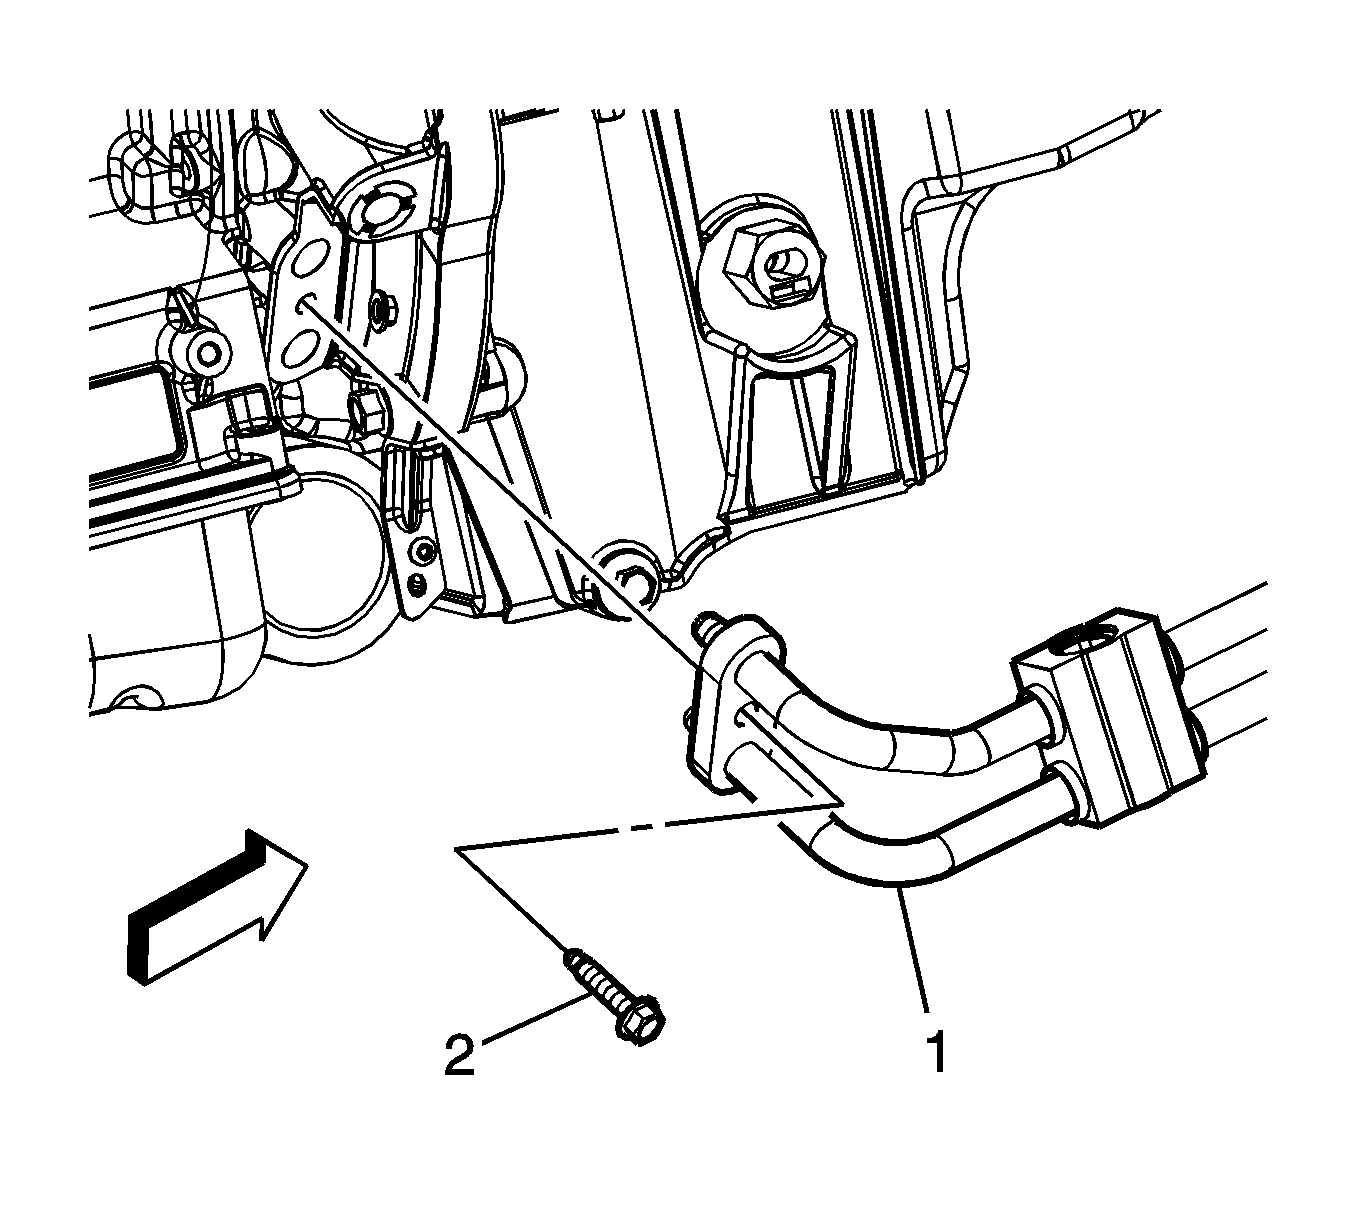
- Remove the transmission oil cooler pipes (1) from the transmission. Refer to Transmission Fluid Cooler Pipe Replacement.
- Plug the transmission oil cooler pipes and pipe connection in the transmission case to prevent fluid loss and contamination.
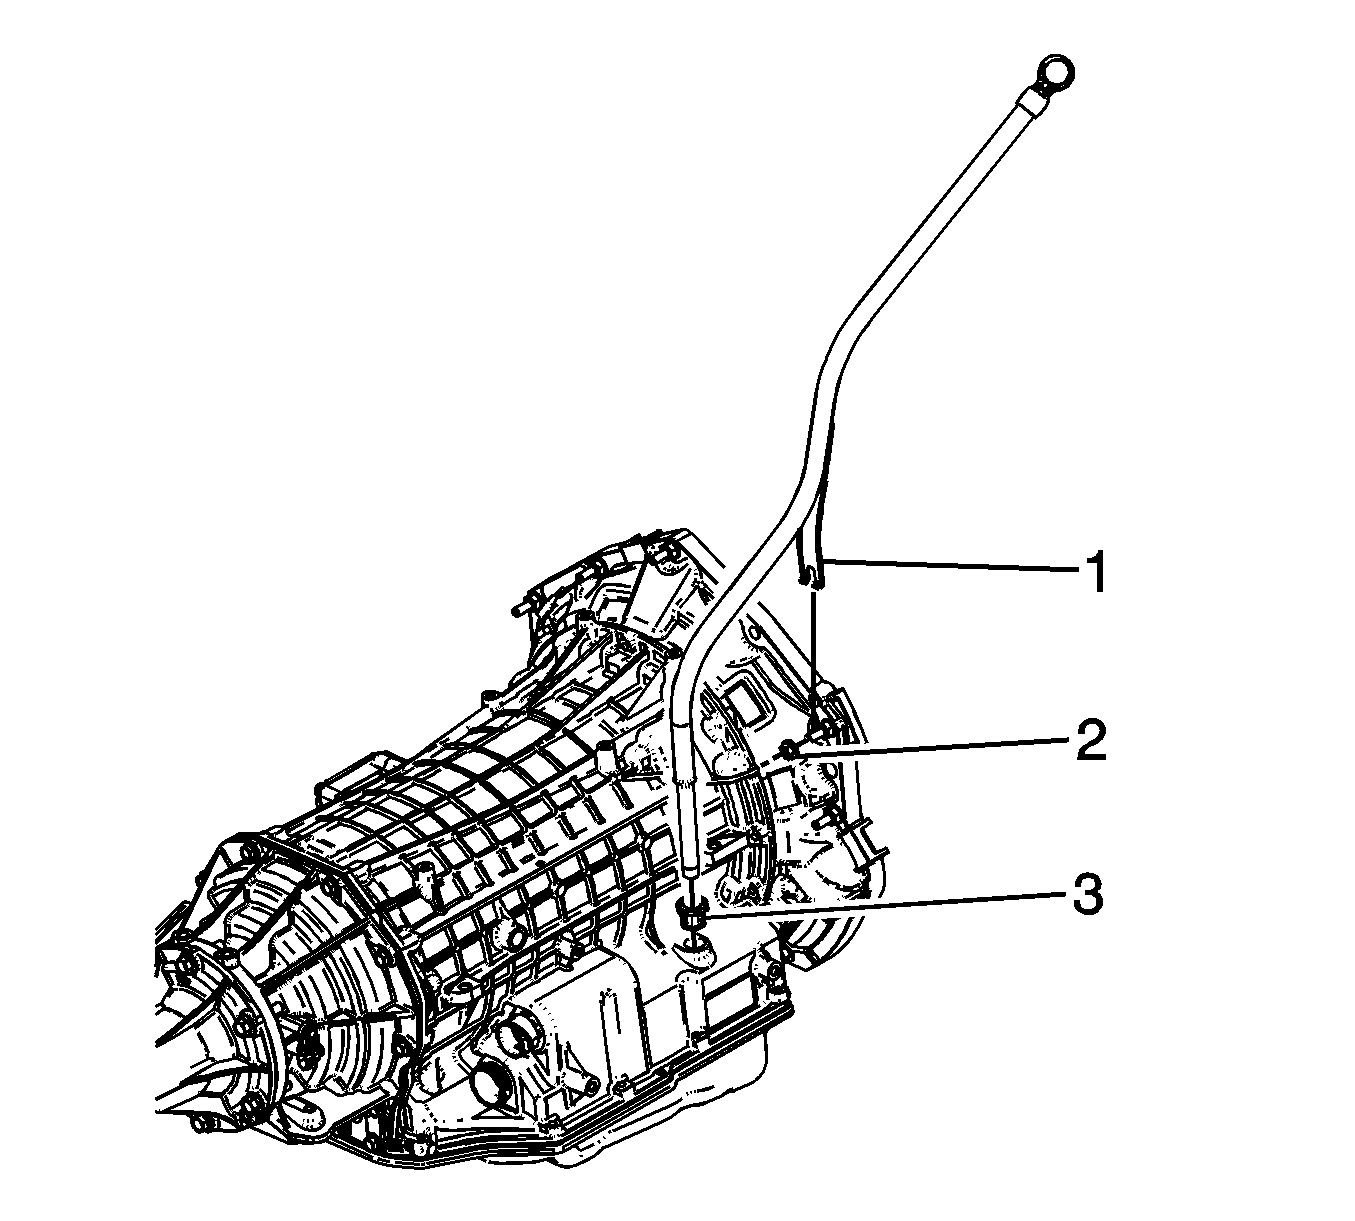
- Remove the fluid filler tube retaining nut (2).
- Remove the fluid filler tube bracket (1) from the transmission and position aside.
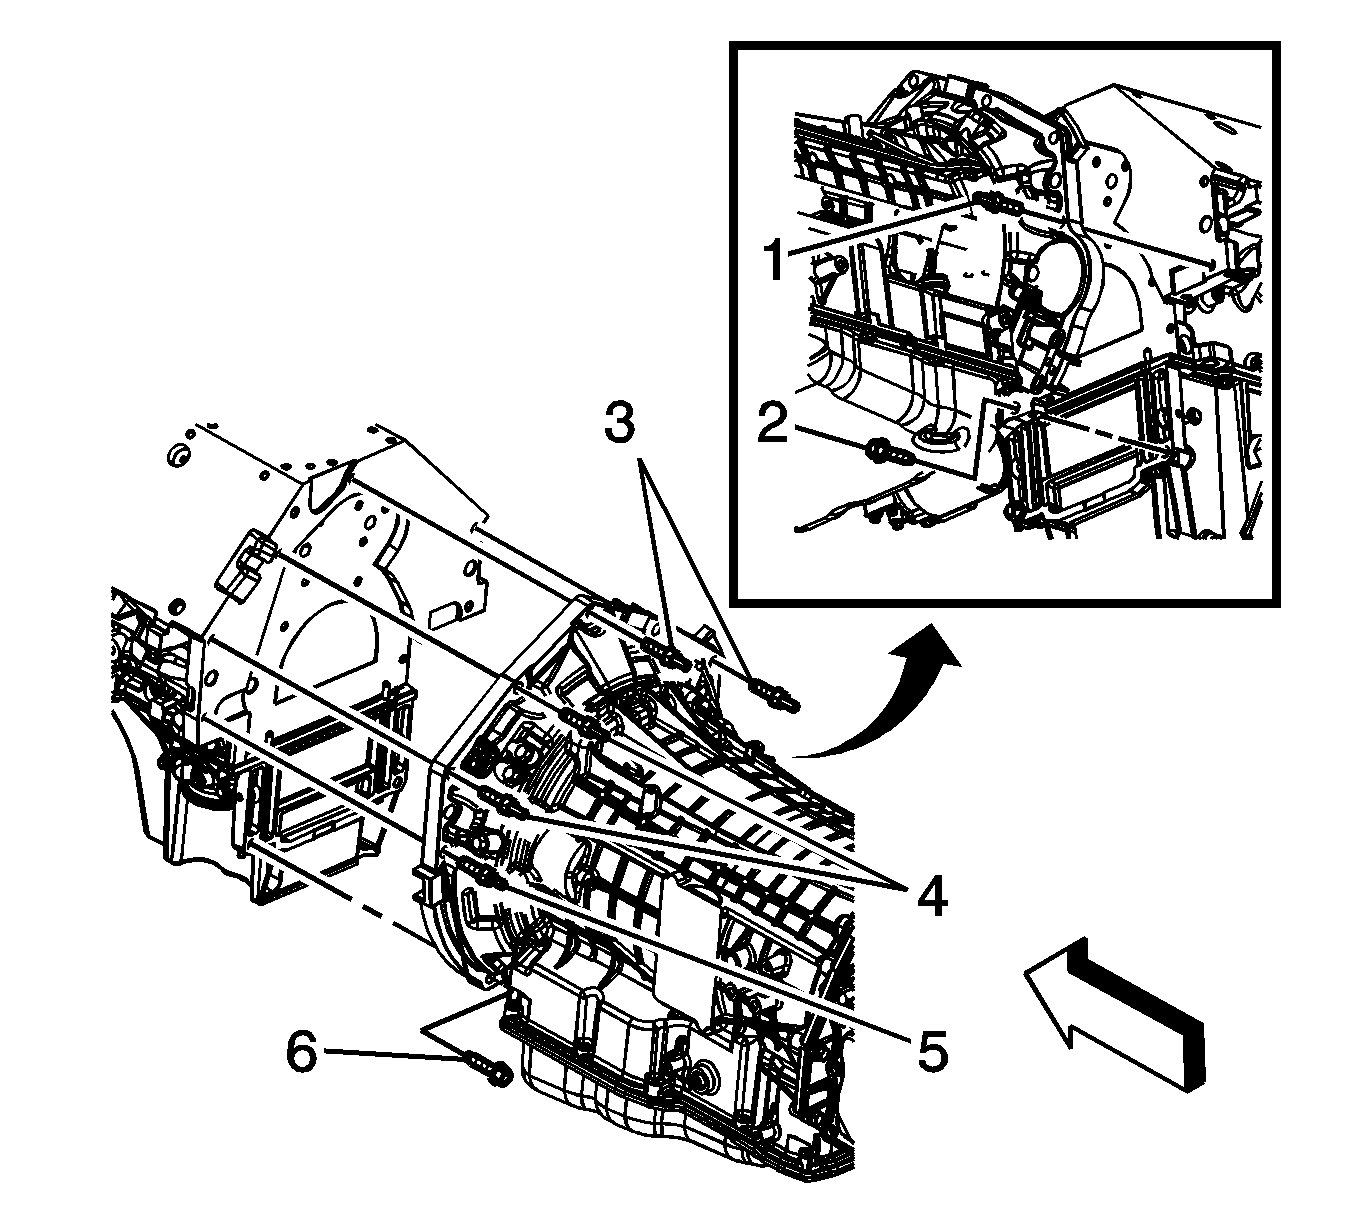
- Remove the bolts and studs (1-6) securing the transmission to the engine.
- Pull the transmission straight back.
- Install the J 21366 onto the transmission bell housing to retain the torque dampener.
- Lower the transmission enough to gain access to the 3 phase cables.
- Remove the 3 phase cables from the transmission. Refer to Generator Control Module 3-Phase Cable Assembly Replacement.
- Remove the transmission from the vehicle while simultaneously removing the fluid filler tube from the transmission.
- Flush the transmission oil cooler and cooling lines if necessary. Refer to Transmission Fluid Cooler Flushing and Flow Test.
- Transfer any remaining components to the new transmission if the transmission is being replaced.
Danger: Always perform the High Voltage Disabling procedure prior to servicing any High Voltage component or connection. Personal Protection Equipment (PPE) and proper procedures must be followed.
The High Voltage Disabling procedure will perform the following tasks:| • | Identify how to disable high voltage. |
| • | Identify how to test for the presence of high voltage. |
| • | Identify condition under which high voltage is always present and personal protection equipment (PPE) and proper procedures must be followed. |
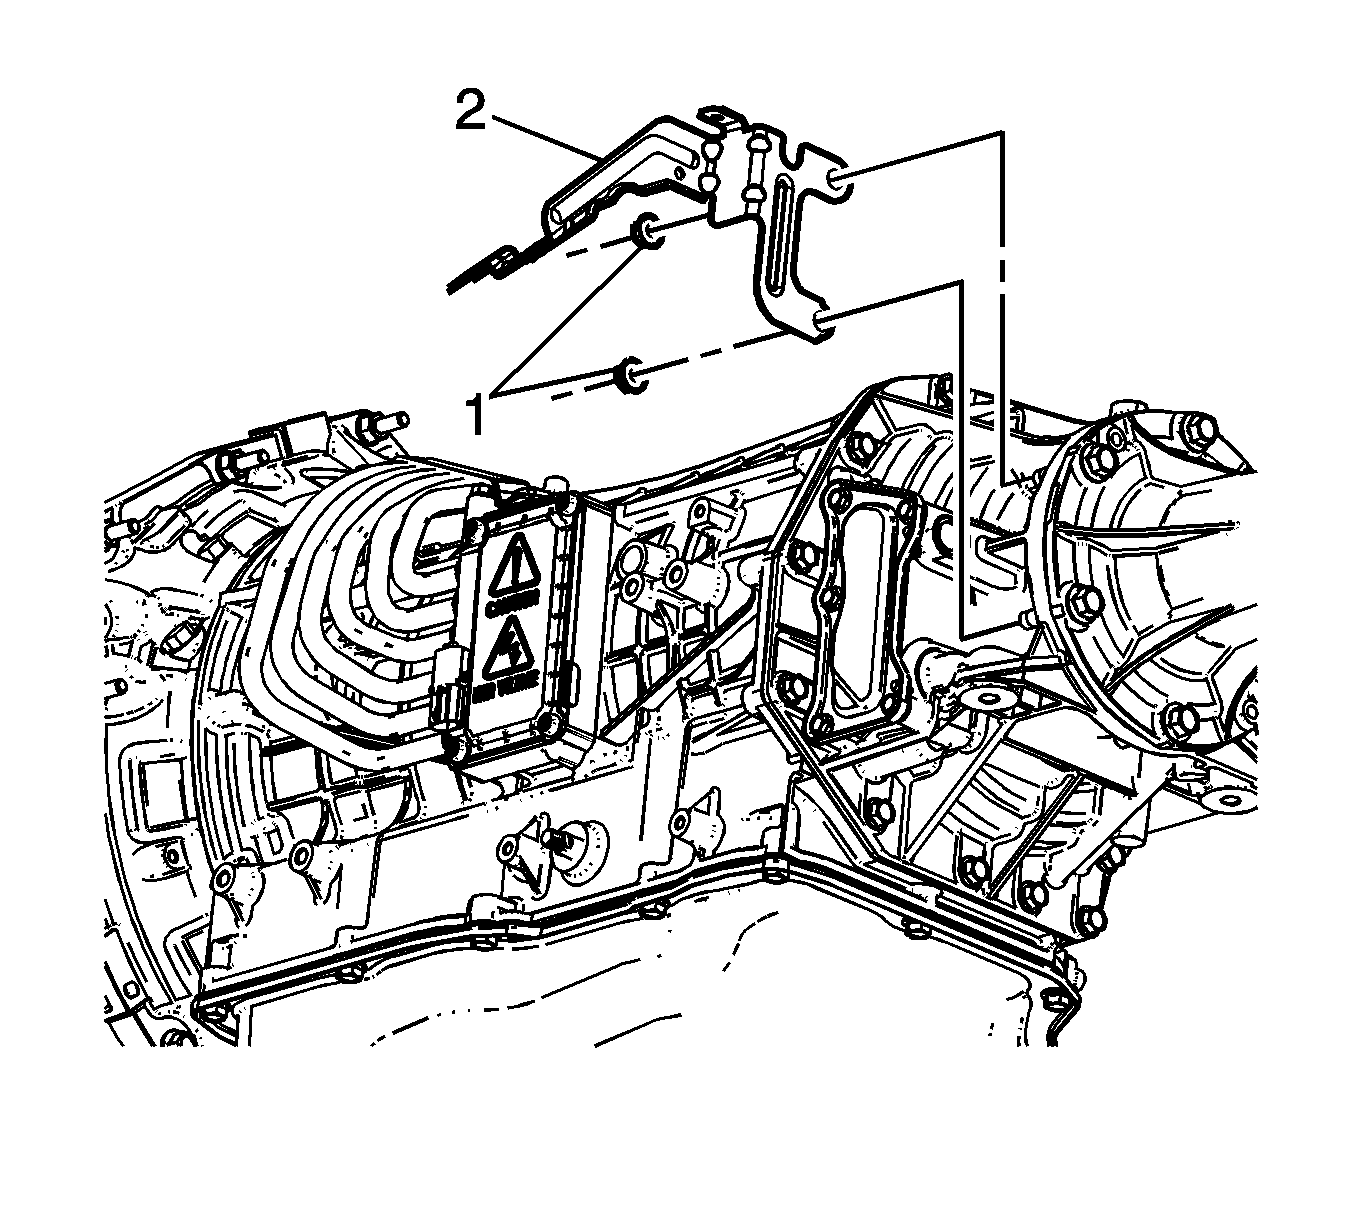
| 48.1. | Remove the fuel pipe bracket nuts (1). |
| 48.2. | Remove the fuel pipe bracket (2). |
Installation Procedure
- Install the J 21366 onto the transmission bell housing to retain the torque dampener.
- Support the transmission with a transmission jack.
- Raise the transmission into place while simultaneously installing the fluid filler tube.
- Install the 3 phase cables to the transmission. Refer to Generator Control Module 3-Phase Cable Assembly Replacement.
- Remove the J 21366 from the transmission.
- Slide the transmission straight onto the locating pins while lining up the marks on the flex plate and the torque dampener.
- Install the bolts and studs (1-6) securing the transmission to the engine.
- Install the fluid filler tube bracket to the transmission.
- Install the fluid filler tube retaining nut.
- Install the transmission oil cooler pipes (1) to the transmission. Refer to Transmission Fluid Cooler Pipe Replacement.
- Install the transfer case, if equipped. Refer to Transfer Case Assembly Replacement.
- Perform the following 2 steps if equipped with 2WD:
- Install the fuel pipe retainer (2).
- Install the fuel pipe bracket screw (3).
- Install the fuel pipe bracket nut (1).
- Connect the transmission electrical harness connector (5) to the transmission.
- Connect the transmission electrical harness connector (7) to the vehicle speed sensor.
- Install the transmission electrical harness retaining clip (6) to the transmission.
- Install the transmission electrical harness retaining bolt (1).
- Install the transmission electrical harness retaining clip (3) to the bracket (4).
- Install the transmission electrical harness retaining clip (5) to the bracket (6).
- Install the transmission electrical harness retaining clip (9) to the bracket (8).
- Connect the transmission electrical harness connector (7) to the transmission cover terminal housing.
- Connect the oxygen sensor electrical connector (1) to the transmission electrical harness connector (2).
- Install the oxygen sensor electrical connector (1) to the fuel pipe bracket.
- Install the transmission electrical harness retainer nut (1).
- Install the range selector lever cable (2) to the cable bracket.
- Install the range selector lever cable retainer (1).
- Connect the range selector lever cable (2) to the range select lever.
- Install the range selector lever cable heat shield (2).
- Install the range selector lever cable heat shield bolts (1).
- Install the transmission heat shield (2).
- Install the transmission heat shield bolts (1).
- Install the vent hoses to the transmission and transfer case. Refer to Vent Hose Replacement.
- Raise the transmission to installed height.
- Install the catalytic converter. Refer to Catalytic Converter Replacement.
- Install the transmission mount. Refer to Transmission Mount Replacement.
- Install the transmission support crossmember. Refer to Transmission Support Crossmember Replacement.
- Remove the transmission jack.
- Install the front propeller shaft, if equipped. Refer to Front Propeller Shaft Replacement.
- Install the rear propeller shaft. Refer to Rear Propeller Shaft Replacement.
- Rotate the engine crank bolt clockwise in order to access the torque dampener bolts.
- If reusing the torque dampener bolts, clean the bolt threads and apply LOCTITE™ 242, GM P/N 12345382 (Canadian P/N 10953489), or equivalent to the threads prior to installation.
- Install the engine shield. Refer to Engine Shield Replacement.
- Install the right flex plate inspection cover (1).
- Install the right flex plate inspection cover bolt (2).
- Install the left flex plate inspection cover (1).
- Install the left flex plate inspection cover stud (2).
- Install the torque dampener access plug (1).
- Install the auxiliary fluid pump. Refer to Auxiliary Fluid Pump and Gasket Replacement.
- Lower the vehicle.
- Install the 3 phase cables to the under hood cable bracket and to the power inverter module. Refer to Generator Control Module 3-Phase Cable Assembly Replacement for completion of the 3 phase cable installation.
- Perform the high voltage enabling. Refer to High Voltage Enabling.
- Fill the transmission with the proper amount of transmission fluid. Refer to Fluid Capacity Specifications and Transmission Fluid Check.
- If a replacement transmission is installed, program the TCM. Refer to Control Module References.

The torque dampener must rotate freely by hand.
Notice: Refer to Fastener Notice in the Preface section.
Tighten
Tighten the bolts and studs to 50 N·m (37 lb ft).

Tighten
Tighten the nut to 18 N·m (13 lb ft).


| 12.1. | Install the fuel pipe bracket (2). |
| 12.2. | Install the fuel pipe bracket nuts (1). |
Tighten
Tighten the nuts to 50 N·m (37 lb ft).

Tighten
Tighten the screw to 7 N·m (62 lb in).
Tighten
Tighten the nut to 25 N·m (18 lb ft).

Tighten
Tighten the bolt to 50 N·m (37 lb ft).


Tighten
Tighten the nut to 25 N·m (18 lb ft).


Tighten
Tighten the bolts to 17 N·m (13 lb ft).

Tighten
Tighten the bolts to 17 N·m (13 lb ft).

Install the 6 flex plate to torque dampener bolts (1).
Tighten
Tighten the bolts to 65 N·m (48 lb ft).

Tighten
Tighten the bolt to 12 N·m (106 lb in).

Tighten
Tighten the stud to 12 N·m (106 lb in).

Notice: Use Dexron VI transmission fluid only. Failure to use the proper fluid may result in transmission internal damage.
