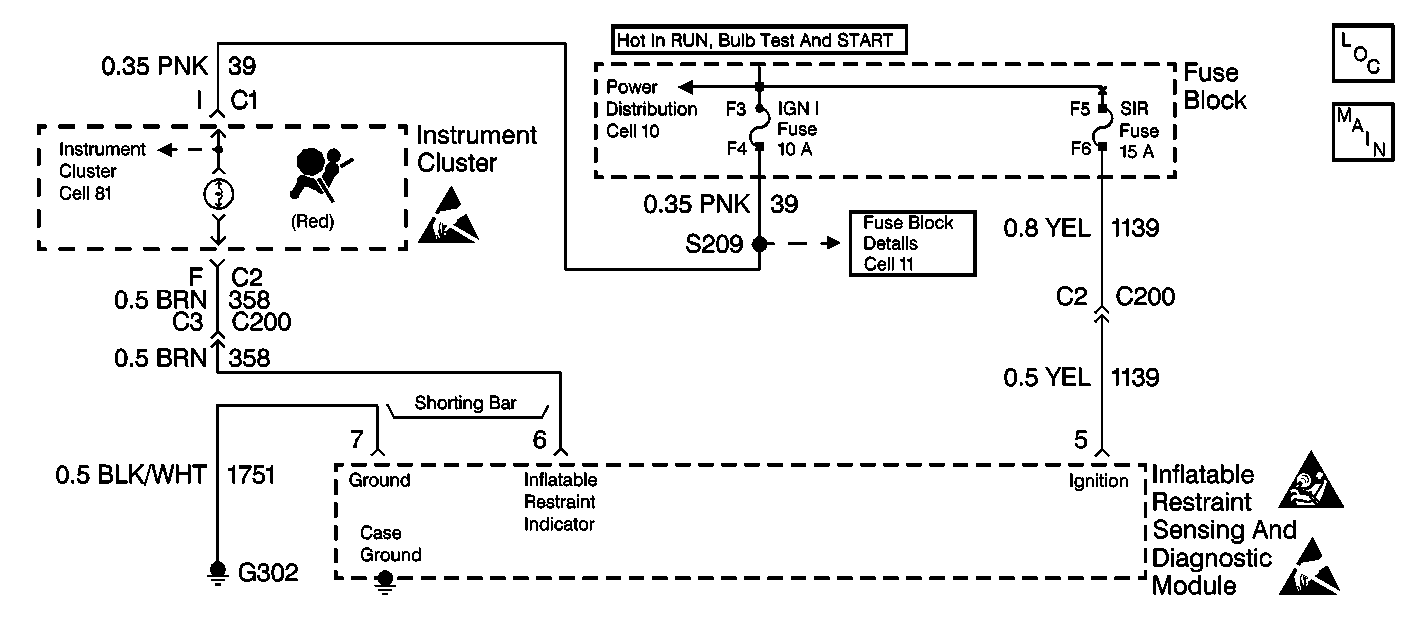
Circuit Description
When the ignition switch is first turned to RUN, the IGN 1 Fuse applies battery voltage to the AIR BAG warning lamp that is connected to INFLATABLE RESTRAINT INDICATOR, terminal 6. The SIR Fuse applies battery voltage to the IGNITION input, terminal 5. The inflatable restraint sensing and diagnostic module (SDM) responds by flashing the AIR BAG warning lamp seven times.
When measurements are requested in this table, use J 39200 Digital Multimeter with the correct terminal adapter from J 35616 Connector Test Adapter Kit. When a check for proper connection is requested, refer to Intermittents and Poor Connections . When a wire, connector or terminal repair is requested, use J-38125 Terminal Repair Kit and refer to Wiring Repair .
Test Description
The numbers below refer to the step numbers on the diagnostic table:
-
This step checks to see if the malfunction is in the inflatable restraint sensing and diagnostic module (SDM) circuitry or in the instrument cluster power feed circuitry.
-
This step checks to see if voltage is present in the AIR BAG warning lamp circuit.
-
This step checks to see if there is a short to B+ in CKT 358.
-
This step checks to see if the instrument cluster wiring harness connector C2 is damaged or corroded.
-
This step checks for an open or a high resistance in CKT 358.
-
This step checks to see if power is available to the instrument cluster power feed circuit.
-
This step determines if there is a short to ground in CKT 39 or if there is a malfunctioning instrument cluster.
-
This step checks to see if the instrument cluster wiring harness connector C2 is damaged or corroded.
-
This step determines if there is an open or a high resistance in CKT 39 or if there is an open or a high resistance in the power feed circuit to the IGN 1 Fuse.
Step | Action | Value(s) | Yes | No |
|---|---|---|---|---|
1 | Was the SIR Diagnostic System Check performed? | -- | ||
Does the BRAKE indicator turn ON? | -- | |||
Is the measured voltage more than the specified value? | 10.0 V | |||
Is the measured voltage less than the specified value? | 1.0 V | |||
5 |
Is the repair complete? | -- | -- | |
Is the connector damaged or corroded? | -- | |||
7 | Repair the instrument cluster harness connector. Refer to Connector Repairs in Wiring Systems. Is the repair complete? | -- | -- | |
Use the J 39200 to measure the resistance between terminal F of the instrument cluster connector C2 and terminal 6 of the SDM wiring harness connector. Is the measured resistance within the specified value? | 0-2 ohms | |||
9 |
Is the repair complete? | -- | -- | |
10 | Replace the instrument cluster. Refer to Instrument Cluster Replacement in Instrument Panel, Gauges and Console. Is the repair complete? | -- | -- | |
Is the fuse good? | -- | |||
12 |
Is the fuse good? | -- | ||
Is the measured resistance less than the specified value? | OL | |||
14 |
Is the repair complete? | -- | -- | |
15 |
Is the repair complete? | -- | -- | |
16 | Install the IGN 1 Fuse. Is the repair complete? | -- | -- | |
Is the connector damaged or corroded? | -- | |||
18 | Repair the instrument cluster harness connector. Refer to Connector Repairs in Wiring Systems. Is the repair complete? | -- | -- | |
Use the J 39200 to measure the resistance between terminal I of the instrument cluster connector C1 and each terminal of the IGN 1 Fuse fuseholder. Is either reading within the specified value? | 0-2 ohms | |||
20 |
Is the repair complete? | -- | -- | |
21 |
Is the repair complete? | -- | -- | |
22 | Reconnect all the SIR system components, making sure all the components are properly mounted. Have all the SIR components been reconnected and properly mounted? | -- | -- |
