For 1990-2009 cars only
Tools Required
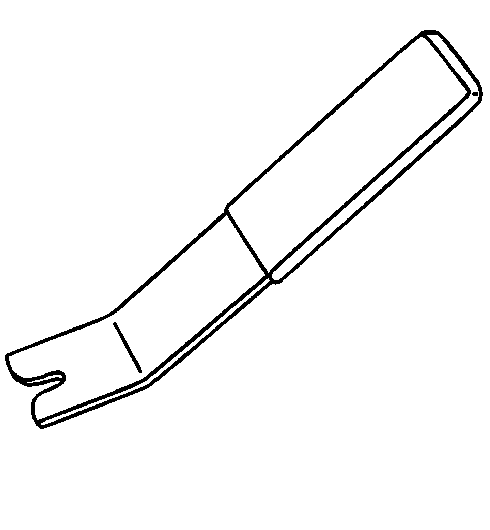
J 38778 Door Trim Pad and Garnish Clip Remover
Removal Procedure
- Remove the windshield garnish moldings. Refer to Windshield Pillar Garnish Molding Replacement .
- Remove the front door opening weather-strips. Refer to Front Door Opening Weatherstrip Replacement in Doors.
- Remove the sunshades. Refer to Sunshade Replacement .
- Remove the overhead console, if equipped. Refer to Roof Console Replacement .
- Remove the dome lamp. Refer to Dome Lamp Replacement in Lighting Systems.
- Remove the finish molding from the rear headliner trim. Refer to Headlining Trim Panel Molding Replacement .
- Remove the upper pillar trim panel. Refer to Center Pillar Upper Trim Panel Replacement .
- Remove the upper trim panel from the rear body side. Refer to Third Pillar Trim Replacement .
- Remove the upper trim panel from the rear corner. Refer to Upper Rear Trim Finish Panel Replacement .
- Remove the reading lamps. Refer to Roof Side Rail Lamp Replacement in Lighting Systems.
- Remove the rear fan/temperature controls. Refer to Control Assembly Replacement - Auxiliary in Overhead Console in HVAC Systems - Manual.
- Remove the cargo lamp. Refer to Cargo Lamp Replacement in Lighting Systems.
- Remove the liftgate weather-strips. Refer to Liftgate Weatherstrip Replacement in Body Rear End.
- Remove the roof auxiliary air outlets, if equipped. Refer to Auxiliary Air Outlet Duct Replacement in Heating, Ventilation, and Air Conditioning.
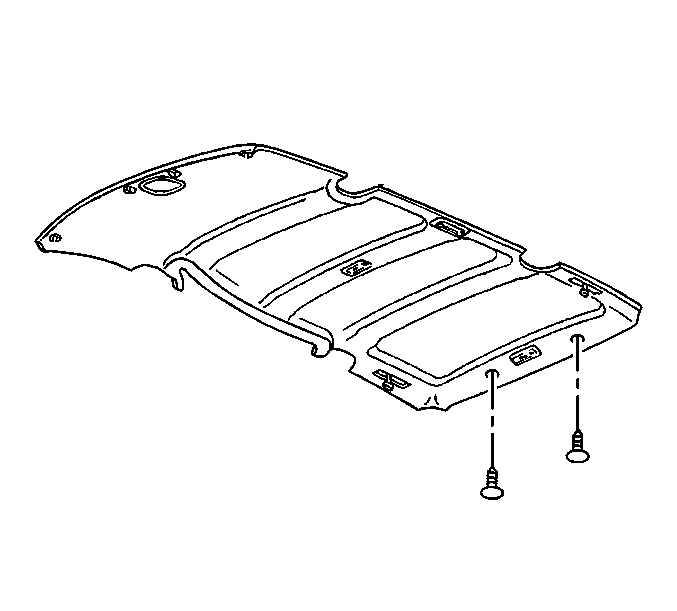
- Use J 38778 in order to remove the rear headliner push-in retainers.
- Push the headliner forward in order to release the locking tab at the front overhead console.
- Remove the headliner from the roof through the rear of the vehicle.
Installation Procedure
- Install the headliner to the roof through the rear of the vehicle.
- Align the locking tab at the front overhead console.
- Push the headliner rearwards in order to lock the headliner into place.
- Install the rear headliner push-in retainers.
- Install the roof auxiliary air outlets, if equipped. Refer to Auxiliary Air Outlet Duct Replacement in HVAC Systems - Manual.
- Install the liftgate weather-strips. Refer to Liftgate Weatherstrip Replacement in Body Rear End.
- Install the cargo lamp. Refer to Cargo Lamp Replacement in Lighting Systems.
- Install the rear fan/temperature controls. Refer to Control Assembly Replacement - Auxiliary in Overhead Console in HVAC Systems - Manual.
- Install the reading lamps. Refer to Roof Side Rail Lamp Replacement in Lighting Systems.
- Install the upper trim panel to the rear corner. Refer to Upper Rear Trim Finish Panel Replacement .
- Install the upper trim panel to the rear body side. Refer to Third Pillar Trim Replacement .
- Install the upper pillar trim panel. Refer to Center Pillar Upper Trim Panel Replacement .
- Install the trim finish molding to the rear headliner. Refer to Headlining Trim Panel Molding Replacement .
- Install the dome lamp. Refer to Dome Lamp Replacement in Lighting Systems.
- Install the overhead console, if equipped. Refer to Roof Console Replacement .
- Install the sunshades. Refer to Sunshade Replacement .
- Install the front door opening weather-strips. Refer to Front Door Opening Weatherstrip Replacement in Doors.
- Install the windshield garnish moldings. Refer to Windshield Pillar Garnish Molding Replacement .
