Circuit Description
DTC C1287 identifies one of the following conditions:
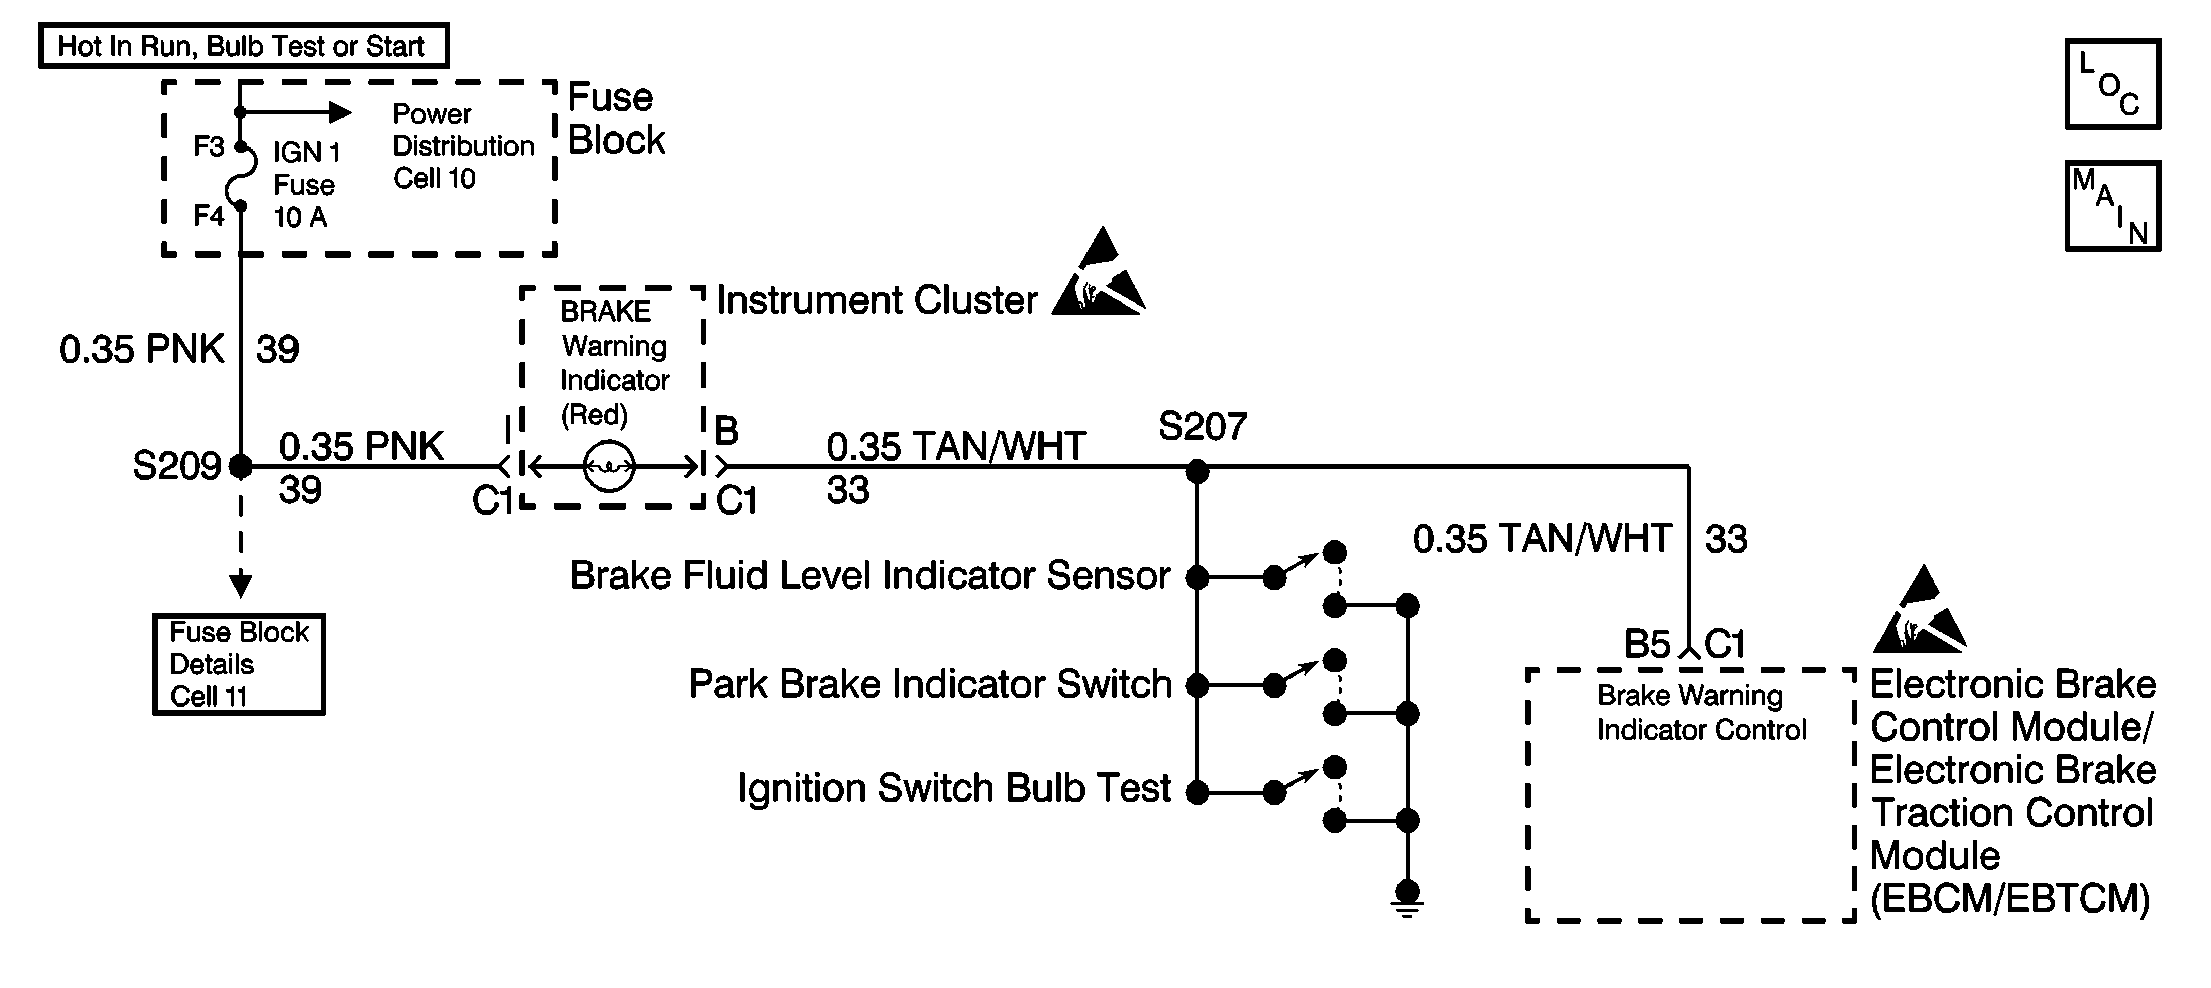
| • | An open or short to voltage between the EBCM/EBTCM and the red BRAKE warning indicator. |
| • | An open driver that does not allow the EBCM/EBTCM to illuminate the red BRAKE warning indicator. |
DTC C1287 will only occur if an ABS malfunction is detected that may degrade base brake operation.
A short to ground in the circuit cannot be detected because the EBCM/EBTCM is not the only device controlling the red BRAKE warning indicator. The following components may also turn on the red BRAKE warning indicator:
| • | The parking brake indicator switch |
| • | The brake fluid level indicator sensor |
Conditions for Setting the DTC
DTC C1287 can set during the three second bulb check and after completing initialization. A malfunction exists if the red BRAKE warning indicator circuit voltage is out of specification. If the circuit voltage is out of specification an open circuit or a short to voltage exists.
Action Taken When the DTC Sets
| • | A malfunction DTC stores. |
| • | The ABS/TCS does not disable. |
| • | The amber ABS/TCS warning indicator will flash to indicate a serious problem if the following conditions occur: |
| - | The EBCM/EBTCM commands the red BRAKE warning indicator on due to an ABS malfunction that may degrade base brake operation. |
| - | The red BRAKE warning indicator cannot turn on. |
Conditions for Clearing the DTC
| • | The condition responsible for setting the DTC no longer exists and the Scan Tool Clear DTC function is used. |
| • | 100 drive cycles pass with no DTC detected. |
Diagnostic Aids
Use the enhanced diagnostic function of the Scan Tool in order to measure the frequency of the malfunction. Refer to the Scan Tool manual or Scan Tool Diagnostics located in this section for the procedure. If the Scan Tool is not available, lift the parking brake handle in order to verify proper indicator operation and continuity of CKT 33 and CKT 39.
Thoroughly inspect any circuitry that may cause the intermittent complaint for the following conditions:
| • | Rubbed-through wire insulation |
| • | A broken wire inside the insulation |
| • | Backed out terminals |
| • | Improper mating |
| • | Broken locks |
| • | Improperly formed or damaged terminals |
| • | Poor terminal-to-wiring connections |
| • | Physical damage to the wiring harness |
Important: Zero the J 39200 test leads before making any resistance measurements.
Step | Action | Value(s) | Yes | No | ||||||
|---|---|---|---|---|---|---|---|---|---|---|
1 | Was the Diagnostic System Check performed? | -- | Go to Step 2 | Go to Diagnostic System Check | ||||||
2 |
Does the brake warning indicator turn ON then OFF? | -- | Go to Step 15 | Go to Step 3 | ||||||
3 |
Does the red BRAKE warning indicator light? | -- | Go to Step 4 | Go to Step 6 | ||||||
4 |
Is the voltage within to the specified value? | 10.0-14.0 V | Go to Step 10 | Go to Step 5 | ||||||
5 | Locate and repair the open in CKT 33 between the EBCM/EBTCM and S207. Is the repair complete? | -- | Go to Diagnostic System Check | -- | ||||||
6 |
Does the brake warning indicator light? | -- | Go to Exterior Lights System Check | Go to Step 7 | ||||||
7 |
Are the bulb and the connection OK? | -- | Go to Step 8 | Go to Step 9 | ||||||
8 | Locate and repair the open in CKT 33 between the instrument cluster connector C1 terminal B and S207. Did you locate and repair an open? | -- | Go to Step 16 | Go to Step 13 | ||||||
9 |
Is the repair complete? | -- | Go to Diagnostic System Check | -- | ||||||
10 |
Does the BRAKE Warning indicator illuminate? | -- | Go to Step 11 | Go to Step 12 | ||||||
11 | Replace the EBCM/EBTCM. Refer to Electronic Brake and Traction Control Module Replacement . Is the repair complete? | -- | Go to Diagnostic System Check | -- | ||||||
12 |
Is the voltage within the specified value? | 10.0-14.0 V | Go to Step 14 | Go to Step 13 | ||||||
13 | Replace the instrument cluster. Refer to Instrument Panel (IP) Cluster Replacement in Instrument Panel, Gauges and Console. Is the repair complete? | -- | Go to Diagnostic System Check | -- | ||||||
14 | Locate and repair the short to voltage in CKT 33. Is the repair complete? | -- | Go to Diagnostic System Check | -- | ||||||
15 | The malfunction is intermittent or is not present at this time. Is the repair complete? | -- | Go to Step 16 | Go to Diagnostic System Check | ||||||
16 |
Has DTC C1287 failed this ignition? | -- | Go to Step 2 | Go to Diagnostic System Check |
