PAINT STRIPPING AND FINISH ANALYSIS AND CORRECTION

Models/Years All Oldsmobile Models
The corrosion protection provided by the factory metal preparation and primer cannot be duplicated in a body shop; therefore, the finish should NOT be stripped down to bare metal unless absolutely necessary. This is particularly true if the primer was applied by electrodeposition (ELPO), which greatly enhances the corrosion resistance of the vehicle.
Only strip the areas that require stripping. If only part of the roof needs to be stripped, then strip only that part of the roof, not the whole vehicle.
Some of the conditions that require stripping down to bare metal are:
1) Rust 2) Body work 3) Cracked primer
The following are conditions that require only the topcoat to be stripped leaving the factory primer intact:
1) Cracked topcoat 2) Pooling paint 3) Excessive film build
Checking the Condition of the Primer
If you are not sure if only the topcoat or the complete finish needs to be stripped, then use lacquer removing solvent to remove the lacquer topcoat from a small area. Clean this area with a rag soaked in a slow reducer. Dry the area and examine it with a magnifying glass. If cracks or pinholes are present in the primer, then strip only the defective areas to bare metal, otherwise only strip the lacquer topcoat.
Stripping the Color Topcoat
Oldsmobile passenger cars are finished in acrylic lacquer. To remove a lacquer topcoat without disturbing the factory primer, use a lacquer removing solvent (feather edger) or an acrylic lacquer paint remover such as Ditzler's DX525 or equivalent.
I. Lacquer Removing Solvent (Feather Edger)
Soak a rag with the solvent and rub the finish until all the topcoat color is removed. Have many rags on hand, keep cloths wet with solvent and turn over frequently to aid in removing finish.
II. Lacquer Paint Remover (i.e. Ditzler's DX525)
A lacquer paint remover will strip lacquer and air dry enamel finishes but, will not touch factory baked enamels and primers.
1. Wear rubber gloves and protective glasses and use in a well ventilated area.
2. Double mask all areas to be protected. Do NOT allow stripper to come in contact with fiberglass, urethane or plastic parts.
3. Brush on one heavy coat of stripper and allow to stand for about 15 minutes.
4. Using a rubber squeegee, simply wipe the old finish off.
5. Remove any remaining residue with lacquer solvent. (Do not use water to wash off since DX525 is not water soluble).
Stripping to Metal
I. Mechanical Method
(A) Lacquer Finish
1. Remove lacquer topcoat with lacquer removing solvent or acrylic lacquer paint remover a previously described. (This is necessary to prevent the grinding disc from getting clogged with lacquer, which melts when it gets hot from friction).
2. Use a No. 24 grit sanding disc to grind off primer down to bare metal.
3. Finish up with a No. 50 grit disc to remove coarse sand scratches.
(B) Enamel Finish
1. Use a No. 24 grit sanding disc to grind off finish to bare metal. (Enamel does not clog the grinding disc like lacquer does).
2. Finish up with a No. 50 grit disc to remove coarse sand scratches.
II. Chemical Method
The following are directions for use of Ditzler's DX-587 fast acting paint stripper. It will remove alkyd, epoxy, acrylic, acrylic urethane and urethane finishes a well as ELPO primer down to bare metal. Similar products are available from other manufacturers.
1. Wear rubber gloves and protective glasses and use in a well ventilated area. The use of a charcoal filter mask is recommended.
2. Doubble mask all areas to be protected. Do NOT use paint stripper on fiberglass panels, flexible urethane parts, plastic parts or moldings.
3. Stir or agitate before using.
4. Apply the stripper with a paint brush or low pressure spray unit. Once the stripper is on the finish, do not agitate it, as this will allow the solvents to escape from the stripper.
5. Let the stripper stand for 15 minutes to 1 hour, or until the paint softens and lifts.
6. Remove old finish with a nylon squeegee or hose off with a high pressure hose.
7. Blow the surface dry and wipe with a rag soaked in silicone and wax remover. (Paint stripper contains wax to hold it against metal panel and seal solvents in).
Mechanical vs. Chemical Stripping --------------------------------- Mechanical stripping is fatest for a small area such as part of a door or fender. Mechanical stripping is also good in an area where the chemical stripper may damage the part or a part nearby. Chemical stripping is quick and eary for a vehicle requiring complete stripping, although areas that need protecting must be double masked first. Chemical stripping is also very good when stripping a complete panel such as a hood or door that can be removed from the vehicle.
FINISH ANALYSIS AND CORRECTION FOR THE NEW CAR PREP TECHNICIAN ----------------------- Introduction
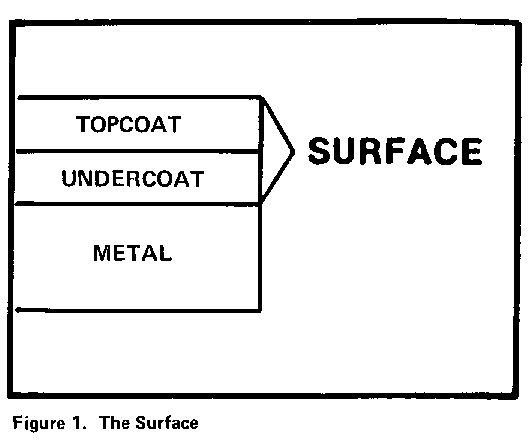
When we refer to the "surface", we're talking about the entire finish topcoats and undercoats - everything short of the bare body metal (Figure 1). The immediate problem involved with breaking through the surface is that when the surface is broken (by sanding or by some other means) the bare metal is exposed to air and moisture - and the possibility of future corrosion. A second reason to avoid breaking through the surface is that there is always the possibility of a color mismatch in areas that are repainted.
Factory Painting Materials and Methods
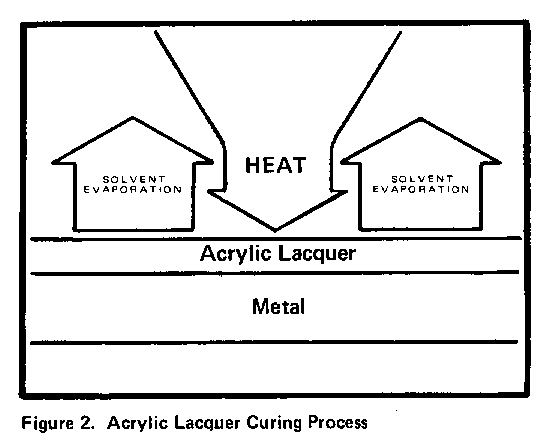
There are two assembly line painting methods used, each with its own set of properties. One method uses thermo-flow acrylic lacquer finishes, while the other uses thermo-set enamel finishes.
Acrylic Lacquer
A thermo-flow acrylic lacquer finish is applied and reflowed in ovens at temperatures of approximately 325 degrees Fahrenheit, so the paint surface flows together. The paint cures by solvent evaporation and the result is a level, glossy coat that requires little or no compounding (Figure 2). Because of the heat involved, the acrylic lacquer cannot be reflowed after any plastic, rubber or glass is mounted on the car.
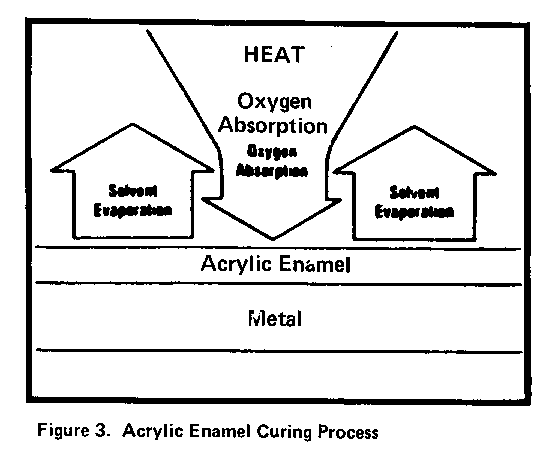
Acrylic Enamel
Heat is also used to cure thermo-set acrylic enamel finishes. However, unlike acrylic lacquers which only undergo a process of solvent evaporation when curing, enamels undergo an additional process of absorption of oxygen from the air (Figure 3). Enamel provides a durable, lustrous finish that cannot be reflowed once it is cured.
When you're called upon to correct a paint imperfection, don't break the surface unless it's absolutely necesary!
Simple Finish Repairs
Depending on the nature of the imperfection, you may be able to correct it using measures that won't disturb the color coat or undercoat. When possible, attempt to rub out and polish the imperfection. If necessary, wet sand the imperfection with ultra-fine or equivalent sandpaper, then rub out and polish the area. To correct dirt in paint conditions use a dirt-nib file to remve dirt speck (nibs) without disturbing surrounding surface. But whatever the case, always use the simplest possible method to repair an imperfection.
Identifying Acrylic Enamel Finishes
Because of the different paint properties discussed in Section 1, there are slightly different steps to be followed when repairing over acrylic enamel finishes.
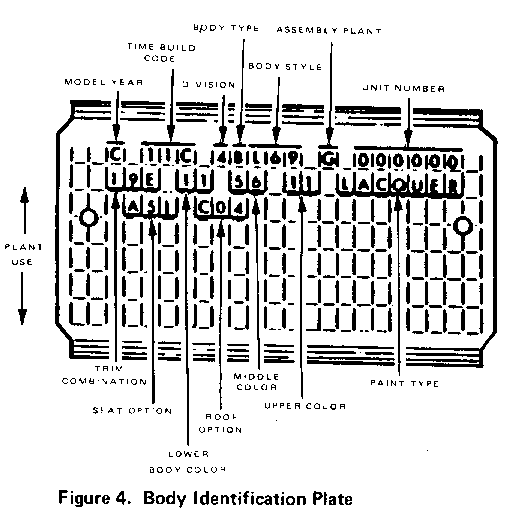
Before you begin making repairs, you must determine whether the factory finish is acrylic lacquer or acrylic enamel. To do this, check the body identification plate on the vehicle (Figure 4).
For identification of acrylic lacquer paint, the letter "L" or the word "Lacquer" will be used. For the acrylic enamels, the letter "W" or the word "water" will designate water-borne acrylic enamel. Also, the letter "E" or the word "Enamel" can be used to designate the paint type as acrylic enamel, solvent reduced.
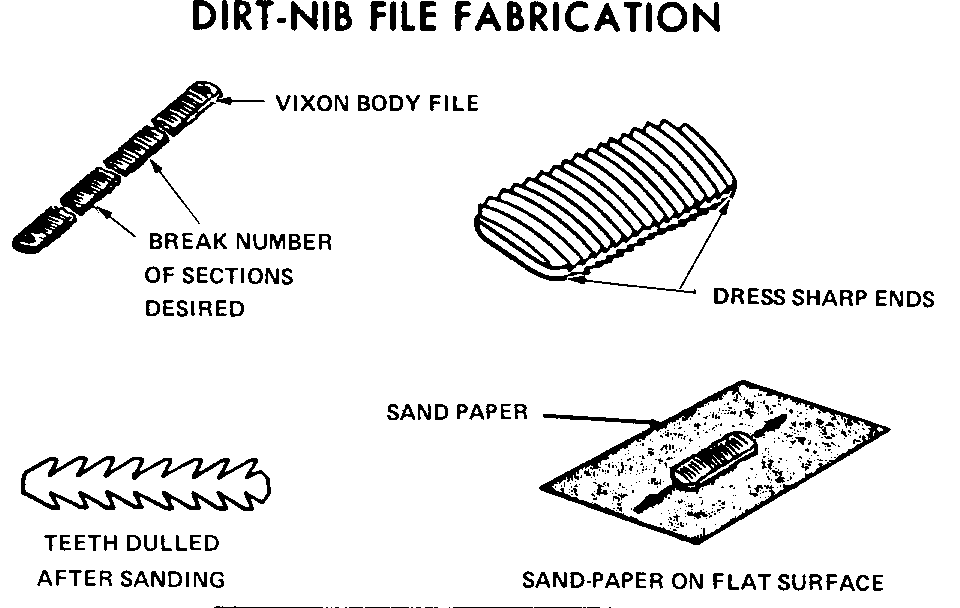
Fabrication of Dirt-Nib File
1. Break vixen file into 1-1/2 inch long lengths. See Figure 5.
2. Dress of sharp ends off.
3. Place 400 to 500 grit sandpaper on flat surface and draw file in fore-aft motions until file teeth are smooth (a light machine oil hastens the operation). Check file on a painted surfuce. It should remove the nib and leave no scratches.
General Motors bulletins are intended for use by professional technicians, not a "do-it-yourselfer". They are written to inform those technicians of conditions that may occur on some vehicles, or to provide information that could assist in the proper service of a vehicle. Properly trained technicians have the equipment, tools, safety instructions and know-how to do a job properly and safely. If a condition is described, do not assume that the bulletin applies to your vehicle, or that your vehicle will have that condition. See a General Motors dealer servicing your brand of General Motors vehicle for information on whether your vehicle may benefit from the information.
