Inside Rearview Mirror Replacement With DD8 and DC4
Removal Procedure
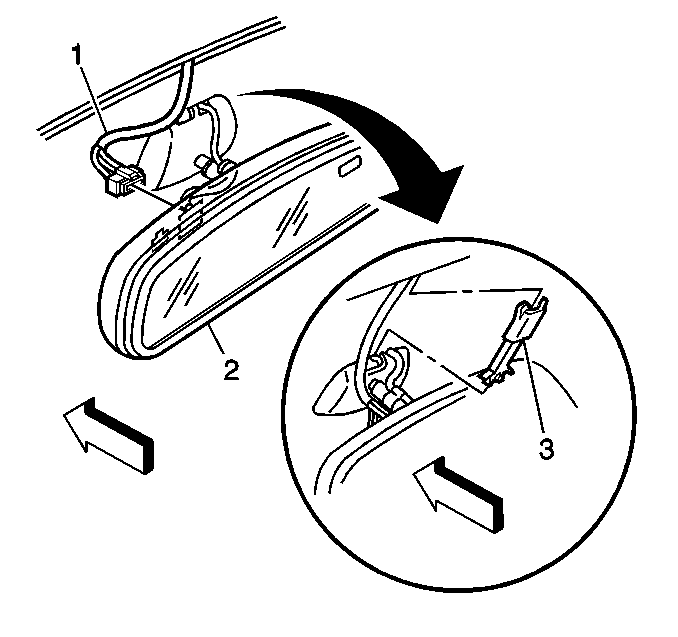
- Disconnect the electrical connector (1) from the mirror (2).
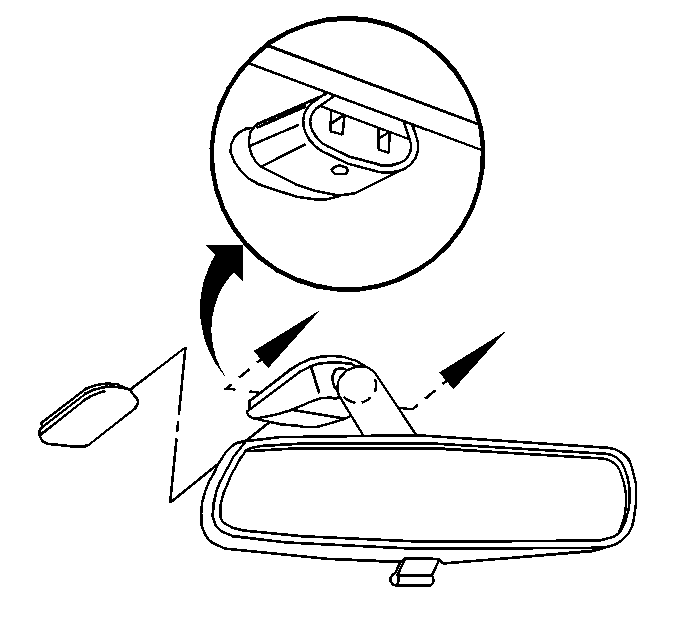
- Remove the mirror assembly from the button by rotating the mirror in a downward-rearward motion.
Notice: Do not use tools or other objects to pry the mirror mount or the mirror away from the windshield. Using tools may damage the mirror mount, the mirror or the windshield.

Adjust the mirror to the full down position.
Using both hands, grasp both sides of the mirror (2) at the top.
Installation Procedure
- Install the center bottom of the mirror mount against the windshield at the top of the button.
- Slide the mount onto the button. Keep the mount parallel to the windshield.
- As the mount begins to grip the button, apply a force against the button. Maintain a downward force until the mount snaps onto the button with an audible click.
- Ensure that the mirror is securely attached to the button by adjusting the mirror in a normal up/down and a side to side range.
- Connect the electrical connector (1).
- Move the sensitivity switch lever to the MAX position. Turn the vehicle ignition OFF.
- In low ambient light, the OFF/M/C/M letters should be illuminated. If the letters are not lit, inspect the connectors and/or the wiring.
- For electrochromatic mirrors, test the mirror by simulating glare. Perform the following steps:

This operation requires at least 20 pounds of force.
| 8.1. | Cover the forward facing sensor, located on the right side of the mirror back, using a black cloth. |
| 8.2. | Hold the cloth over the sensor until the glass starts to darken to the non-reflective stage. |
| 8.3. | Remove the cloth. The mirror returns to the clear reflective stage. |
| 8.4. | Repeat the previous 3 steps several times in order to ensure that the mirror operates correctly. |
Inside Rearview Mirror Replacement Except DC4
Removal Procedure
- Adjust the mirror to the full down position.
- Remove the mirror assembly from the button by rotating the mirror in a downward-rearward motion.
Notice: Do not use tools or other objects to pry the mirror mount or the mirror away from the windshield. Using tools may damage the mirror mount, the mirror or the windshield.

With both hands, grasp both sides of the mirror at the top.
Installation Procedure
- Install the center bottom of the mirror mount against the windshield at the top of the button.
- Slide the mount onto the button, keeping the mount parallel to the windshield.
- As the mount starts to grip the button, apply a force against the button while maintaining a downward force until the mount snaps onto the button with an audible click.
- This operation requires at least 20 pounds of force.
- Check to make sure the mirror is securely attached to the button by adjusting the mirror in a normal up/down and a side to side range.

Inside Rearview Mirror Replacement With DD7
Removal Procedure
- Unplug the electrical connector (1) from the mirror.
- Remove the mirror assembly (2) from the button by rotating the mirror in a downward-rearward motion.
Notice: Do not use tools or other objects to pry the mirror mount or the mirror away from the windshield. Using tools may damage the mirror mount, the mirror or the windshield.

Adjust the mirror to the full down position.
With both hands, grasp both sides of the mirror at the top.
Installation Procedure
- Install the center bottom of the mirror mount against the windshield at the top of the button.
- Slide the mount onto the button, keeping the mount parallel to the windshield.
- As the mount begins to grip the button, apply a force against the button while maintaining a downward force until the mount snaps onto the button with an audible click.
- This operation requires at least 20 pounds of force.
- Check to make sure the mirror (2) is securely attached to the button by adjusting the mirror in a normal up/down and a side to side range.
- Connect the electrical connector (1).
- Move the Sensitivity switch lever to the MAX position and turn the vehicle ignition off.
- In low ambient light, the OFF/M/C/M letters should be illuminated. If they are not lit, check connectors and/or wiring.
- For Electrochromatic mirrors, test the mirror by simulating glare as follows:
- Cover the forward facing sensor, located on the right side of the mirror back with a black cloth.
- Hold the cloth over the sensor until you notice the glass start to darken to the non-reflective stage.
- Remove the cloth and the mirror will return to the clear reflective stage.
- Repeat the previous three steps several times to make sure the mirror operates correctly.
- Calibrate compass if necessary. Refer to Compass Calibration Description .

