Radio/Audio System Operation Buick
Radio Controls Description
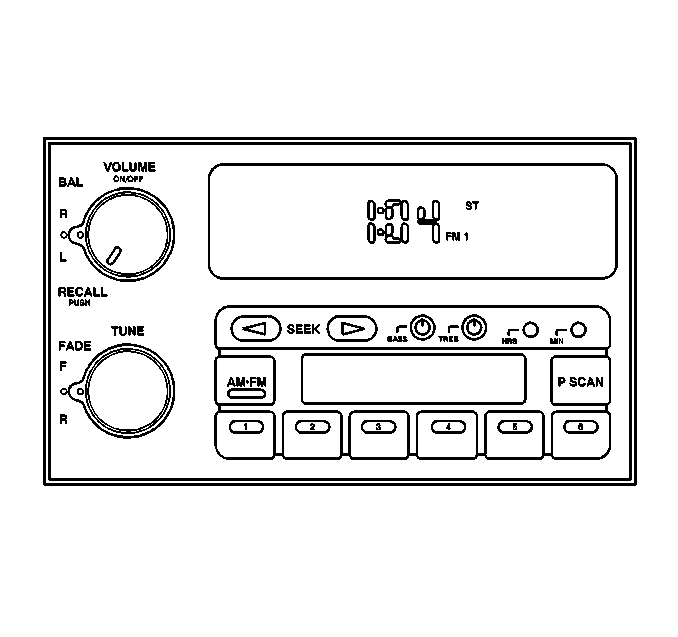
UM7 Radio
UN6 Radio/Cassette
ULO Radio/Cassette with Auto Tone
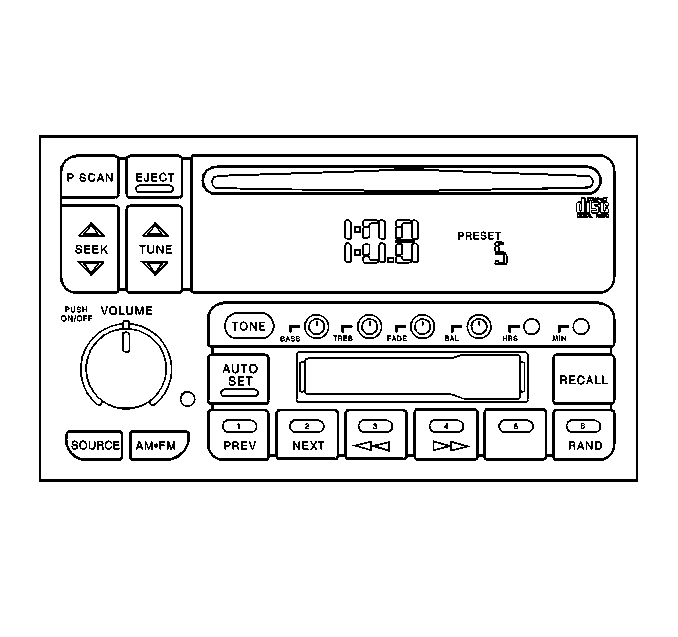
UNO Radio/CD with Auto Tone
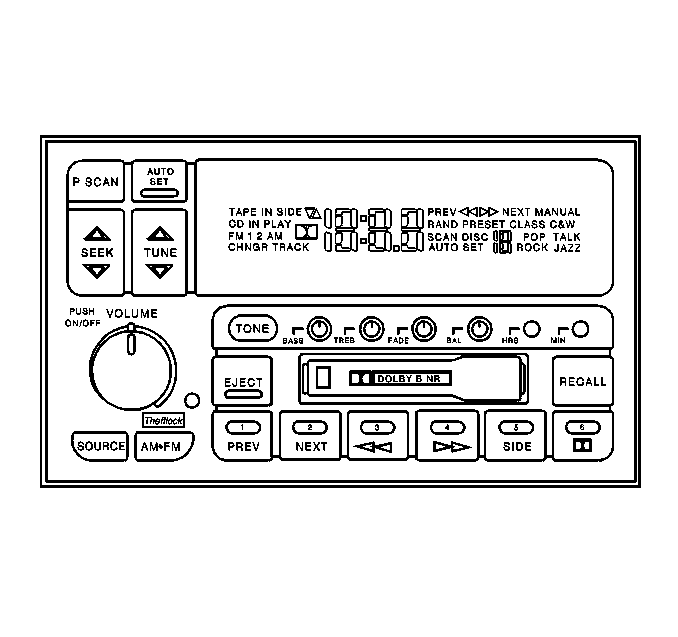
UPO Radio/Cassette/CD with Auto Tone
Volume Control (VOLUME)
Important: When you jump start the vehicle, turn off the radio in order to avoid damaging the sound system.
A single multi-function rotary/push control provides the following functions:
| • | The ON/OFF power |
| • | The volume control functions |
Pressing the VOLUME knob will alternately turn the radio on or off. The volume control portion of the switch is a continuous rotary detent type with 36 detents per revolution. You may increase or decrease the volume over a range of 64 possible steps. This function will not be available during radio conditions that do not permit audio output, such as actively seeking/scanning in tuner mode or in tape mode. The radio display is not affected by volume changes. The volume function is replicated on the steering wheel control with separate volume buttons. Each momentary button closure causes the volume to increase or to decrease by 1 step. Pressing either one of these buttons causes the volume to change at a rate of 12 steps per second.
Stereo Indicator
The word STEREO (UM7) or the letters ST for all other models displays whenever a stereo broadcast is received.
Tune Control
On the UM7 and the UN6 models, the tuning control is a continuous rotary knob with 20 detents per revolution. Turn the control in the desired direction in order to tune the receiver:
| • | Clockwise turning increases the frequency. |
| • | Counterclockwise turning decreases the frequency. |
The UL0, the UN0, and the UP0 models, incorporate a vertically-mounted tuning control button.
| • | Pressing the top portion of the button increases the frequency. |
| • | Pressing the bottom portion of the button decreases the frequency. |
Frequency is either increased or decreased by one channel per detent.
Adjusting the tuning control will stop the SEEK and the SCAN functions. Tuning will then continue from the last frequency where the SEEK/SCAN function stopped. The tuning function is replicated on the steering wheel controls with the separate SEEK and SCAN buttons, when equipped.
AM/FM Switching
The AM/FM button is a sequencing (push-push) type that toggles between the AM, FM1, and FM2 bands The button is active anytime that the unit is on.
| • | Pressing the AM/FM button while the radio is in the receiver mode changes the tuning to the frequency which was last selected on the next band. |
| • | Pressing the AM/FM button while the radio is in the playback mode causes the unit to switch into the receiver mode at the last selected band and frequency. |
The following band switching sequence is from an initial state of FM1:
| • | The first push toggles the receiver to FM2. |
| • | The second push toggles the receiver to AM. |
| • | The third push toggles the receiver back to FM1. |
Recall Button (RECALL)
On the UM7 and the UN6 models, the RECALL activator is a knob. On all other models this activator is a button. Pressing this activator alternates the display between frequency information or time information. With the ignition turned to the OFF position, pressing this activator briefly turns on the display indicating the time of day.
Bass and Treble Controls (BASS) (TREB)
Bass and Treble controls are separate rotary control knobs. Each control is used for adjusting the system's audio frequency response. Operate the BASS function by first pressing and releasing the knob to the out position. This affects only the lower audio frequencies and has a center frequency of 60 Hz.
Operate the TREB (treble) function by first pressing and releasing the knob to the out position. This affects the high audio frequencies and has a center frequency of 10 kHz.
The center position of a given control indicates a flat response over that particular frequency range. Moving a control to the right of center position produces boost, while moving a control to the left produces a cut in frequency range related to that control. All units incorporate a loudness feature that automatically increases the bass bias at low listening levels.
On Auto Tone Control (ATC) models, any adjustment of these controls will activate the MANUAL tone control mode. The MANUAL tone mode will display on the ATC models. On non-ATC models bass and treble changes do not affect the radio display.
Fade Control (FADE)
On the UM7 and the UN6 models, turn the ring behind the lower knob in order to adjust the relative sound between the front and the rear speakers. On all other models, press and release the knob to the out position. Turn the knob either left or right in order to adjust the relative sound between the rear and the front speakers.
Balance Control (BAL)
On the UM7 and the UN6 models, turn the ring behind the upper knob in order to adjust the relative sound between the left and the right speakers. On all other models, press and release the knob to the out position. Turn the knob either to the left or to the right in order to adjust the relative sound between the left and the right speakers respectively.
Auto Set Button
Press the Auto Set button (if equipped) in order to preset the following stations:
| • | The 12 strongest FM stations |
| • | The 6 strongest AM stations |
Press Auto Set button again in order to return the preset to the stations that were manually set.
Station Preset Buttons
The 6 favorite station preset push-buttons serve a dual role with the cassette and the compact disc player functions. When in the receiver mode, these preset buttons serve as station memories. When a CD or a tape is being played, the buttons perform the CD or the tape deck functions as described elsewhere in this section.
The following 18 presets are available:
| • | 6 AM presets |
| • | 6 FM1 presets |
| • | 6 FM2 presets |
Set a desired station by performing the following steps:
- Select the desired band (AM or FM).
- Tune to the desired station.
- Press TONE in order to choose the equalization setting for the station.
- Press and hold one of the 6 numbered buttons.
| 4.1. | The sound will mute. |
| 4.2. | When the sound returns, release the button. |
In order to access a preset station, press and release the button.
Seek
All of the radios feature a dial direction seek function. On models UM7 and UN6, pressing the right arrow SEEK button causes the radio to seek up in frequency. Pressing the left arrow SEEK button causes the radio to seek down in frequency.
All other models incorporate a vertically mounted SEEK button. Pressing the top portion of the button causes the radio to seek up in frequency. Pressing the bottom portion causes the radio to seek down in frequency. When equipped, the seek UP portion of this function is replicated on the steering wheel control.
Scan
Pressing one of the SEEK buttons for 2 seconds causes the word SCAN to appear in the display. The radio will go to the next higher or lower station for 5 seconds, then go on to the next station. Press SEEK again in order to stop scanning.
Preset Scan
Pressing the P-SCAN button will scan the preset stations for 5 seconds and then continue scanning. Press P-SCAN again in order to stop scanning.
Setting Time of Day
Set the time-of-day (TOD) using the HRS (hours) and MIN (minute) push-buttons. An initial delay of 2 seconds occurs after the first button depression before the unit enters the time set mode and the time starts to advance.
| • | When the time set mode begins, the display shows TOD along with an A (AM) or a P (PM). |
| • | Pressing HRS causes the hours display to increase. |
| • | Pressing MIN causes the minutes display to increase. |
| • | Reset the clock if the electrical power is interrupted by one of the following conditions: |
| • | A blown fuse |
| • | A discharged battery |
Auto Tone Control (TONE)
(The response curves shown in the figure above refer to the Oldsmobile radios. The curves for the Buick model radios are similar.)
The TONE button, where applicable, is a sequencing (push-push) type of switch that switches between predetermined frequency response curves and a manual mode (BASS/TREB control functions). The sequence will be as follows in a continuous loop configuration:
- MANUAL
- C & W
- TALK
- JAZZ
- ROCK
- POP
- CLASSICAL
When you select a specific ATC mode with the TONE button, the ATC mode becomes the default. This ATC setting is stored along with the receiver preset frequencies and is recalled whenever you select the preset.
The radio displays the graphical frequency response curves.
Cassette Tape Player Description
Tape Load
The cassette player incorporates a power end load cassette mechanism with an illuminated slot opening. Partially insert the tape through the door ,in the front of the trim plate. The mechanism completes the loading cycle automatically. After loading, the cassette player automatically senses the tape cartridge for either a metal tape or for CRO2 usage. The player makes the appropriate adjustments and the cassette is ready for playing.
EJECT Button
Pressing the EJECT button performs the following functions:
| • | Ejects the cassette the tape |
| • | Returns the audio to the radio mode if the unit is ON |
The eject function is operative from all modes of cassette operation and while the ignition is in the OFF position.
Fast Reverse Button
The Fast Reverse button is a non-latching momentary contact control that serves a dual function with radio preset button number 3. Pressing the Fast Reverse button moves the tape in the reverse direction at a rapid speed until you perform one of the following actions:
| • | Press the Fast Reverse button a second time |
| • | Press the program button in order to return the unit to the normal play mode |
During rewind, the audio reverts to the radio. If no operator changes occur, rewinding continues until the tape reaches the beginning. The unit then returns to the play mode.
Time of day (TOD) remains displayed and a program arrow blinks while the unit is in the fast reverse mode.
Fast Forward Button
The Fast Forward button is a non-latching momentary contact control that serves a dual function with radio preset button number 4. Pressing the Fast Forward button moves the tape in the forward direction at a rapid speed until you perform one of the following actions:
| • | Press the Fast Forward button a second time |
| • | Press the program button in order to return the unit to the normal play mode |
The corresponding program arrow lights while the fast forward mode is selected.
SEEK Button
The SEEK push-button is a rocker type switch which provides seek up or down of tape selections in the direction pressed. On models UM7 and UN6, the audio system consists of a pair of left/right arrows.
A blank spot of 3 seconds duration is required in order for the deck to recognize a pause between selections.
| • | Pressing the top portion of the rocker, or pressing the right arrow, mutes the audio while the deck searches for the beginning of the next tape selection. |
| • | Pressing the bottom portion of the rocker, or pressing the left arrow, mutes the audio while the deck searches for the beginning of the current selection being played. |
Previous Selection (PREV) Button
The PREV (previous selection) button is a non-latching momentary contact control that serves a dual function with the radio preset button number 1. Pressing the PREV button moves the tape in the rewind direction and begins playback at the start of the current selection. If the elapsed time into the current selection is less than 8 seconds, the unit rewinds to the previous selection. A 4 second passage of silence is required between selections in order for the tape unit to recognize the pause. The audio is muted during this operation.
Next Selection Button (NEXT)
The NEXT (next selection) button is a non-latching momentary contact control that serves a dual function with the radio preset button number 2. Pressing the NEXT button moves the tape in the fast-forward direction and begins playing at the start of the next selection . A minimum of 4 seconds is required for the deck to recognize the pause between selections. The audio is muted during this operation.
SIDE
The SIDE push-button is a non-latching momentary contact control that serves a dual function with the radio preset button number 5. Pressing the SIDE button while a tape is playing will change the side of the tape that is playing.
SOURCE Button
Pressing the SOURCE button, where applicable, allows switching between the radio and the tape cassette. When the tape is active, an arrow is displayed.
Dolby® Noise Reduction
The Dolby® Noise Reduction button, when equipped, is a non-latching momentary contact control that serves a dual function with the radio preset button number 6. Pressing this control in the tape mode switches Dolby® noise reduction off or on. A Dolby® symbol appears in the display while this function is active.
Recall
Pressing the RECALL button displays the following items:
| • | The volume |
| • | The current track number |
Pressing the button again within 5 seconds also displays the length of time that the current track has been playing.
Pressing the button a third time within 5 seconds displays the following items:
| • | The time of day (TOD) |
| • | The volume |
If successive depressions of this button exceed the 5-second intervals, the display defaults to TOD and volume.
Clean (CLN) Indicator
The message CLN appears on the display when the tape head needs cleaning. The tape player will still play tapes, but you should clean the player as soon as possible in order to prevent damage to the tapes and to the player.
Press and hold the EJECT button for 5 seconds in order to reset the CLN indicator. A series of 3 dashes (- - -) appears in the display, showing that the indicator is reset.
Compact Disc Player Description

Notice: Do not attempt to insert any disc into a CD player except those discs which display the symbol shown on the disc label illustration. Insertion of a disc which does not display this symbol, such as the 76 mm (3 in) disc, may cause damage to the CD player and/or disc.
Power Cycling
If the CD is playing when ignition voltage is removed, upon reapplication of the ignition voltage the unit resumes playing from the position reached prior to power down. The CD display shows the number of the track which is selected. The CD IN lamp is lit.
If the battery and ignition voltages are removed from the unit, upon reapplication of power, the following actions occur:
| • | The radio is in the off mode and indicates the time of day. |
| • | The CD lamp turns on. |
When the radio is turned on, the following occurs:
| • | The CD is initialized. |
| • | The CD starts to play track 1. |
| • | The CD lights and the time of play displays. |
After 5 seconds the track selection displays.
CD Load
The CD inserts approximately one half of the way into the CD player. Then the mechanism completes the loading cycle automatically. The mechanism begins to play track 1 on the disc. The CD load function is available at all times that a cartridge is not presently loaded.
CD Eject
This function is active with battery voltage. You can eject a disc with the ignition off. With the radio on and the ignition on, pressing the EJECT button performs the following functions:
| • | The disc mutes |
| • | The audio switches to the previous radio function |
| • | The loading motors eject the disc |
| • | The CD indicator turns off |
At any time, with the radio or the ignition on or off, remove an ejected disc from the CD load mechanism within 25 seconds. Otherwise, the disc will automatically reload, even though the play mode will not activate.
Source Button
Press this button in order to switch between the radio and the CD. The CD PLAY display will appear when the CD is active.
Recall
Pressing the RECALL button displays the following items:
| • | The volume |
| • | The current track number |
Pressing the button again within 5 seconds also displays the length of time that the current track has been playing.
Pressing the button a third time within 5 seconds displays the following items:
| • | The time of day (TOD) |
| • | The volume |
If successive depressions of this button exceed the 5-second intervals, the display defaults to TOD and volume.
Stop
Stop the CD playback by employing any one of the following methods, where applicable:
| • | Pressing the AM/FM button in order to switch the unit to the radio mode, with the last frequency and band selected. |
| • | Ejecting a disc or CD changer cartridge in order to switch the unit to the tuner mode. |
| • | Loading a tape in order to switch the unit to the cassette mode. |
Previous Selection (PREV) Button
The PREV button causes the player to start playback of the current track. If the elapsed time is less than 8 seconds, the player moves to the previous track. In random mode, the previous track is the track before the current track in the random library.
Next Selection (NEXT) Button
Press the NEXT button in order to advance the player to the next track. In random mode, the next track is the subsequent track in the random library.
Random (RAND)
The RAND button is a non-latching control that serves a dual function with radio preset button number 6. Pressing this control in the CD play mode causes the current selection to stop playing. A random playback order is selected by the microcomputer. Play then resumes and the are tracks played in the random order that was selected. When the final selection has played, the unit will continue play in the original random order. Pressing the RAND button at any point during random playback causes the playback to continue in the normal sequence beginning with the current track.
Fast Reverse
The fast reverse button is a non-latching momentary contact control that serves a dual function with radio preset button number 3. Pressing this button allows reverse movement within the disc at a faster than normal playback rate, as long as you hold the button in.
When activated, the audio level is reduced by 6 dB. The disc plays in the reverse direction at a rate of 6 times the normal speed. Elapsed time within the selected track is displayed while in the reverse mode.
When you release the Reverse button, the following items display:
- The disc number
- The elapsed time, 5 seconds later
- The user selected default , 5 seconds later
Fast Forward
The fast rorward button is a non-latching momentary contact control that serves a dual function with radio preset button number 4. Pressing this button allows forward movement within the disc at a faster than normal playback rate, as long as you hold the button in.
When activated, the audio level is reduced by 6 dB. The disc plays in the forward direction at a rate of 6 times the normal speed. Elapsed time within the selected track is displayed while in the forward mode.
When you release the fast forward button, the following items display:
- The disc number
- The elapsed time, 5 seconds later
- The user selected default , 5 seconds later
Compression (NR)
The compression function processes the audio signal and makes quieter passages louder, allowing the music to be heard in an automotive environment. The NR button serves a dual function with radio preset button number 6.
Pressing this control in the CD mode toggles compression on or off. The unit stays in the selected mode until the operator resets the unit or until battery voltage is lost. The compression symbol (COMP) is displayed while this feature is in effect. Compression is only useable in the CD mode.
Error (ERR) Detection
The unit indicates an ERR message in the display when any the following conditions occur:
| • | The focusing mechanism is impaired by moisture |
| • | Tracking or servo problems occur |
| • | A disc is inserted upside down |
The unit switches to the radio mode and ejects the CD. The ERR message remains lit in the display for 5 seconds. If a CD is inserted upside down, the CD player is not able to initialize, and the unit will not shift into the audio modes. ERR is lit in the display and the disc ejects. The ERR message turns off after 5 seconds or if the operator reinserts the disc correctly.
The ERR graphic is not lit unless the following conditions are true:
| • | The CD player is active |
| • | The CD player is in the play mode |
Additionally, the ERR graphic is not lit under the following conditions:
| • | The ambient temperature exceeds a preset temperature |
| • | The CD operation is not functional |
| • | The CD operation may cause damage to the laser |
The disc ejects and ERR lights in the display. The ERR message is maintained in the display until the temperature changes to a safe operating temperature. While ERR is displayed, the unit does not accept a disc.
Mode Switching
The unit changes status without popping on the audio lines. Lapses are not longer than 2 seconds between switching audio sources.
Speakers
Speakers for the various systems are assigned in the following manner:
| • | The UQ8 system consists of 4 speakers: 1 in each front door and 2 in the rear. |
| • | The UW6 system consists of 6 speakers: 2 in each front door and 2 in the rear. |
Theft Deterrent (Theftlock®) Description
Enabling Theftlock®
The Theftlock® theft deterrent feature causes the radio to become inoperable if the battery voltage is disconnected for more than 15 seconds when the unit is in the secured state. Use the code entry scheme for the following purposes:
| • | To secure the radio |
| • | To unsecure the radio |
| • | To unlock the radio |
You may use any number between 000-1999 as a security code.
Perform the following sequence of operations in order to enable the theft deterrent:
- Ensure that the battery and the ignition voltages are applied and the radio is turned off.
- Press and hold the radio preset buttons 1 and 4 for 5 seconds. The display will show - - -, indicating that the unit is not in the secure mode.
- Using the HR (or HRS) and the MN (or MIN) buttons, enter any code number. The initial key depression of either button will cause the display to indicate 000.
- Press and hold the MIN (or MN) button until the last two digits of the code appear. The digits will also increment one by one with every momentary depression.
- Press and hold the HRS (or HR) button until the first digit or digits of the code appear. The digits will also increment one by one with every momentary depression.
- Press the AM/FM button. The display will now show REP for 5 seconds, indicating that you must re-enter the code for verification.
- Re-enter the same code number by repeating steps 3-5.
- Press the AM/FM button.
- The display reverts to TOD after 15 seconds.
Important: Only 15 seconds are allowed between each of the following steps.
| • | If the display shows SEC, the verification was successful and the system is in the secure state. |
| • | If the display shows - - -, the verification steps were not successful. Start the entire sequence from the beginning. |
Disabling Theftlock®
Disable the theft deterrent from the secure mode by using the following sequence of operations:
- Ensure that the battery and the ignition voltages are applied and the radio is turned off.
- Press and hold the radio preset buttons 1 and 4 for 5 seconds. The display will show SEC, indicating that the unit is in the secure mode.
- Using the HR (or HRS) and the MN (or MIN) buttons, enter any code number. The initial key depression of either button will cause the display to indicate 000.
- Press and hold the MIN (or MN) button until the last two digits of the code appear. The digits will also increment one by one with every momentary depression.
- Press and hold the HRS (or HR) button until the first digit or digits of the code appear. The digits will also increment one by one with every momentary depression.
- Press the AM/FM button.
| • | If the display shows - - -, the disabling sequence was successful (the numbers matched the user-selected code or the factory backup code) and the system is not in the secure state. |
| • | If the display shows SEC, the numbers did not match either of the codes and the system will remain in the secure state. |
| • | The display reverts to a secure state after 15 seconds. |
Unlocking Radio After Power Loss
If the battery voltage is removed for any reason, LOC appears on the display when voltage is reapplied. Enter the security code in order to unlock the system.
- Using the HR (or HRS) and the MN (or MIN) buttons, enter any code number. The initial key depression of either button will cause the display to indicate 000.
- Press and hold the MIN (or MN) button until the last two digits of the code appear. The digits will also increment one by one with every momentary depression.
- Press and hold the HRS (or HR) button until the first digit or digits of the code appear. The digits will also increment one by one with every momentary depression.
- Press the AM/FM button after you are sure that the code is correct.
Important: Only 15 seconds are allowed between each of the following steps.
| • | If the display shows SEC, the numbers matched the user-selected code. The system can now be used in the secure state. |
| • | If the display continues to show LOC, the unlocking process failed. |
After you have failed 8 times to unlock the system, the following conditions occur:
| • | The unit goes into a second-level lock condition. |
| • | The unit is inoperative for an hour. |
Any further code inputs during this time will cause the display to indicate INOP for 15 seconds before the display returns to LOC.
The battery and the ignition voltages must be present for an hour before you will be allowed to retry the unlocking process. After every successive 3 incorrect entries, the unit will become inoperative for another hour.
RDS Functions
ALT
Use the ALT button in order to access the RDS functions. ALT displays on the screen prompting the user to make an RDS selection. If no selection is made within 20 seconds, the ALT display times out. If the radio backlighting is on and the ALT button is pressed, the radio dual function backlighting will switch in order to illuminate the RDS functions.
Message
Use the message feature in order to display text which is broadcast by an RDS station. This feature is only for domestic RDS receivers. Invoke the message feature by pressing the following buttons:
- ALT
- MSG
If the currently tuned station is broadcasting messages, MSG is displayed. When the user pressed the MSG button, the display shows the first 12/24 characters of information for 20 seconds. If the user again presses the MSG button within 20 seconds, the next 12/24 characters are displayed. This sequence continues until the entire message is displayed.
The display will return to its appropriate contents under the following conditions:
| • | If the display is not changed for 20 seconds |
| • | if any key except MSG is pressed |
Clock Time
The RDS Clock Time (CT) feature enables the receiver to be automatically set by the broadcasting station. The default for CT is OFF. In order to enable the CT function, the user must press the following:
- The ALT button
- Either the HRS button or the MIN button
The display will show the current status. Additional depressions of the MIN button toggles through the following clock time states:
- OFF
- FIXED
- AUTO
The display will return to its appropriate contents under either of the following conditions:
| • | After 5 seconds of inactivity |
| • | If the user presses any button other than MIN |
CT mode selection shall be available during all radio modes in which clock time can be set.
When using CT FIXED, the clock time is updated by the time zone the user defines. If the user defines a time zone which is different from the user's own time zone, the CT will appear to be inaccurate. When using CT AUTO, the clock time is determined by the time zone of the tuned station. When using either CT FIXED or CT AUTO, the clock time will be inaccurate if the station sends the incorrect time.
In order to modify the clock time with CT, set the hours and the minutes in the normal manner. While in the CT FIXED mode, the user selects the appropriate time zone using the HRS button. The HRS button modifies the time zone in ½ hour increments. The time zone displayed will be the selected time zone. The display will return to its appropriate contents under either of the following conditions:
| • | After 5 seconds have elapsed |
| • | If the user presses any other key |
Traffic Announcement (TA)
This feature provides an interruption of the audio in order to allow for the broadcast of a traffic announcement. TA mode is enabled/disabled by pressing ALT-TA. When enabled, the TA light will be ON. When TA is enabled and the receiver is not currently tuned to a station broadcasting TA, the receiver will seek to the next available station broadcasting traffic announcements. If no station is found, the receiver will return to the previously tuned station and cancel the TA mode. When tuned to a station that broadcasts traffic announcements, the TA light will illuminate.
When the system detects a TA, the following sequence will occur:
- If the TA is being referenced with EON, the receiver will tune to the referenced network. Only stations with an identical PI code to that of the reference network will be accepted.
- If a playback device is in use, the receiver will immediately switch the audio to the tuner and the playback device will pause.
- The display will indicate TRAFFIC ANNOUNCEMENT.
- The volume will be set to the greater of the following:
- The user can adjust the volume during the receipt of a traffic announcement. When the traffic announcement is complete, the previously selected functions return to their user-set positions.
| • | The minimum default volume |
| • | The current listening volume |
Emergency Announcement
This feature provides for the interruption of the audio for the broadcast of a weather alert or a disaster alert.
When the system detects an alert, the following sequence occurs:
- If a playback device is in use, the receiver will immediately switch the audio to the tuner and the playback device will pause.
- The display will indicate ALARM for export applications and ALERT for domestic applications.
- The volume will be set to the greater of the following:
- The user can adjust the volume during the alert. When the emergency announcement is complete, the previously selected functions return to their user-set positions.
| • | The TA default volume |
| • | The current listening volume |
Alternate Frequency (AF)
This feature allows the receiver to automatically tune to an alternate station when the signal quality of the currently tuned station falls below an acceptable level. The user can enable/disable the AF mode by pressing ALT-AF. If preset RDS stations are still available, the receiver will attempt to tune in the station. If the receiver is unable to obtain the signal, the radio will perform a PI seek.
Format Seek and Scan
The Program Type (PTY) information identifies a station by program format (TALK, NEWS, ROCK, etc.). The format type allows the user to seek or scan only stations with the selected format. Use the format type in conjunction with the seek and scan. For domestic receivers, the US RDS standard allows for the transmission of an optional Program Type Name (PTY-N). If the PTY-N feature is included in the radio, then you may define the program more specifically using an eight character identifier. The search process does not use this type of identification, but displays after the receiver stops on a station with the entered PTY category. You may select a format type while the radio is in the tuner mode. When you press FMT LIST up or down the display shows the previously selected format. The default format is ANY TYPE. While the format is displayed, press the FMT LIST up or down in order to allow the user to step through the format list. The display of the selected format list remains for 5 seconds. Press any other button in order to cancel the display of the select format list.
Code | Type | Abbreviation |
|---|---|---|
10 | Pop Music | Pop Music |
11 | Rock Music | Rock Music |
12 | M. O. R. Music | M. O. R. Music |
13 | Light Classical | Light Clas |
14 | Serious Classical | Serious Clas |
15 | Other Music | Other Music |
Any | Any Type | Any Type |
1 | News | News |
3 | Information | Information |
2 | Current Affairs | Cur Affairs |
4 | Sports | Sports |
5 | Education | Education |
8 | Science | Science |
7 | Culture | Culture |
6 | Drama | Drama |
9 | Varied | Varied |
16-30 | PTY XY | PTY XY |
0 | No Type | None |
31 | Alarm | Alarm |
The format type 30 is reserved for emergency broadcast tests in the US. Format 31 is reserved for broadcast emergencies. Do not use Format 31 as a search criteria. The format lists include several special types. Use ANY TYPE in order to select any RDS station. While displaying a search format, enabling seek or scan finds the next available RDS station with the selected format type. The display shows SEEK or SCAN and the format type while the function is engaged. When the radio stops on a station during scan, the PS name will display. When you select format seek or scan without first selecting a search format, the previously selected format will be used. If the receiver does not find a station after wrapping around the band twice, the receiver returns to the previous station. Cancel the format seek or scan by pressing any button. The media must be loaded for SOURCE in order to cancel format seek or scan.
Format Presets
The Format Presets feature allows the user to store and recall format types using the following keys:
| • | FMT A |
| • | FMT B |
| • | FMT C |
If you press any of the format presets, the receiver begins seeking. In order to store a format selection, the user selects a format type. Once a format type is selected, you store the format type in the selected format preset in the same manner as a normal preset is stored (press and hold). When the storing process is complete, the display shows the following items:
| • | The format button stored |
| • | The format type |
An automatic seek will not occur after this process. A format seek invoked using the format presets cancels by pressing any button. The media must be loaded in order for SOURCE to cancel the format seek. The defaults for the format preset buttons after battery cycle are ANY TYPE.
Radio/Audio System Operation Oldsmobile
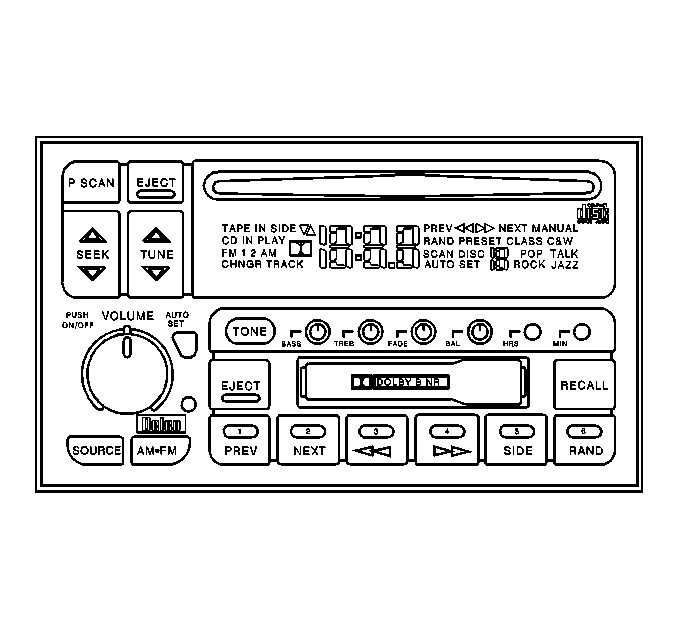
Radio Controls Description
UM7 Radio
ULO Radio/Cassette with Auto Tone
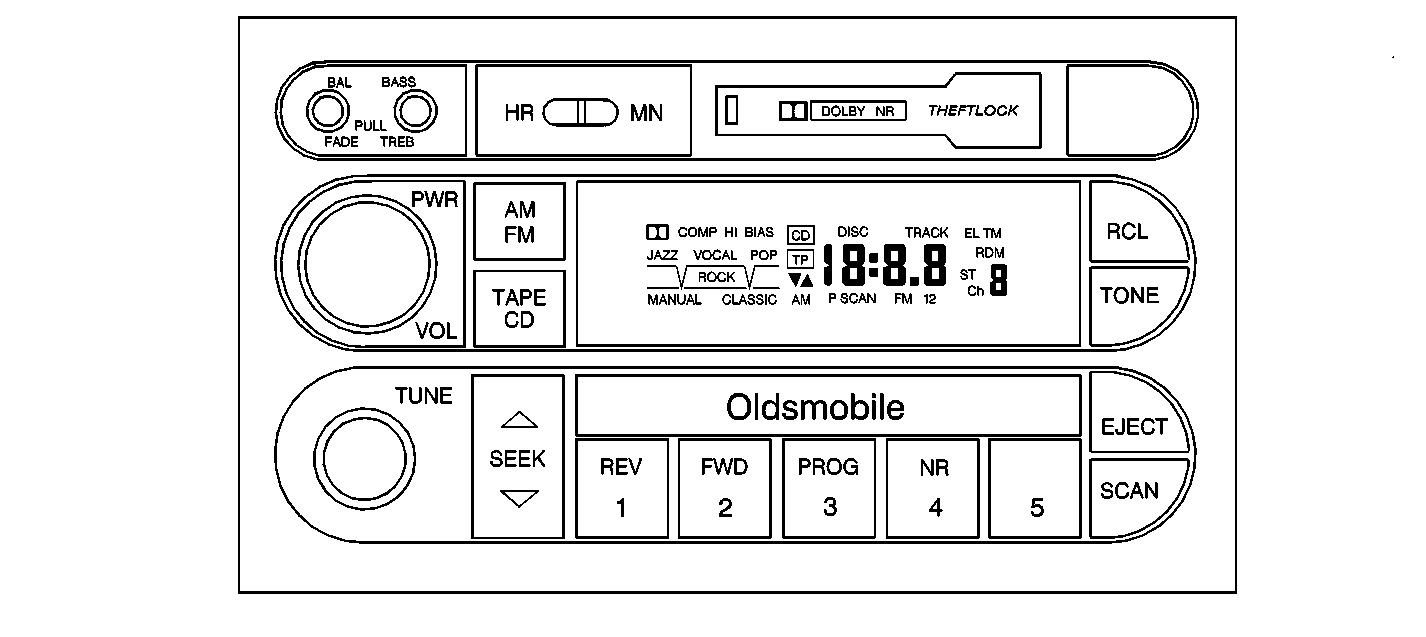
UPO Radio/Cassette/CD with Auto Tone
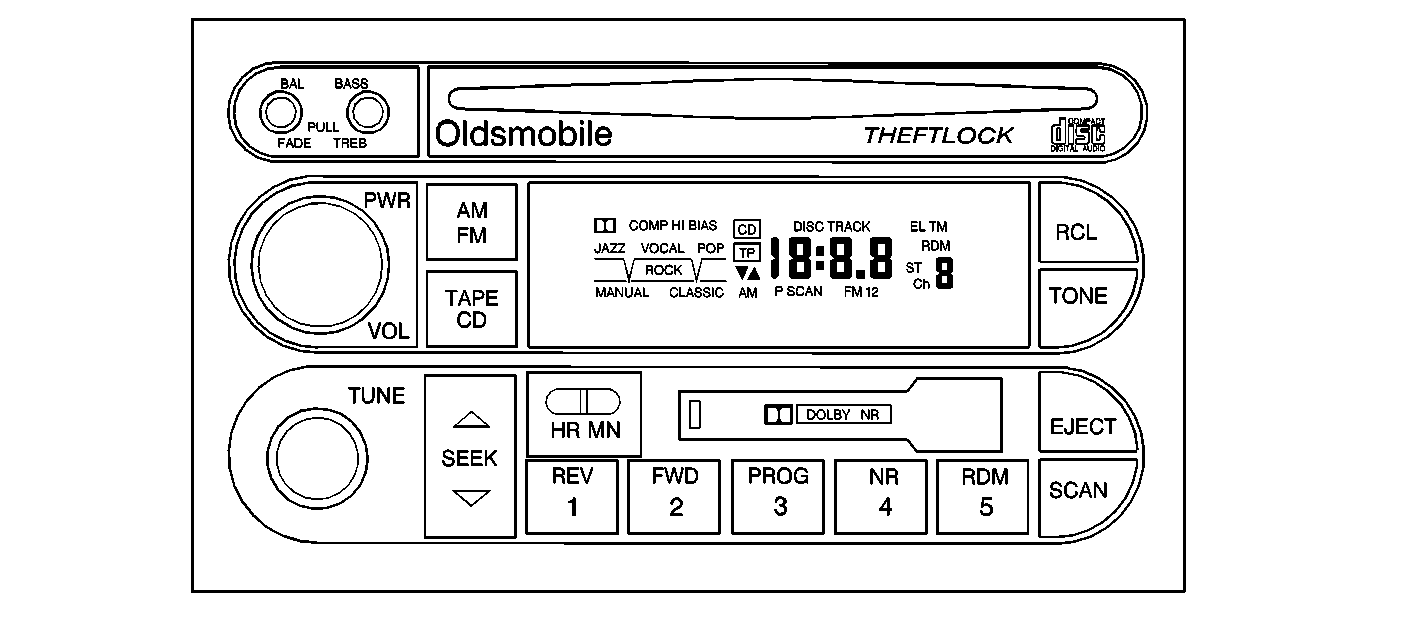
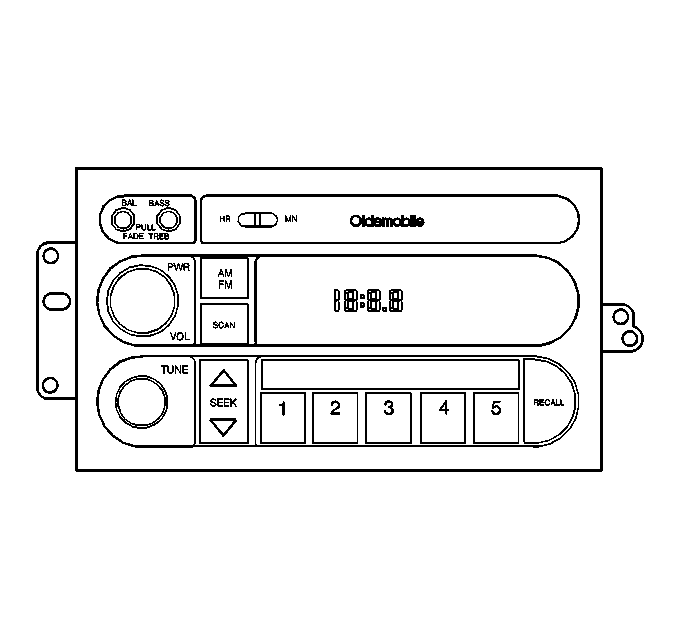
Power Button (PWR) -- On/Off Switch
Pressing the PWR knob will alternately turn the radio on or off. The power knob is a rotary ON/OFF switch that is shared with the volume control.
Important: When you jump start the vehicle, turn the radio off in order to avoid damaging the sound system.
Volume Control (VOL)
A single multi-function rotary/push control provides the following functions:
| • | The ON/OFF power |
| • | The volume control functions |
The volume control portion of the switch is a continuous rotary detent type with 36 detents per revolution. You may increase or decrease the volume over a range of 64 possible steps. This function will not be available during radio conditions that do not permit audio output, such as actively seeking/scanning in tuner mode or in tape mode. The radio display is not affected by volume changes. The volume function is replicated on the steering wheel control with separate volume buttons. Each momentary button closure causes the volume to increase or to decrease by 1 step. Pressing either one of these buttons causes the volume to change at a rate of 12 steps per second.
Stereo Indicator
The word STEREO (UM7) or the letters ST for all other models displays whenever a stereo broadcast is received.
Tune Control
The tuning control is a continuous rotary pop-out knob with 20 detents per revolution. Turn the control in the desired direction in order to tune the receiver.
| • | Clockwise turning increases the frequency. |
| • | Counterclockwise turning decreases the frequency. |
The ULO and UPO models incorporate a vertically-mounted tuning control button. Pressing the top portion of the button increases the frequency. Pressing the bottom portion of the button decreases the frequency.
Frequency is either increased or decreased by one channel per detent.
Adjusting the tuning control will stop the SEEK and the SCAN functions. Tuning will then continue from the last frequency where the SEEK/SCAN function stopped. The tuning function is replicated on the steering wheel controls with the separate SEEK button, when equipped.
AM/FM Switching
The AM/FM button is a sequencing (push-push) type that toggles between the AM, FM1, and FM2 bands The button is active anytime that the unit is on.
| • | Pressing the AM/FM button while the radio is in the receiver mode will change the tuning to the frequency which was last selected on the next band. |
| • | Pressing the AM/FM button while the radio is in the playback mode will cause the unit to switch into the receiver mode at the last selected band and frequency. |
The following band switching sequence is from an initial state of FM1:
| • | The first push toggles the receiver to FM2. |
| • | The second push toggles the receiver to AM. |
| • | The third push toggles the receiver back to FM1. |
Recall Button (RCL)
On the UM7 model, the RECALL button is labeled RECALL. On all other models, this button is labeled RCL. Pressing this button alternates the display between frequency information or time information. With the ignition turned to the OFF position, pressing this button briefly turns on the display indicating the time of day.
Bass and Treble Controls (BASS) (TREB)
Bass and Treble controls are separate rotary control knobs. Each control is used for adjusting the system's audio frequency response. Operate the BASS function by first pressing and releasing the knob to the out position. This affects only the lower audio frequencies and has a center frequency of 60 Hz.
Operate the TREB (treble) function by first pressing and releasing the knob to the out position, then pulling to the fully extended position. This affects the high audio frequencies and has a center frequency of 10 kHz.
The center position of a given control indicates a flat response over that particular frequency range. Moving a control to the right of center position produces boost, while moving a control to the left produces a cut in frequency range related to that control. All units incorporate a loudness feature that automatically increases the bass bias at low listening levels.
On Auto Tone Control (ATC) models, any adjustment of these controls will activate the MANUAL tone control mode. The MANUAL tone mode will display on the ATC models. On non-ATC models bass and treble changes do not affect the radio display.
Fade Control (FADE)
The FADE control is a 270 degree rotary pop-out/pull knob with a center detent. This knob is shared with the balance function. The control adjusts the relative volume between the front and the rear speakers.
- First press and release the knob to the out position.
- Then pull to the fully extended position.
- Rotate the knob:
- Pressing and releasing the knob a second time will return the knob to the in position.
| • | Rotate the knob clockwise in order to cause a volume shift from the rear to the front speakers. |
| • | Rotate the knob counterclockwise in order to cause a volume shift from the front to the rear speakers. |
| • | At full rotation in either direction, the audio is completely eliminated from the corresponding front or rear channels. |
Balance Control (BAL)
The Balance (BAL) Control is a 270 degree rotary pop-out-pull knob with a center detent that is shared with the fade function. The balance control adjusts the relative volume between the right and the left speakers respectively.
- First press and release the knob to the out position.
- Rotate the knob:
- Pressing and releasing the knob a second time will return the knob to the in position. This control is active in either the in or the out position.
| • | Rotate the knob clockwise in order to cause a volume shift from the left to the right speakers. |
| • | Rotate the knob counterclockwise in order to cause a volume shift from the right to the left speakers. |
| • | At full rotation in either direction, the audio is completely eliminated from the corresponding left or right channels. |
Station Preset Buttons
The 5 favorite station preset push-button serve a dual role with the cassette and the compact disc player functions. When in the receiver mode, these preset buttons serve as station memories. When a CD or a tape is being played, the buttons perform the CD or the tape deck functions as described elsewhere in this section.
Pressing and releasing any of the preset buttons will recall that particular frequency, ATC setting (if applicable), and channel number. The audio will mute and the displayed channel number indicators will extinguish while the button is pressed. The unit will then tune to the desired preset after you have released the push-button, as long as you pressed that button for less than 2 seconds. If you exceeded this time, the set mode will activate.
A total of 15 presets are available, with their respective ATC settings (if applicable):
| • | 5 AM presets |
| • | 5 FM1 presets |
| • | 5 FM2 presets |
Set a desired station by performing the following steps:
- Select the desired band (AM or FM).
- Tune to the desired station using either manual TUNE, SEEK, or SCAN.
- Press and hold one of the 5 numbered buttons for at least 2 seconds.
| 3.1. | The sound will mute. |
| 3.2. | No channel number will display during the time-out period |
| 3.3. | When the sound returns and the channel number displays, release the button. |
| 3.4. | The display will show frequency and channel number for 5 seconds after the preset is set. |
In order to access a preset station, press and release the button.
Seek
All of the radios feature a dial direction seek function incorporating a vertically mounted SEEK button. Pressing the top portion of the button causes the radio to seek up in frequency. Pressing the bottom portion causes the radio to seek down in frequency. When equipped, the seek UPportion of this function is replicated on the steering wheel control.
Scan
The SCAN push-button is a momentary type control that is shared with the preset scan feature. Pressing the button will immediately mute the audio. Releasing the button within 2 seconds will cause the frequency to increase until a signal of sufficient strength stops the scanning. After stopping, the audio is un-muted while the tuner pauses for 5 seconds before again muting and continuing to scan. If you press the SCAN button a second time, or if no stations are found after 2 complete band cycles, the scan action ceases and the receiver reverts or stays tuned to the last frequency that was selected.
Preset Scan
When you press the SCAN push-button and hold the button for at least 2 seconds, the Preset Scan mode is activated. Pressing and holding the SCAN button immediately mutes the audio. The receiver chooses the last preset selected by either the radio preset buttons or the SWC program button, if applicable. If the receiver is presently tuned to a preset that was selected with either one of these buttons, the receiver will increment to the next preset selection. The audio is then un-muted while the tuner pauses for 5 seconds before again muting and increments to the next preset. The associated ATC mode will also be selected along with the preset.
Setting Time of Day
Set the Time-of-day (TOD) using the HR (hours) and MN (minutes) push-buttons. An initial delay of 2 seconds occurs after the first button depression before the unit enters the time set mode and the time starts to advance.
| • | When the time set mode begins, the display shows TOD along with an A (AM) or a P (PM). |
| • | Pressing HR causes the hours display to increase. |
| • | Pressing MN causes the minutes display to increase |
| • | Reset the clock if the electrical power is interrupted, for example by one of the following conditions: |
| - | A blown fuse |
| - | A discharged battery |
Auto Tone Control
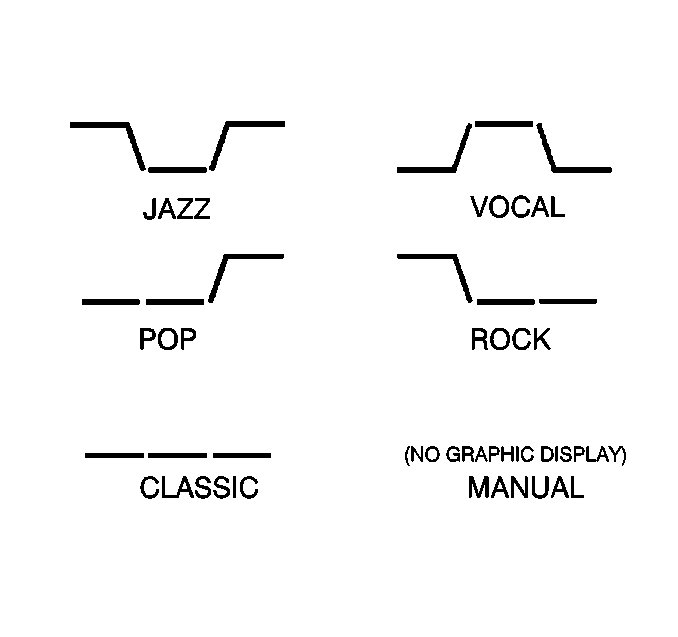
The TONE button, where applicable, is a sequencing (push-push) type of switch that switches between predetermined frequency response curves and a manual mode (BASS/TREB control functions). The sequence will be as follows in a continuous loop configuration:
- JAZZ
- VOCAL
- POP
- ROCK
- CLASSICAL
- MANUAL
When you select a specific ATC mode with the TONE button, the ATC mode becomes the default. This ATC setting is stored along with the receiver preset frequencies and is recalled whenever you select the preset.
The radio displays the graphical frequency response curves.
Cassette Tape Player Description
Tape Load
The cassette player incorporates a power end load cassette mechanism with an illuminated slot opening. Partially insert the tape through the door in the front of the trim plate. The mechanism completes the loading cycle automatically. After loading, the cassette player automatically senses the tape cartridge for either a metal tape or for CRO2 usage. The player makes the appropriate adjustments and the cassette is ready for playing.
EJECT Button
Pressing the EJECT button performs the following functions:
| • | Ejects the cassette tape |
| • | Returns the audio to the radio mode if the unit is ON |
The eject function is operative from all modes of cassette operation and while the ignition is in the OFF position.
Fast Reverse (REV) Button
The Fast Reverse (REV) button is a non-latching momentary contact control that serves a dual function with radio preset button number 1. Pressing the REV button moves the tape in the reverse direction at a rapid speed until you perform one of the following actions:
| • | Press the REV button a second time |
| • | Press the program button in order to return the unit to the normal play mode |
During rewind, the audio reverts to the radio. If no operator changes occur, rewinding continues until the tape reaches the beginning. The unit then returns to the play mode.
Time of day (TOD) remains displayed and a program arrow blinks while the unit is in the fast reverse mode.
Fast Forward (FWD) Button
The Fast Forward (FWD) button is a non-latching momentary contact control that serves a dual function with radio preset button number 2. Pressing the FWD button moves the tape in the forward direction at a rapid speed until you perform one of the following actions:
| • | Press the FWD button a second time |
| • | Press the program button in order to return the unit to the normal play mode |
The corresponding program arrow is lit while the fast forward mode is selected.
SEEK Button
The SEEK push-button is a rocker type switch which provides seek up or down of tape selections in the direction pressed.
A blank spot of 3 seconds duration is required in order for the deck to recognize a pause between selections.
| • | Pressing the top portion of the rocker mutes the audio while the deck searches for the beginning of the next tape selection. |
| • | Pressing the bottom portion of the rocker mutes the audio while the deck searches for the beginning of the current selection being played. |
Program (PROG) Button
The PROG (program) push-button is a momentary contact control that serves a dual function with the radio preset button number 3. Pressing the PROG button causes the tape deck to reverse play direction and changes the indicator arrow direction.
Dolby® Noise Reduction (NR) Button
The Dolby® Noise Reduction (NR) button, when equipped, is a non-latching momentary contact control that serves a dual function with the radio preset button number 4. Pressing the NR button in the tape mode switches Dolby® noise reduction off or on. A Dolby® symbol appears in the display while this function is active.
Recall (RCL) Button
Pressing the RCL button displays the following items:
| • | The volume |
| • | The current track number |
Pressing the button again within 5 seconds also displays the length of time that the current track has been playing.
Pressing the button a third time within 5 seconds displays the following items:
| • | The time of day (TOD) |
| • | The volume |
If successive depressions of this button exceed the 5 second intervals, the display defaults to TOD and volume.
Compact Disc Player Description
Notice: Do not attempt to insert any disc into a CD player except those discs which display the symbol shown on the disc label illustration. Insertion of a disc which does not display this symbol, such as the 76 mm (3 in) disc, may cause damage to the CD player and/or disc.
Power Cycling
If the CD is playing when ignition voltage is removed, upon reapplication of the ignition voltage the unit resumes playing from the position reached prior to power down. The CD display shows the number of the track which is selected. CD IN lamp is lit.
If the battery and ignition voltages are removed from the unit, upon reapplication of power, the following actions occur:
| • | The radio is in the OFF mode and indicates the time of day. |
| • | The CD lamp turns on. |
When the radio is turned on, the following occurs:
| • | The CD is initialized. |
| • | The CD starts to play track 1. |
| • | The CD lights along with the time of play displays. |
After 5 seconds the track selection displays.
CD Load
The CD inserts approximately one half of the way into the CD player. Then the mechanism completes the loading cycle automatically. The mechanism begins to play track #1 on the disc. The CD load function is available at all times that a cartridge is not presently loaded.
CD Eject
This function is active with battery voltage. You can eject a disc with the ignition off. With the radio ON and the ignition ON, pressing the EJECT button performs the following functions:
| • | The disc mutes |
| • | The audio switches to the previous radio function |
| • | The loading motors eject the disc |
| • | The CD indicator turns OFF |
At any time, with the radio or the ignition ON or OFF, remove an ejected disc from the CD load mechanism within 25 seconds. Otherwise, the disc will automatically reload, even though the play mode will not activate.
Play
The TAPE/CD button is a sequencing momentary contact type of switch which causes the unit to enter he playback mode. The operation of this control is explained under the following two conditions:
| • | Single playback CD or dual playback units with NO cassette loaded. Pressing this button with a CD loaded will cause the CD to begin playing. This button will have no effect if a CD is not presently loaded. |
| • | Dual playback units with both CD and cassette loaded. Pressing this button will cause the last selected playback device to start playing. Each additional depression of the button will toggle between playbacks. |
The first depression of the TAPE/CD button causes the following conditions to occur:
| • | The CD mechanism halts. |
| • | The cassette starts playing. |
Pressing the TAPE/CD button with a cassette active and a CD loaded causes the following conditions to occur:
| • | The cassette deck stops playing. |
| • | The CD resumes playing from the same location as when the CD stopped. |
Play is continuous with a wrap back to the first track after the last track has completed. A box appears around the CD symbol in the display when a CD becomes active.
Recall
Pressing the RECALL button displays the following items:
| • | The volume |
| • | The current track number |
Pressing the button again within 5 seconds also displays the length of time that the current track has been playing.
Pressing the button a third time within 5 seconds displays the following items:
| • | The time of day (TOD) |
| • | The volume |
If successive depressions of this button exceed the 5-second intervals, the display defaults to TOD and volume.
STOP
Stop the CD playback by employing any one of the following methods, where applicable:
| • | Pressing the AM/FM button will switch the unit to the radio mode, with the last frequency and band selected. |
| • | Pressing the TAPE/CD button will switch the unit to cassette mode when a cassette is loaded (dual playback applications only). |
| • | Ejecting a disc or CD changer cartridge switches the unit to the tuner mode. |
| • | Loading a tape switches the unit to the cassette mode. |
SEEK
The SEEK push-button is a rocker type switch which provides seek up or down of CD tracks in the direction pressed. This button is shared with the frequency seek function in tuner mode and with the cassette seek function in dual playback applications.
| • | If you press the top portion of the rocker, the audio will mute while the deck searches for the beginning of the next track, and begins playing. Each successive momentary depression of this button will increment the track number by one. This function is replicated on models equipped with steering wheel controls. |
| • | If you press the bottom portion of the rocker, the audio will mute while the deck searches for the beginning of the current track being played, and begins playing. If this function is enabled within the first 8 seconds of a track, the unit will start playing at the beginning of the previous track. Each successive momentary depression of this button will decrement the track number by one. |
SCAN
The SCAN push-button is a non-latching control which provides forward scanning of CD selections. This button is shared with the frequency scan function in tuner mode and with the cassette scan in dual playback applications. When you press the SCAN button, the following actions occur:
| • | The audio is muted as the deck increments to the beginning of the next track. |
| • | The unit begins to play the first 10 seconds of the next track. |
| • | The unit increments and plays 10 seconds of each consecutive track. |
If you again press the SCAN button while the function is active, the SCAN function will be canceled and the present track will continue playing.
For remote CD changer applications, scan will operate between tracks on all available discs. The SCAN symbol and the track number appear in the display while in the CD scan mode.
Random (RDM)
The RDM button is a non-latching control that serves a dual function with radio preset button number 5. Pressing this control in the CD play mode causes the current selection to stop playing. A random playback order is chosen by the microcomputer. Play then resumes with the tracks played in the random order that was chosen. When the final selection has played, the unit will continue play in the original random order. Pressing the RDM button at any point during random playback causes the playback to continue in the normal sequence beginning with the current track.
Fast Reverse (REV)
The Fast Reverse (REV) button is a non-latching momentary contact control that serves a dual function with radio preset button number 1. Pressing the REV button allows reverse movement within the disc at a faster rate than normal playback rate, as long as you hold the button in.
When activated, the audio level is reduced by 6 dB. The disc plays in the reverse direction at a rate of 6 times the normal speed. Elapsed time within the selected track is displayed while in the Reverse mode.
When you release the Reverse button, the following items display:
- The disc number
- The elapsed time, 5 seconds later
- The user selected default , 5 seconds later
Fast Forward (FWD)
The Fast Forward (FWD) button is a non-latching momentary contact control that serves a dual function with radio preset button number 2. Pressing the FWD button allows forward movement within the disc at a faster rate than normal playback rate, as long as you hold the button in.
When activated, the audio level is reduced by 6 dB. The disc plays in the forward direction at a rate of 6 times the normal speed. Elapsed time within the selected track is displayed while in the forward mode.
When you release the Fast Forward button, the following items display:
- The disc number
- The elapsed time, 5 seconds later
- The user selected default , 5 seconds later
Compression (NR)
The Compression function processes the audio signal and makes quieter passages louder, allowing the music to be heard in an automotive environment. The NR button serves a dual function with radio preset button number 4.
Pressing this control in the CD mode toggles compression on or off. The unit stays in the selected mode until the operator resets the unit or until battery voltage is lost. The compression symbol (COMP) is displayed while this feature is in effect. Compression is only effective in the CD mode.
Error (ERR) Detection
The unit indicates an ERR message in the display when any the following conditions occur:
| • | The focusing mechanism is impaired by moisture. |
| • | Tracking or servo problems occur. |
| • | A disc is inserted upside down. |
The unit switches to the radio mode and ejects the CD. The ERR message remains lit in the display for 5 seconds. If a CD is inserted upside down, the CD player is not able to initialize, and the unit will not shift into the audio modes. ERR is lit in the display and the disc ejects. The ERR message turns off after 5 seconds or when the operator reinserts the disc correctly.
The ERR graphic is not lit unless the following conditions are true:
| • | The CD player is active. |
| • | The CD player is in the play mode. |
Additionally, the ERR graphic is not lit under the following conditions:
| • | The ambient temperature exceeds a preset temperature. |
| • | The CD operation is not functional. |
| • | The CD operation may cause damage to the laser. |
The disc ejects and ERR lights in the display. The ERR message is maintained in the display until the temperature changes to a safe operating temperature. While ERR is displayed, the unit does not accept a disc.
Mode Switching
The unit changes status without popping on the audio lines. Lapses are not longer than 2 seconds between switching audio sources.
Speakers
Speakers for the various systems are assigned as follows:
| • | The UX7 system consists of 4 speakers: one in each front door and two in the rear. |
| • | The UW6 system consists of 6 speakers: two in each front door and two in the rear. |
Theft Deterrent (Theftlock®) Description
Enabling Theftlock®
The Theftlock® theft deterrent feature causes the radio to become inoperable if the battery voltage is disconnected for more than 15 seconds when the unit is in the secured state. Use the code entry scheme for the following purposes:
| • | In order to secure the radio |
| • | In order to unsecure the radio |
| • | In order to unlock the radio |
You may use any number between 000-1999 as a security code.
Perform the following sequence of operations in order to enable the theft deterrent:
- Ensure that the battery and the ignition voltages are applied and the radio is turned off.
- Press and hold the radio preset buttons 1 and 4 for 5 seconds. The display will show - - -, indicating that the unit is not in the secure mode.
- Using the HR (or HRS) and the MN (or MIN) buttons, enter any code number. The initial key depression of either button will cause the display to indicate 000.
- Press and hold the MIN (or MN) button until the last two digits of the code appear. The digits will also increment one by one with every momentary depression.
- Press and hold the HRS (or HR) button until the first digit or digits of the code appear. The digits will also increment one by one with every momentary depression.
- Press the AM/FM button. The display will now show REP for 5 seconds, indicating that you must re-enter the code for verification.
- Re-enter the same code number by repeating steps 3-5.
- Press the AM/FM button.
- The display reverts to TOD after 15 seconds.
Important: Only 15 seconds are allowed between each of the following steps.
| • | If the display shows SEC, the verification was successful and the system is in the secure state. |
| • | If the display shows - - -, the verification steps were not successful. Start the entire sequence from the beginning. |
Disabling Theftlock®
Disable the theft deterrent from the secure mode by using the following sequence of operations:
- Ensure that the battery and the ignition voltages are applied and the radio is turned off.
- Press and hold the radio preset buttons 1 and 4 for 5 seconds. The display will show SEC, indicating that the unit is in the secure mode.
- Using the HR (or HRS) and the MN (or MIN) buttons, enter any code number. The initial key depression of either button will cause the display to indicate 000.
- Press and hold the MIN (or MN) button until the last two digits of the code appear. The digits will also increment one by one with every momentary depression.
- Press and hold the HRS (or HR) button until the first digit or digits of the code appear. The digits will also increment one by one with every momentary depression.
- Press the AM/FM button.
| • | If the display shows - - -, the disabling sequence was successful (the numbers matched the user-selected code or the factory backup code) and the system is not in the secure state. |
| • | If the display shows SEC, the numbers did not match either of the codes and the system will remain in the secure state. |
| • | The display reverts to a secure state after 15 seconds. |
Unlocking Radio After Power Loss
If the battery voltage is removed for any reason, LOC appears on the display when voltage is reapplied. Enter the security code in order to unlock the system.
- Using the HR (or HRS) and the MN (or MIN) buttons, enter any code number. The initial key depression of either button will cause the display to indicate 000.
- Press and hold the MIN (or MN) button until the last two digits of the code appear. The digits will also increment one by one with every momentary depression.
- Press and hold the HRS (or HR) button until the first digit or digits of the code appear. The digits will also increment one by one with every momentary depression.
- Press the AM/FM button after you are sure that the code is correct.
Important: Only 15 seconds are allowed between each of the following steps.
| • | If the display shows SEC, the numbers matched the user-selected code. The system can now be used in the secure state. |
| • | If the display continues to show LOC, the unlocking process failed. |
After you have failed 8 times to unlock the system, the following conditions occur:
| • | The unit goes into a second-level lock condition. |
| • | The unit will be inoperative for an hour. |
Any further code inputs during this time will cause the display to indicate INOP for 15 seconds before the display returns to LOC.
The battery and the ignition voltages must be present for an hour before you will be allowed to retry the unlocking process. After every successive 3 incorrect entries, the unit will become inoperative for another hour.
RDS Functions
ALT
Use the ALT button in order to access the RDS functions. ALT displays on the screen prompting the user to make an RDS selection. If no selection is made within 20 seconds, the ALT display times out. If radio backlighting is on and the ALT button is pressed, the radio dual function backlighting will switch in order to illuminate the RDS functions.
Message
The Message feature is used in order to display text which is broadcast by an RDS station. This feature is only for domestic RDS receivers and is invoked by pressing the following buttons:
- ALT
- MSG
If the currently tuned station is broadcasting messages, MSG is displayed. When the user pressed the MSG button, the display shows the first 12/24 characters of information for 20 seconds. If the user again presses the MSG button within 20 seconds, the next 12/24 characters are displayed. This sequence continues until the entire message is displayed.
The display will return to its appropriate contents under the following conditions:
| • | If the display is not changed for 20 seconds |
| • | if any key except MSG is pressed |
Clock Time
The RDS Clock Time (CT) feature enables the receiver to be automatically set by the broadcasting station. The default for CT is OFF. In order to enable the CT function, the user must press the following:
- The ALT button
- Either the HRS button or the MIN button
The display will show the current status. Additional depressions of the MIN button toggles through the following clock time states:
- OFF
- FIXED
- AUTO
The display will return to its appropriate contents under either of the following conditions:
| • | After 5 seconds of inactivity |
| • | If the user presses any button other than MIN |
CT mode selection shall be available during all radio modes in which clock time can be set.
When using CT FIXED, the clock time is updated by the time zone the user defines. If the user defines a time zone which is different from the user's own time zone, the CT will appear to be inaccurate. When using CT AUTO. The time zone of the tuned station determines the clock time. When using either CT FIXED or CT AUTO, the clock time will be inaccurate if the station sends the incorrect time.
In order to modify the clock time with CT, set the hours and the minutes in the normal manner. While in the CT FIXED mode, the user selects the appropriate time zone using the HRS button. The HRS button modifies the time zone in 0.5 hour increments. The time zone displayed will be the selected time zone. The display will return to its appropriate contents under either of the following conditions:
| • | After 5 seconds have elapsed |
| • | If the user presses any other key |
Traffic Announcement (TA)
This feature provides an interruption of the audio in order to allow for the broadcast of a traffic announcement. TA mode is enabled/disabled by pressing ALT-TA. When enabled, the TA light will be ON. When TA is enabled and the receiver is not currently tuned to a station broadcasting TA, the receiver will seek to the next available station broadcasting traffic announcements. If no station is found, the receiver will return to the previously tuned station and cancel the TA mode. When tuned to a station that broadcasts traffic announcements, the TA light will illuminate.
When the system detects a TA, the following sequence will occur:
- If the TA is being referenced with EON, the receiver will tune to the referenced network. Only stations with an identical PI code to that of the reference network will be accepted.
- If a playback device is in use, the receiver will immediately switch the audio to the tuner and the playback device will pause.
- The display will indicate TRAFFIC ANNOUNCEMENT.
- The volume will be set to the greater of the following:
- The user can adjust the volume during the receipt of a traffic announcement. When the traffic announcement is complete, the previously selected functions return to their user-set positions.
| • | The minimum default volume |
| • | The current listening volume |
Emergency Announcement
This feature provides for the interruption of the audio for the broadcast of a weather alert or a disaster alert.
When the system detects an alert, the following sequence occurs:
- If a playback device is in use, the receiver will immediately switch the audio to the tuner and the playback device will pause.
- The display will indicate ALARM for export applications and ALERT for domestic applications.
- The volume will be set to the greater of the following:
- The user can adjust the volume during the alert. When the emergency announcement is complete, the previously selected functions return to their user-set positions.
| • | The TA default volume |
| • | The current listening volume |
Alternate Frequency (AF)
This feature allows the receiver to automatically tune to an alternate station when the signal quality of the currently tuned station falls below an acceptable level. The user can enable/disable the AF mode by pressing ALT-AF. If preset RDS stations are still available, the receiver will attempt to tune in the station. If the receiver is unable to obtain the signal, the radio will perform a PI seek.
Format Seek and Scan
The Program Type (PTY) information identifies a station by program format (TALK, NEWS, ROCK, etc.). The format type allows the user to seek or scan only stations with the selected format. Use the format type in conjunction with the seek and scan. For domestic receivers, the US RDS standard allows for the transmission of an optional Program Type Name (PTY-N). If the PTY-N feature is included in the radio, then you may define the program more specially using an eight character identifier. The search process does not use this type of identification, but displays after the receiver stops on a station with the entered PTY category. Select a format type while the radio is in the tuner mode. When you press FMT LIST up or down the display shows the previously selected format. The default format is ANY TYPE. While the format is displayed, press the FMT LIST up or down in order to allow the user to step through the format list. The display of the selected format list remains for 5 seconds. Press any other button in order to cancel the display of the select format list.
Code | Type | Abbreviation |
|---|---|---|
10 | Pop Music | Pop Music |
11 | Rock Music | Rock Music |
12 | M. O. R. Music | M. O. R. Music |
13 | Light Classical | Light Clas |
14 | Serious Classical | Serious Clas |
15 | Other Music | Other Music |
Any | Any Type | Any Type |
1 | News | News |
3 | Information | Information |
2 | Current Affairs | Cur Affairs |
4 | Sports | Sports |
5 | Education | Education |
8 | Science | Science |
7 | Culture | Culture |
6 | Drama | Drama |
9 | Varied | Varied |
16-30 | PTY XY | PTY XY |
0 | No Type | None |
31 | Alarm | Alarm |
The format type 30 is reserved for emergency broadcast tests in the US. Format 31 is reserved for broadcast emergencies. Do not use Format 31 as a search criteria. The format lists include several special types. Use ANY TYPE in order to select any RDS station. While displaying a search format, enabling seek or scan finds the next available RDS station with the selected format type. The display shows SEEK or SCAN and the format type while the function is engaged. When the radio stops on a station during scan, the PS name will display. When you select format seek or scan without first selecting a search format, the previously selected format will be used. If the receiver does not find a station after wrapping around the band twice, the receiver returns to the previous station. Cancel the format seek or scan by pressing any button. The media must be loaded for SOURCE in order to cancel format seek or scan.
Format Presets
The Format Presets feature allows the user to store and recall format types using the following keys:
| • | FMT A |
| • | FMT B |
| • | FMT C |
If you press any of the format presets, the receiver begins seeking. In order to store a format selection, the user selects a format type. Once a format type is selected, you store the format type in the selected format preset in the same manner as a normal preset stored (press and hold). When the storing process is complete, the display shows the following items:
| • | The format button stored |
| • | The format type |
An automatic seek will not occur after this process. A format seek invoked using the format presets cancels by pressing any button. Load the media in order for SOURCE to cancel the format seek. The defaults for the format preset buttons after battery cycle are ANY TYPE.
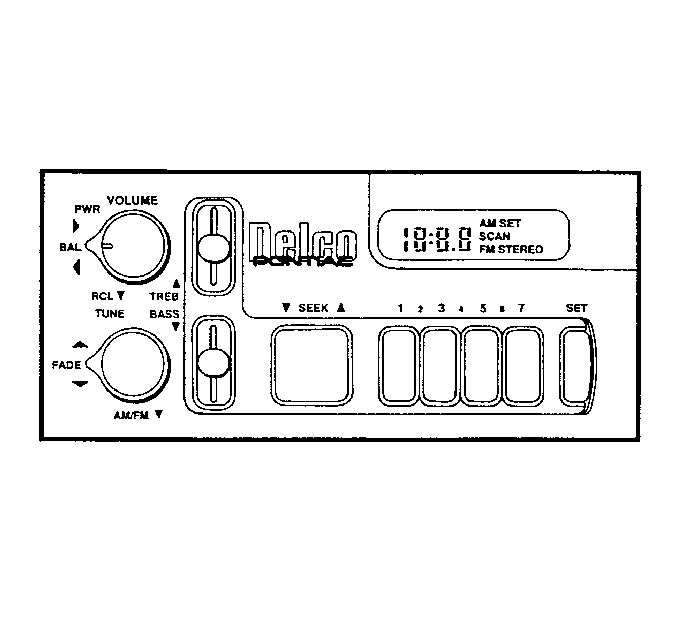
Radio/Audio System Operation Pontiac
Radio Controls
UM7 Radio
UN6 Radio/Cassette
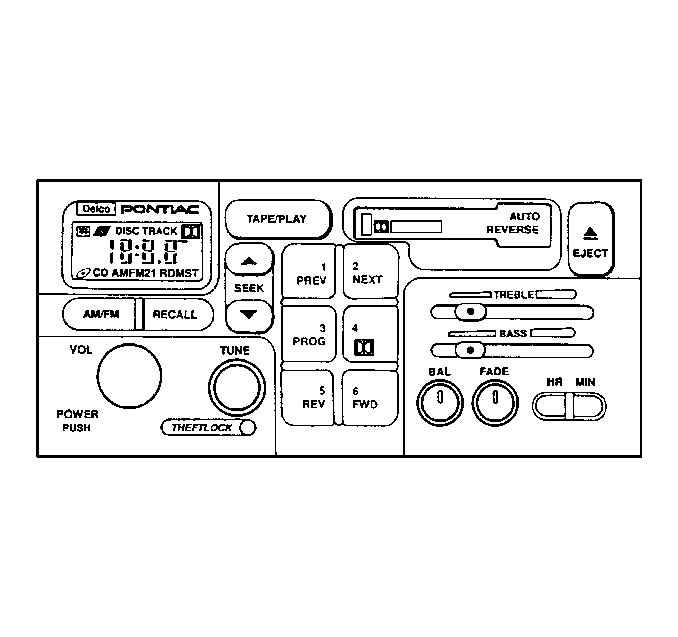
UT6 Radio/Cassette with Equalizer
U1C Radio CD
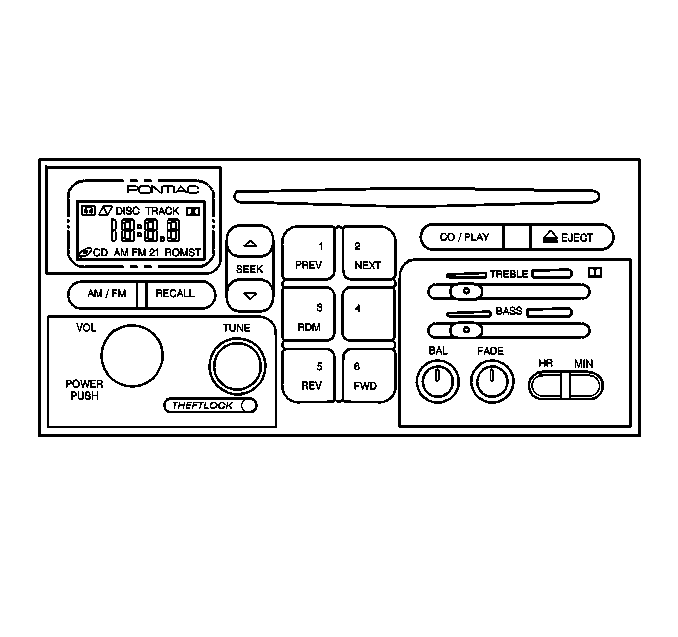
UP3 Radio/CD with Equalizer
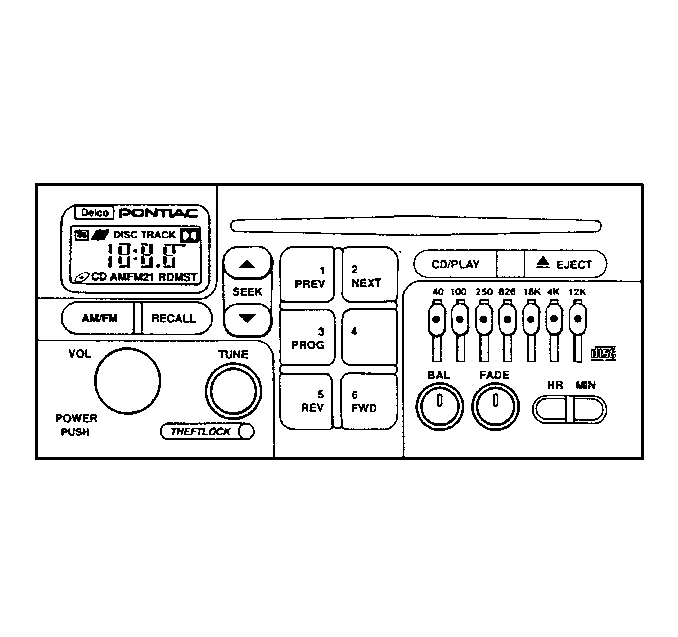
Volume Control
Important: When you jump start the vehicle, turn the radio off in order to avoid damaging the sound system.
A single multi-function rotary/push control provides the following functions:
| • | The ON/OFF power control |
| • | The volume control functions |
Pressing the volume knob will alternately turn the radio on or off. The volume control portion of the switch is a continuous rotary detent type with 36 detents per revolution. You may increase or decrease the volume over a range of 64 possible steps. Thus function will not be available during radio conditions that do not permit audio output, such as actively seeking/scanning in the tuner mode or in the tape mode. The radio display is not affected by volume changes. The volume function is replicated on the steering wheel control with separate volume buttons. Each momentary button closure causes the volume to increase or to decrease by 1 step. Pressing either one of these buttons causes the volume to change at a rate of 12 steps per second.
Stereo Indicator
The word STEREO (UM7), or the letters ST for all other models, displays whenever a stereo broadcast is received.
Tune Control
The tuning control is a continuous rotary knob with 20 detents per revolution. Turn the control in the desired direction in order to tune the receiver.
| • | Clockwise to increase the frequency. |
| • | Counterclockwise to decrease the frequency. |
The frequency is either increased or decreased by one channel per detent.
Adjusting the tuning control will stop the seek and the scan functions. Tuning will then continue from the last frequency where the SEEK/SCAN function stopped. The tuning function is replicated on the steering wheel controls with the separate SEEK and SCAN buttons, when equipped.
AM/FM Switching
The AM/FM button is a sequencing (push-push) type that toggles between the AM, FM1, and FM2 bands. The button is active anytime that the unit is on.
| • | Press the AM/FM button while the radio is in the receiver mode in order to change the tuning to the frequency which was last selected on the next band. |
| • | Press the AM/FM button while the radio is in the playback mode in order to cause the unit to switch into the receiver mode at the last selected band and frequency. |
The following band switch sequence is from an initial state of FM1:
| • | The first push toggles the receiver to FM2. |
| • | The second push toggles the receiver to AM. |
| • | The third push toggles the receiver back to FM1. |
Recall Button (RECALL)
On the UM7 model, the recall activator is a knob labeled RCL. On all other models, the activator is a button labeled RECALL. Pressing this activator alternates the display between frequency information or time information. With the ignition turned to the OFF position, pressing this activator briefly turns on the display indicating the time of day.
Bass and Treble Controls (BASS) (TREB)
Bass and treble controls vary based on the model:
| • | On the UM7 model, slide the controls up or down in order to increase or decrease the bass and the treble response. |
| • | On the UT6 and the UP3 models, refer to Five Band Equalizer. |
| • | On the UN6 and the U1C models, the bass and the treble controls are mounted horizontally. Slide the controls to the left or to the right in order to increase or decrease the bass and the treble response. |
Fade Control (FADE)
On the UM7 model, turn the ring behind the lower knob in order to adjust the relative sound between the front and the rear speakers. On all other models, press and release the pop-out knob to the out position. Turn the knob to either the left or the right in order to adjust the relative sound between the rear and the front speakers.
Spatial Fade (BOSE® Applications)
The Spatial Fade Control performs the same function as Fade Control except that Spatial Fade primarily affects the high audio frequencies. At full rotation in either direction, the audio is completely eliminated from the corresponding front or rear channels, except for the subwoofer. Fade to front, except for the last step, and fade to rear will have no affect on the subwoofer audio. However, the last step of fade to front will cut the audio to the subwoofer completely. Fade changes do not affect the radio display.
Balance Control (BAL)
On the UM7 and the UN6 models, turning the ring behind the upper knob adjusts the relative sound between the left and the right speakers. On all other models, press and release the pop-out knob to the out position. Turn the knob to the left or to the right in order to adjust the relative sound between the left and the right speakers respectively.
Balance Control (BAL) (BOSE® Applications)
The Bose® models have the same feature functionally for all channels, except the subwoofer output. The left and the right audio of the subwoofer are summed together. The audio is cut completely from the opposite channel only at the last left and right balance steps. Full right balance cuts the left audio channel to the subwoofer. Intermediate balance adjustments do not affect the subwoofer output level. Balance changes do not affect the radio display.
Station Preset Buttons
On the UM7 model, 4 push buttons enable the setting of preselected AM and FM stations. You can store 7 presets for AM and FM by simultaneously pressing any two adjacent buttons. Use the following steps in order to set a desired station:
- Select the desired band (AM or FM).
- Tune in the desired station.
- Press the SET button.
- Press the desired station select push button.
Preset stations will return when you press those buttons again.
For all other models, the 6 station preset push-buttons serve a dual role with the cassette and the compact disc player functions. When in the receiver mode, these preset buttons serve as station memories. When a CD or a tape is playing, the buttons perform the CD or the tape deck functions as described elsewhere in this section.
A total of 18 presets are available:
| • | 6 AM presets |
| • | 6 FM1 presets |
| • | 6 FM2 presets |
Set a desired station by performing the following steps:
- Select the desired band (AM or FM)
- Tune to the desired station using either manual tune or SEEK
- Press and hold 1 of the 6 numbered buttons for 2 seconds.
In order to access a preset station, press and release the button.
If battery voltage is interrupted you must reset all of the stations.
Seek
All of the radios feature a dial direction seek function. On the UM7, pressing on the right of the SEEK button causes the radio to seek up in frequency. Pressing the left of the button causes the radio to seek down in frequency.
All other models incorporate a vertically mounted SEEK button. Pressing the top portion of the button causes the radio to seek up in frequency. Pressing the bottom portion causes the radio to seek up in frequency. Pressing the bottom portion causes the radio to seek down in frequency. When equipped, the seek UP portion of this function is replicated on the steering wheel control.
Clock
On the UM7 model, turn the ignition to either the ON or the ACCY position. The radio can be either on or off. After pressing the SET button, the SET enunciator lights in the display and the SET mode is activated. If the SET mode is activated while the time is on the display, the SET enunciator lights in the display and the SEEK button is activated for time setting.
Pressing the SEEK button to the left causes the hours display to increase. Pressing the SEEK button to the right causes the minute display to increase. When you release the button, the following actions occur:
| • | The seconds of the clock reset to :00. This is a synchronization feature. |
| • | The SET function times out and the SET enunciator extinguishes. |
You can cancel the SET function immediately by pressing the SET button again.
Setting Time of Day
On all models except the UM7, set the time-of-day (TOD) using the HR (hours) and MIN (minutes) push-buttons. An initial delay of 2 seconds occurs after the first button depression before the unit enters the time set mode and the time starts to advance.
| • | When the time set mode begins, the display shows TOD along with an A (AM) or a P (PM). |
| • | Pressing HR causes the hours display to increase. |
| • | Pressing MIN causes the minutes display to increase |
| • | Reset the clock if the electrical power is interrupted. |
Five Band Equalizer
The equalizer function exists only for the UT6 and the UP3 models. The equalizer consists of 7 slide controls used for increasing or decreasing the audio system's audio frequency response in the bands centered around the following frequencies:
| • | 40 Hz |
| • | 100 Hz |
| • | 250 Hz |
| • | 625 Hz |
| • | 1.6 kHz |
| • | 4 kHz |
| • | 12 kHz |
Slide a lever up in order to increase the volume of its frequency range, or slide a lever down in order to decrease the volume of its frequency range. When a lever is in the center position, that frequency range is not processed by the graphic equalizer. When all 5 levers are in the center the sound system has a flat frequency response.
Cassette Tape Player Description
Tape Load
The cassette player incorporates a power end load cassette mechanism with an illuminated slot opening. Partially insert a tape through the door in the front of the trim plate. The mechanism will complete the loading cycle automatically. After loading, the cassette player automatically senses the tape cartridge for either metal tape or for CRO2 usage. The player makes the appropriate adjustments and the cassette is ready for playing.
EJECT Button
Press the EJECT button in order to perform the following functions:
| • | Eject the cassette tape |
| • | Return the audio to the radio mode if the unit is on |
The eject function is operative from all modes of cassette operation and while the ignition is in the OFF position.
Fast Reverse (REV) Button
The fast reverse (REV) button is a non-latching momentary contact control that serves a dual function with radio preset button number 5. Pressing the REV button moves the tape in the reverse direction at a rapid speed until you perform one of the following actions:
| • | Press the REV button a second time |
| • | Press the program button in order to return the unit to the normal play mode |
During rewind, the audio reverts to the radio. If no operator changes occur, rewinding continues until the tape reaches the beginning. The unit then returns to the play mode.
The time of day (TOD) remains displayed and a program arrow blinks while the unit is in the fast reverse mode.
Fast Forward (FWD) Button
The fast forward (FWD) button is a non-latching momentary contact control that serves a dual function with radio preset button number 6. Pressing the FWD button moves the tape in the forward direction at a rapid speed until you perform one of the following actions:
| • | Press the FWD button a second time |
| • | Press the program button in order to return the unit to the normal play mode |
The corresponding program arrow is lit while the fast forward mode is selected.
SEEK Button
The SEEK push-button is a rocker type switch which provides seek up or down of tape selections in the direction pressed.
A blank spot of 3 seconds duration is required in order for the deck to recognize a pause between selections.
| • | Pressing the top portion of the rocker mutes the audio while the deck searches for the beginning of the next tape selection. |
| • | Pressing the bottom portion of the rocker mutes the audio while the deck searches for the beginning of the current selection being played. |
Previous Selection (PREV) Button
The previous selection (PREV) button is a non-latching momentary contact control that serves a dual function with the radio preset button number 1. Pressing the PREV button moves the tape in the rewind direction and begins playback at the start of the current selection. If the elapsed time into the current selection is less than 8 seconds, the unit rewinds to the previous selection. A 4 second passage of silence is required between selections in order for the tape unit to recognize the pause. The audio is muted during this operation.
Next Selection (NEXT) Button
The next selection (NEXT) button is a non-latching momentary contact control that serves a dual function with the radio preset button number 2. Pressing the NEXT button moves the tape in the fast-forward direction and begins playing at the start of the next selection . A minimum of 4 seconds is required for the deck to recognize the pause between selections. The audio is muted during this operation.
Program (PROG) Button
The program (PROG) push-button is a momentary contact control that serves a dual function with the radio preset button number 3:
| • | Pressing the PROG button causes the tape deck to reverse play direction |
| • | Pressing the PROG button changes the indicator arrow direction. |
Dolby® Noise Reduction (NR)
The Dolby® Noise Reduction (NR) button, when equipped, is a non-latching momentary contact control that serves a dual function with the radio preset button number 4:
| • | Pressing the NR button in the tape mode switches Dolby® noise reduction off or on |
| • | A Dolby® symbol appears in the display while this function is active. |
Recall
Pressing the RECALL button displays the following items:
| • | The volume |
| • | The current track number |
Pressing the button again within 5 seconds also displays the length of time that the current track has been playing.
Pressing the button a third time within 5 seconds displays the following items:
| • | The time of day (TOD) |
| • | The volume |
If successive depressions of this button exceed the 5 second intervals, the display defaults to TOD and volume.
Pressing the RECALL button displays the following items
TAPE/PLAY Button
Pressing the TAPE/PLAY button causes the tape to stop and the radio to come on. Pressing the button again interrupts the radio and resumes the playback of the tape from where the tape has left off. This button also stops the rewind mode or the fast forward mode. Pressing the button again resumes play.
Compact Disc Player Description
Notice: Do not attempt to insert any disc into a CD player except those discs which display the symbol shown on the disc label illustration. Insertion of a disc which does not display this symbol, such as the 76 mm (3 in) disc, may cause damage to the CD player and/or disc.
Power Cycling
If the CD is playing when ignition voltage is removed, upon reapplication of the ignition voltage the unit resumes playing from the position reached prior to the power removal. The CD display shows the number of the track which is selected. The CD IN lamp is lit.
If the battery and ignition voltages are removed from the unit, upon reapplication of power, the following actions occur:
| • | The radio is in the OFF mode and indicates the time of day. |
| • | The CD lamp turns on. |
When the radio is turned on, the following occurs:
| • | The CD is initialized. |
| • | The CD starts to play track 1. |
| • | The CD lights along with the time of play displays. |
After 5 seconds the track selection displays.
CD Load
The CD inserts approximately one half of the way into the CD player. Then the mechanism completes the loading cycle automatically. The mechanism begins to play track 1 on the disc. The CD load function is available at all times that a cartridge is not presently loaded.
CD Eject
This function is active with battery voltage. You can eject a disc with the ignition off. With the radio and the ignition both on, pressing the EJECT button performs the following functions:
| • | The disc mutes |
| • | The audio switches to the previous radio function |
| • | The loading motors eject the disc |
| • | The CD indicator turns off |
At any time, with the radio or the ignition on or off, remove an ejected disc from the CD load mechanism within 25 seconds. Otherwise the disc will automatically reload, even though the play mode will not activate.
CD/PLAY Button
Pressing the CD/PLAY button causes the CD to stop and the radio to come on. Pressing the button again interrupts the radio and resumes the playback of the CD where the CD has left off.
Recall
Pressing the RECALL button displays the following items:
| • | The volume |
| • | The current track number |
Pressing the button again within 5 seconds also displays the length of time that the current track has been playing.
Pressing the button a third time within 5 seconds displays the following items:
| • | The time of day (TOD) |
| • | The volume |
If successive depressions of this button exceed the 5-second intervals, the display defaults to TOD and volume.
STOP
Stop the CD playback by employing any one of the following methods, where applicable:
| • | Pressing the AM/FM button in order to switch the unit to the radio mode with the last frequency and band selected. |
| • | Ejecting a disc or CD changer cartridge in order to switch the unit to the tuner mode. |
| • | Loading a tape in order to switch the unit to the cassette mode. |
Previous Selection (PREV)
The PREV button causes the player to start playback of the current track. If the elapsed time is less than 8 seconds, the player moves to the previous track. In random mode, the previous track is the track before the current track in the random library.
Next Selection (NEXT)
Press the NEXT button in order to advance the player to the next track. In random mode, the next track is the subsequent track in the random library.
Random (RDM)
The RDM button is a non-latching control that serves a dual function with radio preset button number 3. Pressing this control in the CD play mode causes the current selection to stop playing. A random playback order is derived by the microcomputer. Play then resumes with the tracks played in random order . When the final selection has played the unit will continue play in the original random order. Pressing the RDM button at any point during random playback causes the playback to continue in the normal sequence beginning with the current track.
Fast Reverse (REV)
The fast reverse (REV) button is a non-latching momentary contact control that serves a dual function with radio preset button number 5. Pressing the REV button allows reverse movement within the disc to go at a faster rate than normal playback rate for as long as you hold the button in.
When activated, the audio level is reduced by 6 dB. The disc plays in the reverse direction at a rate of 6 times the normal speed. Elapsed time within the selected track is displayed while in the reverse mode.
When you release the reverse button, the following items display:
- The disc number
- The elapsed time, 5 seconds later
- The user selected default , 5 seconds later
Fast Forward (FWD)
The fast forward (FWD) button is a non-latching momentary contact control that serves a dual function with radio preset button number 6. Pressing the FWD button allows forward movement within the disc at a faster rate than normal playback rate for as long as you hold the button in.
When activated, the audio level is reduced by 6 dB. The disc plays in the forward direction at a rate of 6 times the normal speed. Elapsed time within the selected track is displayed while in the forward mode.
When you release the fast forward button, the following items display:
- The disc number
- The elapsed time, 5 seconds later
- The user selected default , 5 seconds later
Compression (NR)
The compression function processes the audio signal and makes quieter passages louder, allowing the music to be heard in an automotive environment. The NR button serves a dual function with radio preset button number 4.
Pressing this control in the CD mode toggles compression on or off. The unit stays in the selected mode until the operator resets the unit or until battery voltage is lost. The compression symbol (COMP) is displayed while this feature is in effect. Compression is only useable in the CD mode.
Error Detection (ERR)
The unit indicates an ERR message in the display when any the following conditions occur:
| • | The focusing mechanism is impaired by moisture |
| • | Tracking or servo problems occur |
| • | A disc is inserted upside down |
The unit switches to the radio mode and ejects the CD. The ERR message remains lit in the display for 5 seconds. If a CD is inserted upside down, the CD player is not able to initialize, and the unit will not shift into the audio modes. ERR lights in the display and the disc ejects. The ERR message turns off after 5 seconds or if the operator inserts the disc correctly.
The ERR graphic is not lit unless the following conditions are true:
| • | The CD player is active |
| • | The CD player is in the play mode |
Additionally, the ERR graphic does not light under the following conditions:
| • | The ambient temperature exceeds a preset temperature |
| • | The CD operation is not functional |
| • | The CD operation may cause damage to the laser |
The disc ejects and the ERR message lights in the display. The ERR message is maintained in the display until the temperature changes to a safe operating temperature. While ERR is displayed, the unit does not accept a disc.
Mode Switching
The unit changes status without popping on the audio lines. Lapses are not longer than 2 seconds between switching audio sources.
Speakers
Speakers for the various systems are assigned as follows:
| • | The UX7 system consists of 4 speakers: 1 in each front door and 2 in the rear. |
| • | The UW6 system consists of 6 speakers: 2 in each front door and 2 in the rear. |
| • | The UZ8 system consists of 8 speakers: 4 in each front door, 2 in each passenger door, and 2 in the rear deck area. |
Theft Deterrent (Theftlock®) Description
Enabling Theftlock®
The Theftlock® theft deterrent feature causes the radio to become inoperable if the battery voltage is disconnected for more than 15 seconds when the unit is in the secured state. Use the code entry scheme for the following purposes:
| • | In order to secure the radio |
| • | In order to unsecure the radio |
| • | In order to unlock the radio |
You may use any number between 000-1999 as a security code.
Perform the following sequence of operations in order to enable the theft deterrent:
- Ensure that the battery and the ignition voltages are applied and the radio is turned off.
- Press and hold the radio preset buttons 1 and 4 for 5 seconds. The display will show - - -, indicating that the unit is not in the secure mode.
- Using the HR (or HRS) and the MN (or MIN) buttons, enter any code number. The initial key depression of either button will cause the display to indicate 000.
- Press and hold the MIN (or MN) button until the last two digits of the code appear. The digits will also increment one at a time with every momentary depression.
- Press and hold the HRS (or HR) button until the first digit or digits of the code appear. The digits will also increment one at a time with every momentary depression.
- Press the AM/FM button. The display will show REP for 5 seconds, indicating that you must re-enter the code for verification.
- Re-enter the same code number by repeating steps 3-5.
- Press the AM/FM button.
- The display reverts to TOD after 15 seconds.
Important: Only 15 seconds are allowed between each of the following steps.
| • | If the display shows SEC, the verification was successful and the system is in the secure state. |
| • | If the display shows - - -, the verification steps were not successful. Start the entire sequence from the beginning. |
Disabling Theftlock®
Disable the theft deterrent from the secure mode by using the following sequence of operations:
- Ensure that the battery and the ignition voltages are applied and the radio is turned off.
- Press and hold the radio preset buttons 1 and 4 for 5 seconds. The display will show SEC, indicating that the unit is in the secure mode.
- Using the HR (or HRS) and the MN (or MIN) buttons, enter any code number. The initial key depression of either button will cause the display in order to indicate 000.
- Press and hold the MIN (or MN) button until the last two digits of the code appear. The digits will also increment one at a time with every momentary depression.
- Press and hold the HRS (or HR) button until the first digit or digits of the code appear. The digits will also increment one at a time with every momentary depression.
- Press the AM/FM button.
| • | If the display shows - - -, the disabling sequence was successful (the numbers matched the user-selected code or the factory backup code) and the system is not in the secure state. |
| • | If the display shows SEC, the numbers did not match either of the codes and the system will remain in the secure state. |
| • | The display reverts to a secure state after 15 seconds. |
Unlocking Radio After Power Loss
If the battery voltage is removed for any reason, LOC appears on the display when voltage is reapplied. Enter the security code in order to unlock the system.
- Using the HR (or HRS) and the MN (or MIN) buttons, enter any code number. The initial key depression of either button will cause the display to indicate 000.
- Press and hold the MIN (or MN) button until the last two digits of the code appear. The digits will also increment one at a time with every momentary depression.
- Press and hold the HRS (or HR) button until the first digit or digits of the code appear. The digits will also increment one at a time with every momentary depression.
- Press the AM/FM button after you are sure that the code is correct.
Important: Only 15 seconds are allowed between each of the following steps.
| • | If the display shows SEC, the numbers matched the user-selected code. The system can now be used in the secure state. |
| • | If the display continues to show LOC, the unlocking process failed. |
If you have failed 8 times to unlock the system, the following conditions occur:
| • | The unit goes into a second-level lock condition. |
| • | The unit will be inoperative for an hour. |
Any further code inputs during this time will cause the display to indicate INOP for 15 seconds before the display returns to LOC.
The battery and the ignition voltages must be present for an hour before you will be allowed to retry the unlocking process. After every successive 3 incorrect entries, the unit will become inoperative for another hour.
RDS Functions
ALT
Use the ALT button in order to access the RDS functions. ALT displays on the screen prompting the user to make an RDS selection. If no selection is made within 20 seconds, the ALT display times out. If radio backlighting is on and the ALT button is pressed, the radio dual function backlighting will switch in order to illuminate the RDS functions.
Message
The message feature is used in order to display text which is broadcast by an RDS station. This feature is only for domestic RDS receivers. Invoke the message feature by pressing the following buttons:
- ALT
- MSG
If the currently tuned station is broadcasting messages, MSG is displayed. When the user presses the MSG button, the display shows the first 12/24 characters of information for 20 seconds. If the user presses the MSG button again within 20 seconds the next 12/24 characters are displayed. This sequence continues until the entire message is displayed.
The display will return to its appropriate contents under the following conditions:
| • | If the display is not changed for 20 seconds |
| • | if any key except MSG is pressed |
Clock Time
The RDS clock time (CT) feature enables the receiver to be automatically set by the broadcasting station. The default for CT is off. In order to enable the CT function, the user must press the following buttons:
- The ALT button
- Either the HRS button or the MIN button
The display will show the current status. Additional depressions of the MIN button toggles through the following clock time states:
- OFF
- FIXED
- AUTO
The display will return to its appropriate contents under either of the following conditions:
| • | After 5 seconds of inactivity |
| • | If the user presses any button other than MIN |
CT mode selection is available during all radio modes in which the clock time can be set.
When using CT FIXED, the clock time is updated for the time zone the user defines. If the user defines a time zone which is different from the user's own time zone, the CT appears to be inaccurate. When using CT AUTO, the clock time is determined by the time zone of the tuned station. When using either CT FIXED or CT AUTO, the clock time will be inaccurate if the station sends the incorrect time.
In order to modify the clock time with CT, set the hours and the minutes in the normal manner. While in the CT FIXED mode, the user selects the appropriate time zone using the HRS button. The HRS button modifies the time zone in ½ hour increments. The time zone displayed will be the selected time zone. The display will return to its appropriate contents under either of the following conditions:
| • | After 5 seconds have elapsed |
| • | If the user presses any other key |
Traffice Announcement (TA)
The traffic announcement (TA) feature provides an interruption of the audio in order to allow for the broadcast of a traffic announcement. TA mode is enabled or disabled by pressing ALT-TA. When enabled, the TA light will be on. When TA is enabled and the receiver is not currently tuned to a station broadcasting TA, the receiver will seek to the next available station broadcasting traffic announcements. If no station is found, the receiver will return to the previously tuned station and cancel the TA mode. When tuned to a station that broadcasts traffic announcements, the TA light will illuminate.
When the system detects a TA, the following sequence will occur:
- If the TA is being referenced with EON, the receiver will tune to the referenced network. Only stations with an identical PI code to that of the reference network will be accepted.
- If a playback device is in use, the receiver will immediately switch the audio to the tuner and the playback device will pause.
- The display will indicate TRAFFIC ANNOUNCEMENT.
- The volume will be set to the greater of the following:
- The user can adjust the volume during the receipt of a traffic announcement. When the traffic announcement is complete, the previously selected functions return to their user-set positions.
| • | The minimum default volume |
| • | The current listening volume |
Emergency Announcement
The emergency announcement feature provides for the interruption of the audio for the broadcast of a weather alert or a disaster alert.
When the system detects an alert, the following sequence occurs:
- If a playback device is in use, the receiver will immediately switch the audio to the tuner and the playback device will pause.
- The display will indicate ALARM for export applications and ALERT for domestic applications.
- The volume will be set to the greater of the following:
- The user can adjust the volume during the alert. When the emergency announcement is complete, the previously selected functions return to their user-set positions.
| • | The TA default volume |
| • | The current listening volume |
Alternate Frequency (AF)
The alternate frequency (AF) feature allows the receiver to automatically tune to an alternate station when the signal quality of the currently tuned station falls below an acceptable level. The user can enable or disable the AF mode by pressing ALT-AF. If preset RDS stations are still available, the receiver will attempt to tune in the station. If the receiver is unable to obtain the signal, the radio will perform a PI seek.
Format Seek and Scan
The program type (PTY) information identifies a station by program format (TALK, NEWS, ROCK, etc.). The format type allows the user to seek or scan only those stations with the selected format. Use the format type in conjunction with the seek and scan. For domestic receivers, the US RDS standard allows for the transmission of an optional Program Type Name (PTY-N). If the PTY-N feature is included in the radio, then you may define the program more specially using an eight character identifier. The search process does not use this type of identification, but displays after the receiver stops on a station with the entered PTY category. You may select a format type while the radio is in the tuner mode. When you press FMT LIST up or down the display shows the previously selected format. The default format is ANY TYPE. While the format is displayed, press the FMT LIST up or down in order to allow the user to step through the format list. The display of the selected format list remains for 5 seconds. Press any other button in order to cancel the display of the select format list.
Code | Type | Abbreviation |
|---|---|---|
10 | Pop Music | Pop Music |
11 | Rock Music | Rock Music |
12 | M. O. R. Music | M. O. R. Music |
13 | Light Classical | Light Clas |
14 | Serious Classical | Serious Clas |
15 | Other Music | Other Music |
Any | Any Type | Any Type |
1 | News | News |
3 | Information | Information |
2 | Current Affairs | Cur Affairs |
4 | Sports | Sports |
5 | Education | Education |
8 | Science | Science |
7 | Culture | Culture |
6 | Drama | Drama |
9 | Varied | Varied |
16-30 | PTY XY | PTY XY |
0 | No Type | None |
31 | Alarm | Alarm |
The format type 30 is reserved for emergency broadcast tests in the US. Format 31 is reserved for broadcast emergencies. Do not use the Format 31 as a search criteria. The format lists include several special types. Use ANY TYPE in order to select any RDS station. While displaying a search format, enabling seek or scan finds the next available RDS station with the selected format type. The display shows SEEK or SCAN and the format type while the function is engaged. When the radio stops on a station during scan, the PS name will display. When you select format seek or scan without first selecting a search format, the previously selected format will be used. If the receiver does not find a station after wrapping around the band twice, the receiver returns to the previous station. Cancel the format seek or scan by pressing any button. Load the media for SOURCE in order to cancel format seek or scan.
Format Presets
The format presets feature allows the user to store and recall format types using the following keys:
| • | FMT A |
| • | FMT B |
| • | FMT C |
If you press any of the format presets, the receiver begins seeking. In order to store a format selection, the user selects a format type. Once a format type is selected, you may store the format type in the selected format preset in the same manner as a normal preset is stored (press and hold). When the storing process is complete, the display shows the following items:
| • | The format button stored |
| • | The format type |
An automatic seek will not occur after this process. A format seek invoked by using the format presets is cancelled by pressing any button. Load the media in order for SOURCE to cancel the format seek. The defaults for the format preset buttons after battery cycle are ANY TYPE.
