For 1990-2009 cars only
Tools Required
J 38778 Door Trim Pad and Garnish Clip Remover
Removal Procedure
- Remove the rear shelf. Refer to Rear Window Shelf Trim Panel Replacement .
- Disconnect the electric connector, which is located under the rear shelf, to the headliner wiring harness.
- Remove the sunshades. Refer to Sunshade Replacement .
- Remove the sunshade retainers. Refer to Sunshade Anchor Replacement .
- Disconnect the electric connector to the rearview mirror.
- Remove the side assist handle. Refer to Front Assist Handle Replacement and to Roof Rail Rear Assist Handle Replacement .
- Remove the windshield pillar garnish molding. Refer to Windshield Pillar Garnish Molding Replacement .
- Remove the upper quarter trim panels. Refer to Rear Quarter Upper Trim Panel Replacement .
- Remove the overhead console, if equipped. Refer to Roof Console Replacement .
- Remove the finishing lace from around the sunroof opening, if equipped.
- Recline the front seats as far as possible to the rearward position.
- Remove the upper center pillar trim panels. Refer to Center Pillar Upper Trim Panel Replacement .
- Pull down on the front door weatherstrip seal.
- Pull down on the rear door weatherstrip seal.
- Pull down the headliner around the sunroof opening to release the headliner from the hook and loop retainers.
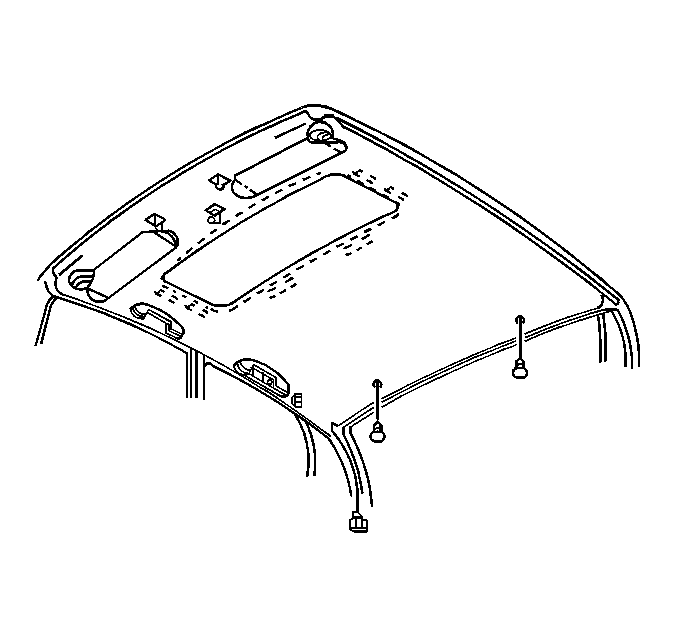
- Use J 38778 in order to remove the 2 push-in retainers which secure the rear headliner to the roof
- Remove the headliner from the vehicle through the right front door.
Installation Procedure
- Align the headliner to the vehicle through the right front door.
- Align the sunshade holes in the headliner with the respective hole in the body structure in order to install the headliner.
- Install the passenger side sunshade retainer to correctly align the front of the headliner to the roof. Refer to Sunshade Anchor Replacement .
- Connect the electric connector to the rearview mirror.
- Install the 2 push-in retainers which secure the rear headliner to the roof.
- Push up on the headliner around the sunroof opening to secure the headliner to the hook and loop retainers.
- Install the overhead console, if equipped. Refer to Roof Console Replacement .
- Install the finishing lace around the sunroof opening, if equipped.
- Install the front door weatherstrip seal to hold the headliner in place.
- Install the rear door weatherstrip seal to hold the headliner in place.
- Install the upper center pillar trim panels. Refer to Center Pillar Upper Trim Panel Replacement .
- Connect the electric connector, which is located under the rear shelf, to the headliner wiring harness.
- Install the rear shelf. Refer to Rear Window Shelf Trim Panel Replacement .
- Install the upper quarter trim panels. Refer to Rear Quarter Upper Trim Panel Replacement .
- Install the windshield pillar garnish molding. Refer to Windshield Pillar Garnish Molding Replacement .
- Install the assist handle. Refer to Front Assist Handle Replacement and to Roof Rail Rear Assist Handle Replacement .
- Install the remaining sunshade retainer. Refer to Sunshade Anchor Replacement .
- Install the sunshades. Refer to Sunshade Replacement .
Important: Do not bend the headliner when installing.
