SERVICE MANUAL UPDATE SEC. 8C ARMREST/CONSOLE-REVISED PROC.

SUBJECT: SERVICE MANUAL UPDATE - SECTION 8C - REVISED SERVICE PROCEDURES FOR INSTRUMENT PANEL, GAUGES AND CONSOLE
VEHICLES AFFECTED: 1992 "H" MODELS
Service Procedures for Instrument Panel, Gauges and Console in Section 8C-7-8-9 have been revised. Armrest Bin Lid Hinge and Console Bezel/Latch/Cup Holder assembly on Page 7, and Console Centre Trim Plate on Page 8 have new procedures. Figure 5 - Console Assembly on Page 9 also has been revised. Console Plate on Page 8 should be referred to as Console Trim Plate.
Please use the following revised information for servicing these components.
Please update your service manuals accordingly.
Console Center Trim Plate
Figure 5
[] Remove or Disconnect
1. Trans control lever handle retainer. 2. Trans control lever handle from shifter. 3. Ash tray; open lid and lift. 4. Console trim plate; pry up carefully. 5. Console center trim plate to auto trans cable bracket bolts. o Rotate console center trim plate up. 6. Connector. o Disengage console center trim plate pivot arms by squeezing arms together. o Rotate console center trim plate further, then pull forward. 7. Console center trim plate.
[] Install or Connect
1. Console center trim plate; install in rotated position. o Engage console center trim plate pivot arms to pins; squeeze pivot arms together, align with pins, snap into place. 2. Connector. 3. Console center trim plate to auto trans cable bracket bolts.
[] Tighten Bolts to 1.9 N-m (17 lb. in.).
4. Console trim plate, press until firmly seated. 5. Ash tray; open lid and insert. 6. Trans control lever handle to shifter. o Align slot in handle to keyway on shifter. 7. Trans control lever handle retainer.
Console Bezel/Latch/Cup Holder Assembly --------------------------------------- [] Remove or Disconnect
1. Console duct assembly, refer to "Console Duct Assembly" in this section. 2. Console bezel/latch/cup holder assembly and armrest bin lid hinge to lower console nuts. 3. Armrest bin lid hinge, refer to "Armrest Bin Lid Hinge" in this section. 4. Console bezel/latch/cup holder assembly to lower console screws. 5. Console bezel/latch/cup holder assembly.
[] Install or Connect
1. Console bezel/latch/cup holder assembly. 2. Armrest bin lid hinge, refer to "Armrest Bin Lid Hinge" in this section. 3. Console bezel/latch/cup holder assembly and armrest bin lid hinge to lower console nuts.
[] Tighten Nuts to 1.9 Nm (17 lb. in.).
4. Console bezel/latch/cup holder assembly to lower console screws. 5. Console duct assembly, refer to "Console Duct Assembly" in this section.
Armrest Bin Lid Hinge
Figure 5 [] Remove or Disconnect
1. Armrest bin lid to armrest hinge screws. 2. Armrest bin lid. 3. Console vent assembly outlets by pulling rearward from knob. 4. Lower console, refer to "Lower Console" in this section. 5. Console duct assembly. 6. Console bezel/latch/cup holder assembly and armrest bin lid hinge to lower console nuts. 7. Armrest bin lid hinge.
[] Install or Connect
1. Console bezel/latch/cup holder assembly and armrest bin lid hinge to lower console nuts after positioning armrest bin lid hinge.
[] Tighten Nuts to 1.9 Nm (17 lb. in.).
2. Console duct assembly. 3. Lower console, refer to "Lower Console" in this section. 4. Console vent assembly outlets by aligning pin with hole in flow diverting knob, aligning outlet with pivot arm, then pressing until firmly seated. 5. Armrest bin lid to armrest hinge screws after positioning armrest bin lid.
[] Tighten Screws to 1.9 Nm (17 lb. in.).
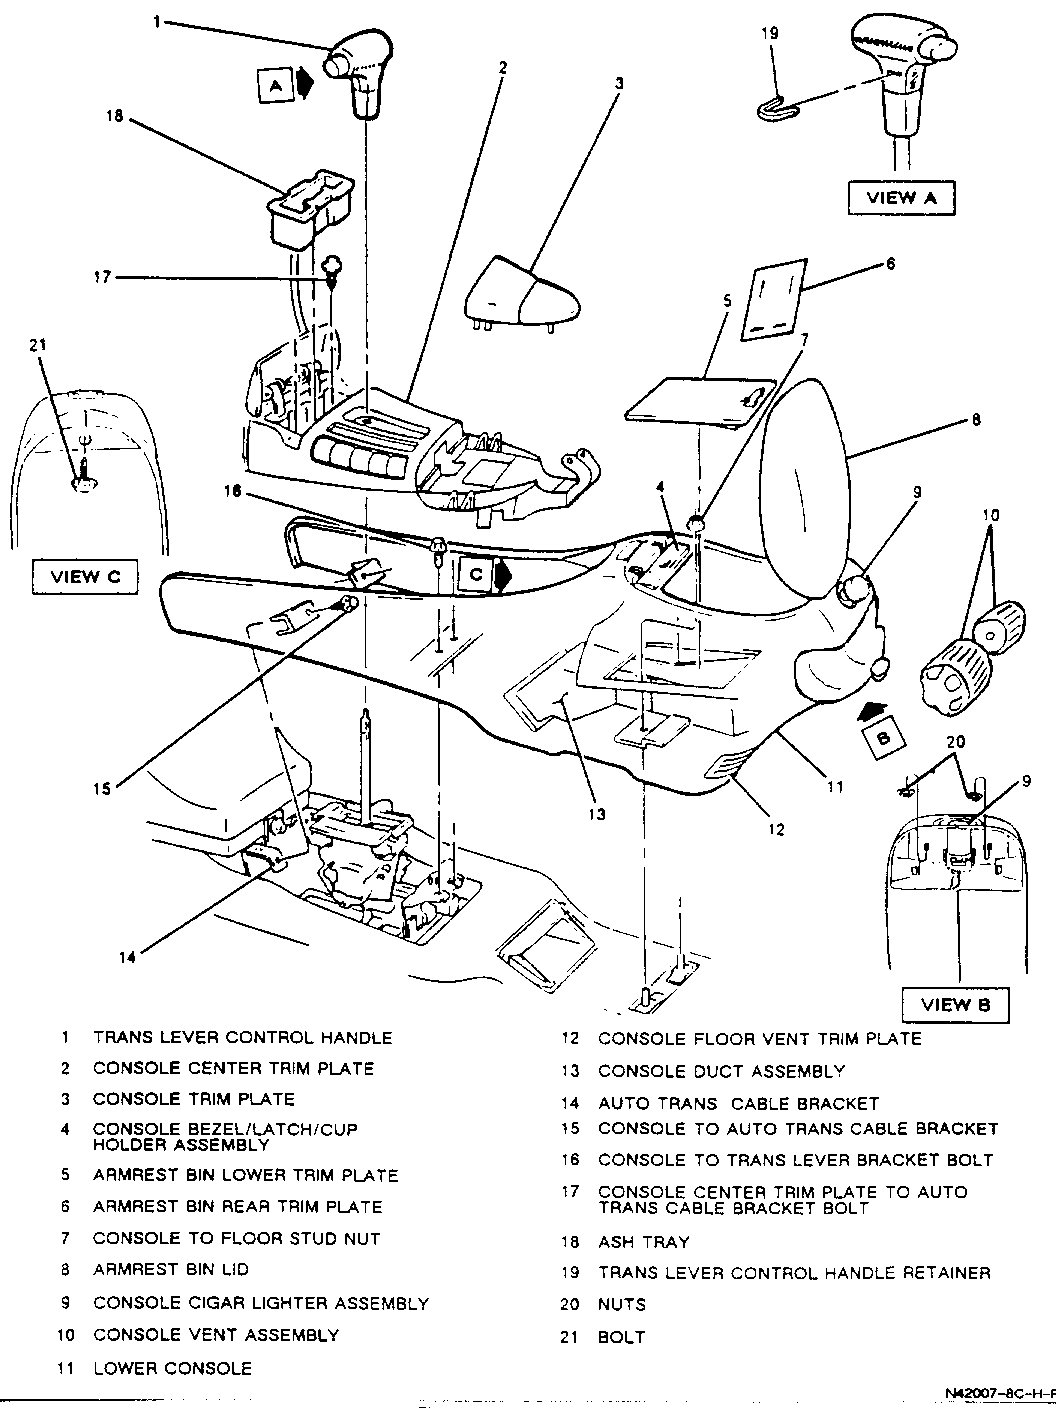
Figure 5-Console Assembly
1 TRANS LEVER CONTROL HANDLE 12 CONSOLE FLOOR VENT TRIM PLATE 2 CONSOLE CENTER TRIM PLATE 13 CONSOLE DUCT ASSEMBLY 3 CONSOLE TRIM PLATE 14 AUTO TRANS CABLE BRACKET 4 CONSOLE BEZEL/LATCH/CUP 15 CONSOLE TO AUTO TRANS CABLE BRACKET HOLDER ASSEMBLY 16 CONSOLE TO TRANS LEVER BRACKET BOLT 5 ARMREST BIN LOWER TRIM PLATE 17 CONSOLE CENTER TRIM PLATE TO AUTO 6 ARMSEST BIN REAR TRIM PLATE TRANS CABLE BRACKET BOLT 7 CONSOLE TO FLOOR STUD NUT 18 ASH TRAY 8 ARMREST BIN LID 19 TRANS LEVER CONTROL HANDLE RETAINER 9 CONSOLE CIGAR LIGHTER ASSEMBLY 20 NUTS 10 CONSOLE VENT ASSEMBLY 21 BOLT 11 LOWER CONSOLE
General Motors bulletins are intended for use by professional technicians, not a "do-it-yourselfer". They are written to inform those technicians of conditions that may occur on some vehicles, or to provide information that could assist in the proper service of a vehicle. Properly trained technicians have the equipment, tools, safety instructions and know-how to do a job properly and safely. If a condition is described, do not assume that the bulletin applies to your vehicle, or that your vehicle will have that condition. See a General Motors dealer servicing your brand of General Motors vehicle for information on whether your vehicle may benefit from the information.
