NO DRIVE, REVERSE, SLIPS/HARSH SHIFT (INSPECT CHECK BALLS)

SUBJECT: NO DRIVE OR REVERSE, SLIPS, HARSH 1-2 UP/DOWN SHIFTS, SOFT 2/3 UP/DOWN SHIFTS - INSTALL CORRECT CHECKBALLS
MODELS/YEARS: 1992 EIGHTY EIGHT AND NINETY EIGHT MODELS
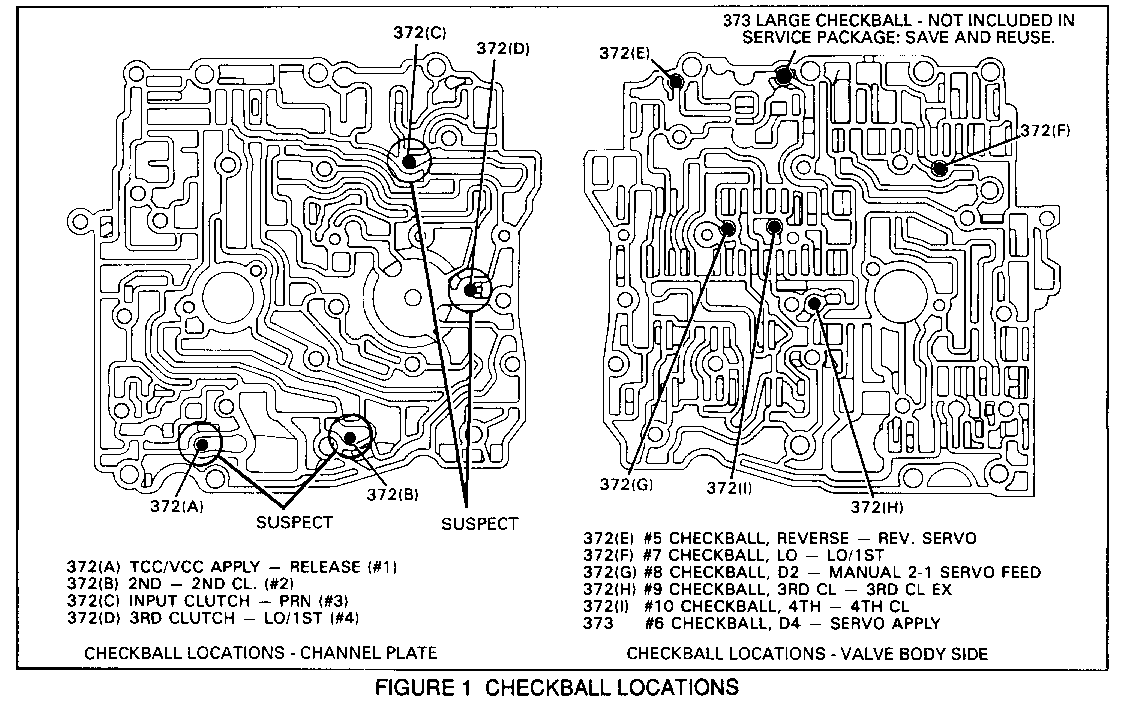
SERVICE MANUAL REFERENCE: Refer to the 1992 Service Manual, General Information Section OA for vehicle identification number (VIN) information. Refer to Automatic Transaxle On-Vehicle Service, Section 7A, for transaxle nameplate information or procedures to remove and replace a control valve body. Refer to the Automatic Transaxle Unit Repair Section for proper checkball locations and functions.
CONDITION: Some Eighty Eights and Ninety Eights equipped with HYDRA-MATIC 4T60-E transaxle (RPO M13) built between Julian Date 021 (January 21) line 3B, to Julian Date 023 (January 23, 1992) line 3A & 3B, may exhibit any or all of the conditions listed below.
Note: Symptoms will depend on checkball function and degree of severity:
o No drive/reverse or slips in drive/reverse range.
o No converter clutch apply or straw colored "HOT" converter housing assembly.
o Harsh 1-2 upshift/downshift feel.
o Soft 2-3 upshift feel and/or no/slipping 3rd gear.
o No D1, (manual low) range.
Affected transaxles are in vehicles assembled at the Orion and Flint vehicle assembly plants. Assembly plant locations can be determined by the 11th position in the VIN. An Orion assembled vehicle will have a number "4" in the 11th position while a Flint assembled vehicle will have the letter "H."
Suspect transaxles can be identified by the information on the transaxle nameplate and VIN. Both nameplate and VIN information must be present to consider the vehicle a suspect for this condition.
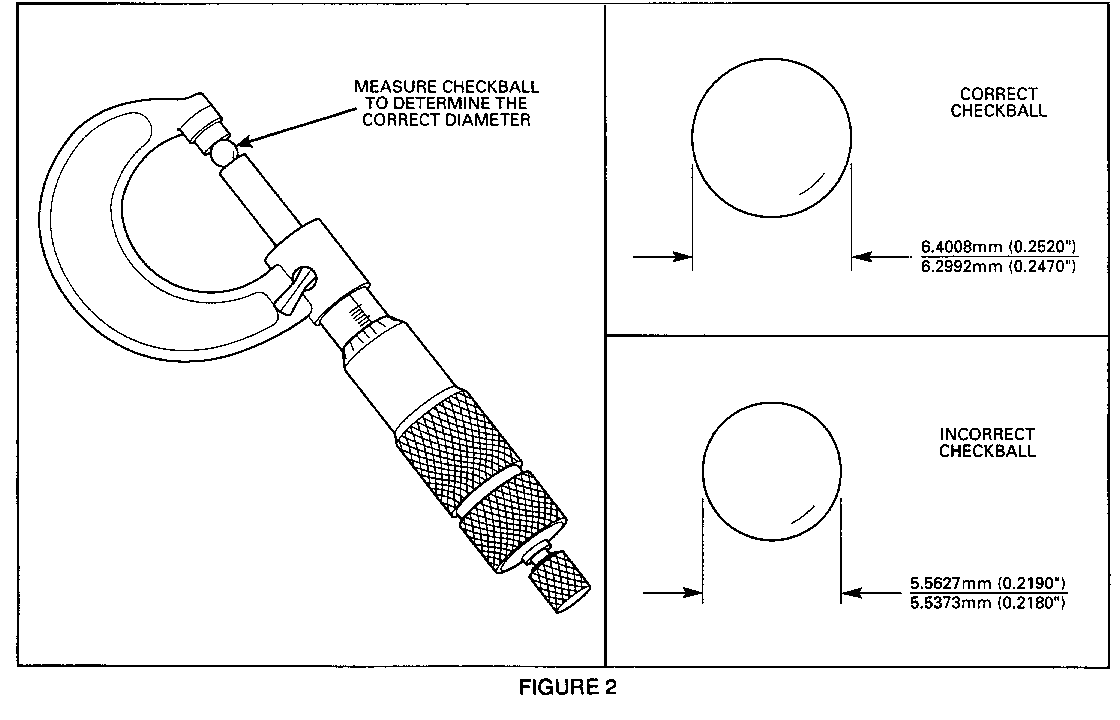
CAUSE: Transaxles built with the above-mentioned criteria may have had smaller checkballs installed in the four (4) checkball locations of the channel plate assembly. See figure 1 in this bulletin. The desired checkballs should be between 6.40mm (0.252") maximum and 6.29mm (0.247) minimum diameter. See Figure 2 in this bulletin. Due to the minimal size difference between large and small checkballs, it is essential that the sizes be verified using a micrometer. A small checkball may cause premature wear of the spacer plate and/or stick in the checkball pockets of the channel plate assembly.
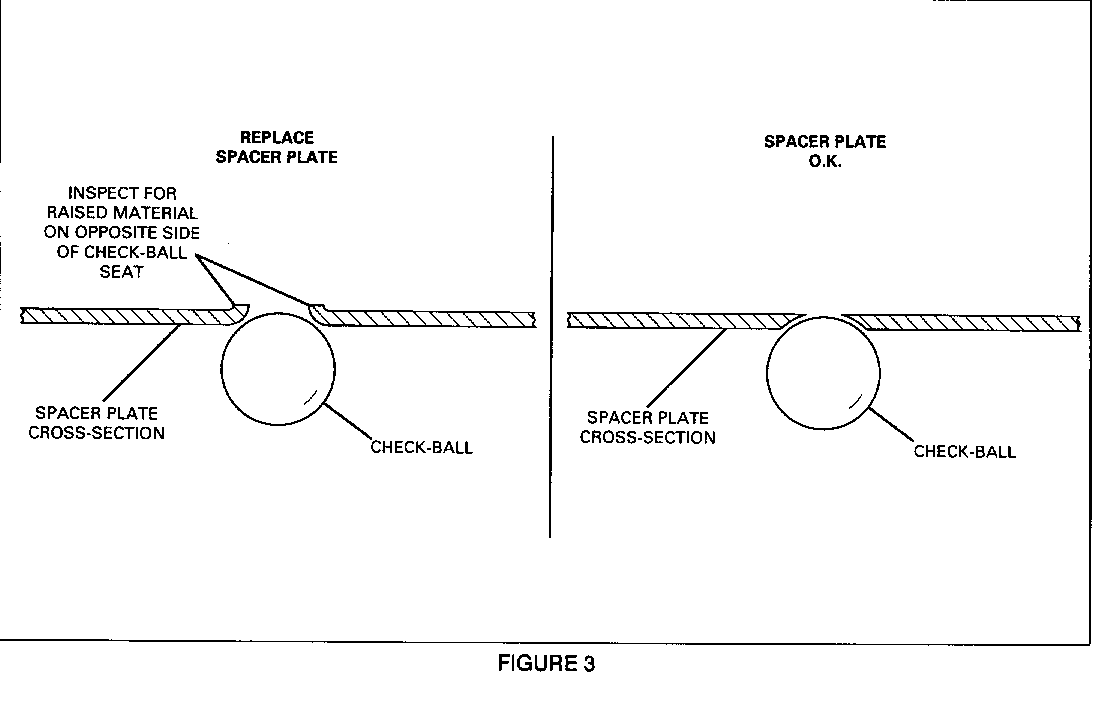
Note: Some spacer plate peening is considered acceptable and preferred because it can help seat the checkball. The following two procedures can help determine if the spacer plate can be reused. Perform the following at all checkball locations (except #6).
1. The spacer plate must be inspected for raised material on the opposite side of the checkball seat. See Figure 3. If the material on the opposite side is raised, peening is too severe and the spacer plate must be replaced.
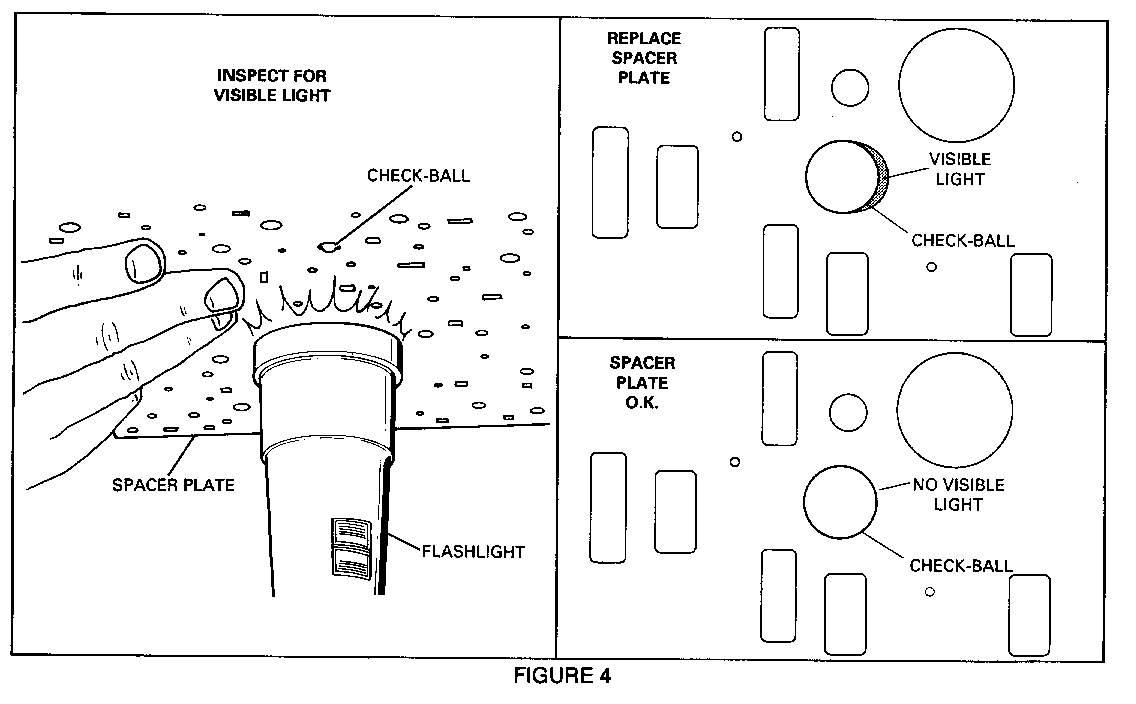
2. To verify that the spacer plate is peening evenly and the ball is sealing correctly, seat the checkball on the spacer plate. Shine a beam of light on the opposite side and inspect for light between the spacer plate and checkball. See Figure 4. No trace of light should be present. If light can be seen, a proper seal does not exist, and the spacer plate needs to be replaced.
CORRECTION: Begin with the "Quick Check Procedure" found in the "Automatic Transaxle Diagnosis" section of the 1992 Service Manual. These procedures will aid the Technician in choosing the proper diagnostic path and ensure that no unnecessary repairs are performed.
SERVICE PARTS INFORMATION: Service Parts were set up so only damaged components need be ordered and replaced.
Part Number Description Model Usage ----------- ----------- ----------- 8644902 Pkg. Side Cover Gaskets 2CLW, 2YMW
8651922 Pkg. Spacer Plate Gaskets 2CLW, 2YMW
0104918 Pkg. Checkball - 0.25" diameter 2CLW, 2YMW 2CLW, 2YMW (contains 5 checkballs 0.25" diameter per package. Order two packages to replace all nine checkballs)
8680495 Plate Asm. Valve Body Spacer 2CLW and 2YMW
8681846 Channel Plate Asm. Complete 2CLW
8681847 Channel Plate Asm. Complete 2YMW
Note: Due to the minimal size difference between "large" and "small" checkballs, it is recommended if the checkballs need replacing, that all nine be discarded and replaced with checkballs in service package #0104918. It should also be noted that checkball #6, which is visibly larger than the others, was not suspect in this bulletin, it must be saved and reused.
Parts are currently available from GMSPO.


General Motors bulletins are intended for use by professional technicians, not a "do-it-yourselfer". They are written to inform those technicians of conditions that may occur on some vehicles, or to provide information that could assist in the proper service of a vehicle. Properly trained technicians have the equipment, tools, safety instructions and know-how to do a job properly and safely. If a condition is described, do not assume that the bulletin applies to your vehicle, or that your vehicle will have that condition. See a General Motors dealer servicing your brand of General Motors vehicle for information on whether your vehicle may benefit from the information.
