A/C MOAN, GROWL OR VIBRATION (ADD BRACE, RECHARGE A/C SYS.)

SUBJECT: AIR CONDITIONING MOAN, GROWL, OR VIBRATION (ADD BRACE, CHANGE REFRIGERANT CHARGE)
VEHICLES AFFECTED: 1989-92 "A"-CAR WITH 3.3L (VIN N) OLDSMOBILE CUTLASS CIERA, CRUISER BUICK CENTURY
CONDITION: Some 1989-92 A cars with 3.3 L (VIN Code N) engines may have a moan, growl or vibration when operating with the air conditioning on.
CAUSE: May be one or more of the following:
1. Pressure pulses in the A/C hose. 2. "Ground outs" of system components. 3. Exhaust system vibrations. 4. Over-charge of refrigerant.
CORRECTION: This condition may be improved by using the following service parts and procedure, along with the parts and procedure of previous Product Service Bulletin 92-633-100 on Damper-Exhaust System. If the procedure in the previous bulletin has not been done, it should be done before going on with this procedure.
PARTS:
QTY. PART NO. PART NAME ---- ---------- --------- 1 10213676 Bracket and Clamp Asm. 1 11502670 Bolt *1 10137383 Damper-Exhaust System
*Reference Product Service Bulletin No. 92-633-100.
PROCEDURE:
1. Align the vehicle on a hoist (to be raised later) and raise hood to the full open position.
Note: If the vehicle is a 1992 model, or is a 1991 model with 2.375 lbs. charge, skip Steps #2 And 15. Check the blue label on the compressor to verify the charge. All 1992 vehicles are built with the proper A/C charge.
2. Discharge the A/C system using the normal recovery method.
WHILE DISCHARGE/RECOVERY IS TAKING PLACE
3. Remove the upper radiator mounting panel.
Requires:
- Disconnect upper engine strut from radiator tie bar. - Disconnect upper cooling fan attaching bolts.
4. Looking down between the radiator and condenser, inspect the back side of the condenser for contact with the radiator cross braces, and CAREFULLY bend braces rearward for clearance in contact areas.
5. Raise the vehicle on the hoist.
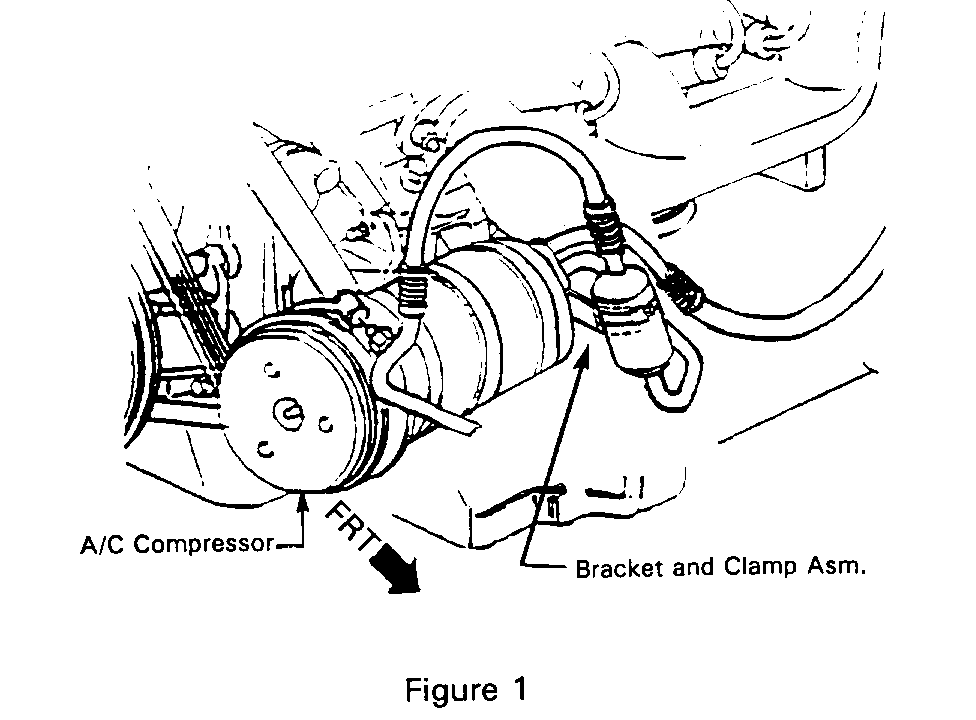
6. Separate the new bracket and clamp assembly and install the bracket to the A/C compressor snug, but not tight, with the service bolt. See Figure 1. Install the clamp through the bracket and around the muffler. Tighten the clamp, and the bracket bolt to the compressor.
7. If the exhaust system damper has not been installed, install the damper according to the procedure shown in the previous Bulletin.
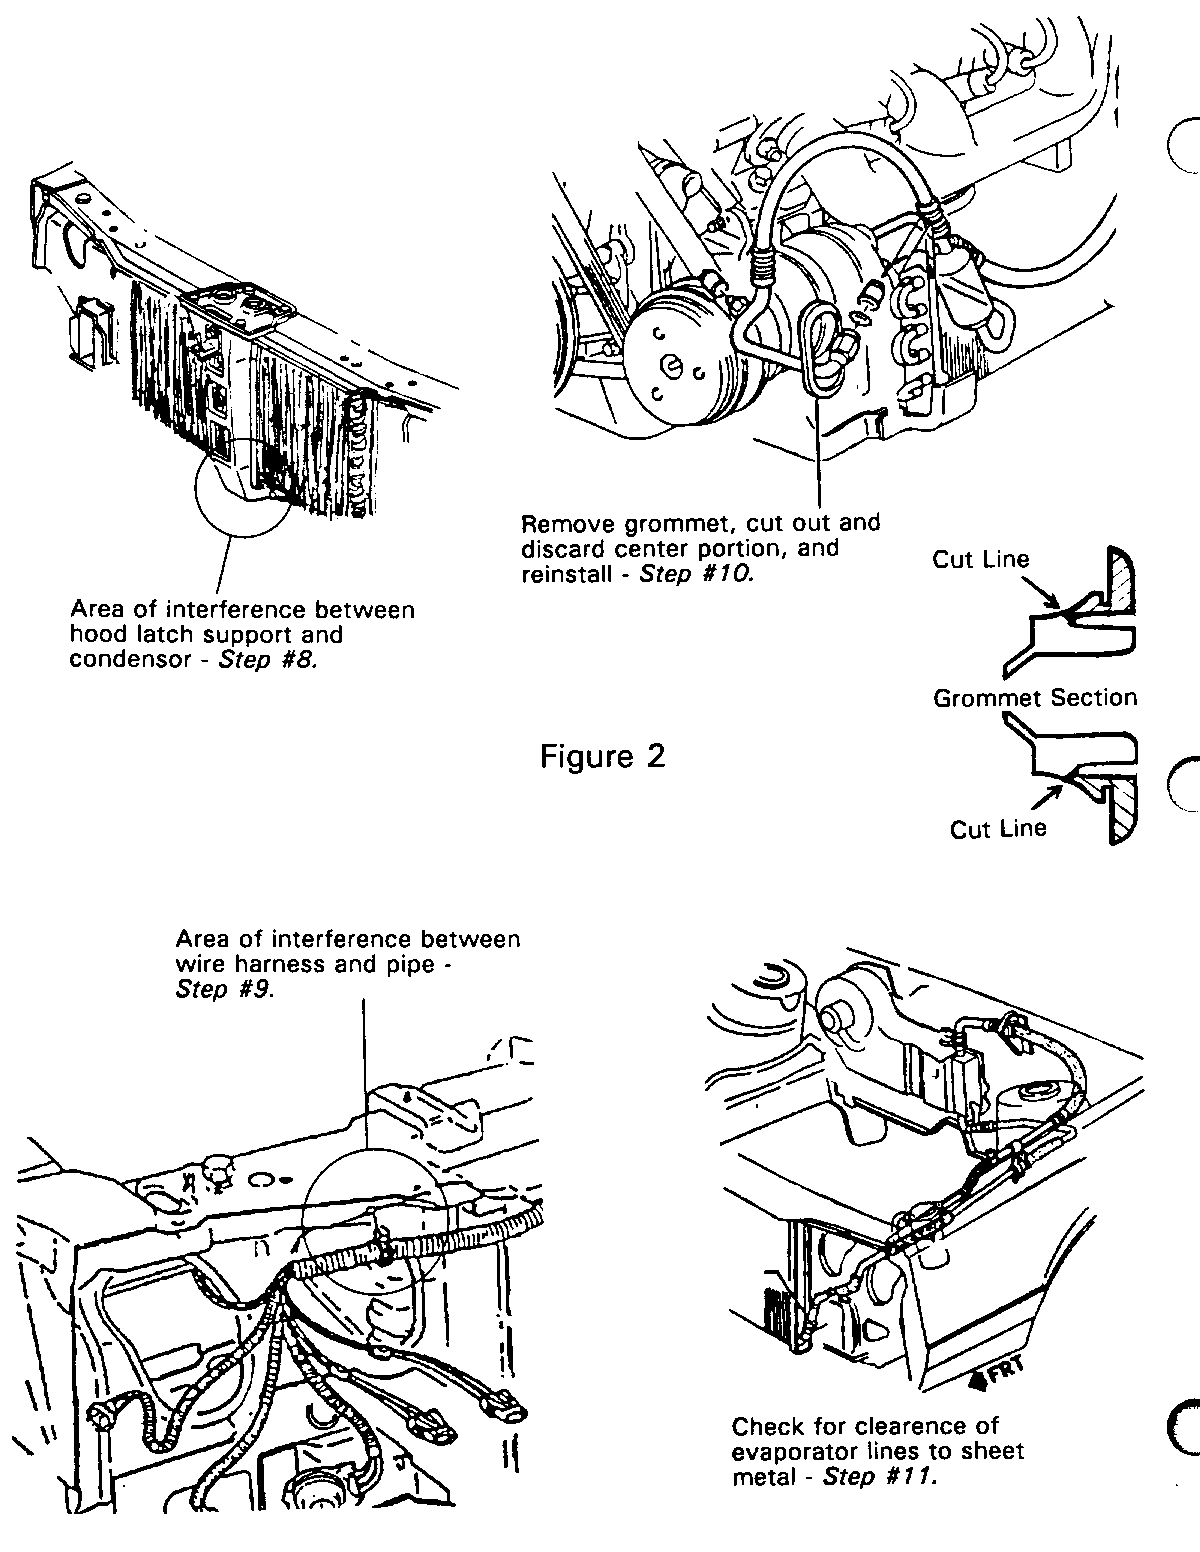
8. Inspect the condenser for contact marks at the lower front edge (center) from damper the hood latch support and CAREFULLY bend the condenser fins in the contact area to provide clearance (See Figure 2).
9. Reposition the wiring harness (clip located on the upper right area of the radiator support), by removing the conduit from the rosebud clip and letting the harness hang free, to provide harness clearance to condenser pipe (See Figure 2).
10. Remove the grommet from the right side radiator support, cut out the center of the grommet and discard, and reinstall the remainder of the grommet (See Figure 2).
11. Inspect the condenser pipes and lines to insure no contact is present to sheet metal or structure (See Figure 2).
12. Lower the vehicle.
13. Inspect the remainder of the A/C system components for contact to sheet metal or body structure and provide clearances if necessary.
14. Reinstall the upper radiator mounting panel, engine strut and fan attaching bolts.
- Torque strut attachments to 23 N.m (17 Lbs. Ft.) - Torque fan and panel attachments to 10 N.m (89 Lbs.In.)
15. Recharge A/C system to 2.375 Lbs. NOTE: DO NOT recharge A/C system to original specifications OF 2.75 Lbs.
For vehicles repaired under warranty use:
LABOR TIME: 1988 to 1991 with 2.75 lbs. Charge 1.5 Hrs. 1991 to 1992 with 2.375 lbs. Charge 0.8 Hrs.


General Motors bulletins are intended for use by professional technicians, not a "do-it-yourselfer". They are written to inform those technicians of conditions that may occur on some vehicles, or to provide information that could assist in the proper service of a vehicle. Properly trained technicians have the equipment, tools, safety instructions and know-how to do a job properly and safely. If a condition is described, do not assume that the bulletin applies to your vehicle, or that your vehicle will have that condition. See a General Motors dealer servicing your brand of General Motors vehicle for information on whether your vehicle may benefit from the information.
