GM Service Manual Online
For 1990-2009 cars only

Tools Required

    • J 28410 Gasket Remover
    • J 36660-A Torque/Angle Meter

Removal Procedure

  1. Remove the following subassemblies:
  2. • The right exhaust manifold. Refer to Exhaust Manifold Replacement - Right Side in Engine Exhaust.
    • The water crossover. Refer to Engine Coolant Crossover Pipe Replacement in Engine Cooling.
    • The intake manifold. Refer to Intake Manifold Replacement .
    • The camshaft cover. Refer to Camshaft Cover Replacement - Right Side .
    • The engine front cover. Refer to Engine Front Cover Replacement .
    • The right secondary camshaft drive chain. Refer to Secondary Camshaft Drive Chain Replacement - Right Side .

    Object Number: 588929  Size: SH
  3. Disconnect the electrical connector (2) from the ECT sensor.
  4. Remove the nut (3) securing the coil cassette ground wire to the cylinder head.
  5. Remove the bolt securing the exhaust crossover pipe to the cylinder head.
  6. Raise and support the vehicle. Refer to Lifting and Jacking the Vehicle in General Information.

  7. Object Number: 588753  Size: SH
  8. Remove the bolt (1) securing the front transaxle brace (2) to the cylinder head.
  9. Loosen the bolts (3) attaching the transaxle brace (2) to the transaxle.

  10. Object Number: 588757  Size: SH
  11. Remove the bolt (2) securing the rear transaxle brace (1) to the transaxle.
  12. Lower the vehicle.
  13. Remove the nuts (3) securing the rear transaxle brace (1) to the cylinder head.
  14. Remove the rear transaxle brace.

  15. Object Number: 522833  Size: SH
  16. Remove the three M6 external drive bolts from the front portion of the cylinder head.
  17. Important: DO NOT reuse the M11 cylinder head bolts.

  18. Remove and discard the ten M11 internal drive cylinder head bolts.

  19. Object Number: 522830  Size: SH
  20. Remove the right cylinder head. Make sure that no dowel guide pins are stuck in the cylinder head.
  21. Important: You must clean the thread sealant material from the cylinder head bolt holes in the cylinder block. Failure to do so could cause false torque readings during reassembly.

  22. After removing the cylinder head, remove any remaining bolt thread sealant material from the threaded cylinder block holes.

  23. Object Number: 522824  Size: SH

    Important: DO NOT reuse the cylinder head gasket.

  24. Remove the right cylinder head gasket.
  25. Remove all remaining gasket material from the cylinder head and cylinder block using the J 28410 .
  26. Place the cylinder head on a flat, clean surface with the combustion chambers face-up in order to prevent damage to the deck face.
  27. Clean and inspect the cylinder head. Refer to Cylinder Head Cleaning and Inspection in Engine Mechanical - 4.0 L Unit Repair.

Installation Procedure


    Object Number: 522821  Size: SH
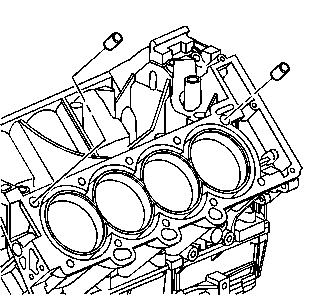
  1. Make sure all the cylinder head locating pins are securely mounted in the cylinder block deck face.
  2. Important: Failure to remove all the old thread sealant material from the cylinder block could cause false torque readings.

  3. Make sure any old thread sealant material is removed from the cylinder head bolt holes in the cylinder block.
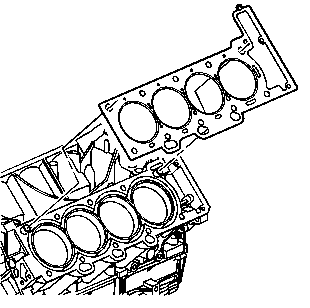
  4. Object Number: 522824  Size: SH
  5. Install a new right cylinder head gasket using the deck face locating pins for retention.
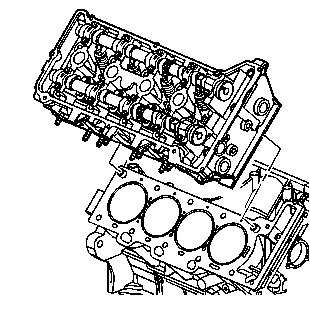
  6. Object Number: 522830  Size: SH
  7. Align the cylinder head with the deck face locating pins.
  8. Place the cylinder head in position on the deck face.
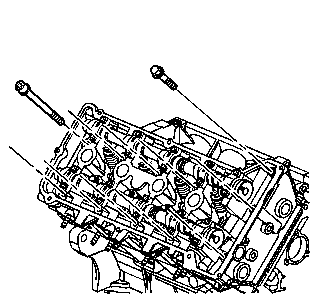
  9. Object Number: 522833  Size: SH

    Important: DO NOT reuse the old M11 cylinder head bolts.

  10. Install new M11 cylinder head bolts in the cylinder head.
  11. Install the M6 cylinder head bolts at the front of the cylinder head.
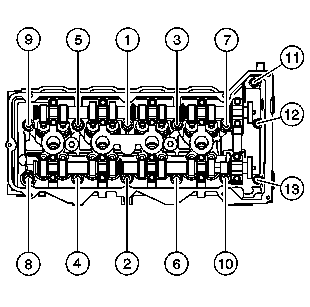
  12. Object Number: 522836  Size: SH

    Notice: Use the correct fastener in the correct location. Replacement fasteners must be the correct part number for that application. Fasteners requiring replacement or fasteners requiring the use of thread locking compound or sealant are identified in the service procedure. Do not use paints, lubricants, or corrosion inhibitors on fasteners or fastener joint surfaces unless specified. These coatings affect fastener torque and joint clamping force and may damage the fastener. Use the correct tightening sequence and specifications when installing fasteners in order to avoid damage to parts and systems.

  13. Tighten the right cylinder head bolts in the sequence shown.
  14. 8.1. First Pass

    Tighten
    Tighten the right cylinder head M11 cylinder head bolts to 40 N·m (30 lb ft) in the sequence shown.

    8.2. Second Pass

    Tighten
    Using the J 36660-A , tighten the right cylinder head M11 cylinder head bolts an additional 70 degrees in the sequence shown.

    8.3. Third Pass

    Tighten
    Repeat the sequence turning each bolt another 60 degrees.

    8.4. Final Pass

    Tighten
    Repeat the sequence again turning each bolt a final 45 degrees (total 175 degrees).

  15. Tighten the M6 bolts at the front of the cylinder head.
  16. Tighten
    Tighten the M6 cylinder head bolts to 12 N·m (106 lb in).
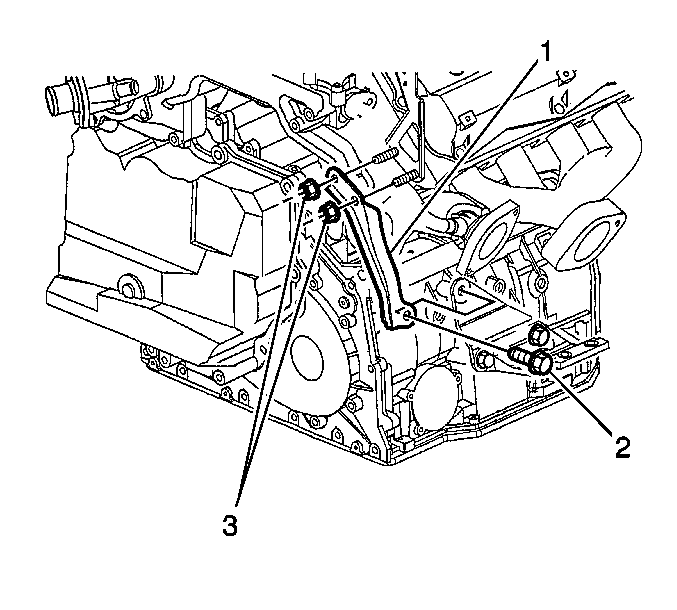

    Object Number: 588757  Size: SH
  17. Position the rear transaxle brace over the studs located at the rear of the right cylinder head.
  18. Loosely install the nuts (3) securing the rear transaxle brace (1) to the cylinder head.
  19. Raise and support the vehicle. Refer to Lifting and Jacking the Vehicle in General Information.
  20. Install the bolt (2) securing the rear transaxle brace (1) to the transaxle.
  21. Tighten
    Tighten the rear transaxle brace bolt to 50 N·m (37 lb ft).
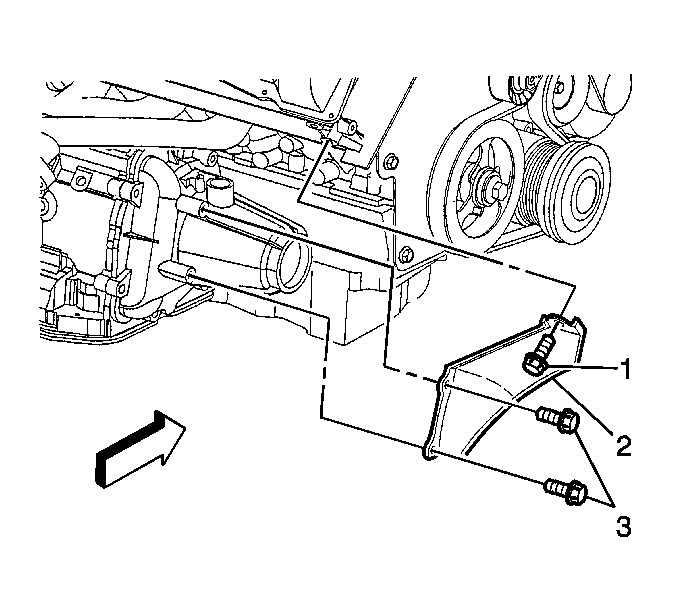

    Object Number: 588753  Size: SH
  22. Install the bolt (1) securing the front transaxle brace (2) to the cylinder head.
  23. Tighten
    Tighten the front transaxle brace bolts to 50 N·m (37 lb ft).

  24. Lower the vehicle.
  25. Tighten the nuts installed in step 11.
  26. Tighten
    Tighten the rear transaxle brace nuts to 50 N·m (37 lb ft).
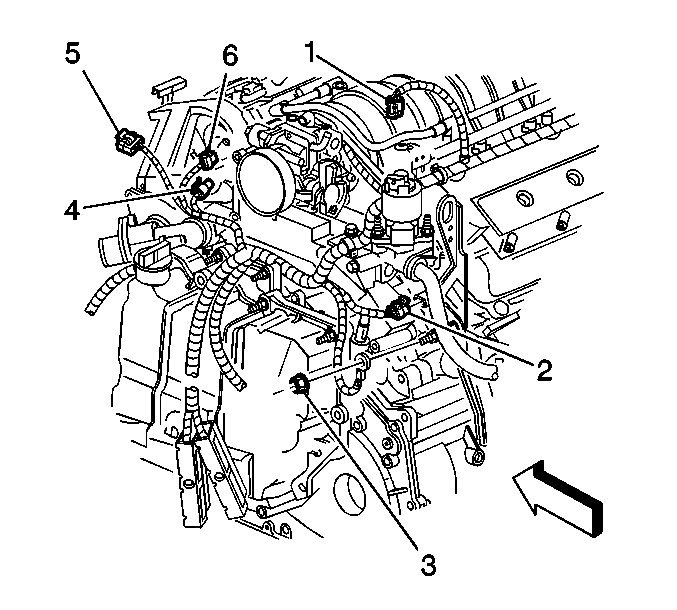

    Object Number: 588929  Size: SH
  27. Connect the electrical connector (2) to the ECT sensor.
  28. Install the bolt securing the exhaust crossover pipe to the cylinder head.
  29. Tighten
    Tighten the exhaust crossover pipe to cylinder head bolt to 25 N·m (18 lb ft).

  30. Install the nut (3) securing the coil cassette ground wire to the cylinder head.
  31. Tighten
    Tighten the coil cassette ground wire nut to 17 N·m (13 lb ft).

  32. Install the following subassemblies:
  33. • The right secondary camshaft drive chain. Refer to Secondary Camshaft Drive Chain Replacement - Right Side .
    • The engine front cover. Refer to Engine Front Cover Replacement .
    • The camshaft cover. Refer to Camshaft Cover Replacement - Right Side .
    • The intake manifold. Refer to Intake Manifold Replacement .
    • The water crossover. Refer to Engine Coolant Crossover Pipe Replacement in Engine Cooling.
    • The right exhaust manifold. Refer to Exhaust Manifold Replacement - Right Side in Engine Exhaust.