Circuit Description
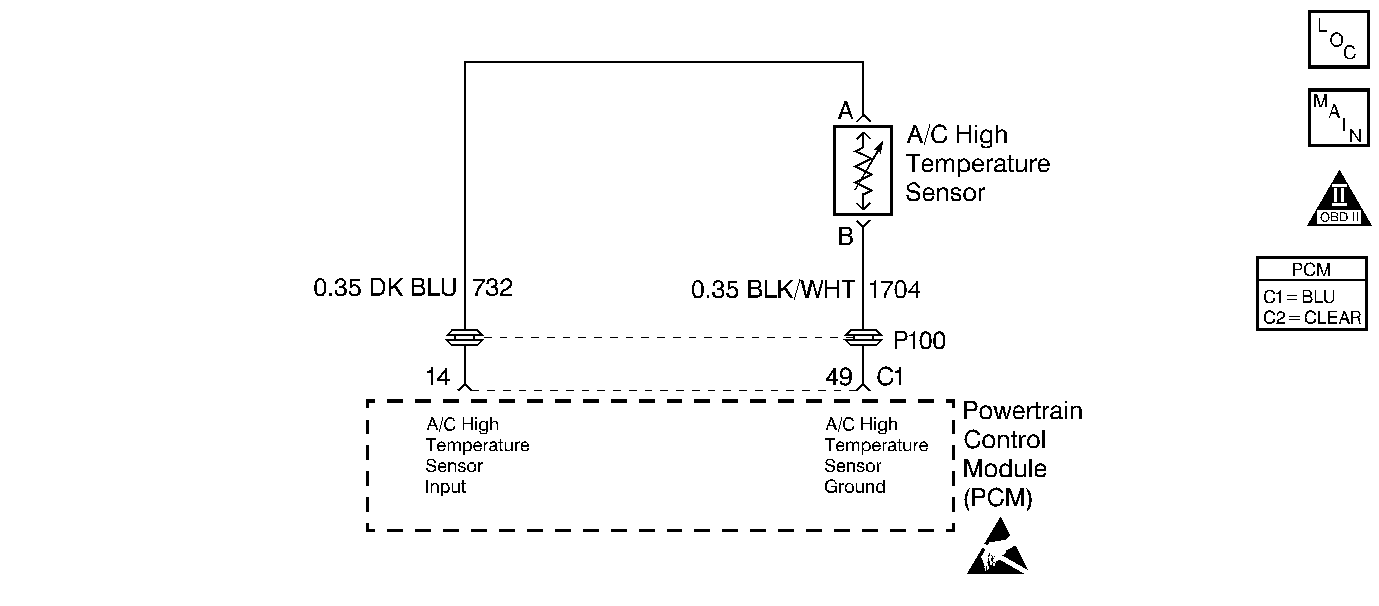
The A/C high side temperature sensor uses a thermister to control the signal voltage to the PCM. The PCM applies 5 volts on CKT 732 to the sensor. When the sensor is cold, its resistance is high; therefore, the PCM will see a high signal voltage. As the sensor warms, its resistance becomes less and the signal voltage is pulled low through the ground, CKT 1704. This diagnostic detects a shorted to ground or open A/C high side temperature sensor circuit by setting the DTC if the PCM monitors a signal voltage, temperature, that is too high or low.
Conditions for Setting the DTC
Test Conditions
| • | Ambient Air Temperature between 40°F and 210°F. |
| • | Ambient Air Temperature sensor failure not indicated by the HVAC controller. |
Failure Condition
A/C high temperature sensor reads less than 12°C (10°F) or more than 210°C (410°F).
Action Taken When the DTC Sets
| • | Enable cooling fans to high if A/C clutch engagement is possible. |
| • | The Malfunction Indicator Lamp (MIL) will not illuminate. |
| • | No message will be displayed. |
Conditions for Clearing the DTC
| • | A History DTC will clear after forty consecutive warm-up cycles with no failures of any non-emission related diagnostic test. |
| • | A Last Test Failed (current) DTC will clear when the diagnostic runs and does not fail. |
| • | Use a scan tool to clear DTCs. |
| • | Interrupting PCM battery voltage may or may not clear DTCs. This practice is not recommended. Refer to Clearing Diagnostic Trouble Codes in PCM Description and Operation. |
Diagnostic Aids
With the vehicle engine not running and at ambient temperature the A/C temperature sensor should also be near ambient temperature. If the A/C temperature sensor is not near ambient temperature check for a sensor or circuit with resistance that is too high or too low. A sensor temperature reading that is too high would indicate a shorted or low resistance sensor or circuit. A sensor temperature reading that is too low would indicate an open or high resistance sensor or circuit.
Step | Action | Value(s) | Yes | No |
|---|---|---|---|---|
1 | Was the Powertrain On-Board Diagnostic (OBD) System Check performed? | -- | Go to A Powertrain On Board Diagnostic (OBD) System Check | |
2 |
Does the scan tool display a value between the range specified? | -12°C (10°F) - 210°C (410°F) | Fault not present. Refer to Diagnostic Aids | |
3 | Is the temperature displayed more than the value specified? | 210°C (410°F) | ||
4 |
Is the temperature displayed more than the value specified? | 210°C (410°F) | ||
5 |
Is the temperature displayed more than the value specified? | 210°C (410°F) | ||
6 |
Is the resistance more than the value specified? | 5 ohms | ||
7 | Disconnect the sensor connector. Is the temperature displayed less than the value specified? | -12°C (10°F) | ||
8 |
Is the resistance more than the value specified? | 10K ohms | ||
9 | Repair the open in the A/C High Temperature Sensor ground circuit. Is the repair complete? | -- | Go to Powertrain Control Module Diagnosis for Verify Repair | -- |
10 | Repair the open in the A/C High Temperature Sensor signal circuit. Is the repair complete? | -- | Go to Powertrain Control Module Diagnosis for Verify Repair | -- |
11 | Repair the short to ground in the A/C High Temperature Sensor signal circuit. Is the repair complete? | -- | Go to Powertrain Control Module Diagnosis for Verify Repair | -- |
12 |
Was terminal contact repaired? | -- | Go to Powertrain Control Module Diagnosis for Verify Repair | |
13 | Replace the sensor. Refer to Section 1, Heating and Air Conditioning . Is the replacement complete? | -- | Go to Powertrain Control Module Diagnosis for Verify Repair | -- |
14 |
Was terminal contact repaired? | -- | Go to Powertrain Control Module Diagnosis for Verify Repair | |
15 | Replace the PCM. Refer to PCM Replacement/Programming . Is the replacement complete? | -- | Go to Powertrain Control Module Diagnosis for Verify Repair | -- |
