Circuit Description
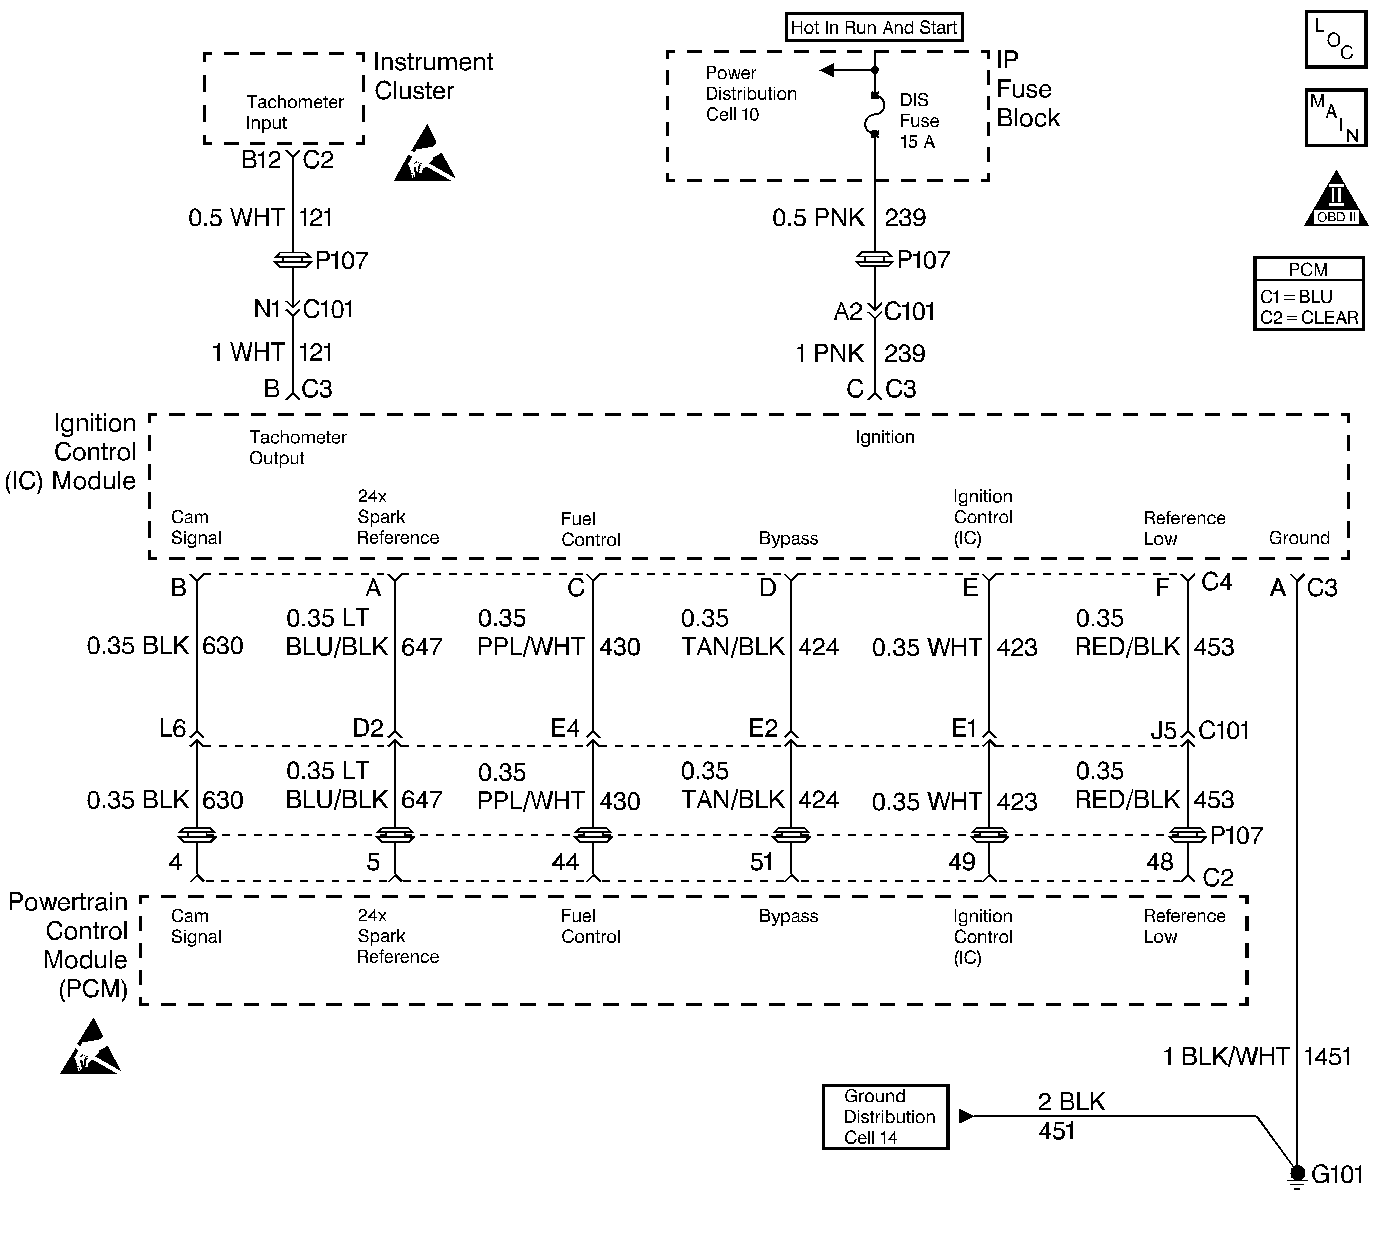
The Ignition Control Module creates a 4X signal and a 24X signal that is used by the PCM for ignition and fuel control. If the PCM does not receive 4X reference pulses from the Ignition Control Module for more than 0.4 second while the engine is running, DTC P1320 is set.
Conditions for Setting the DTC
Test Conditions
| • | DTCs P0232 and P1376 are not set. |
| • | Engine speed greater than 568 rpm. |
Failure Condition
No 4X reference pulse has been received by the PCM for 0.4 second.
Action Taken When the DTC Sets
| • | The Malfunction Indicator Lamp (MIL) will not illuminate. |
| • | No message will be displayed. |
Conditions for Clearing the DTC
| • | A History DTC will clear after forty consecutive warm-up cycles with no failures of any non-emission related diagnostic test. |
| • | A Last Test Failed (current) DTC will clear when the diagnostic runs and does not fail. |
| • | Use a scan tool to clear DTCs. |
| • | Interrupting PCM battery voltage may or may not clear DTCs. This practice is not recommended. Refer to Clearing Diagnostic Trouble Codes in PCM Description and Operation. |
Diagnostic Aids
This DTC may set due to a false start condition in which cranking engine exceeds 568 rpm but does not start.
If no fault present check for intermittent opens/shorts in CKT's 430, 239 and 1451 or EMI interference on CKT 430.
Without 4X reference pulses the vehicle will start although crank time can be extended to as much as 45 seconds. If this DTC is set with a No Start complaint crank the vehicle for 45 seconds before attempting to determine the cause of a No Start condition.
Test Description
Number(s) below refer to the step number(s) on the Diagnostic Table.
-
Check to see if other ignition DTCs are set.
-
Checking for power to the ignition control module.
-
Checking if fault is in circuit.
-
Checking if fault is in circuit.
-
Checking if fault is in circuit.
-
IC module output should be 4.2 volts or more.
-
IC module frequency output should be 30 Hz or more.
A diagnostic jumper can be created with the terminals supplied in the J 38125-A Terminal Repair Kit. Assemble the jumpers and terminals and cover the exposed terminals with heat shrink tubing. Do not cover the spade of the male terminals.
Step | Action | Value(s) | Yes | No | ||||||||||||
|---|---|---|---|---|---|---|---|---|---|---|---|---|---|---|---|---|
1 | Was the Powertrain On-Board Diagnostic (OBD) System Check performed? | -- | Go to A Powertrain On Board Diagnostic (OBD) System Check | |||||||||||||
Are DTCs P0232, P0322, P1323 or P1375 also set? | -- | Go to DTCs that are set | ||||||||||||||
Is the voltage the same or more than the value specified? | 10.0 volts | |||||||||||||||
Is the resistance more than the value specified? | 10K ohms | |||||||||||||||
Measure the resistance between IC module connector C4 terminal C and PCM connector C2 terminal 44. Is the resistance the same or less than the value specified? | 5 ohms | |||||||||||||||
Is the voltage less than the value specified? | 0.5 volts | |||||||||||||||
Is the voltage more than the value specified? | 4.2 volts | |||||||||||||||
OR:
Does the FREQUENCY measure less than the value specified? | 30 Hertz | |||||||||||||||
9 |
Has DTC P1320 reset? | -- | Fault not present. Refer to Diagnostic Aids | |||||||||||||
10 |
Is the repair complete? | -- | Go to Powertrain Control Module Diagnosis for Verify Repair | -- | ||||||||||||
11 | Repair the short to ground in the Fuel Control (4X) circuit. Is the repair complete? | -- | Go to Powertrain Control Module Diagnosis for Verify Repair | -- | ||||||||||||
12 | Repair the open in the Fuel Control (4X) circuit. Is the repair complete? | -- | Go to Powertrain Control Module Diagnosis for Verify Repair | -- | ||||||||||||
13 | Repair the short to voltage in the Fuel Control (4X) circuit. Is the repair complete? | -- | Go to Powertrain Control Module Diagnosis for Verify Repair | -- | ||||||||||||
14 |
Was terminal contact repaired? | -- | Go to Powertrain Control Module Diagnosis for Verify Repair | |||||||||||||
15 | Replace the Ignition Control Module. Refer to Ignition Control Module Replacement (Assembly) . Is the replacement complete? | -- | Go to Powertrain Control Module Diagnosis for Verify Repair | |||||||||||||
16 |
Was terminal contact repaired? | -- | Go to Powertrain Control Module Diagnosis for Verify Repair | |||||||||||||
17 | Replace the PCM. Refer to PCM Replacement/Programming . Is the replacement complete? | -- | Go to Powertrain Control Module Diagnosis for Verify Repair | -- |
