For 1990-2009 cars only
Frame Replacement Manual Transmission
Removal Procedure
- Install the engine support fixture. Refer to Engine Support Fixture for the 2.2L engine.
- Raise the vehicle on a hoist. Refer to Lifting and Jacking the Vehicle .
- Remove the tire and wheel assemblies. Refer to Tire and Wheel Removal and Installation .
- Remove the front fender liner. Refer to Front Fender Liner Replacement .
- Disconnect the Antilock Brake System (ABS) sensor from the wheel speed sensor and frame.
- Remove the lower ball joints from the steering knuckles. Refer to Lower Control Arm Ball Joint Replacement .
- Remove the stabilizer shaft insulators. Refer to Stabilizer Shaft Insulator Replacement .
- Remove the brake modulator assembly from the support bracket. Refer to Electronic Brake Control Module Replacement .
- Remove the front transmission mount bracket bolts. Refer to Transmission Front Mount Replacement for the M86/M94 Getrag transmission.
- Remove the rear transmission mount bracket bolts. Refer to Transmission Rear Mount Replacement for the M86/M94 Getrag transmission.
- Remove the side transmission mount bracket bolts. Refer to Transmission Mount Replacement - Side for the M86/M94 Getrag transmission.
- Remove the mounting bolts from the power steering gear and secure out of the way with mechanic's wire or equivalent, being sure not to overextend the intermediate shaft. Refer to Steering Gear Replacement .
- Remove the right front brake line from the vehicle. Refer to Front Brake Hose Replacement .
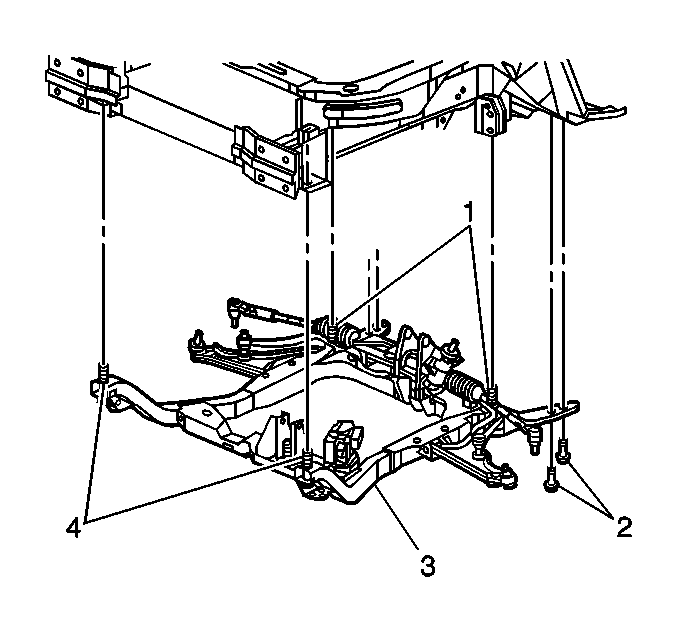
- Remove the brake lines from the retainers on the crossmember (2).
- Lower the vehicle until the suspension crossmember (2) rests on the jack stands.
- Remove the front suspension crossmember support bolts (3).
- Remove the rear suspension crossmember support bolts (4).
- Remove the suspension crossmember to body bolts (1).
- Raise the vehicle off of the suspension crossmember (2).
- Remove the following components if replacing the suspension crossmember:
| • | The lower control arms |
| • | Refer to Lower Control Arm Replacement . |
| • | The front transmission mount |
| • | Refer to Transmission Front Mount Replacement for the M86/M94 Getrag transmission. |
| • | The rear transmission mount |
| • | Refer to Transmission Rear Mount Replacement for the M86/M94 Getrag transmission. |
| • | The side transmission mount |
| • | Refer to Transmission Mount Replacement - Side for the M86/M94 Getrag transmission. |
| • | The stabilizer shaft |
| • | Refer to Stabilizer Shaft Replacement . |
Installation Procedure
- Install the following components on the suspension crossmember if removed:
- Lower the vehicle on to the frame (3).
- Install the lower control arm rear bolt (1). Hand tighten the bolts.
- Install the frame to body rear bolts (2). Hand tighten the bolts.
- Install the frame to body front bolts (4). Hand tighten the bolts.
- Tighten the suspension crossmember bolts in the following order:
- Tighten the frame to body rear bolts to 100 N·m (74 lb ft) plus 180 degrees rotation.
- Tighten the frame to body front bolts to 100 N·m (74 lb ft) plus 180 degrees rotation.
- Tighten the lower control arm to body bolts to 100 N·m (74 lb ft) plus 180 degrees rotation.
- Raise the vehicle and support with jack stands. Refer to Lifting and Jacking the Vehicle .
- Install the brake lines to the retainers on the crossmember (2).
- Remove the mechanic's wire or equivalent and install the power steering gear mounting bolts. Refer to Steering Gear Replacement .
- Install the right front brake line from the vehicle. Refer to Front Brake Hose Replacement .
- Install the side transmission mount bracket bolts. Refer to Transmission Mount Replacement - Side for the M86/M94 Getrag transmission.
- Install the rear transmission mount bracket bolts. Refer to Transmission Rear Mount Replacement for the M86/M94 Getrag transmission.
- Install the front transmission mount bracket bolts. Refer to Transmission Front Mount Replacement for the M86/M94 Getrag transmission.
- Install the brake modulator assembly to the support bracket. Refer to Electronic Brake Control Module Replacement .
- Install the lower ball joints to the steering knuckles. Refer to Lower Control Arm Ball Joint Replacement .
- Install the front fender liner. Refer to Front Fender Liner Replacement .
- Install the tire and wheel assemblies. Refer to Tire and Wheel Removal and Installation .
- Remove the engine support fixture. Refer to Engine Support Fixture for the 2.2L engine.
- Bleed the brake system. Refer to Hydraulic Brake System Bleeding .
| • | The stabilizer shaft |
| • | Refer to Stabilizer Shaft Replacement . |
| • | The rear transmission mount |
| • | Refer to Transmission Rear Mount Replacement for the M86/M94 Getrag transmission. |
| • | The front transmission mount |
| • | Refer to Transmission Front Mount Replacement for the M86/M94 Getrag transmission. |
| • | The side transmission mount |
| • | Refer to Transmission Mount Replacement - Side for the M86/M94 Getrag transmission. |
| • | The lower control arms |
| • | Refer to Lower Control Arm Replacement . |
Notice: Refer to Fastener Notice in the Preface section.
Tighten
Frame Replacement Automatic Transmission
Removal Procedure
- Install the engine support fixture. Refer to Engine Support Fixture for the 2.2L engine or Engine Support Fixture for the 3.4L engine.
- Support the radiator with mechanics wire or equivalent. Secure the wire to the upper radiator support or the engine support fixture.
- Raise the vehicle on a hoist. Refer to Lifting and Jacking the Vehicle .
- Remove the tire and wheel assemblies. Refer to Tire and Wheel Removal and Installation .
- Remove the front fender liners. Refer to Front Fender Liner Replacement .
- Remove the lower radiator support. Refer to Radiator Support Replacement .
- Disconnect the antilock brake system (ABS) sensors from the wheel speed sensors and the frame.
- Remove the ball joints from the steering knuckles. Refer to Lower Control Arm Ball Joint Replacement .
- Remove the brake modulator assembly bracket from the frame. Refer to Brake Pressure Modulator Valve Bracket Replacement .
- Remove the stabilizer links from the stabilizer shaft. Refer to Stabilizer Shaft Link Replacement .
- Remove the front transmission mount bracket bolts. Refer to Transmission Front Mount Replacement for the automatic transmission.
- Remove the rear transmission mount bracket bolts. Refer to Transmission Rear Mount Replacement for the automatic transmission.
- Remove the brake lines from the retainers on the frame.
- Lower the vehicle until the frame (3) rests on the jackstands.
- Remove the front frame mounting bolts (4).
- Remove the rear frame mounting bolts (1).
- Remove the frame-to-body bolts (2).
- Raise the vehicle enough to remove the stabilizer shaft insulator clamp bolts on the driver side of the vehicle. Refer to Stabilizer Shaft Insulator Replacement .
- Rotate the stabilizer shaft to access the steering gear mounting bolts.
- Remove the steering gear mounting bolts and secure the gear out of the way using mechanics wire or the equivalent. Ensure not to overextend the intermediate shaft. Refer to Steering Gear Replacement .
- Raise the vehicle off of the frame (3).
- Remove the following components if replacing the frame:
Support the modulator assembly and bracket with mechanics wire or equivalent.
| • | The lower control arms, refer to Lower Control Arm Replacement . |
| • | The front transmission mount, refer to Transmission Front Mount Replacement for the automatic transmission. |
| • | The rear transmission mount, refer to Transmission Rear Mount Replacement for the automatic transmission. |
| • | The stabilizer shaft, refer to Stabilizer Shaft Replacement . |
| • | The lower radiator support panel, refer to Radiator Support Replacement . |
Installation Procedure
- Install the following components on the frame if removed:
- Lower the vehicle to the frame (3), do not position in place.
- Install the steering gear mounting bolts. Refer to Steering Gear Replacement .
- Install the stabilizer shaft insulator clamp bolts on the driver side of the vehicle. Refer to Stabilizer Shaft Insulator Replacement .
- Install the front frame bolts (4). Hand tighten the bolts.
- Install the rear frame bolts (1). Hand tighten the bolts.
- Install the frame-to-body bolts (2). Hand tighten the bolts.
- Raise the vehicle and remove the frame supports.
- Install the brake lines to the retainers on the frame.
- Install the rear transmission mount bracket bolts. Refer to Transmission Rear Mount Replacement for the automatic transmission.
- Install the front transmission mount bracket bolts. Refer to Transmission Front Mount Replacement for the automatic transmission.
- Instal the stabilizer shaft links to the stabilizer shaft. Refer to Stabilizer Shaft Insulator Replacement .
- Install the brake modulator assembly bracket to the frame. Refer to Brake Pressure Modulator Valve Bracket Replacement .
- Install the lower ball joints to the steering knuckles. Refer to Lower Control Arm Ball Joint Replacement .
- Install the ABS sensors to the wheel speed sensors and the frame.
- Install the lower radiator support. Refer to Radiator Support Replacement .
- Install the front fender liners. Refer to Front Fender Liner Replacement .
- Install the tire and wheel assemblies. Refer to Tire and Wheel Removal and Installation .
- Lower the vehicle.
- Remove the engine support fixture. Refer to Engine Support Fixture for the 2.2L engine or Engine Support Fixture for the 3.4L engine
| • | The lower control arms, refer to Lower Control Arm Replacement . |
| • | The front transmission mount, refer to Transmission Front Mount Replacement for the automatic transmission. |
| • | The rear transmission mount, refer to Transmission Rear Mount Replacement for the automatic transmission. |
| • | The stabilizer shaft, refer to Stabilizer Shaft Replacement . |
| • | The lower radiator support panel, refer to Radiator Support Replacement . |
Notice: Refer to Fastener Notice in the Preface section.
Tighten the bolts in the following sequence:
Tighten
| • | Tighten the rear frame bolts to 100 N·m (74 lb ft) plus 180 degrees rotation. |
| • | Tighten the front frame bolts to 100 N·m (74 lb ft) plus 180 degrees rotation. |
| • | Tighten the frame-to-body bolts to 100 N·m (74 lb ft) plus 180 degrees rotation. |
