- Support the vehicle drive axle on a suitable hoist. Refer to Lifting and Jacking the Vehicle in General Information.
- Remove the tire and wheel assemblies from the drive axle. Refer to Tire and Wheel Removal and Installation in Tires and Wheels.
- Reinstall the wheel nuts in order to retain the brake rotors.
- Run the vehicle at the concern speed while inspecting for the presence of the vibration.
- If the vibration is still present, remove the rotors from the drive axle, then run the vehicle back to the concern speed. Refer to Front Brake Rotor Replacement in Disc Brakes.
- If the vibration is eliminated when the brake rotors are removed from the drive axle, repeat the test with one rotor installed at a time. Replace the rotor that is causing or contributing to the vibration concern. Refer to Front Brake Rotor Replacement in Disc Brakes.
- If a brake rotor was replaced as a result of following the previous steps, or if necessary to confirm the results obtained during the previous steps, and/or to check the non-drive axle components, perform the following:
Caution: One or more of the following guidelines may apply when performing specific required tests in the work stall:
• When a test requires spinning the drive wheels with the vehicle jacked up, adhere to the following precautions: - Do not exceed 56 km/h (35 mph) when spinning one drive wheel with the other drive wheel stopped. This limit is necessary because the speedometer indicates only one-half the actual vehicle speed under these conditions. Personal injury
may result from excessive wheel spinning. - If all of the drive wheels are spinning at the same speed, do not exceed 112 km/h (70 mph). Personal injury may result from excessive wheel spinning. - All persons should stay clear of the rotating components and the balance weight areas in order to avoid possible personal injury. - When running an engine in the repair stall for an extended period of time, use care not to overheat the engine and the transmission. • When a test requires jacking up the vehicle and running with the wheels and brake rotors removed, adhere to the following precautions: - Support the suspension at normal ride height. - Do not apply the brake with the brake rotors removed. - Do not place the transmission in PARK with the drive axles spinning. - Turn Off the ignition in order to stop the powertrain components from spinning. • When running an engine in the work stall, use the exhaust removal system to prevent breathing dangerous gases.
Notice: Do not depress the brake pedal with the brake rotors and/or the brake drums removed, or with the brake calipers repositioned away from the brake rotors, or damage to the brake system may result.
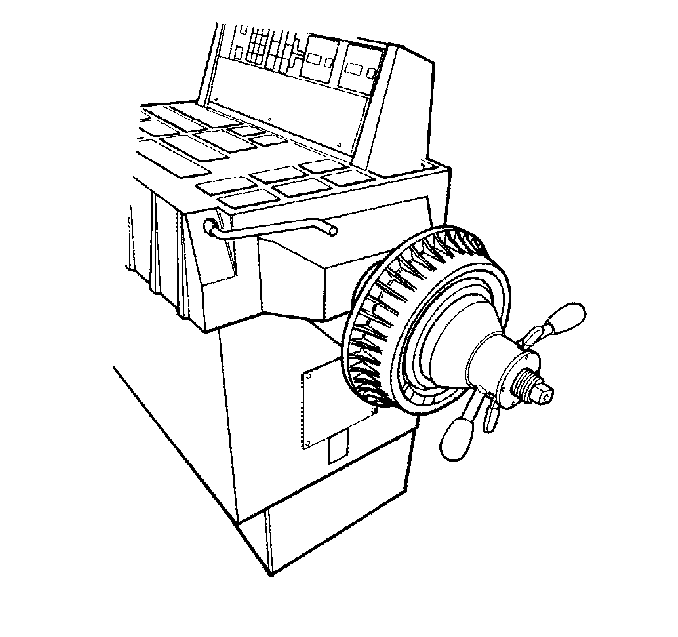
| 7.1. | Mount the brake rotor/drum on a balancer in the same manner as a tire and wheel assembly. |
| Important: Check brake rotors/drums for static imbalance only; ignore the dynamic imbalance readings. |
| 7.2. | Inspect the rotor/drum for static imbalance. |
There is not a set tolerance for brake rotor/drum static imbalance. However, any brake rotor/drum measured in this same manner which is over 21 g (¾ oz) may have the potential to cause or contribute to a vibration. Rotors/drums suspected of causing or contributing to a vibration should be replaced. Any rotor/drum that is replaced should be checked for imbalance in the same manner.
