For 1990-2009 cars only
Removal Procedure
- Disconnect the battery negative cable. Refer to Battery Negative Cable Disconnection and Connection in Engine Electrical.
- Disable the SIR system. Refer to Disabling the SIR System in SIR .
- Remove the windshield side upper garnish molding. Refer to Windshield Pillar Garnish Molding Replacement .
- Remove the instrument panel defroster grille. Refer to Defroster Grille Replacement .
- Remove the instrument panel endcaps. Refer to Instrument Panel Outer Trim Cover Replacement .
- Remove the instrument panel insulators. Refer to Instrument Panel Insulator Panel Replacement - Right Side and Instrument Panel Insulator Panel Replacement - Left Side .
- Remove the instrument panel compartment. Refer to Instrument Panel Compartment Replacement .
- Remove the passenger inflator module. Refer to Inflatable Restraint Instrument Panel Module Replacement in SIR.
- Remove the instrument panel accessory trim plate. Refer to Instrument Panel Accessory Trim Plate Replacement .
- Remove the instrument panel cluster trim plate. Refer to Instrument Cluster Trim Panel Replacement .
- Remove the instrument panel cluster. Refer to Instrument Cluster Replacement .
- Remove the radio. Refer to Radio Replacement in Entertainment.
- Remove the steering column. Refer to Steering Column Replacement in Steering Wheel and Column-Tilt.
- Remove the cup holder. Refer to Front Floor Console Cup Holder Replacement .
- Remove the front floor console. Refer to Front Floor Console Replacement .
- Remove the ignition switch. Refer to Ignition and Start Switch Replacement .
- Remove the fog lamp switch. Refer to Fog Lamp Switch Replacement in Lighting Systems.
- Remove the instrument panel upper bolt covers.
- Disconnect the electrical connections from the electrical junction box.
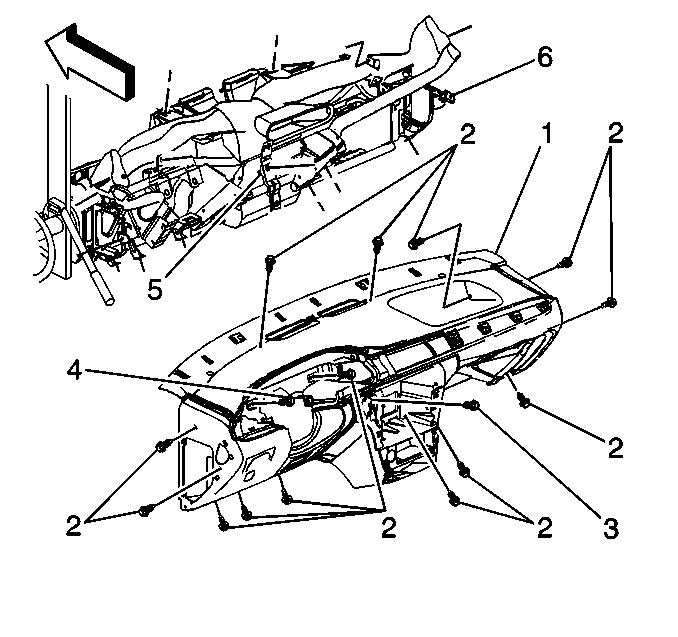
- Remove the screws (2,3,4) connecting the instrument panel (1) to the cross car beam (6).
- Remove the instrument panel (1) from the cross car beam (6).

Installation Procedure
- Install the instrument panel (1) to the cross car beam (6).
- Install the screws (2,3,4) connecting the instrument panel (1) to the cross car beam (6).
- Connect the electrical connectors to the electrical junction box.
- Install the fog lamp switch. Refer to Fog Lamp Switch Replacement in Lighting Systems.
- Install the ignition switch. Refer to Ignition and Start Switch Replacement .
- Install the front floor console. Refer to Front Floor Console Replacement .
- Install the cup holder. Refer to Front Floor Console Cup Holder Replacement .
- Install the steering column. Refer to Steering Column Replacement in Steering Wheel and Column-Tilt.
- Install the radio. Refer to Radio Replacement in Entertainment.
- Install the instrument panel cluster. Refer to Instrument Cluster Replacement .
- Install the instrument panel cluster trim plate. Refer to Instrument Cluster Trim Panel Replacement .
- Install the instrument panel accessory trim plate. Refer to Instrument Panel Accessory Trim Plate Replacement .
- Install the passenger inflator module. Refer to Inflatable Restraint Instrument Panel Module Replacement in SIR.
- Install the instrument panel compartment. Refer to Instrument Panel Compartment Replacement .
- Install the instrument panel insulators. Refer to Instrument Panel Insulator Panel Replacement - Right Side and Instrument Panel Insulator Panel Replacement - Left Side .
- Install the instrument panel endcaps. Refer to Instrument Panel Outer Trim Cover Replacement .
- Install the instrument panel defroster grille. Refer to Defroster Grille Replacement .
- Install the windshield side upper garnish molding. Refer to Windshield Pillar Garnish Molding Replacement .
- Enable the SIR system. Refer to Enabling the SIR System in SIR.
- Connect the battery negative cable. Refer to Battery Negative Cable Disconnection and Connection in Engine Electrical.

Important: When installing the instrumental panel carrier to the vehicle, ensure that the cowl seal is seated properly to the cowl. Failure to do so may cause a vibration rattle between the carrier and the cowl.
