VARIOUS DRIVEABILTY CONDITIONS (REPAIR OVERSIZED TERMINALS)

SUBJECT: VARIOUS DRIVEABILITY CONDITIONS - REPAIR OVERSIZED TERMINALS
MODEL/YEARS: 1992 CUSTOM CRUISER W/5.OL OR 5.7L (VIN E & 7) AND ACHIEVA W/2.3L (VIN A, D. & 3) OR 3300 (VIN N) ENGINES
CONDITION: Some owners of the vehicles listed below may experience various driveability conditions such as reduced fuel economy, SES light, runs rough, misses, etc. (specific concerns are described in the symptoms chart below). If diagnosis indicates a need to replace any control system components (example, ECM or sensors), check suspect connector terminals and repair if necessary prior to replacing the control system component.
CAUSE: The condition may be a result of intermittent or open circuits caused by insufficient contact between the ECM harness female terminal and the mating ECM male pin. Some of the 12089649 micro-pack 100 series female terminals (formerly P/N 12020757) could have an oversized contact area condition.
Note: Either terminal part number may be used in repair.
VIN BREAKPOINTS:
Custom Cruiser
Beginning VIN Ending VIN
NW303548 NW303853
Achieva
Beginning VIN Ending VIN
NM450908 NM457343
SYMPTOMS
Engine Circuit(s) Connector Symptoms Cavity/Wire Color 1992 Custom Cruiser
ALL 419 A5/BRN/WHT 1. SES light will not illuminate SES light driver
All 467 D16/DkBLU 1 .Detonation injector 1 2. No power
All 468 D14/DkGRN 3. Hard start Injector 2 4. Rough idle 5. SES light 'on' (if circuit 419 okay) 6. Code 43 and/or 44 stored 7. No start if both circuits open 8. Miss 9. Hesitates 10. Surge 11. Quit 12. Intermittent circuit may or may not set codes
1992 Achieva
2.3L 888 C15/DkBlu 1. SES light 'on' (LD2) injectors 2/3 C13/DkBlu 2. Codes 44 and/or 65 stored VIN D 3. No start (L40) 4. Stalls VIN 3 5. Hard start (LG0) 6. Detonation VIN A 7. No power 8. Intermittent circuit may or may not set codes
3300 639 A6/PNK/BLK 1. Stalls (LG7) Ignition 2. Stumbles VIN N 3. SES light flashing 4. Stalls 5. No SES light 6. No start 7. No ALDL data 8. Intermittent circuit will cause erratic Tech 1 readings
CORRECTION:
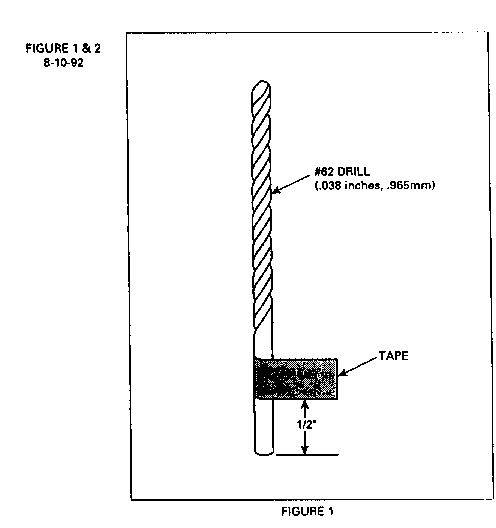
1. To check for an oversize terminal, use a #62* drill bit (.038 inches, .965 mm) and place a mark 1/2 inch up from the bottom of the shank of the drill bit. Place a flag made from tape at the mark on the drill (see Figure 1).
2. Remove connector from ECM and hold connector vertically up.
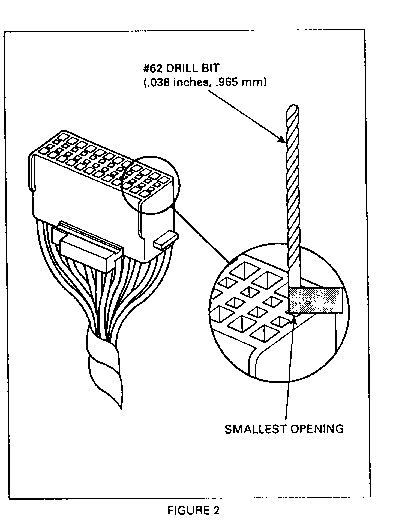
3. Place shank of #62* drill bit (.038 inches, .965 mm) in connector cavity of suspect terminal. Do not push on drill (see Figure 2).
4. Repair any terminal allowing drill bit to fall unassisted to the flag on drill bit. Any terminals having resistance or drag or not allowing drill to enter terminal are okay and do not need repair. Repair any over sized terminal as described in steps 5 through 8.
5. Remove the TPA (terminal position assurance) from the connector.
6. Remove the terminal from the connector using terminal removal tool GM 12031876-1 (Kent-Moore Tool No. J 38125-A).
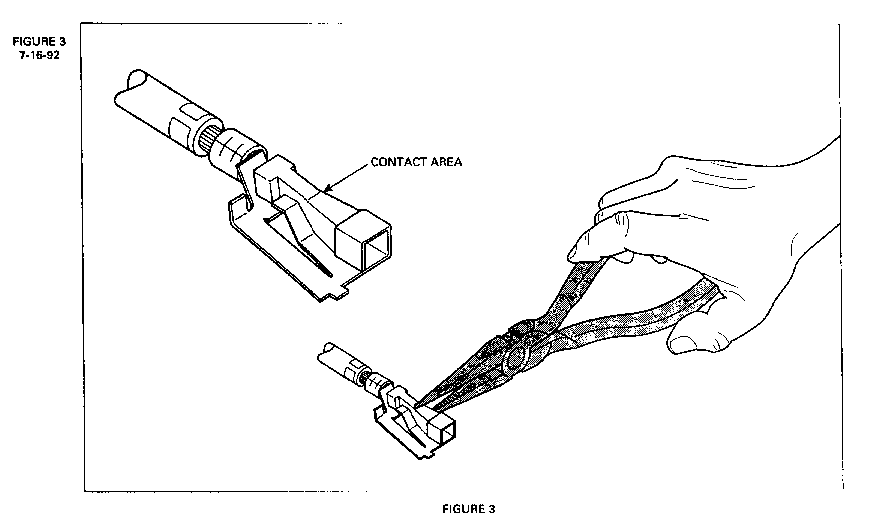
7. With a pair of small needle nose pliers, resize the contact area of the terminal as shown in Figure 3.
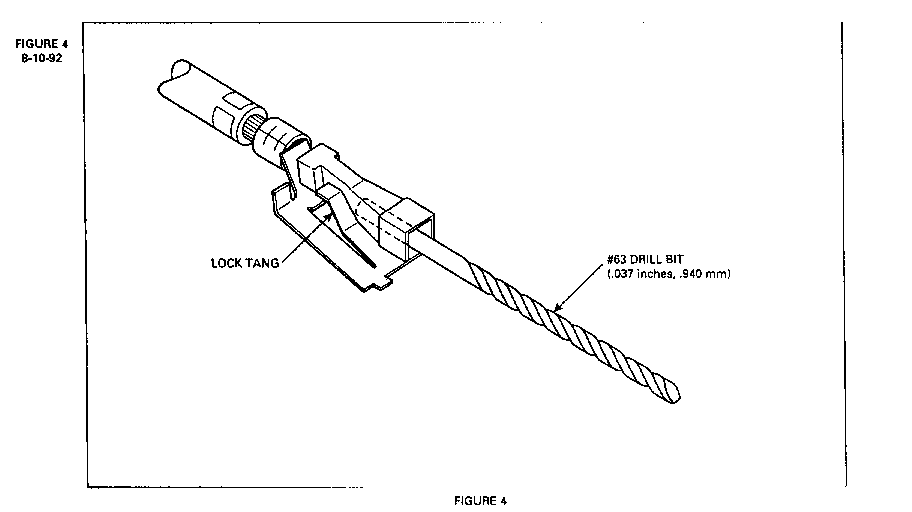
8. To verify the terminal has been adequately sized, insert a #63* drill bit (.037 inches, .940 mm) into the contact area as shown in Figure 4. If resistance can be felt against the bit in the resized area, resizing is complete. If no resistance is felt, repeat steps 7 and 8.
9. Raise the terminal lock tang (Figure 4) so the terminal can be properly held in the connector.
10. Reinsert the terminal into the proper connector cavity.
11. Reinsert the TPA into the connector.
12. If the terminal becomes severely damaged by using this method, replace the terminal using established terminal replacement procedures.
13. Reinstall hamess to ECM and perform any required releam procedure prior to continuing diagnosis.
*Note: Measure drill to ensure drill is of proper diameter. A larger sized drill will damage a good terminal.
WARRANTY INFORMATION: See current Labor Time Guide.


General Motors bulletins are intended for use by professional technicians, not a "do-it-yourselfer". They are written to inform those technicians of conditions that may occur on some vehicles, or to provide information that could assist in the proper service of a vehicle. Properly trained technicians have the equipment, tools, safety instructions and know-how to do a job properly and safely. If a condition is described, do not assume that the bulletin applies to your vehicle, or that your vehicle will have that condition. See a General Motors dealer servicing your brand of General Motors vehicle for information on whether your vehicle may benefit from the information.
