Steering Angle Sensor Replacement LHD
Removal Procedure
- Turn the key to the ignition OFF position.
- Disconnect the battery ground cable. Refer to Battery Negative Cable Disconnection and Connection .
- Disable the SIR system. Refer to SIR Disabling and Enabling .
- Remove the inflatable restraint steering wheel module. Refer to Inflatable Restraint Steering Wheel Module Replacement .
- Remove the steering wheel. Refer to Steering Wheel Replacement .
- Remove the steering column trim covers. Refer to Steering Column Trim Covers Replacement .
- Remove the cruise control switch. Refer to Turn Signal Switch Replacement .
- Remove the wipers/washer switch. Refer to Windshield Wiper and Washer Switch Replacement .
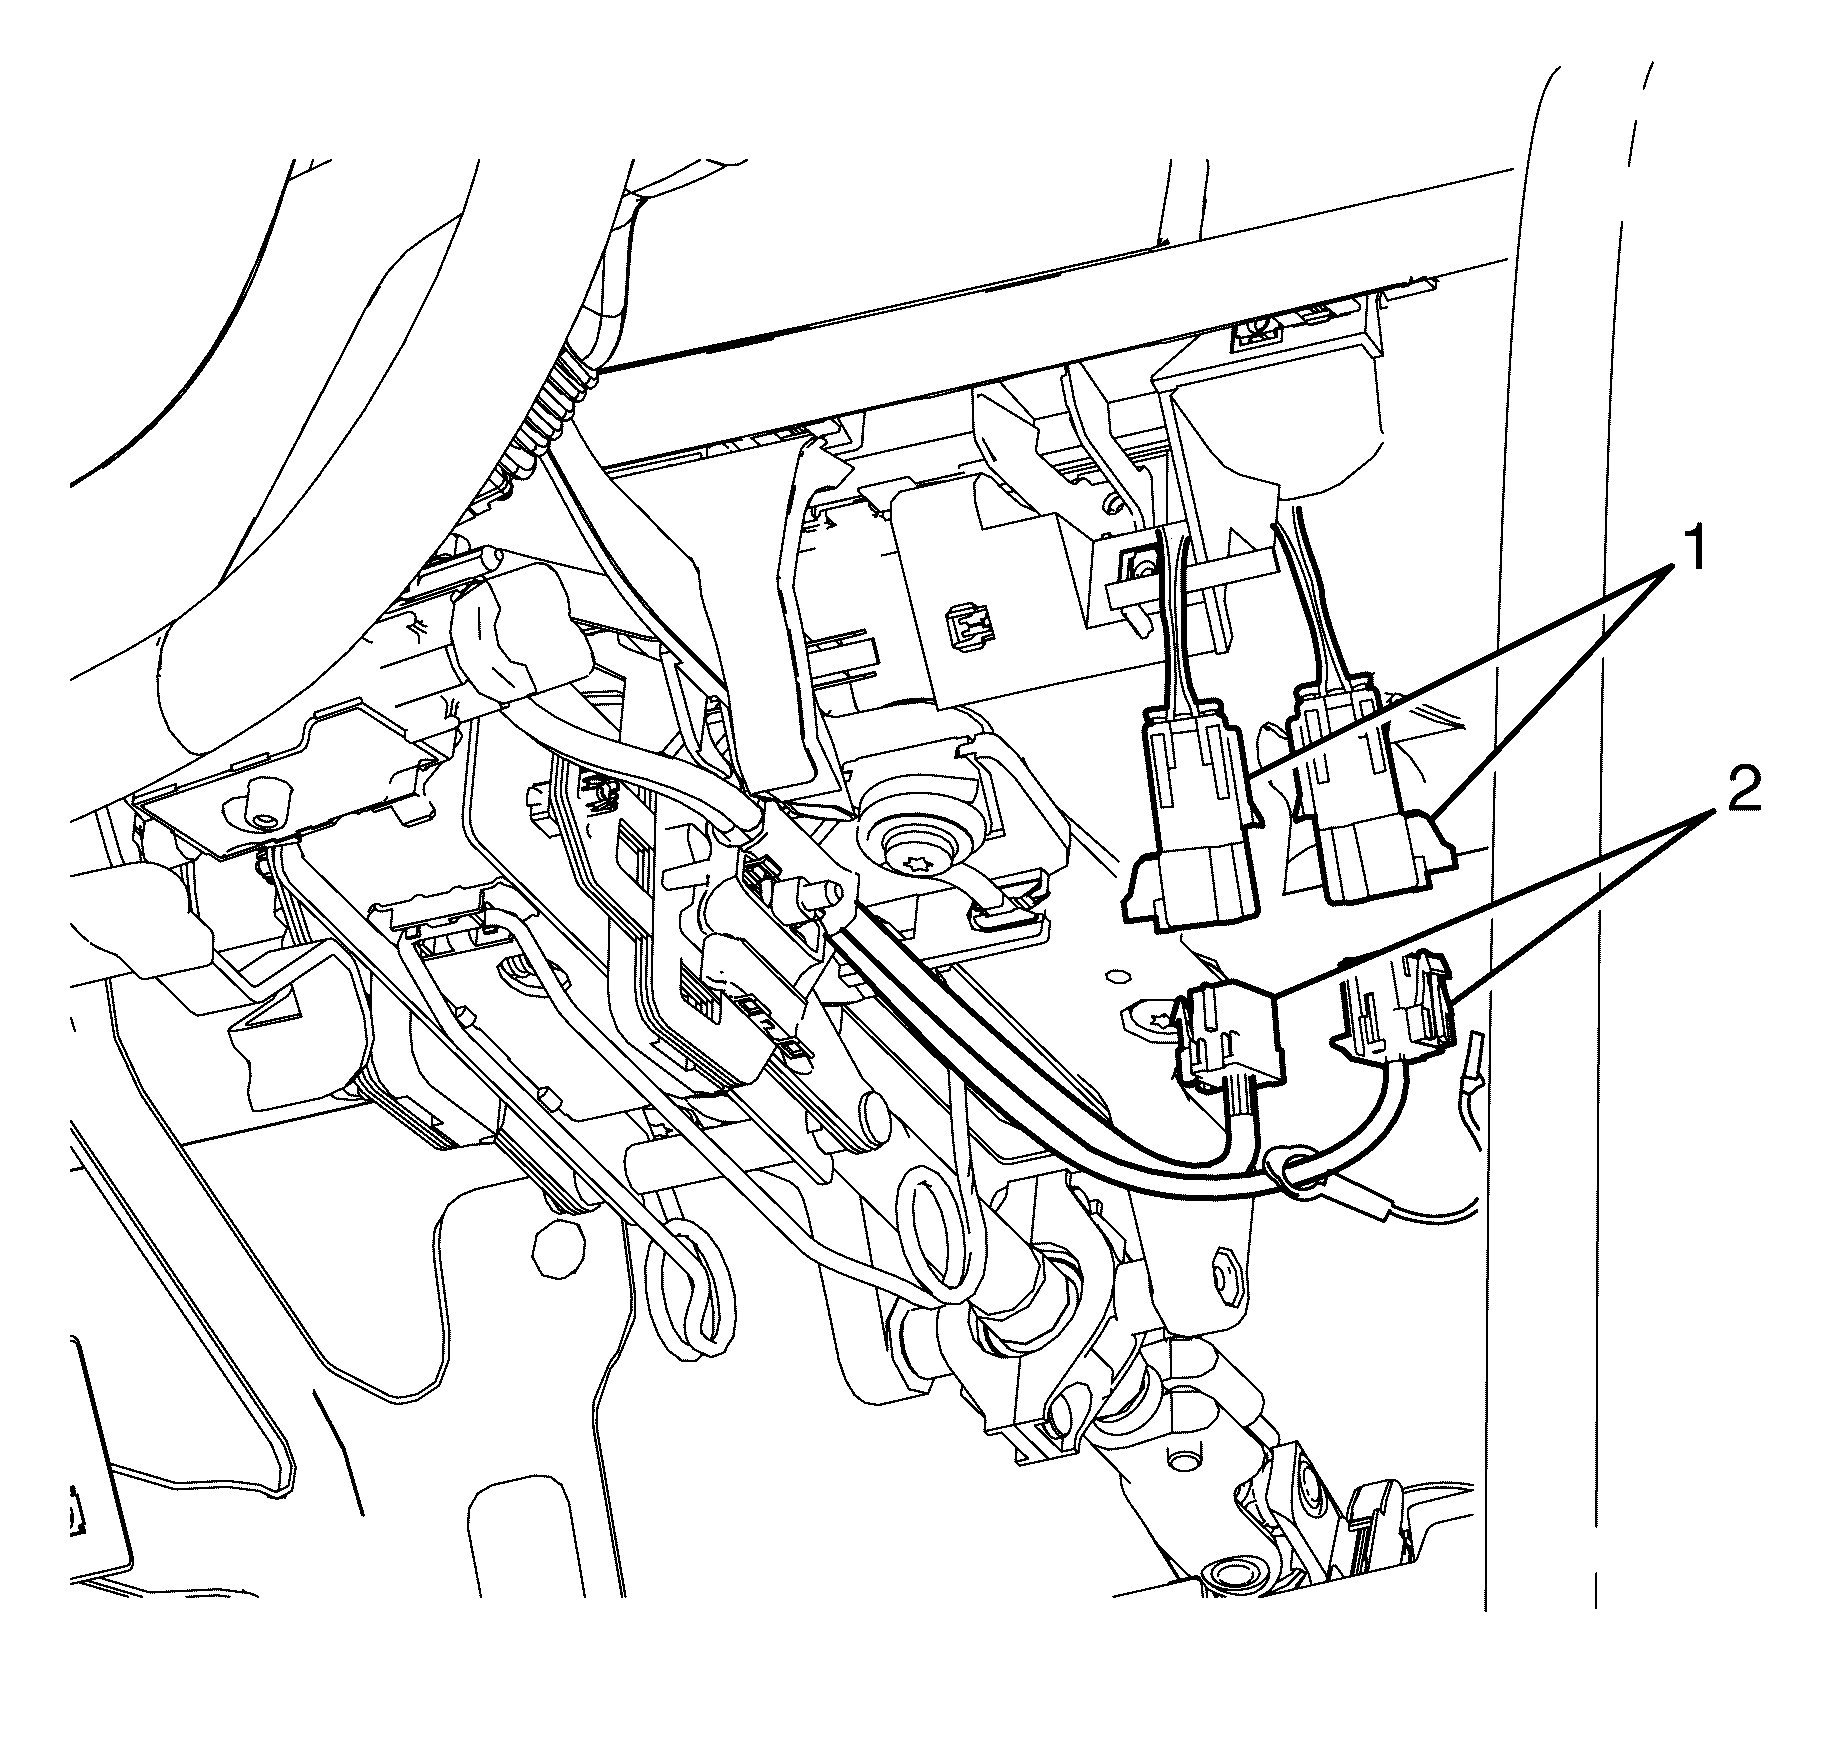
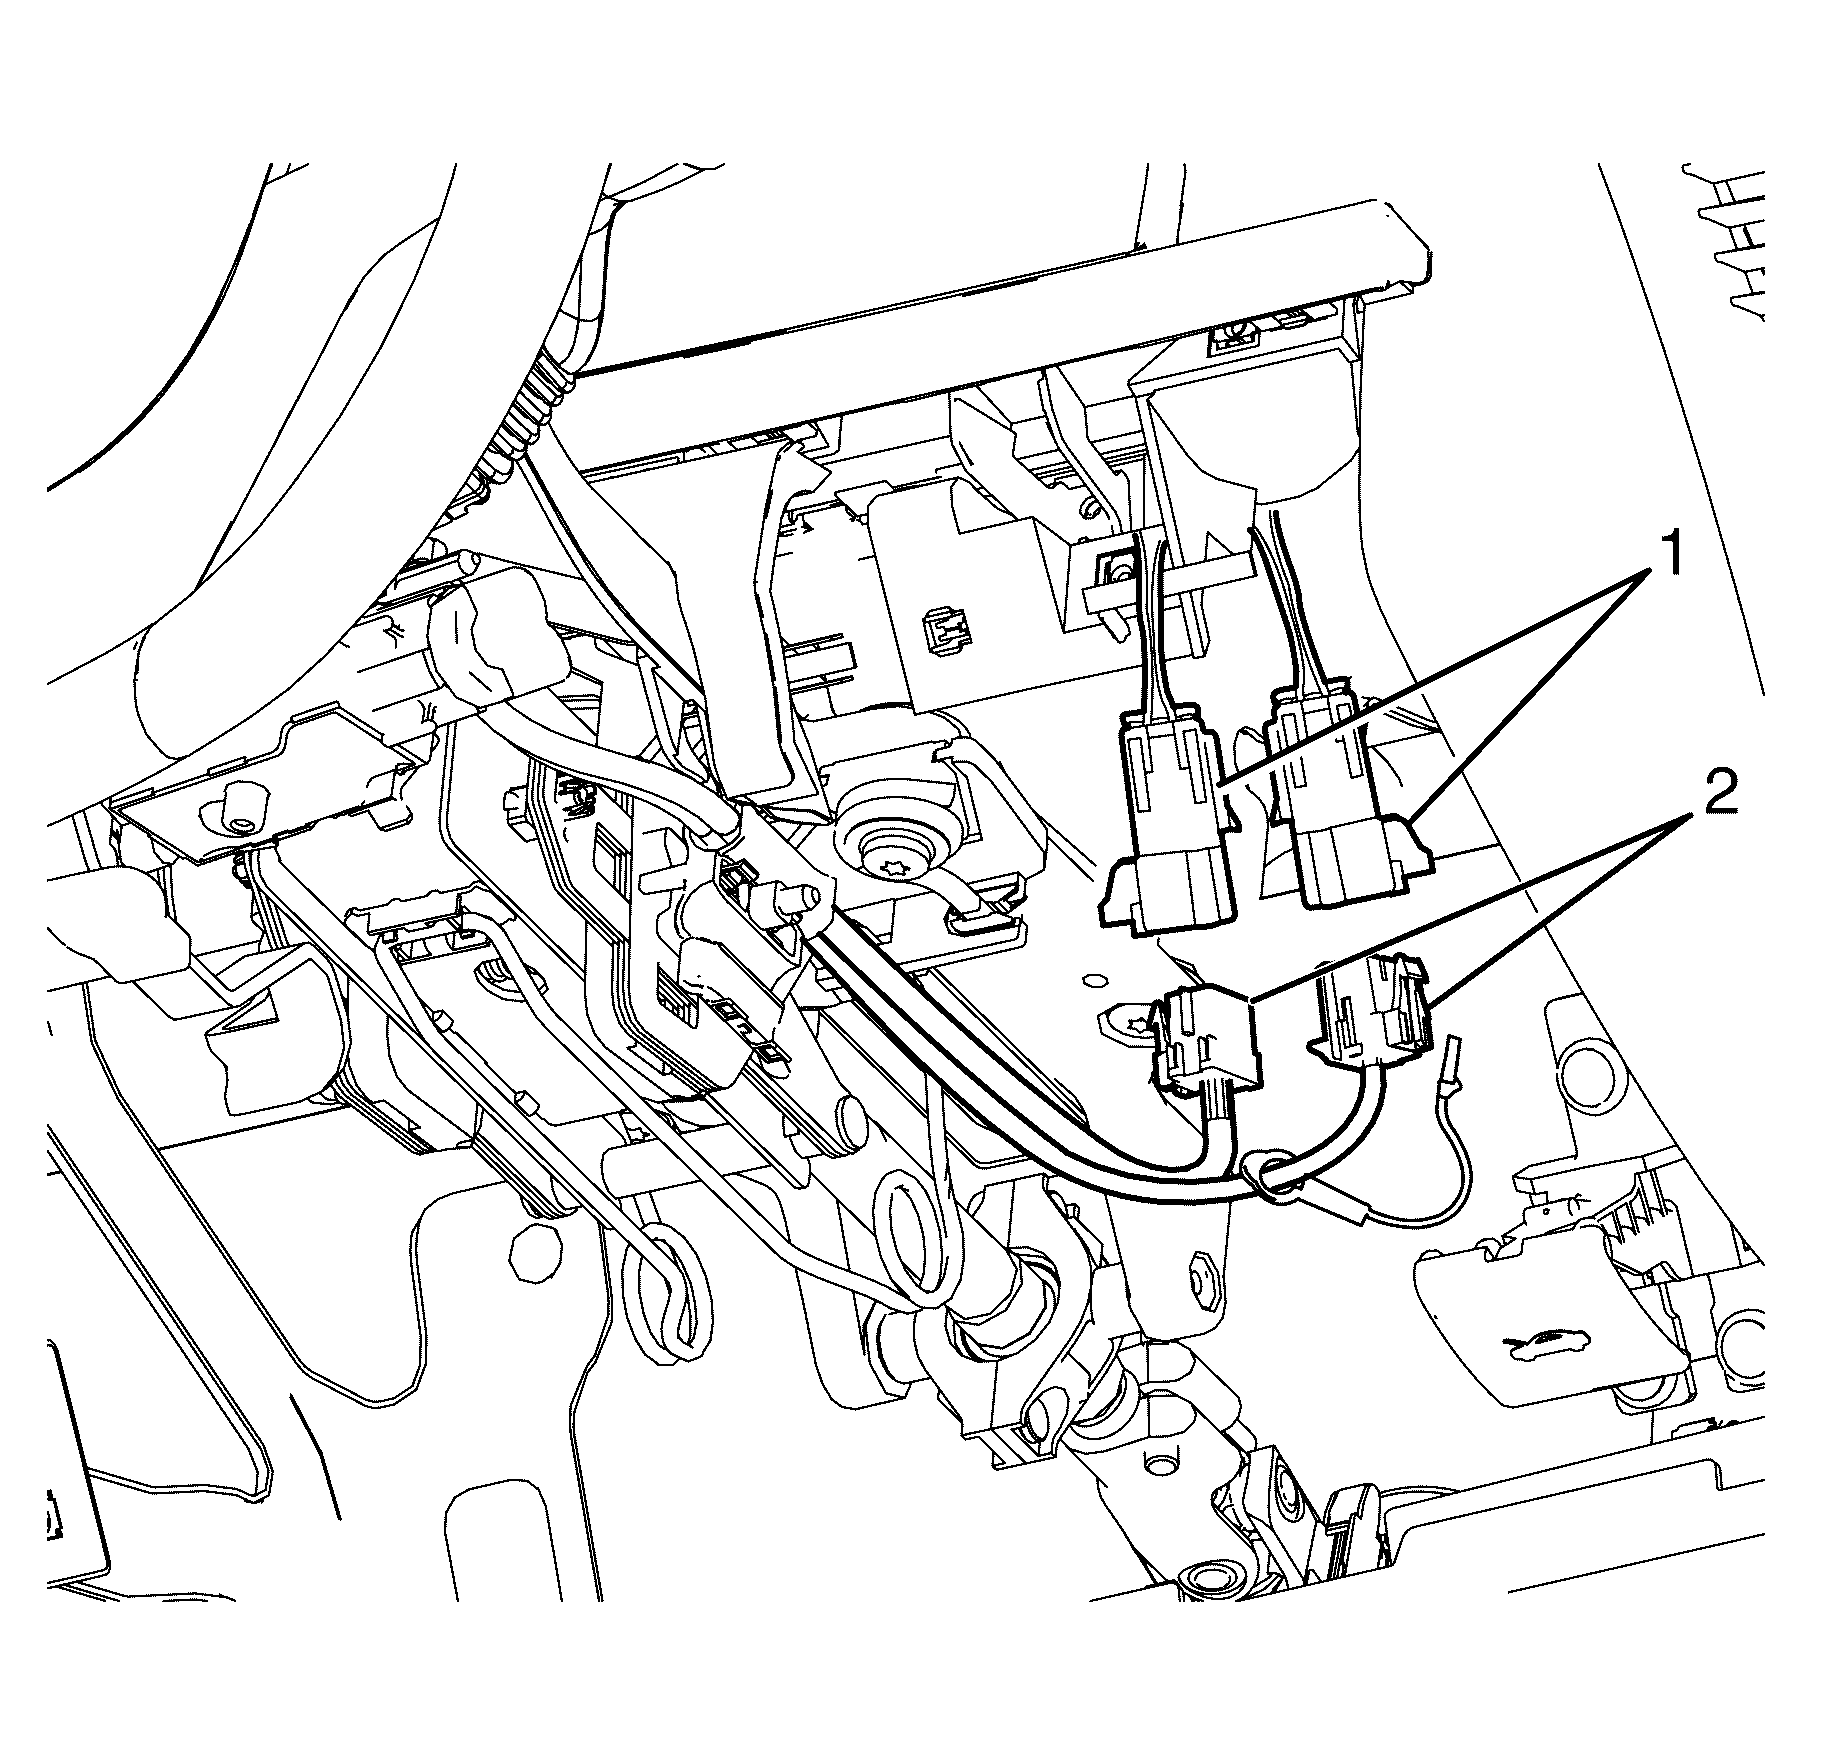
- Disconnect the SIR coil assembly connectors, (1) from (2).
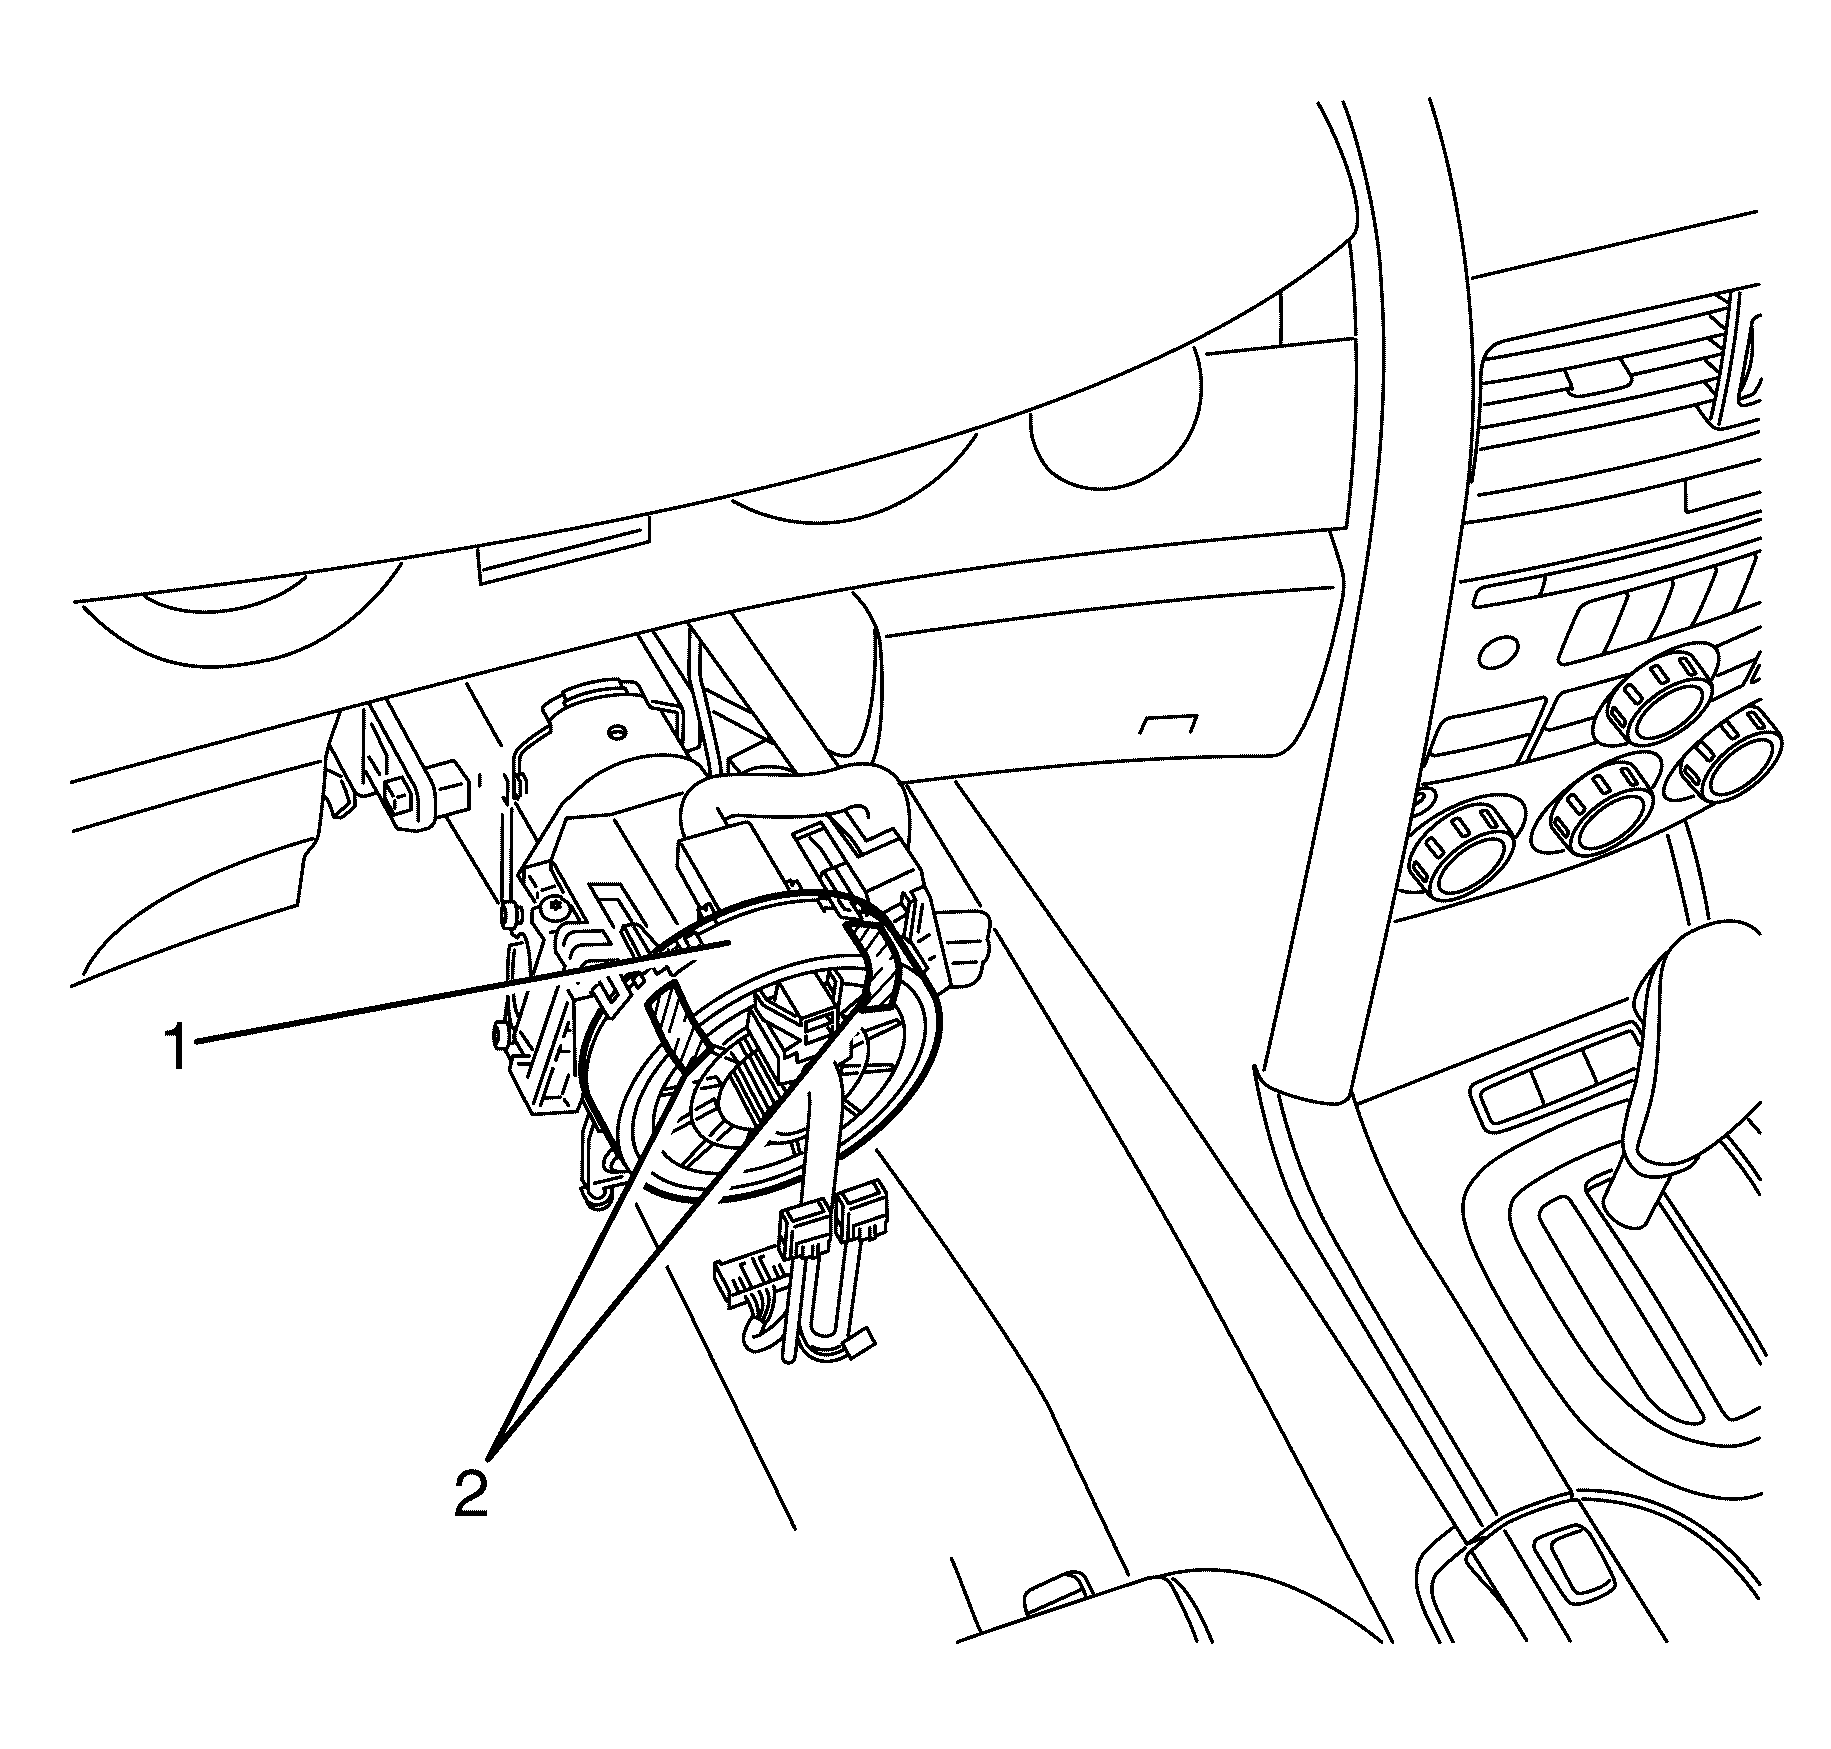
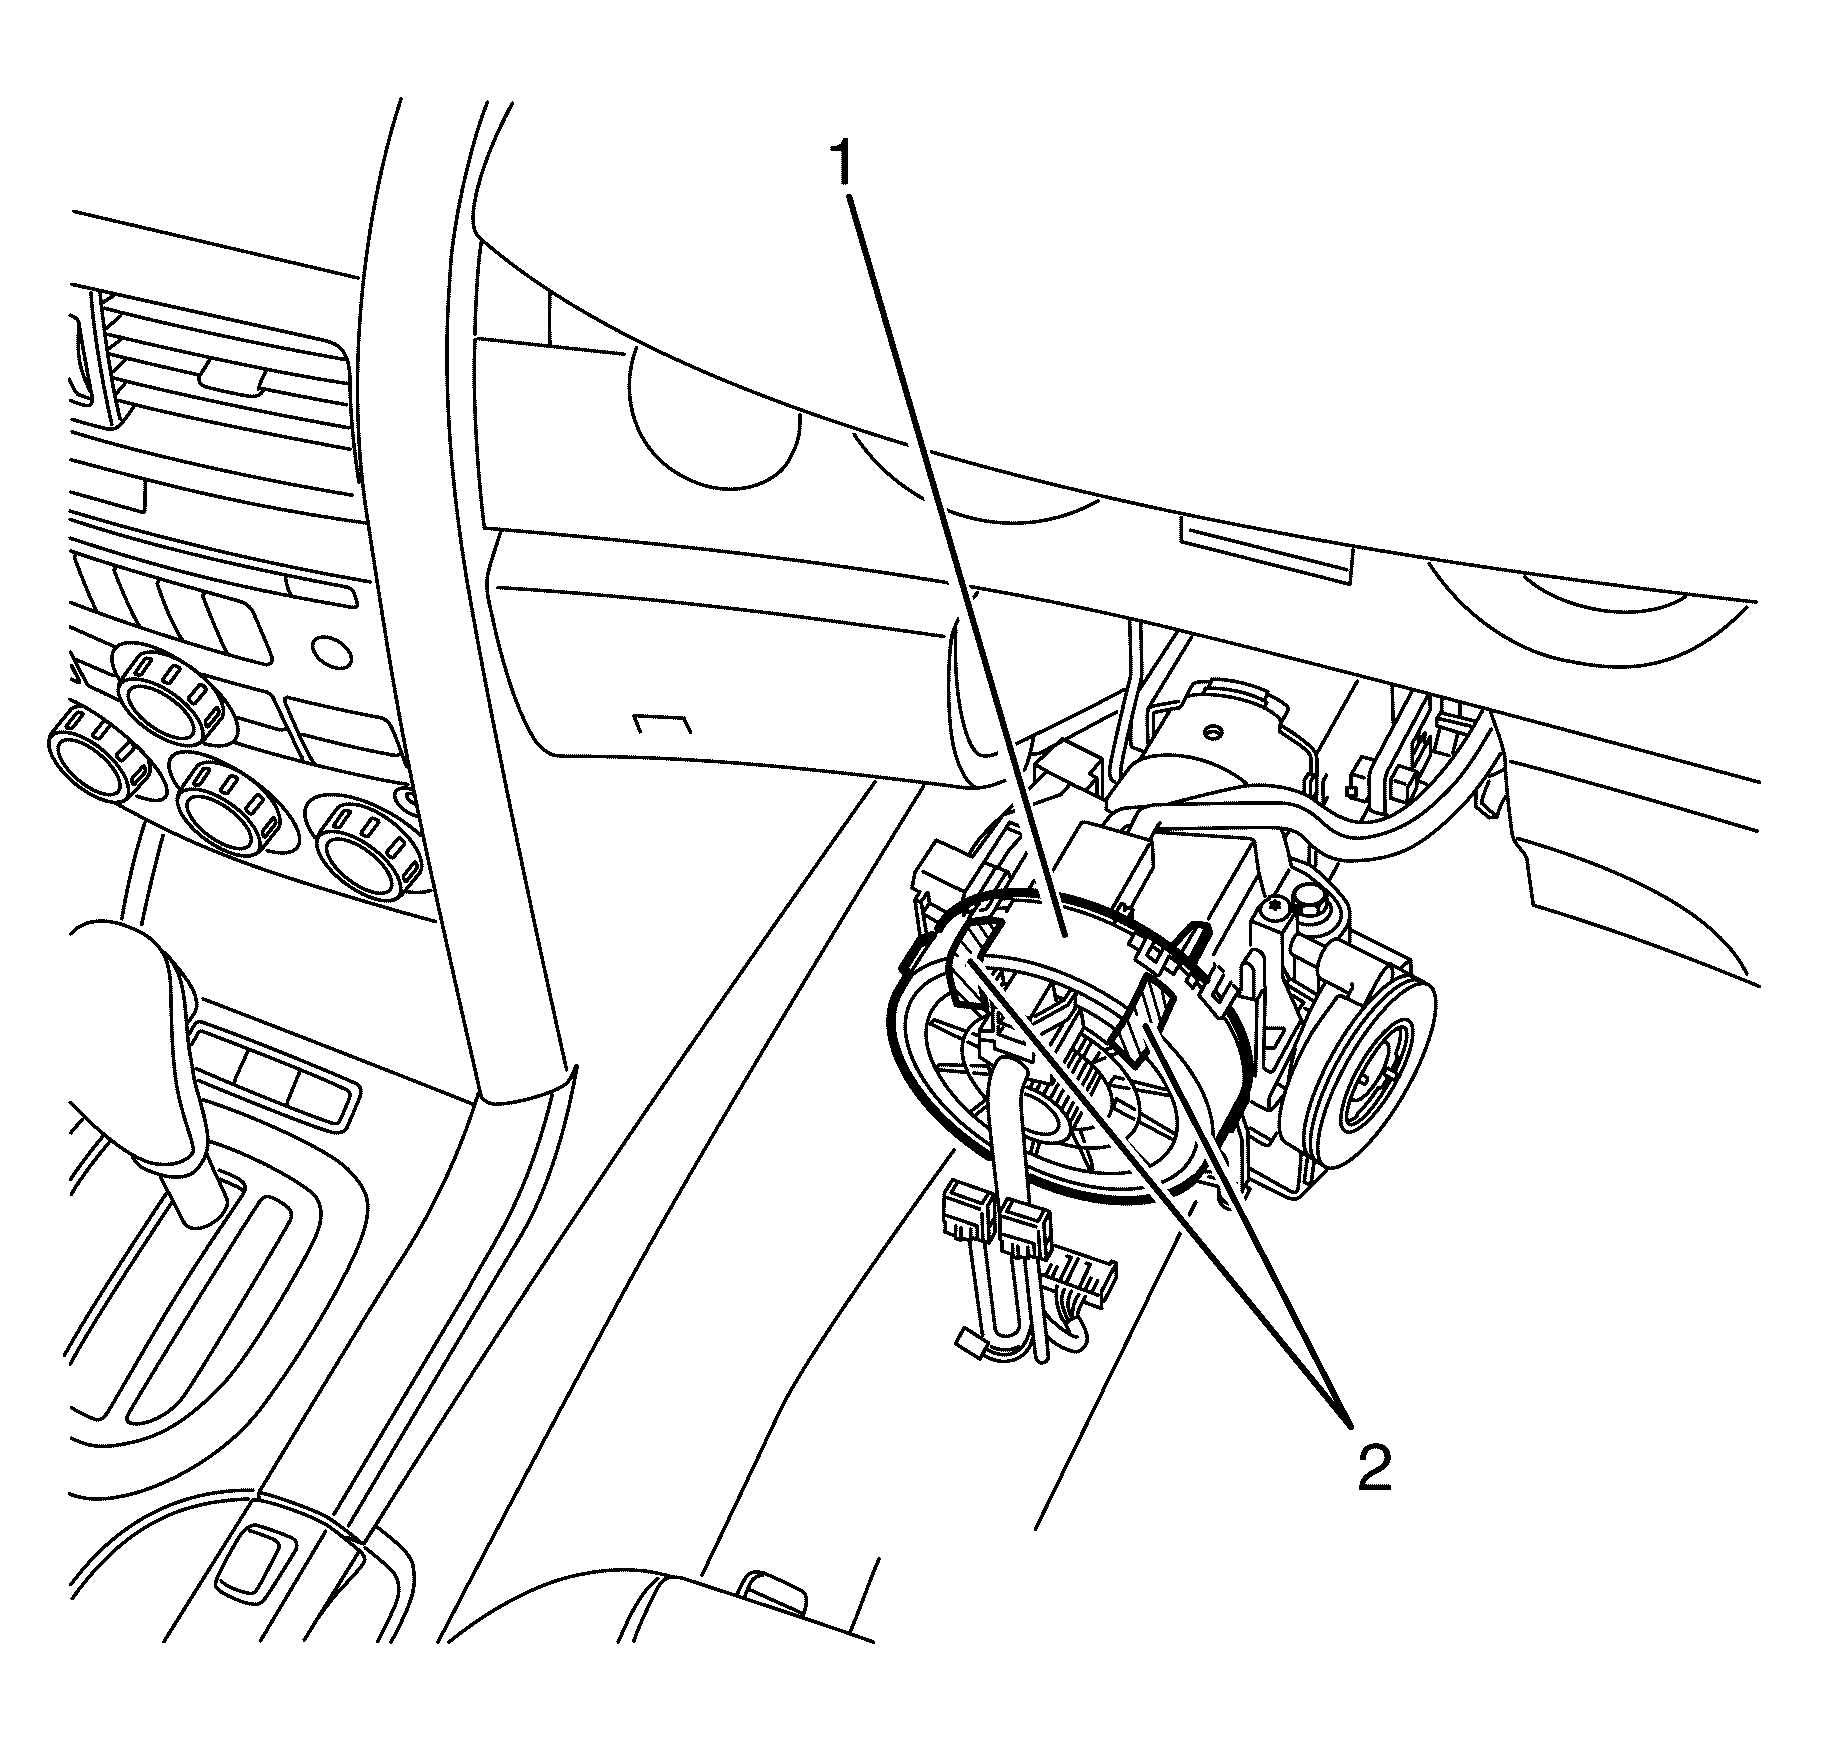
- Secure the SIR coil assembly (1) using suitable tape (2) to prevent rotation during disassembly.
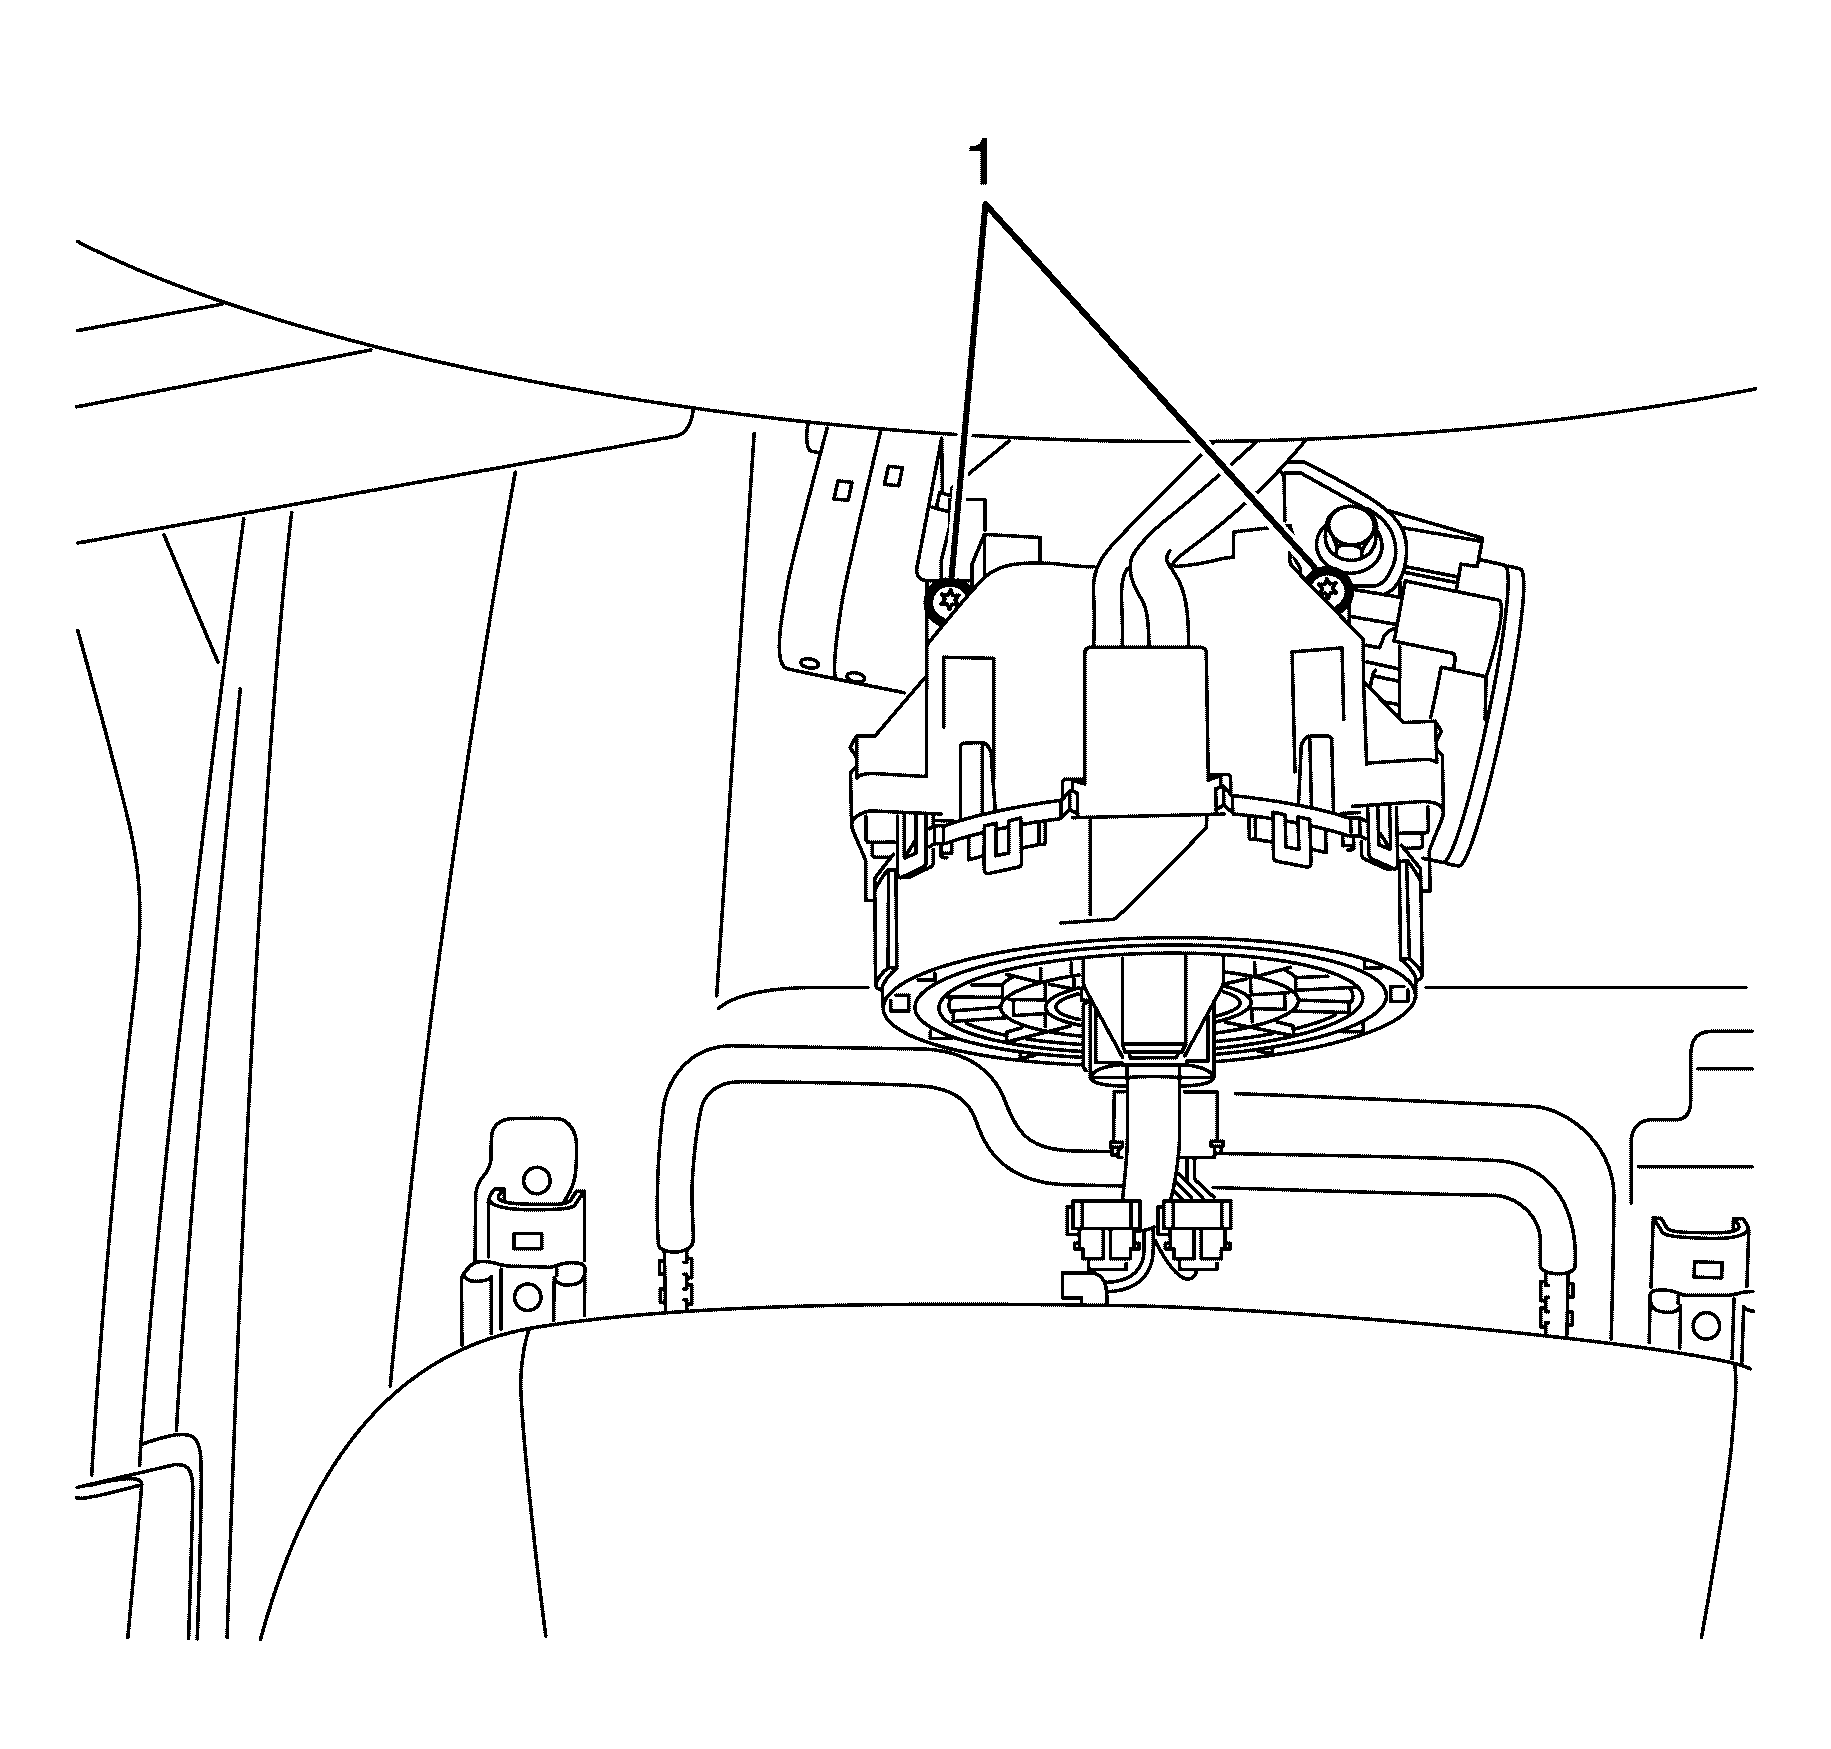
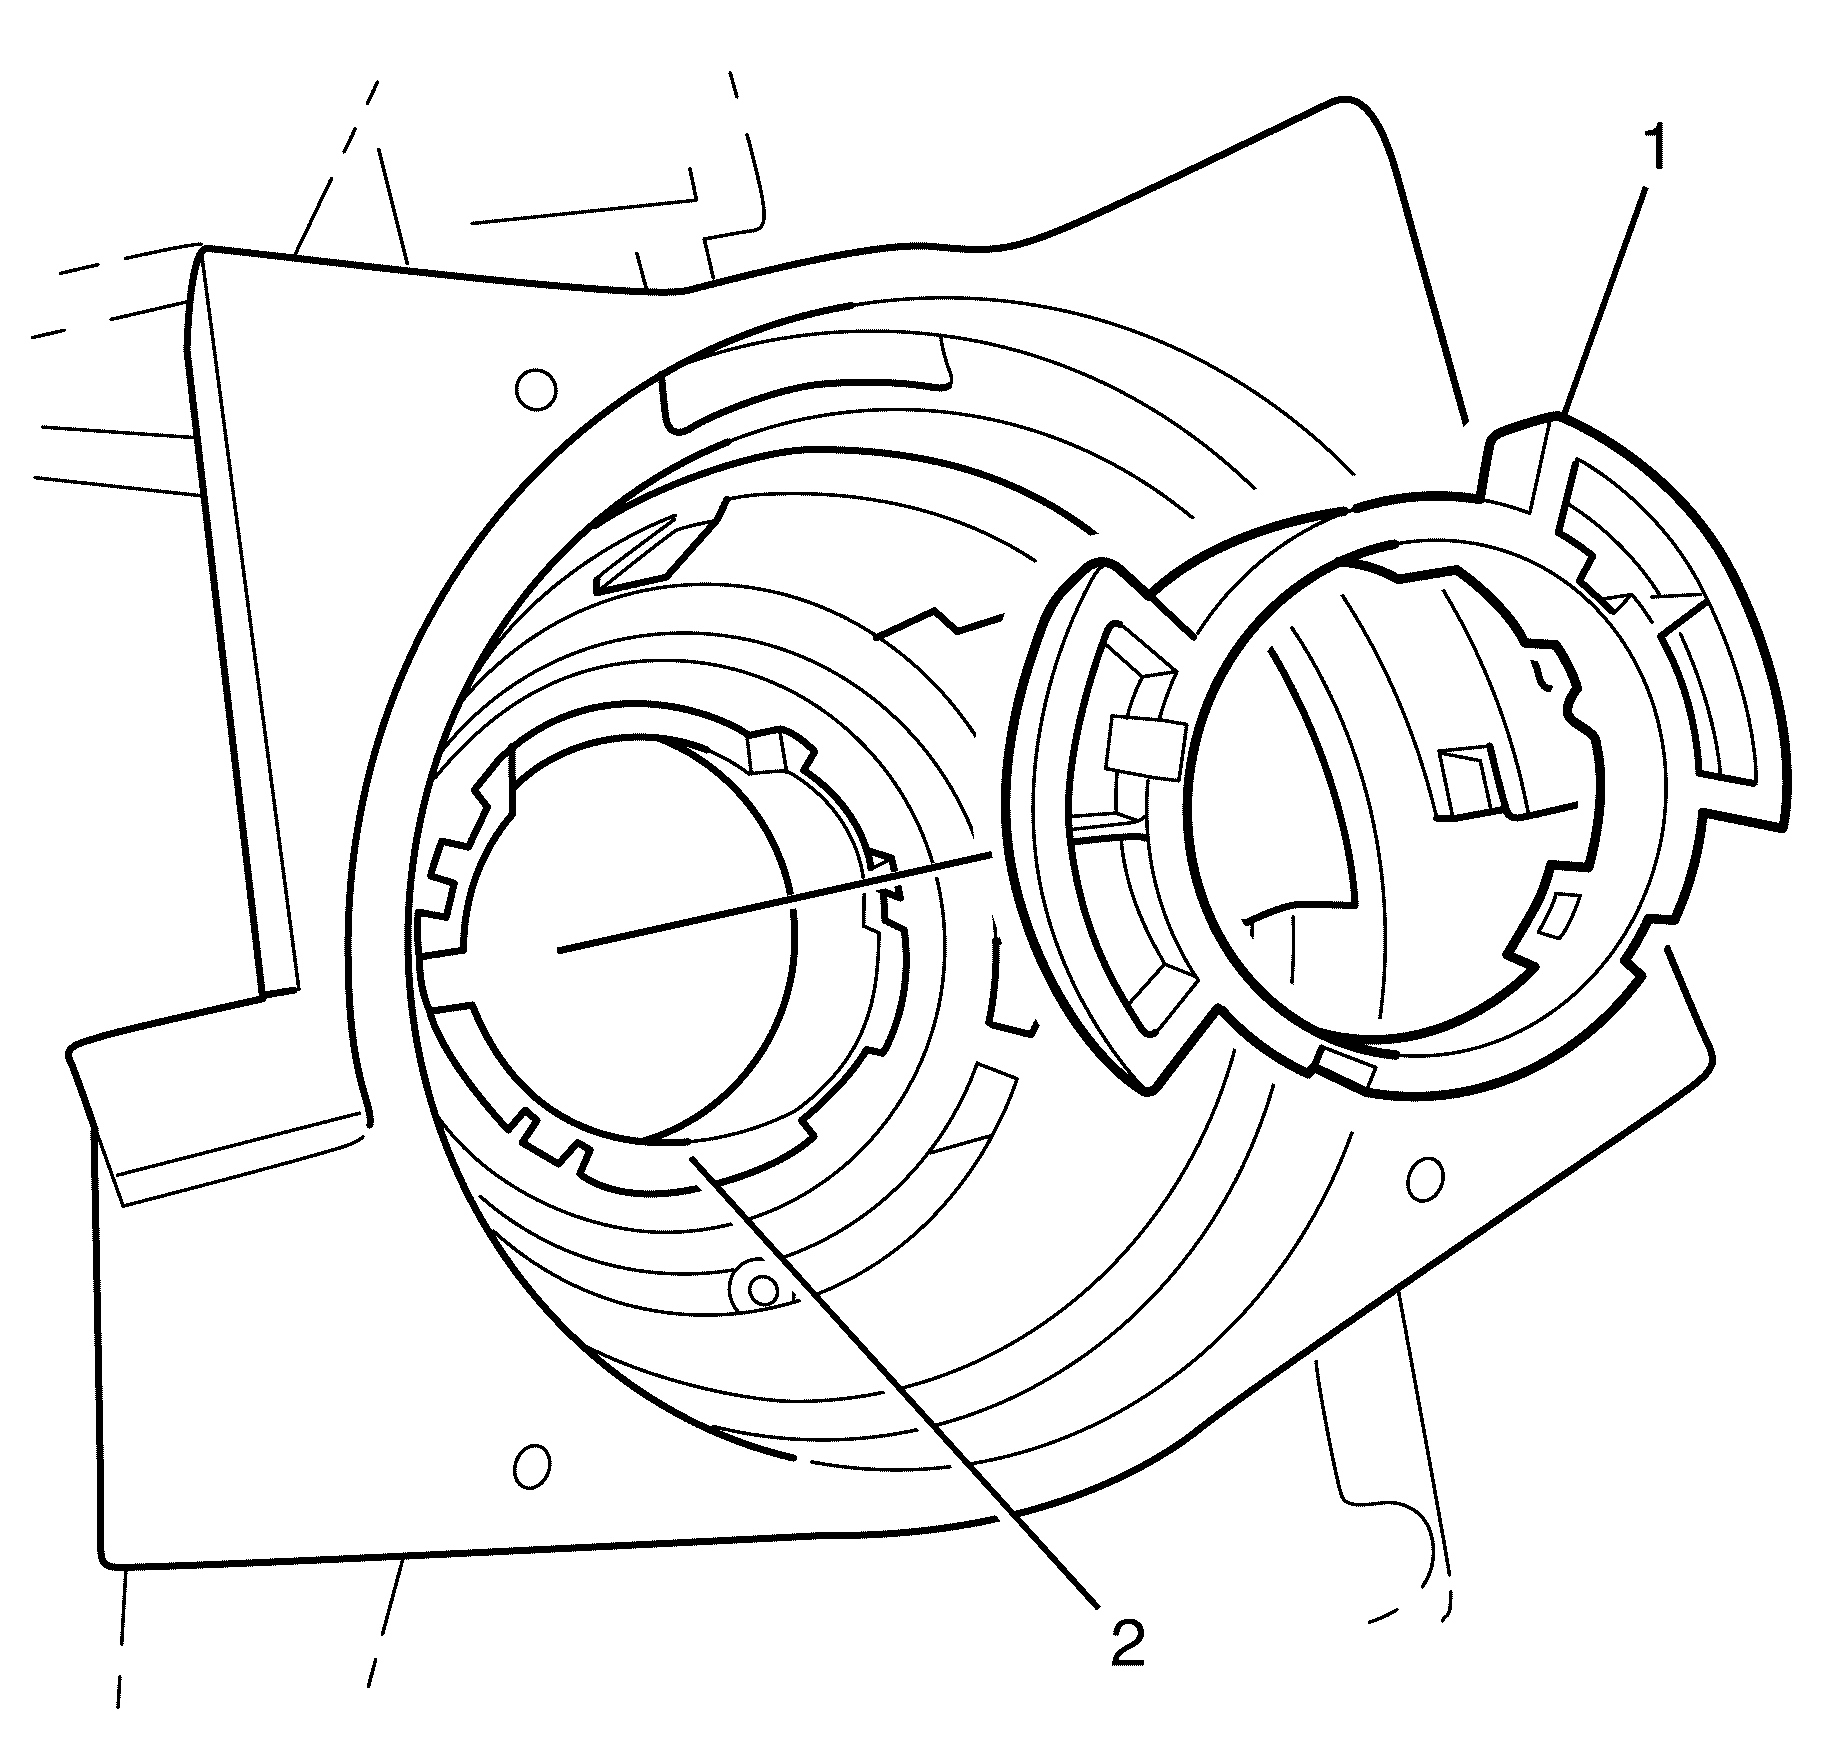
- Remove the SIR coil assembly to steering column retaining screws (1).
Caution: Refer to Battery Disconnect Caution in the Preface section.
Caution: Refer to SIR Caution in the Preface section.
Important: The clock spring is referred to as the SIR coil.
Important: The steering angle sensor, SIR coil and turn signal cancel cam assembly is referred to as the SIR coil assembly.
Important: Secure the SIR coil assembly so it does not rotate whilst disassembling.
Disassembly Procedure
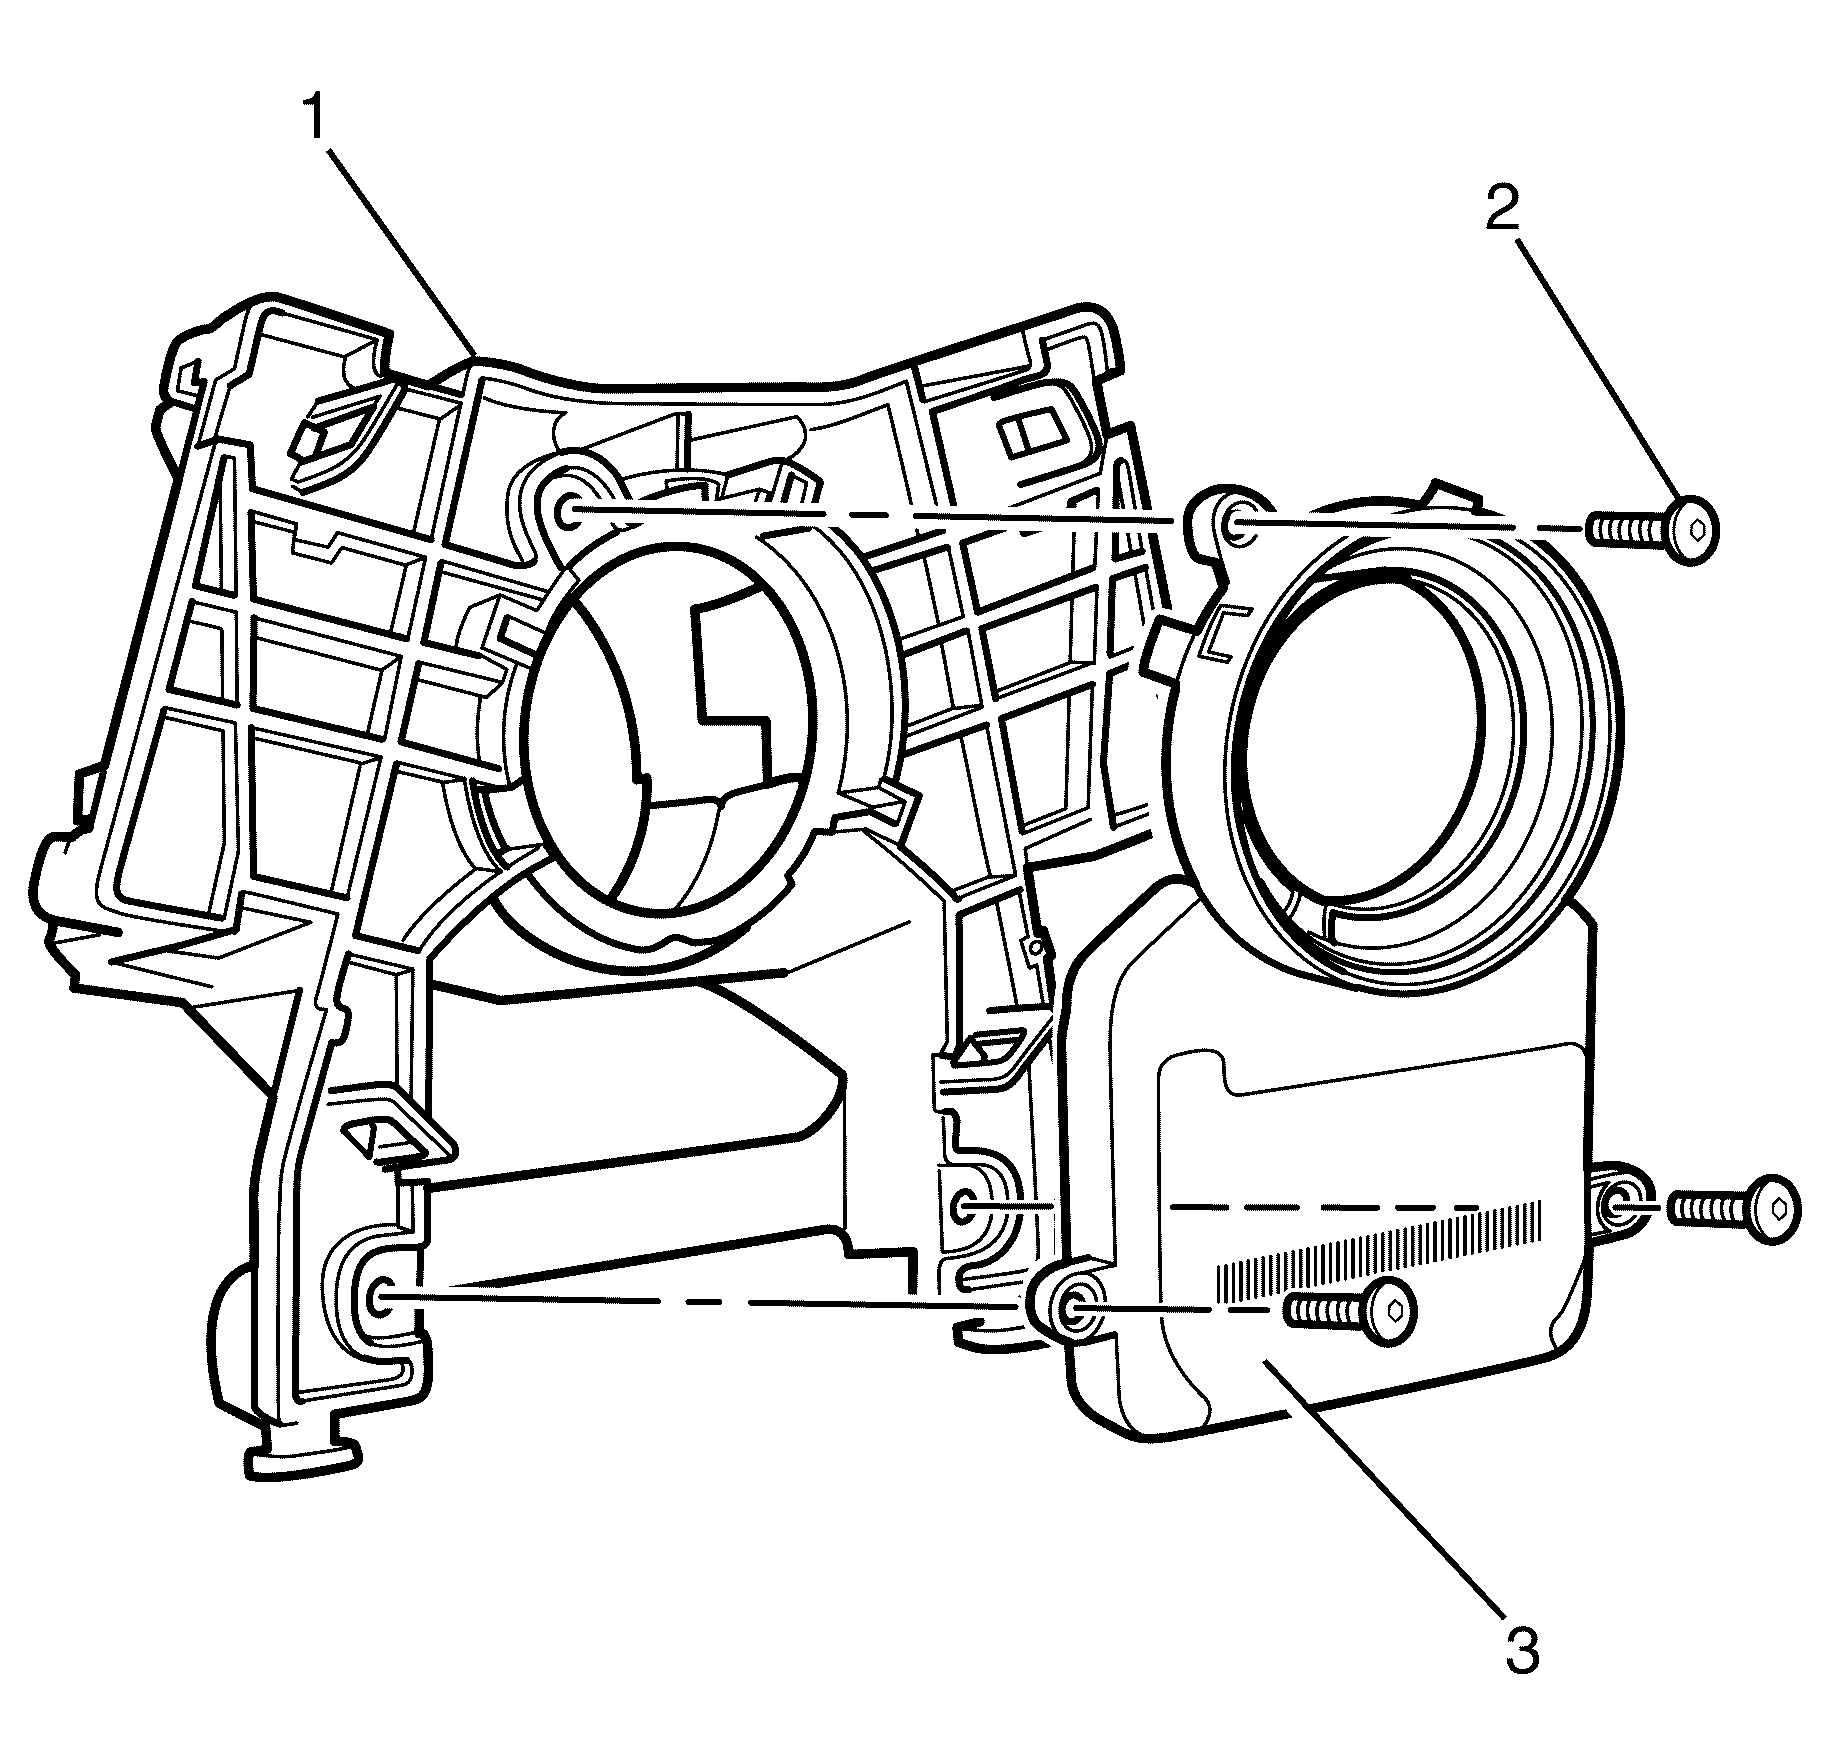
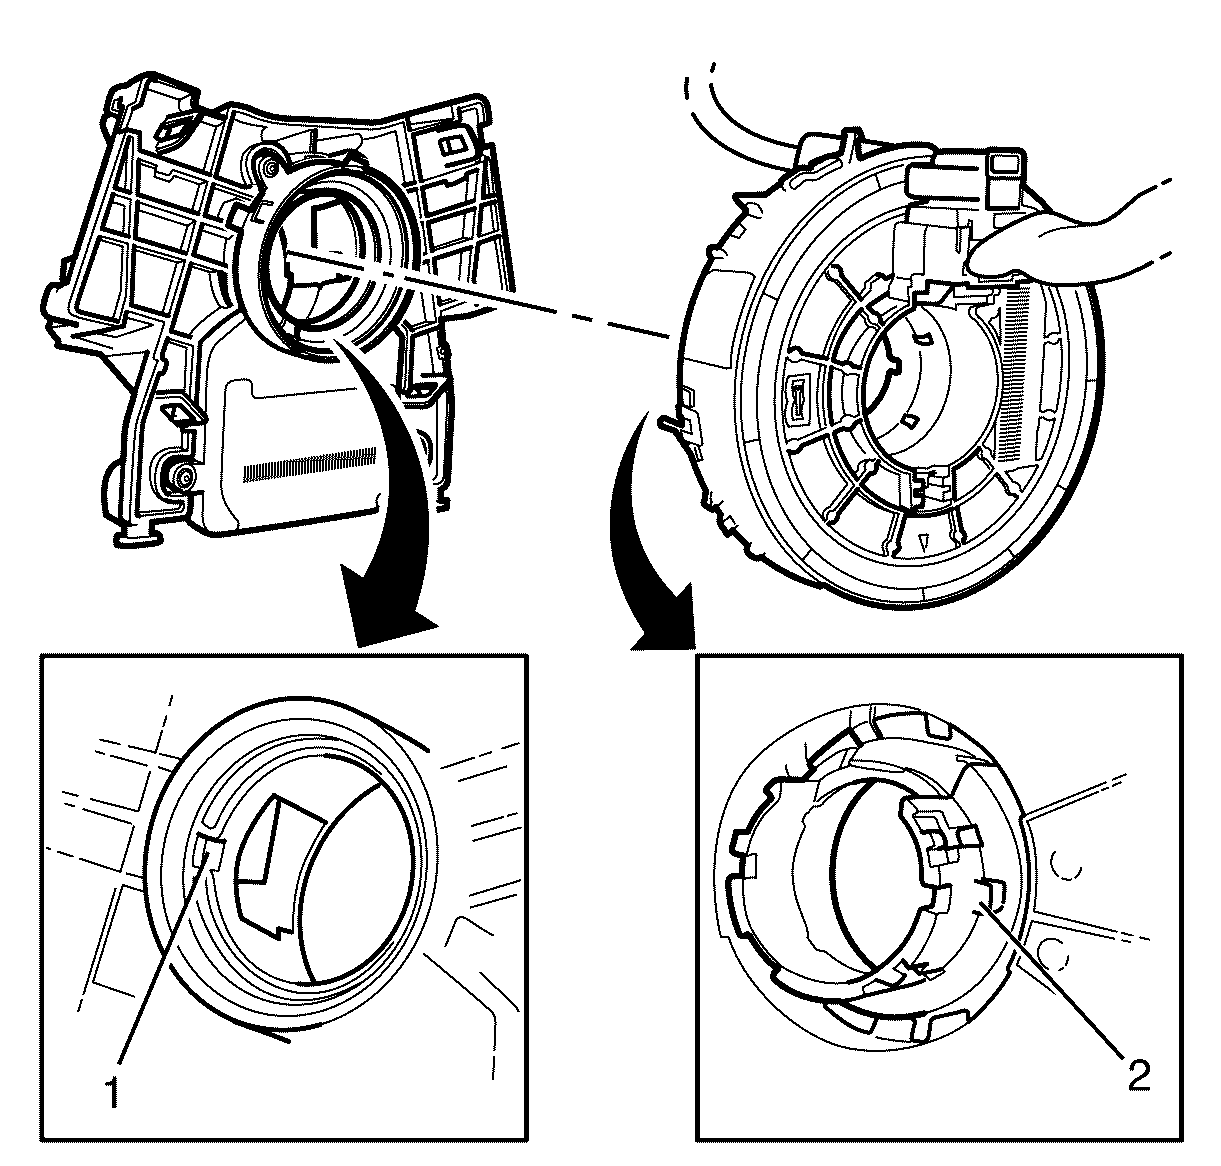
- Remove turn signal cancel cam (1) from back of the SIR coil assembly using a suitable tool and discard the turn signal cancel cam .
- Remove the steering angle sensor to multifunction switch (MFS) holder retaining screws (2).
- Remove the steering angle sensor (3) from the MFS holder (1) and discard the holder.

Important: Discard the turn signal cancel cam after removal.
Important: The MFS must be discarded if steering angle sensor is replaced
Assembly Procedure
- Install the steering angle sensor (3) to the NEW MFS holder (1).
- Install the steering angle sensor to MFS holder retaining screws (2).
- Centre the SIR coil assembly if required.
- Align SIR coil assembly locating block (2) to the steering angle sensor (1) cutout
- Install the SIR coil assembly (2) to the MFS holder (3).
- Install the NEW turn signal cancel cam (1) to the back of the SIR coil assembly (2).
Important: Install the steering angle sensor to MFS holder retaining screws (2) until there is no movement of the sensor to MFS holder, DO NOT overtighten the screws as damage to the steering angle sensor may occur.
Tighten
Tighten the screws to 0.3 Nm (0.22 lb in).
Notice: The new SIR coil assembly will be centered. Improper alignment of the SIR coil assembly may damage the unit, causing an inflatable restraint malfunction.
Important: If an existing SIR coil assembly is to being installed, the SIR coil assembly must be centred.
Important: To centre the SIR coil rotate the coil in one direction until resistance can be felt, then rotate the coil in the opposite direction counting the amount of rotations (there should be approximately 6 complete rotations). Position the wiring harness on the front of the SIR coil to the 12 O'clock position (if not already there) then rotate the coil 3 full turns in the opposite direction and lock the coil in this position, this is the centre position.
Important: Make sure that the locating cutout on the steering angle sensor (1) aligns with the SIR coil (2), mark the cutout on the steering angle sensor (1) to assist in correct locating of the SIR coil (2).
Installation Procedure
- Install the SIR coil assembly to steering column retaining screws (1).
- Connect the SIR coil assembly connectors, (1) to (2).
- Install the wipers/washer switch. Refer to Windshield Wiper and Washer Switch Replacement .
- Install the cruise control switch. Refer to Turn Signal Switch Replacement .
- Remove the SIR coil assembly securing tape.
- Install the steering column trim covers. Refer to Steering Column Trim Covers Replacement .
- Install the steering wheel. Refer to Steering Wheel Replacement .
- Install the inflatable restraint steering wheel module to the steering wheel. Refer to Inflatable Restraint Steering Wheel Module Replacement .
- Connect the battery ground cable. Refer to Battery Negative Cable Disconnection and Connection .
- Enable the SIR system. Refer to SIR Disabling and Enabling .
- Calibrate the steering angle sensor. Refer to Steering Angle Sensor Centering .
Tighten
Tighten the screws to 1 Nm (9 lb in).
Steering Angle Sensor Replacement RHD
Removal Procedure
- Turn the key to the ignition OFF position.
- Disconnect the battery ground cable. Refer to Battery Negative Cable Disconnection and Connection .
- Disable the SIR system. Refer to SIR Disabling and Enabling .
- Remove the inflatable restraint steering wheel module. Refer to Inflatable Restraint Steering Wheel Module Replacement .
- Remove the steering wheel. Refer to Steering Wheel Replacement .
- Remove the steering column trim covers. Refer to Steering Column Trim Covers Replacement .
- Remove the cruise control switch. Refer to Turn Signal Switch Replacement .
- Remove the wipers/washer switch. Refer to Windshield Wiper and Washer Switch Replacement .
- Disconnect the SIR coil assembly connectors, (1) from (2).
- Secure the SIR coil assembly (1) using suitable tape (2) to prevent rotation during disassembly.
- Remove the SIR coil assembly to steering column retaining screws (1).
Caution: Refer to Battery Disconnect Caution in the Preface section.
Caution: Refer to SIR Caution in the Preface section.
Important: The clock spring is referred to as the SIR coil.
Important: The steering angle sensor, SIR coil and turn signal cancel cam assembly is referred to as the SIR coil assembly.
Important: Secure the SIR coil assembly so it does not rotate whilst disassembling.
Disassembly Procedure
- Remove turn signal cancel cam (1) from back of the SIR coil assembly using a suitable tool and discard the turn signal cancel cam .
- Remove the steering angle sensor to multifunction switch (MFS) holder retaining screws (2).
- Remove the steering angle sensor (3) from the MFS holder (1) and discard the holder.
Important: Discard the turn signal cancel cam after removal.
Important: The MFS must be discarded if steering angle sensor is replaced
Assembly Procedure
- Install the steering angle sensor (3) to the NEW MFS holder (1).
- Install the steering angle sensor to MFS holder retaining screws (2).
- Centre the SIR coil assembly if required.
- Align SIR coil assembly locating block (2) to the steering angle sensor (1) cutout
- Install the SIR coil assembly (2) to the MFS holder (3).
- Install the NEW turn signal cancel cam (1) to the back of the SIR coil assembly (2).
Important: Install the steering angle sensor to MFS holder retaining screws (2) until there is no movement of the sensor to MFS holder, DO NOT overtighten the screws as damage to the steering angle sensor may occur.
Tighten
Tighten the screws to 0.3 Nm (0.22 lb in).
Notice: The new SIR coil assembly will be centered. Improper alignment of the SIR coil assembly may damage the unit, causing an inflatable restraint malfunction.
Important: If an existing SIR coil assembly is to being installed, the SIR coil assembly must be centred.
Important: To centre the SIR coil rotate the coil in one direction until resistance can be felt, then rotate the coil in the opposite direction counting the amount of rotations (there should be approximately 6 complete rotations). Position the wiring harness on the front of the SIR coil to the 12 O'clock position (if not already there) then rotate the coil 3 full turns in the opposite direction and lock the coil in this position, this is the centre position.
Important: Make sure that the locating cutout on the steering angle sensor (1) aligns with the SIR coil (2), mark the cutout on the steering angle sensor (1) to assist in correct locating of the SIR coil (2).
Installation Procedure
- Install the SIR coil assembly to steering column retaining screws (1).
- Connect the SIR coil assembly connectors, (1) to (2).
- Install the wipers/washer switch. Refer to Windshield Wiper and Washer Switch Replacement .
- Install the cruise control switch. Refer to Turn Signal Switch Replacement .
- Remove the SIR coil assembly securing tape.
- Install the steering column trim covers. Refer to Steering Column Trim Covers Replacement .
- Install the steering wheel. Refer to Steering Wheel Replacement .
- Install the inflatable restraint steering wheel module to the steering wheel. Refer to Inflatable Restraint Steering Wheel Module Replacement .
- Connect the battery ground cable. Refer to Battery Negative Cable Disconnection and Connection .
- Enable the SIR system. Refer to SIR Disabling and Enabling .
- Calibrate the steering angle sensor. Refer to Steering Angle Sensor Centering .
Tighten
Tighten the screws to 1 Nm (9 lb in).
