For 1990-2009 cars only
Tools Required
J 39400-A Halogen Leak Detector
Important: The A/C refrigerant filter installation procedure applies to vehicles with an auxiliary system only.
The A/C refrigerant filter must be installed to the A/C evaporator tube (liquid line) between the condenser and evaporator. The installation of this A/C refrigerant filter eliminates the need for flushing.- Remove the air cleaner. Refer to Air Cleaner Assembly Replacement for the 4.8L, 5.3L, 6.0L engine.
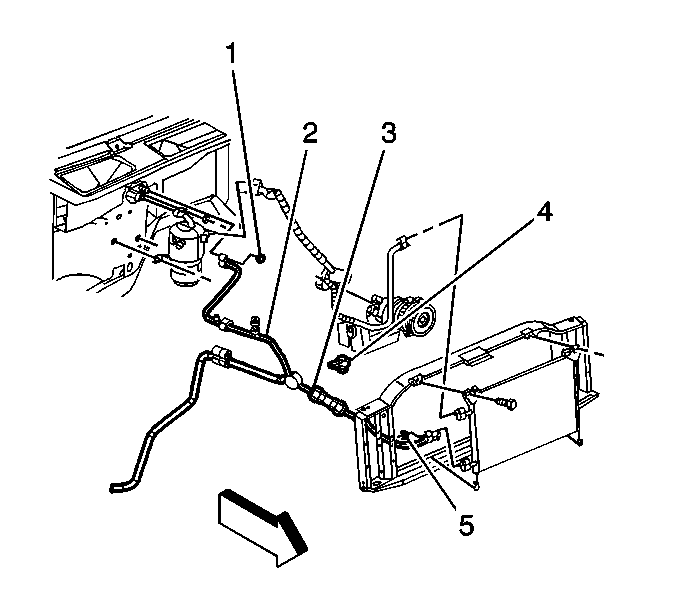
- Remove the evaporator tube (2) from the vehicle. Refer to Evaporator Tube Replacement .
- Measure 45 mm (1.75 in) from the bend on the condenser end of the evaporator tube (2) and mark the location.
- Measure 45 mm (1.75 in) from the mark on the evaporator tube (2) towards the evaporator from the previous step.
- Using a tubing cutter, cut the marked section of the evaporator tube (2).
- Remove the burrs from the evaporator tube (2).
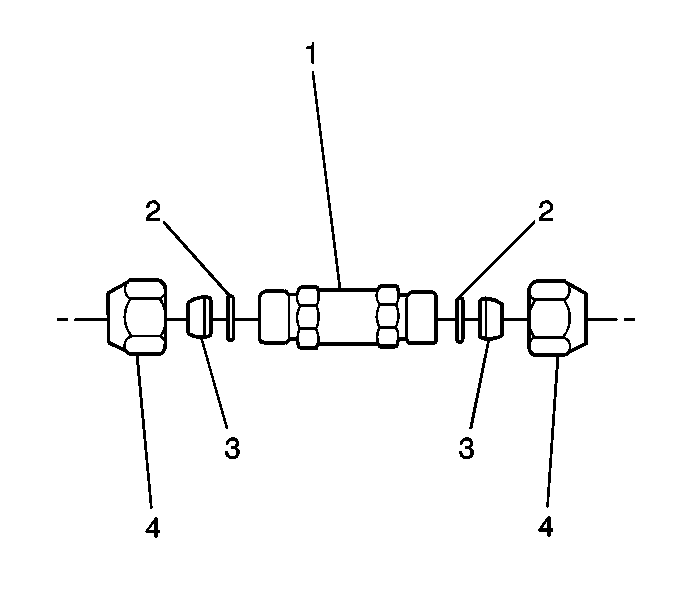
- Remove the nuts (4), the ferrules (3), and the O-rings (2) from the A/C refrigerant filter (1).
- Push the proper size nuts (4) and ferrules (3) over each of the evaporator tube halves.
- Install the ferrules (3) with the small end toward the nut (4).
- Install the A/C refrigerant filter (3) to the evaporator tube (2) with the flow arrow pointing towards the evaporator.
- While holding the evaporator tube in the A/C refrigerant filter (1), tighten the nuts (4) to the A/C refrigerant filter (1).
- Remove the nuts (4) from the A/C refrigerant filter (1).
- Install the O-rings (2) to the evaporator tube halves. Refer to O-Ring Replacement .
- Install the nuts (4) to the A/C refrigerant filter (1).
- Install the evaporator tube (2) to the vehicle. Refer to Evaporator Tube Replacement .
- Evacuate and recharge the system. Refer to Refrigerant Recovery and Recharging .
- Leak test the fittings of the component using the J 39400-A .
- Install the air cleaner. Refer to Air Cleaner Assembly Replacement for the 4.8L, 5.3L, 6.0L engine.

Important: Do not allow metal burrs to enter the evaporator tube (2) during cutting or when removing the burrs.

Important: Do Not install the O-rings (2) in this step.

Notice: Refer to Fastener Notice in the Preface section.

Tighten
Tighten the nuts to 34 N·m (25 lb ft).
Tighten
Tighten the nuts to 34 N·m (25 lb ft).

