Removal Procedure
- Remove the transfer case shield, if equipped. Refer to Transfer Case Shield Replacement .
- Remove the front propeller shaft. Refer to Front Propeller Shaft Replacement in Propeller Shaft.
- Remove the rear propeller shaft. Refer to Rear Propeller Shaft Replacement in Propeller Shaft.
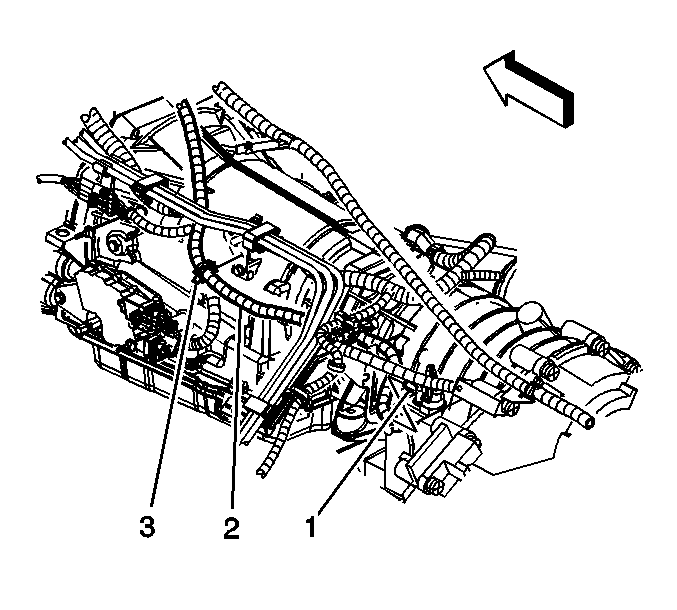
- Remove the vent hose (2) from the transfer case fitting (1).
- Reposition the vent hose out of the way.
- Remove the harness inline to engine harness connector (1) clip from the fuel feed and return pipe bracket.
- Disconnect the encoder motor electrical connector (7).
- Disconnect the speed sensor electrical connectors (3, 4, and 5).
- Remove the harness clips (6, 8) from the transfer case.
- Reposition the harness out of the way.
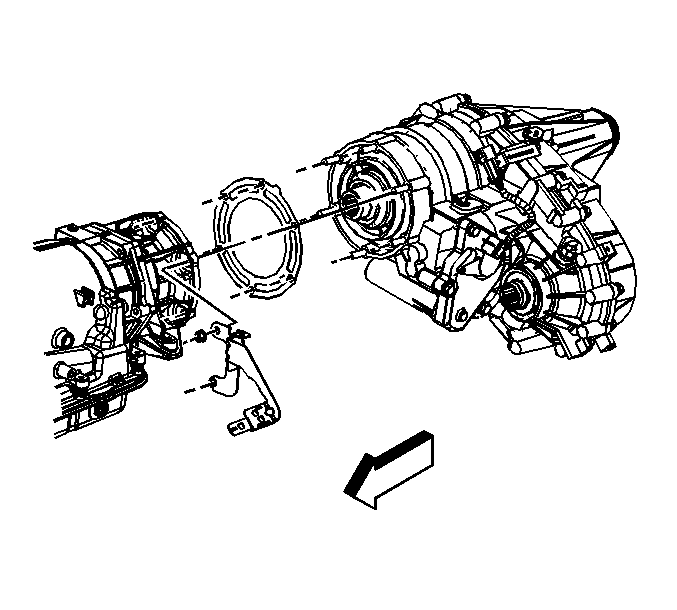
- Support the transfer case with a suitable transmission jack.
- Remove the transfer case adapter nuts.
- Remove the fuel feed and return pipe bracket.
- Separate the transfer case from the transmission by moving the transfer case straight back toward the rear of the vehicle.
- Rotate the transfer case so that the transfer case is perpendicular to the transmission.
- Lower the transfer case.

Important: Ensure that the transfer case is correctly secured to the transmission jack.
Important: When removing the transfer case from the transmission, do not remove the transmission mount or the transfer case adapter.
Installation Procedure
- Rotate the transfer case so that the transfer case is perpendicular to the transmission.
- Raise the transfer case into position.
- Rotate the transfer case so that the transfer case aligns with the transfer case adapter.
- Install the transfer case.
- Install the fuel feed and return pipe bracket.
- Install the transfer case adapter nuts.
- Remove the transmission jack from the transfer case.
- Position the harness to the transfer case.
- Install the harness clips (6, 8) to the transfer case.
- Connect the speed sensor electrical connectors (3, 4, and 5).
- Connect the encoder motor electrical connector (7).
- Install the harness inline to engine harness connector (1) clip to the fuel feed and return pipe bracket.
- Position the vent hose to the transfer case.
- Install the vent hose (2) to the transfer case fitting (1).
- Install the rear propeller shaft. Refer to Rear Propeller Shaft Replacement in Propeller Shaft.
- Install the front propeller shaft. Refer to Front Propeller Shaft Replacement in Propeller Shaft.
- Install the transfer case shield, if equipped. Refer to Transfer Case Shield Replacement .
Notice: Use the correct fastener in the correct location. Replacement fasteners must be the correct part number for that application. Fasteners requiring replacement or fasteners requiring the use of thread locking compound or sealant are identified in the service procedure. Do not use paints, lubricants, or corrosion inhibitors on fasteners or fastener joint surfaces unless specified. These coatings affect fastener torque and joint clamping force and may damage the fastener. Use the correct tightening sequence and specifications when installing fasteners in order to avoid damage to parts and systems.
Tighten
Tighten the nuts to 50 N·m (37 lb ft).
