Information on Upgrading Certain OnStar Analog/Digital-Ready Systems to OnStar Generation 6 Digital-Capable System

| Subject: | Information on Upgrading Certain OnStar® Analog/Digital-Ready Systems to OnStar® Generation 6 Digital-Capable System |
| Models: | 2000-2004 Buick LeSabre |
| 2003-2004 Buick Rendezvous |
| 2004 Buick Rainier, Regal |
| 2004-2005 Buick Century |
| 2002-2004 Cadillac DeVille, Seville |
| 2003-2004 Cadillac CTS |
| 2003-2004 Cadillac Escalade Models |
| 2004-2005 Cadillac SRX, XLR |
| 2005 Cadillac CTS, STS |
| 2001-2004 Chevrolet Impala, Monte Carlo |
| 2002-2004 Chevrolet TrailBlazer Models |
| 2003-2004 Chevrolet Avalanche, Express, Silverado, Suburban, Tahoe |
| 2003-2005 Chevrolet Cavalier, Venture |
| 2004 Chevrolet Colorado |
| 2004-2005 Chevrolet Malibu, Malibu Maxx |
| 2005 Chevrolet Cobalt, Corvette, Equinox |
| 2002-2004 GMC Envoy Models |
| 2003-2004 GMC Savana, Sierra, Yukon Models |
| 2004 GMC Canyon |
| 2001-2003 Oldsmobile Aurora |
| 2002-2004 Oldsmobile Bravada |
| 2003-2004 Oldsmobile Silhouette |
| 2003-2004 Pontiac Aztek |
| 2000-2004 Pontiac Bonneville |
| 2003-2005 Pontiac Montana, Sunfire |
| 2004 Pontiac Grand Prix |
| 2005 Pontiac G6, Pursuit (Canada) |
| 2003-2004 HUMMER H2 |
| 2002-2004 Saturn VUE |
| 2003-2004 Saturn ION |
| 2003-2004 Saturn L-Series |
| with OnStar® (RPO UE1) |
This bulletin is being revised to add upgrade kit installation information for the 2001 Chevrolet Impala and Monte Carlo. Please discard Corporate Bulletin Number 05-08-46-006O (Section 08 - Body and Accessories).
This bulletin is being issued to provide dealer personnel with information and procedures to follow should an owner wish to upgrade their OnStar® Analog/Digital-Ready system to an OnStar® Generation 6 Digital-Capable system.
Program Overview
To upgrade their vehicle to an OnStar® Generation 6 Digital-Capable system, all that a customer must do is:
| • | Take their vehicle to their dealer for the system upgrade. |
| • | Pay the dealer the regular retail price (no discounts are available) for one of the following 1-year, non-refundable OnStar® Analog-to-Digital Transition (ADT) Service Subscription Plans: |
| - | 1-year Safe & Sound Subscription: $199 ($289 in Canada) |
| - | 1-year Directions & Connections Subscription: $399 ($579 in Canada) |
| • | Pay the dealer the applicable state and local sales taxes on the subscription: |
| - | U.S. Dealers: Taxes only apply in these states: CT, DC, FL, HI, ND, NJ, NM, NY, SC, SD, TX, and WV |
| - | Canadian Dealers: All applicable taxes |
| • | Pay the dealer a one-time charge of $15 for the upgrade: |
| - | U.S. Dealers: Do not collect taxes on the $15 |
| - | Canadian Dealers: Collect all applicable taxes on the $15 |
Note: Dealers should NOT remit OnStar® ADT-related taxes to their taxing authority as OnStar® is responsible for tax remittance.
Please Be Sure To Read these Important Points:
| • | The 1-year OnStar subscription is not refundable or transferable to another person. Upgraders can apply unused subscription months to a new or Certified Pre-Owned digital OnStar-equipped GM vehicle purchase or lease. As noted above, the digital upgrade program requires the subscriber to purchase a one-year prepaid OnStar® subscription. Assuming the subscriber intends to keep their vehicle, but subsequently purchases or leases a 2006 model year or newer OnStar®-equipped new or certified used GM vehicle, in the interest of subscriber satisfaction, they may apply remaining unused whole months of the subscription to the new vehicle. The subscription may not be applied to another person's vehicle. |
| Important: This is a customer satisfaction measure that would usually occur several months after an upgrade. It is not intended to be leveraged as part of a new/used vehicle purchase or lease transaction. |
| • | The $15 charge is not refundable. |
| • | Dealer ADT kit orders are VIN specific. Dealer kit orders require a VIN and must be exchanged with the OnStar® unit in the vehicle with that VIN. Proper activation and enrollment depends on this step. |
| • | You must put the actual miles on the Repair Order. Do not estimate. |
| • | Customers will receive a Hands-Free Calling number once the digital hardware is installed and configured. |
| • | Any nametags that were stored in the old system will need to be re-set by the subscriber once the new hardware is installed. |
| • | Customers are responsible for the charges described above regardless of whether their vehicle is in or out of the New Vehicle Warranty period. In addition, customers should not be charged labor costs. Dealers can charge GM the labor for the upgrade as specified at the end of this bulletin using the listed labor operation. |
| • | Vehicles eligible for an OnStar® hardware upgrade are listed in this bulletin. Vehicle upgradeability can also be determined by typing the VIN into the field entitled "Determine VIN Hardware Functionality" on the OnStar® Online Enrollment website, located in the sales or service workbench tab of GM GlobalConnect. Canadian Dealers can use a similar tool that is available within InfoNET. |
| • | Access to the sales and/or service workbench in the GM GlobalConnect website can be granted by the dealership’s Partner Security Coordinator (PSC). If you are unsure who the PSC is, check with the Sales Manager. |
Ordering the Upgrade Kit
- To order a kit, you will need to access the OnStar® Online Enrollment webpage, located under the sales or service workbench of GM GlobalConnect (infoNET for Canadian upgrade orders).
- Click on the Analog-to-Digital Program link to start the ordering process.
- To order a kit, you will need the following information:
- After submitting the order, the "Terms and Conditions of Your OnStar® Service" page will display. This is your confirmation that the upgrade kit order has been created. U.S. Dealers will also receive an e-mail from Autocraft within several hours of ordering an upgrade kit (Canadian Dealers will receive an e-mail from MASS Electronics).
- Print the "Terms and Conditions of Your OnStar® Service" page, and have the customer sign a copy.
- A copy of this form should be stapled to the customer’s copy of the Repair Order and one copy should be retained in the customer service folder.
- If the kit you ordered is available, you will receive the upgrade kit within 4 business days of entering your order through the OnStar® Online Enrollment webpage.
- To check on kit availability or the status of your order, U.S. Dealers can log onto the distributor's website at www.autocraft.com. Canadian dealers can call MASS Electronics at 877-410-6277.
These kits cannot be ordered from GMSPO.
| • | VIN |
| • | OnStar® account holder's first name |
| • | OnStar® account holder's last name |
| • | OnStar® account holder's e-mail address (optional) |
| • | OnStar® account holder's phone number |
| • | OnStar® account holder's street address |
| • | OnStar® account holder's ZIP code (or postal code for Canadian upgrades) |
| • | 6-digit Dealer BAC code and the 5-digit Divisional Dealer Code (do not use a Parts Department Dealer Code). |
| • | Service department contact's name, phone number and a dealership e-mail address |
| • | Repair Order (R.O.) Number |
| • | Mileage on vehicle |
| • | Which OnStar® subscription plan do they want (Safe & Sound or Directions & Connections)? |
Upgrade Kit Installation
- Skip to the next step if the vehicle to be upgraded is not listed below:
- Skip to the next step if the vehicle to be upgraded is not listed below:
- Skip to the next step if the vehicle to be upgraded is not a 2005 Cadillac STS. The 2005 Cadillac STS kit may include a new inside rearview (ISRV) mirror assembly and a new ISRV mirror wiring cover. If the kit you receive includes these parts, please remove the existing ISRV mirror and wire cover from the vehicle and install the ones provided in the kit per the instructions in SI.
- Skip this step if the vehicle to be upgraded is not listed below.
- Replace the OnStar® Vehicle Communication Interface Module (VCIM) in the vehicle with the provided Digitally-Capable VCIM. Refer to the Communication Interface Module Replacement procedure in the Cellular Communication section of SI. This kit may include a new VCIM bracket. If it does, use this new bracket on the vehicle and discard the original bracket. The kit may also include a small wiring jumper cable. If it does, plug the wiring jumper cable into the connector on the VCIM and the other end to the corresponding vehicle wiring harness connector.
- After replacing the VCIM, it is essential to configure the new OnStar® system. Failure to configure the system will result in an additional customer visit for repair. DO NOT press and hold the white dot or phone button on the keypad as it will not reset this version of the OnStar® system and may result in a DTC being set. Use of the TIS2WEB and SPS applications, along with the Tech2®, are required in order to perform the VCIM configuration and setup procedure for this vehicle. The configuration and set-up procedure is now a two-step process which enables an automated activation by the OnStar® Center, without a button press by the technician to the OnStar® Call Center.
- Skip to the next step if the vehicle to be upgraded is not listed below:
| • | 2003 Buick Rendezvous |
| • | 2003 Cadillac Escalade, Escalade ESV, Escalade EXT |
| • | 2003 Chevrolet Avalanche, Silverado, Suburban, Tahoe, Venture |
| • | 2003 GMC Sierra, Yukon, Yukon XL |
| • | 2003 HUMMER H2 |
| • | 2003 Oldsmobile Silhouette |
| • | 2003 Pontiac Aztek, Montana |
| Unscrew the existing analog OnStar® antenna mast from the antenna base and discard. Screw the provided Digital-Capable OnStar® antenna mast onto the antenna base. |
| • | 2000-2004 Buick LeSabre |
| • | 2004 Buick Regal |
| • | 2004-2005 Buick Century |
| • | 2002-2004 Cadillac DeVille, Seville |
| • | 2003-2004 Cadillac CTS |
| • | 2004 Cadillac SRX built prior to VIN breakpoint 40171353 |
| • | 2002-2003 Chevrolet TrailBlazer, TrailBlazer EXT |
| • | 2003-2004 Chevrolet Express |
| • | 2002-2004 Chevrolet Impala, Monte Carlo |
| • | 2003-2005 Chevrolet Cavalier |
| • | 2002-2003 GMC Envoy, Envoy XL |
| • | 2003-2004 GMC Savana |
| • | 2001-2003 Oldsmobile Aurora |
| • | 2002-2003 Oldsmobile Bravada |
| • | 2000-2004 Pontiac Bonneville |
| • | 2003-2005 Pontiac Sunfire |
| • | 2003-2004 Saturn L-Series |
| • | 2003 Saturn ION |
| • | 2002-2004 Saturn VUE |
| Replace the existing OnStar® analog on-glass antenna mast, inner coupler and outer coupler with the provided new Digital-Capable antenna components. Refer to the antenna component replacement instructions included in the kit or those found in the Cellular Communication section of SI. You must follow these instructions carefully in order to ensure proper adhesion of the new antenna. |
| • | 2003-2004 Saturn L-Series |
| • | 2003 Saturn ION |
| • | 2002-2003 Saturn VUE |
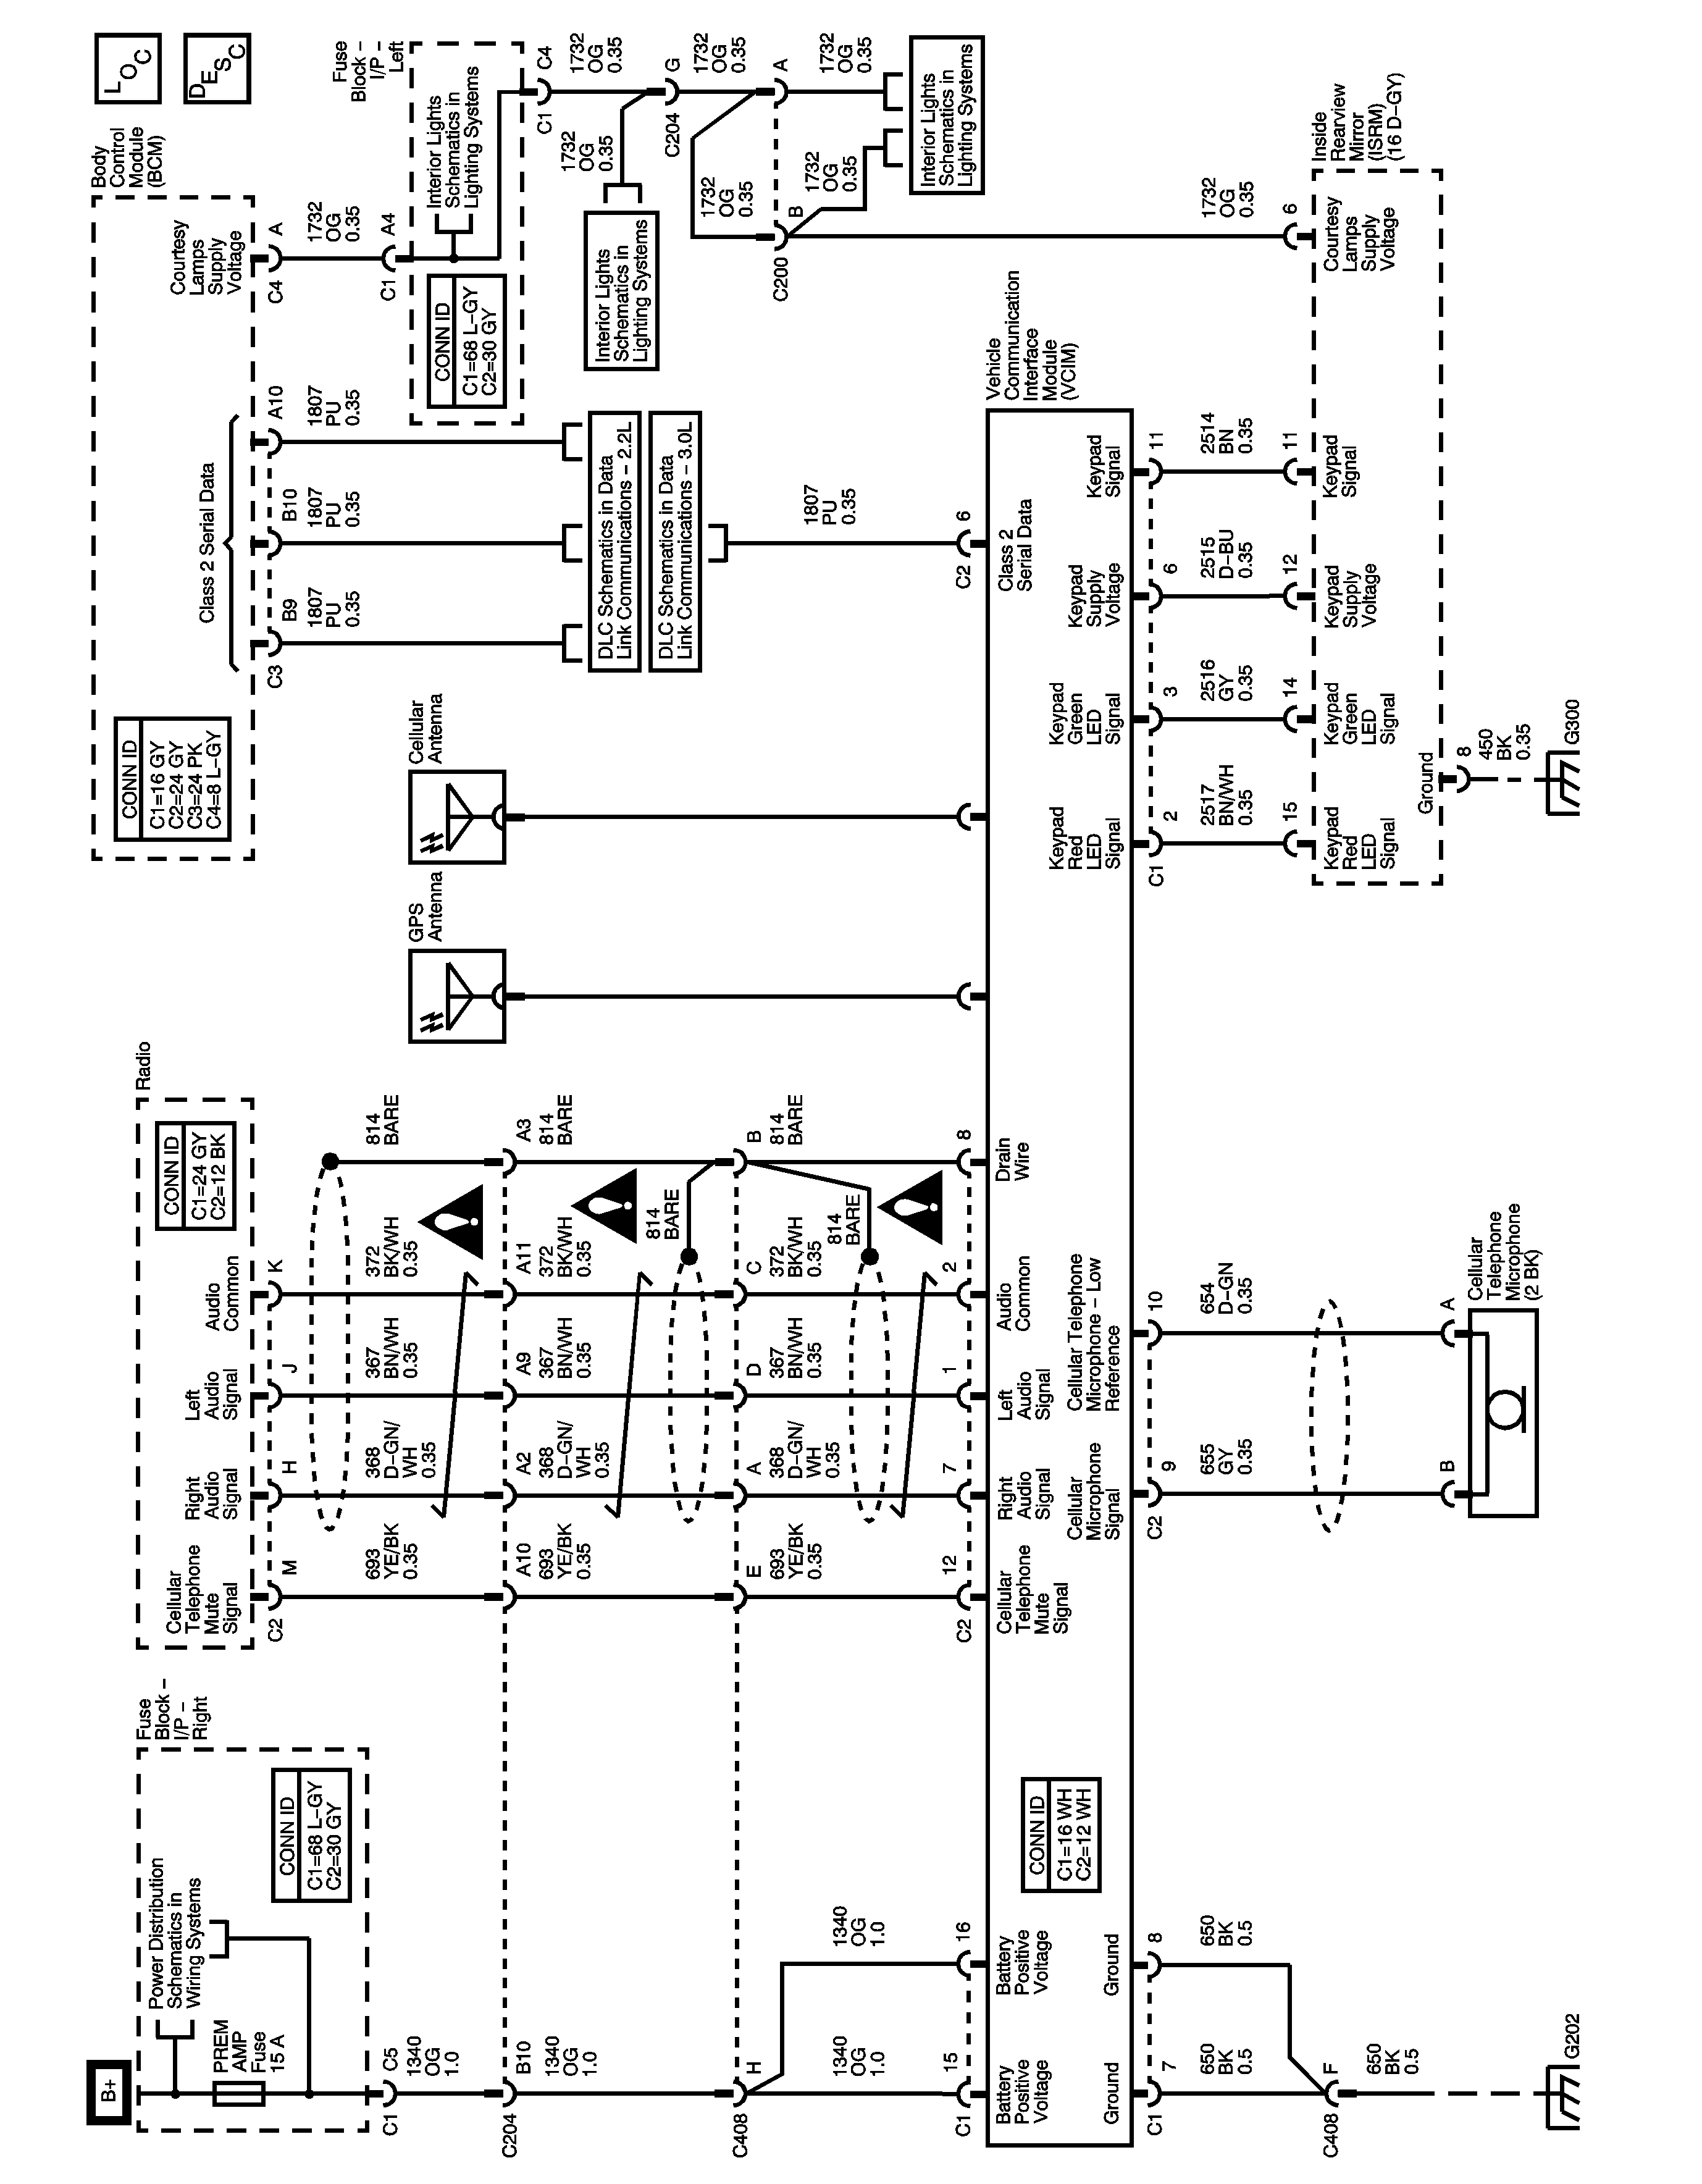
| 4.1. | Locate and remove the Right Audio output signal terminal 7 from Connector C2 at the Vehicle Communication Interface Module (VCIM). |
| 4.2. | Remove the terminal end and strip the wire. |
| 4.3. | Locate the Left Audio output signal wire from terminal 1 in Connector C2. |
| 4.4. | Splice the Right Audio output signal wire from terminal 7 with the Left Audio output signal wire from terminal 1. |
| 4.5. | See Wiring Repairs in SI for approved splicing methods. |
| 4.6. | See wiring diagram at end of this bulletin, for details. |
| • | For 2001, 2002 and 2003 Chevrolet Impala and Monte Carlo, do not reinstall the black plastic OnStar® module cover onto the vehicle after the VCIM and module bracket have been installed. This black plastic cover will no longer fit on the vehicle. |
| • | The upgrade kit for 2002 Sevilles and DeVilles, and some 2003 Sevilles and DeVilles, will contain a large bracket. To install the new VCIM into this bracket you’ll need to carefully line up the notch in the VCIM with the tab in the bracket. |
| • | On 2002 Sevilles and DeVilles, the GPS jumper cable MUST be unclipped from the back seat cross brace, or unplugged from the VCIM first . DO NOT pull back on the mounting bracket until the GPS antenna jumper cable is unclipped from the back seat cross brace or unplugged from the VCIM. The short length of jumper cable does not allow the VCIM mounting bracket to be pulled back very far, and could lead to a break at the VCIM connector. |
| • | On 2000-2002 Bonnevilles and LeSabres and 2001-2002 Auroras you will need to follow these steps: |
| 5.1. | Remove the 4 nuts that secure the VCU/VIU bracket assembly to the rear seat back brace. Note: Save these nuts for later use. |
| 5.2. | Remove and discard the plastic VCU/VIU bracket assembly from the vehicle. |
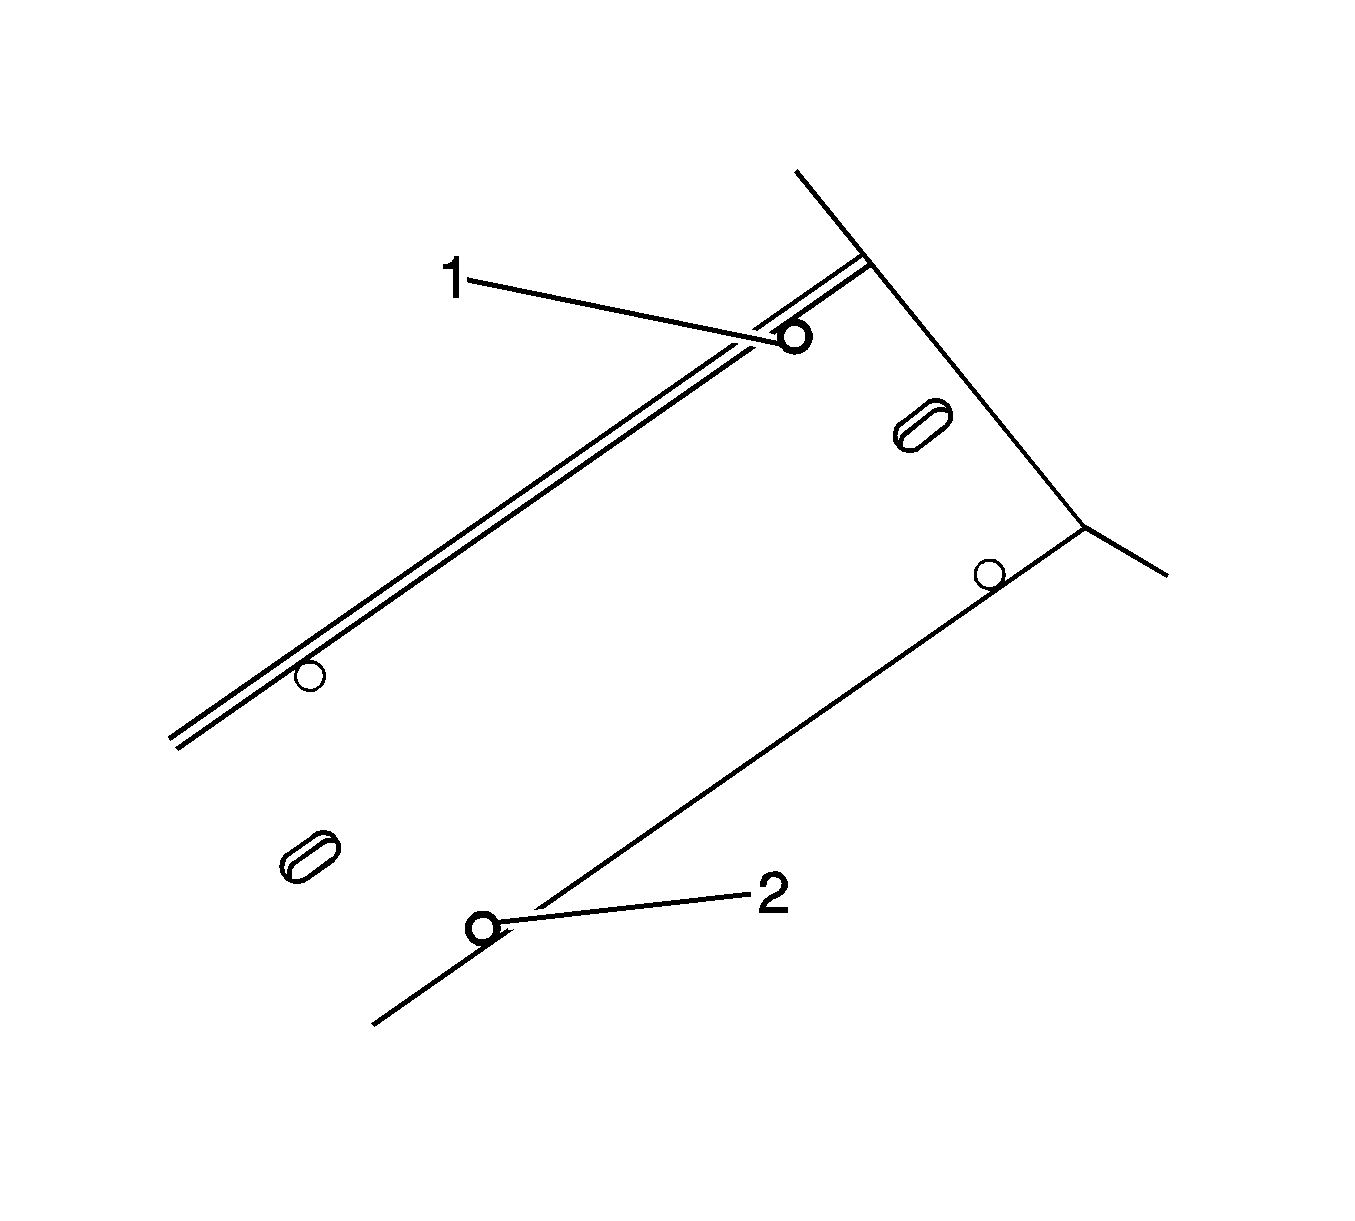
| 5.3. | Remove the upper right stud (1) from the rear seat back brace and re-install in the middle lower slot (2) on the brace. Tighten the fastener to 4 N·m (36 lb in). |
| 5.4. | Position the new VCIM in the vehicle over the studs on the rear seat back brace. |
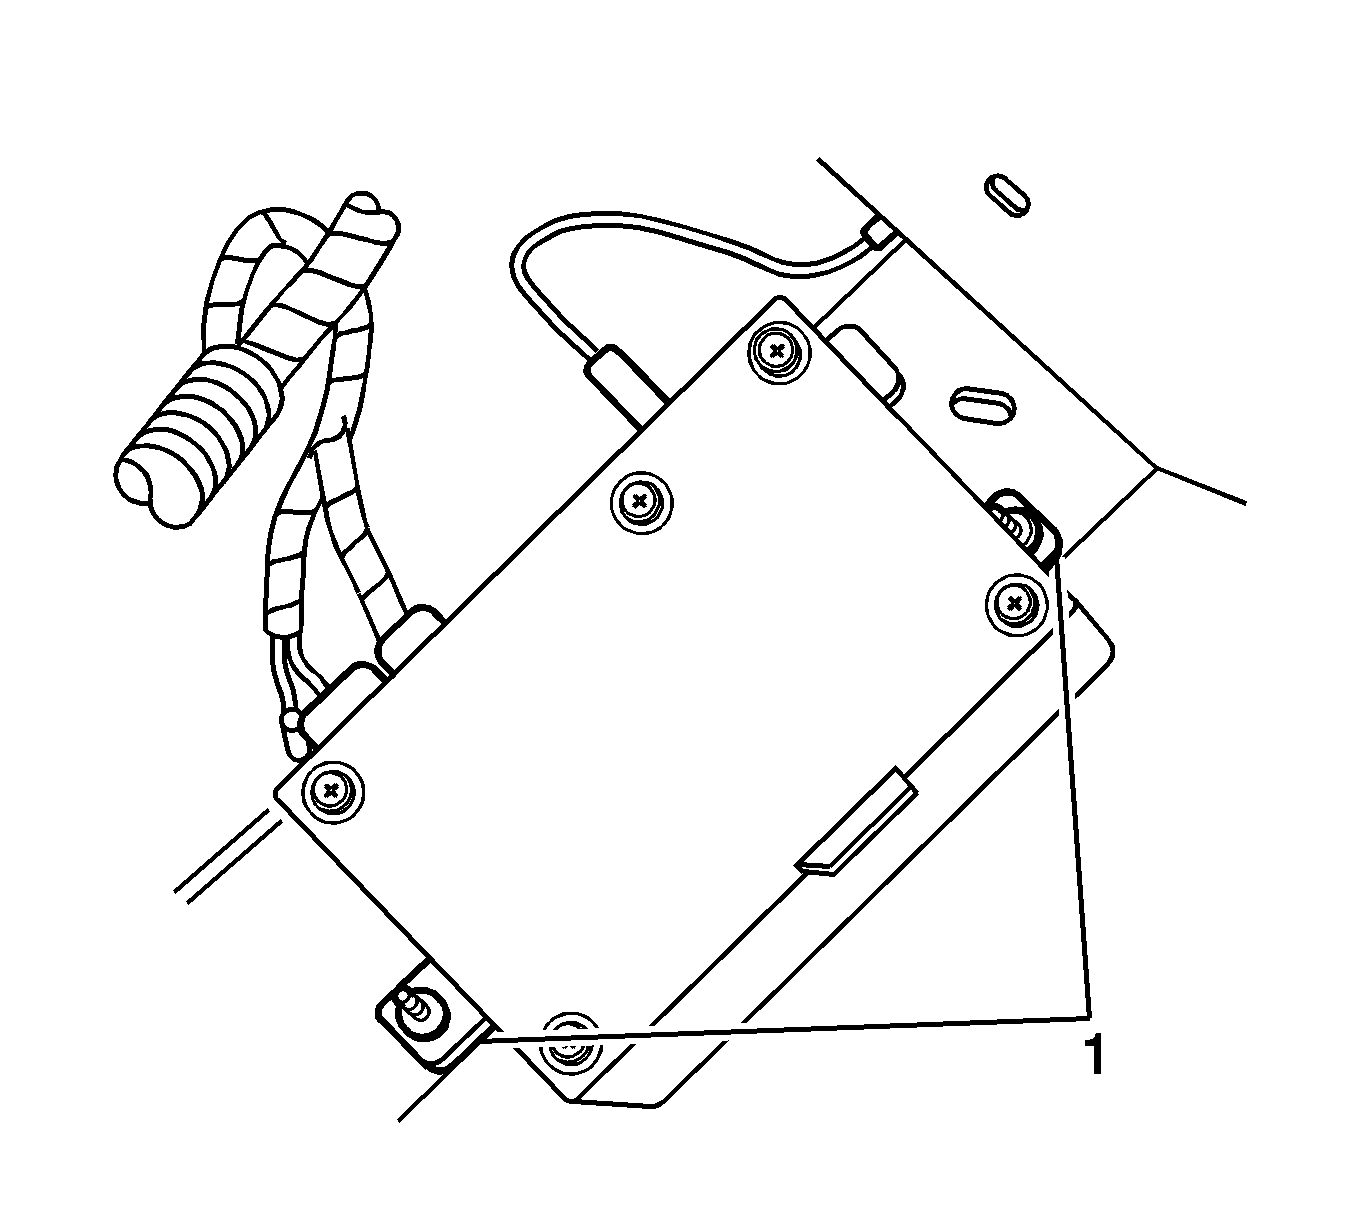
| 5.5. | Install two of the nuts saved from step (1). Tighten the nuts to 4 N·m (36 lb in). |
| 5.6. | Connect the new OnStar jumper harness supplied in the kit to the VCIM (two white connectors) and the body wiring harness (C345 connector). |
| 5.7. | Connect the small coaxial jumper cable supplied in the kit, to the VCIM, with the end that has a blue plastic housing connector. Plug the other end of this coaxial jumper cable to the OnStar Global Positioning Satellite (GPS) antenna coaxial cable at the right angle connector. Note: The GPS cable in the new OnStar jumper harness is not utilized. |
| 5.8. | Connect the cellular coaxial cable to the OnStar VCIM. |
On 2001 Impala and Monte Carlos you will need to follow these steps:
| 5.9. | Remove the Vehicle Communications Unit (VCU) and Vehicle Interface Unit (VIU) following the procedures listed in SI. Save the bracket nuts for later use. |
| 5.10. | Disconnect and remove the OnStar® jumper harness. |
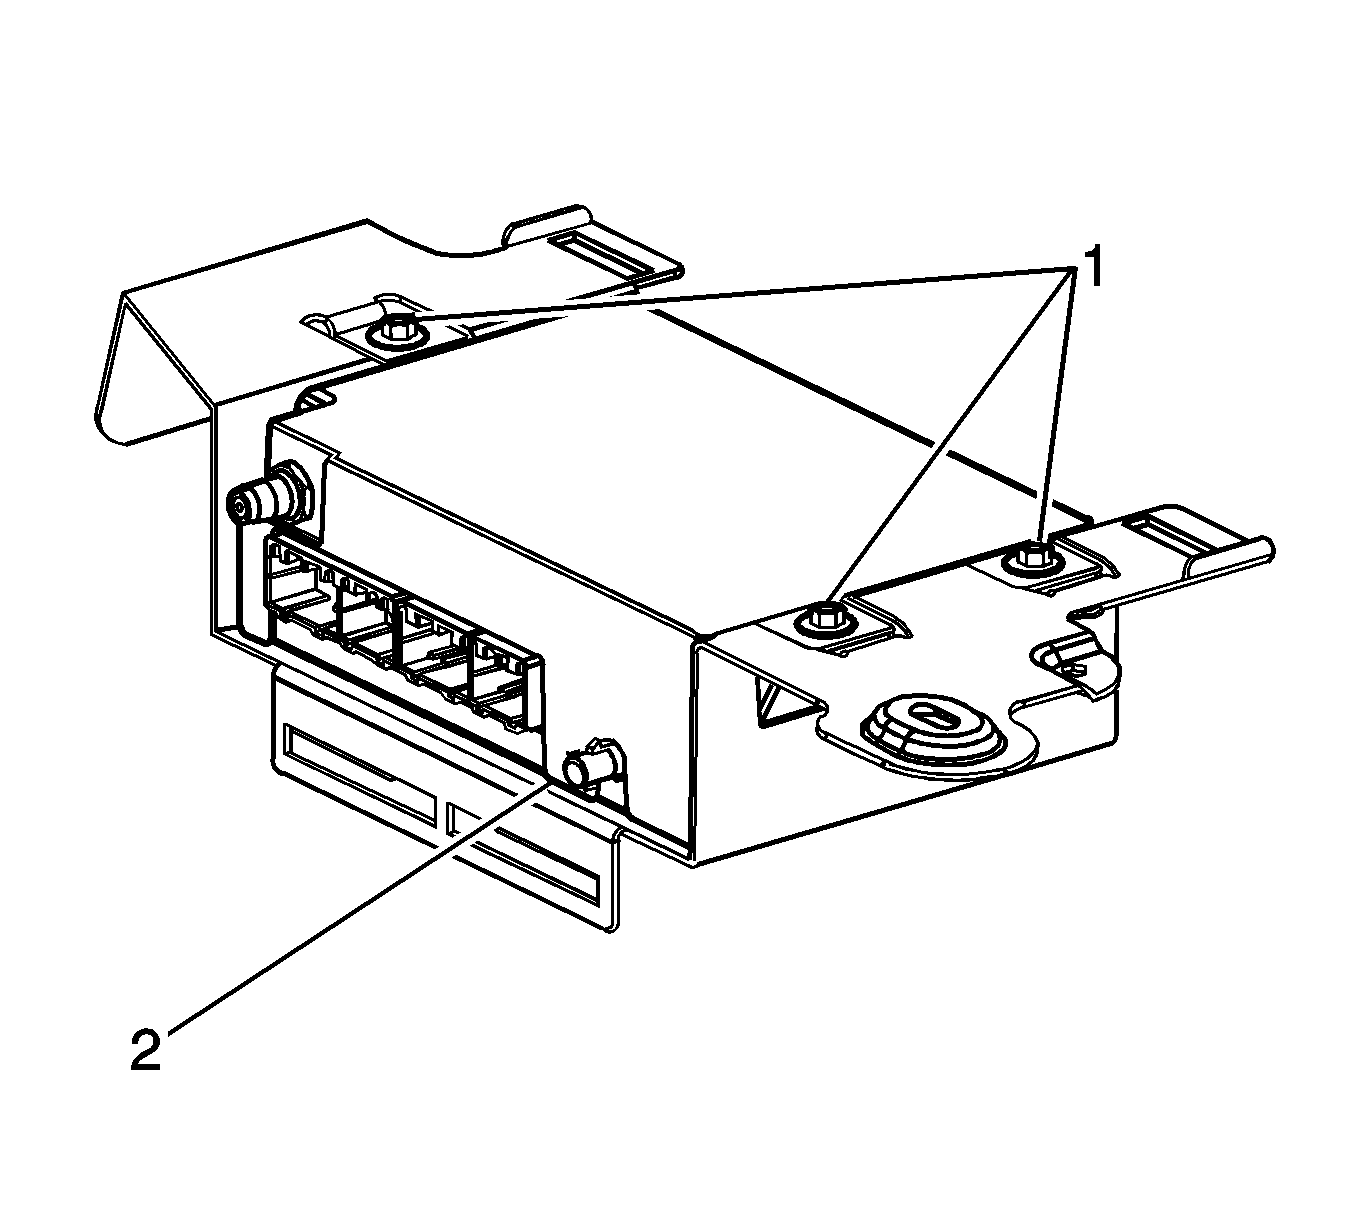
| 5.11. | Fasten three retainer clips (1) from the kit to the new bracket that is included in the kit, and position the VCIM to the bracket (2). |
| 5.12. | Install the three bolts from the kit. Tighten the bolts to 10 N·m (89 lb in). |
| 5.13. | Connect the new OnStar® jumper harness supplied in the kit to the VCIM (two white connectors on module). |
| 5.14. | Connect small coax cable jumper harness supplied in the kit -- end with blue plastic housing to VCIM GPS connector. |
| 5.15. | Position the VCIM / bracket assembly to the studs. |
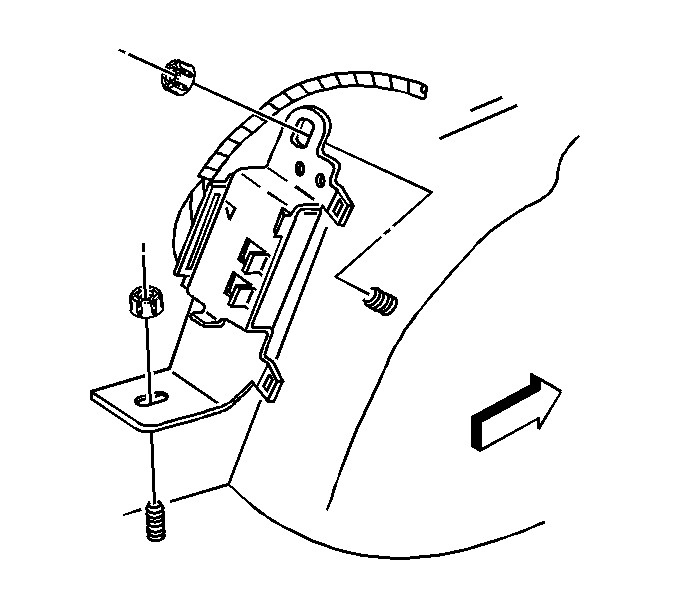
| 5.16. | Install the bracket nuts saved from the Removal Procedure above to the VCIM / bracket assembly mounting studs. Tighten the nuts to 4 N·m (35 lb in). |
| 5.17. | Connect the new OnStar® jumper harness to the body wiring harness (C410 connector). |
| 5.18. | Connect small coax cable jumper from VCIM to the OnStar® Global Positioning Satellite (GPS) antenna coaxial cable at the connector previously left in the vehicle. |
| 5.19. | Connect the cellular coaxial cable previously left in vehicle to the OnStar® VCIM. |
| 6.1. | Connect the Tech2® to the vehicle. |
| 6.2. | Connect the Techline Information System (TIS) terminal to the Tech2®. |
| 6.3. | Scroll to the bottom of the Controller List, and select the "ONSA TIS2WEB Pass-Thru OnStar® Activation (Replaced/Upgraded Units Only)" option using the Service Programming System (SPS). |
| Important: Do not use the clear DTC function. This will only temporarily turn the LED to green. |
| 6.4. | Upon completion of the OnStar® TIS2WEB step, disconnect the TIS terminal from the Tech2® and perform the VCIM/OnStar® Set-up Procedure using the Tech2®. The set up procedure is located under the special function menu option. |
| Important: Failure to perform the above steps will result in a red LED, DTC being set and limited or incomplete OnStar® services, and will require a customer return visit to the dealership. |
| 6.5. | The default language for the new VCIM will be English. To change to French or Spanish, access the special functions menu on the Tech 2®, and follow the instructions accordingly. |
| • | 2002-2004 Cadillac DeVille |
| • | 2002-2004 Cadillac Seville |
| • | 2005 Cadillac STS |
Set up the Dash Integration Module (DIM) using the following procedure:
| 7.1. | On the Tech2® select the correct Year, Make and Model. |
| 7.2. | Enter Dash Integration Module (DIM) > Special Functions > Set Options > Misc. Options 1 > and turn off phone (if the vehicle does not have the UV8 option). |
| 7.3. | Enter Nav Radio Present and set to "No Nav" (if the vehicle does not have a navigation radio). |
| 7.4. | Turn the ignition off and open the door to turn off the RAP. |
| 7.5. | Turn the ignition on and enter the Vehicle Comm. Interface Module > Special Functions > Set Up OnStar /VCIM. |
| 7.6. | When prompted select "No Phone" (if the vehicle does not have the UV8 phone) and "No Nav" (if the vehicle does not have a navigation radio). |
| 7.7. | Turn the ignition off and open the door to turn off the RAP. |
Important: OnStar® Emergency Services are immediately available after these steps, however, full configuration, including activation of Hands-Free Calling, may take up to 24 hours to complete.
Processing the Module Exchange
For this program, submitting a credit request for the removed OnStar® VCIM (the core) will be performed through a website. When this process is followed, the removed Analog / Digital-Ready VCIM, in most cases, will not be mailed back to the distributor, but can be scrapped by the dealership.
U.S. Dealers
- Return the removed Analog / Digital-Ready OnStar® VCIM to the Parts Manager.
- The Parts Manager will log onto www.autocraft.com.
- Select Account Maintenance.
- Select Outstanding Cores.
- Choose the outstanding core you wish to process, by selecting the Virtual Core Button on the far right side of the screen.
- Enter the information in the required fields and select the submit button. Record the confirmation number.
Canadian Dealers
- Return the removed Analog / Digital-Ready OnStar® VCIM to the Parts Manager.
- The Parts Manager will log onto https://adt.onstar.gm.mass.ca and enter information as prompted.
All Dealers
If the website indicates that the VCIM needs to be physically returned to the distributor, please use the pre-paid shipping label that was included in the kit to return the removed VCIM.
Important: To avoid a $250 core non-return charge, you must do one of the following within 30 days of kit shipment:
Returning the Upgraded Vehicle to the Customer
- Place the new OnStar Subscriber Information (Owner's Manual kit) in the customer's vehicle where they can review some of the new features of the Digital-Capable system. The continuous digit dialing feature should be highlighted to the customer to avoid a return to the dealership for dialing instructions. Advise the customer to discard any existing OnStar® Owner's Manuals that may be in the vehicle.
- Have the Service Advisor, Service Manager or Sales Consultant review the new OnStar® Hands-Free Calling procedure with the customer. The customer is uses to their analog OnStar® Hands-Free Calling system, which uses individual digit dial to make a call. The Generation 6 Digital-Capable system uses continuous digit dial, and the customer needs to be made aware of this change.
- U.S. Dealers Only: Staple the "Tip Sheet - OnStar® Generation 6 Digitally-Capable System", that was included in the kit, to the customer’s copy of the repair order. This tip sheet will help your customer better understand their new OnStar® system.
- Canadian Dealers Only: Refer the customer to the Hands-Free Calling Quick Review Card from the new OnStar® Owner’s Manual kit for help with the new dialing procedure.
- Fill out the form entitled "GM Limited Warranty for Upgraded OnStar® Digital Equipment Program Participants" and staple a copy of this to the customer’s repair order. You may want to keep a copy for your records.
- Encourage your customer to press their blue OnStar® button the next day. The OnStar® Advisor will be able to review some of the new features of their digital OnStar® system.
Closing the OnStar® Upgrade Exchange
- Collect payment from the customer. Your dealership’s open account (sales) will be charged for the cost of the chosen subscription plan, any applicable subscription taxes, and the $15 upgrade charge after the vehicle has been configured through the TIS2WEB process.
- None of the costs associated with the OnStar Digital Upgrade program may be claimed as a GM goodwill event. These costs must be paid by the customer, and may not be included in any goodwill offered to the customer. GM employees or representatives or field personnel are not able to offer goodwill for this program. If the dealership decides to pay for the upgrade for their customer, be aware that your GM or OnStar® contact will not be able to reimburse you for this cost.
- Use labor code Z2096 to submit your claim for the labor time published below plus 0.2 hr Administrative Allowance and an additional $20.00 Net Amount.
| • | For all dealer claim submissions (excluding U.S. Saturn), use Complaint Code MH -- Technical Bulletin, and Failure Code 93 -- Technical Service Bulletin. |
| • | For U.S. Saturn retailer claim submission, use Net Item code "M" and Case Type VW. |
Parts Information
The following OnStar® upgrade kits are ordered by clicking on the Analog-to-Digital Program link, which can be accessed on the OnStar® Online Enrollment webpage, located under the sales or service workbench of GM GlobalConnect (infoNET for Canadian upgrade orders).
Part Number | Model Year and Vehicle Line |
19115913 Or 19117013 | 2004 Grand Prix 2005 Corvette 2005 Equinox |
19117088 Or 19117089 | 2000-2002 LeSabre 2000-2002 Bonneville 2001-2002 Aurora |
19115914 Or 19117014 | 2004 H2 2004 Colorado 2004 Canyon |
19115950 Or 19117015 | 2003 Rendezvous 2003 Aztek |
19115951 Or 19117016 | 2003 Escalade/ESV/EXT 2003 Avalanche 2003 Silverado 2003 Suburban 2003 Tahoe 2003 Sierra 2003 Yukon/ XL |
19115952 Or 19117017 | 2003 H2 |
19117091 Or 19117101 | 2003-2004 LeSabre 2004 Regal 2004-2005 Century 2003 CTS (built after and including VIN breakpoint 30148827) 2004 CTS 2003-2004 Express 2004 Impala, Monte Carlo 2003-2004 Savana 2003-2004 Bonneville 2004 L-Series 2003 Aurora |
19117094 Or 19117104 | 2003 CTS (built prior to VIN breakpoint 30148827) |
19117097 Or 19117107 | 2002-2003 Impala, Monte Carlo |
19117092 Or 19117102 | 2002 Deville 2003 DeVille (built prior to VIN breakpoint 3U261178) |
19117093 Or 19117103 | 2002 Seville (without the F45/F55 suspension option) 2003 Seville (built prior to VIN breakpoint 3U261889 without the F45/F55 suspension option) |
19117099 Or 19117109 | 2002 Seville (with the F45/F55 suspension option) 2003 Seville (built prior to VIN breakpoint 3U261889 with the F45/F55 suspension option) |
19117095 Or 19117105 | 2004 SRX (built prior to VIN breakpoint 40171353) 2003 TrailBlazer/EXT 2003 Envoy/XL 2003 Bravada 2003 ION |
19117096 Or 19117106 | 2002 TrailBlazer/EXT 2002 Envoy XL 2002 Bravada |
19115912 Or 19117012 | 2004 Escalade, Escalade ESV, Escalade EXT 2005 CTS (built prior to VIN breakpoint 50162843) 2004 Avalanche, Silverado, Suburban, Tahoe 2004 Sierra, Yukon, Yukon XL |
19115503 Or 19117009 | 2004 Rainier 2004 SRX (built after and including VIN breakpoint 40171353) 2005 SRX (built prior to VIN breakpoint 50169388) 2004 TrailBlazer, TrailBlazer EXT 2004-2005 Venture 2004 Envoy, Envoy XL, Envoy XUV 2004 Bravada, Silhouette 2004-2005 Montana 2004 ION |
19115911 Or 19117011 | 2004 Rendezvous 2004-2005 XLR 2004 Aztek |
19116022 | 2005 STS with option DD7 |
19117090 Or 19117100 | 2003 DeVille (built after and including VIN breakpoint 3U261178) Seville (built after and including VIN breakpoint 3U261889) 2004 DeVille, Seville 2003-2005 Cavalier 2003-2005 Sunfire |
19116021 | 2005 STS (with options DD8 & TQ5) |
19115502 | 2005 STS (with option DD8) 2004-2005 Malibu, Malibu Maxx 2005 G6 |
19115506 Or 19117010 | 2003 Venture 2003 Silhouette 2003 Montana |
19115504 | 2005 Cobalt 2005 Pursuit |
19117026 Or 19117116 | 2003 L-Series (LW) |
19117025 Or 19117115 | 2003 L-Series (LS) |
19117027 Or 19117117 | 2002 VUE 2003 VUE (built prior to VIN breakpoint 3S885677) |
19117098 Or 19117108 | 2003 VUE (built after and including VIN breakpoint 3S885677) 2004 VUE |
19117322 | 2001 Impala, Monte Carlo |
Labor Time Information
Labor Operation | Model Year and Vehicle Line | Labor Time |
|---|---|---|
Z2096 OnStar® Analog-to-Digital Upgrade Kit-Install* | 2004-2005 Cadillac XLR | 0.4 hr |
2004 Pontiac Grand Prix | 0.5 hr | |
2004 Buick Rainier 2005 Cadillac STS (with option DD8) 2004 Chevrolet Colorado 2004 Chevrolet TrailBlazer, TrailBlazer EXT 2003-2005 Chevrolet Venture 2005 Chevrolet Equinox 2004 GMC Envoy, Envoy XL, Envoy XUV 2004 GMC Canyon 2004 Oldsmobile Bravada 2003-2004 Oldsmobile Silhouette 2003-2005 Pontiac Montana | 0.6 hr | |
2003-2004 Buick Rendezvous 2005 Cadillac CTS 2005 Chevrolet Corvette 2003-2004 Pontiac Aztek | 0.7 hr | |
2003-2004 Buick LeSabre 2003-2004 Chevrolet Express 2003-2004 GMC Savana 2003-2004 Pontiac Bonneville 2003-2004 Saturn L-Series | 0.8 hr | |
2002-2004 Cadillac DeVille 2005 Cadillac STS (with options DD8 & TQ5) 2005 Cadillac STS (with option DD7) 2002-2003 Chevrolet TrailBlazer, TrailBlazer EXT 2002-2004 Chevrolet Impala, Monte Carlo 2002-2003 GMC Envoy, Envoy XL, Envoy XUV 2002-2003 Oldsmobile Bravada 2002-2004 Saturn VUE | 0.9 hr | |
2004-2005 Buick Century 2000-2002 Buick LeSabre 2004 Buick Regal 2003-2004 Cadillac CTS 2005 Chevrolet Cobalt 2001-2003 Oldsmobile Aurora 2000-2002 Pontiac Bonneville | 1.0 hr | |
2002-2004 Cadillac Seville 2003-2004 Cadillac Escalade, Escalade ESV, Escalade EXT 2001 Chevrolet Impala, Monte Carlo 2003-2004 Chevrolet Avalanche, Silverado, Suburban, Tahoe 2003-2004 GMC Sierra, Yukon, Yukon XL | 1.1 hrs | |
2004 ION | 1.2 hrs | |
2003-2004 HUMMER H2 | 1.4 hrs | |
2003-2005 Chevrolet Cavalier 2003-2005 Pontiac Sunfire 2003 Saturn ION | 1.6 hrs | |
2004 Cadillac SRX (built after VIN breakpoint 40171353) 2005 Cadillac SRX 2004-2005 Chevrolet Malibu, Malibu Maxx 2005 Pontiac G6 | 1.7 hrs | |
2004 Cadillac SRX (prior to VIN breakpoint 40171353) | 2.1 hrs | |
*This labor operation number is for bulletin use only. This number will not be published in the Labor Time Guide. | ||
