Quarter Panel Sectioning Utility
Removal Procedure
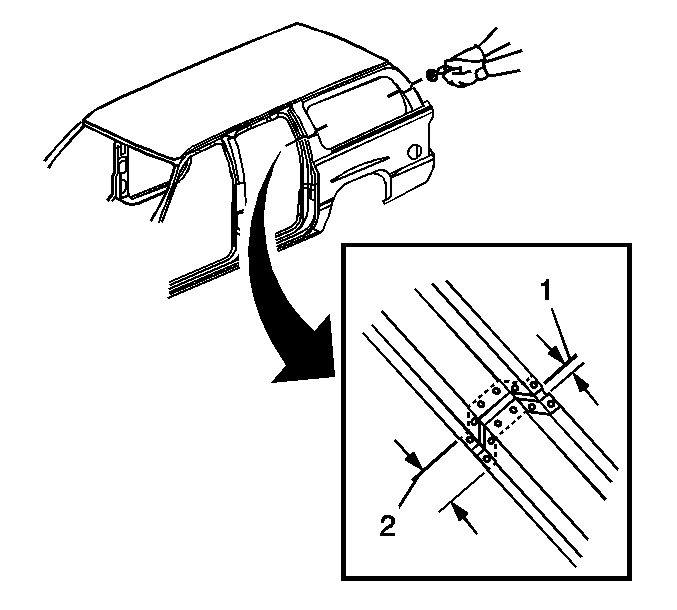
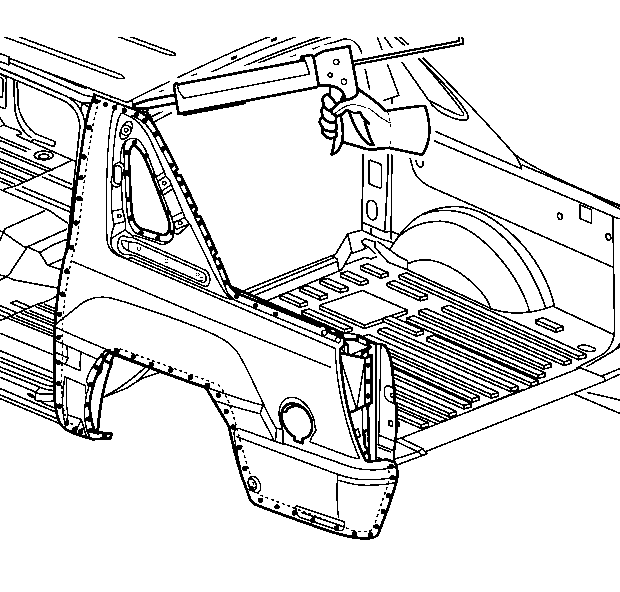
Important: The quarter panel can be serviced as a complete panel or sectioned. When complete
panel replacement is performed, the roof panel must be removed and replaced. For
sectioning, the quarter panel can be replaced by making sectioning cuts at the window
pillars and using a 5 mm (2 in) backing plate (2) with a gap
of 1 ½ times the metal thickness (1) at the sectioning joint.
- Remove all related panels and components.
- Restore as much of the damage as possible to factory specifications.
- Note the location and remove the following as necessary:
| • | Anti-corrosion materials |
Important: Do not damage the inner panels or reinforcements.
- Cut the quarter panel in the location where sectioning is to be performed
- Locate and drill out all factory welds. Note the number and location
of the welds for installation of the service part.
- Remove the damaged quarter panel section.
Installation Procedure
- Cut the replacement quarter panel in corresponding
locations to fit the remaining original panel. The sectioning joint should be trimmed
to allow a gap of 1 ½ times the metal thickness at the sectioning joint.
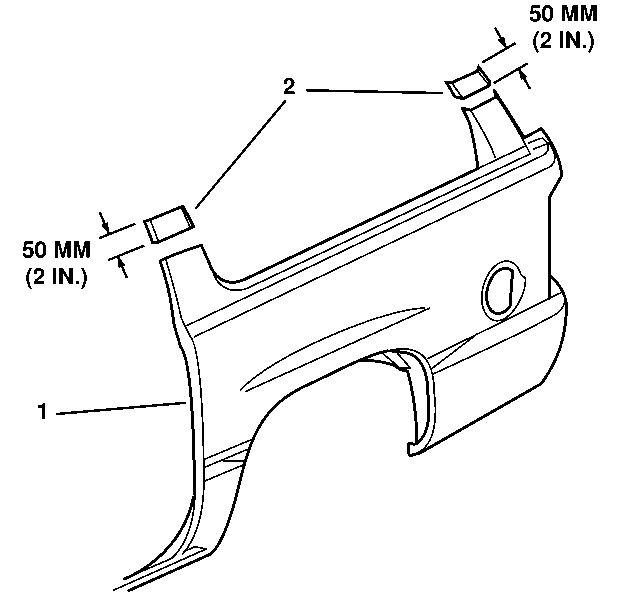
- Create a 50 mm (2 in) backing plate (2) from the
unused portion of the service part (1). Trim the backing plate as necessary
to fit behind the sectioning joint.
- Drill 8 mm (5/16 in) plug weld holes along the sectioning
cut on the remaining original panel. Locate these holes 13 mm (1/2 in)
from the edge and spaced 40 mm (1 in) apart.
Important: In any area damaged beyond recognition, space plug weld holes every 40 mm
(1 in) apart.
- Drill 8 mm (5/16 in) plug weld holes in the service panel as
necessary in the locations noted from the original panel and along the sectioning
cut.
Caution: Foam sound deadeners must be removed from areas within 152.4 mm
(6 in) of where flame is to be used for body repairs. When
reinstalling foam sound deadeners, avoid inhaling fumes as bodily injury
may result.
- Prepare all attachment surfaces as necessary.
- Apply 3M Weld-Thru Coating P/N 05916 or equivalent to all bare metal surfaces.
- Fit the backing plate halfway into the sectioning joint, clamp and plug
weld to the vehicle.
- Align the quarter panel to adjacent panels using 3-dimensional measuring
equipment. Leave a gap of 1½ times the metal thickness at the sectioning
joint.
- Plug weld accordingly.
- To create a solid joint with minimal heat distortion, make 25 mm
(1 in) stitch welds along the seam with 2 mm (1 in) gaps between
them, then go back and complete the stitch weld.
- Clean and prepare all welded surfaces.
Important: Prior to refinishing, refer to publication GM 4901M-D-2000 GM Approved
Refinish Materials for recommended products. Do not combine paint systems. Refer
to paint manufacturer's recommendations.
- Apply the following as necessary:
| • | An approved anticorrosion primer |
| • | Sound deadening materials |
- Install all related panels and components.
Quarter Panel Sectioning Avalanche
Removal Procedure
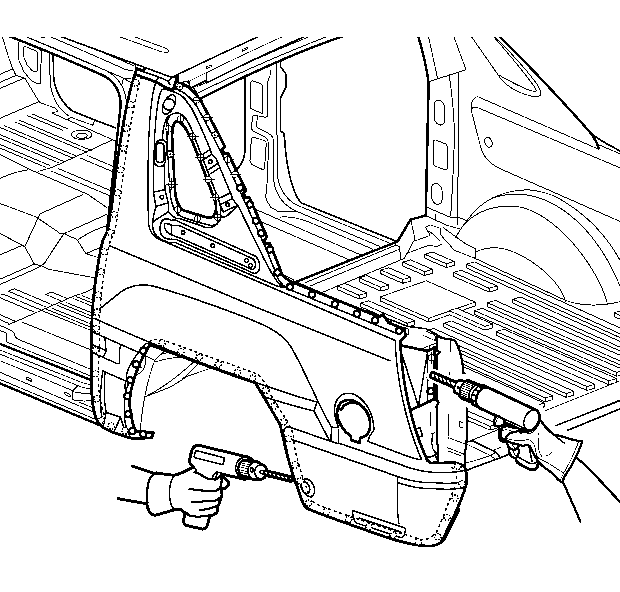
- Remove all related panels and components.
- Restore as much of the damage as possible to factory specifications.
Caution: Foam sound deadeners must be removed from areas within 152.4 mm
(6 in) of where flame is to be used for body repairs. When
reinstalling foam sound deadeners, avoid inhaling fumes as bodily injury
may result.
- Note the location and remove the following as necessary:
| • | The anti-corrosion materials |
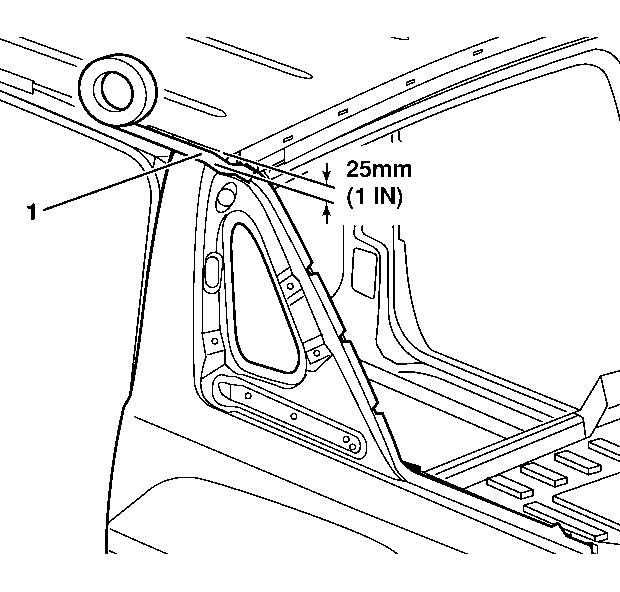
- Apply 25 mm (1 in) wide tape (1) along the upper edge
of the quarter panel at the roof line.
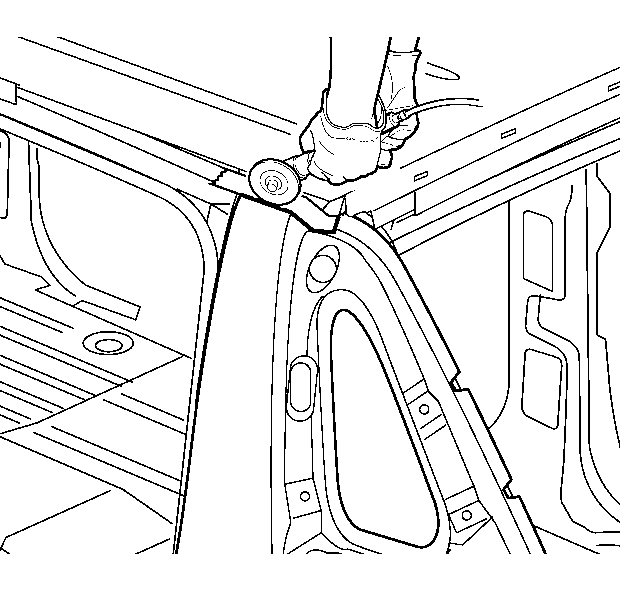
Important: Do not damage any inner panels or reinforcements.
- Cut the quarter panel at the bottom edge of the tape.
- Locate and drill out all factory welds.
Note the number and location of welds for installation of the service part.
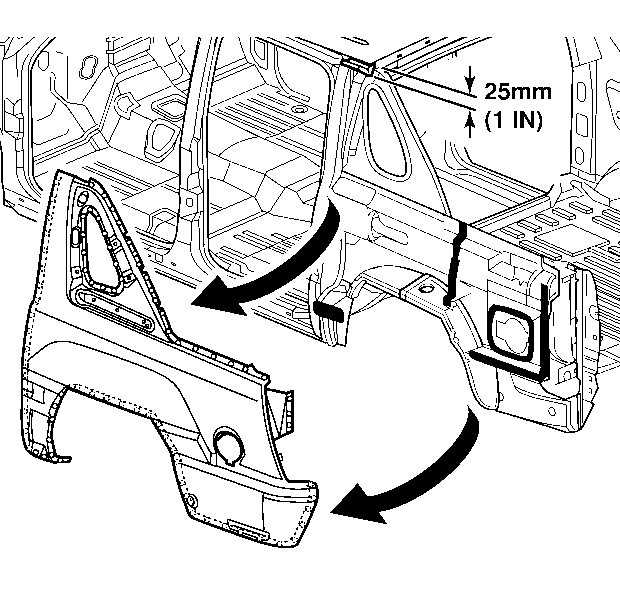
- Remove the damaged quarter panel, leaving
a 25 mm (1 in) flange attached to the roof.
Installation Procedure
- Trim and discard the upper mounting flange
on the service quarter panel so that it will fit over the 25 mm (1 in)
flange left from the original panel.
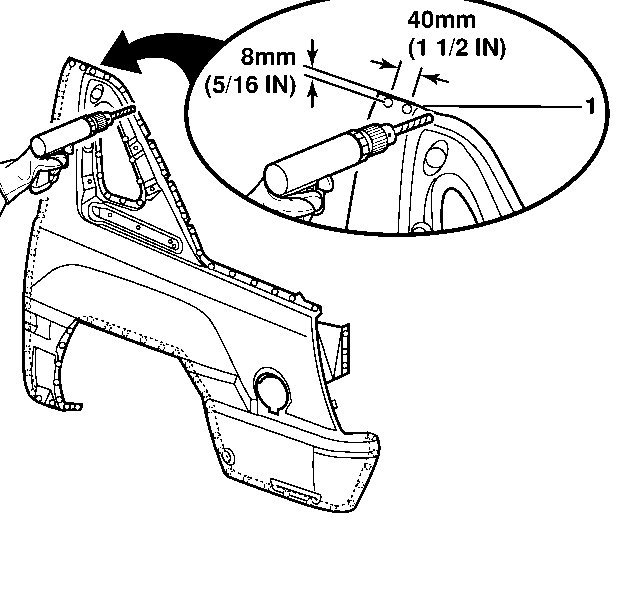
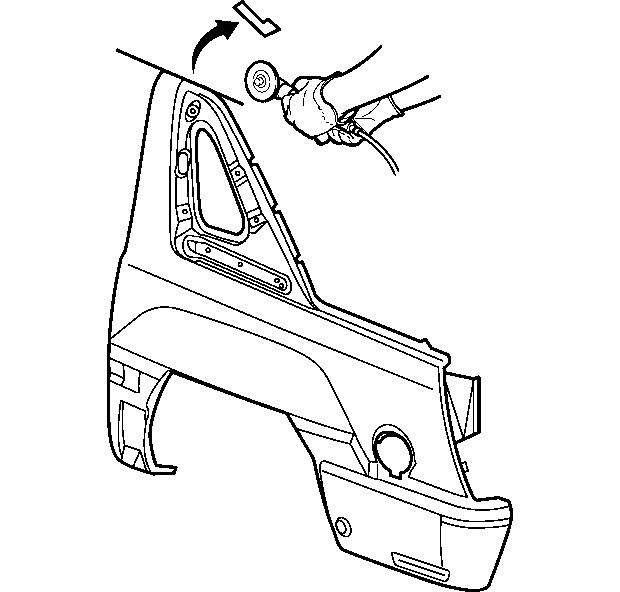
- Drill 8 mm (5/16 in) plug
weld holes along the sectioning cut on the service part. Locate these holes 13 mm
(1/2 in) from the edge and spaced 40 mm (1 1/2 in) apart.
Important: In any area damaged beyond recognition, space plug weld holes every 40 mm
(1 1/2 in) apart.
- Drill 8 mm (5/16 in) plug weld holes in the service part as necessary
in the locations noted from the original panel and along the sectioning cut.
- Prepare all attachment surfaces as necessary.
- Apply 3M Weld-Thru Coating P/N 05916 or equivalent to all bare metal surfaces.
Sealing the Quarter Panel Caution: The fuel filler opening must be properly sealed prior to positioning
the quarter panel. Failure to properly seal the quarter panel could result
in exhaust gas leakage into the interior of the vehicle causing personal
injury.
Caution: Properly seal the fuel filler opening before you position the quarter
panel. Failure to seal the opening could allow exhaust gas to leak into the
interior of the vehicle, causing personal injury.
- Install GM P/N 12399117 Sealing Strip between outer wheelhouse
and quarter panel gas door pocket.
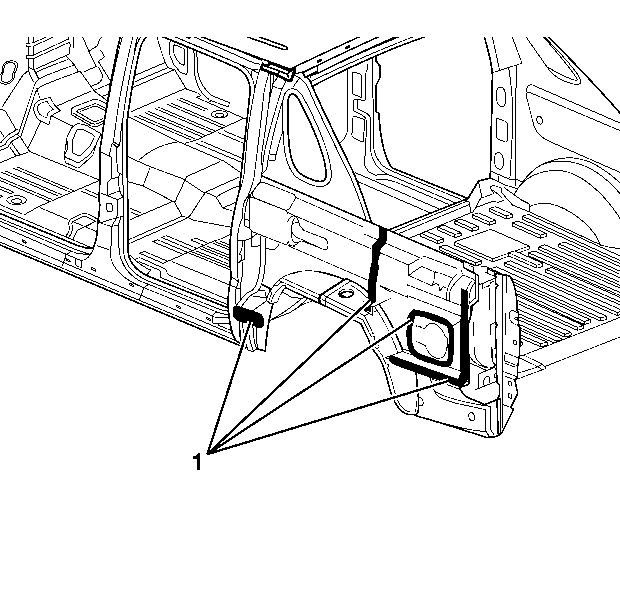
- Apply internal sealers (1) in the locations noted from the removal
procedure.
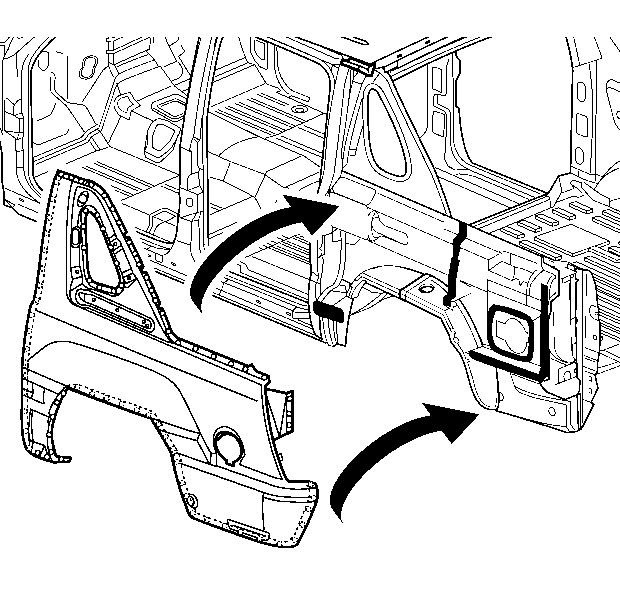
- Position the quarter panel to the vehicle.
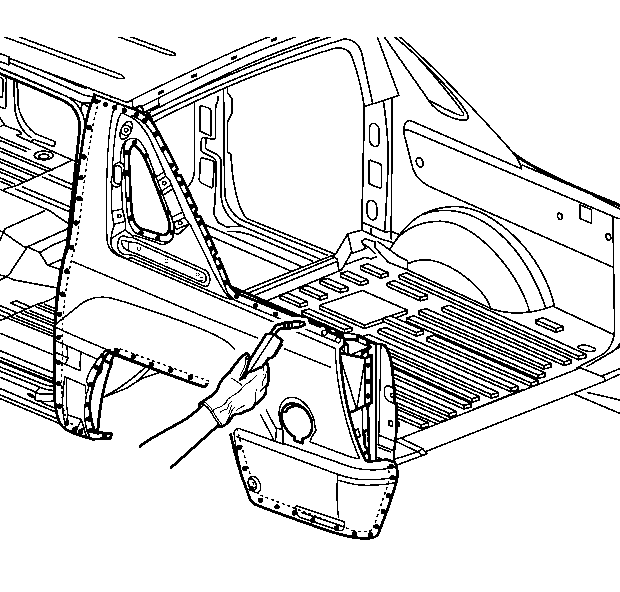
- Plug weld accordingly.
- To create a solid weld with minimum heat distortion, make 25 mm
(1 in) stitch welds along the seam with 25 mm (1 in) gaps
between them. Then go back and complete the stitch weld.
- Clean and prepare all welded surfaces.
Important: Prior to refinishing, refer to publication GM 4901MD GM Approved
Refinish Materials for recommended products. Do not combine paint systems. Refer
to paint manufacturer's recommendations.
- Apply the following as necessary:
| • | The approved anti-corrosion primer |
- Refinish as necessary.
- Install all related panels and components.
