Fuel Tank Replacement 1500 LWB - 117.3L (31 gal) Tank + E85
Special Tools
J 45722 Fuel Sender Lock Ring Wrench
Removal Procedure
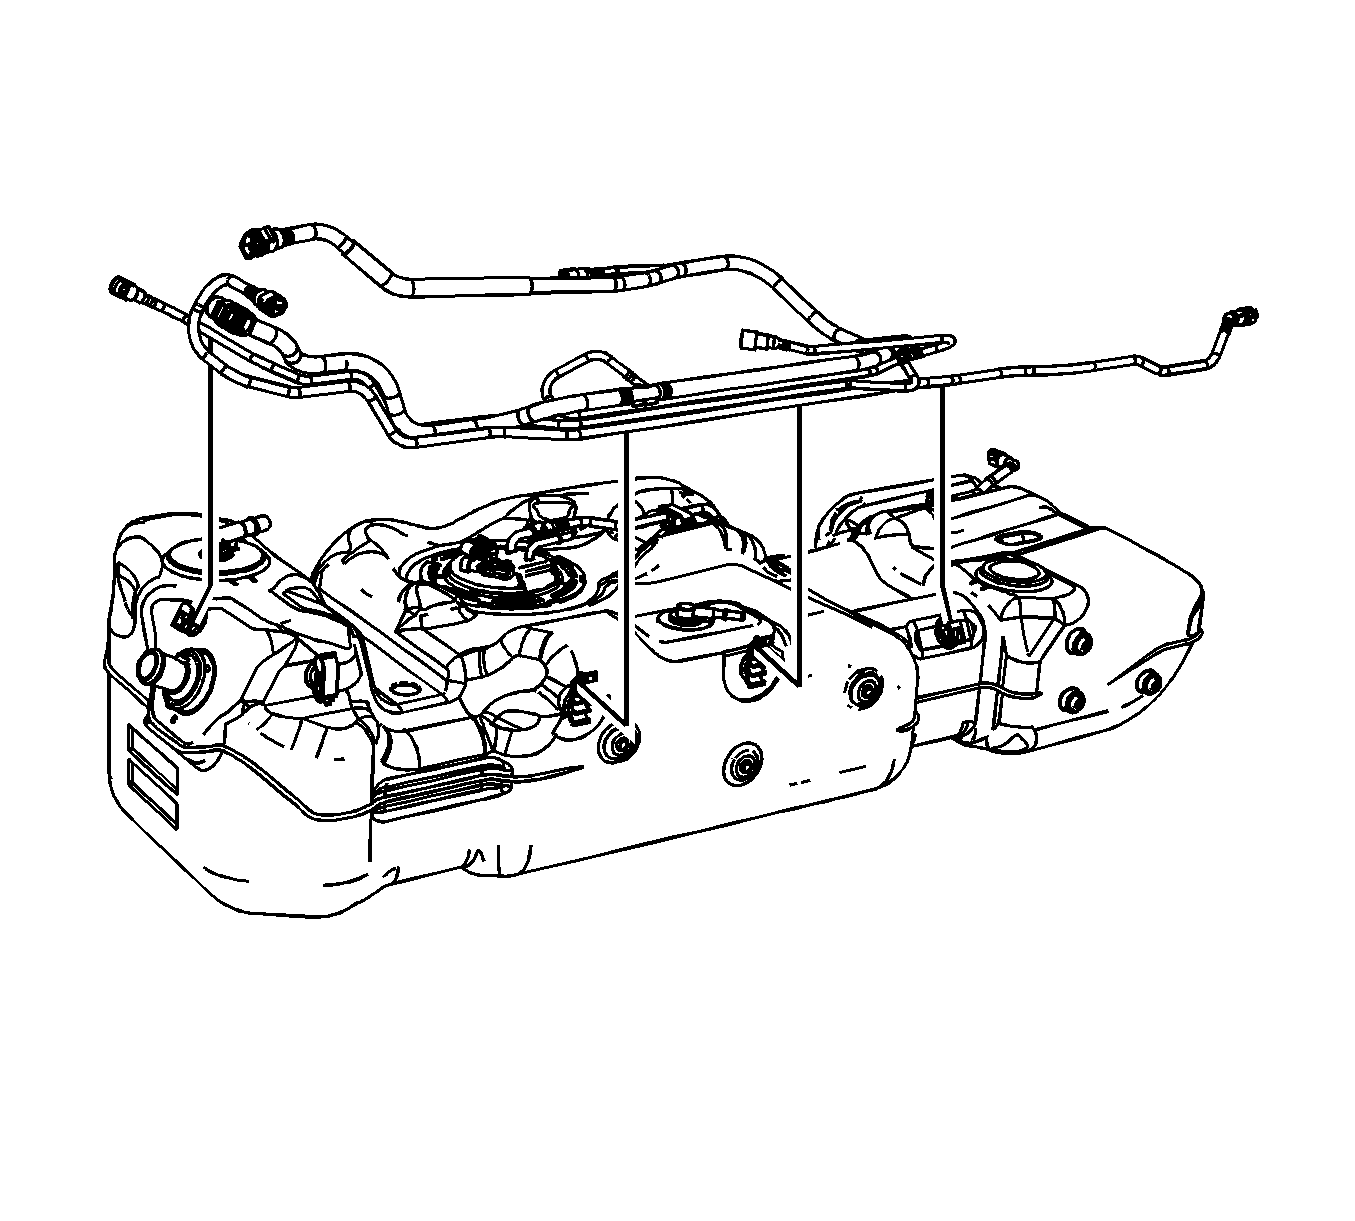
Note: Clean the fuel and evaporative emission (EVAP) connections and surrounding areas prior to disconnecting the lines in order to avoid possible system contamination.
- Relieve the fuel system pressure. Refer to Fuel Pressure Relief.
- Drain the fuel tank. Refer to Fuel Tank Draining.
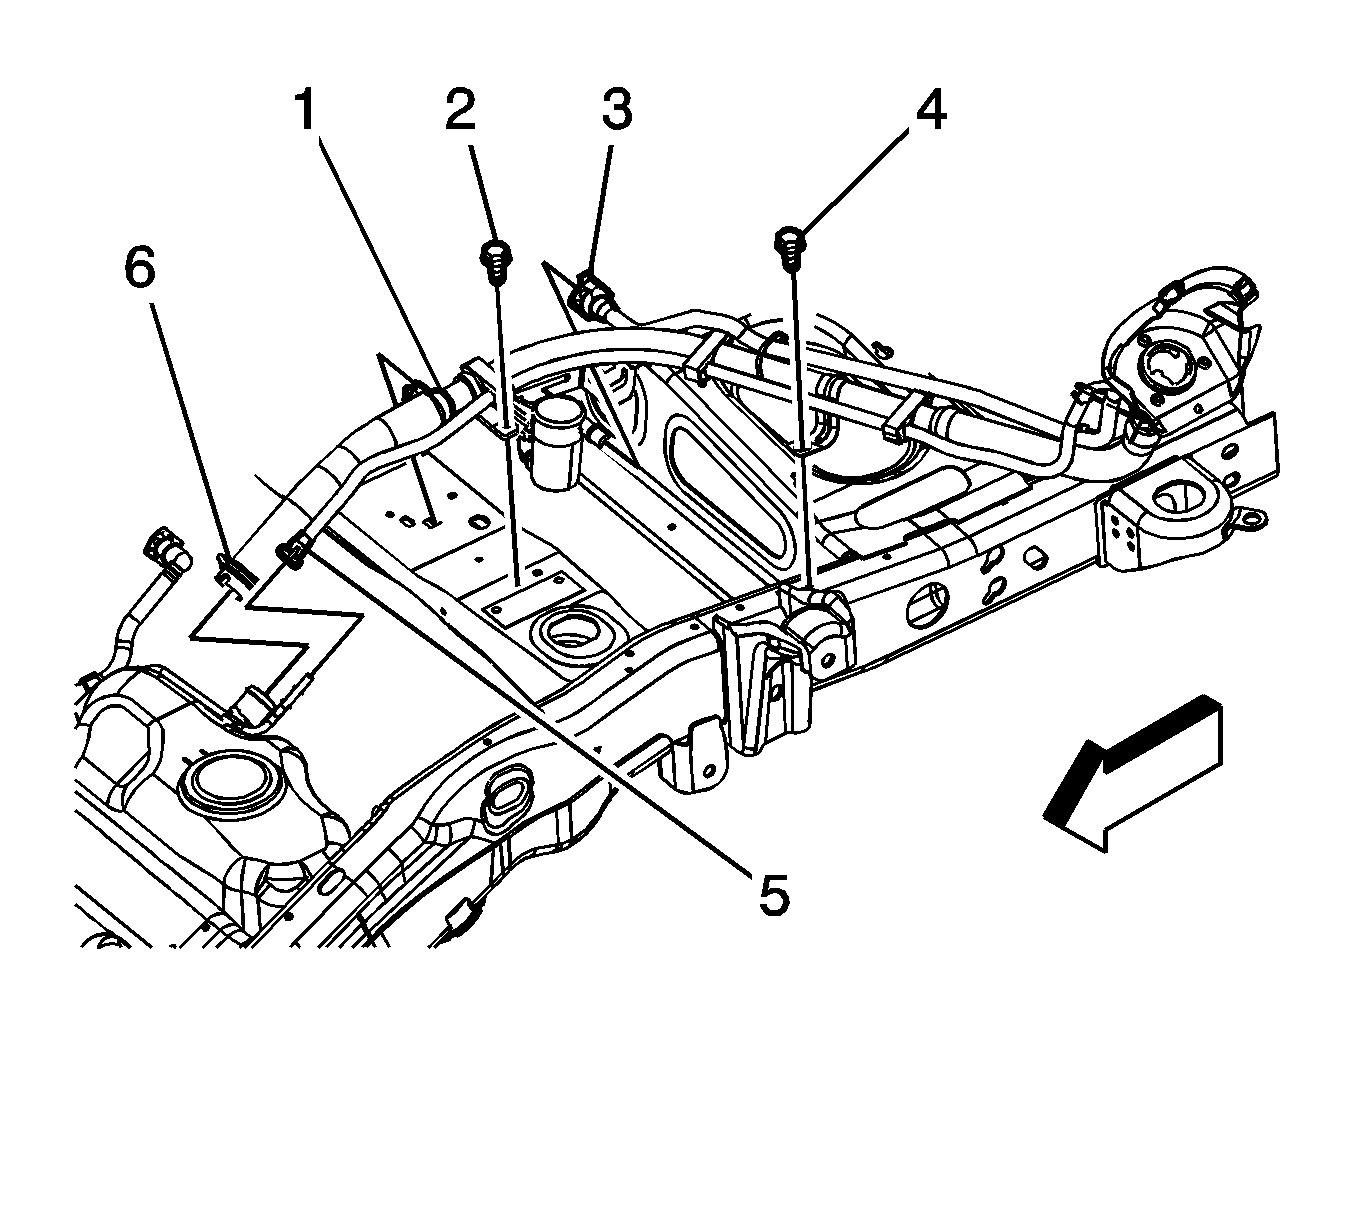
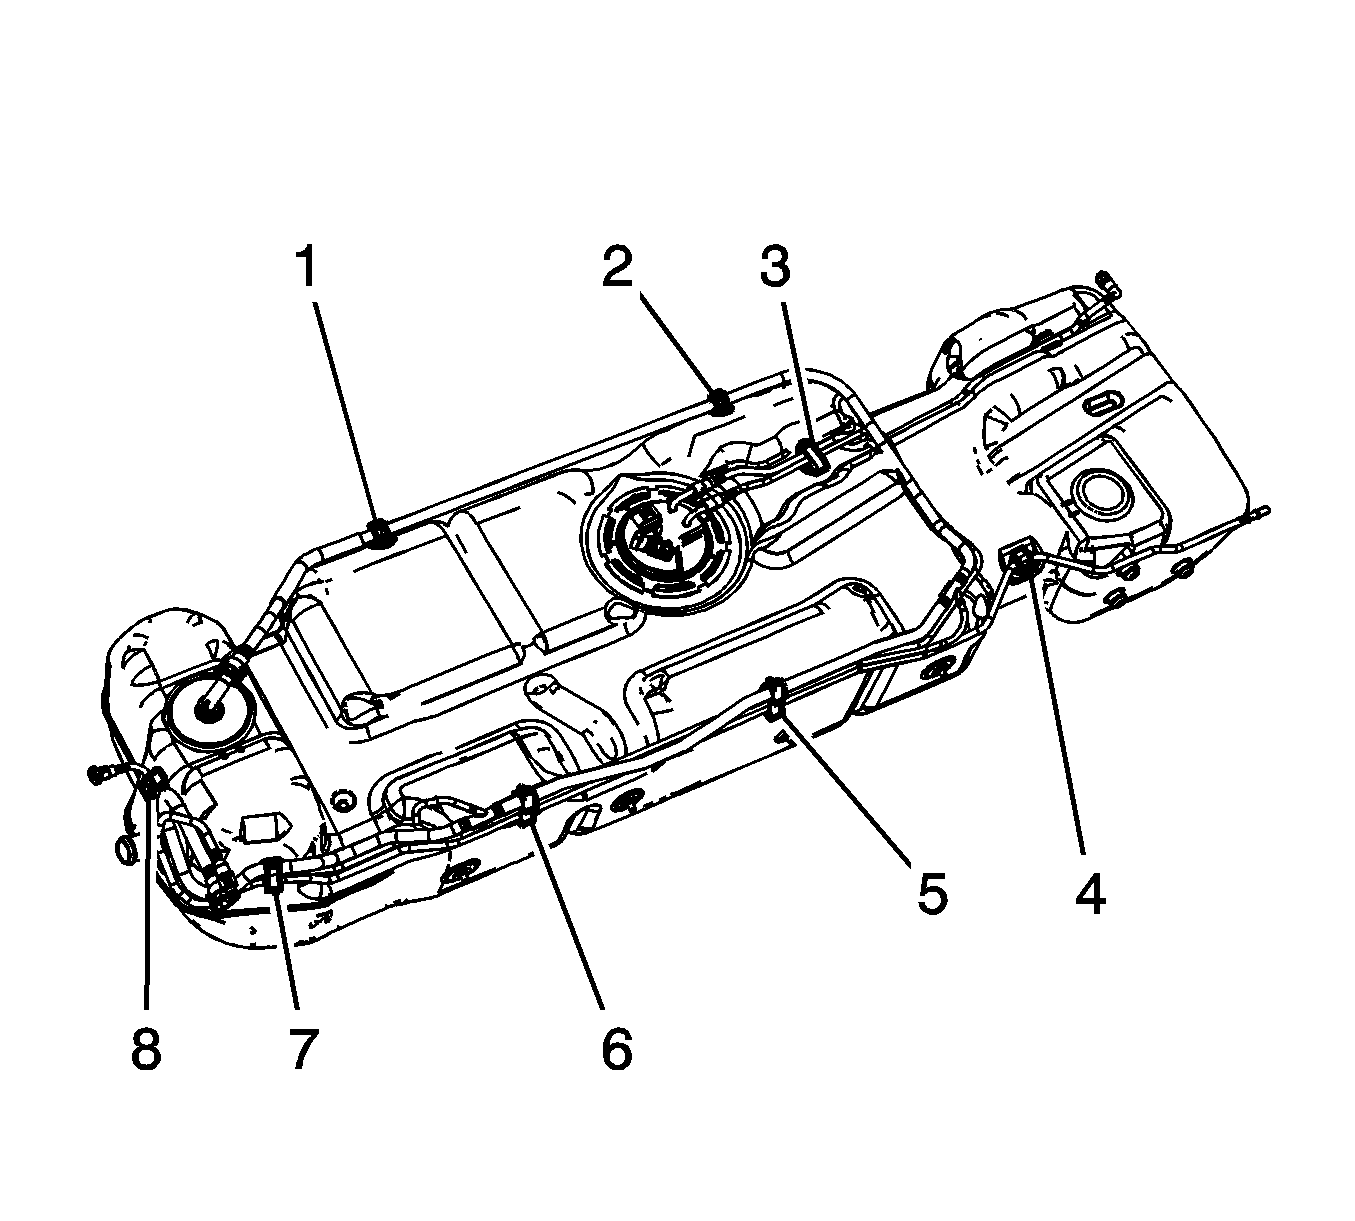
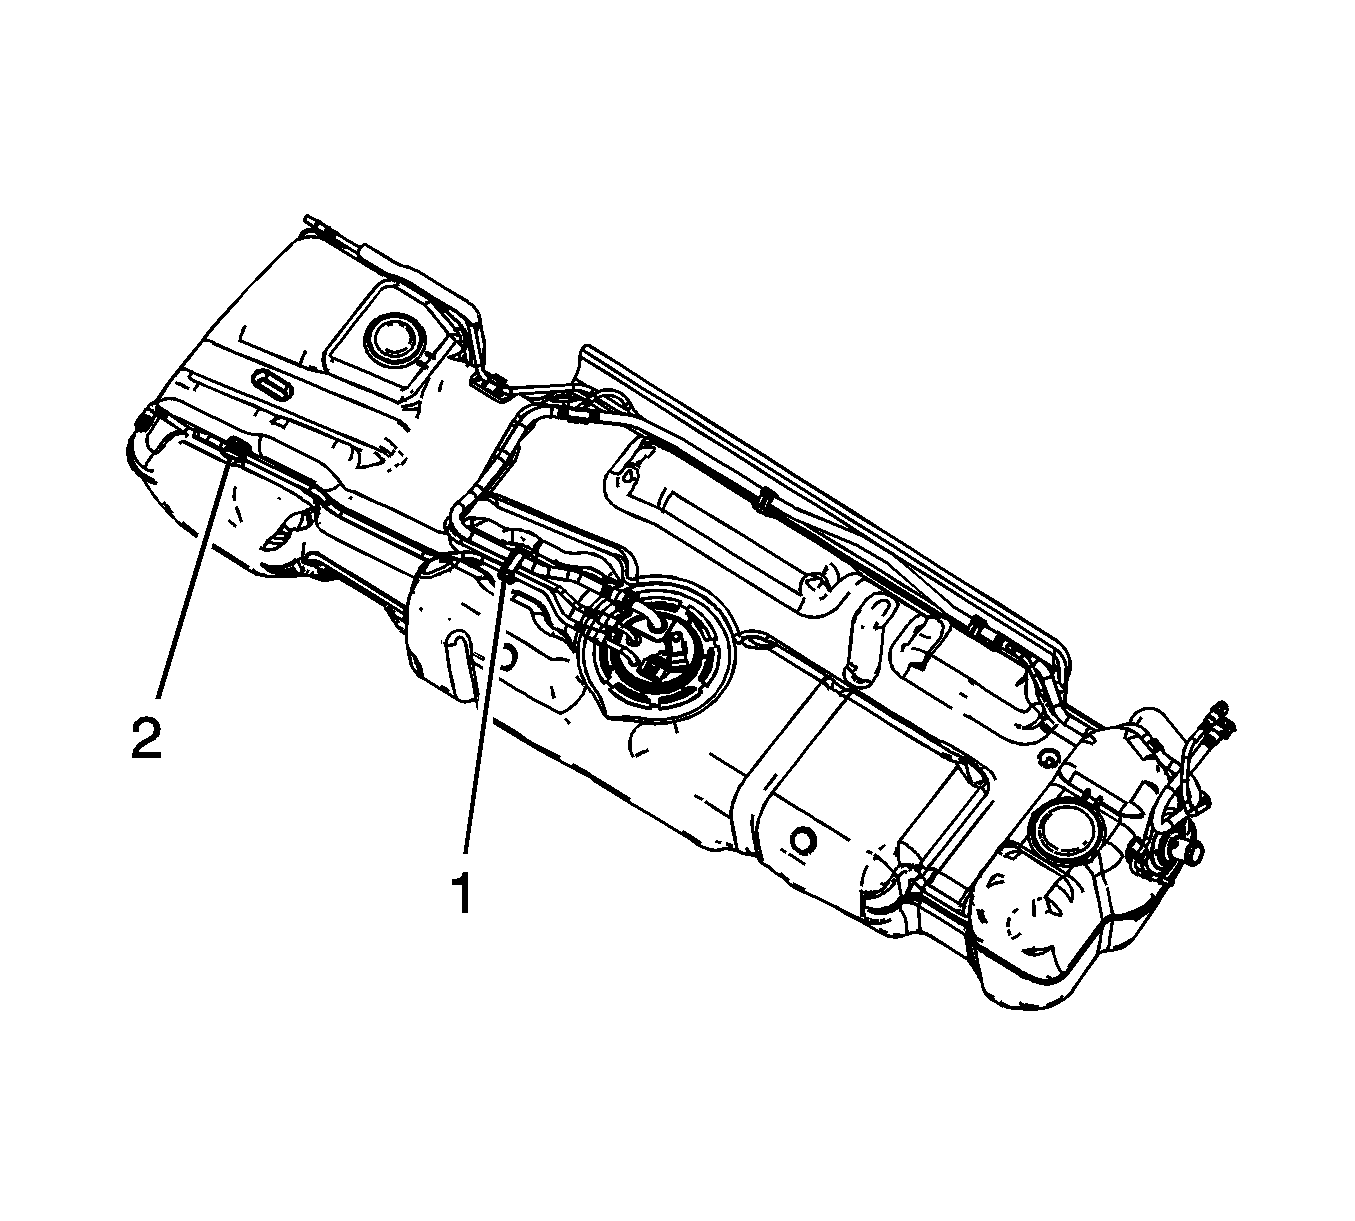
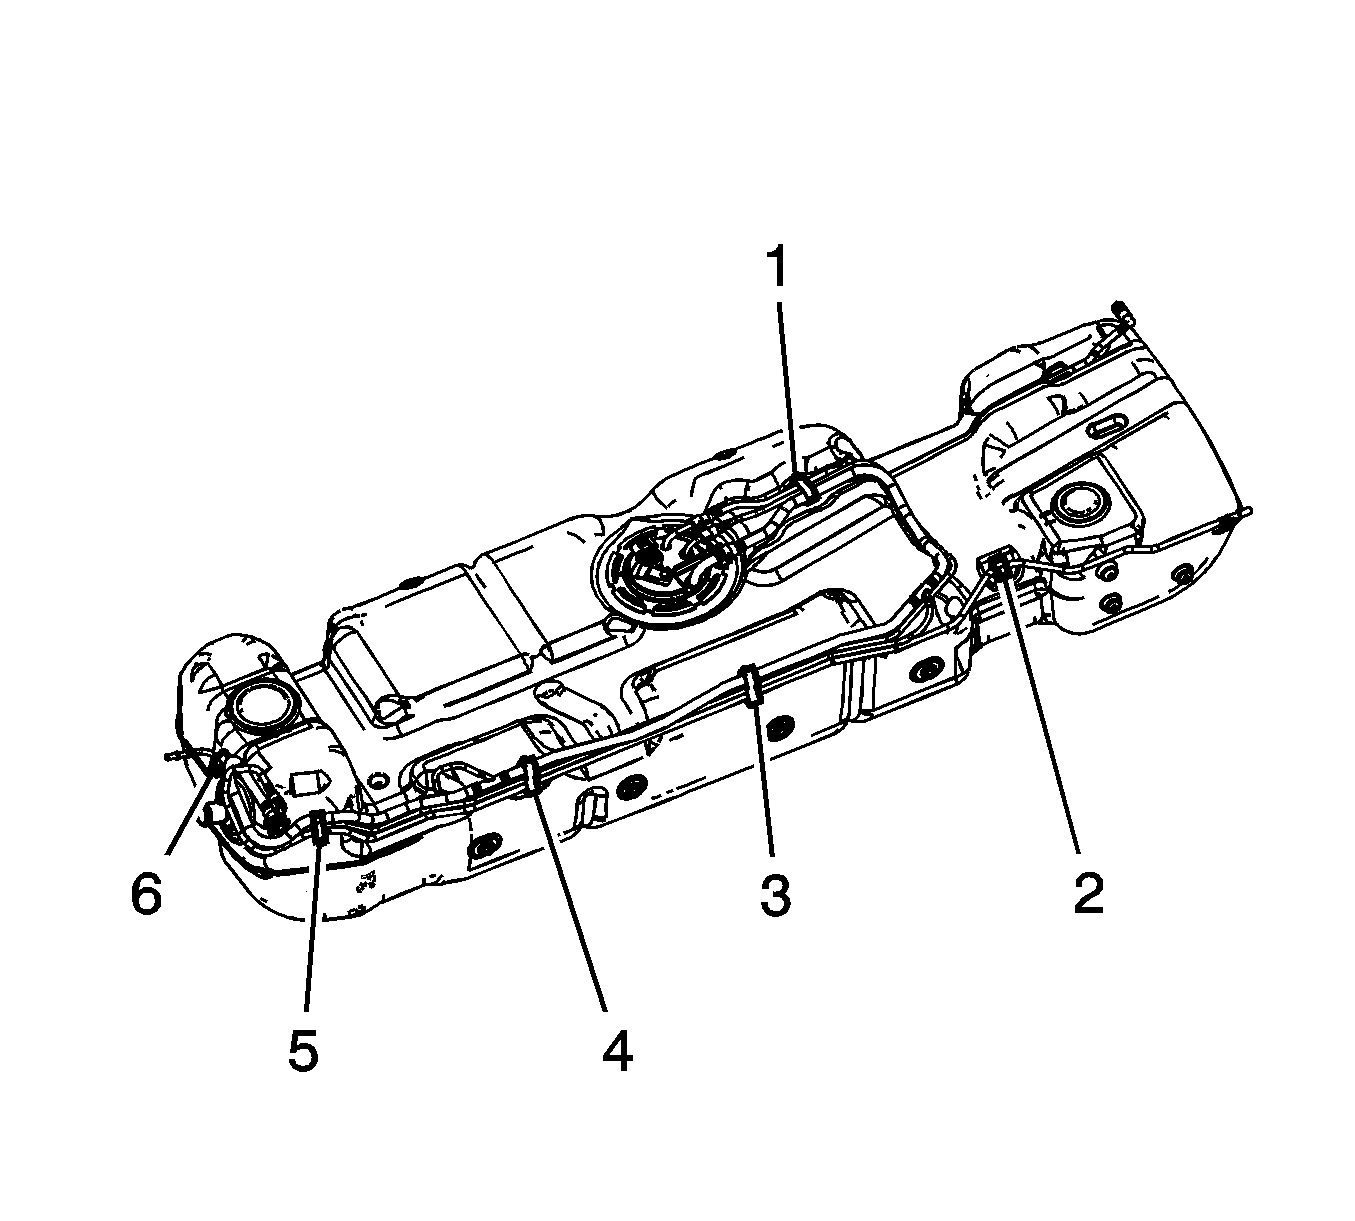
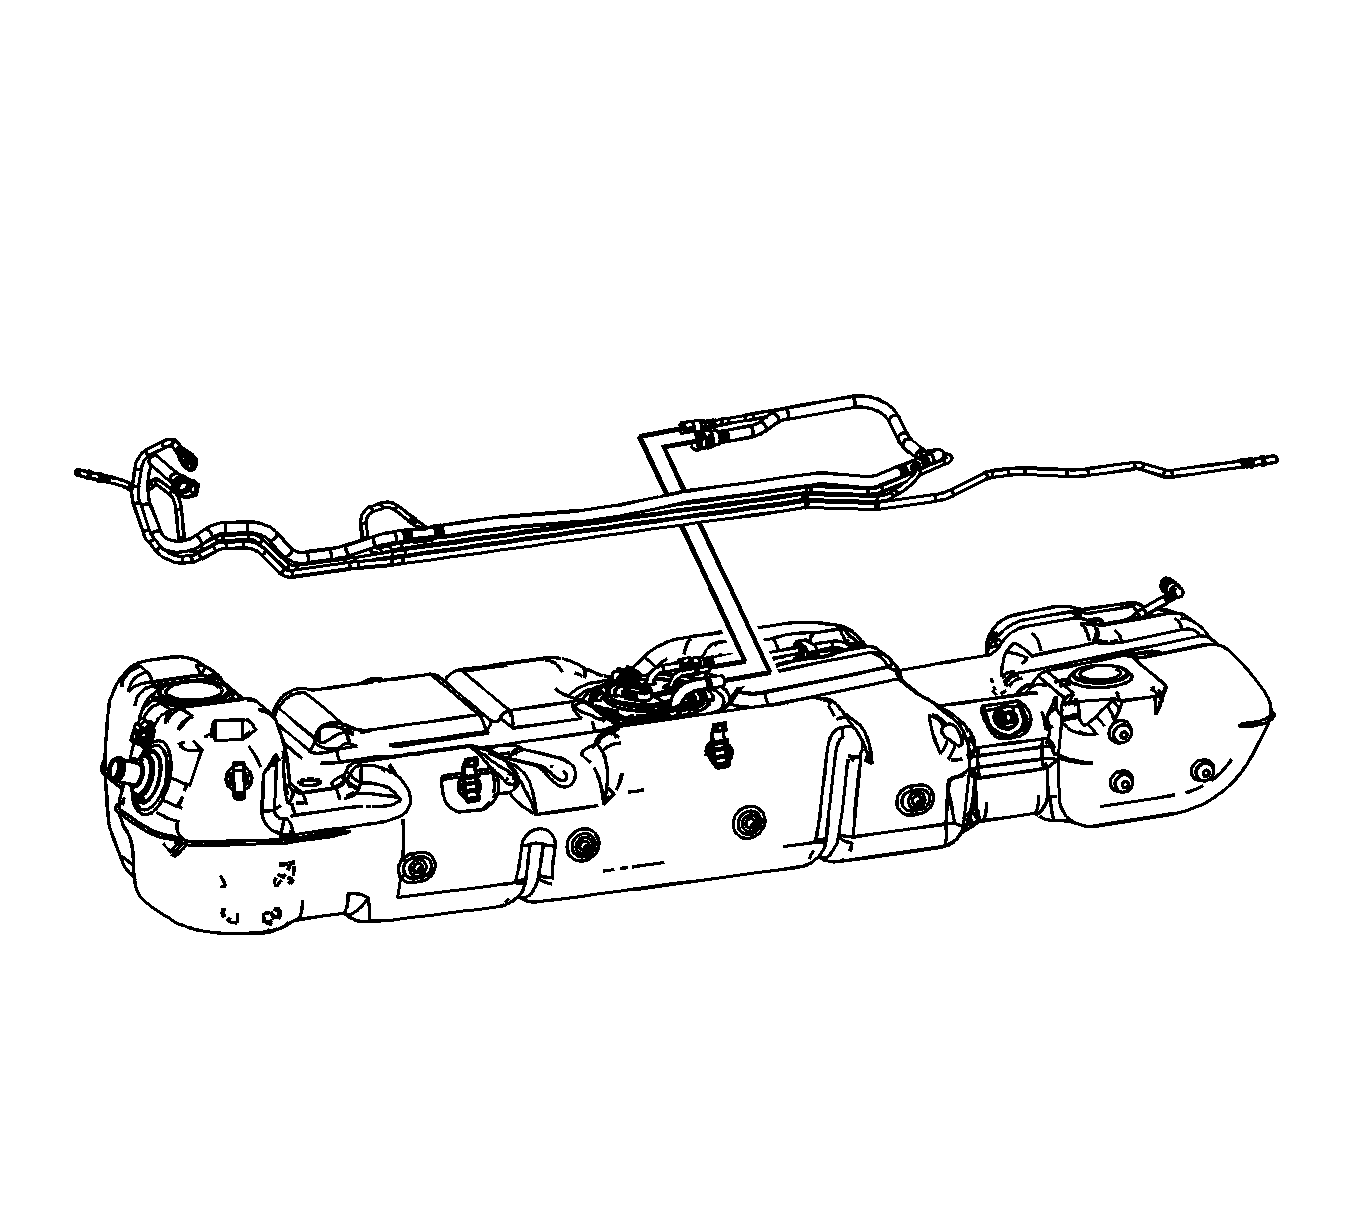
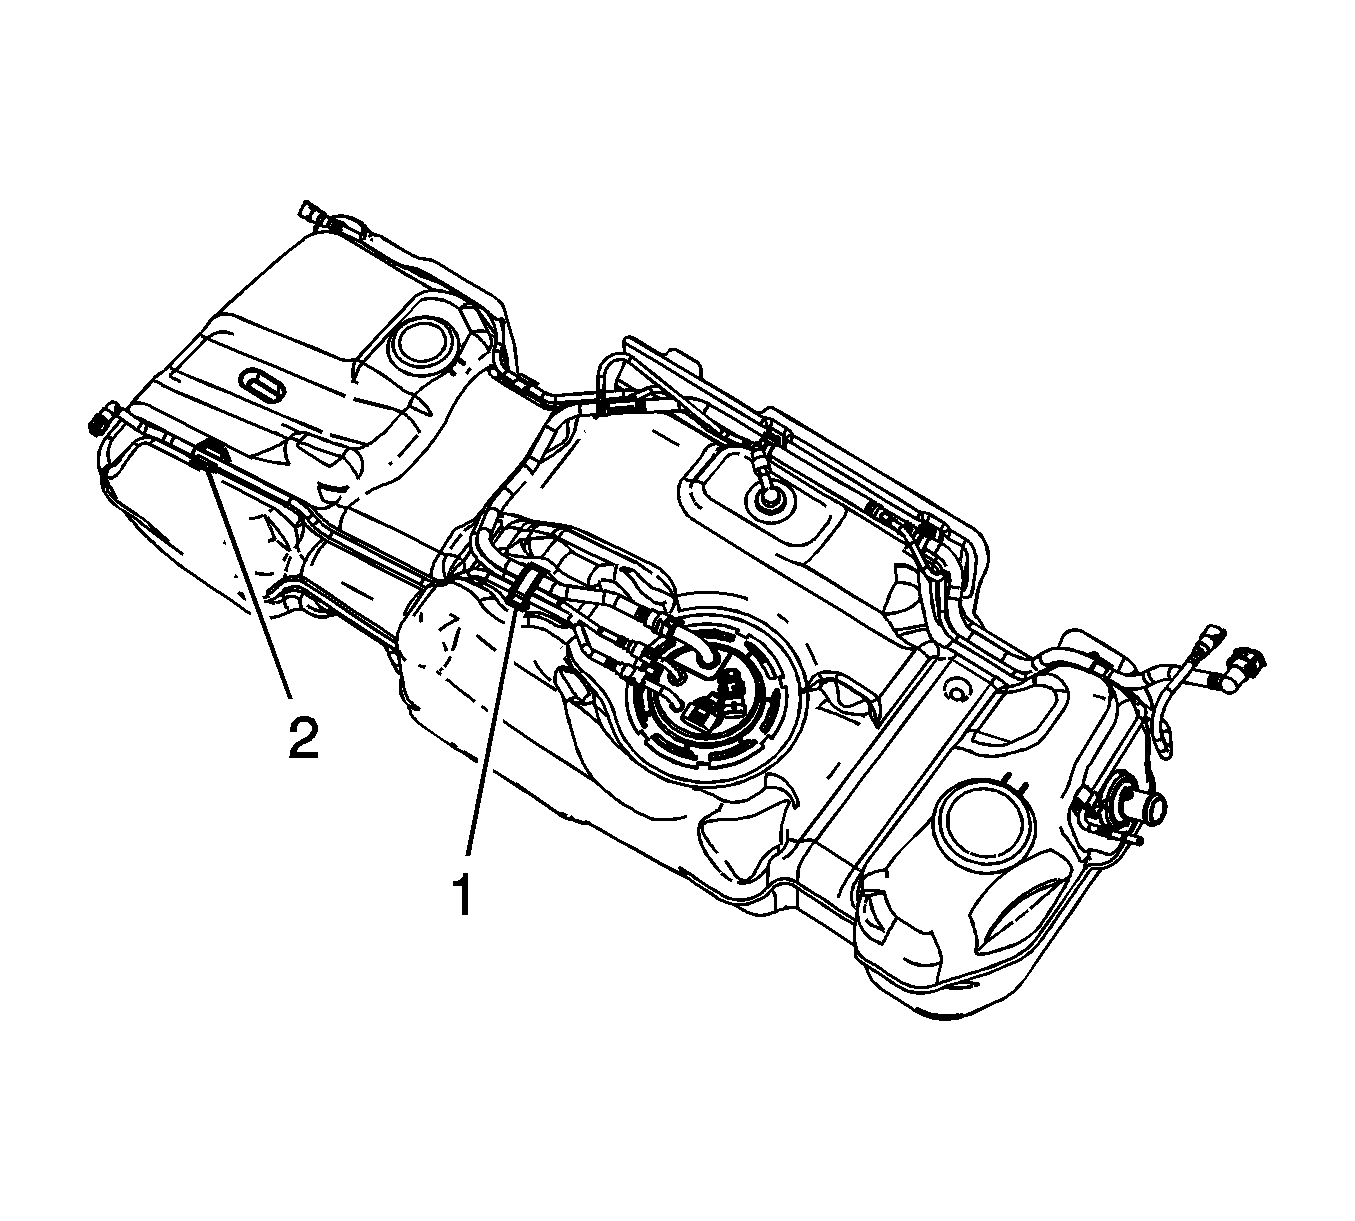
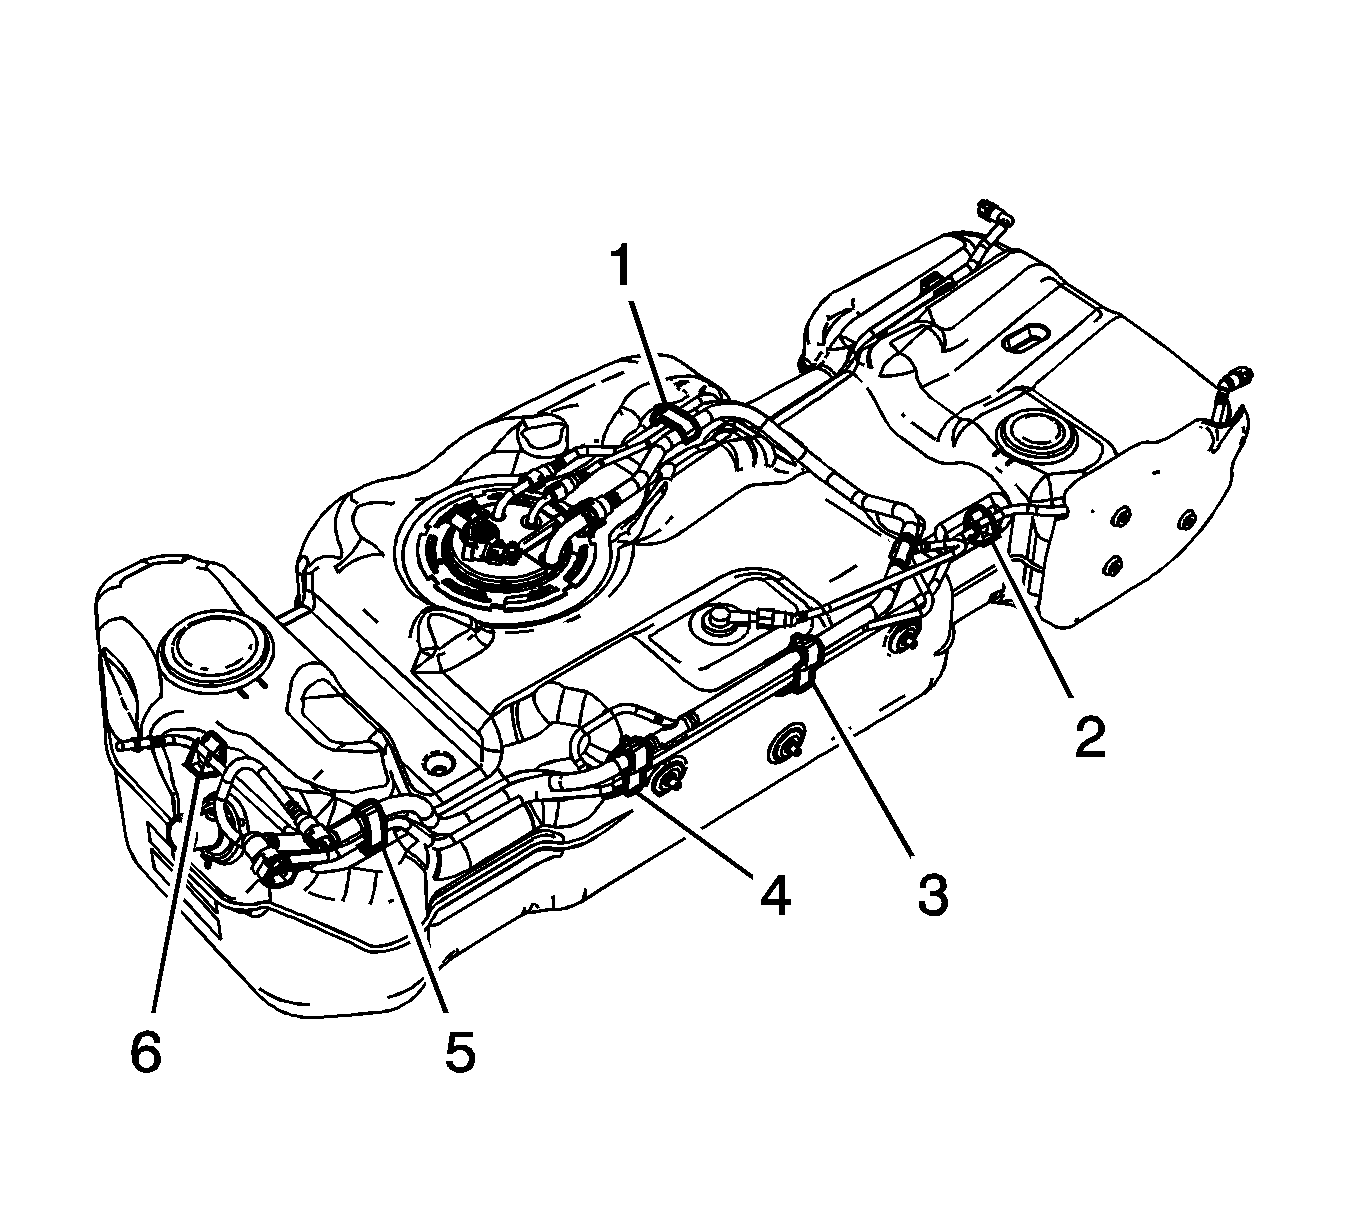
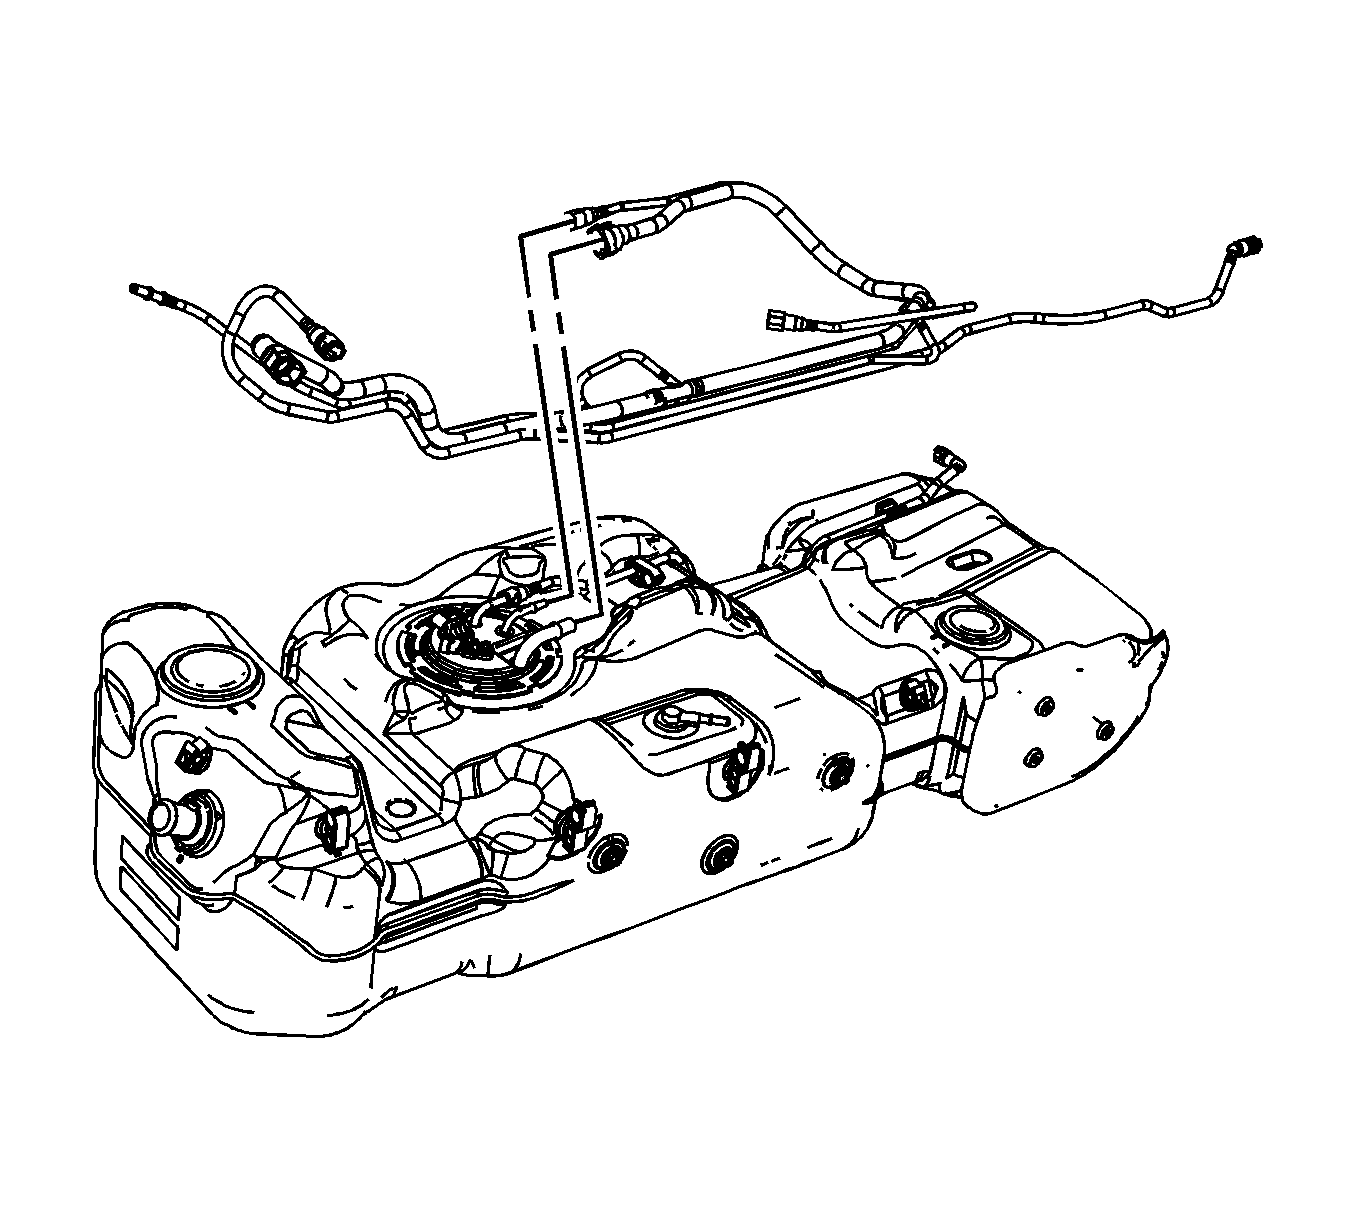
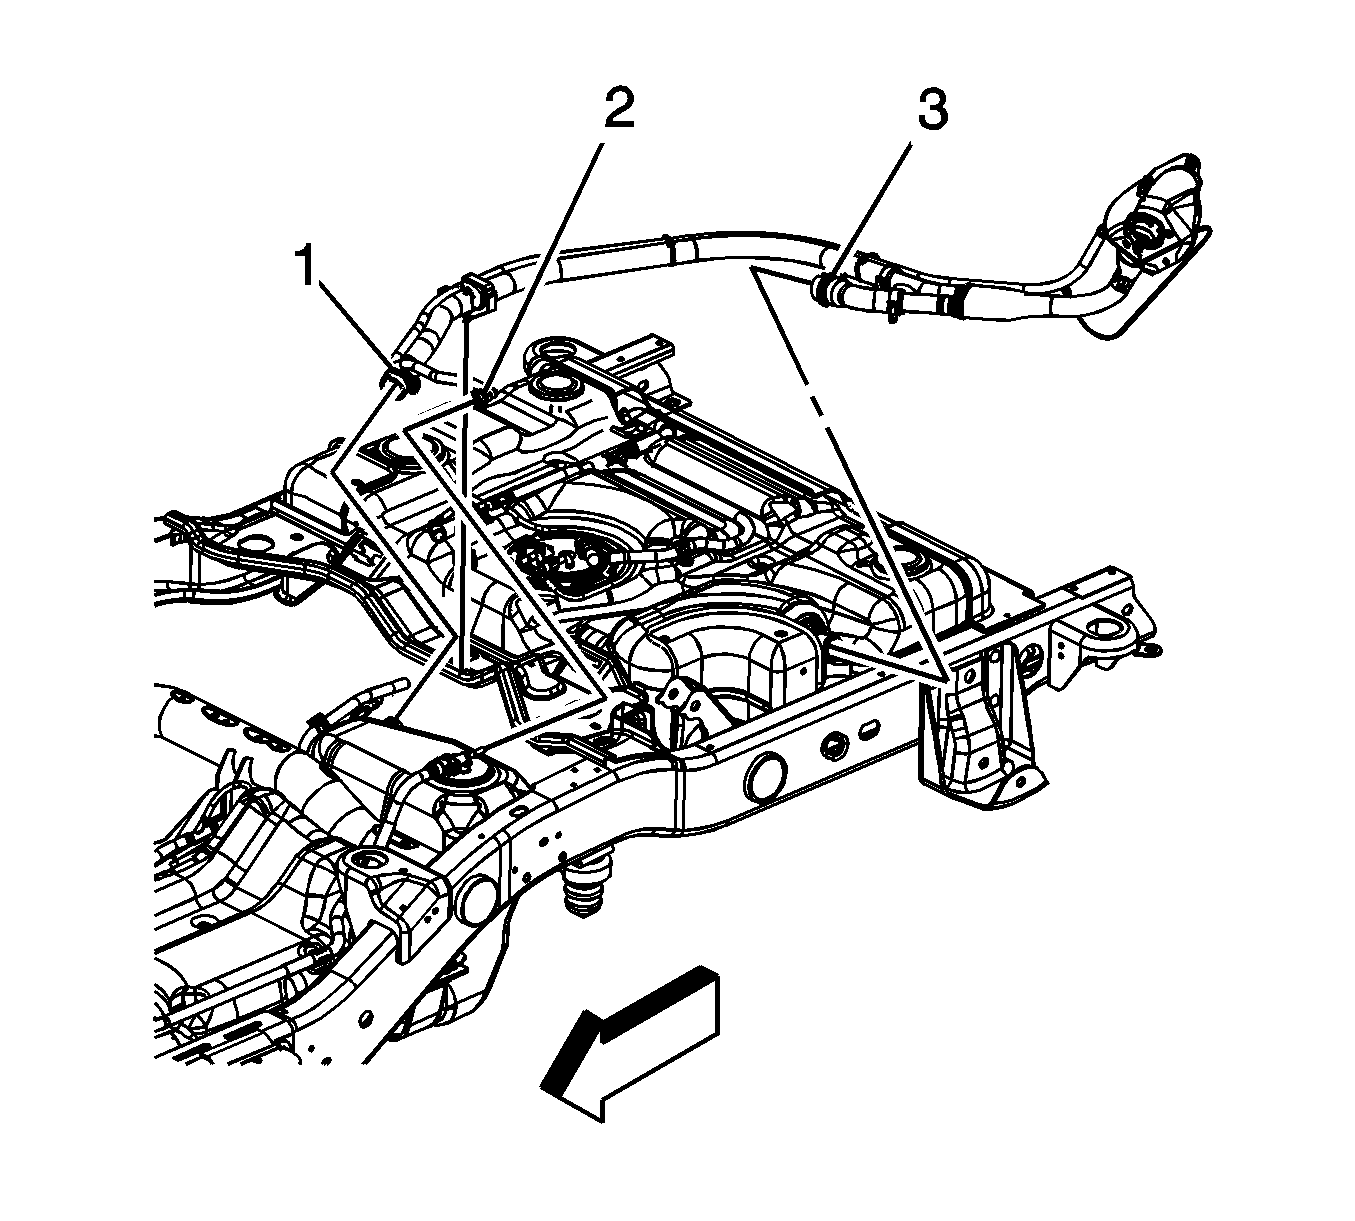
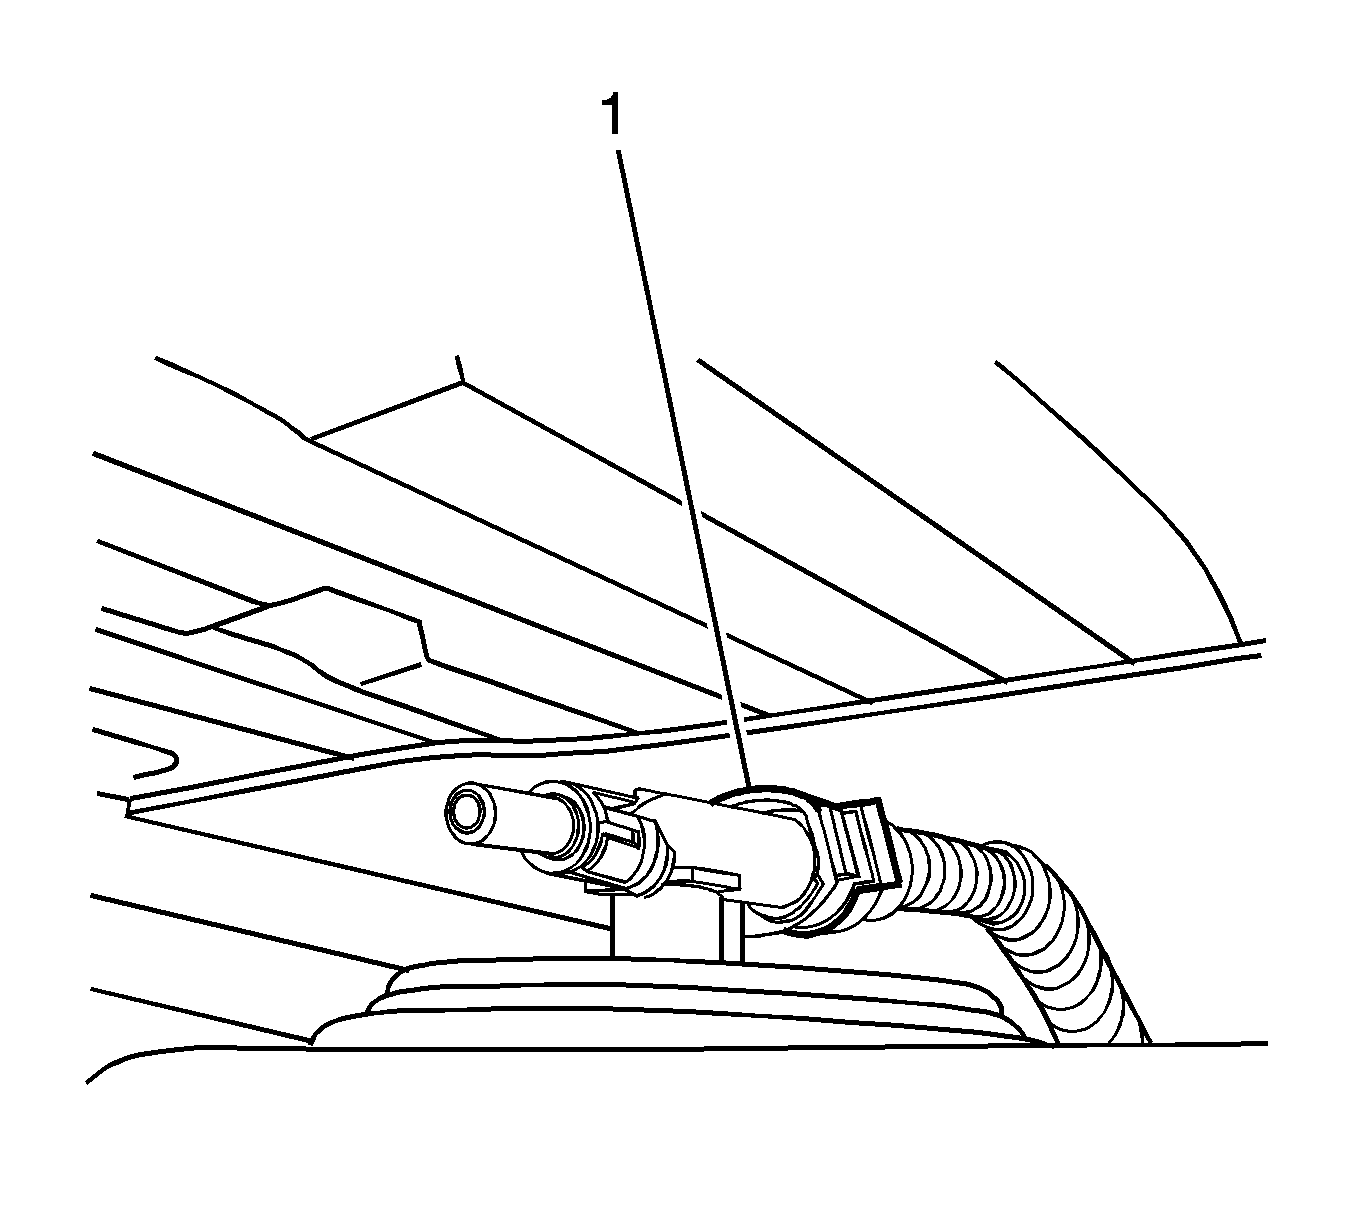
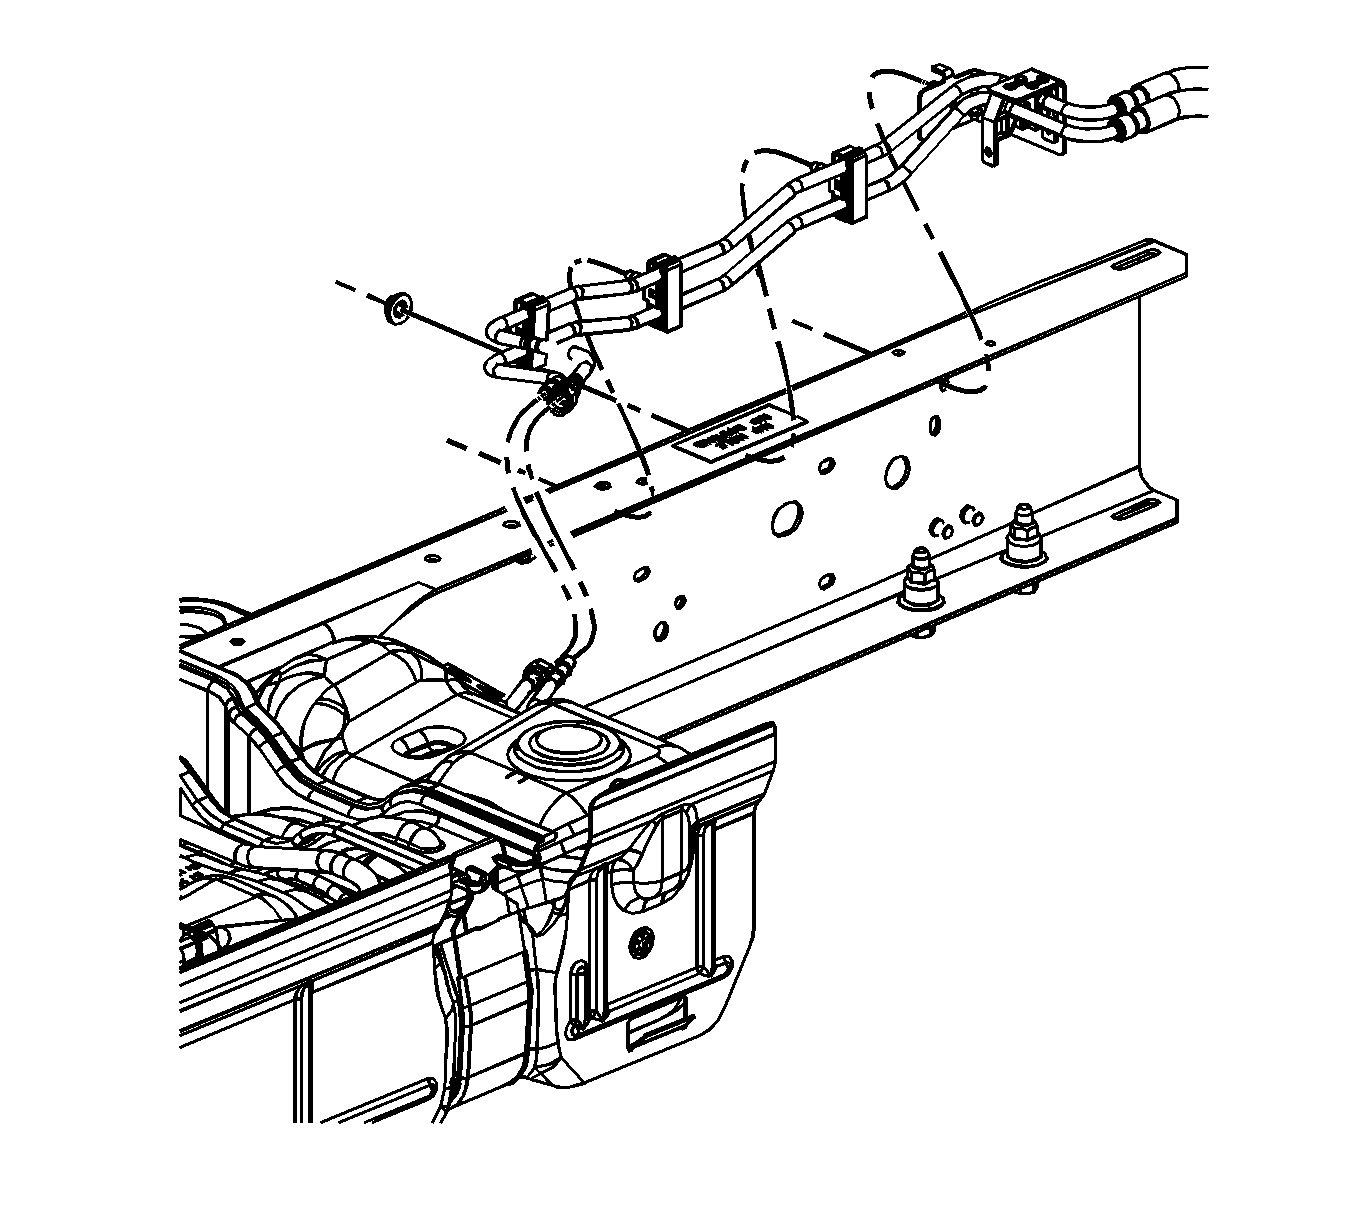
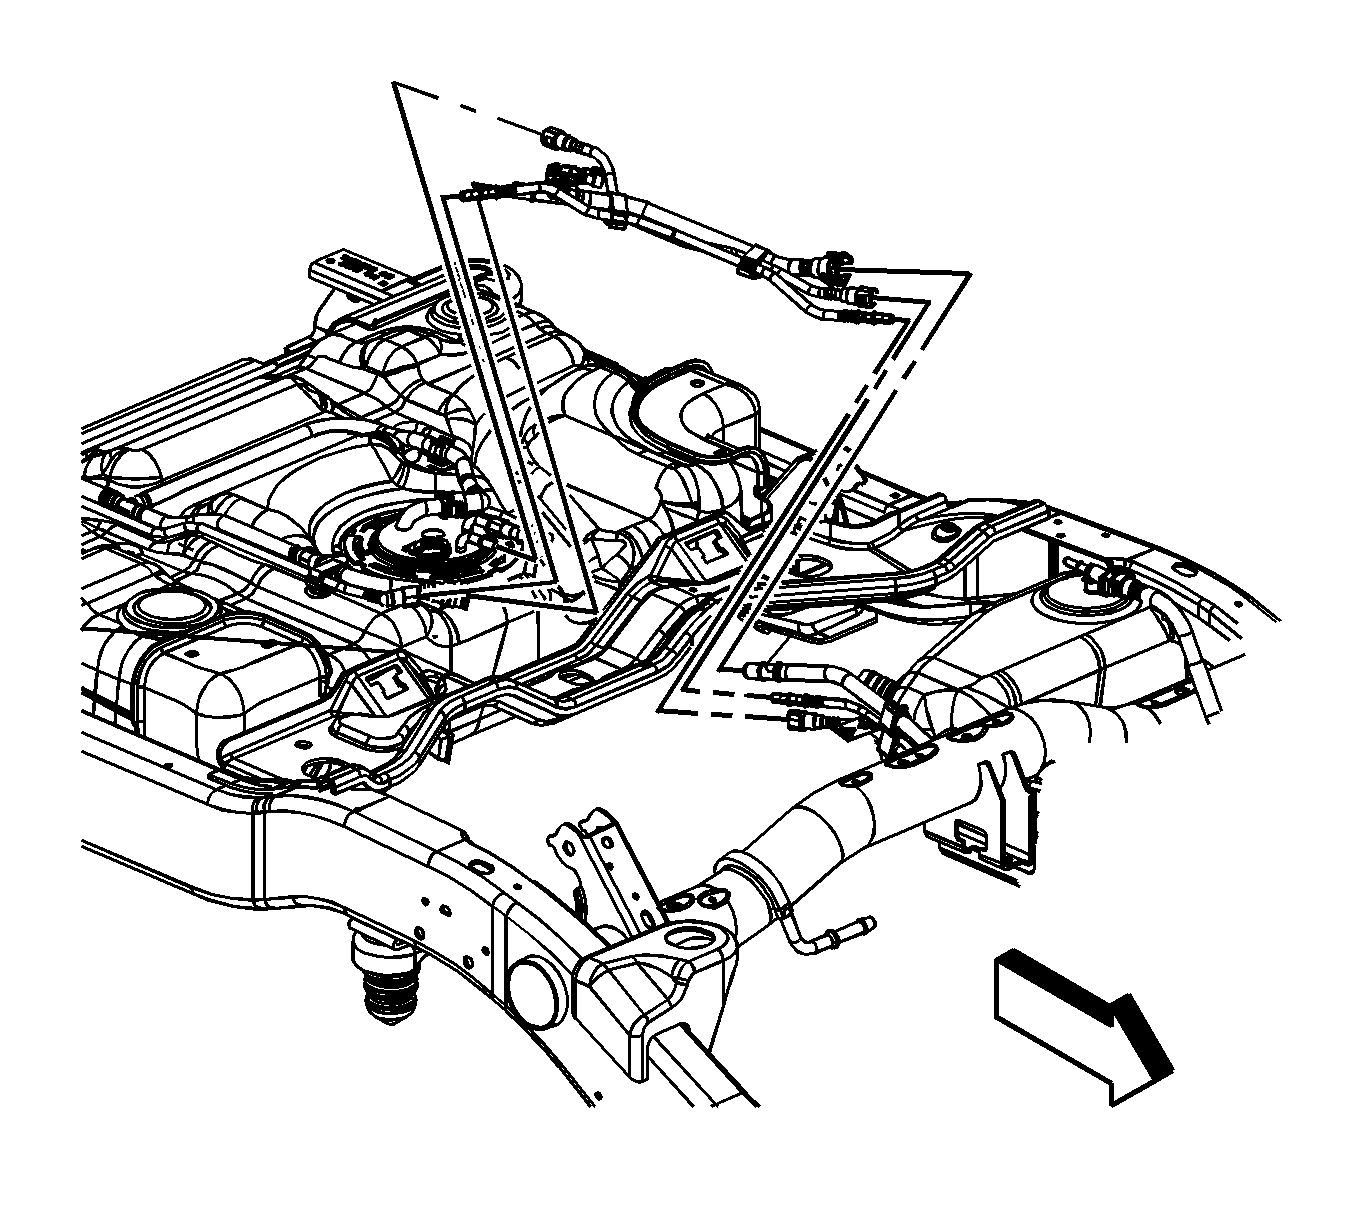
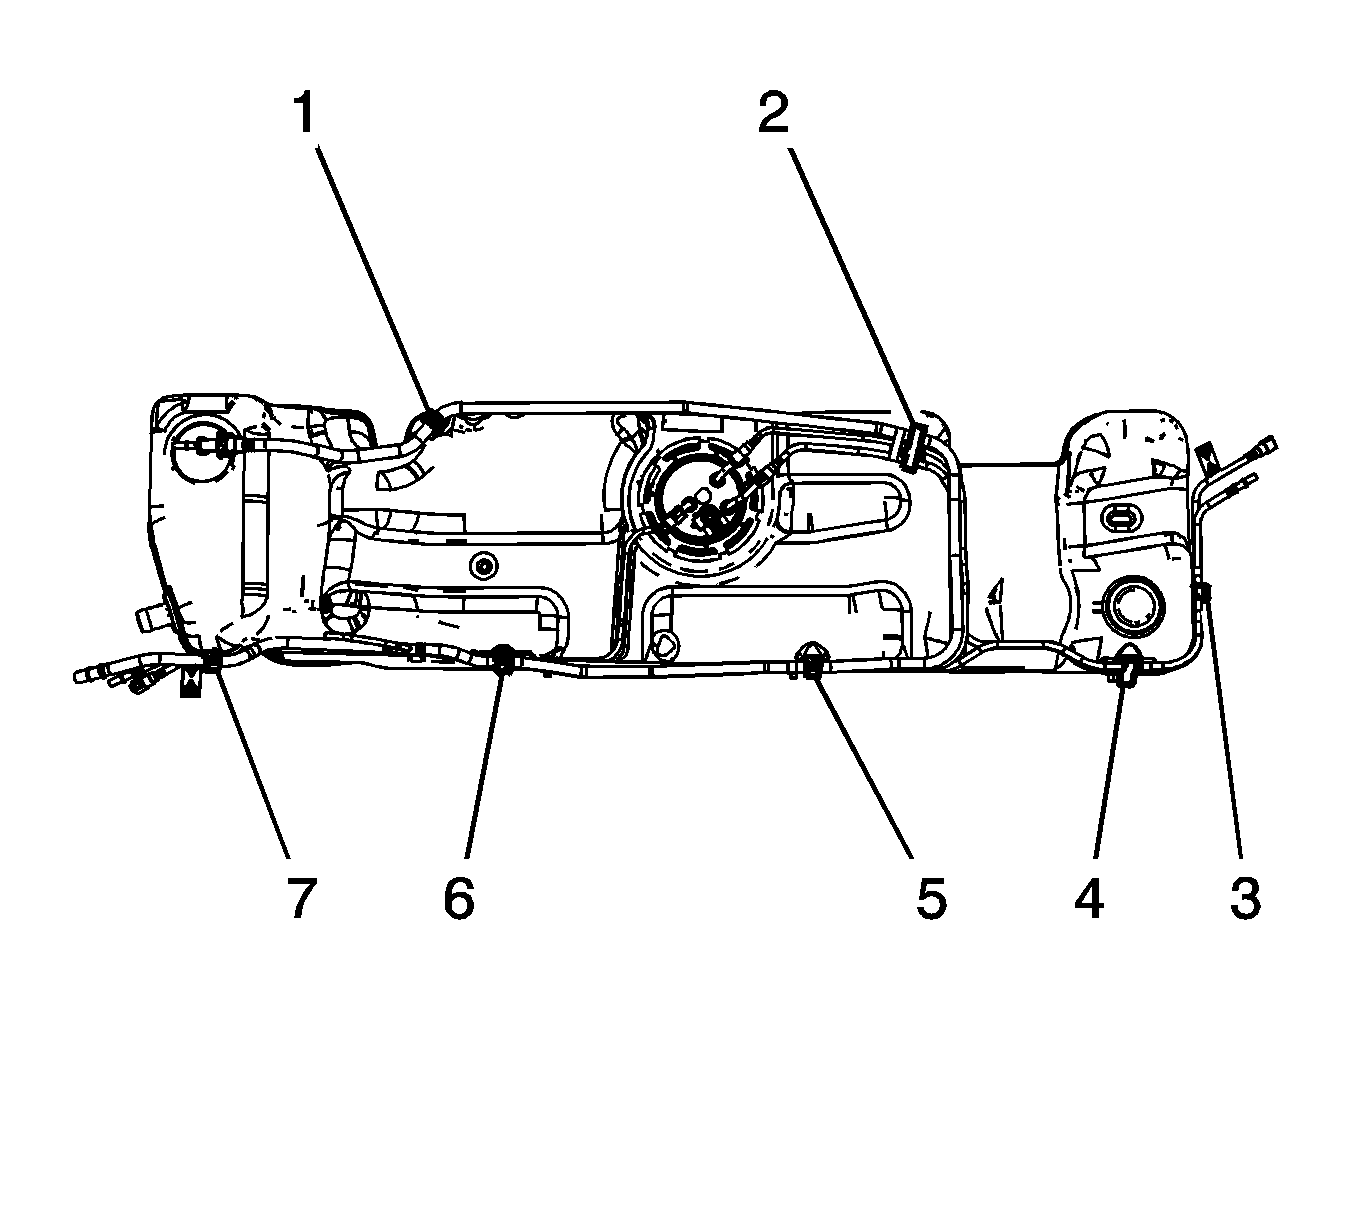
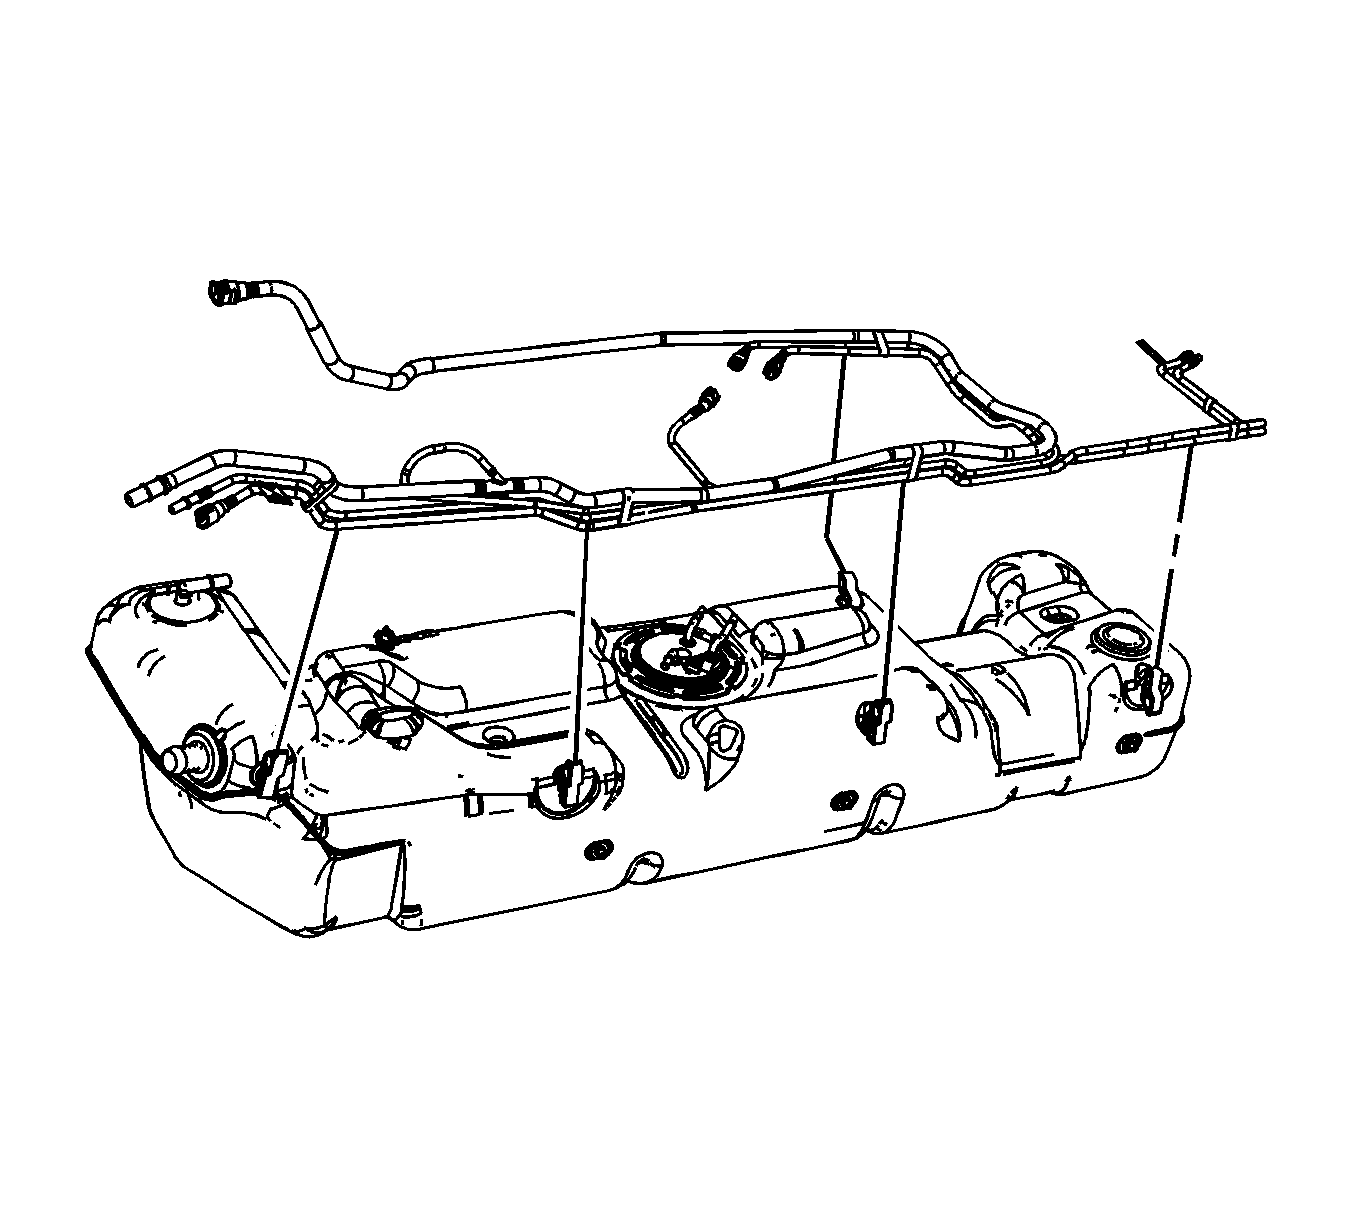
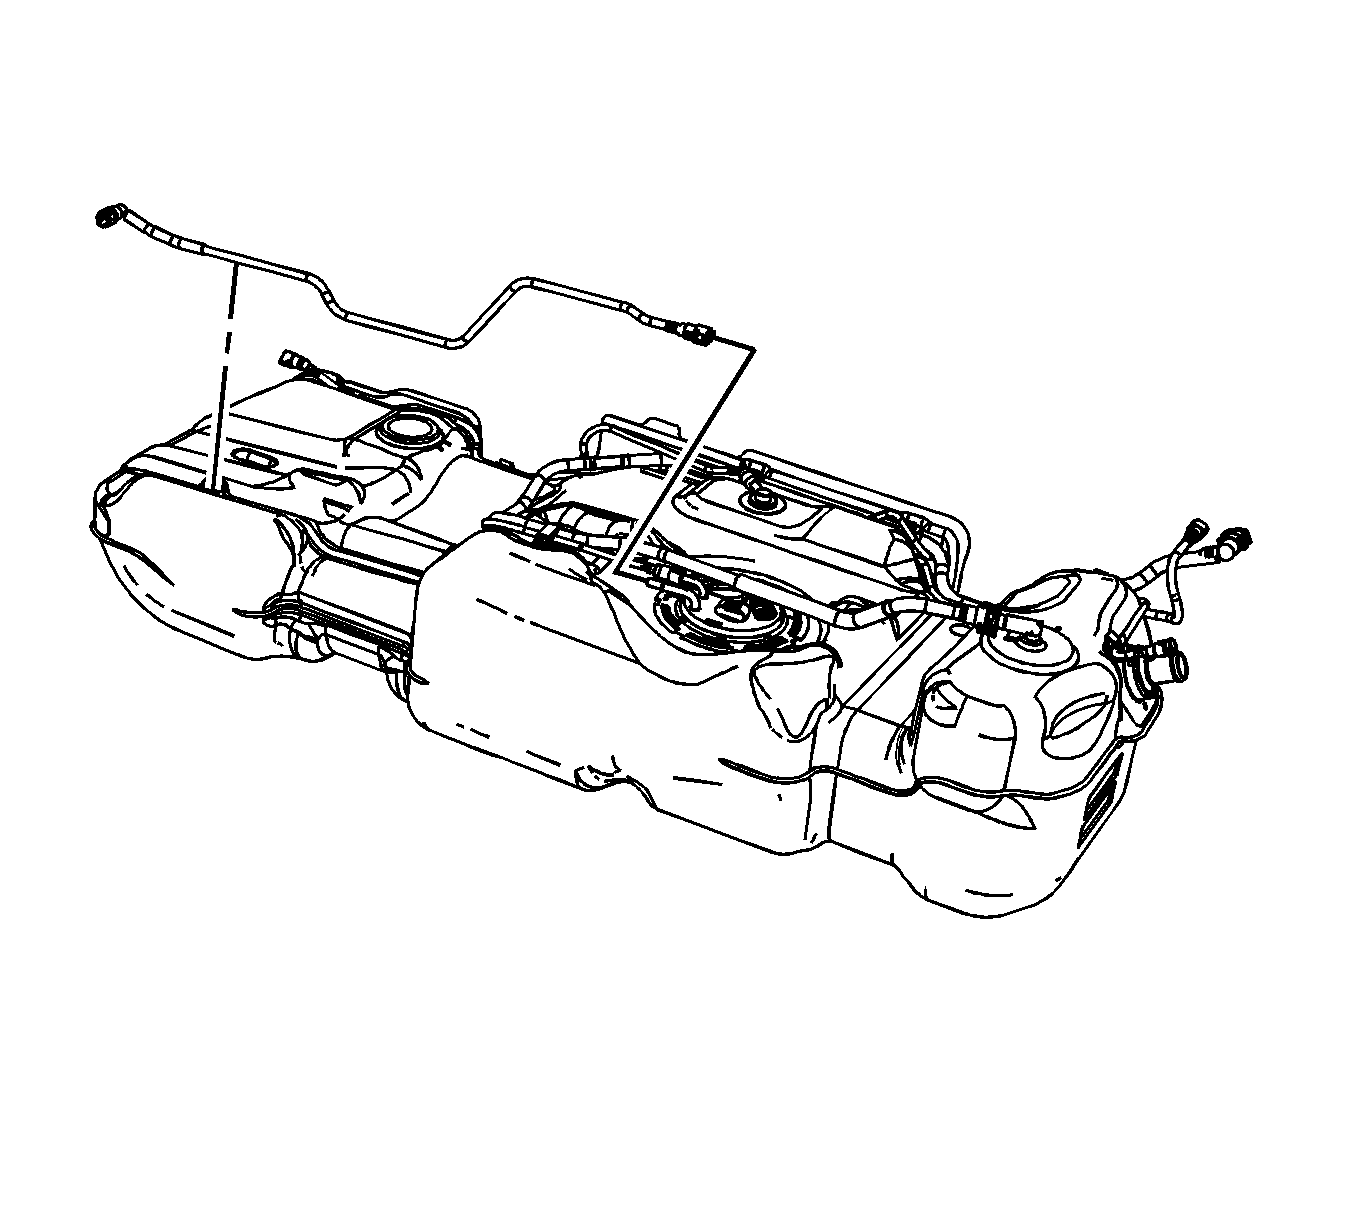
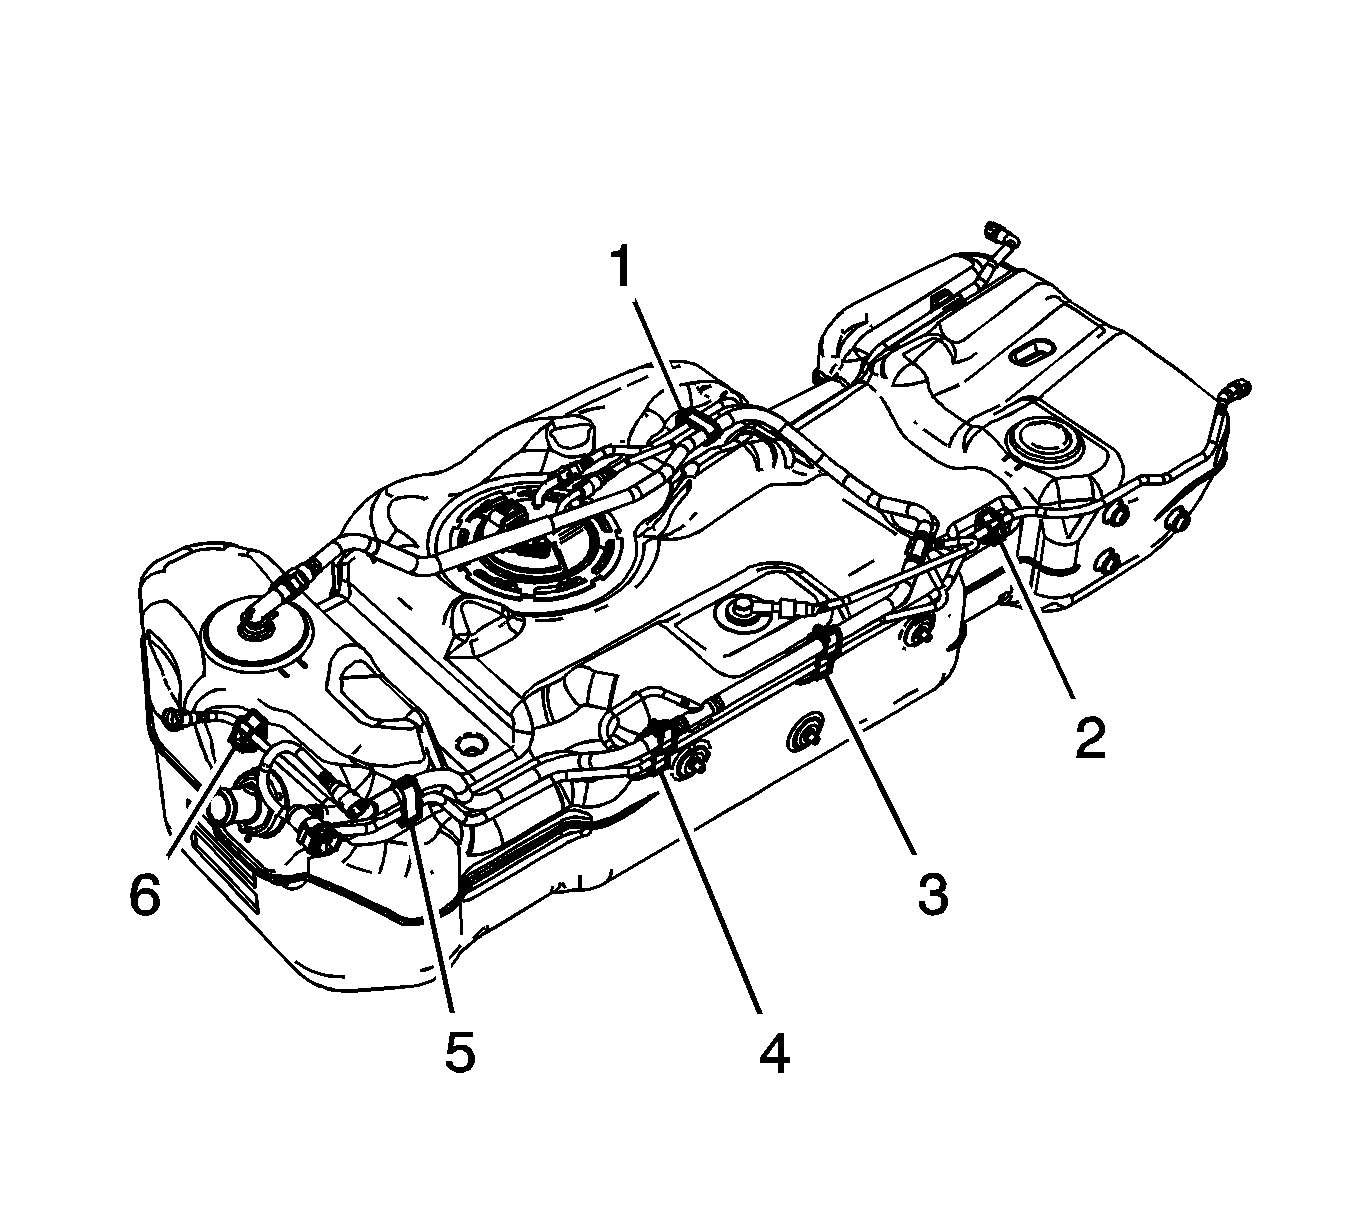
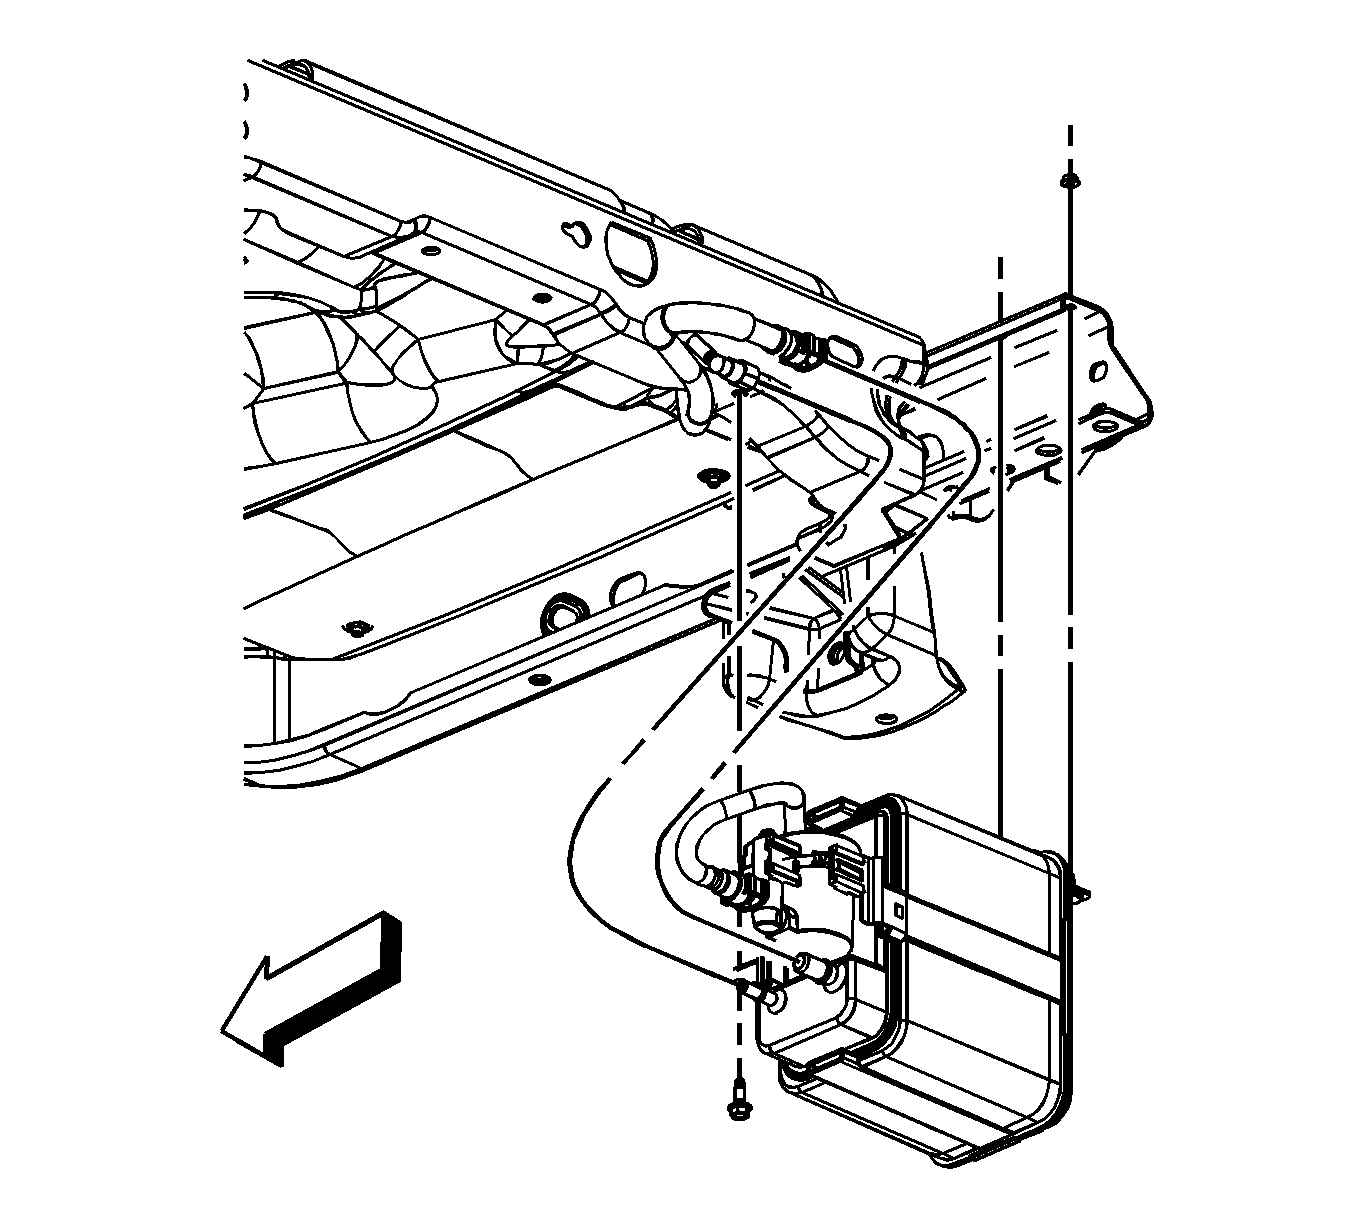
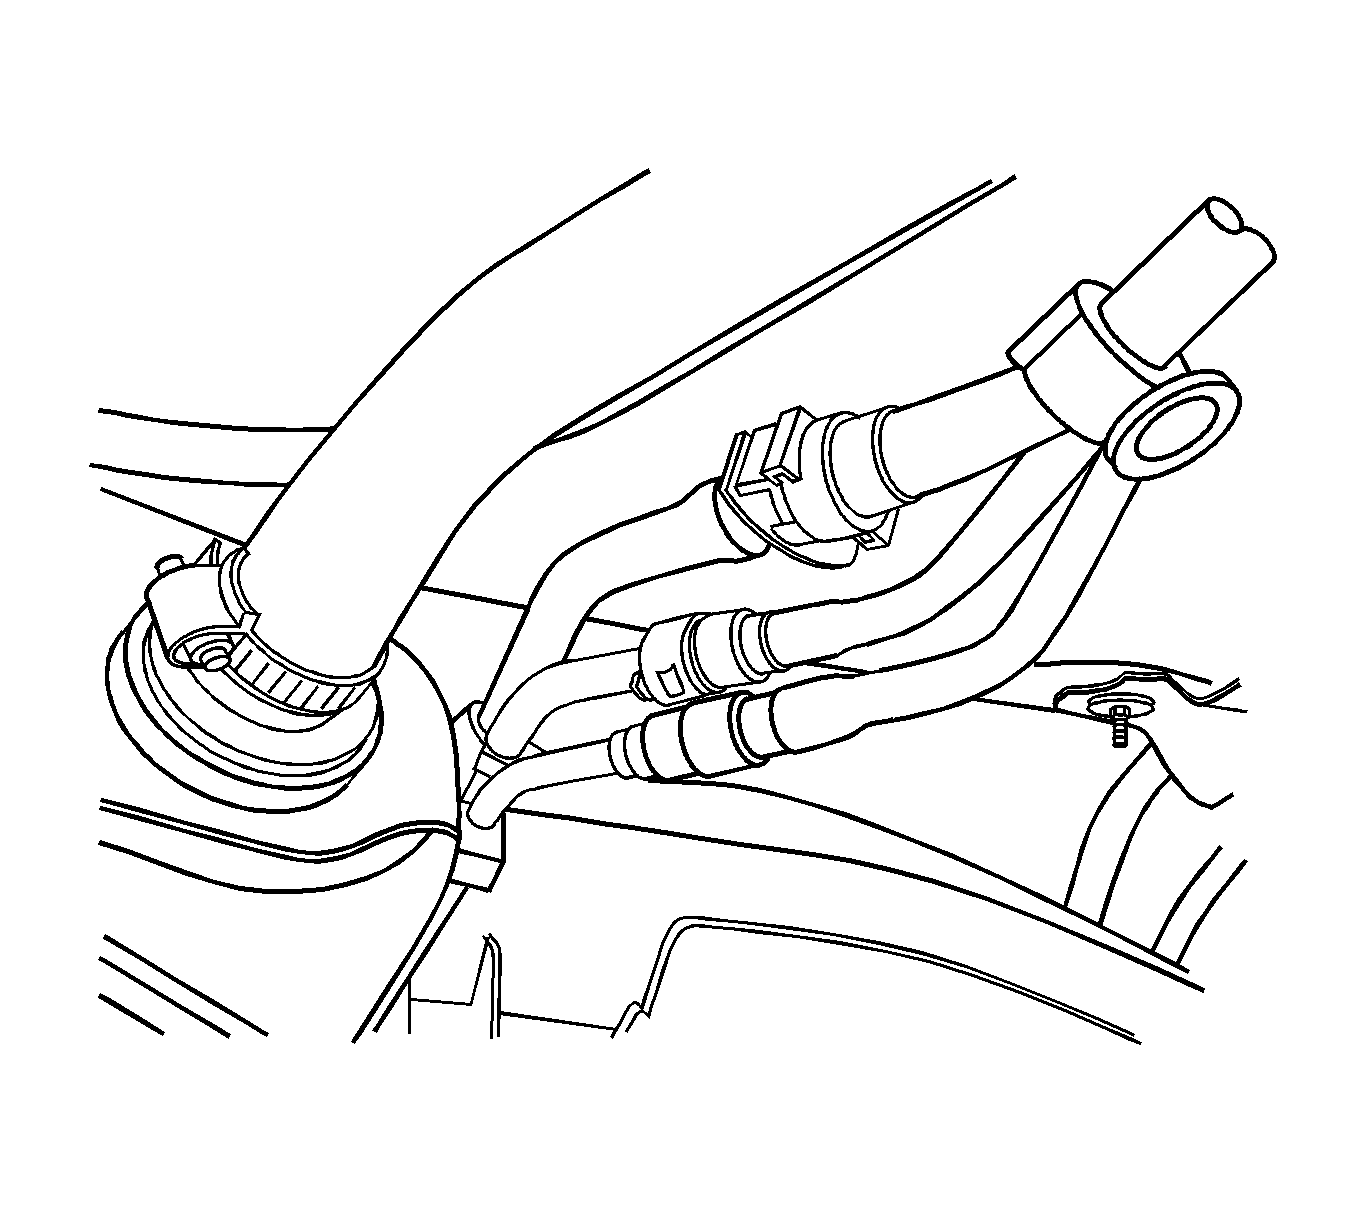
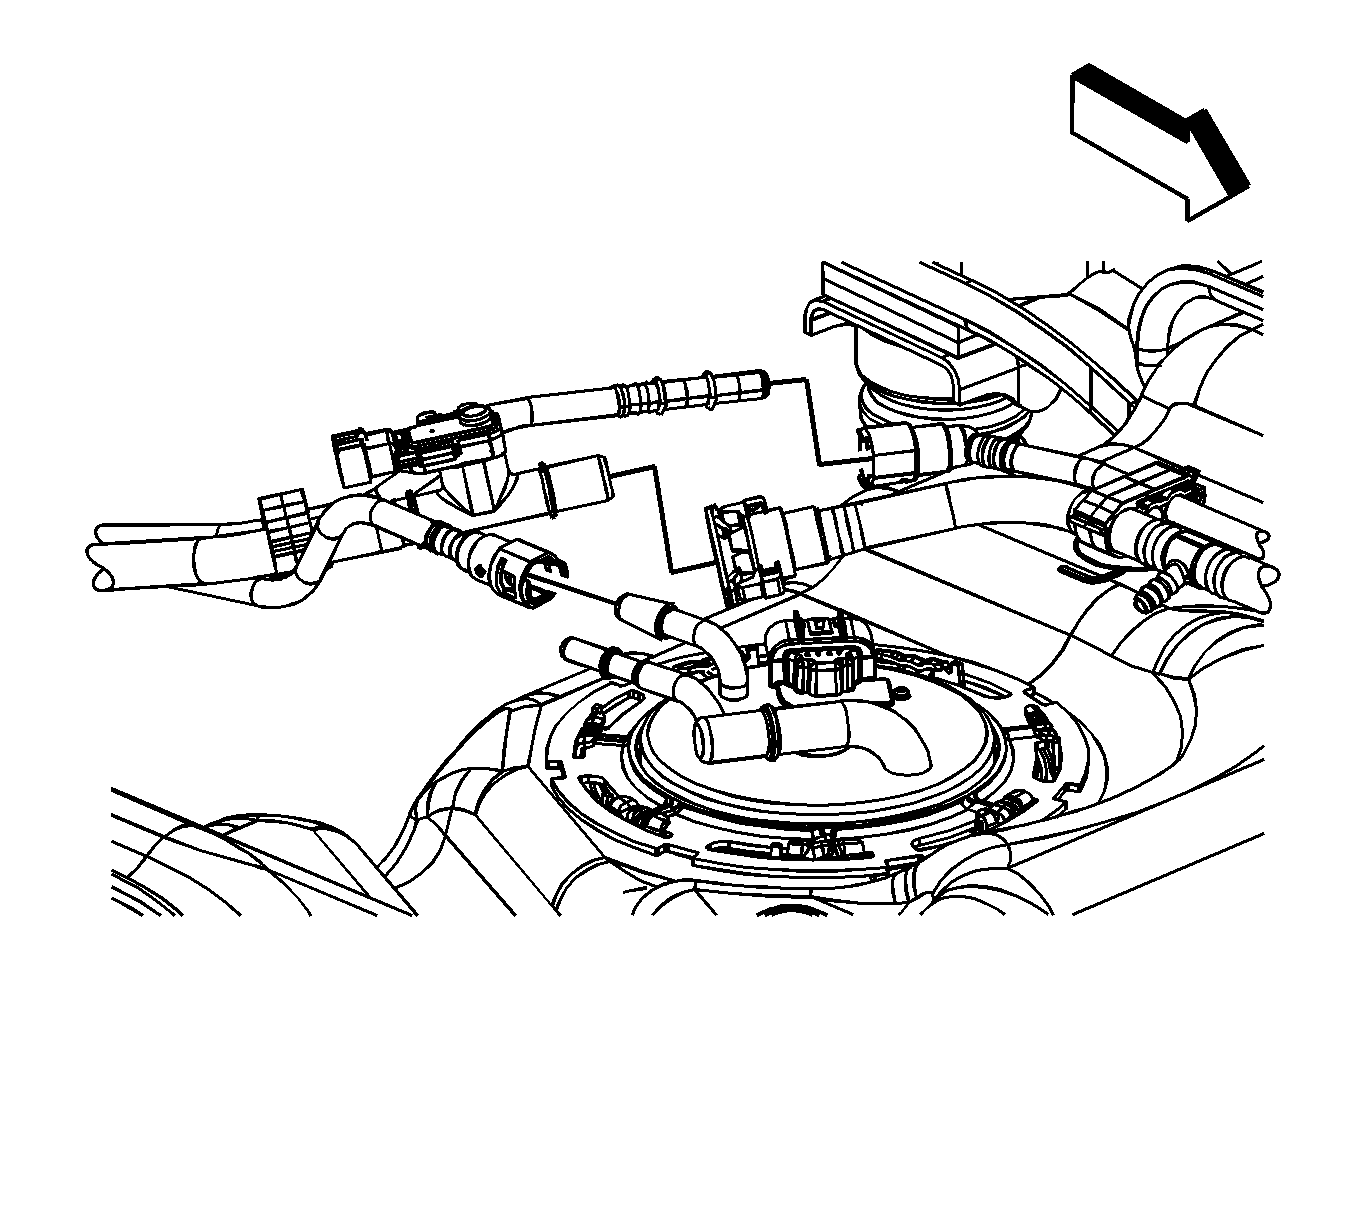
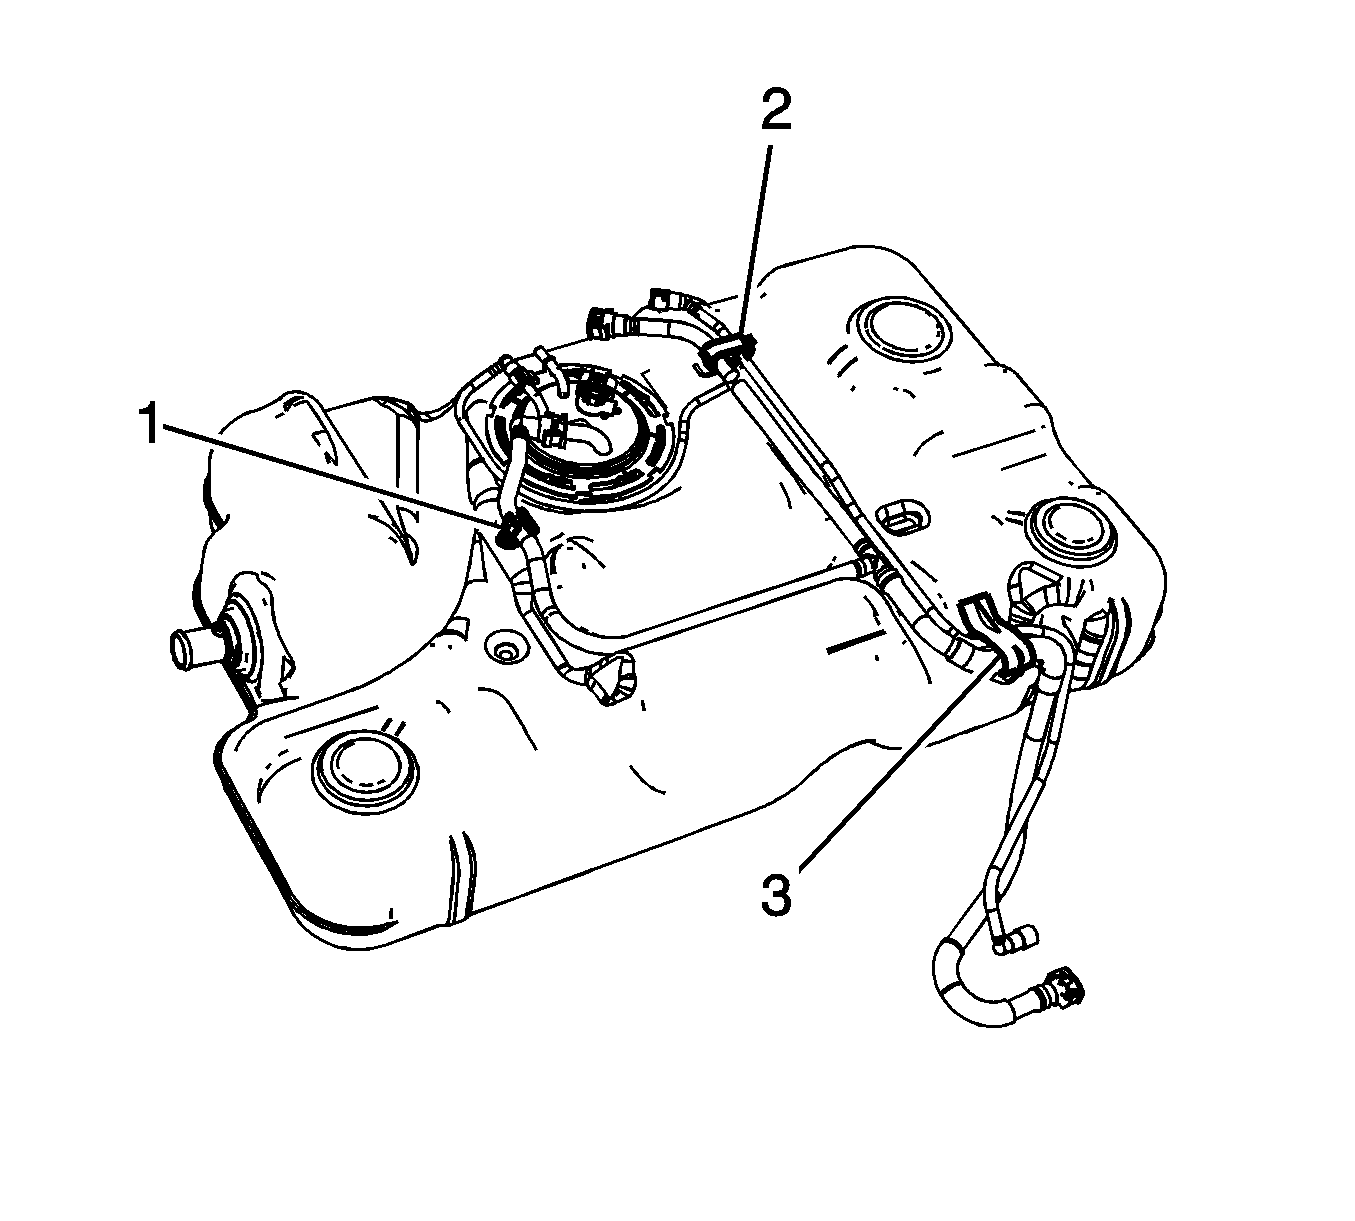
- Disconnect the fuel tank vent line quick connect fitting (5) from the fuel fill pipe vent line. Refer to Plastic Collar Quick Connect Fitting Service.
- Disconnect the chassis EVAP line quick connect fitting (4) from the fuel tank line. Refer to Plastic Collar Quick Connect Fitting Service.
- Disconnect the fuel tank fuel feed line quick connect fitting (5) from the chassis line. Refer to Plastic Collar Quick Connect Fitting Service.
- Cap the fuel and EVAP lines in order to prevent possible fuel and/or EVAP system contamination.
- Disconnect the fuel tank EVAP lines (1) from the EVAP canister. Refer to Plastic Collar Quick Connect Fitting Service.
- Cap the EVAP lines in order to prevent possible EVAP system contamination.
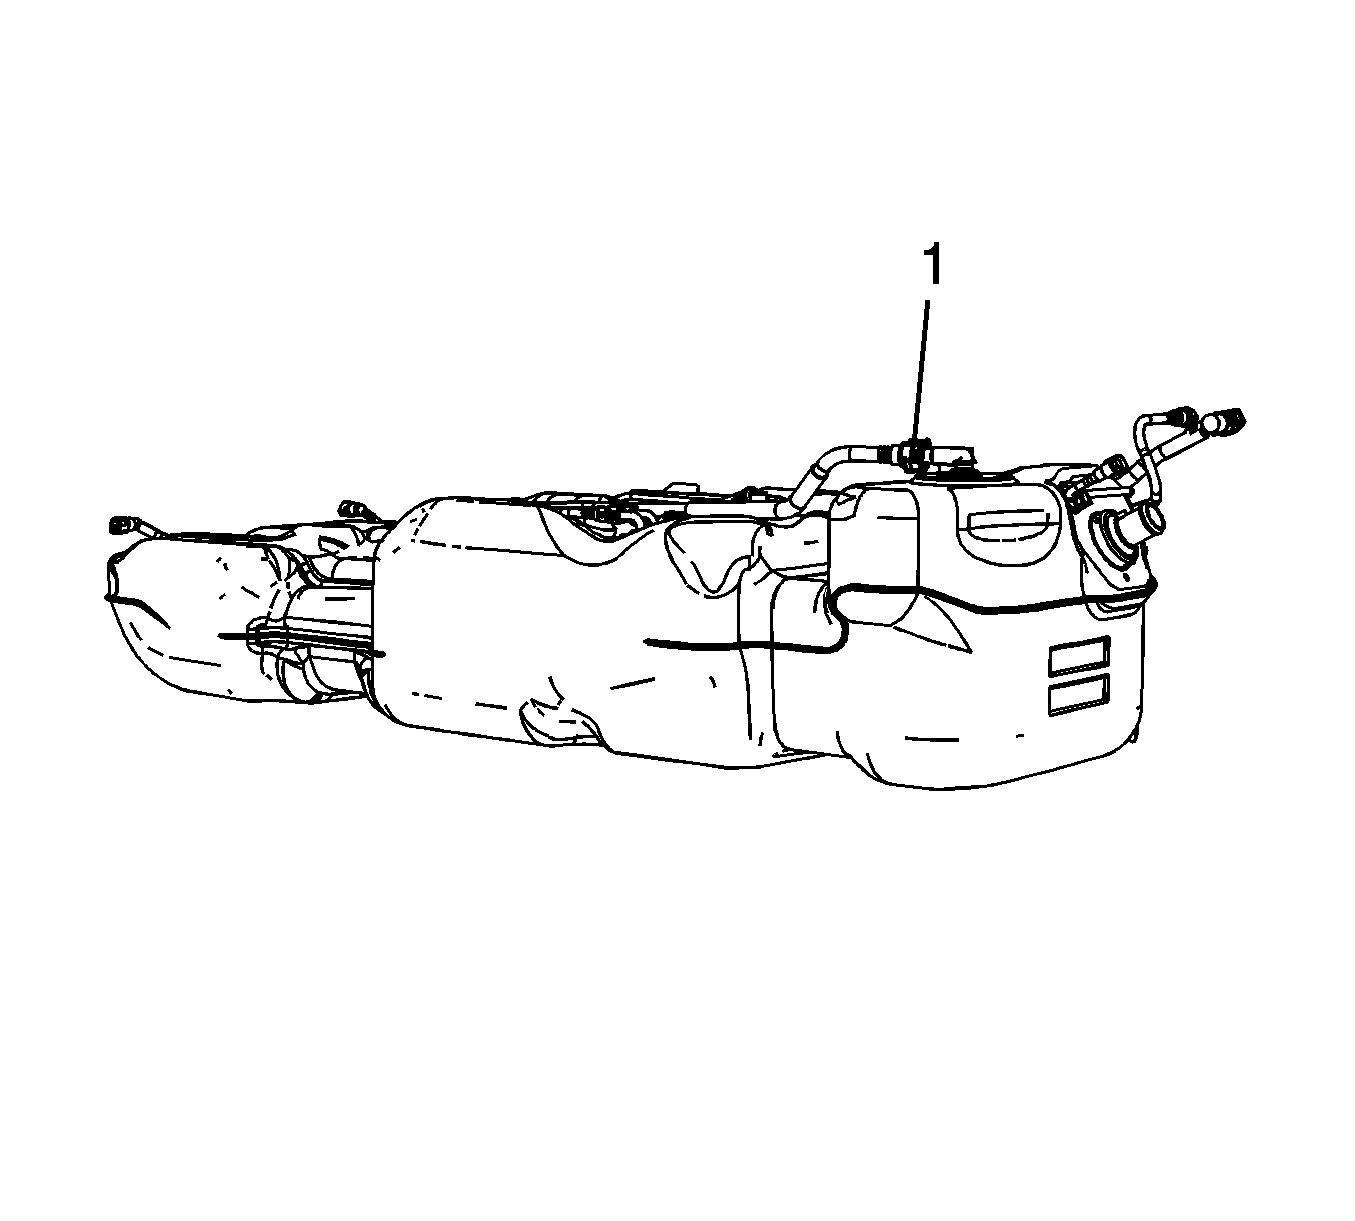
- Disconnect the fuel tank EVAP line quick connect fitting (1) at the fuel tank vent valve. Refer to Plastic Collar Quick Connect Fitting Service.
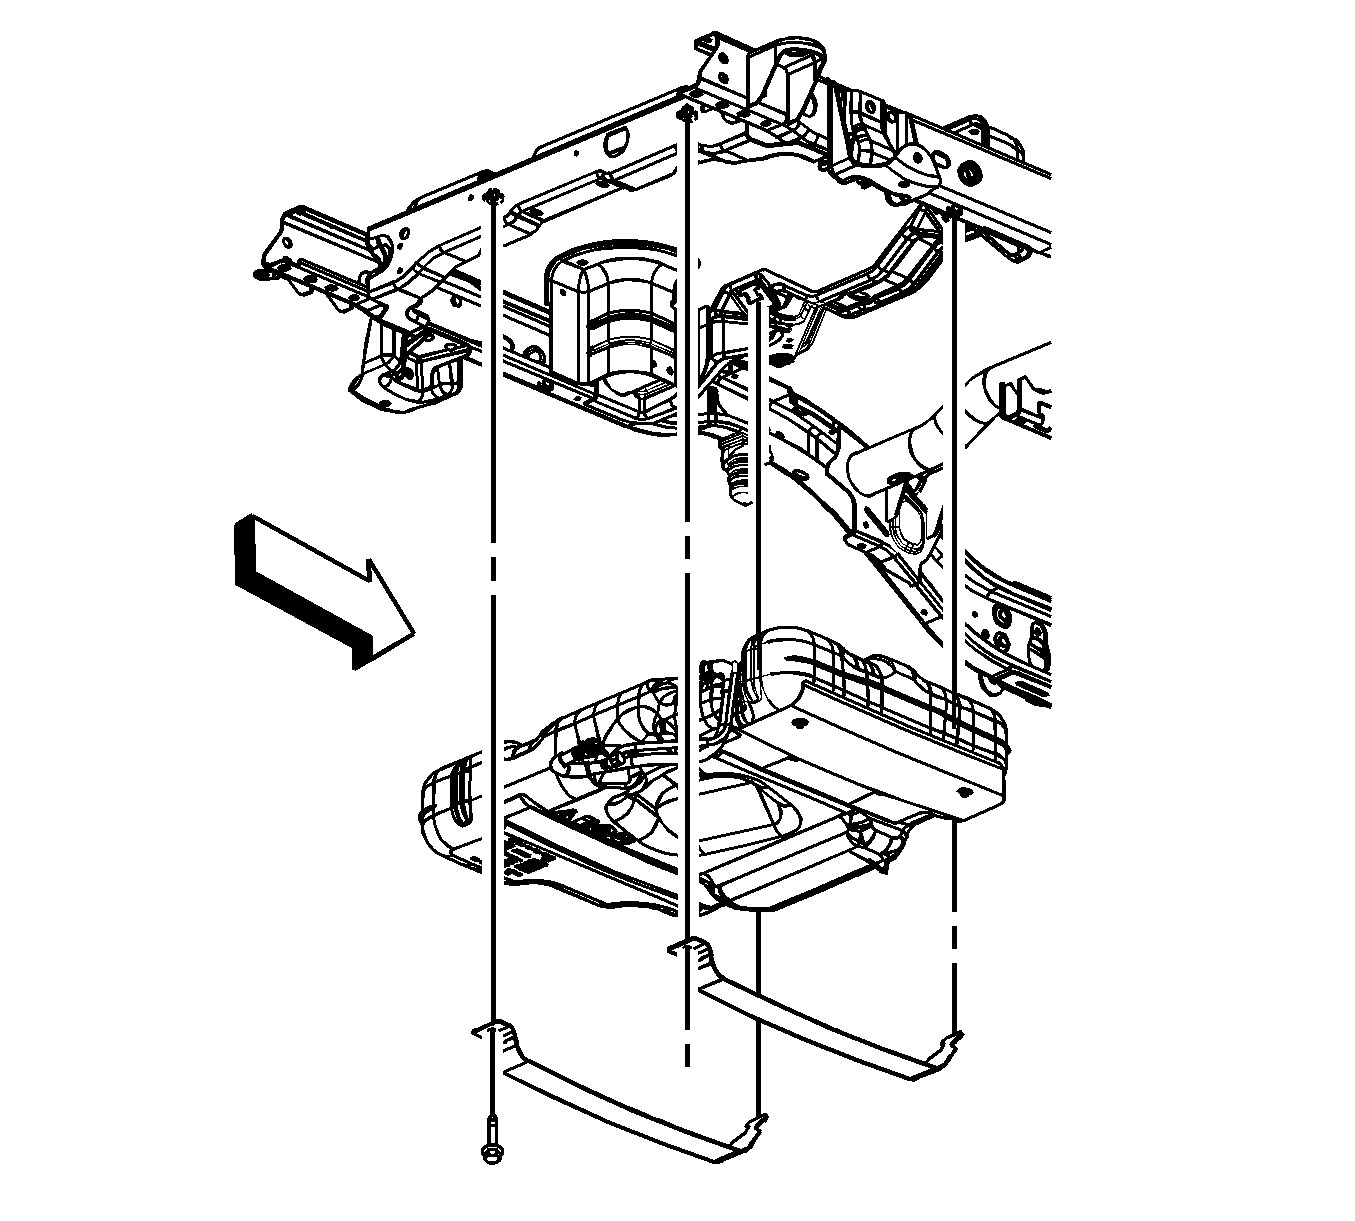
- Using an adjustable jack, support the fuel tank.
- Remove the fuel tank strap bolts.
- Remove the fuel tank straps.
- With the aid of an assistant, carefully lower the rear of the fuel tank.
- Slide the front of the tank away from the frame.
- Lower the fuel tank slightly until the chassis wiring harness electrical connectors can be accessed.
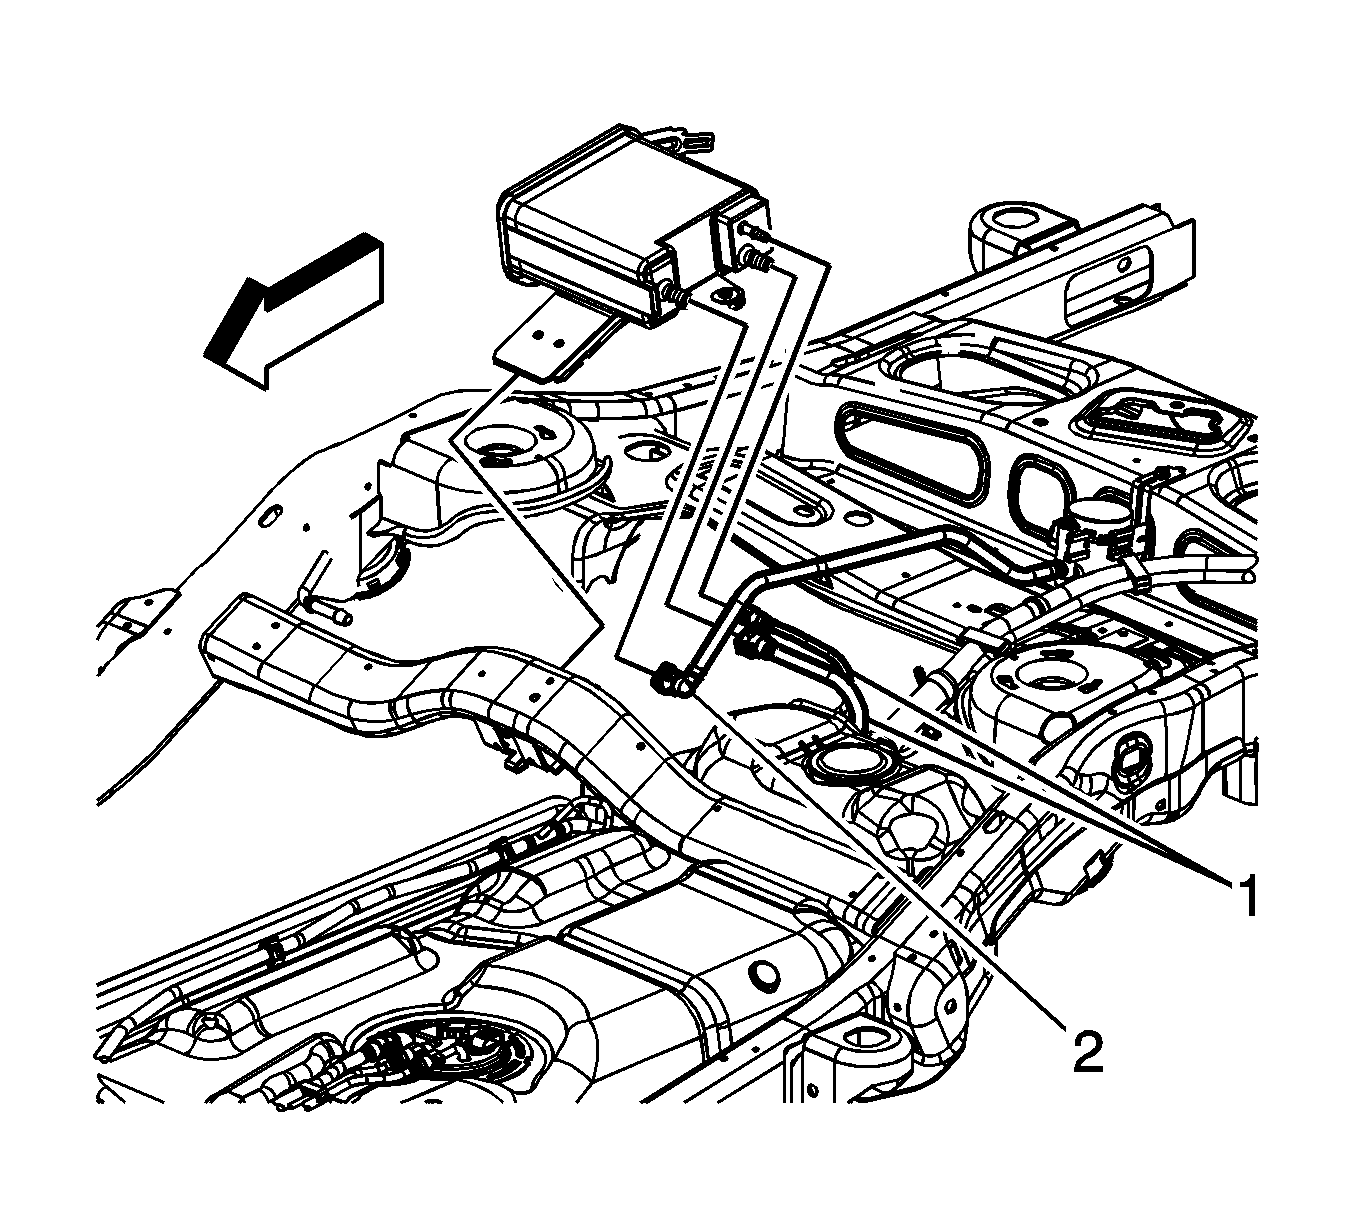
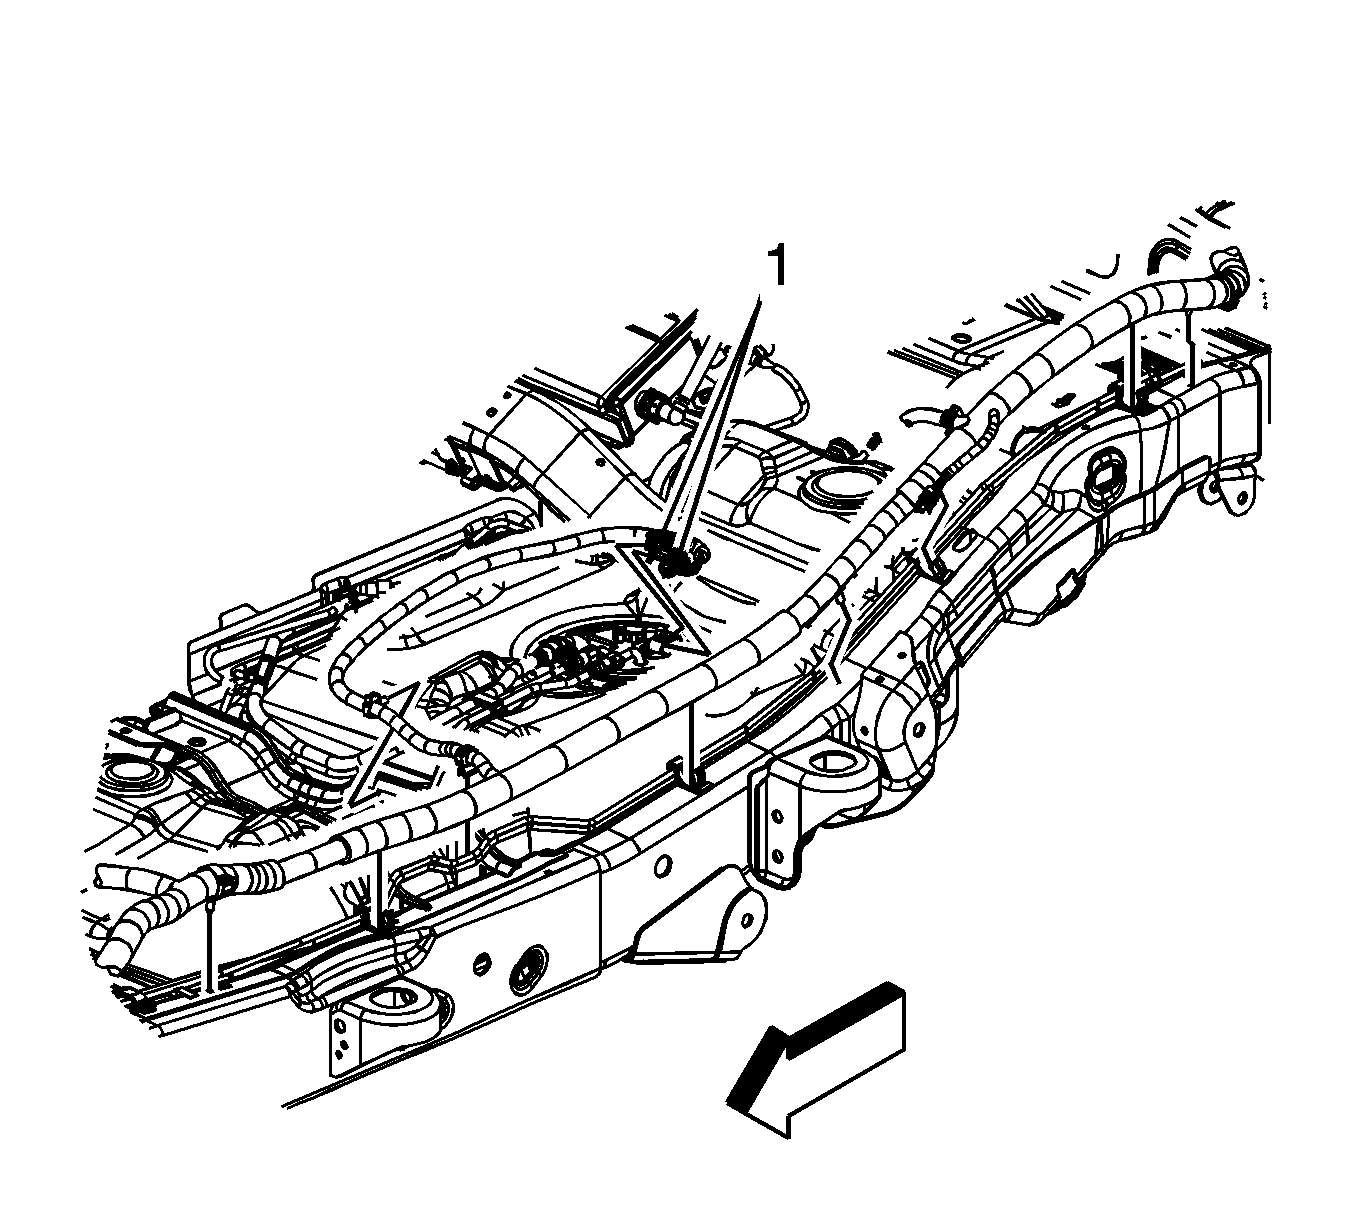
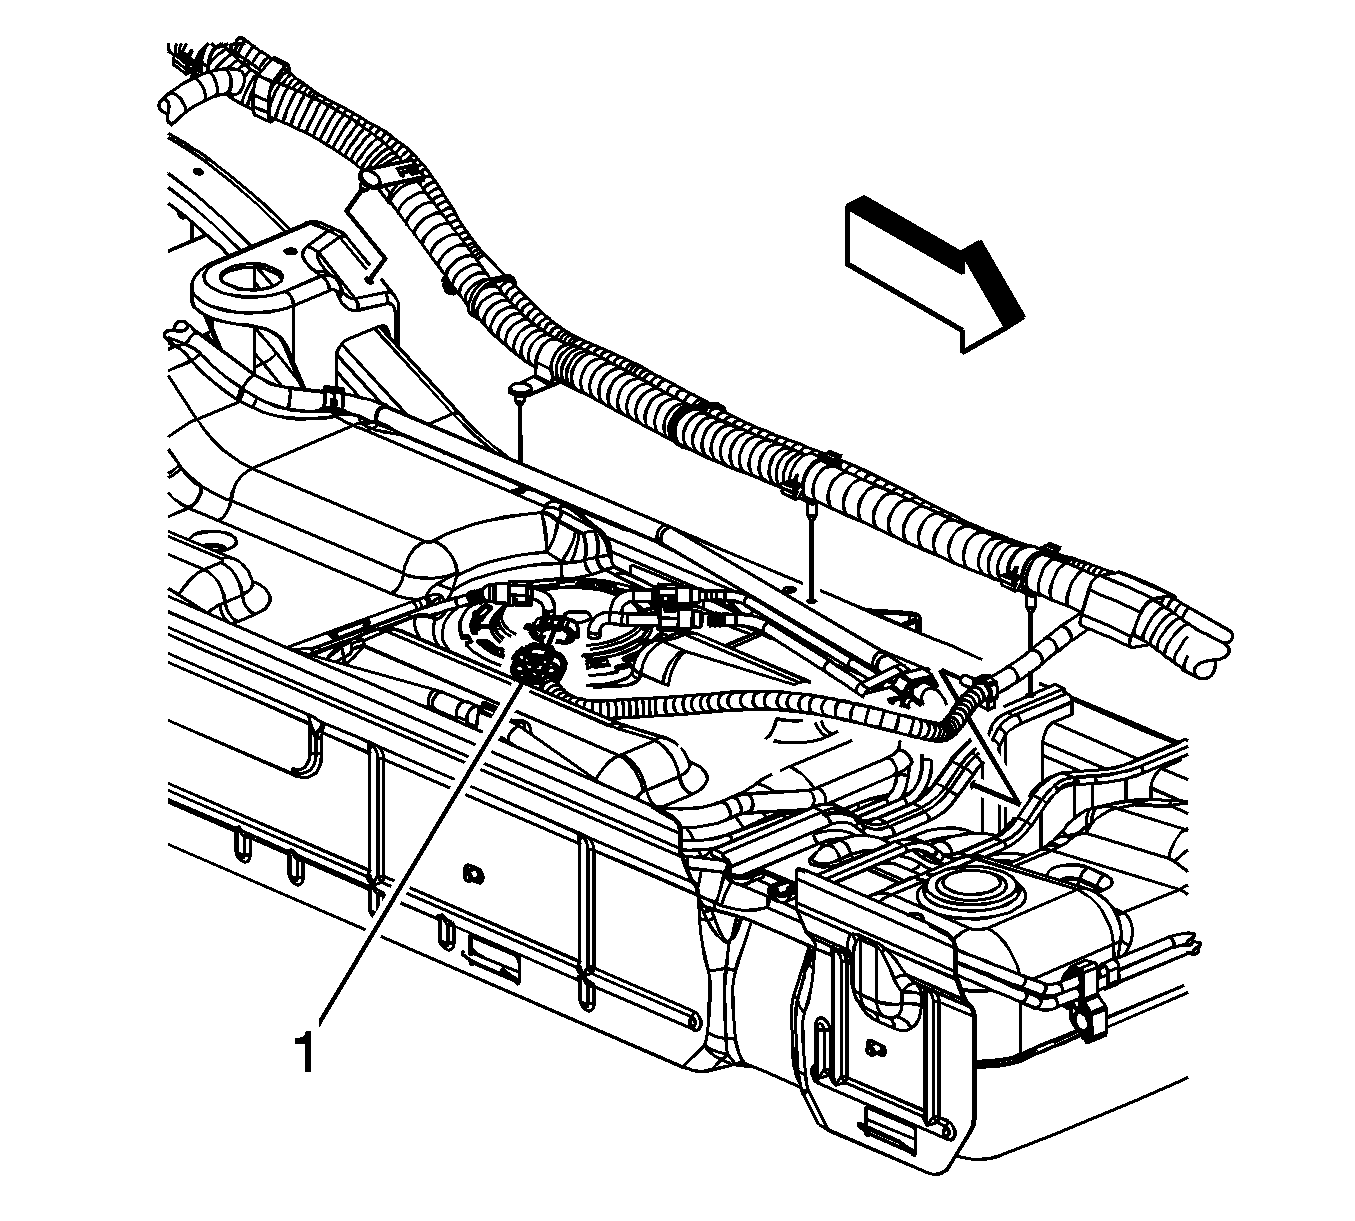
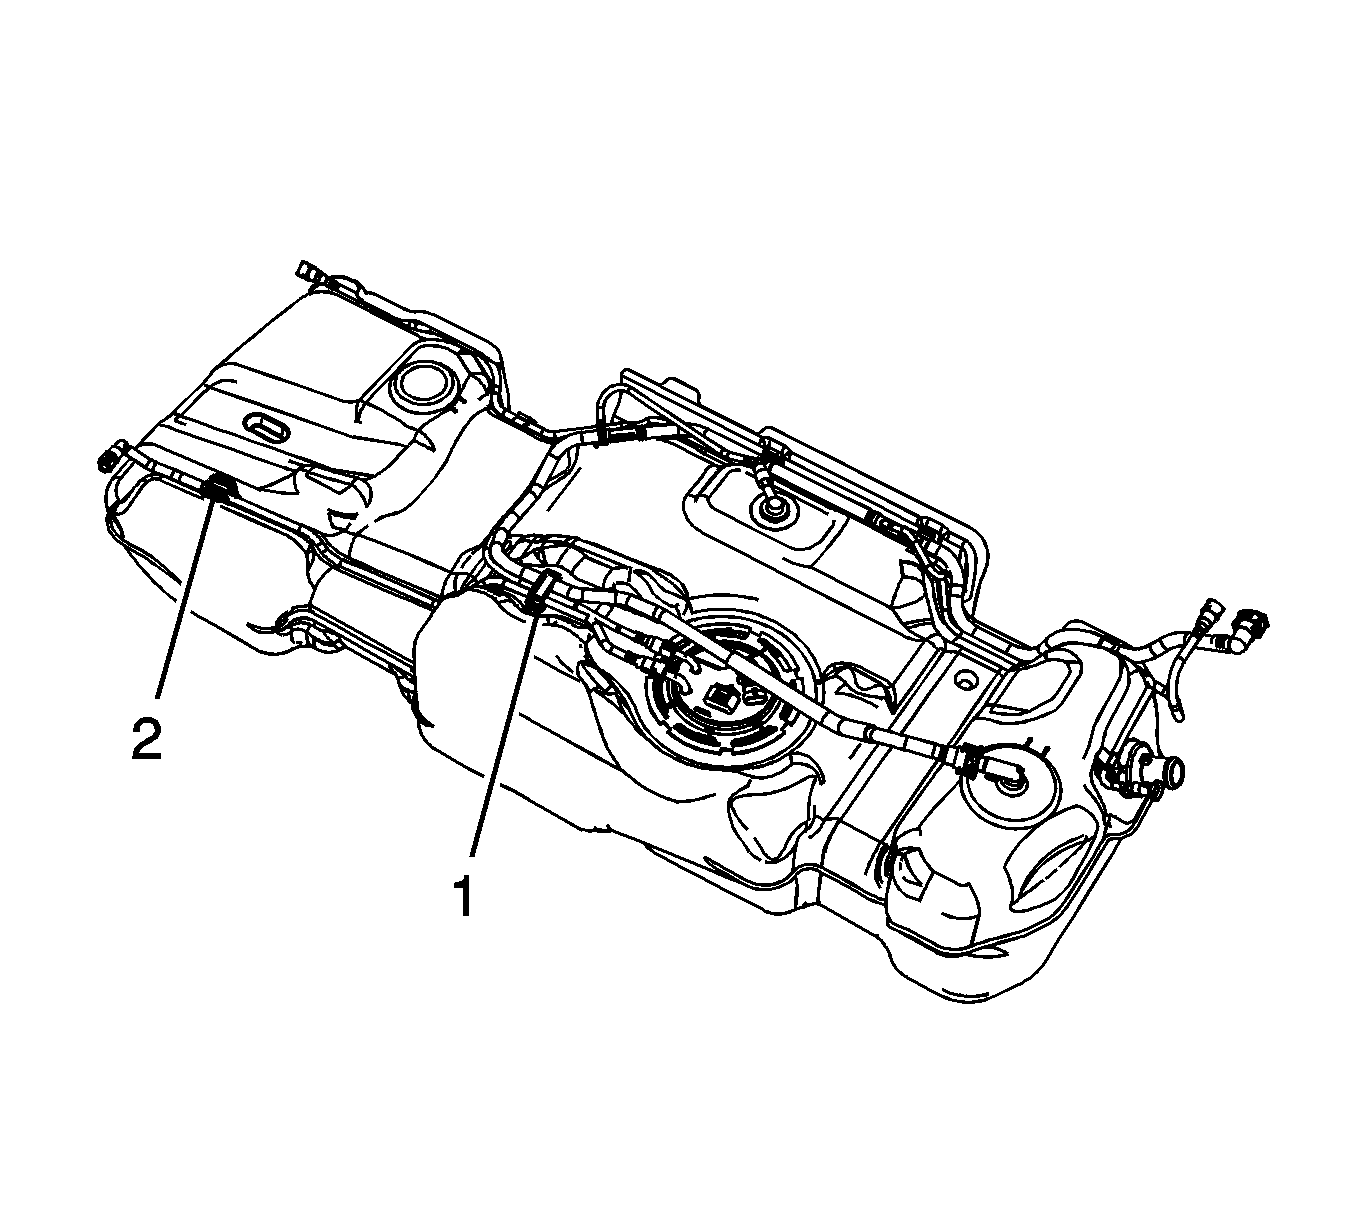
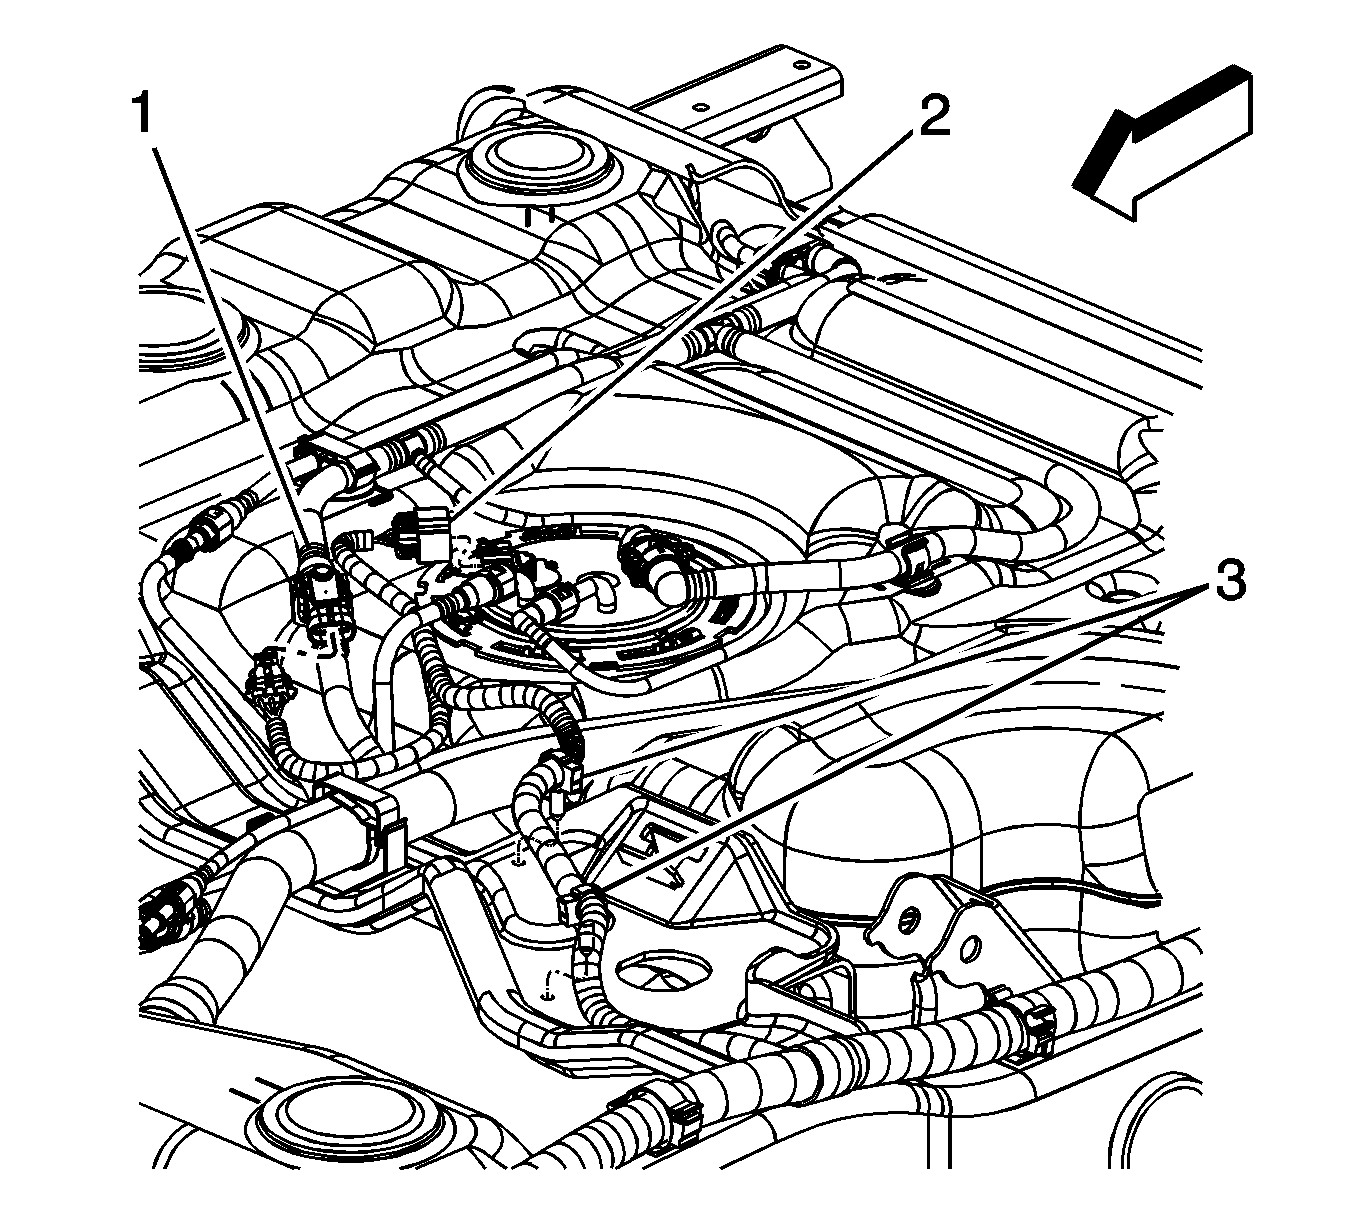
- Disengage the chassis wiring harness electrical connector, connector position assurance (CPA) retainer at the module.
- Disconnect the chassis wiring harness electrical connectors (1) from the module and the fuel pressure sensor.
- Completely lower the fuel tank.
- With the aid of an assistant, place the fuel tank in a suitable work area.
- If replacing the fuel tank proceed to the next step, otherwise proceed to step 18 in the installation procedure.
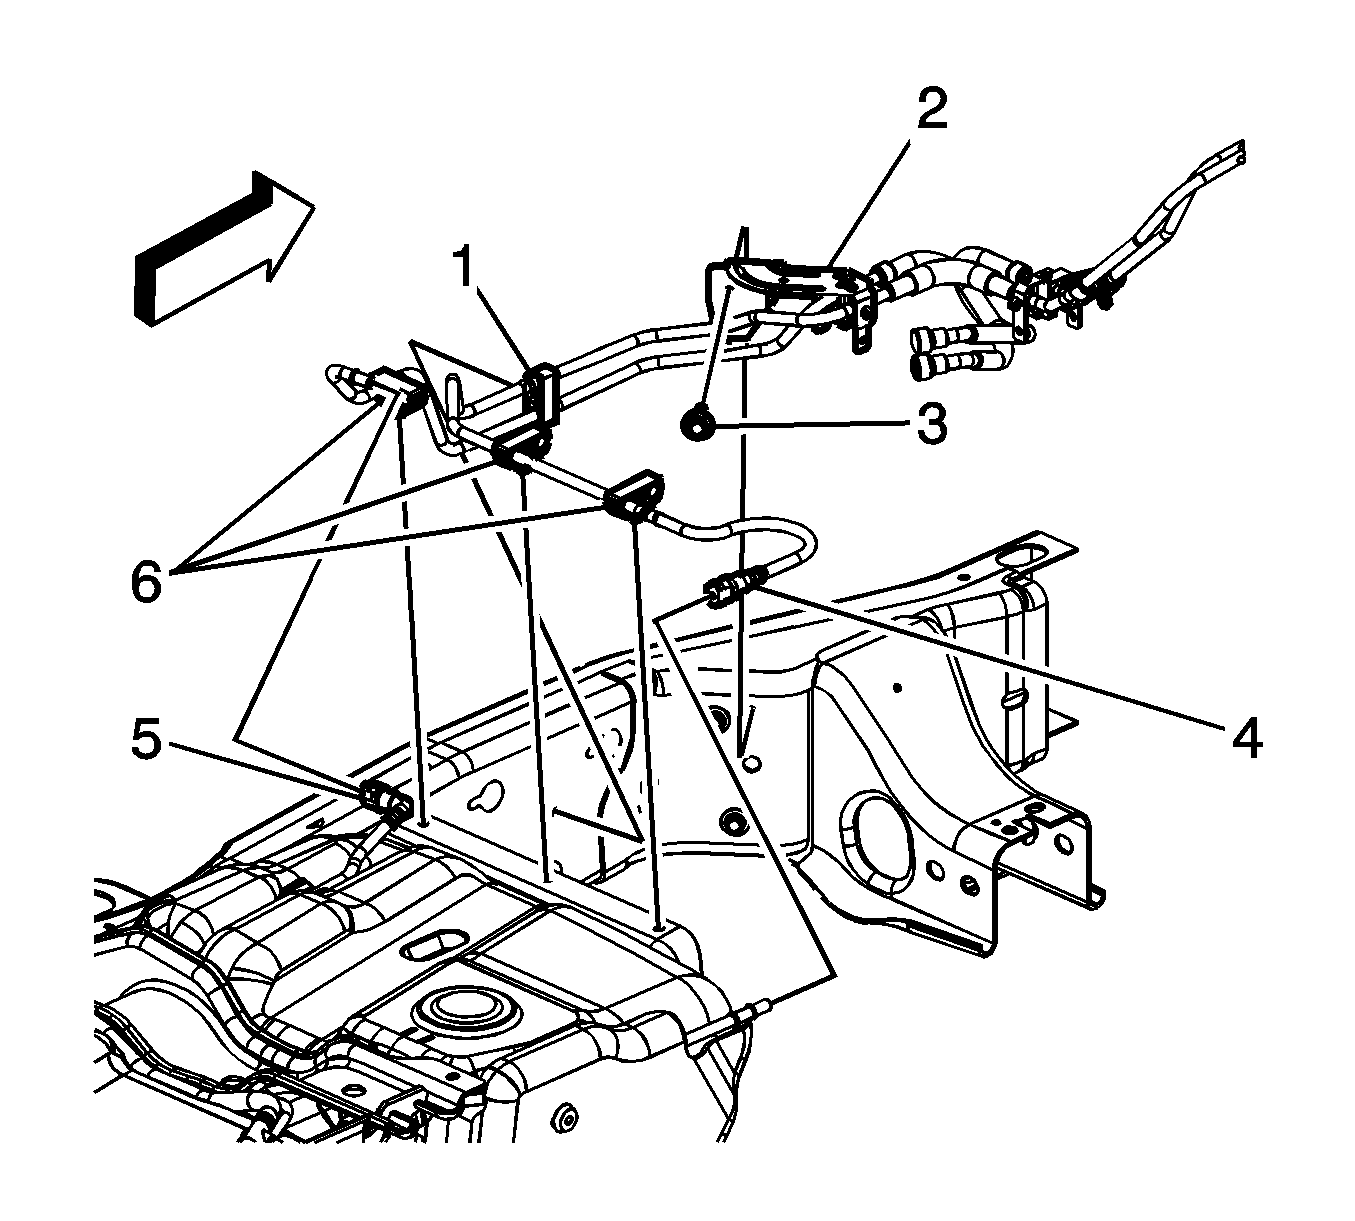
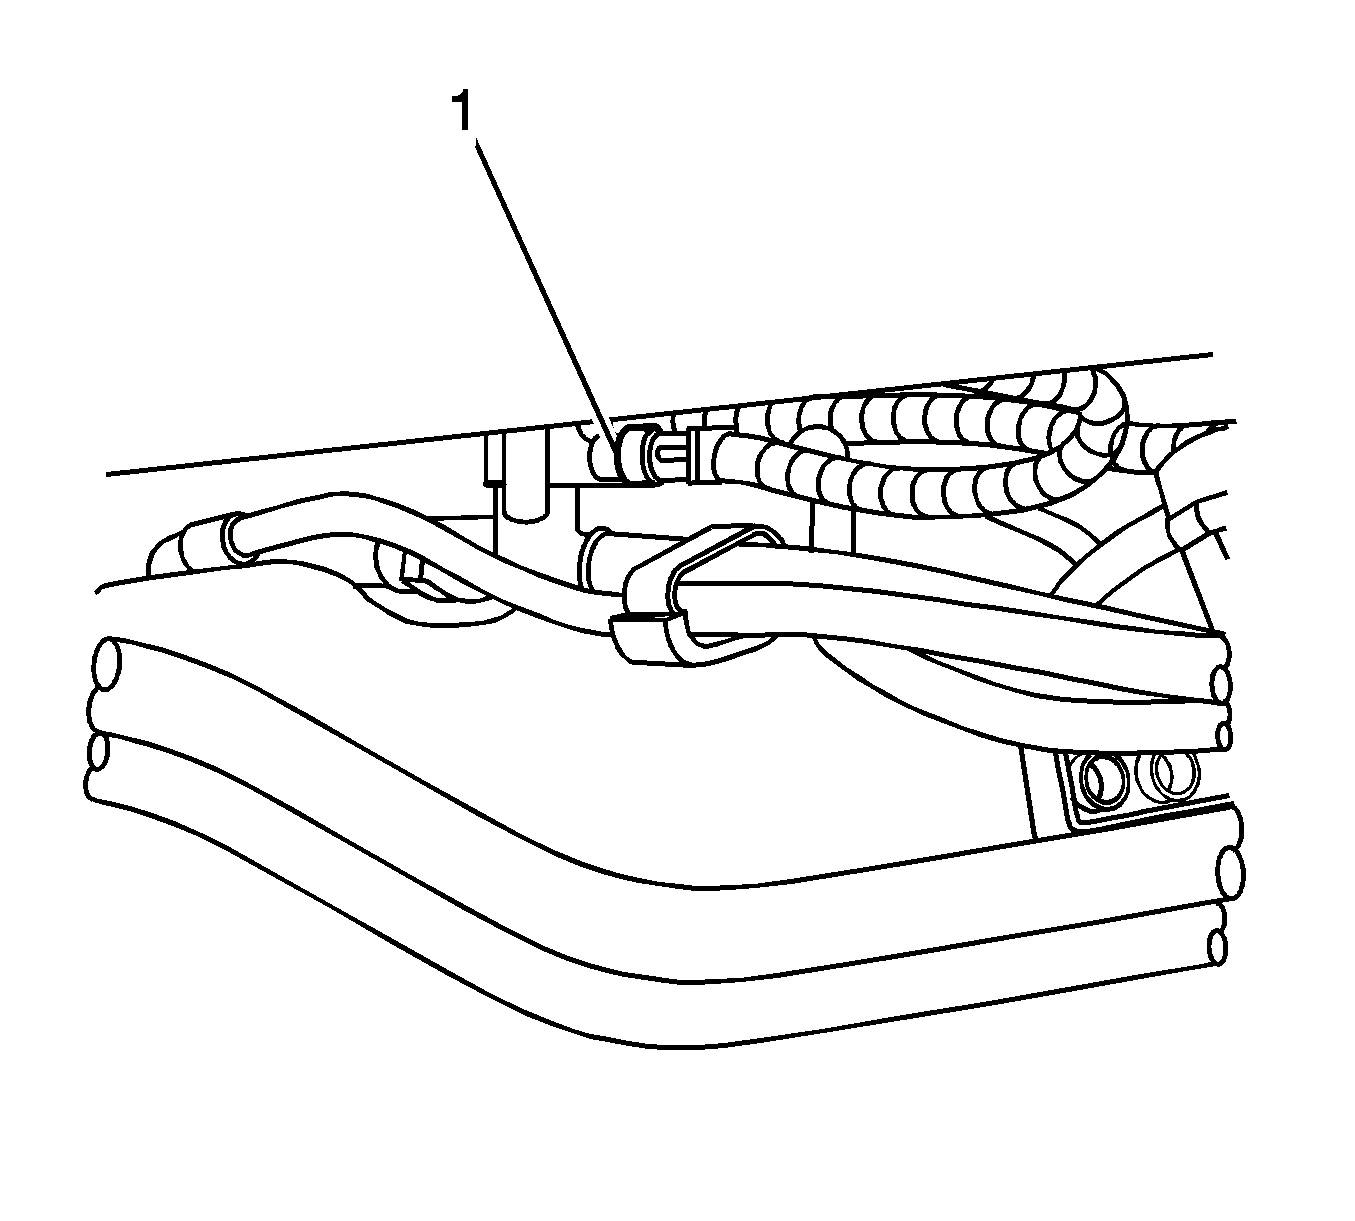
- Remove the fuel feed line from the retaining feature (2) in the fuel tank.
- Open the fuel/EVAP line clip (1) and remove the fuel feed line from the clip.
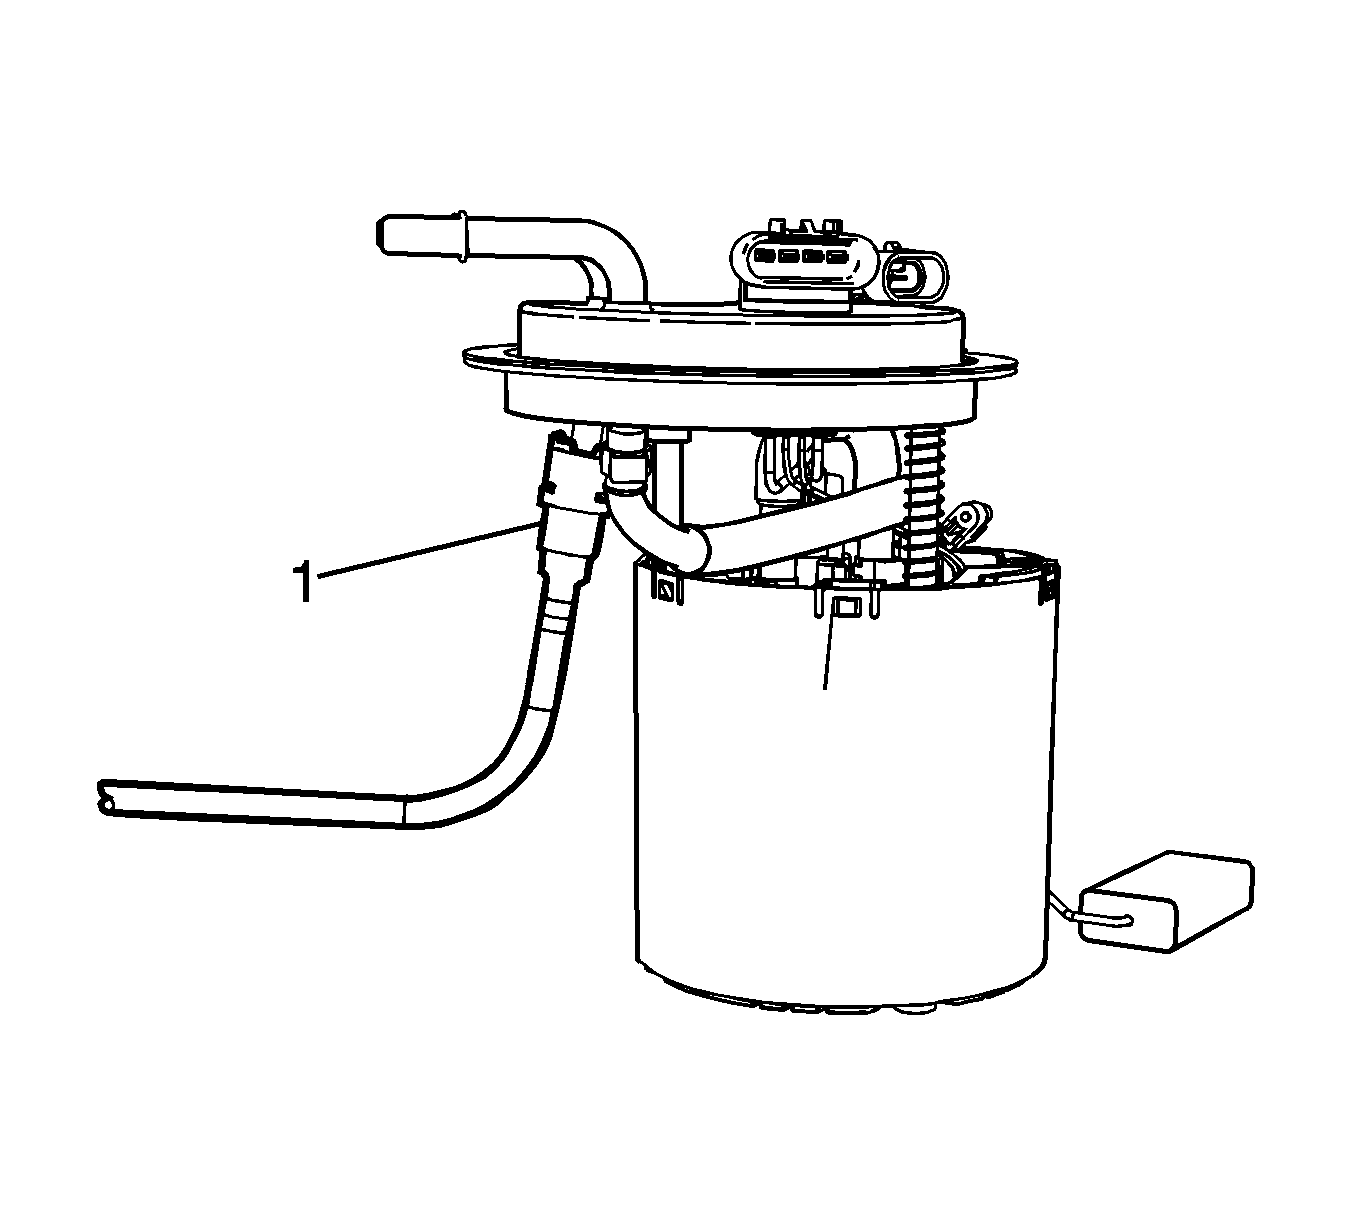
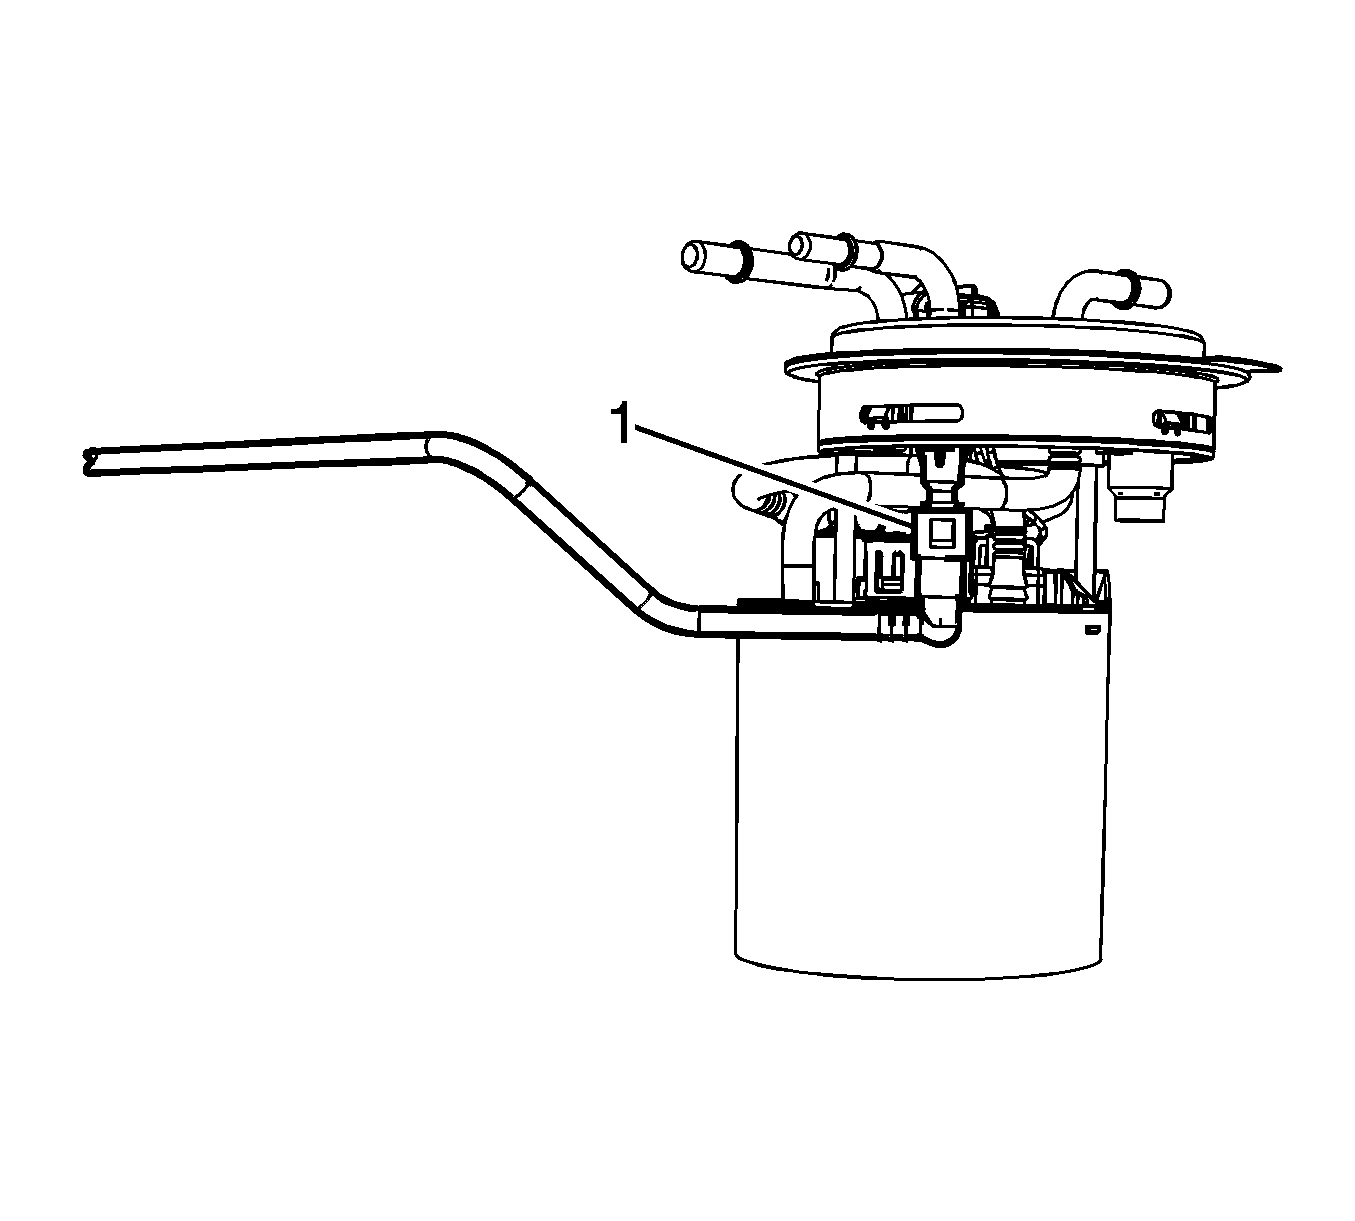
- Disconnect the fuel feed line quick connect fitting at the fuel tank module. Refer to Plastic Collar Quick Connect Fitting Service.
- Remove the fuel feed line from the fuel tank.
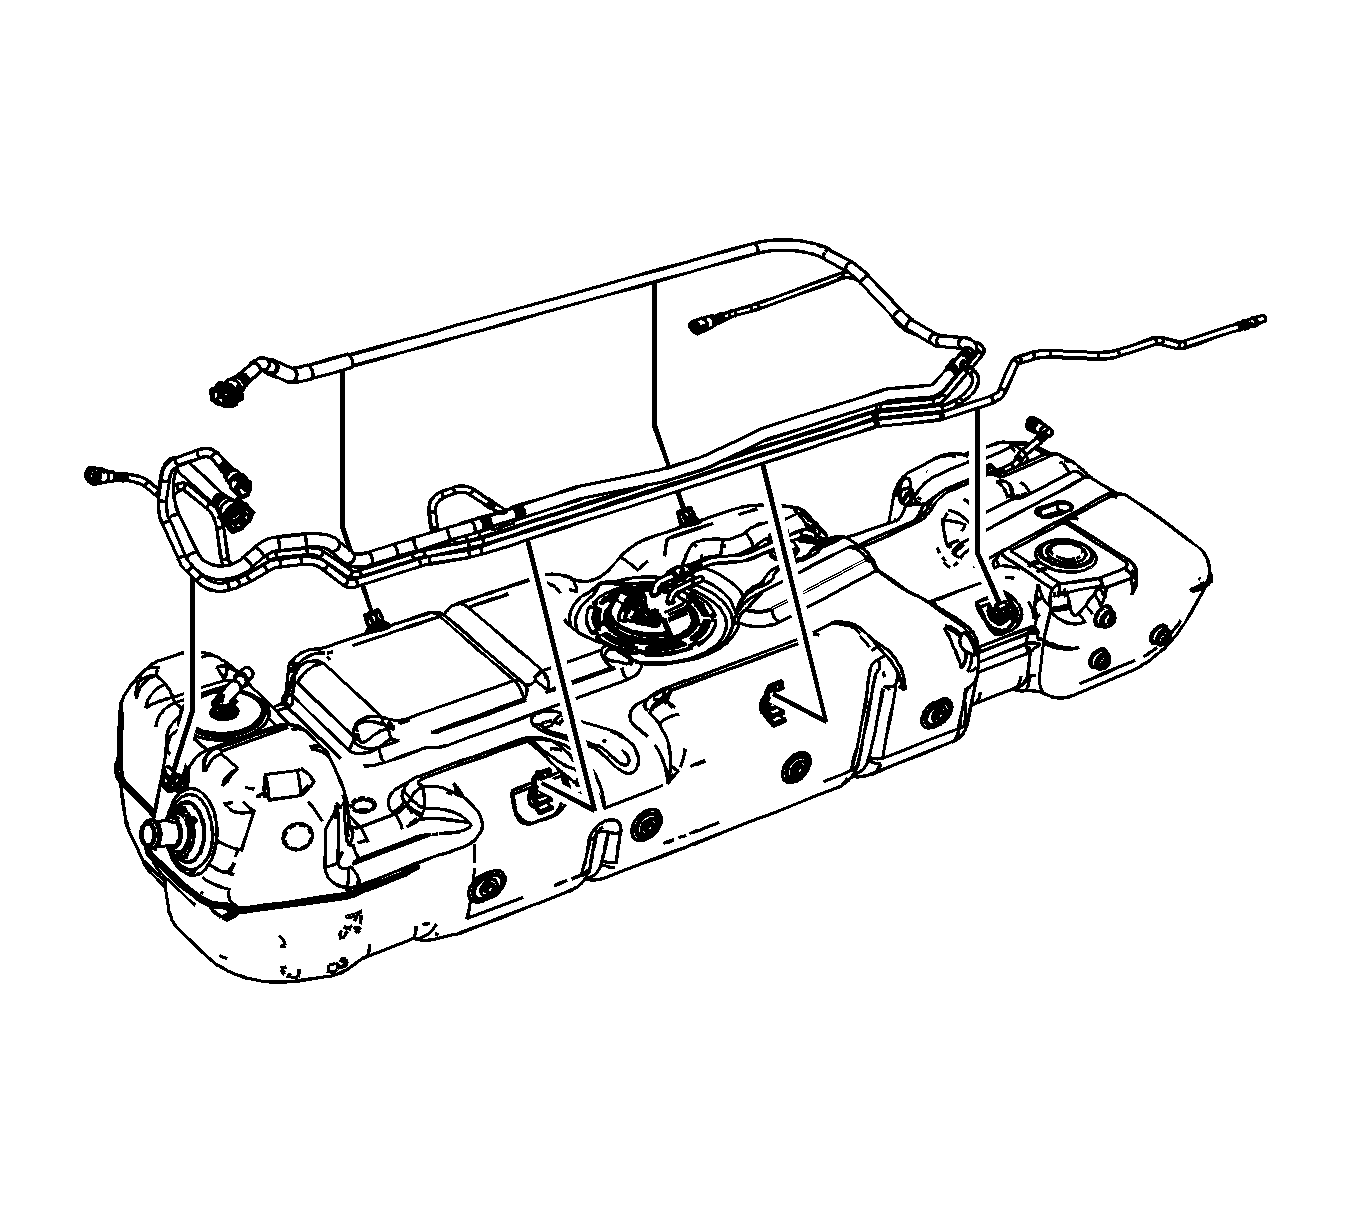
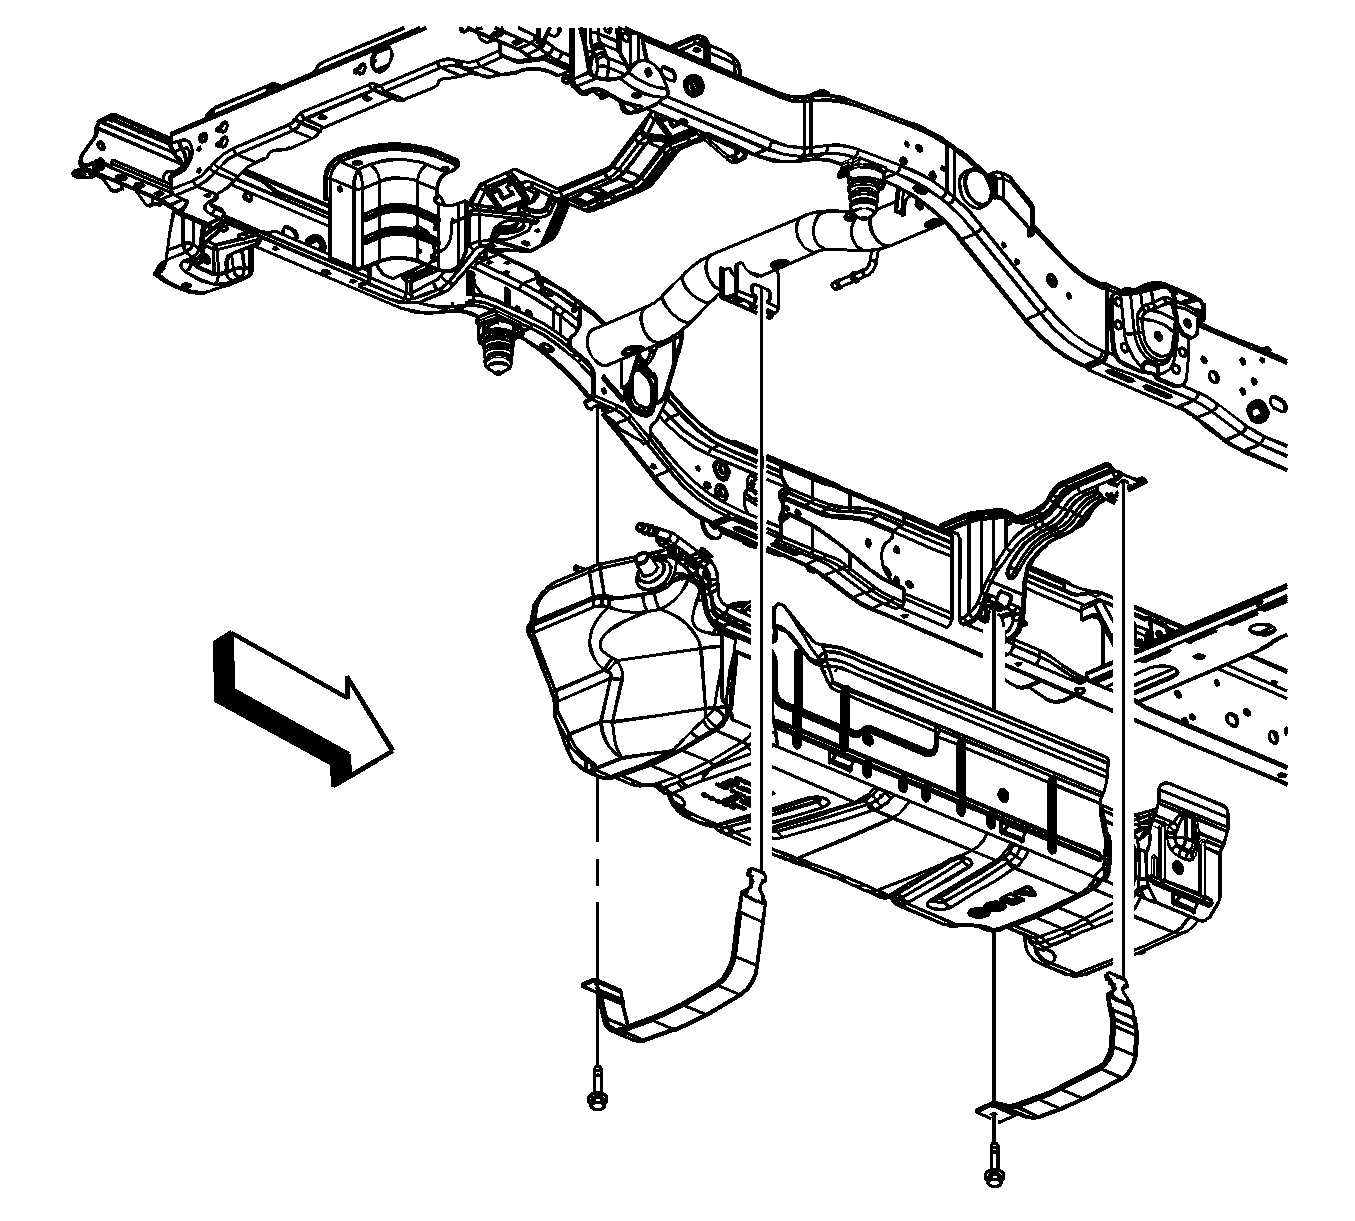
- Remove the fuel tank shield retainers (2 and 3) and shields (1 and 4).
- Remove the EVAP line from the fuel tank clips (1, 2, 4, and 8).
- Open the fuel tank clips (3, 5, 6, and 7) and remove the EVAP lines from the clips.
- Disconnect the EVAP line quick connect fitting at the fuel tank module. Refer to Plastic Collar Quick Connect Fitting Service.
- Remove the EVAP lines from the fuel tank.
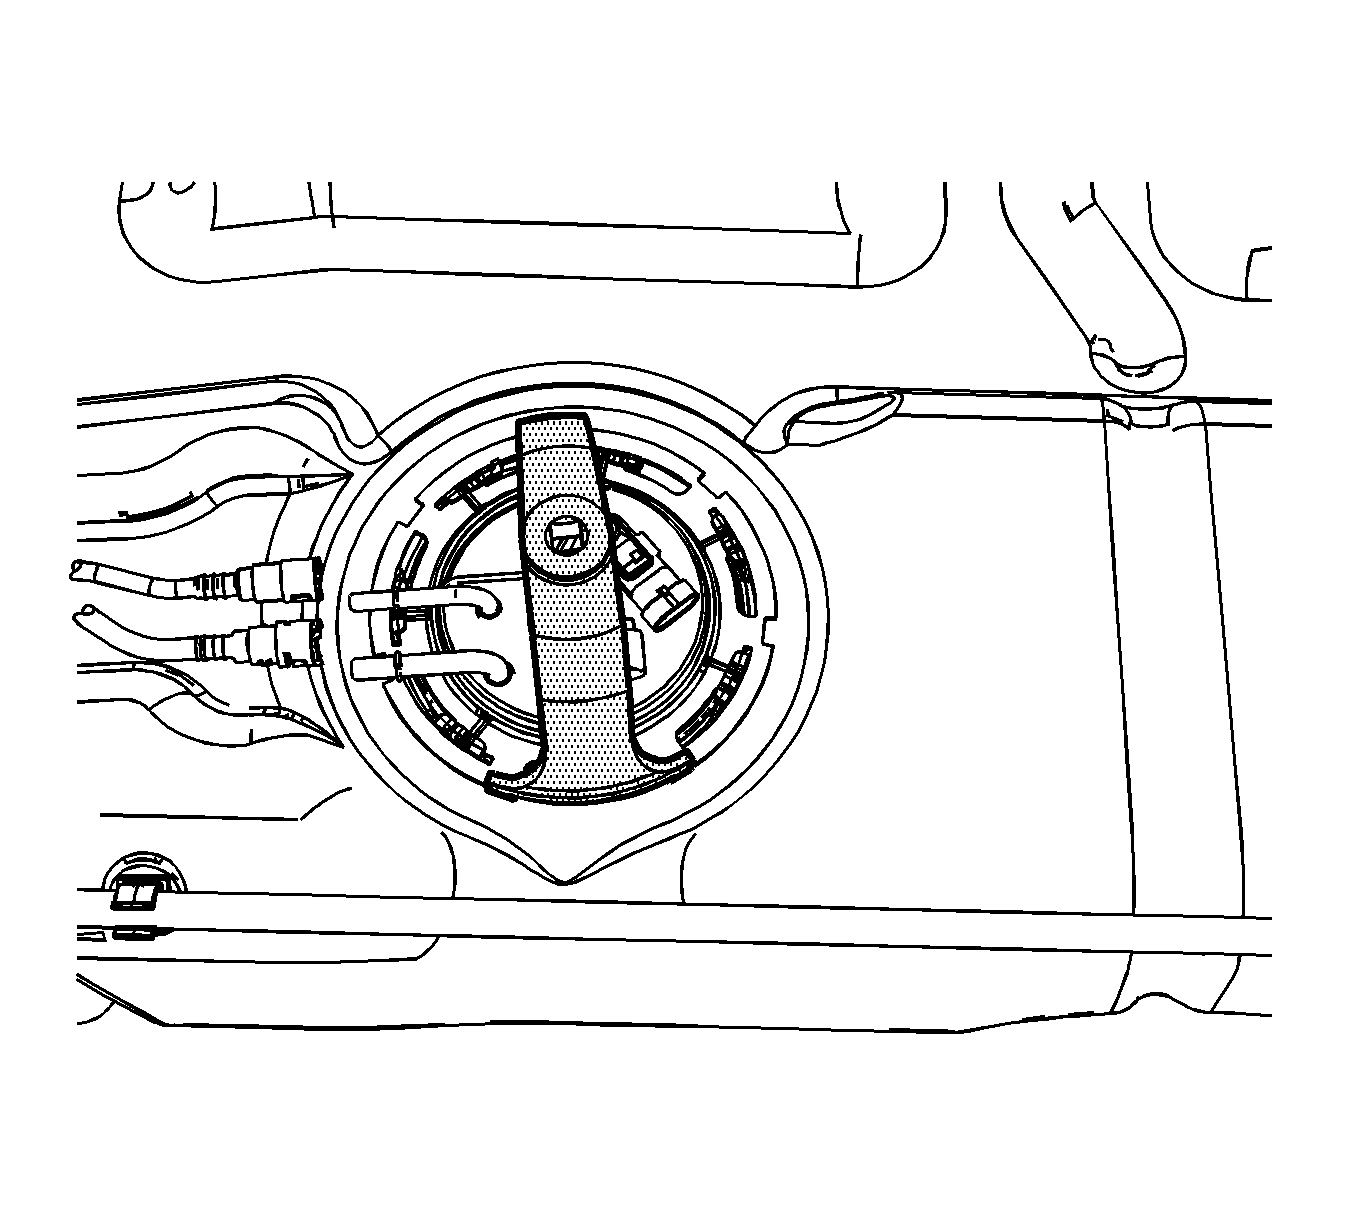
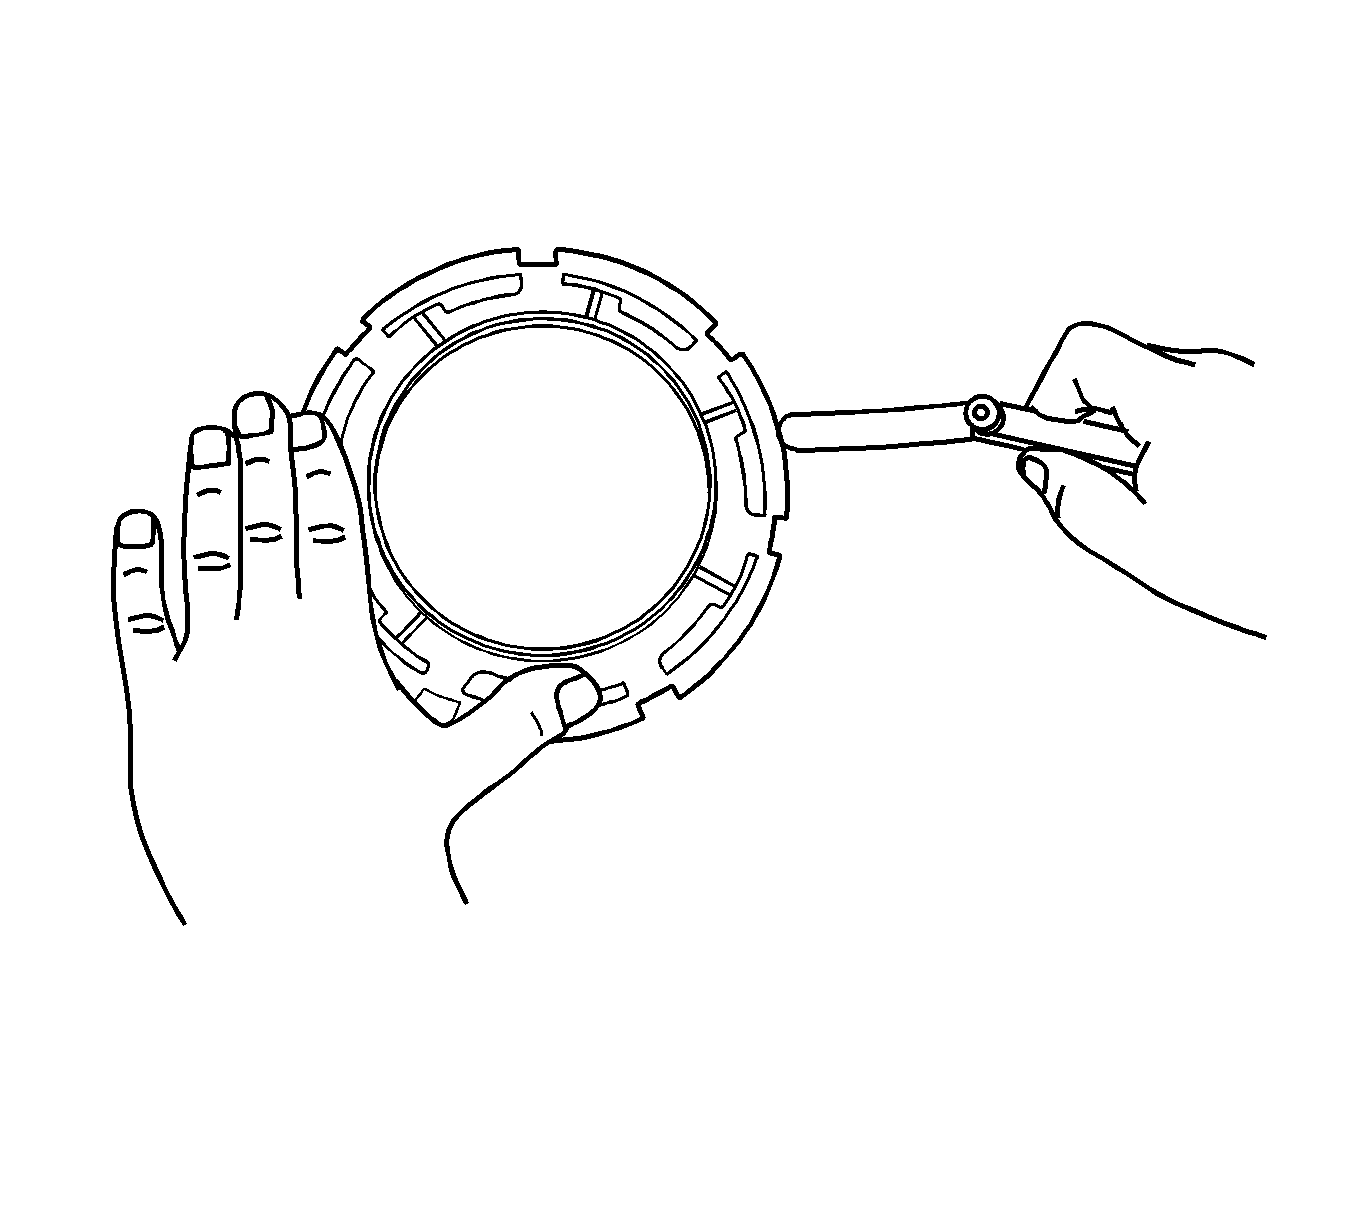
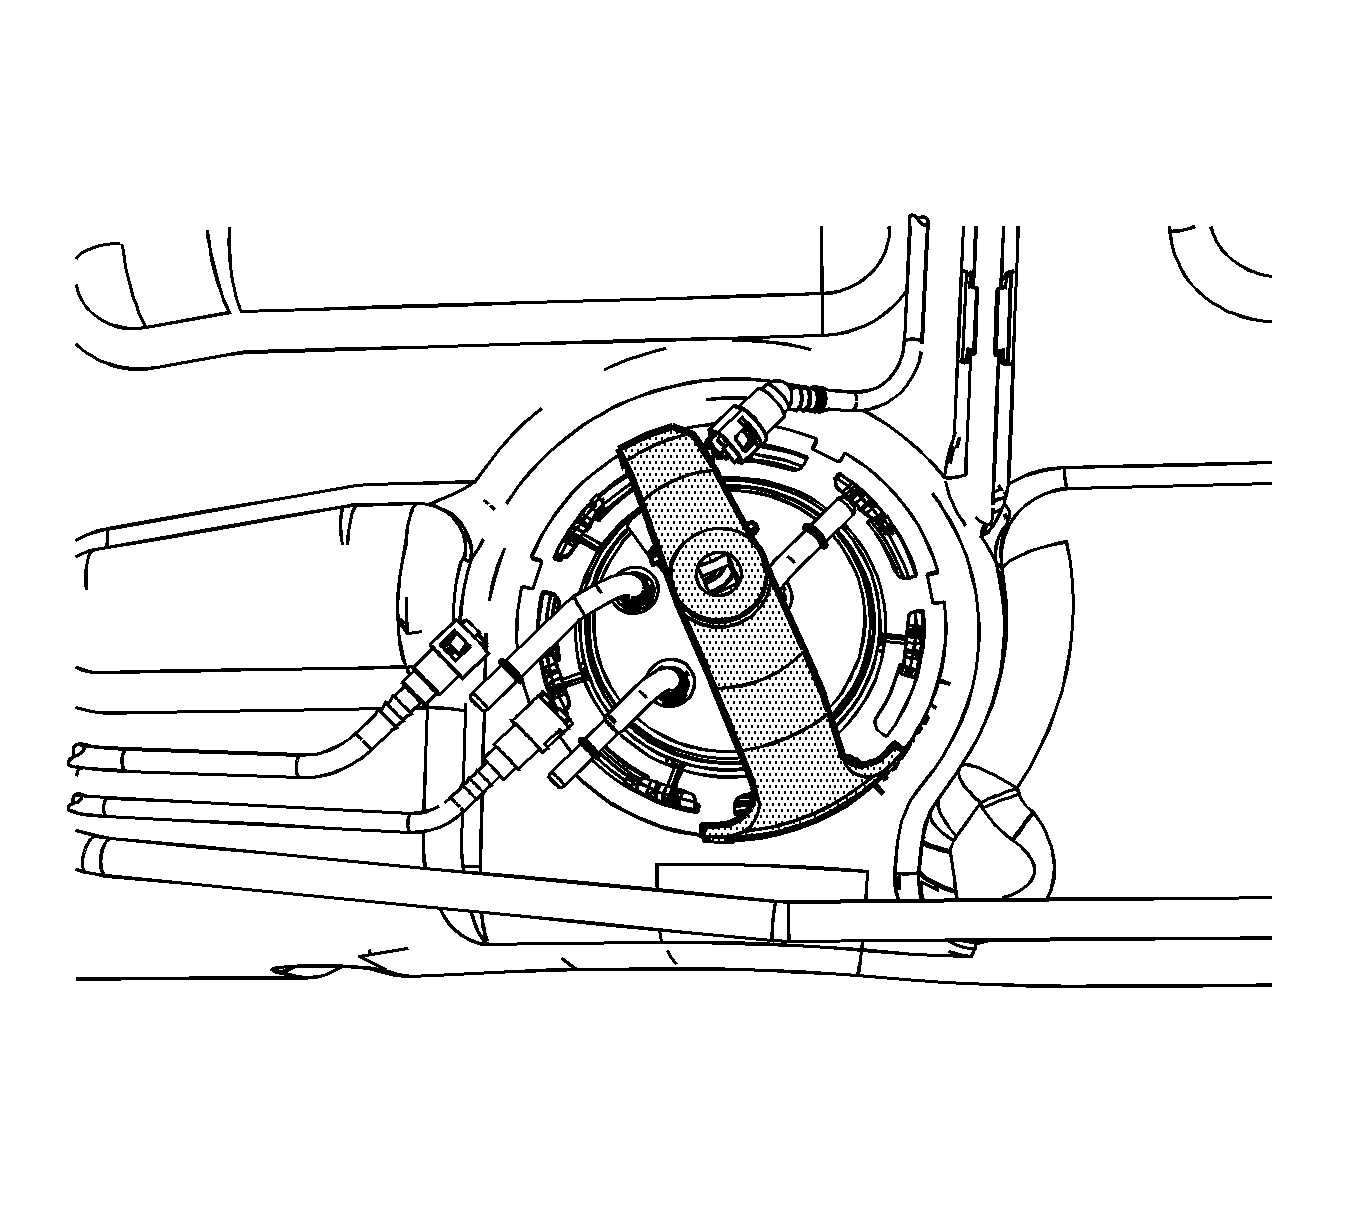
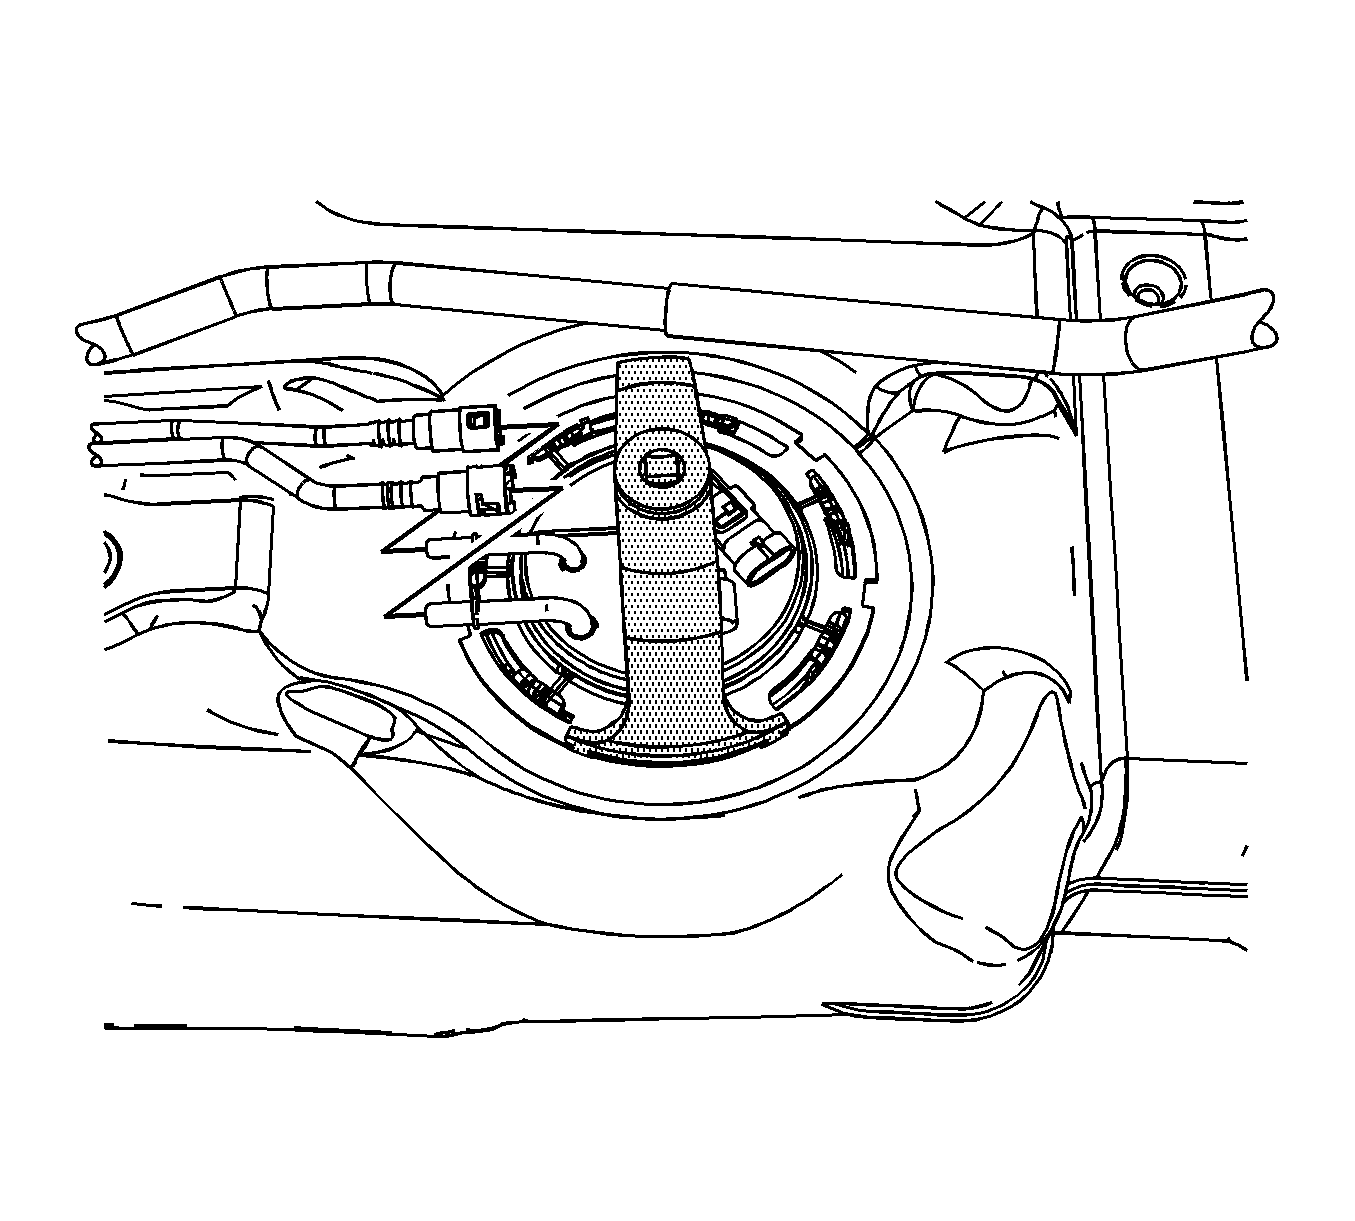
- Using the J 45722 , remove the lock ring.
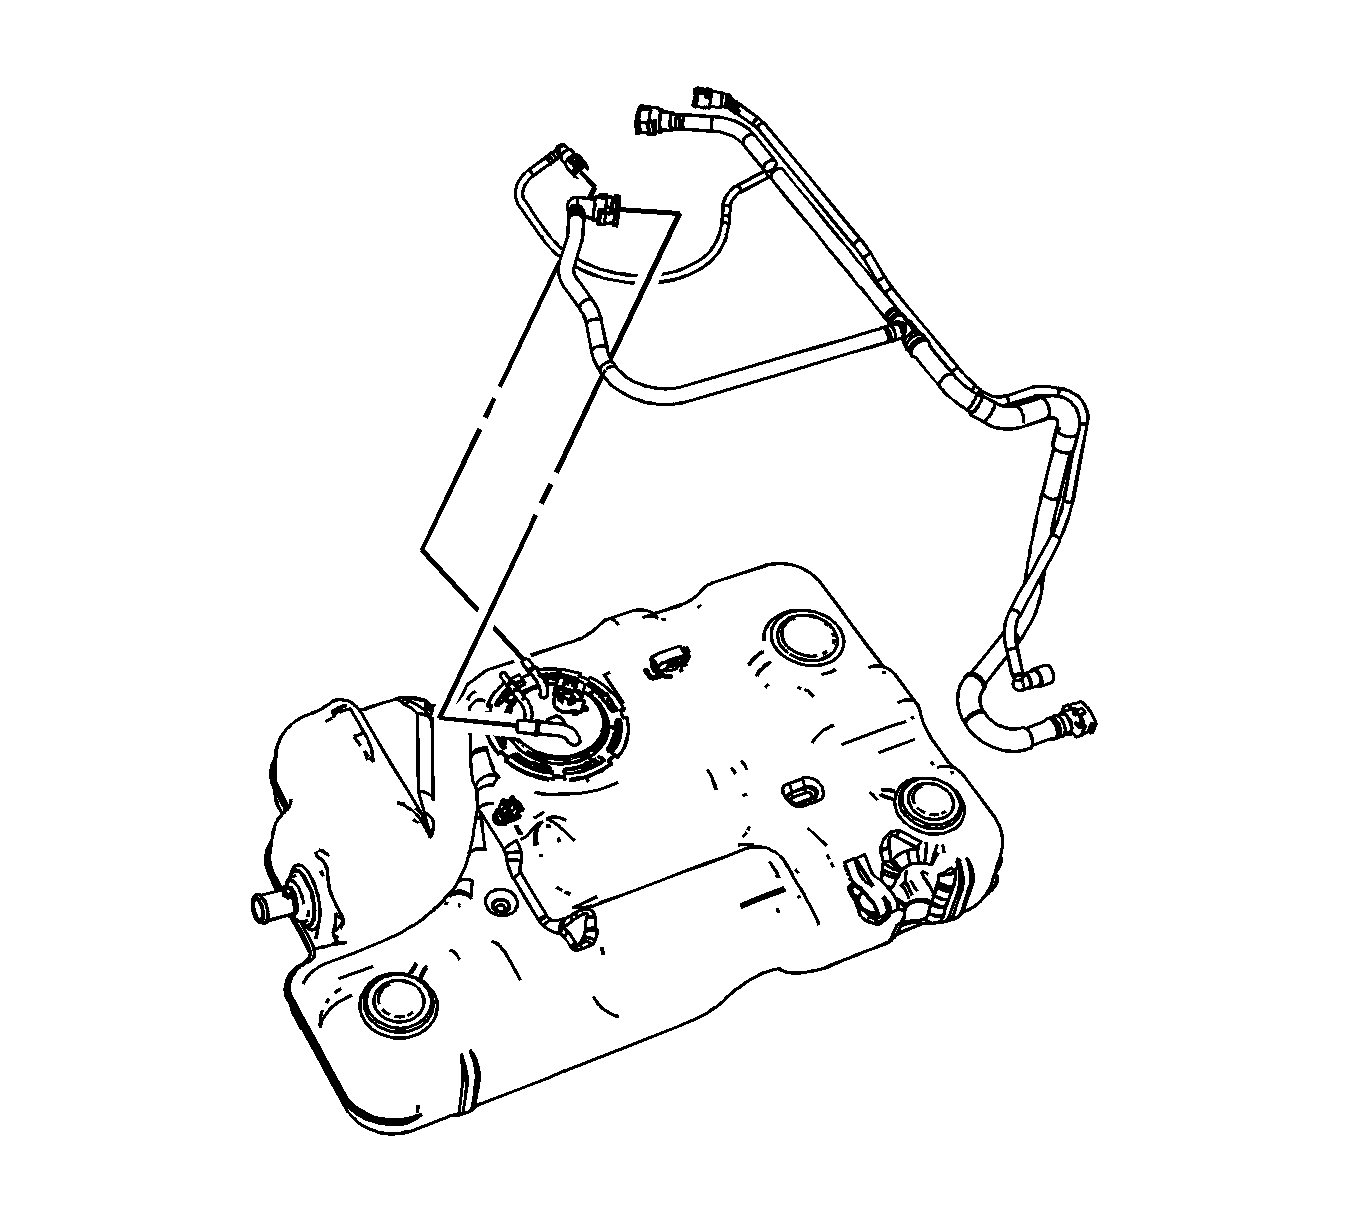
- Carefully lift the module from the fuel tank, enough to access the quick connect fitting (1) under the module cover. Disconnect the quick connect fitting. Refer to Plastic Collar Quick Connect Fitting Service.
- Remove the fuel tank module.
- Remove and discard the fuel tank module seal.
- Place the lock ring on a flat surface. Measure the clearance between the lock ring and the flat surface using a feeler gage at 7 points.
- If warpage is less than 0.41 mm (0.016 in), the lock ring does not require replacement.
- If warpage is greater than 0.41 mm (0.016 in), the lock ring must be replaced.
Caution: Refer to Damage to Fuel Tank Straps Caution in the Preface section.
Note: Carefully lower the fuel tank until the EVAP line can be repositioned.

Note:
• Some lock rings were manufactured with "DO NOT REUSE" stamped into them. These lock rings may be reused if they are not damaged or warped. • Inspect the lock ring for damage due to improper removal or installation procedures. If damage is found, install a NEW lock ring. • Check the lock ring for flatness.
Installation Procedure
- If the fuel tank was replaced perform the following steps, otherwise proceed to step 18.
- Install a NEW fuel tank module seal onto the fuel tank.
- Pull the vent line in the fuel tank up as far as possible for ease of installation.
- Position the fuel tank module part way into the fuel tank.
- Connect the quick connect fitting (1) to the module cover. Refer to Plastic Collar Quick Connect Fitting Service.
- Install the fuel tank module into the fuel tank.
- Place the lock ring into position.
- Rotate the lock ring counterclockwise using the J 45722 .
- Install the EVAP lines to the fuel tank.
- Connect the EVAP line quick connect fitting at the fuel tank module. Refer to Plastic Collar Quick Connect Fitting Service.
- Install the EVAP lines to the fuel tank clips (3, 5, 6, and 7) and close the clips.
- Install the EVAP line to the fuel tank clips (1, 2, 4, and 8).
- Install the fuel tank shields (1 and 4) and retainers (2 and 3).
- Install the fuel feed line to the fuel tank.
- Connect the fuel feed line quick connect fitting at the fuel tank module. Refer to Plastic Collar Quick Connect Fitting Service.
- Install the fuel feed line to the clip (1) and close the clip.
- Install the fuel feed line to the retaining feature (2) in the fuel tank.
- Place the fuel tank onto a suitable jack.
- With the aid of an assistant, partially raise the fuel tank until the electrical connections can be made.
- Connect the chassis wiring harness electrical connectors (1) to the fuel tank module and fuel pressure sensor.
- Engage the chassis harness electrical connector CPA retainer at the module electrical connector.
- Completely raise the fuel tank.
- Install the fuel tank straps.
- Install the fuel tank strap bolts.
- Remove the adjustable jack from the fuel tank.
- Connect the fuel tank EVAP line quick connect fitting (1) at the fuel tank vent valve. Refer to Plastic Collar Quick Connect Fitting Service.
- Remove the caps from the EVAP lines.
- Connect the fuel tank EVAP lines (1) to the EVAP canister. Refer to Plastic Collar Quick Connect Fitting Service.
- Remove the caps from the fuel and EVAP lines.
- Connect the chassis EVAP line quick connect fitting (4) to the fuel tank line. Refer to Plastic Collar Quick Connect Fitting Service.
- Connect the fuel tank fuel feed line quick connect fitting (5) to the chassis line. Refer to Plastic Collar Quick Connect Fitting Service.
- Connect the fuel tank vent line quick connect fitting (5) to the fuel fill pipe line. Refer to Plastic Collar Quick Connect Fitting Service.
- Install the fuel fill hose to the fuel tank. Ensure that the notch in the hose is aligned with the notch on the fuel tank.
- Tighten the fuel fill hose clamp (6).
- Lower the vehicle.
- Refill the fuel tank.
- Install the fuel fill cap.
- Connect the negative battery cable. Refer to Battery Negative Cable Disconnection and Connection.
- Use the following procedure in order to inspect for leaks:
- Install the intake manifold sight shield. Refer to Upper Intake Manifold Sight Shield Replacement.
Note: Always replace the fuel module seal when installing the fuel module. Replace the lock ring if necessary. DO NOT apply any type of lubrication in the seal groove.
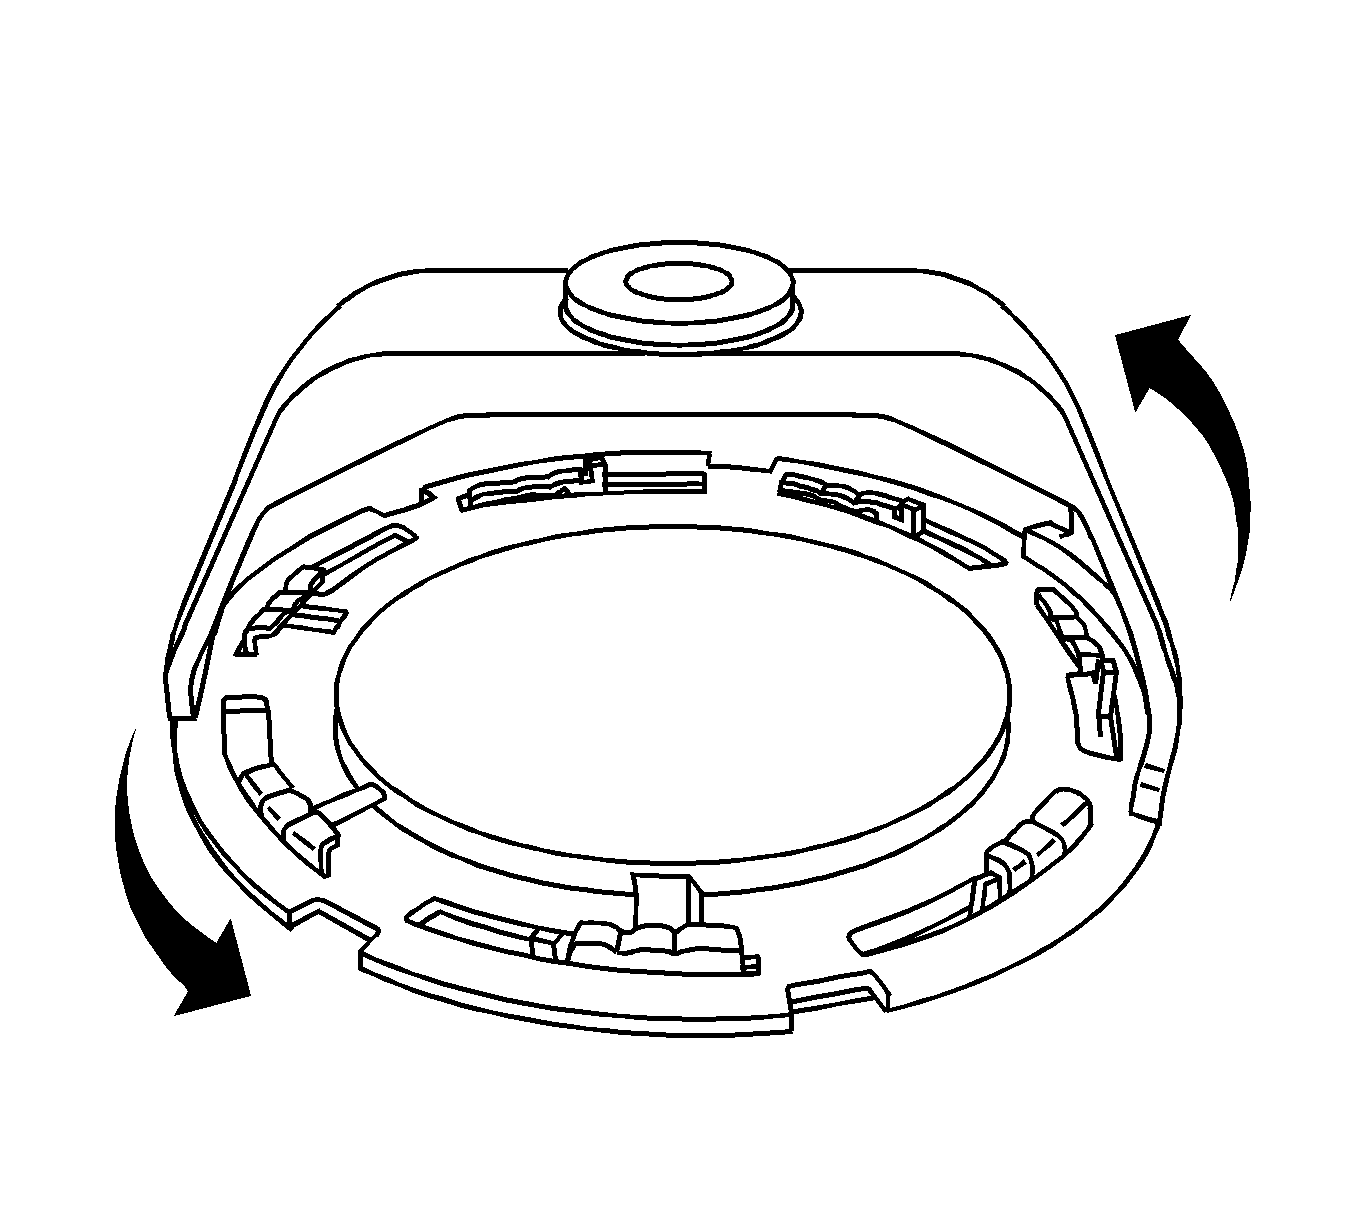
Ensure the lock ring is installed with the correct side facing upward. A correctly installed lock ring will only turn in a clockwise direction.
Note: Carefully raise the fuel tank until the EVAP line can be positioned.
Caution: Refer to Fastener Caution in the Preface section.
Tighten
Tighten the bolts to 40 N·m (30 lb ft).
Tighten
Tighten the clamp to 2.5 N·m (22 lb in).
| 39.1. | Turn the ignition ON, with the engine OFF, for 2 seconds. |
| 39.2. | Turn the ignition OFF for 10 seconds. |
| 39.3. | Turn the ignition ON, with the engine OFF. |
| 39.4. | Inspect for fuel leaks. |
Fuel Tank Replacement 1500 LWB - 117.3L (31 gal) Tank
Special Tools
J 45722 Fuel Sender Lock Ring Wrench
Removal Procedure
Note: Clean the fuel and evaporative emission (EVAP) connections and surrounding areas prior to disconnecting the lines in order to avoid possible system contamination.
- Relieve the fuel system pressure. Refer to Fuel Pressure Relief.
- Drain the fuel tank. Refer to Fuel Tank Draining.
- Disconnect the fuel tank vent line quick connect fitting (5) from the fuel fill pipe line. Refer to Plastic Collar Quick Connect Fitting Service.
- Disconnect the chassis EVAP line quick connect fitting (4) from the fuel tank line. Refer to Plastic Collar Quick Connect Fitting Service.
- Disconnect the fuel tank fuel feed line quick connect fitting (5) from the chassis line. Refer to Plastic Collar Quick Connect Fitting Service.
- Cap the fuel and EVAP lines in order to prevent possible fuel and/or EVAP system contamination.
- Disconnect the fuel tank EVAP lines (1) from the EVAP canister. Refer to Plastic Collar Quick Connect Fitting Service.
- Cap the EVAP lines in order to prevent possible EVAP system contamination.
- Using an adjustable jack, support the fuel tank.
- Remove the fuel tank strap bolts.
- Remove the fuel tank straps.
- With the aid of an assistant, carefully lower the rear of the fuel tank.
- Slide the front of the tank away from the frame.
- Lower the fuel tank slightly until the chassis wiring harness electrical connectors can be accessed.
- Disengage the chassis wiring harness electrical connector, connector position assurance (CPA) retainer at the module.
- Disconnect the chassis wiring harness electrical connectors (1) from the module and the fuel pressure sensor.
- Completely lower the fuel tank.
- With the aid of an assistant, place the fuel tank in a suitable work area.
- If replacing the fuel tank proceed to the next step, otherwise proceed to step 18 in the installation procedure.
- Remove the fuel feed line from the retaining feature (2) in the fuel tank.
- Open the fuel/EVAP line clip (1) and remove the fuel feed line from the clip.
- Disconnect the fuel feed line quick connect fitting at the fuel tank module. Refer to Plastic Collar Quick Connect Fitting Service.
- Remove the fuel feed line from the fuel tank.
- Remove the fuel tank shield retainers (2 and 3) and shields (1 and 4).
- Remove the EVAP line from the fuel tank clips (2 and 6).
- Open the fuel tank clips (1, 3, 4, and 5) and remove the EVAP lines from the clips.
- Disconnect the EVAP line quick connect fittings at the fuel tank module and fuel tank vent valve. Refer to Plastic Collar Quick Connect Fitting Service.
- Remove the EVAP lines from the fuel tank.
- Using the J 45722 , remove the lock ring.
- Carefully lift the module from the fuel tank, enough to access the quick connect fittings (1) under the module cover. Disconnect the quick connect fittings. Refer to Plastic Collar Quick Connect Fitting Service.
- Remove the fuel tank module.
- Remove and discard the fuel tank module seal.
- Place the lock ring on a flat surface. Measure the clearance between the lock ring and the flat surface using a feeler gage at 7 points.
- If warpage is less than 0.41 mm (0.016 in), the lock ring does not require replacement.
- If warpage is greater than 0.41 mm (0.016 in), the lock ring must be replaced.
Caution: Refer to Damage to Fuel Tank Straps Caution in the Preface section.

Note:
• Some lock rings were manufactured with "DO NOT REUSE" stamped into them. These lock rings may be reused if they are not damaged or warped. • Inspect the lock ring for damage due to improper removal or installation procedures. If damage is found, install a NEW lock ring. • Check the lock ring for flatness.
Installation Procedure
- If the fuel tank was replaced perform the following steps, otherwise proceed to step 18.
- Install the NEW fuel tank module seal onto the fuel tank.
- Pull the vent lines in the fuel tank up as far as possible for ease of installation.
- Position the fuel tank module part way into the fuel tank.
- Connect the quick connect fittings (1) to the module cover. Refer to Plastic Collar Quick Connect Fitting Service.
- Install the fuel tank module into the fuel tank.
- Place the lock ring into position.
- Rotate the lock ring counterclockwise using the J 45722 .
- Install the EVAP lines to the fuel tank.
- Connect the EVAP line quick connect fittings at the fuel tank module and fuel tank vent valve. Refer to Plastic Collar Quick Connect Fitting Service.
- Install the EVAP lines to the fuel tank clips (1, 3, 4, and 5) and close the clips.
- Install the EVAP line to the fuel tank clips (2 and 6).
- Install the fuel tank shields (1 and 4) and retainers (2 and 3).
- Install the fuel feed line to the fuel tank.
- Connect the fuel feed line quick connect fitting at the fuel tank module. Refer to Plastic Collar Quick Connect Fitting Service.
- Install the fuel feed line to the clip (1) and close the clip.
- Install the fuel feed line to the retaining feature (2) in the fuel tank.
- Place the fuel tank onto a suitable jack.
- With the aid of an assistant, partially raise the fuel tank until the electrical connections can be made.
- Connect the chassis wiring harness electrical connectors (1) to the fuel tank module and fuel pressure sensor.
- Engage the chassis harness electrical connector CPA retainer at the module electrical connector.
- Completely raise the fuel tank.
- Install the fuel tank straps.
- Install the fuel tank strap bolts.
- Remove the adjustable jack from the fuel tank.
- Remove the caps from the EVAP lines.
- Connect the fuel tank EVAP lines (1) to the EVAP canister. Refer to Plastic Collar Quick Connect Fitting Service.
- Remove the caps from the fuel and EVAP lines.
- Connect the chassis EVAP line quick connect fitting (4) to the fuel tank line. Refer to Plastic Collar Quick Connect Fitting Service.
- Connect the fuel tank fuel feed line quick connect fitting (5) to the chassis line. Refer to Plastic Collar Quick Connect Fitting Service.
- Connect the fuel tank vent line quick connect fitting (5) to the fuel fill pipe line. Refer to Plastic Collar Quick Connect Fitting Service.
- Install the fuel fill hose to the fuel tank. Ensure that the notch in the hose is aligned with the notch on the fuel tank.
- Tighten the fuel fill hose clamp (6).
- Lower the vehicle.
- Refill the fuel tank.
- Install the fuel fill cap.
- Connect the negative battery cable. Refer to Battery Negative Cable Disconnection and Connection.
- Use the following procedure in order to inspect for leaks:
- Install the intake manifold sight shield. Refer to Upper Intake Manifold Sight Shield Replacement.
Note: Always replace the fuel module seal when installing the fuel module. Replace the lock ring if necessary. DO NOT apply any type of lubrication in the seal groove.
Ensure the lock ring is installed with the correct side facing upward. A correctly installed lock ring will only turn in a clockwise direction.
Caution: Refer to Fastener Caution in the Preface section.
Tighten
Tighten the bolts to 40 N·m (30 lb ft).
Tighten
Tighten the clamp to 2.5 N·m (22 lb in).
| 38.1. | Turn the ignition ON, with the engine OFF, for 2 seconds. |
| 38.2. | Turn the ignition OFF for 10 seconds. |
| 38.3. | Turn the ignition ON, with the engine OFF. |
| 38.4. | Inspect for fuel leaks. |
Fuel Tank Replacement 1500 SWB - 98.4L (26 gal) Tank
Special Tools
J 45722 Fuel Sender Lock Ring Wrench
Removal Procedure
Note: Clean the fuel and evaporative emission (EVAP) connections and surrounding areas prior to disconnecting the lines in order to avoid possible system contamination.
- Relieve the fuel system pressure. Refer to Fuel Pressure Relief.
- Drain the fuel tank. Refer to Fuel Tank Draining.
- Disconnect the fuel tank vent line quick connect fitting (5) from the fuel fill pipe line. Refer to Plastic Collar Quick Connect Fitting Service.
- Disconnect the chassis EVAP line quick connect fitting (4) from the fuel tank line. Refer to Plastic Collar Quick Connect Fitting Service.
- Disconnect the fuel tank fuel feed line quick connect fitting (5) from the chassis line. Refer to Plastic Collar Quick Connect Fitting Service.
- Cap the fuel and EVAP lines in order to prevent possible fuel and/or EVAP system contamination.
- Disconnect the fuel tank EVAP lines (1) from the EVAP canister. Refer to Plastic Collar Quick Connect Fitting Service.
- Cap the EVAP lines in order to prevent possible EVAP system contamination.
- Using an adjustable jack, support the fuel tank.
- Remove the fuel tank strap bolts.
- Remove the fuel tank straps.
- With the aid of an assistant, carefully lower the rear of the fuel tank.
- Slide the front of the tank away from the frame.
- Lower the fuel tank slightly until the chassis wiring harness electrical connectors can be accessed.
- Disengage the chassis wiring harness electrical connector, connector position assurance (CPA) retainer at the module.
- Disconnect the chassis wiring harness electrical connectors (1) from the module and the fuel pressure sensor.
- Completely lower the fuel tank.
- With the aid of an assistant, place the fuel tank in a suitable work area.
- If replacing the fuel tank proceed to the next step, otherwise proceed to step 18 in the installation procedure.
- Remove the fuel feed line from the retaining feature (2) in the fuel tank.
- Open the fuel/EVAP line clip (1) and remove the fuel feed line from the clip.
- Disconnect the fuel feed line quick connect fitting at the fuel tank module. Refer to Plastic Collar Quick Connect Fitting Service.
- Remove the fuel feed line from the fuel tank.
- Remove the fuel tank shield retainers (2 and 3) and shields (1 and 4).
- Remove the EVAP line from the fuel tank clips (2 and 6).
- Open the fuel tank clips (1, 3, 4, and 5) and remove the EVAP lines from the clips.
- Disconnect the EVAP line quick connect fittings at the fuel tank module and fuel tank vent valve. Refer to Plastic Collar Quick Connect Fitting Service.
- Remove the EVAP lines from the fuel tank.
- Using the J 45722 , remove the lock ring.
- Carefully lift the module from the fuel tank, enough to access the quick connect fittings (1) under the module cover. Disconnect the quick connect fittings. Refer to Plastic Collar Quick Connect Fitting Service.
- Remove the fuel tank module.
- Remove and discard the fuel tank module seal.
- Place the lock ring on a flat surface. Measure the clearance between the lock ring and the flat surface using a feeler gage at 7 points.
- If warpage is less than 0.41 mm (0.016 in), the lock ring does not require replacement.
- If warpage is greater than 0.41 mm (0.016 in), the lock ring must be replaced.
Caution: Refer to Damage to Fuel Tank Straps Caution in the Preface section.
Note:
• Some lock rings were manufactured with "DO NOT REUSE" stamped into them. These lock rings may be reused if they are not damaged or warped. • Inspect the lock ring for damage due to improper removal or installation procedures. If damage is found, install a NEW lock ring. • Check the lock ring for flatness.
Installation Procedure
- If the fuel tank was replaced perform the following steps, otherwise proceed to step 18.
- Install the NEW fuel tank module seal onto the fuel tank.
- Pull the vent lines in the fuel tank up as far as possible for ease of installation.
- Position the fuel tank module part way into the fuel tank.
- Connect the quick connect fittings (1) to the module cover. Refer to Plastic Collar Quick Connect Fitting Service.
- Install the fuel tank module into the fuel tank.
- Place the lock ring into position.
- Rotate the lock ring counterclockwise using the J 45722 .
- Install the EVAP lines to the fuel tank.
- Connect the EVAP line quick connect fittings at the fuel tank module and fuel tank vent valve. Refer to Plastic Collar Quick Connect Fitting Service.
- Install the EVAP lines to the fuel tank clips (1, 3, 4, and 5) and close the clips.
- Install the EVAP line to the fuel tank clips (2 and 6).
- Install the fuel tank shields (1 and 4) and retainers (2 and 3).
- Install the fuel feed line to the fuel tank.
- Connect the fuel feed line quick connect fitting at the fuel tank module. Refer to Plastic Collar Quick Connect Fitting Service.
- Install the fuel feed line to the clip (1) and close the clip.
- Install the fuel feed line to the retaining feature (2) in the fuel tank.
- Place the fuel tank onto a suitable jack.
- With the aid of an assistant, partially raise the fuel tank until the electrical connections can be made.
- Connect the chassis wiring harness electrical connectors (1) to the fuel tank module and fuel pressure sensor.
- Engage the chassis harness electrical connector CPA retainer at the module electrical connector.
- Completely raise the fuel tank.
- Install the fuel tank straps.
- Install the fuel tank strap bolts.
- Remove the adjustable jack from the fuel tank.
- Remove the caps from the EVAP lines.
- Connect the fuel tank EVAP lines (1) to the EVAP canister. Refer to Plastic Collar Quick Connect Fitting Service.
- Remove the caps from the fuel and EVAP lines.
- Connect the chassis EVAP line quick connect fitting (4) to the fuel tank line. Refer to Plastic Collar Quick Connect Fitting Service.
- Connect the fuel tank fuel feed line quick connect fitting (5) to the chassis line. Refer to Plastic Collar Quick Connect Fitting Service.
- Connect the fuel tank vent line quick connect fitting (5) to the fuel fill pipe line. Refer to Plastic Collar Quick Connect Fitting Service.
- Install the fuel fill hose to the fuel tank. Ensure that the notch in the hose is aligned with the notch on the fuel tank.
- Tighten the fuel fill hose clamp (6).
- Lower the vehicle.
- Refill the fuel tank.
- Install the fuel fill cap.
- Connect the negative battery cable. Refer to Battery Negative Cable Disconnection and Connection.
- Use the following procedure in order to inspect for leaks:
- Install the intake manifold sight shield. Refer to Upper Intake Manifold Sight Shield Replacement.
Note: Always replace the fuel module seal when installing the fuel module. Replace the lock ring if necessary. DO NOT apply any type of lubrication in the seal groove.
Ensure the lock ring is installed with the correct side facing upward. A correctly installed lock ring will only turn in a clockwise direction.
Caution: Refer to Fastener Caution in the Preface section.
Tighten
Tighten the bolts to 40 N·m (30 lb ft).
Tighten
Tighten the clamp to 2.5 N·m (22 lb in).
| 38.1. | Turn the ignition ON, with the engine OFF, for 2 seconds. |
| 38.2. | Turn the ignition OFF for 10 seconds. |
| 38.3. | Turn the ignition ON, with the engine OFF. |
| 38.4. | Inspect for fuel leaks. |
Fuel Tank Replacement 2500 LWB - 98.4L (26 gal) Tank Front
Special Tools
J 45722 Fuel Sender Lock Ring Wrench
Removal Procedure
Note: Clean all fuel and evaporative emission (EVAP) line connections and surrounding areas prior to disconnecting the lines in order to avoid possible fuel and/or EVAP system contamination.
- Relieve the fuel system pressure. Refer to the Fuel Pressure Relief.
- Drain the fuel tank. Refer to Fuel Tank Draining.
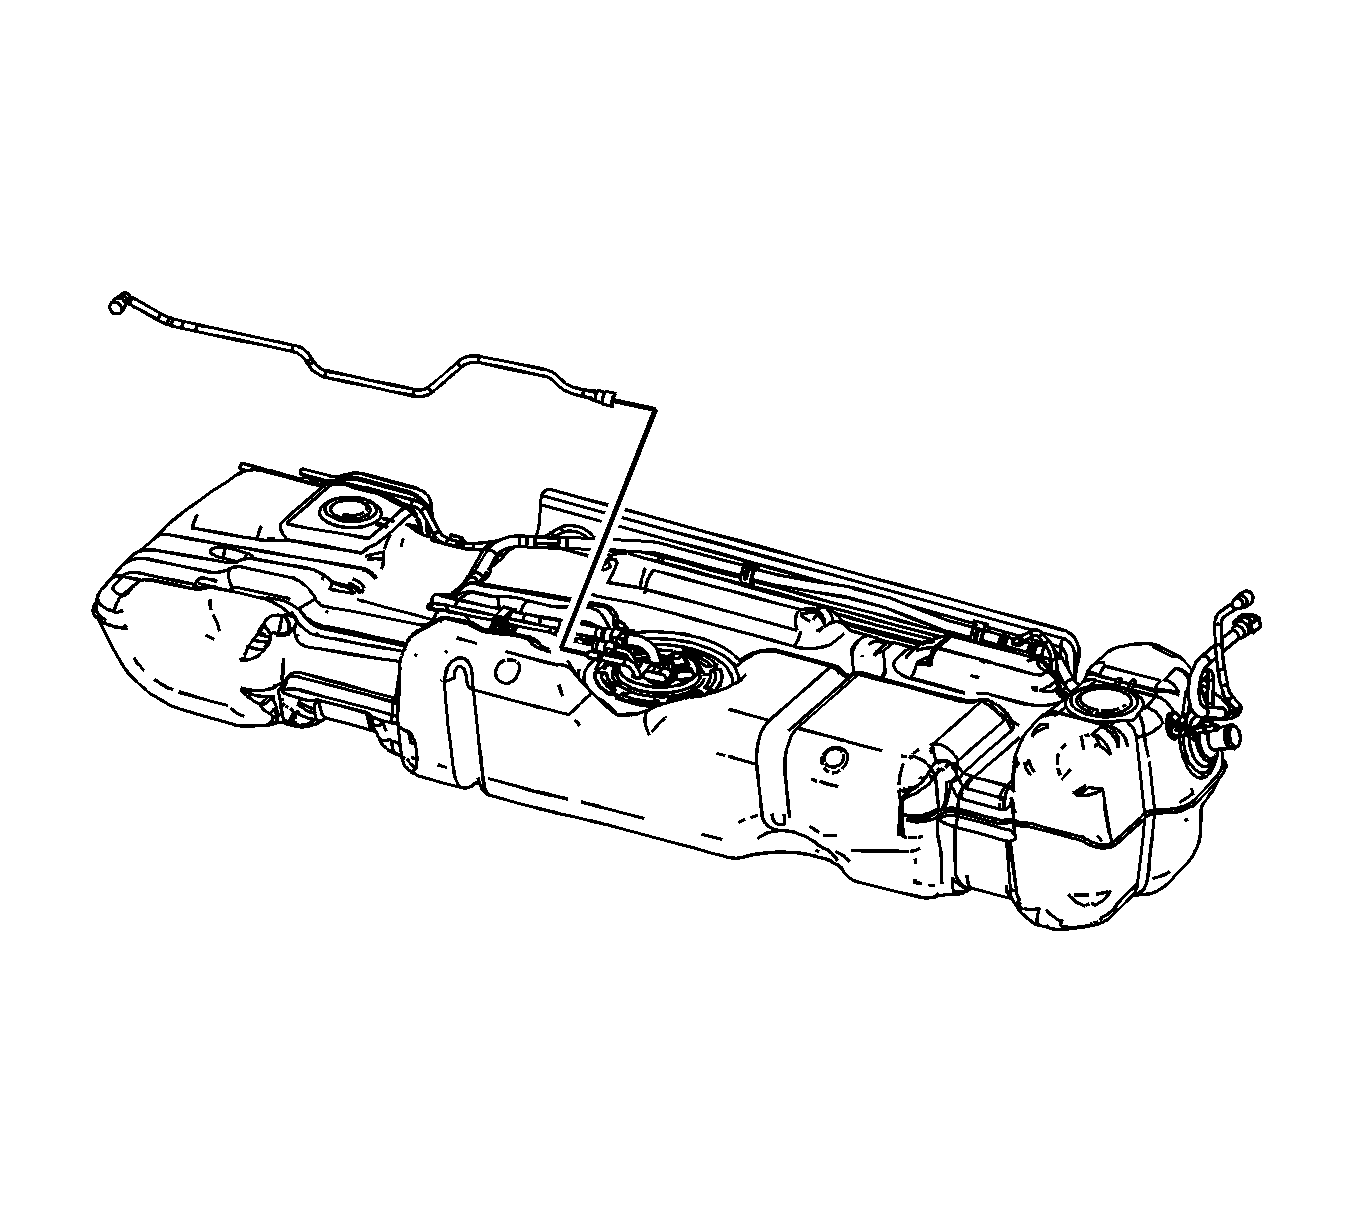
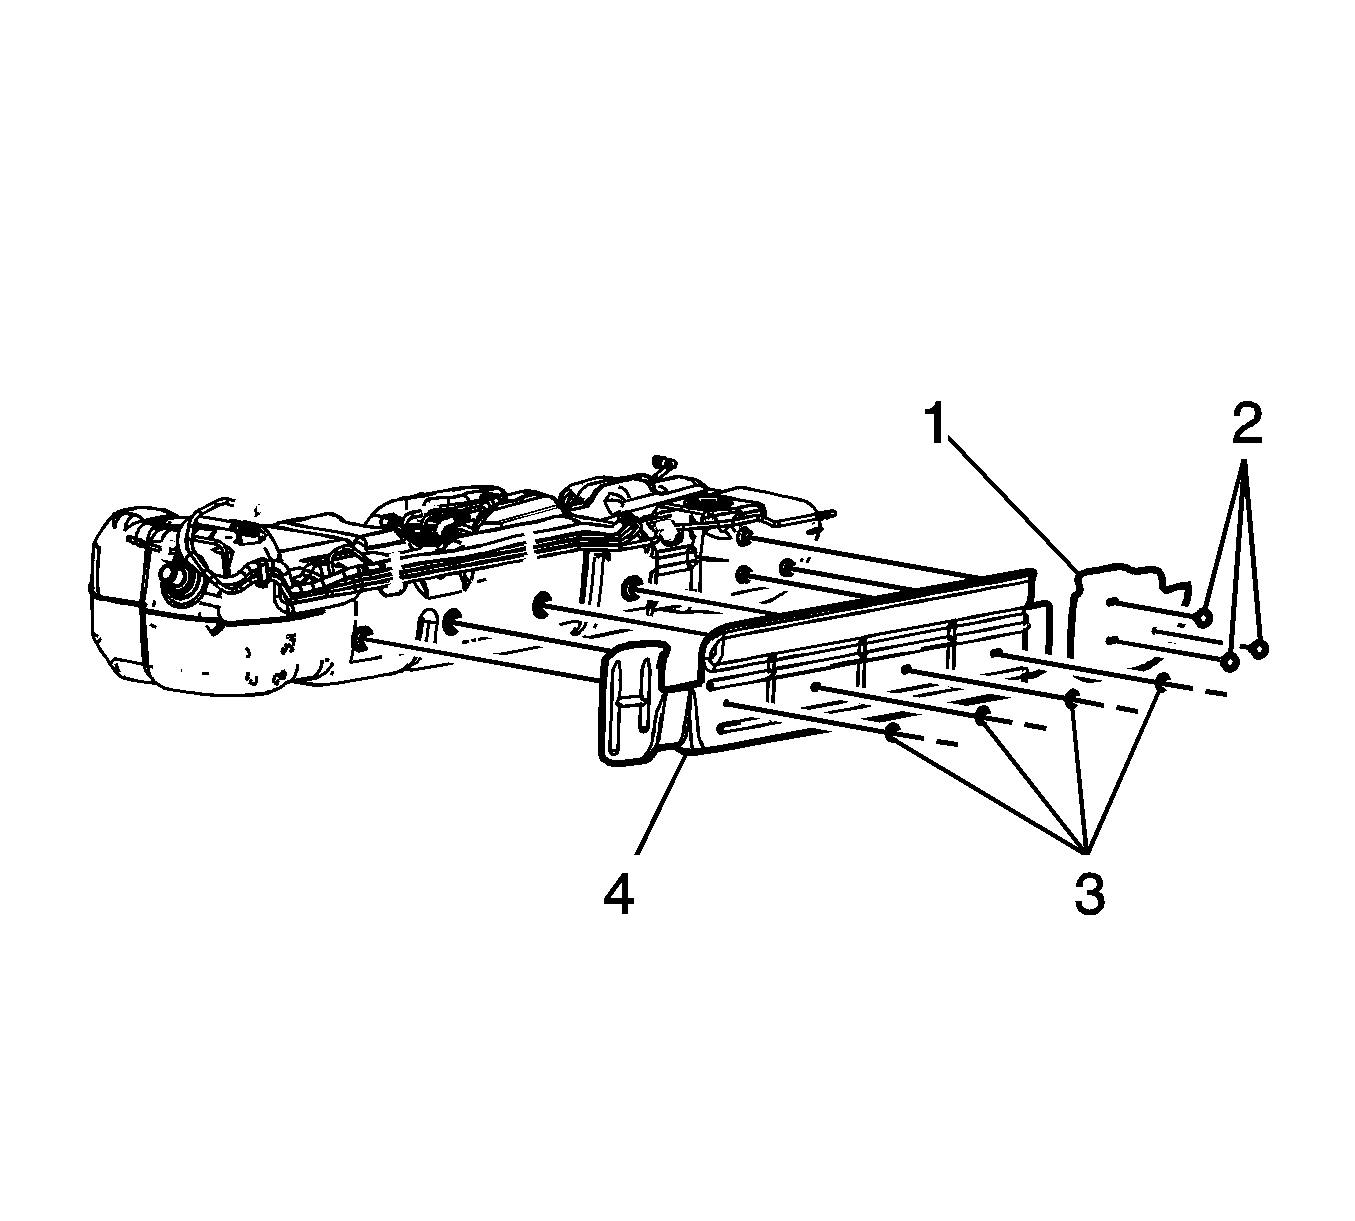
- Disconnect the fill pipe evaporative emission (EVAP) line quick connect fitting (2) from the fuel tank vent valve. Refer to Plastic Collar Quick Connect Fitting Service.
- Disconnect the EVAP line quick connect fitting (1) from the fuel tank vent valve. Refer to Plastic Collar Quick Connect Fitting Service.
- Disconnect the chassis fuel feed and EVAP line quick connect fittings from the fuel tank line quick connect fittings. Refer to Plastic Collar Quick Connect Fitting Service.
- Open the clip on the side of the fuel tank retaining the intermediate lines.
- Disconnect the fuel and EVAP intermediate line quick connect fittings from the front tank lines. Refer to Plastic Collar Quick Connect Fitting Service.
- Cap the fuel and EVAP lines in order to prevent possible fuel/EVAP system contamination.
- Using an adjustable jack, support the fuel tank.
- Remove the fuel tank strap bolts.
- Remove the fuel tank straps.
- With the aid of an assistant, carefully lower the fuel tank until the electrical connectors can be accessed.
- Disengage the connector position assurance (CPA) retainer.
- Disconnect the chassis harness electrical connector (1) from the fuel tank module.
- Completely lower the fuel tank.
- Place the fuel tank in a suitable work area.
- If replacing the fuel tank proceed to the next step, otherwise proceed to step 14 in the installation procedure.
- Remove the fuel tank shield retainers (1) and shield (2).
- Remove the EVAP line from the fuel tank clip (1).
- Open the fuel tank clips (2-7) and remove the fuel/EVAP lines from the clips.
- Disconnect the fuel/EVAP line quick connect fittings from the fuel tank module. Refer to Plastic Collar Quick Connect Fitting Service.
- Remove the fuel/EVAP lines from the fuel tank.
- Using the J 45722 remove the lock ring.
- Carefully lift the module from the fuel tank, enough to access the quick connect fitting (1) under the module cover. Disconnect the quick connect fitting. Refer to Plastic Collar Quick Connect Fitting Service.
- Remove the fuel tank module.
- Remove and discard the fuel tank module seal.
- Place the lock ring on a flat surface. Measure the clearance between the lock ring and the flat surface using a feeler gage at 7 points.
- If warpage is less than 0.41 mm (0.016 in), the lock ring does not require replacement.
- If warpage is greater than 0.41 mm (0.016 in), the lock ring must be replaced.
Caution: Refer to Damage to Fuel Tank Straps Caution in the Preface section.
Note: When lowering the fuel tank, ensure that the EVAP line does not get caught on anything.
Note:
• Some lock rings were manufactured with "DO NOT REUSE" stamped into them. These lock rings may be reused if they are not damaged or warped. • Inspect the lock ring for damage due to improper removal or installation procedures. If damage is found, install a NEW lock ring. • Check the lock ring for flatness.
Installation Procedure
- If the fuel tank was replaced perform the following steps, otherwise proceed to step 14.
- Install the NEW fuel tank module seal onto the fuel tank.
- Pull the vent line in the fuel tank up as far as possible for ease of installation.
- Position the fuel tank module part way into the fuel tank.
- Connect the quick connect fitting (1) to the module cover. Refer to Plastic Collar Quick Connect Fitting Service.
- Install the fuel tank module into the fuel tank.
- Place the lock ring into position.
- Rotate the lock ring counterclockwise using the J 45722
- Install the EVAP lines to the fuel tank.
- Connect the EVAP line quick connect fittings at the fuel tank module. Refer to Evaporative Emission Hoses/Pipes Replacement - Canister/Fuel Tank.
- Install the EVAP lines to the fuel tank clips (2-7) and close the clips.
- Install the EVAP line to the fuel tank clip (1).
- Install the fuel tank shield (2) and retainers (1).
- Place the fuel tank onto a suitable jack.
- With the aid of an assistant, partially raise the fuel tank.
- Connect the chassis harness electrical connector (1) to the fuel tank module.
- Engage the CPA retainer.
- With the aid of an assistant, completely raise the fuel tank.
- Install the fuel tank straps.
- Install the fuel tank strap bolts.
- Remove the adjustable jack from under the fuel tank.
- Remove the caps from the fuel and EVAP lines.
- Connect the fuel and EVAP intermediate lines to the front tank. Refer to Plastic Collar Quick Connect Fitting Service.
- Install the lines to the clip on the side of the fuel tank and close the clip.
- Connect the chassis fuel feed and EVAP line quick connect fittings to the fuel tank line quick connect fittings. Refer to Plastic Collar Quick Connect Fitting Service
- Connect the EVAP line quick connect fitting (1) to the fuel tank vent valve. Refer to Plastic Collar Quick Connect Fitting Service.
- Connect the fill pipe EVAP line quick connect fitting (2) to the fuel tank vent valve. Refer to Plastic Collar Quick Connect Fitting Service.
- Install the fuel fill hose to the fuel tank.
- Tighten the fuel fill hose clamp at the fuel tank.
- Lower the vehicle.
- Refill the fuel tank.
- Install the fuel fill cap.
- Connect the negative battery cable. Refer to Battery Negative Cable Disconnection and Connection.
- Use the following procedure in order to inspect for leaks:
- Install the intake manifold sight shield. Refer to Upper Intake Manifold Sight Shield Replacement.
Note: When installing the fuel tank, ensure that the EVAP line is correctly routed over the frame.
Caution: Refer to Fastener Caution in the Preface section.
Tighten
Tighten the bolts to 40 N·m (30 lb ft).
Tighten
Tighten the clamp to 2.5 N·m (22 lb in).
| 34.1. | Turn the ignition ON, with the engine OFF, for 2 seconds. |
| 34.2. | Turn the ignition OFF for 10 seconds. |
| 34.3. | Turn the ignition ON, with the engine OFF. |
| 34.4. | Inspect for fuel leaks. |
Fuel Tank Replacement 1500 SWB - 98.4L (26 gal) Tank + E85
Special Tools
J 45722 Fuel Sender Lock Ring Wrench
Removal Procedure
Note: Clean the fuel and evaporative emission (EVAP) connections and surrounding areas prior to disconnecting the lines in order to avoid possible system contamination.
- Relieve the fuel system pressure. Refer to Fuel Pressure Relief.
- Drain the fuel tank. Refer to Fuel Tank Draining.
- Disconnect the fuel tank vent line quick connect fitting (5) from the fuel fill pipe vent line. Refer to Plastic Collar Quick Connect Fitting Service.
- Disconnect the chassis EVAP line quick connect fitting (4) from the fuel tank line. Refer to Plastic Collar Quick Connect Fitting Service.
- Disconnect the fuel tank fuel feed line quick connect fitting (5) from the chassis line. Refer to Plastic Collar Quick Connect Fitting Service.
- Cap the fuel and EVAP lines in order to prevent possible fuel and/or EVAP system contamination.
- Disconnect the fuel tank EVAP lines (1) from the EVAP canister. Refer to Plastic Collar Quick Connect Fitting Service.
- Cap the EVAP lines in order to prevent possible EVAP system contamination.
- Disconnect the fuel tank EVAP line quick connect fitting (1) at the fuel tank vent valve. Refer to Plastic Collar Quick Connect Fitting Service.
- Using an adjustable jack, support the fuel tank.
- Remove the fuel tank strap bolts.
- Remove the fuel tank straps.
- With the aid of an assistant, carefully lower the rear of the fuel tank.
- Slide the front of the tank away from the frame.
- Lower the fuel tank slightly until the chassis wiring harness electrical connectors can be accessed.
- Disengage the chassis wiring harness electrical connector, connector position assurance (CPA) retainer at the module.
- Disconnect the chassis wiring harness electrical connectors (1) from the module and the fuel pressure sensor.
- Completely lower the fuel tank.
- With the aid of an assistant, Place the fuel tank in a suitable work area.
- If replacing the fuel tank proceed to the next step, otherwise proceed to step 18 in the installation procedure.
- Remove the fuel feed line from the retaining feature (2) in the fuel tank.
- Open the fuel/EVAP line clip (1) and remove the fuel feed line from the clip.
- Disconnect the fuel feed line quick connect fitting at the fuel tank module. Refer to Plastic Collar Quick Connect Fitting Service.
- Remove the fuel feed line from the fuel tank.
- Remove the fuel tank shield retainers (2 and 3) and shields (1 and 4).
- Remove the EVAP line from the fuel tank clips (2 and 6).
- Open the fuel tank clips (1, 3, 4, and 5) and remove the EVAP lines from the clips.
- Disconnect the EVAP line quick connect fittings at the fuel tank module and fuel tank vent valves. Refer to Plastic Collar Quick Connect Fitting Service.
- Remove the EVAP lines from the fuel tank.
- Using the J 45722 , remove the lock ring.
- Carefully lift the module from the fuel tank, enough to access the quick connect fitting (1) under the module cover. Disconnect the quick connect fitting. Refer to Plastic Collar Quick Connect Fitting Service.
- Remove the fuel tank module.
- Remove and discard the fuel tank module seal.
- Place the lock ring on a flat surface. Measure the clearance between the lock ring and the flat surface using a feeler gage at 7 points.
- If warpage is less than 0.41 mm (0.016 in), the lock ring does not require replacement.
- If warpage is greater than 0.41 mm (0.016 in), the lock ring must be replaced
Caution: Refer to Damage to Fuel Tank Straps Caution in the Preface section.
Note: Carefully lower the fuel tank until the EVAP line can be repositioned.

Note:
• Some lock rings were manufactured with "DO NOT REUSE" stamped into them. These lock rings may be reused if they are not damaged or warped. • Inspect the lock ring for damage due to improper removal or installation procedures. If damage is found, install a NEW lock ring. • Check the lock ring for flatness.
Installation Procedure
- If the fuel tank was replaced perform the following steps, otherwise proceed to step 18.
- Install the NEW fuel tank module seal onto the fuel tank.
- Pull the vent lines in the fuel tank up as far as possible for ease of installation.
- Position the fuel tank module part way into the fuel tank.
- Connect the quick connect fittings (1) to the module cover. Refer to Plastic Collar Quick Connect Fitting Service.
- Install the fuel tank module into the fuel tank.
- Place the lock ring into position.
- Rotate the lock ring counterclockwise using the J 45722 .
- Install the EVAP lines to the fuel tank.
- Connect the EVAP line quick connect fittings at the fuel tank module and fuel tank vent valves. Refer to Plastic Collar Quick Connect Fitting Service.
- Install the EVAP lines to the fuel tank clips (1, 3, 4, and 5) and close the clips.
- Install the EVAP line to the fuel tank clips (2 and 6).
- Install the fuel tank shields (1 and 4) and retainers (2 and 3).
- Install the fuel feed line to the fuel tank.
- Connect the fuel feed line quick connect fitting at the fuel tank module. Refer to Plastic Collar Quick Connect Fitting Service.
- Install the fuel feed line to the clip (1) and close the clip.
- Install the fuel feed line to the retaining feature (2) in the fuel tank.
- Place the fuel tank onto a suitable jack.
- With the aid of an assistant, partially raise the fuel tank until the electrical connections can be made.
- Connect the chassis wiring harness electrical connectors (1) to the fuel tank module and fuel pressure sensor.
- Engage the chassis harness electrical connector CPA retainer at the module electrical connector.
- Completely raise the fuel tank.
- Install the fuel tank straps.
- Install the fuel tank strap bolts.
- Remove the adjustable jack from the fuel tank.
- Connect the fuel tank EVAP line quick connect fitting (1) at the fuel tank vent valve. Refer to Plastic Collar Quick Connect Fitting Service.
- Remove the caps from the EVAP lines.
- Connect the fuel tank EVAP lines (1) to the EVAP canister. Refer to Plastic Collar Quick Connect Fitting Service.
- Remove the caps from the fuel and EVAP lines.
- Connect the chassis EVAP line quick connect fitting (4) to the fuel tank line. Refer to Plastic Collar Quick Connect Fitting Service.
- Connect the fuel tank fuel feed line quick connect fitting (5) to the chassis line. Refer to Plastic Collar Quick Connect Fitting Service.
- Connect the fuel tank vent line quick connect fitting (5) to the fuel fill pipe line. Refer to Plastic Collar Quick Connect Fitting Service.
- Install the fuel fill hose to the fuel tank. Ensure that the notch in the hose is aligned with the notch on the fuel tank.
- Tighten the fuel fill hose clamp (6).
- Lower the vehicle.
- Refill the fuel tank.
- Install the fuel fill cap.
- Connect the negative battery cable. Refer to Battery Negative Cable Disconnection and Connection.
- Use the following procedure in order to inspect for leaks:
- Install the intake manifold sight shield. Refer to Upper Intake Manifold Sight Shield Replacement.
Note: Always replace the fuel module seal when installing the fuel module. Replace the lock ring if necessary. DO NOT apply any type of lubrication in the seal groove.
Ensure the lock ring is installed with the correct side facing upward. A correctly installed lock ring will only turn in a clockwise direction.
Note: Carefully raise the fuel tank until the EVAP line can be positioned.
Caution: Refer to Fastener Caution in the Preface section.
Tighten
Tighten the bolts to 40 N·m (30 lb ft).
Tighten
Tighten the clamp to 2.5 N·m (22 lb in).
| 39.1. | Turn the ignition ON, with the engine OFF, for 2 seconds. |
| 39.2. | Turn the ignition OFF for 10 seconds. |
| 39.3. | Turn the ignition ON, with the engine OFF. |
| 39.4. | Inspect for fuel leaks. |
Fuel Tank Replacement 2500 LWB - 4.35L (11.5 gal) Tank Rear
Removal Procedure
Note: Clean all fuel and evaporative emission (EVAP) line connections and surrounding areas prior to disconnecting the lines in order to avoid possible fuel and/or EVAP system contamination.
- Relieve the fuel system pressure. Refer to the Fuel Pressure Relief.
- Remove the spare tire stowage lock cylinder.
- Remove the spare tire.
- Drain the fuel tank. Refer to Fuel Tank Draining.
- Remove the rear exhaust insulator.
- Remove the spare tire hoist crossmember bolts and crossmember.
- Disconnect the rear fuel tank EVAP line quick connect fittings from the EVAP canister. Refer to Plastic Collar Quick Connect Fitting Service.
- Disconnect the fuel and EVAP intermediate line quick connect fittings from the front tank. Refer to Plastic Collar Quick Connect Fitting Service.
- Disconnect the chassis harness electrical connector (1) from the fuel pressure sensor.
- Support the fuel tank with a suitable jack.
- Remove the fuel tank strap bolts.
- Remove the fuel tank straps.
- With the aid of an assistant, lower the rear tank until the intermediate line connections can be reached.
- Disconnect the fuel and EVAP intermediate line quick connect fittings from the rear tank. Refer to Plastic Collar Quick Connect Fitting Service.
- Remove the fuel and EVAP intermediate lines.
- Cap the fuel and EVAP lines in order to prevent possible EVAP/fuel system contamination.
- Disconnect the chassis harness electrical connector (2) from the fuel tank module.
- Completely lower the fuel tank.
- With the aid of an assistant, remove the tank from the jack.
- If replacing the fuel tank proceed to the next step, otherwise proceed to step 14 in the installation procedure.
- Remove the EVAP line from the clip (1) on the fuel tank.
- Open the EVAP line clip (2) and remove the EVAP line from the clip.
- Remove the EVAP lines from the clip (3).
- Disconnect the EVAP line quick connect fittings from the fuel tank module. Refer to Plastic Collar Quick Connect Fitting Service.
- Remove the EVAP lines from the fuel tank.
- Using the J 45722 , remove the lock ring.
- Carefully lift the module from the fuel tank, enough to access the quick connect fitting under the module cover. Disconnect the quick connect fitting. Refer to Plastic Collar Quick Connect Fitting Service.
- Remove the fuel tank module.
- Remove and discard the fuel tank module seal.
- Place the lock ring on a flat surface. Measure the clearance between the lock ring and the flat surface using a feeler gage at 7 points.
- If warpage is less than 0.41 mm (0.016 in), the lock ring does not require replacement.
- If warpage is greater than 0.41 mm (0.016 in), the lock ring must be replaced.
Caution: Refer to Damage to Fuel Tank Straps Caution in the Preface section.
Note:
• Some lock rings were manufactured with "DO NOT REUSE" stamped into them. These lock rings may be reused if they are not damaged or warped. • Inspect the lock ring for damage due to improper removal or installation procedures. If damage is found, install a NEW lock ring. • Check the lock ring for flatness.
Installation Procedure
- If the fuel tank was replaced perform the following steps, otherwise proceed to step 14.
- Install the NEW fuel tank module seal onto the fuel tank.
- Pull the vent line in the fuel tank up as far as possible for ease of installation.
- Position the fuel tank module part way into the fuel tank.
- Connect the quick connect fittings to the module cover. Refer to Plastic Collar Quick Connect Fitting Service.
- Install the fuel tank module into the fuel tank.
- Place the lock ring into position.
- Rotate the lock ring counterclockwise using the J 45722 .
- Install the EVAP lines to the fuel tank.
- Connect the EVAP line quick connect fittings to the fuel tank module. Refer to Plastic Collar Quick Connect Fitting Service.
- Install the EVAP lines to the clip (3).
- Install the EVAP line to the clip (2) and close the clip.
- Install the EVAP line to the clip (1) on the fuel tank.
- With the aid of an assistant, install the tank onto the jack.
- Partially raise the fuel tank.
- Connect the chassis harness electrical connector (2) to the fuel tank module.
- Remove the caps from the fuel and EVAP lines.
- Install the fuel and EVAP intermediate lines.
- Connect the fuel and EVAP intermediate lines to the rear tank. Refer to Plastic Collar Quick Connect Fitting Service.
- With the aid of an assistant, completely raise the rear tank.
- Install the fuel tank straps.
- Install the fuel tank strap bolts.
- Remove the adjustable jack from under the fuel tank.
- Connect the chassis harness electrical connector (1) to the fuel pressure sensor.
- Connect the fuel and EVAP intermediate line quick connect fittings to the front tank. Refer to Plastic Collar Quick Connect Fitting Service.
- Connect the rear fuel tank EVAP line quick connect fittings to the EVAP canister. Refer to Plastic Collar Quick Connect Fitting Service.
- Install the spare tire hoist crossmember and bolts.
- Install the rear exhaust insulator.
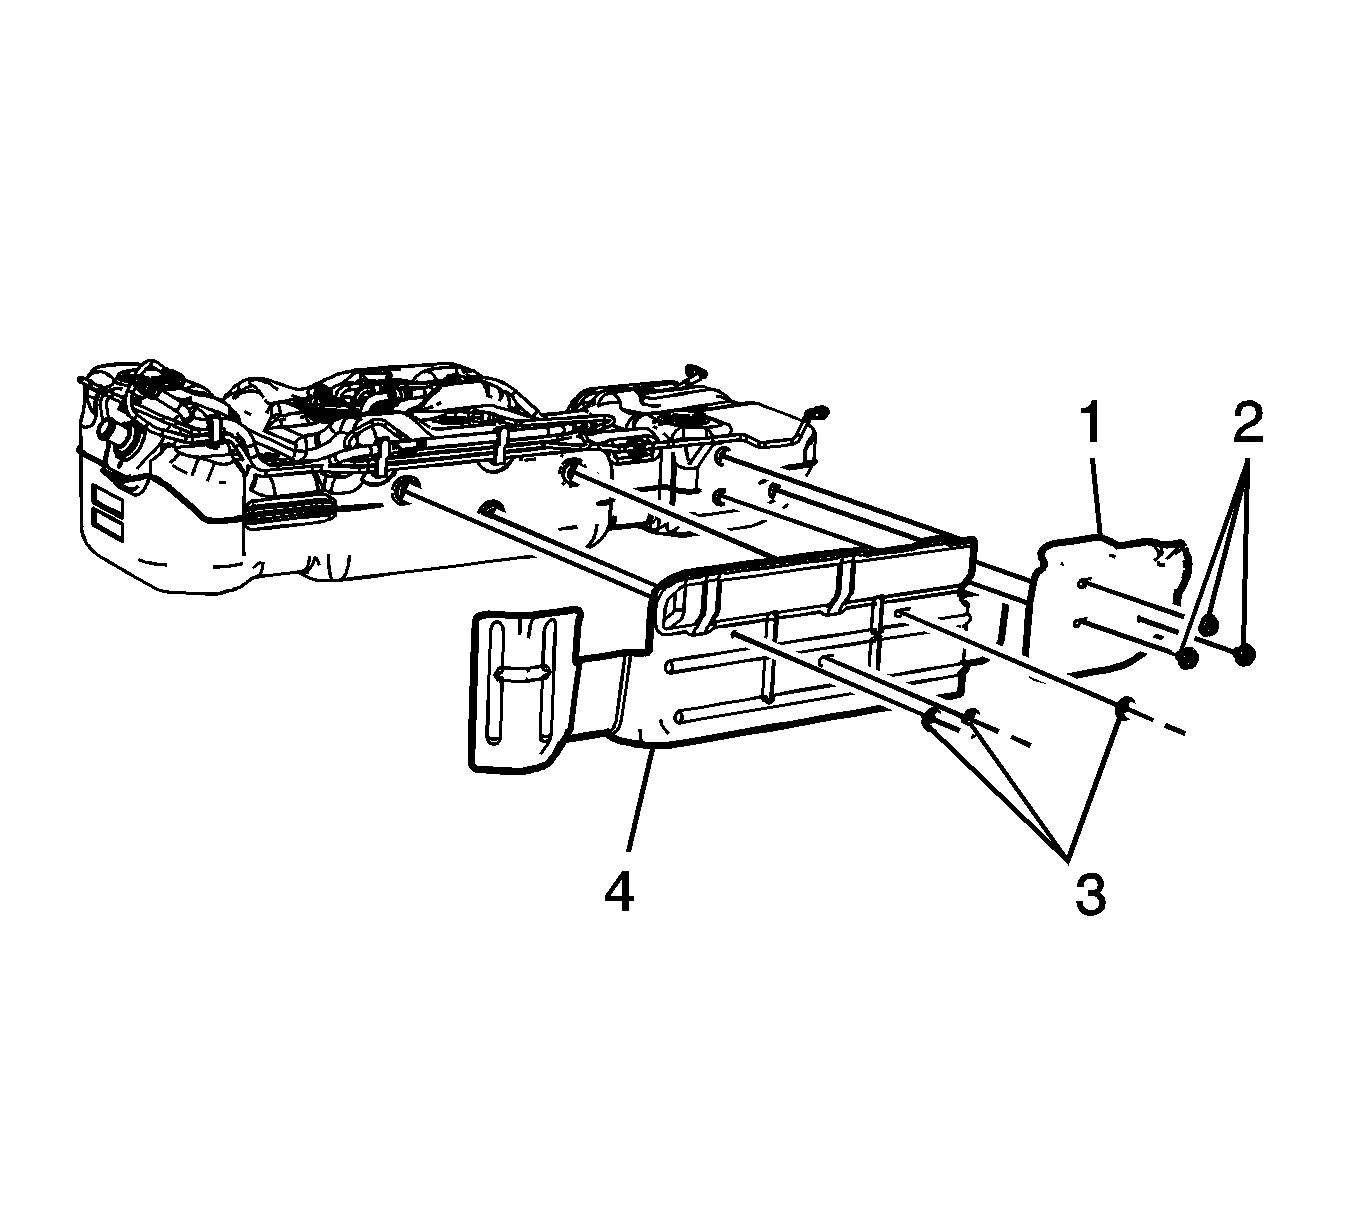
- Install the fuel fill hose (1, 3) to the fuel tank.
- Tighten the fuel fill hose clamp (2) at the fuel tank.
- Lower the vehicle.
- Install the spare tire.
- Install the spare tire stowage lock cylinder.
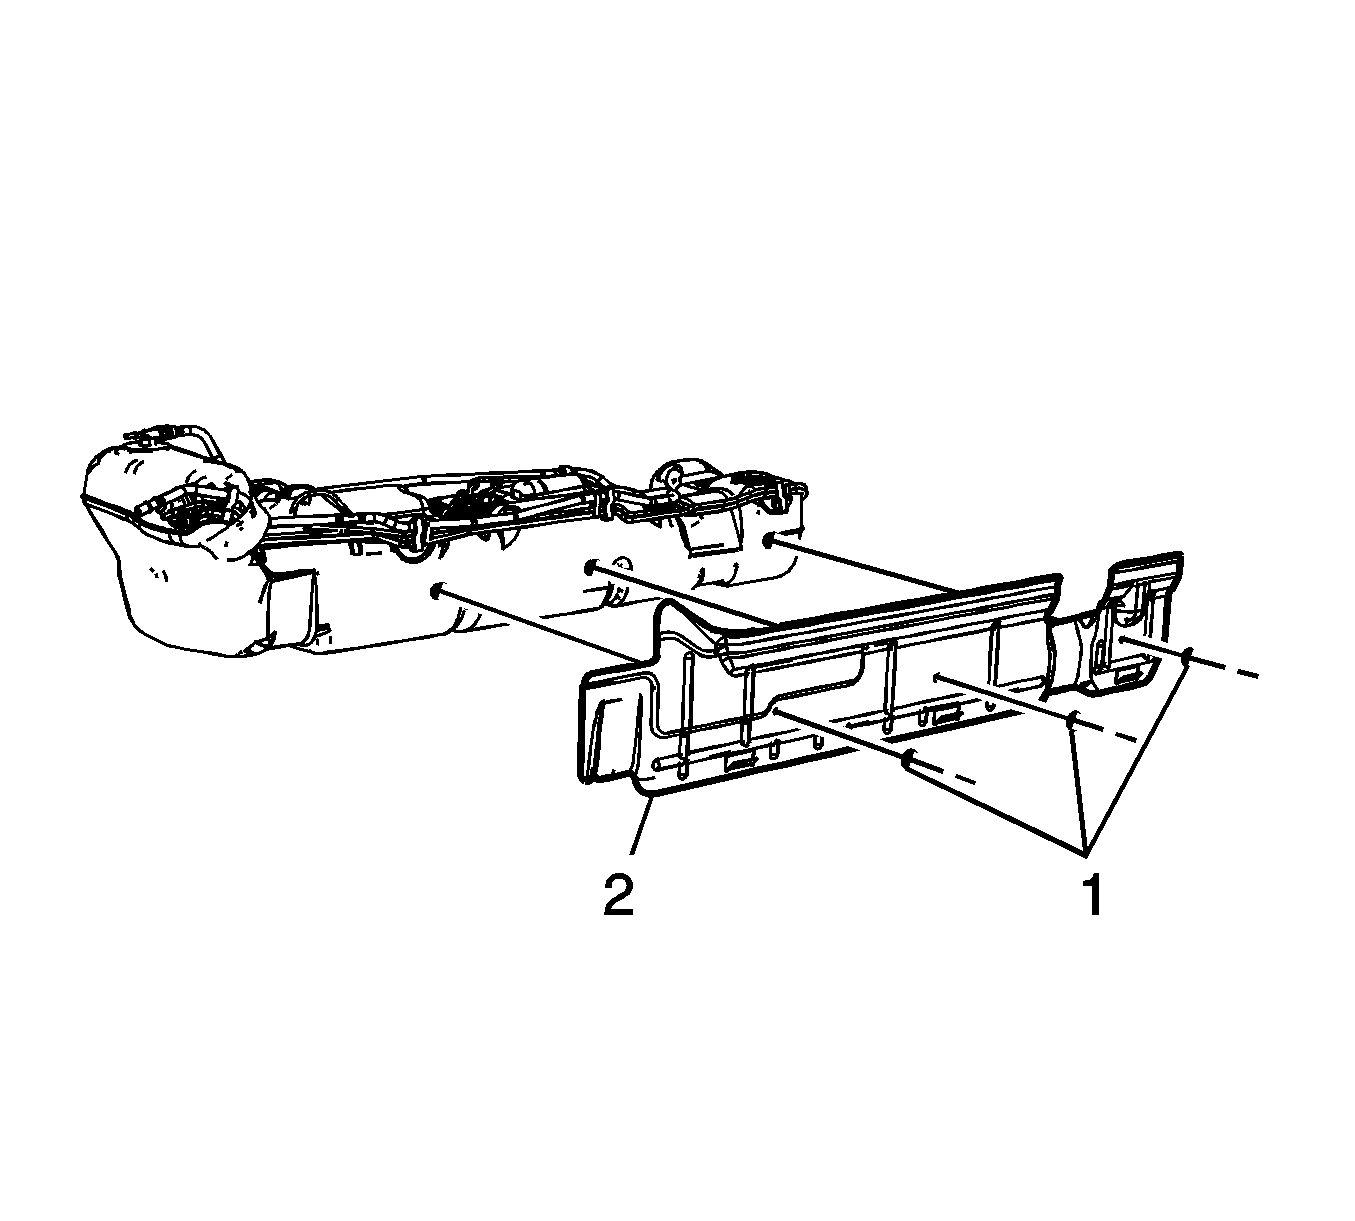
- Install the fuel tank filler housing.
- Install the fuel tank filler housing to fuel tank fill pipe bolts.
- Install the fuel tank filler housing to body TORX® screws (1) and retainer (2).
- Refill the fuel tank.
- Install the fuel fill cap.
- Connect the negative battery cable. Refer to Battery Negative Cable Disconnection and Connection.
- Use the following procedure in order to inspect for leaks:
- Install the intake manifold sight shield. Refer to Upper Intake Manifold Sight Shield Replacement.
Caution: Refer to Fastener Caution in the Preface section.
Tighten
Tighten the bolts to 40 N·m (30 lb ft).
Tighten
Tighten the bolts to 50 N·m (37 lb ft).
Tighten
Tighten the clamp to 2.5 N·m (22 lb in).

Tighten
Tighten the bolts to 2.3 N·m (20 lb in).

Tighten
Tighten the screws to 2.3 N·m (20 lb in).
| 40.1. | Turn the ignition ON, with the engine OFF, for 2 seconds. |
| 40.2. | Turn the ignition OFF for 10 seconds. |
| 40.3. | Turn the ignition ON, with the engine OFF. |
| 40.4. | Inspect for fuel leaks. |
