Rear Brake Caliper Bracket Replacement Exc. 35 Series
Removal Procedure
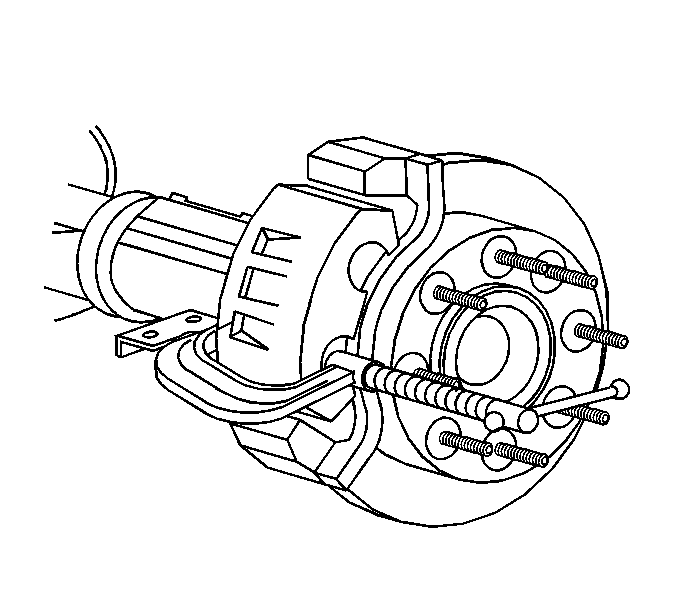
Notice: Support the brake caliper with heavy mechanic wire, or equivalent,
whenever it is separated from its mount and the hydraulic flexible brake hose is still connected. Failure to support the caliper in this manner will cause the flexible brake hose to bear the weight of the caliper, which may cause damage to the brake hose and
in turn may cause a brake fluid leak.
- Remove the caliper from the mounting bracket and support the caliper
with heavy mechanic's wire or equivalent. DO NOT disconnect the hydraulic
brake flexible hose from the caliper. Refer to
Front Brake Caliper Replacement
.
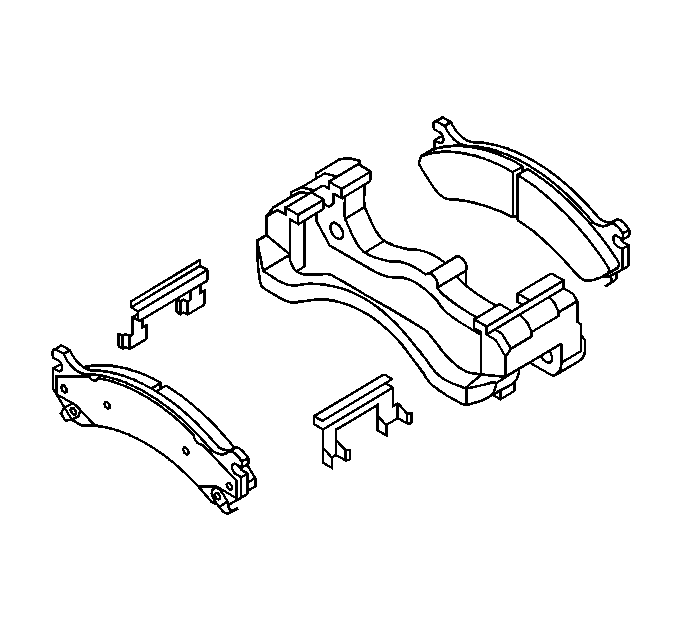
- Remove the brake pads.
- Remove the anti-rattle clips from the brake caliper bracket.
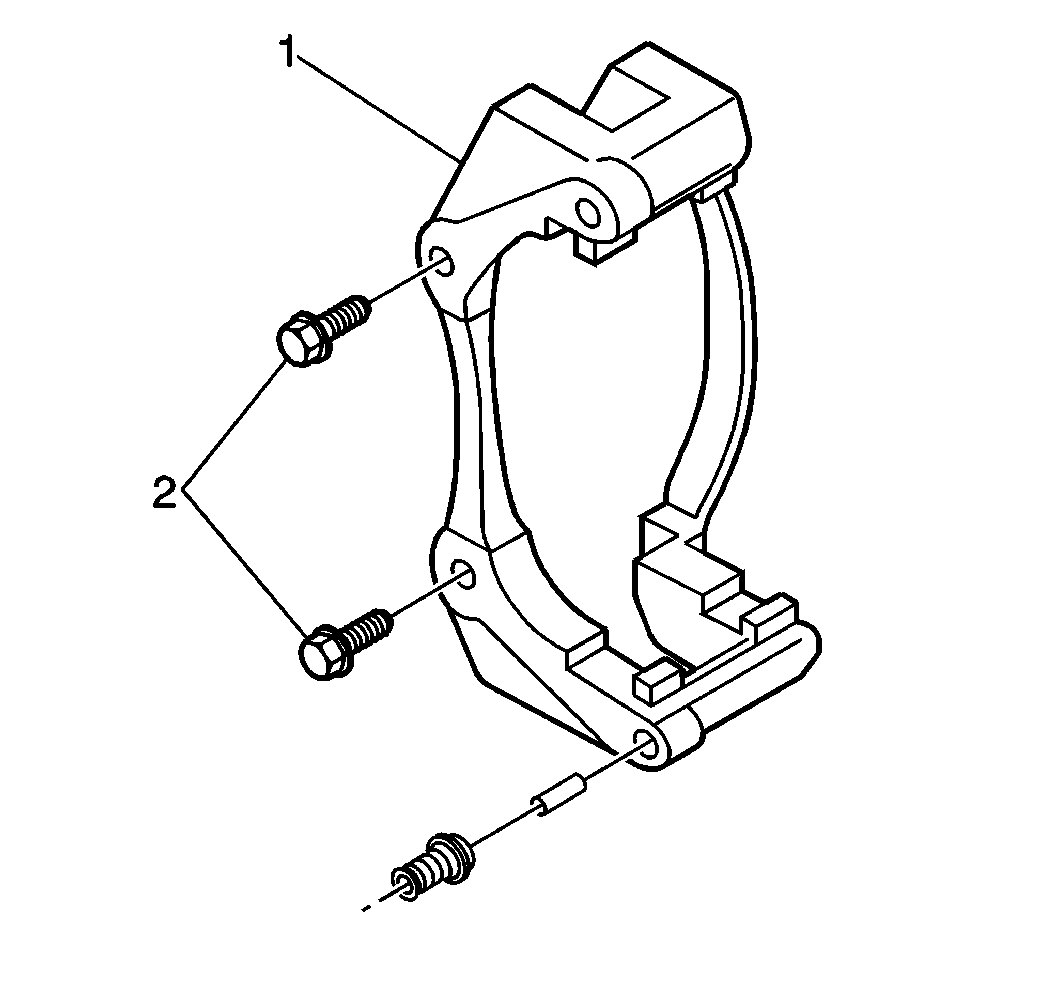
- Remove the brake caliper bracket mounting
bolts (2).
- Remove the brake caliper bracket (1).
- Remove any contaminants or foreign material from the inside ends
of the brake caliper bracket.
- Clean the mounting surface and threads of the brake caliper bracket.
Installation Procedure
- Install the brake caliper bracket (1).
- Perform the following procedure before installing the brake caliper
bracket mounting bolts.
| • | Remove all traces of the original adhesive patch. |
| • | Clean the threads of the bolt with denatured alcohol or equivalent
and allow to dry. |
| • | Apply Threadlocker GM P/N 12345493 or RED LOCTITE™ #272
to the threads of the bolt. |
Notice: Use the correct fastener in the correct location. Replacement fasteners
must be the correct part number for that application. Fasteners requiring
replacement or fasteners requiring the use of thread locking compound or sealant
are identified in the service procedure. Do not use paints, lubricants, or
corrosion inhibitors on fasteners or fastener joint surfaces unless specified.
These coatings affect fastener torque and joint clamping force and may damage
the fastener. Use the correct tightening sequence and specifications when
installing fasteners in order to avoid damage to parts and systems.
- Install the caliper
bracket mounting bolts (2).
Tighten
| • | For vehicles equipped with JC5/JH5 brake systems, tighten the
caliper bracket mounting bolts to 200 N·m (148 lb ft). |
| • | For vehicles equipped with JH6 brake systems, tighten the caliper
bracket mounting bolts to 165 N·m (122 lb ft). |
- Install the anti-rattle
clips to the brake caliper bracket.
- Install the brake pads to the brake caliper bracket.
- Slide the brake pads in until they contact the rotor.
- Install the brake caliper. Refer to
Front Brake Caliper Replacement
.
- Install the tire and wheel assembly. Refer to
Tire and Wheel Removal and Installation
in Tires and Wheels.
- Lower the vehicle.
- With the engine OFF, gradually apply the brake pedal to approximately
2/3 of it's travel distance.
- Slowly release the brake pedal.
- Wait 15 seconds, then repeat steps 7-8 until a firm pedal
is obtained. This will properly seat the brake caliper pistons and brake pads.
Rear Brake Caliper Bracket Replacement 35 Series
Removal Procedure
- Raise and support the vehicle. Refer
to
Lifting and Jacking the Vehicle
in General Information.
- Remove the tire and wheel assembly. Refer to
Tire and Wheel Removal and Installation
in Tires and Wheels.
- Compress the caliper piston.
| 3.1. | Install a large C-clamp over the top of the caliper housing and
against the back of the outboard pad. |
| 3.2. | Slowly tighten the C-clamp until the piston pushes fully into
the caliper bore. |
| 3.3. | Remove the C-clamp from the caliper. |
- Loosen the rear brake caliper mounting bolts. Do not remove.
- Remove the brake caliper bracket mounting
bolts (2).
- Remove the brake caliper bracket (1) and brake caliper
as an assembly.
- Remove the brake caliper mounting bolts from the caliper bracket.
Notice: Support the brake caliper with heavy mechanic wire, or equivalent,
whenever it is separated from its mount and the hydraulic flexible brake hose is still connected. Failure to support the caliper in this manner will cause the flexible brake hose to bear the weight of the caliper, which may cause damage to the brake hose and
in turn may cause a brake fluid leak.
- Remove the caliper from the mounting bracket and support the caliper
with heavy mechanic's wire or equivalent. DO NOT disconnect the hydraulic
brake flexible hose from the caliper. Refer to
Front Brake Caliper Replacement
.
- Remove the brake pads
from the brake caliper bracket.
- Remove the anti-rattle clips from the brake caliper bracket.
Installation Procedure
- Install the anti-rattle
clips to the brake caliper bracket.
- Install the brake pads to the brake caliper bracket.
- Install the brake caliper to the brake caliper bracket.
- Install the brake caliper bolts to the brake caliper mounting
bracket. Do not tighten.
- Install the brake caliper and brake caliper
bracket (1) as an assembly.
- Perform the following procedure before installing the brake caliper
bracket mounting bolts.
| • | Remove all traces of the original adhesive patch. |
| • | Clean the threads of the bolt with denatured alcohol or equivalent
and allow to dry. |
| • | Apply Threadlocker GM P/N 12345493 or RED LOCTITE™ #272
to the threads of the bolt. |
Notice: Use the correct fastener in the correct location. Replacement fasteners
must be the correct part number for that application. Fasteners requiring
replacement or fasteners requiring the use of thread locking compound or sealant
are identified in the service procedure. Do not use paints, lubricants, or
corrosion inhibitors on fasteners or fastener joint surfaces unless specified.
These coatings affect fastener torque and joint clamping force and may damage
the fastener. Use the correct tightening sequence and specifications when
installing fasteners in order to avoid damage to parts and systems.
- Install the caliper
bracket mounting bolts (2).
Tighten
Tighten the caliper bracket mounting bolts to 300 N·m (221 lb ft).
- Tighten the brake caliper mounting bolts (2).
Tighten
Tighten the brake caliper mounting bolts to 108 N·m (80 lb ft).
- Install the tire and wheel assembly. Refer to
Tire and Wheel Removal and Installation
in Tires and Wheels.
- Lower the vehicle.
- With the engine OFF, gradually apply the brake pedal to approximately
2/3 of it's travel distance.
- Slowly release the brake pedal.
- Wait 15 seconds, then repeat steps 11-12 until a firm pedal
is obtained. This will properly seat the brake caliper pistons and brake pads.
