Rear Vision Camera Inoperative - keywords inop photo radio vision

| Subject: | Rear Vision Camera In-Operative |
| Models: | 2007 -2009 Cadillac Escalade and Escalade ESV |
| 2007-2009 Chevrolet Avalanche, Tahoe, Suburban |
| 2007-2009 GMC Yukon, Yukon XL, Denali, Denali XL |
| With Navigation radio and Rear Camera System (RPO - UVC) |
This PI was superseded to update model years and add pictures. Please discard PIT3862E.
The following diagnosis might be helpful if the vehicle exhibits the symptom(s) described in this PI.
Condition/Concern:
Some customers may experience a condition with the rear vision camera being inoperative or having a blank screen when shifting into reverse. You will also notice a disclaimer at the top of the screen but the rest of the screen is black.
Recommendation/Instructions:
Check the rear vision camera on/off selection in the customer selectable menu settings.
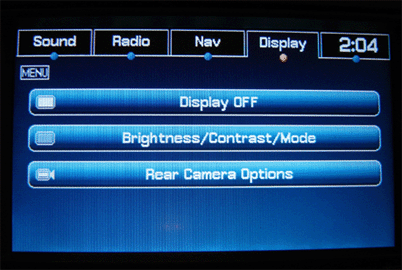
Press the Menu Hard key then select the Display soft key on Chevrolet and GMC Models or Press the Config Hard key then select the Display soft key on Escalade Models

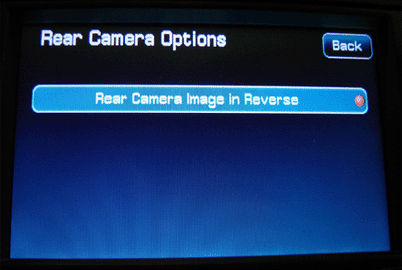
To verify the rear camera setting, touch the Rear Camera Options soft key. If the bullet is blue, it is turned off and will not display the rear vision image from the camera. To turn on the Rear Camera Image in Reverse, touch the soft key. An Orange bullet indicates the camera is turned on when in Reverse.

If the camera selection is on and the camera image is not displayed, examine the connections at the rearview camera module that is located under the front passengers seat (See Document ID # 1757497). Check for bent or backed out pins in the rearview camera connector. Also check the wiring that is right before the module. You will notice a small loop in the wiring harness. Check for the possibility of this loop coming in contact or snagging on the front passengers seat track when moving the seat forwards or backwards. Also check connector C209 that is located on the right side of the Instrument Panel. There are reports in the field where this connector is not plugged in or is not fully connected.
Please follow this diagnostic or repair process thoroughly and complete each step. If the condition exhibited is resolved without completing every step, the remaining steps do not need to be performed.
