Important: If the vehicle has been in a collision, refer to
Repairs and Inspections Required After a Collision
for additional information.
Perform the following inspection from the driver seat:
- Turn the ignition switch to the ON position. Verify proper operation of the seat belt reminder lamp with the belt buckled and with the belt unbuckled.
- Inspect the shoulder belt guide in order to ensure that the following conditions are met:
| • | The shoulder belt guide swivels freely in the rear seat position. |
| • | The seat belt webbing is seated flatly in the guide slot. |
| • | The seat belt webbing does not bind. |
- Verify that the seat belt buckle faces inboard and is accessible.
- Verify that the seat belt retractor units are securely attached.
- Verify that the seat belt anchor bolts are secure.
- Fully extend the seat belt webbing. Verify that the seat belt webbing does not have any twists or tears.
- Allow the seat belt webbing to retract. Verify that the seat belt webbing returns freely and completely back into the retractor. If the seat belt webbing will not retract, refer to
Seat Belt Does Not Retract
.
- Snap the seat belt latch plate into the buckle.
- Sharply tug on the seat belt latch plate and the buckle. Verify that the seat belt latch plate and the buckle remain locked when tugged.
- Push the button on the buckle:
| • | Verify that the seat belt latch plate releases easily from the buckle. |
| • | Verify that the button returns to its original position. |
Repeat the inspection procedure, steps 2-10, from the front passenger seat.
Test the function of the automatic locking child restraint feature:
- To engage the automatic locking feature, pull the belt to the fully extended position. Allow the belt to retract to the proper position for the child seat and fasten the latch plate to the buckle. As the belt retracts, a ratcheting sound should be
heard.
- To disengage the automatic locking feature, allow the belt to retract to the fully stowed position. Before the belt is completely stowed, the cinch feature will reset, the ratcheting sound will stop and the belt will extract freely.
Perform the following steps in order to inspect the center seat belts:
- Verify that the center seat belts are accessible.
- Verify that the center seat belts have no twists or tears in the webbing.
- Snap the center seat belt latch plate into the buckle.
- Sharply tug on the seat belt latch plate and the buckle. Verify that the seat belt latch plate and the buckle remain locked when tugged.
- Push the button on the buckle:
| • | Verify that the seat belt latch plate releases easily from the buckle. |
| • | Verify that the button returns to its original position. |
Repeat the inspection procedure, steps 2-10, from the rear seats. The child restraint feature is located on the outboard position for the rear seat.
Repeat the center seat belt inspection procedure, steps 1-5, from the rear seat.
For information on removal of the rear seats cushions, refer to
Rear Seat Cushion Cover and Pad Replacement
.
Emergency Locking Retractors
Caution: Perform this test in an area clear of other vehicles or obstructions.
Do not conduct this test on the open road. A large, empty parking lot is suitable.
Failure to observe this precaution may result in damage to the vehicle and
possible personal injury.
- Fasten the seat belts, an assistant is needed when the retractor under test is not part of the driver seat belt.
- Accelerate the vehicle slowly to 16 km/h (10 mph) and apply the brakes firmly.
- Verify that the seat belt locks when braking firmly.
- If the belt does not lock, proceed with the following steps:
| 4.1. | Remove the seat belt retractor assembly. |
| 4.2. | Tilt the seat belt retractor slowly. |
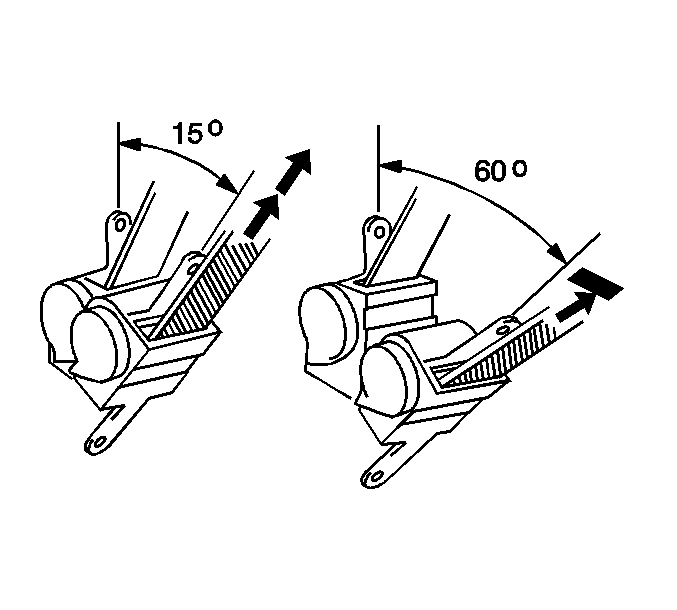
| 4.3. | Ensure that the seat belt webbing can be pulled from the retractor at an inclination
of 15 degrees or less and cannot be pulled from the retractor at an inclination of 60 degrees or more. |
| 4.4. | If the seat belt retractor does not operate as described, replace the retractor assembly. Refer to the following procedures: |
