For 1990-2009 cars only
Wheel Bearing Adjustment Non FH4
Tools Required
| • | J 44619 High Shear Wheel Nut Socket |
| • | J 44275 High Shear Wheel Nut Socket |
| • | J 28721-910 Wheel Bearing Lock Nut Socket |
Removal Procedure
- Block the rear wheels.
- Raise the front axle and place the jack stands under the frame rails. Ensure that the vehicle front wheels are off the floor. Refer to Lifting and Jacking the Vehicle .
- Release the parking brake.
- Remove the hub caps. Refer to Hub Cap Replacement .
- Remove the high shear wheel nut using one of the following J-tools:
| • | J 44619 High Shear Wheel Nut Socket |
| • | J 44275 High Shear Wheel Nut Socket |
| • | J 28721-910 Wheel Bearing Lock Nut Socket |
Installation Procedure
- Align the thrust washer keyway with the spindle keyway with the nut facing outboard.
- Engage thread and spin nut down until thrust washer bottoms on bearing surface.
- Apply axial pressure on the installation tool, depressing the nut and lock ring which will bottom out against the thrust washer.
- While holding axial pressure rotate hub to make sure all bearings are seated and rotating freely.
- Align the thrust washer keyway with the spindle keyway with the nut facing outboard.
- Maintain axial pressure, backing off the adjusting nut 90 degrees.
- Inspect the nut for lock engagement by releasing axial pressure. The nut should no longer turn by hand only.
- Inspect the bearing end play. End play must be between 0.0254-0.1016 mm (.000 in-.004 in).
- Install the hub caps. Refer to Hub Cap Replacement .
- Lower the front axle. Refer to Lifting and Jacking the Vehicle .
Notice: Refer to Fastener Notice in the Preface section.
Tighten
Tighten the nut to 104 N·m (77 lb ft).
Retorque the hub adjusting nut with axial pressure applied to 24 N·m (18 lb ft) while rotating the hub to insure bearings are rotating freely.
Wheel Bearing Adjustment FH4
Tools Required
J 28721-913 Truck Wheel Bearing Locknut Wrench (3-7/8 inch 8 pt)
- Set the parking brake.
- Block the vehicle rear wheels.
- Lift the vehicle frame until the front tire is off the ground.
- Support the frame using suitable safety stands.
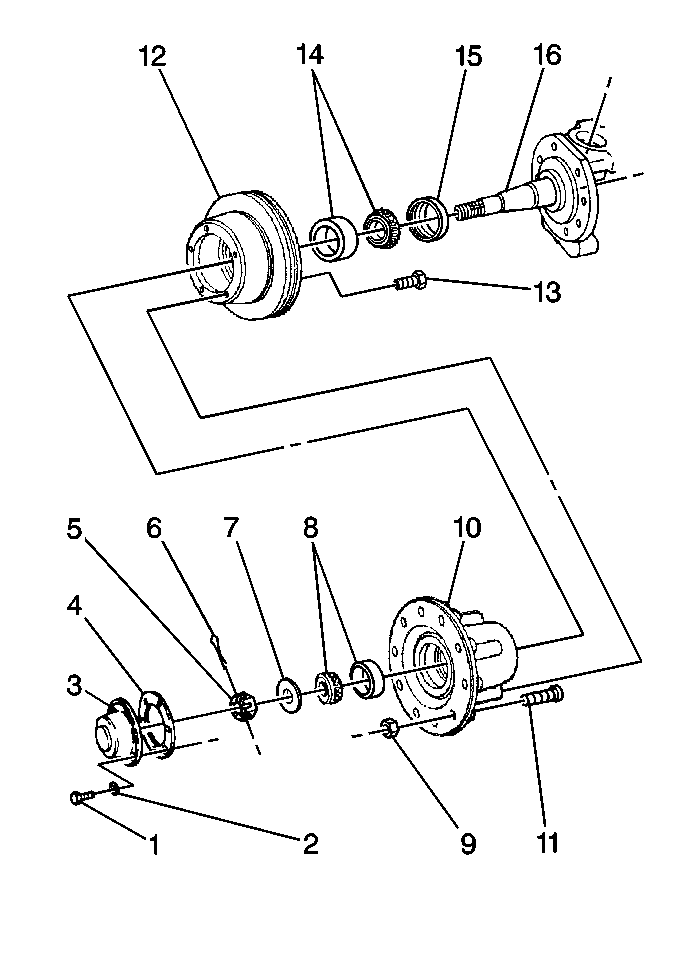
- Remove the bolts (1) and the washers (2). The illustration shows a wheel hub with disc brakes, but you will perform the bearing adjustment in the same manner for any kind of axle.
- Remove the hub cap (3) and the gasket (4). DO NOT allow the gasket material to fall into the hub, where applicable.
- Remove the cotter pin (6).
- Adjust the nut (5) using J 28721-913 .
- Tighten the nut to 153 N·m (113 lb ft) while rotating the wheel 360 degrees in both directions. This rotation will correctly position the bearings.
- Back off the nut 1/4-1/6 turn until the slot in the nut lines up with hole in the spindle (16) of the steering knuckle.
- Install a new cotter pin (6). Bend the cotter pin for proper clearance of the rotating components.
- Install a new gasket (4) and align the gasket properly. Attach the hub cap (3).
- Install the bolts (1) with new washers (2).
- Add new lubricant to the oil lubricated bearings (1) only. Refer to Adding Lubricant to Hub Caps .
- Remove the safety stands.
- Lower the vehicle.
Notice: Refer to Vehicle Lifting and Jacking Notice in the Preface section.
Notice: Refer to Fastener Notice in the Preface section.
Tighten
Important: Always back off the nut 1/4-1/6 turn. This adjustment should result in bearing end play of 0.025-0.200 mm (0.001-0.008 in).
Tighten
Tighten the hub cap bolts evenly to 30 N·m (22 lb in).

