Removal Procedure
- Raise the hood. Support the hood.
- Remove the battery. Refer to Battery Replacement in Engine Electrical.
- Remove the grille. Refer to Grille Replacement in Exterior Trim.
- Remove the air cleaner assembly. Refer to Air Cleaner Assembly Replacement in Engine Controls - 4.3 L.
- Remove the front bumper impact bar. Refer to Front Bumper Impact Bar Replacement in Bumpers.
- Remove the headlamp assemblies. Refer to Headlamp Replacement in Lighting Systems.
- Raise and suitably support the vehicle. Refer to Lifting and Jacking the Vehicle in General Information.
- Remove the steering linkage shield. Refer to Steering Linkage Shield Replacement in Steering Linkage (Non-Rack & Pinion).
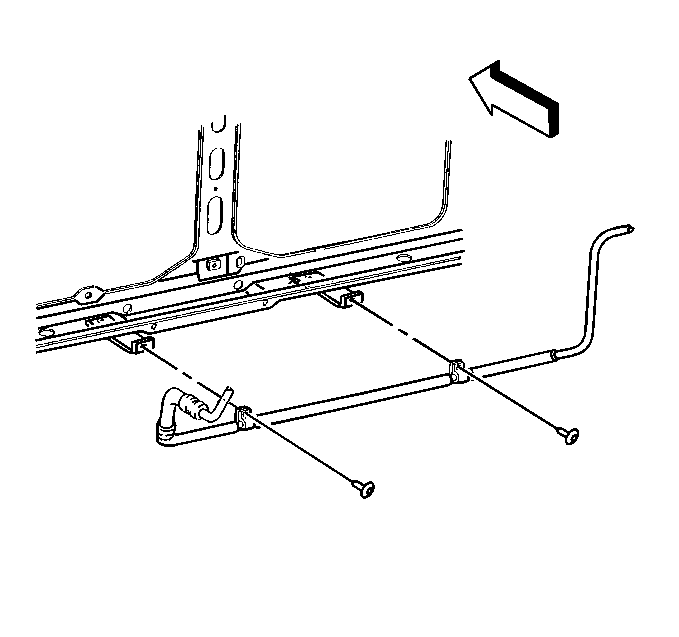
- Disconnect the A/C evaporator line from the 2 brackets located at the bottom of the radiator support. Refer to Evaporator Tube Replacement in Heating, Ventilation and Air Conditioning.
- Disconnect the electrical connector to the SIR discriminating sensors.
- Remove the SIR discriminating sensors from the radiator support (if replacing the radiator support). Refer to Inflatable Restraint Front End Discriminating Sensor Replacement in SIR.
- Lower the vehicle. Refer to Lifting and Jacking the Vehicle in General Information.
- Disconnect the power steering hoses to the power steering cooler. Refer to Power Steering Fluid Cooler Replacement in Power Steering System.
- Remove the power steering cooler from the radiator support (if replacing the radiator support). Refer to Power Steering Fluid Cooler Replacement in Power Steering System.
- Remove the hood release cable from the radiator support and the primary hood latch. Refer to Hood Primary Latch Release Cable Replacement .
- Remove the primary hood latch support. Refer to Hood Latch Support Replacement .
- Remove the air intake baffle. Refer to Air Intake Baffle Replacement - Radiator in Body Front End.
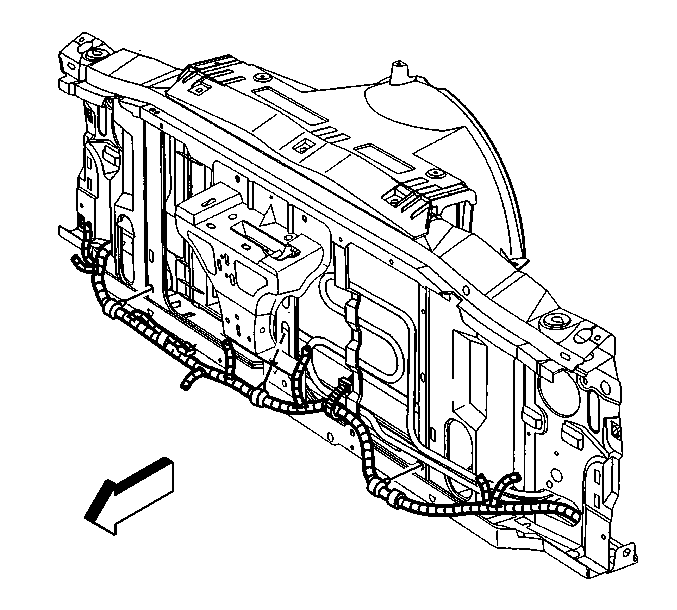
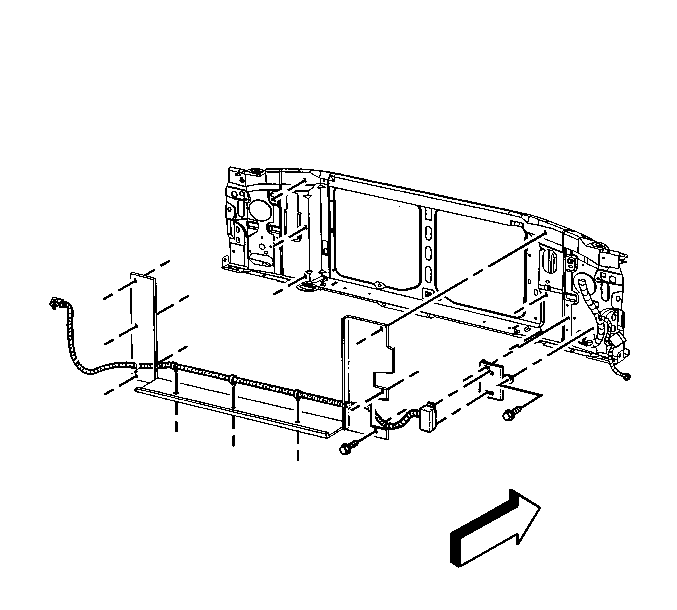
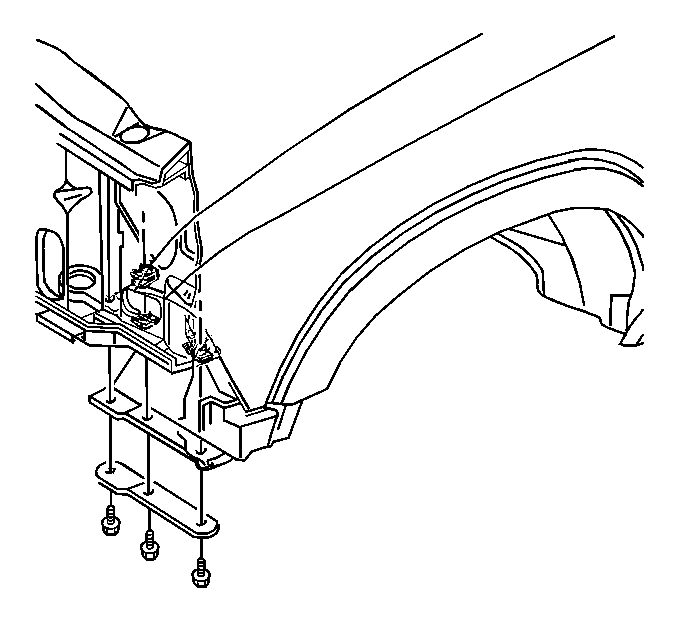
- Remove the forward lamp wiring harness from the radiator support.
- Remove the upper fan shroud from the radiator support. Refer to Fan Shroud Replacement in Engine Cooling.
- Remove the headlamp ballast and support bracket. Refer to High Intensity Discharge Headlamp Ballast Replacement in Lighting Systems.
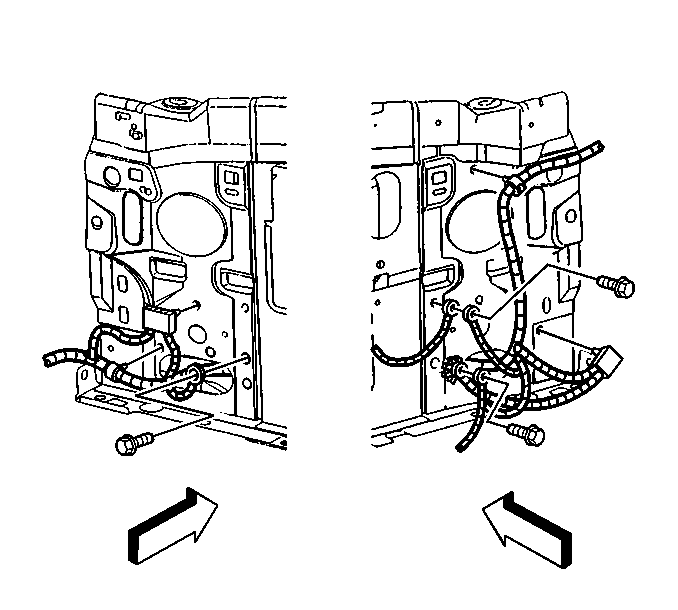
- Remove the ground screw terminals from the radiator support.
- Remove the bolts that retain the air conditioning condenser to the radiator support. Refer to Condenser Replacement in Heater, Ventilation and Air Conditioning.
- Remove the bolts that retain the battery tray to the radiator support. Refer to Battery Tray Replacement in Engine Electrical.
- Remove the radiator air intake baffle. Refer to Air Intake Baffle Replacement - Radiator .
- Remove the hood support rod. Refer to Hood Hold-Open Rod Replacement .
- Remove the mega fuse cable and bracket.
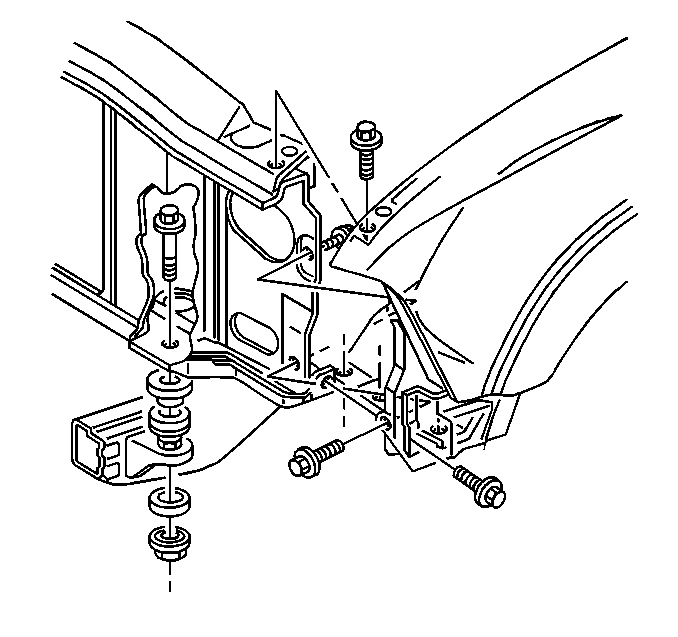
- Remove the bolts that retain the radiator support to the right and the left wheel house panel. Refer to Wheelhouse Panel Replacement in Exterior Trim.
- Remove the bolts that retain the left fender to the wheel house panel. Refer to Front Fender Replacement .
- Remove the bolts that retain the radiator support to the frame.
- Remove the bolts that retain the radiator support to the right and the left fender. Refer to Front Fender Replacement .
- Remove the radiator support frame mounts.
- Lightly push the left fender away from the vehicle in order to allow a clearance between the fender and the radiator support.
- Slide the left side of the support away from the vehicle.
- Remove the radiator support.
Tilt the radiator toward the engine.
Installation Procedure
- Lightly push the fender away from the vehicle in order to allow a clearance between the fender and the radiator support.
- Install the radiator support into the frame.
- Install the radiator support frame mounts.
- Install the bolts through the frame mount.
- Install the bolts that retain the left wheel house panel to the fender. Refer to Front Fender Replacement .
- Install the bolts that retain the radiator support to the right and the left fender. Refer to Front Fender Replacement .
- Install the bolts that retain the radiator support to the right and the left wheel house panel. Refer to Wheelhouse Panel Replacement in Exterior Trim.
- Install the hood support rod. Refer to Hood Hold-Open Rod Replacement .
- Install the radiator air intake baffle to the vehicle. Refer to Air Intake Baffle Replacement - Radiator .
- Install the bolts that retain the battery tray to the radiator support bolts. Refer to Battery Tray Replacement in Engine Electrical.
- Install the mega fuse cable and bracket to the radiator support.
- Install the air conditioning condenser, if equipped. Refer to Condenser Replacement in HVAC Systems-Manual.
- Install the fan shroud to the radiator support. Refer to Fan Shroud Replacement in Engine Cooling.
- Install the forward lamp wiring harness to the radiator support.
- Install the ground screw terminals to the radiator support.
- Install the headlamp ballast and support bracket. Refer to High Intensity Discharge Headlamp Ballast Replacement in Lighting Systems.
- Install the primary hood latch support. Refer to Hood Latch Support Replacement .
- Install the power steering cooler to the radiator support (if removed). Refer to Power Steering Fluid Cooler Replacement in Power Steering System.
- Connect the power steering hoses to the power steering cooler. Refer to Power Steering Fluid Cooler Replacement in Power Steering System.
- Raise the vehicle. Refer to Lifting and Jacking the Vehicle in General Information.
- Install the SIR discriminating sensors to the radiator support (if removed). Refer to Inflatable Restraint Front End Discriminating Sensor Replacement in SIR.
- Connect the electrical connector to the SIR discriminating sensors.
- Connect the A/C evaporator line to the 2 brackets located at the bottom of the radiator support. Refer to Evaporator Tube Replacement in Heating, Ventilation and Air Conditioning.
- Lower the vehicle. Refer to Lifting and Jacking the Vehicle in General Information.
- Install the hood release cable to the radiator support and the primary hood latch. Refer to Hood Primary Latch Release Cable Replacement .
- Install the steering linkage shield. Refer to Steering Linkage Shield Replacement in Steering Linkage (Non-Rack & Pinion).
- Install the headlamp assemblies. Refer to Headlamp Replacement in Lighting Systems.
- Install the bumper. Refer to Front Bumper Impact Bar Replacement in Bumpers.
- Install the air cleaner assembly. Refer to Air Cleaner Assembly Replacement in Engine Controls - 4.3 L.
- Install the grille. Refer to Grille Replacement in Exterior Trim.
- Install the battery. Refer to Battery Replacement in Engine Electrical.
- Lower the hood.
- Inspect the latch. Adjust if necessary.
Slide the right side of the support onto the frame. Pivot the left side of the support into place.
Notice: Use the correct fastener in the correct location. Replacement fasteners must be the correct part number for that application. Fasteners requiring replacement or fasteners requiring the use of thread locking compound or sealant are identified in the service procedure. Do not use paints, lubricants, or corrosion inhibitors on fasteners or fastener joint surfaces unless specified. These coatings affect fastener torque and joint clamping force and may damage the fastener. Use the correct tightening sequence and specifications when installing fasteners in order to avoid damage to parts and systems.
Tighten
Tighten the radiator support frame mount bolts to 70 N·m
(52 lb ft).
