Removal Procedure
- Raise the vehicle. Refer to Lifting and Jacking the Vehicle .
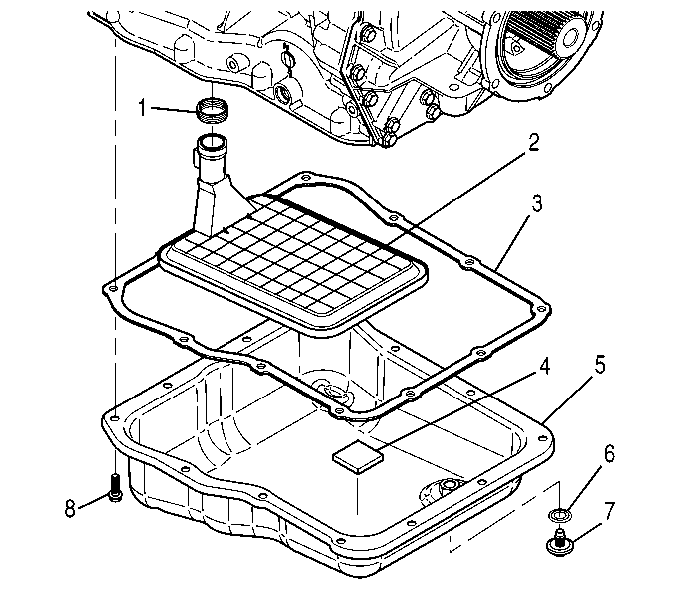
- Remove the drain plug (7) and drain plug seal (6) from the oil pan (5). Allow the fluid to drain into a suitable container.
- Inspect the drained fluid. Refer to Transmission Fluid Check
- Remove 12 bolts (8). Hold the oil pan in position as the last bolt is removed.
- Remove oil pan (5) and gasket (3).
- Inspect magnet (4). Excessive metallic particles or large metallic particles may indicate need for overhaul or replacement of the transmission.
- Remove the transmission internal oil filter (2) by pulling straight down where the suction tube is seated in the transmission case.
- Remove the transmission internal oil filter seal (1) from the filter or from the seal bore in the transmission case. Discard the old seal. Discard the filter, if the filter is being replaced.

Important: It would be helpful to record the amount of transmission fluid lost during this procedure. Fluid in good condition, drained into a clean container, may be reused.
Important: DO NOT remove the transmission internal oil filter or seal if only replacing the oil pan or oil pan gasket.
Installation Procedure
- Remove all gasket material from the transmission case. Remove any scratches from the transmission case that would cause a split-line leak.
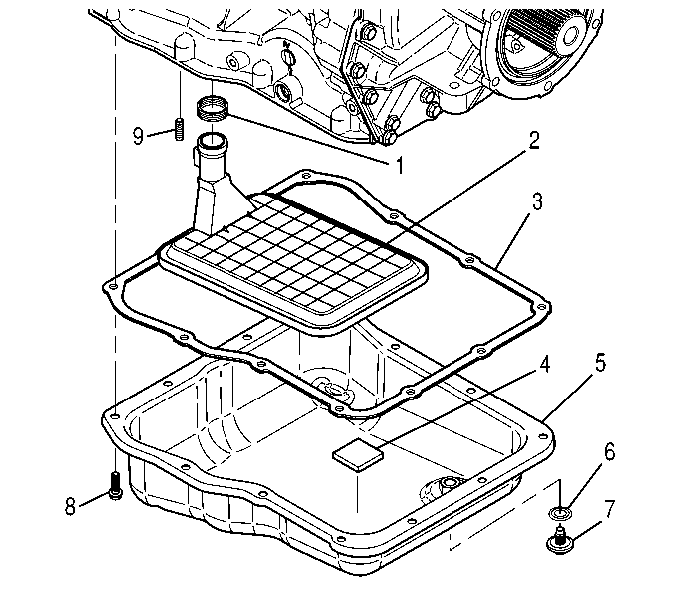
- Place a new seal (1) on the tube of the transmission internal oil filter (2), if the filter was removed. Be sure the seal locates against the shoulder on the internal oil filter tube.
- Push the filter (2) and seal (1) into the seal bore in the transmission case. Position the transmission internal oil filter properly.
- Install 2 headless guide bolts (9), M8 x 1.25, into opposite corners of the oil pan mounting face on the transmission case.
- Place a gasket (3) on the oil pan and align the bolt holes.
- Slide the gasket (3) and oil pan (5) over the guide bolts and hold them in place while installing 2 bolts (8) to hold the parts in place.
- Remove the guide bolts.
- Install the 10 remaining oil pan bolts (8).
- Install the drain plug (7) and drain plug seal (6).
- Lower the vehicle.
- Refill the transmission with DEXRON®VI Automatic Transmission Fluid. Refer to Fluid Capacity Specifications .
- Check the transmission fluid level. Refer to Transmission Fluid Check .

Notice: Use the correct fastener in the correct location. Replacement fasteners must be the correct part number for that application. Fasteners requiring replacement or fasteners requiring the use of thread locking compound or sealant are identified in the service procedure. Do not use paints, lubricants, or corrosion inhibitors on fasteners or fastener joint surfaces unless specified. These coatings affect fastener torque and joint clamping force and may damage the fastener. Use the correct tightening sequence and specifications when installing fasteners in order to avoid damage to parts and systems.
Tighten
Tighten the bolts to 27 N·m (20 lb ft).
Notice: Refer to Component Fastener Tightening Notice in the Preface section.
Tighten
Tighten the drain plug to 35 N·m (26 lb ft).
Notice: Use only clean and approved transmission fluid.
Important: Remember fluid remains in the external circuits and transmission cavities after draining the transmission.
