Special Tools
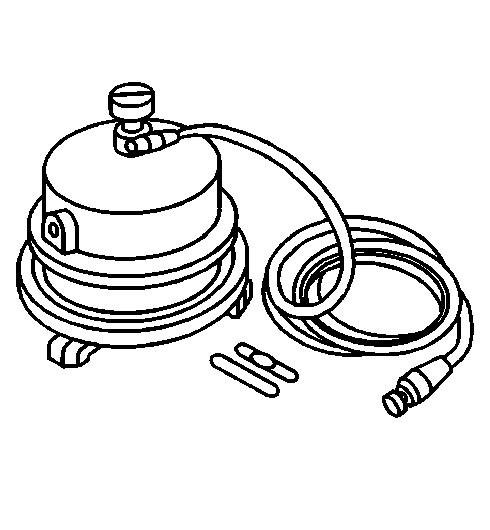
| • | J 35589-A Brake Bleeder Adapter, or equivalent |
Warning: At times during this brake bleed procedure brake fluid will be under higher pressures than during typical brake bleed procedures. Ensure the bleeder hose attached to the bleeder valve is securely maintained in position whenever the bleeder valve is opened. Failure to maintain the bleeder hose securely to the valve when opened, may allow the hose to blow off and brake fluid to spray out of the bleeder valve, possibly resulting in personal injury.
Caution: When adding fluid to the brake master cylinder reservoir, use only Delco Supreme 11®, GM P/N 12377967 (Canadian P/N 992667), or equivalent DOT-3 brake fluid from a clean, sealed brake fluid container. The use of any type of fluid other than the recommended type of brake fluid, may cause contamination which could result in damage to the internal rubber seals and/or rubber linings of hydraulic brake system components.
Caution: Refer to Brake Fluid Effects on Paint and Electrical Components Caution in the Preface section.
Note:
• Do not pressurize the brake pressure bleeder
J-29532-A or
J 29532 and thereby the master cylinder reservoir until instructed to do so by the scan tool. Portions of the
automated bleed process require the master cylinder reservoir not be pressurized through the
J-29532-A or
J 29532 . • Do not apply the brake pedal until instructed to do so by the scan tool. Applying the brake pedal before instructed by the scan tool may result in setting a DTC and may require the sensor and boost valve calibration and electronic brake control module
(EBCM) learn procedures to be repeated manually.
- Place the transmission in the PARK or NEUTRAL position.
- Turn the ignition to OFF, without pausing at ACCESSORY, and without applying the brake pedal.
- Raise and support the vehicle. Refer to Lifting and Jacking the Vehicle.
- Remove the tire and wheel assemblies. Refer to Tire and Wheel Removal and Installation.
- Inspect the brake system for leaks and visual damage. Refer to Symptoms - Hydraulic Brakes. Repair or replace components as necessary.
- Lower the vehicle to allow for entry and exit while bleeding the brake corners and other components.
- Connect a battery charger to the 12V battery. The battery charger must remain connected for the entire automated bleed procedure. Refer to Battery Charging.
- Install a scan tool to the vehicle.
- Turn the ignition switch to the ON position with the engine OFF.
- Using the scan tool, perform the following steps:
- Press Start to begin the automated bleed procedure. Ensure the J-29532-A or J 29532 has not yet been installed to the vehicle.
- Press Start to continue.
- Inspect the fluid level in the J-29532-A or J 29532 . Clean the outside of the J-29532-A or J 29532 and add GM approved or equivalent DOT-3 brake fluid from a clean, sealed brake fluid container, as necessary.
- Clean the outside of the master cylinder reservoir on and around the reservoir cap prior to removing the cap and diaphragm.
- Install the J 35589-A and the J-29532-A or J 29532 to the vehicle.
- Set the pressure regulator of the J-29532-A or charge the air tank of the J 29532 to 200 kPa (30 psi).
- Open the J-29532-A or J 29532 fluid tank valve to allow pressurized brake fluid to enter the brake system.
- Wait approximately 30 seconds, then inspect the entire hydraulic brake system to ensure there are no existing external brake fluid leaks.
- Secure bleeder hoses to all 4 brake caliper bleeder valves.
- Bleed each of the 4 brake corners using the J-29532-A or J 29532 in the following sequence. Ensure the brake fluid is clear and free of air bubbles at each corner.
- Ensure each of the 4 brake caliper bleeder valves are tightened securely.
- Press Start to begin the system automated bleed steps.
- When instructed, firmly apply and release the brake pedal using smooth, consistent full brake pedal strokes.
- Continue the brake applications until instructed by the scan tool.
- When instructed by the scan tool, stop performing the brake applications and press Enter.
- When instructed by the scan tool, press Start to continue.
- Following the instructions on the scan tool, open the left rear (LR) brake caliper bleeder valve.
- With the bleeder valve open and the bleeder hose maintained firmly in place, press Start to begin the bleeding process.
- Press Enter when instructed to repeat the bleeding process 5 more times on the scan tool.
- Press Enter when instructed at the end of the 6th bleeding process.
- Ensure the LR brake caliper bleeder valve is tightened securely.
- Reduce the charge in the air tank of the J-29532-A or J 29532 to 0 kPa (0 psi).
- Press Start to continue.
- Place shop cloths beneath the master cylinder brake pipe connections to protect the vehicle from the brake fluid expelled during the next sequence.
- When instructed by the scan tool, set the pressure regulator of the J-29532-A or charge the air tank of the J 29532 to 200 kPa (30 psi).
- Press Start to begin the next bleed sequence.
- Loosen, but do not disconnect, one of the 2 intermediate brake pipe fittings (1).
- Tighten the first brake pipe fitting, then loosen, but do not disconnect, the second intermediate brake pipe fitting (1).
- Tighten the second intermediate brake pipe fitting.
- If both of the intermediate brake pipe ports (1) were not fully bled within the 60-second cycle time, press Start to repeat Steps 37-39.
- Press Enter to continue.
- Loosen, but do not disconnect, the primary brake pipe fitting (1).
- Tighten the primary brake pipe fitting (1).
- If the primary brake pipe port (1) was not fully bled within the 60-second cycle time, press Start to repeat Steps 42-43.
- Press Enter to continue.
- Following the instructions on the scan tool, press Start to begin the next bleed sequence.
- Open the right rear (RR) brake caliper bleeder valve.
- If the RR bleeder valve was not fully bled within the 60 second cycle time, press Start to repeat Step 47 until the brake fluid is clear of any air.
- Press Enter to continue.
- Following the instructions on the scan tool, press Start to begin the next bleed sequence.
- Open the left rear (LR) brake caliper bleeder valve.
- If the LR bleeder valve was not fully bled within the 60-second cycle time, press Start to repeat Step 51 until the brake fluid is clear of any air.
- Press Enter to continue.
- Secure bleeder hoses to all 4 brake caliper bleeder valves.
- Bleed each of the 4 brake corners using the J-29532-A or J 29532 , in the following sequence. Ensure the brake fluid is clear and free of air bubbles at each corner.
- Ensure each of the 4 brake caliper bleeder valves are tightened securely.
- Press Enter to continue.
- Remove the J 35589-A and the J-29532-A or J 29532 from the vehicle.
- Ensure the master cylinder reservoir is filled no higher than the MAX operating range line. Add or remove brake fluid as necessary. Refer to Master Cylinder Reservoir Filling.
- Start the engine.
- Press Start to continue the final sequence.
- Continue to follow the instructions on the scan tool.
- Allow the engine to idle for 1 minute to allow the system to recalibrate.
- Turn the engine OFF, then turn the ignition switch to the ON position without starting the engine.
- Clear any DTCs from the EBCM.
- The hybrid brake control modulator is an OBDII compliant module. As such, brake related DTCs may be stored in the powertrain control modules. After addressing any other stored DTCs, clear any brake related DTCs stored in the powertrain control modules.
- Turn the ignition switch to OFF, without pausing at ACCESSORY, and without applying the brake pedal.
- Allow the vehicle to remain OFF for at least 1 minute before applying the brake pedal, starting the engine, or performing a test drive.
- Remove the scan tool from the vehicle.
- Before starting the engine, firmly apply the brake pedal several times.
- If the brake pedal feels spongy, perform the following:
- If the brake pedal stills feels spongy, an if no external brake fluid leaks are found, inspect the brake system for internal leaks and inspect the brake pedal travel. Refer to Brake System Internal Leak Test and Brake Pedal Travel Measurement and Inspection.
- If internal leaks are found, replace the master cylinder. Refer to Master Cylinder Replacement.
- If the brake pedal travel exceeds specification and there is no damage to the pedal system or pushrod, replace the master cylinder. Refer to Master Cylinder Replacement.
- Turn the ignition switch to ON, without starting the engine.
- If the brake system warning lamp remains illuminated, DO NOT allow the vehicle to be driven until the brake system is diagnosed and repaired. Refer to Symptoms - Hydraulic Brakes.
- Start the engine.
- Firmly apply the brake pedal several times.
- If the brake pedal feels spongy, repeat the automated bleeding procedure until a firm brake pedal is obtained.
- Drive the vehicle to a speed above 13 km/h (8 mph) to allow ABS initialization to occur.
- If the brake pedal feels spongy, repeat the automated bleeding procedure until a firm brake pedal is obtained.
Note: The ignition must be in the OFF position, without pausing at ACCESSORY, and without applying the brake pedal to ensure the brake modulator and high pressure accumulator (HPA) pressure relief occurs. This process will take approximately 1-3 minutes.
Remove the ignition key.
Note: The ignition switch must remain in the ON position with the engine OFF during the entire automated bleed procedure.
Note: Do not pressurize the pressure bleeder J-29532-A or J 29532 , and thereby the master cylinder reservoir, until instructed to do so by the scan tool.
| 10.1. | Select Diagnostics |
| 10.2. | Select the appropriate vehicle information |
| 10.3. | Select Chassis |
| 10.4. | Select Electronic Brake Control Module (EBCM) |
| 10.5. | Select Special Functions |
| 10.6. | Select Automated Bleed |
The travel and pressure sensors are being calibrated and learned by the EBCM during this step.
Note: Approximately 2.5-3.0 L (2.6-3.2 qt) of brake fluid will be used throughout this procedure. Ensure there is an adequate supply of brake fluid in the J-29532-A or J 29532 .
Note: Do not pressurize the J-29532-A or J 29532 and thereby the master cylinder reservoir until instructed to do so by the scan tool.
Note: Ensure a MINIMUM of 200 kPa (30 psi) of pressure is MAINTAINED in the J-29532-A or J 29532 throughout this procedure, except as instructed.
| 20.1. | Left front |
| 20.2. | Right front |
| 20.3. | Left rear |
| 20.4. | Right rear |
Follow all instructions on the scan tool. Only apply the brake pedal when instructed to do so by the scan tool.
The brake pedal will go fully to the floor with some pedal feedback felt. The master cylinder reservoir supply circuit is being flushed through these steps.
The scan tool will instruct to perform 10 brake applies.
The scan tool will instruct to perform Steps 23-25 2 more times.
Note: The hydraulic brake system will be under high pressure during the next bleed sequence. Ensure the bleeder hose is maintained securely to the bleeder valve, and open the bleeder valve slowly.
This process will run in a 30-second cycle. The pump and HPA circuits are being flushed during these steps.
The brake pedal simulator circuit is being flushed through this step.
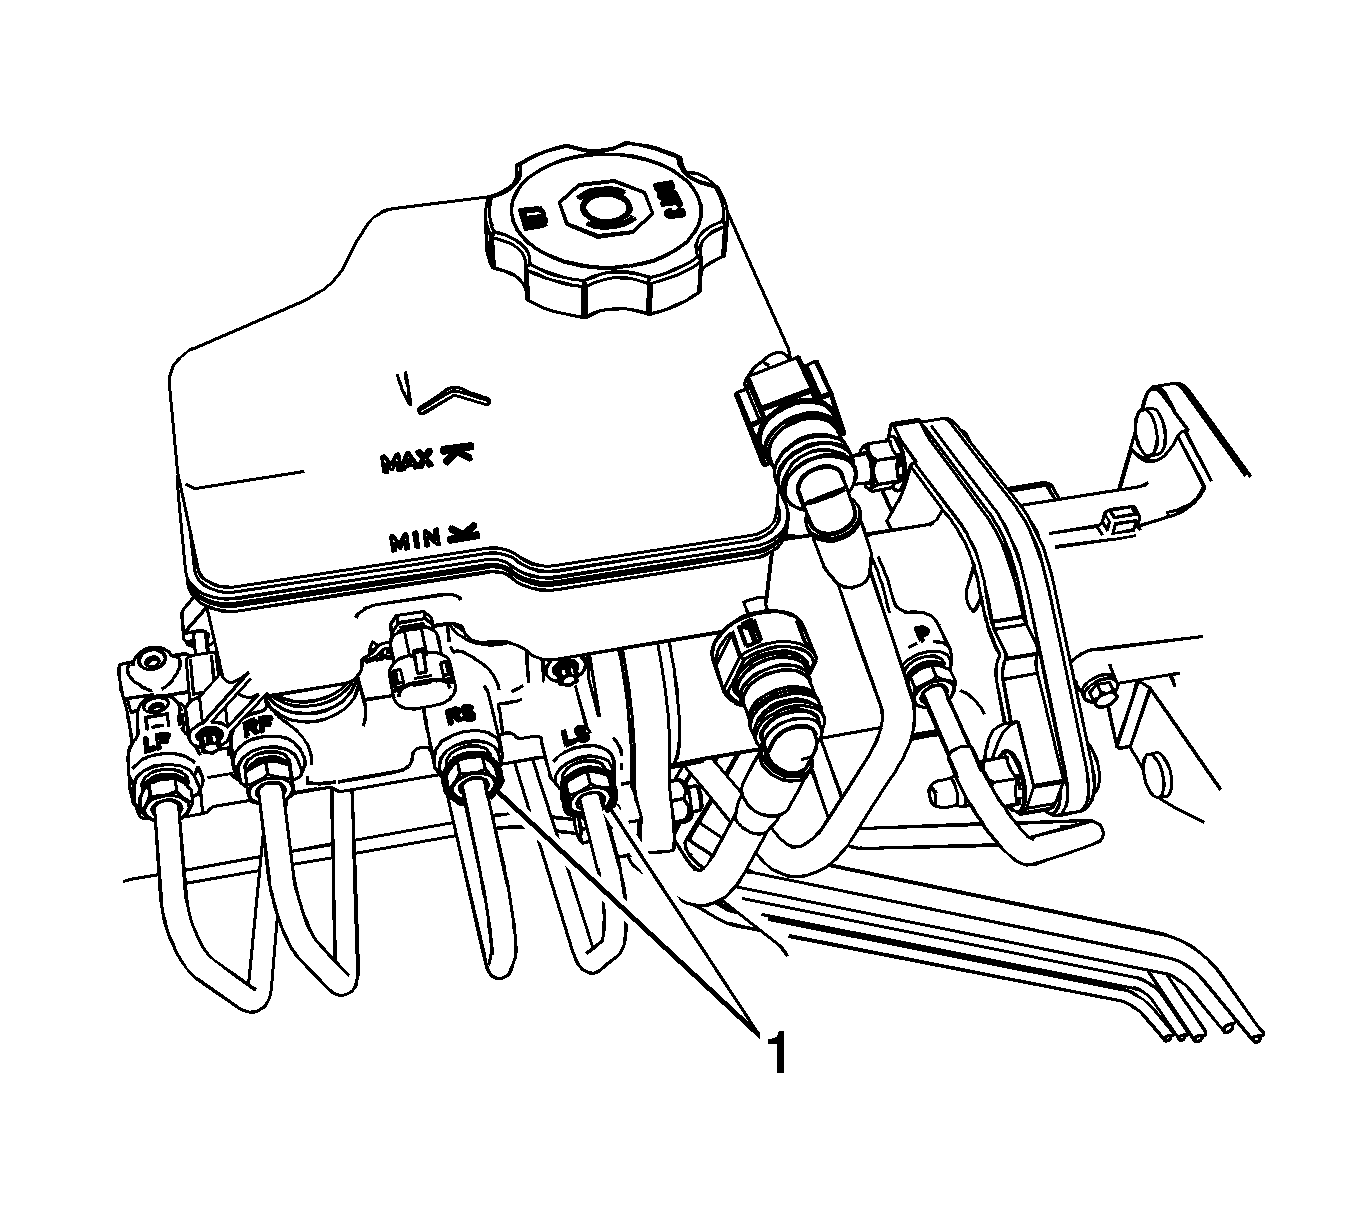
The brake modulator to master cylinder, or intermediate, brake circuits are being port bled during this sequence. Ensure each of the 2 intermediate brake pipe ports (1) is fully bled and securely tightened before the 60-second cycle is completed.
Keep the connection open just long enough to expel the air trapped in this circuit; about 15-20 seconds.
Keep the connection open just long enough to expel the air trapped in this circuit; about 15-20 seconds.
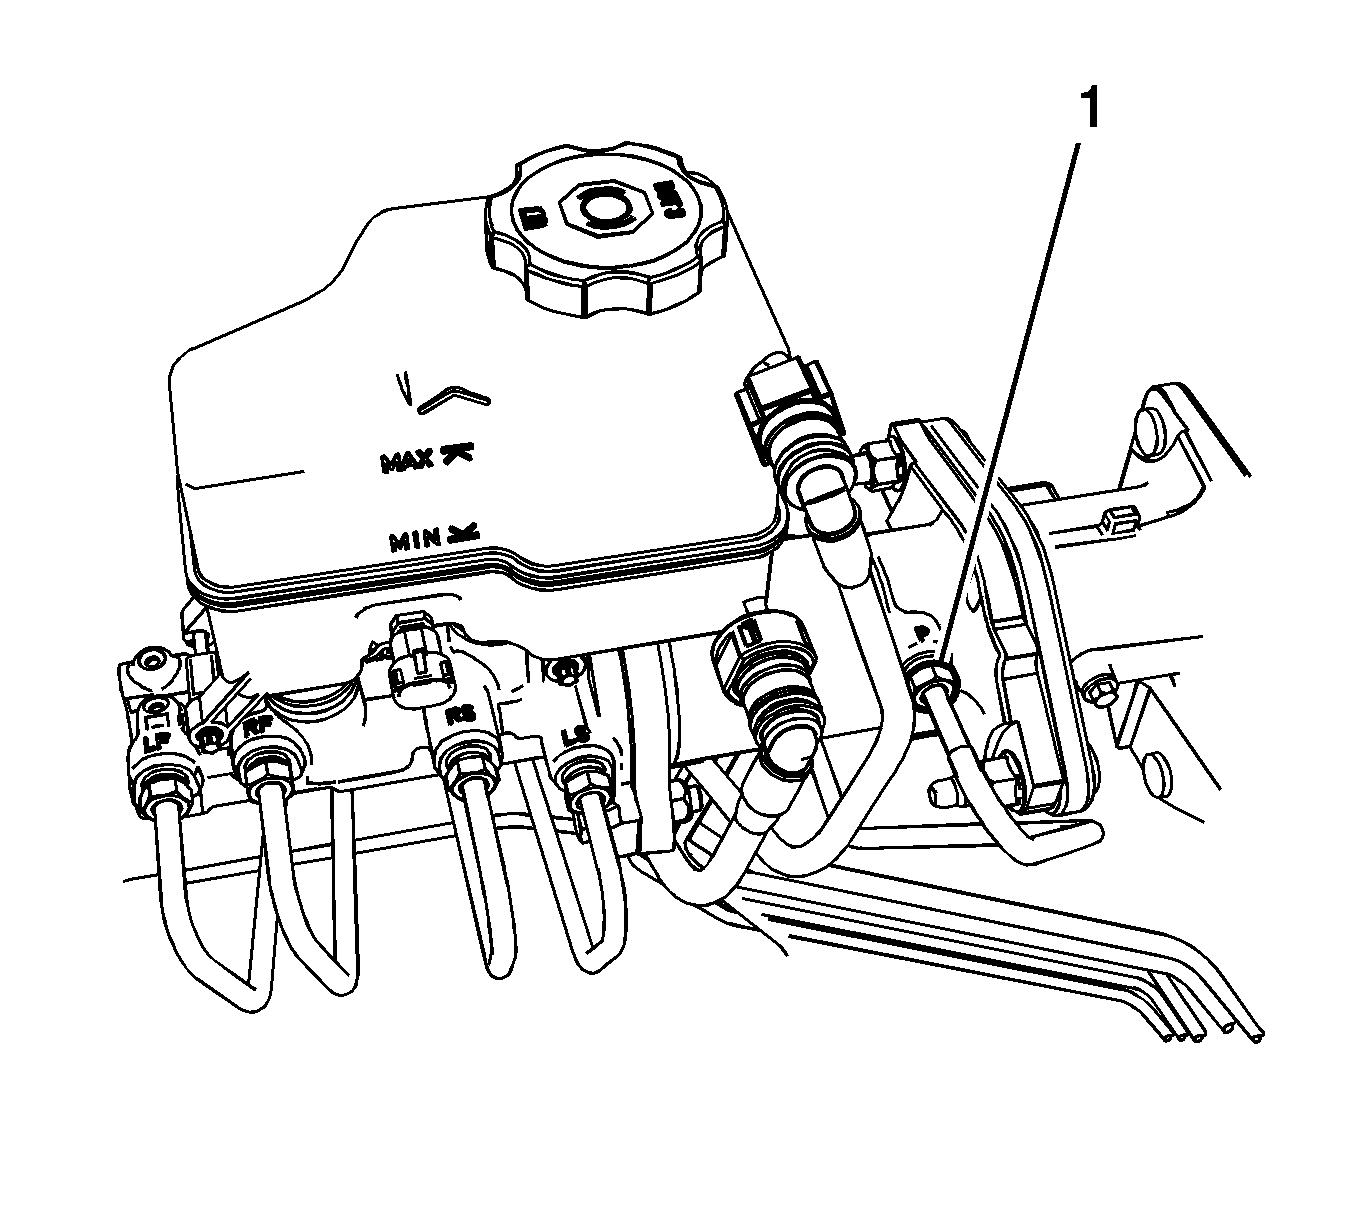
The brake master cylinder to brake modulator, or primary, brake circuit is being port bled during this sequence. Ensure the primary brake pipe port (1) is fully bled and securely tightened before the 60-second cycle is completed.
Keep the connection open just long enough to expel the air trapped in this circuit; about 15-20 seconds.
Ensure the RR bleeder valve is fully bled and securely tightened before the 60-second cycle is completed. Do not leave the bleeder valve open for longer than 60-seconds.
Ensure the LR bleeder valve is fully bled and securely tightened before the 60-second cycle is completed. Do not leave the bleeder valve open for longer than 60-seconds.
| 55.1. | Left front |
| 55.2. | Right front |
| 55.3. | Left rear |
| 55.4. | Right rear |
Note: The system is active and pressurized, therefore the brake fluid level in the master cylinder reservoir cannot be allowed to be higher than the MAX mark of the operating range.
The pump and the HPA circuits are being flushed, and the boost valve is being calibrated and learned by the EBCM through this step.
Remove the ignition key.
This waiting period is essential to complete the sensor and boost valve calibration and EBCM learn processes, and to allow the HPA to depressurize to allow for a deactivated system pedal feel check.
Observe the brake pedal feel.
| 71.1. | Repeat the base hydraulic brake system bleeding procedure. Refer to Hydraulic Brake System Bleeding. |
| 71.2. | If the brake pedal feel is now firm, repeat the automated bleeding procedure. |
| 71.3. | If the brake pedal stills feels spongy after repeating the base hydraulic brake system bleeding procedure, inspect the brake system for external leaks. Refer to Brake System External Leak Inspection. |
Observe if the brake system warning lamp remains illuminated.
Observe the brake pedal feel.
Observe the brake pedal feel.
