GM Service Manual Online
For 1990-2009 cars only

Special Tools

J 41427 Engine Lift Brackets

Removal Procedure


    Object Number: 310799  Size: SH
  1. Raise the hood to the service position, perform the following:
  2. 1.1. Remove the hood hinge bolts (1).
    1.2. Raise the hood until vertical.
    1.3. Install the hood hinge bolts until snug in the service position (2).
  3. Disconnect the negative battery cable. Refer to Battery Negative Cable Disconnection and Connection.
  4. Drain the cooling system. Refer to Cooling System Draining and Filling.
  5. Remove the fuel pipes/hoses. Refer to Fuel Hose/Pipes Replacement - Engine Compartment.
  6. Remove the lower fan shroud. Refer to Engine Coolant Fan Lower Shroud Replacement.
  7. Remove the drive belt. Refer to Drive Belt Replacement.
  8. Raise and suitably support the vehicle. Refer to Lifting and Jacking the Vehicle.

  9. Object Number: 309158  Size: SH
  10. If equipped, remove the oil pan skid plate bolts and plate.
  11. If equipped, remove the engine shield. Refer to Engine Shield Replacement.
  12. Remove the starter. Refer to Starter Motor Replacement.

  13. Object Number: 869720  Size: SH
  14. Remove the transmission cover.

  15. Object Number: 869722  Size: SH
  16. Remove the positive battery cable clip bolt (2).
  17. Remove the catalytic converter. Refer to Catalytic Converter Replacement.

  18. Object Number: 310250  Size: SH
  19. Remove the battery cable bracket bolts.

  20. Object Number: 782731  Size: SH
  21. Disconnect the crankshaft position (CKP) sensor electrical connector (5) and remove the harness from the retainer clip.
  22. Remove the ground bolt (3) holding the negative battery cable (6) and ground cable (4) to the engine.

  23. Object Number: 9096  Size: SH
  24. If equipped, remove the torque converter bolts.
  25. Remove the transmission bolts.
  26. Lower the vehicle.

  27. Object Number: 367002  Size: SH
  28. Reposition the radiator inlet hose clamp.
  29. Remove the radiator inlet hose from the thermostat housing.

  30. Object Number: 367001  Size: SH
  31. Reposition the radiator outlet hose clamps.
  32. Remove the radiator outlet hose from the surge tank.
  33. Remove the radiator outlet hose from the water pump.

  34. Object Number: 1878341  Size: SH
  35. Disconnect the following electrical connectors:
  36. • The A/C pressure switch (1), if equipped
    • The air conditioning (A/C) compressor clutch (2), if equipped
  37. If equipped, remove the air conditioning (A/C) hoses. Refer to Discharge Hose Replacement and Suction Hose Replacement.
  38. Remove the positive cable nut and cable from the generator.

  39. Object Number: 1876870  Size: SH
  40. Remove the engine wiring harness clips (1, 2) from the engine harness brackets.

  41. Object Number: 1876871  Size: SH
  42. Remove the engine wiring harness rear bracket bolts and bracket.

  43. Object Number: 1876492  Size: SH
  44. Disconnect the following electrical connectors:
  45. • Evaporative emission (EVAP) canister purge solenoid valve (1)
    • Manifold absolute pressure (MAP) sensor
  46. Disconnect the engine wiring harness electrical connector (2) from the throttle body.

  47. Object Number: 782680  Size: SH
  48. Disconnect the following electrical connectors:
  49. • Knock sensor (1)
    • Camshaft position (CMP) sensor (2)
    • Fuel pump/oil pressure sensor (3)
  50. Remove the harness ground bolt.
  51. Reposition the harness ground (4) and ground strap (5).

  52. Object Number: 2056546  Size: SH
  53. Remove the engine wiring harness bracket bolt (1).
  54. Position the engine wiring harness bracket (2) and engine harness aside.

  55. Object Number: 782670  Size: SH
  56. Remove the junction block bracket bolt.
  57. Reposition the bracket and wiring harness aside.

  58. Object Number: 782176  Size: SH
  59. Remove the engine wiring harness rear bracket nut at the EVAP canister purge solenoid valve.
  60. Remove the stud holding the engine wiring harness bracket.
  61. Reposition the engine wiring harness with the bracket aside.
  62. Remove the heater hoses. Refer to Heater Inlet Hose Replacement and Heater Outlet Hose Replacement.

  63. Object Number: 1876612  Size: SH
  64. Disconnect the EVAP canister harness (1) from the purge solenoid valve.

  65. Object Number: 1876873  Size: SH
  66. Disconnect the engine wiring harness electrical connector (7) from the ignition coil.
  67. Disconnect the power brake booster vacuum hose from the vacuum fitting.

  68. Object Number: 340090  Size: SH
  69. Loosen the power steering (P/S) pump rear bracket nut.
  70. Remove the P/S pump rear bracket front nut.
  71. Remove the bolts and the nut for the P/S pump bracket.
  72. Leave the A/C compressor, if equipped, and the P/S pump on the bracket.
  73. Slide the P/S pump bracket forward off the stud and set aside.
  74. Remove the thermostat and water outlet. Refer to Engine Coolant Thermostat Replacement.

  75. Object Number: 33636  Size: SH
  76. Remove the left front and right rear intake manifold lower bolts.
  77. Install J 41427 to the left front and right rear intake manifold bolts, using the following procedure:
  78. Caution: Refer to Fastener Caution in the Preface section.

    53.1. Install the J 41427 marked RIGHT REAR.
    53.2. Install the lift bracket bolts.

    Tighten
    Tighten the bolts to 15 N·m (11 lb ft).

    53.3. Install the J 41427 marked LEFT FRONT with the arrow pointing to the front of the engine.
    53.4. Install the lift bracket bolts.

    Tighten
    Tighten the bolts to 15 N·m (11 lb ft).

  79. Install a suitable lifting devise to the engine lift brackets.

  80. Object Number: 310259  Size: SH
  81. Remove the engine mount to engine mount bracket nuts.
  82. Support the transmission with a suitable floor jack.
  83. Remove the engine.

Installation Procedure

    Caution: Refer to Fastener Caution in the Preface section.


    Object Number: 310259  Size: SH
  1. Install the engine.
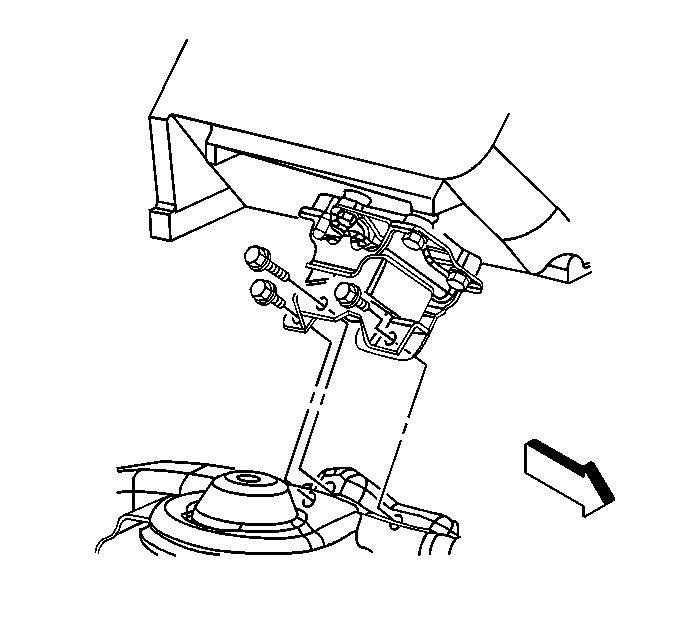
  2. Install the engine mount to engine mount bracket bolts.
  3. Tighten
    Tighten the bolts to 65 N·m (48 lb ft).


    Object Number: 33636  Size: SH
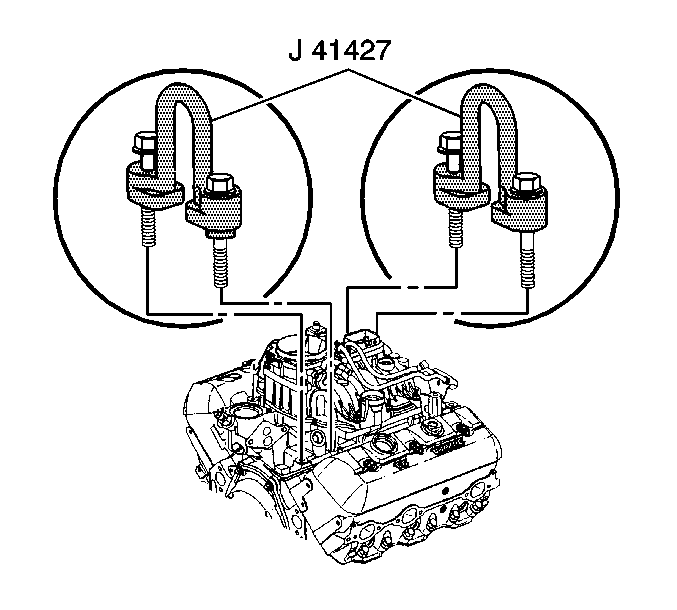
  4. Remove the lifting devise and the J 41427 .
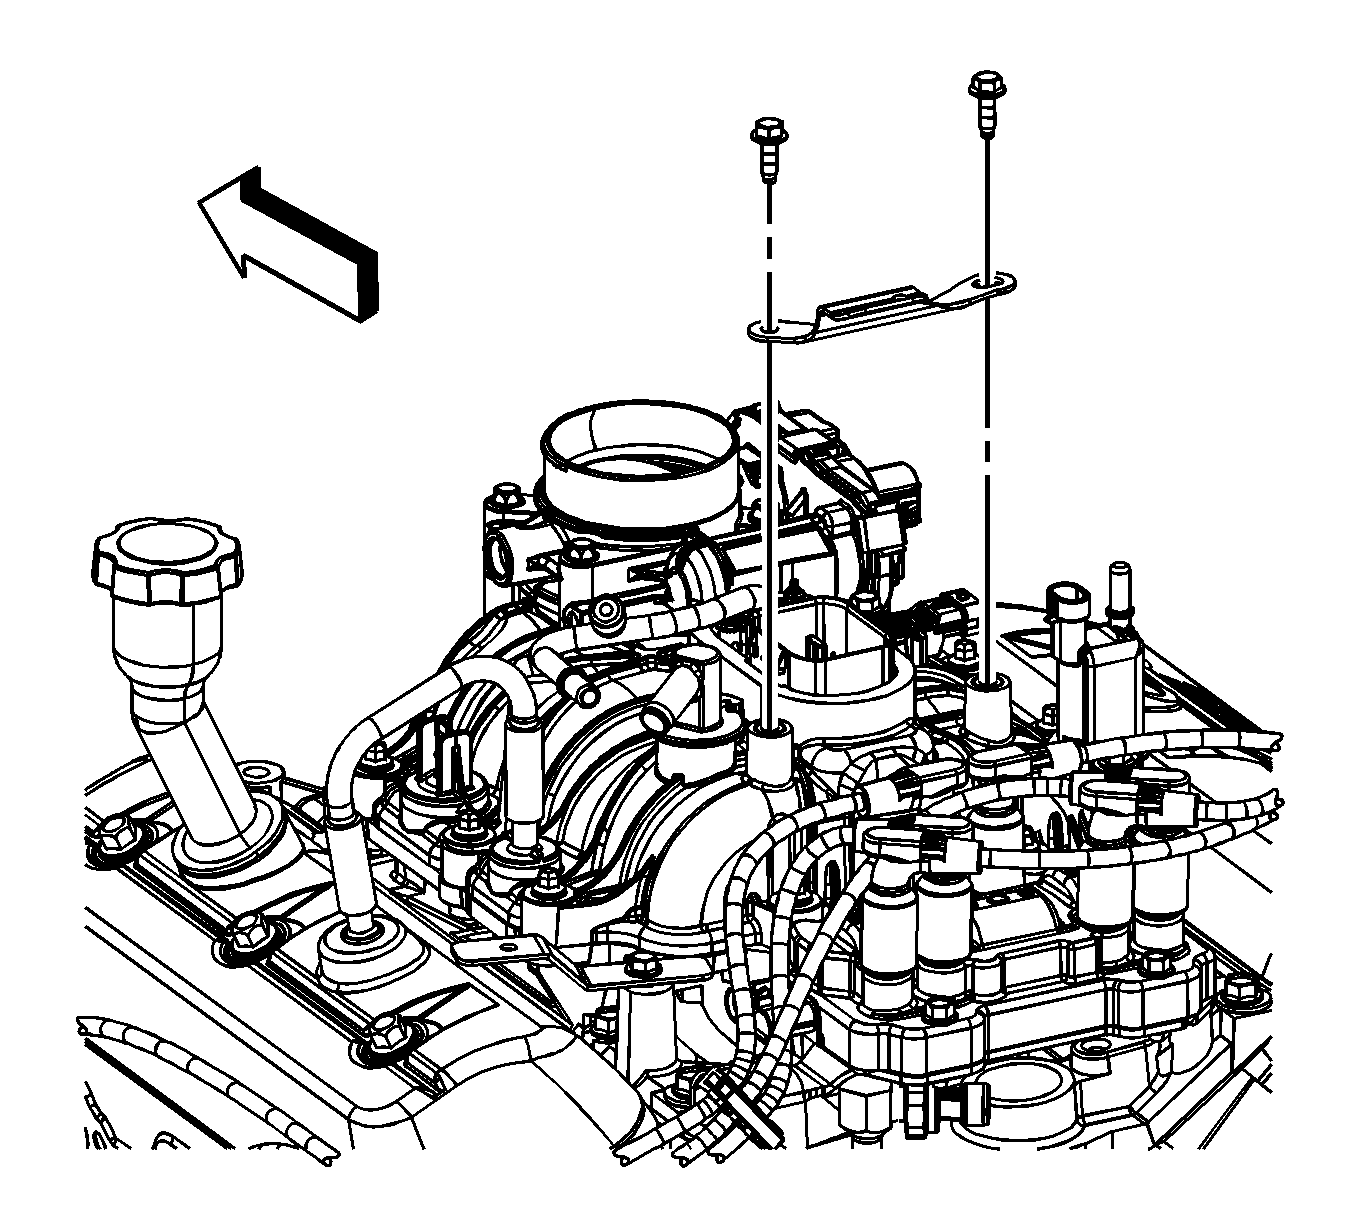
  5. Apply threadlock to the threads of the intake manifold lower bolts.
  6. Install the intake manifold bolts. Refer to Adhesives, Fluids, Lubricants, and Sealers for the correct part number.
  7. Tighten

    1. Tighten the bolts a first pass to 3 N·m (27 lb in).
    2. Tighten the bolts a second pass to 12 N·m (106 lb in).
    3. Tighten the bolts a final pass to 15 N·m (11 lb ft).
  8. Install one transmission bolt until snug.
  9. Remove the support jack from under the transmission.
  10. Install the thermostat and water outlet. Refer to Engine Coolant Thermostat Replacement.

  11. Object Number: 340090  Size: SH
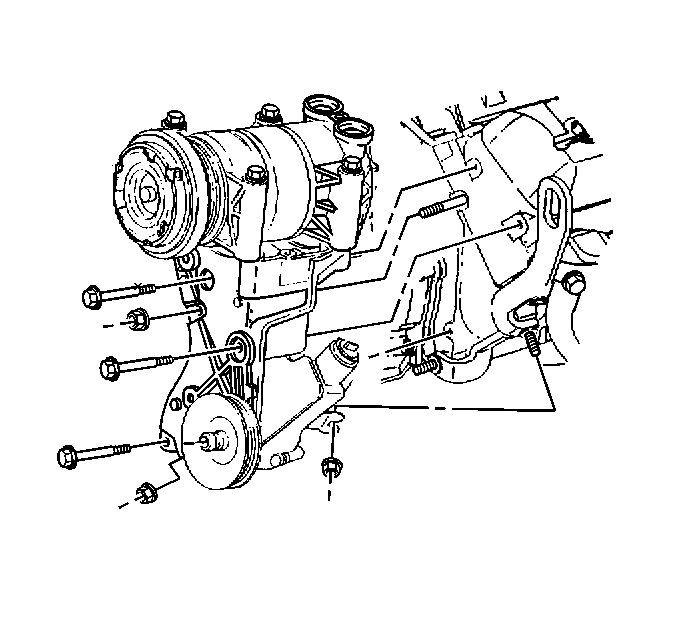
  12. Slide the P/S pump bracket onto the stud.
  13. Install the bolts and the nut for the P/S pump bracket.
  14. Install the P/S pump rear bracket front nut.
  15. Tighten the P/S pump rear bracket nut.
  16. Tighten
    Tighten the bolts and nuts to 41 N·m (30 lb ft).

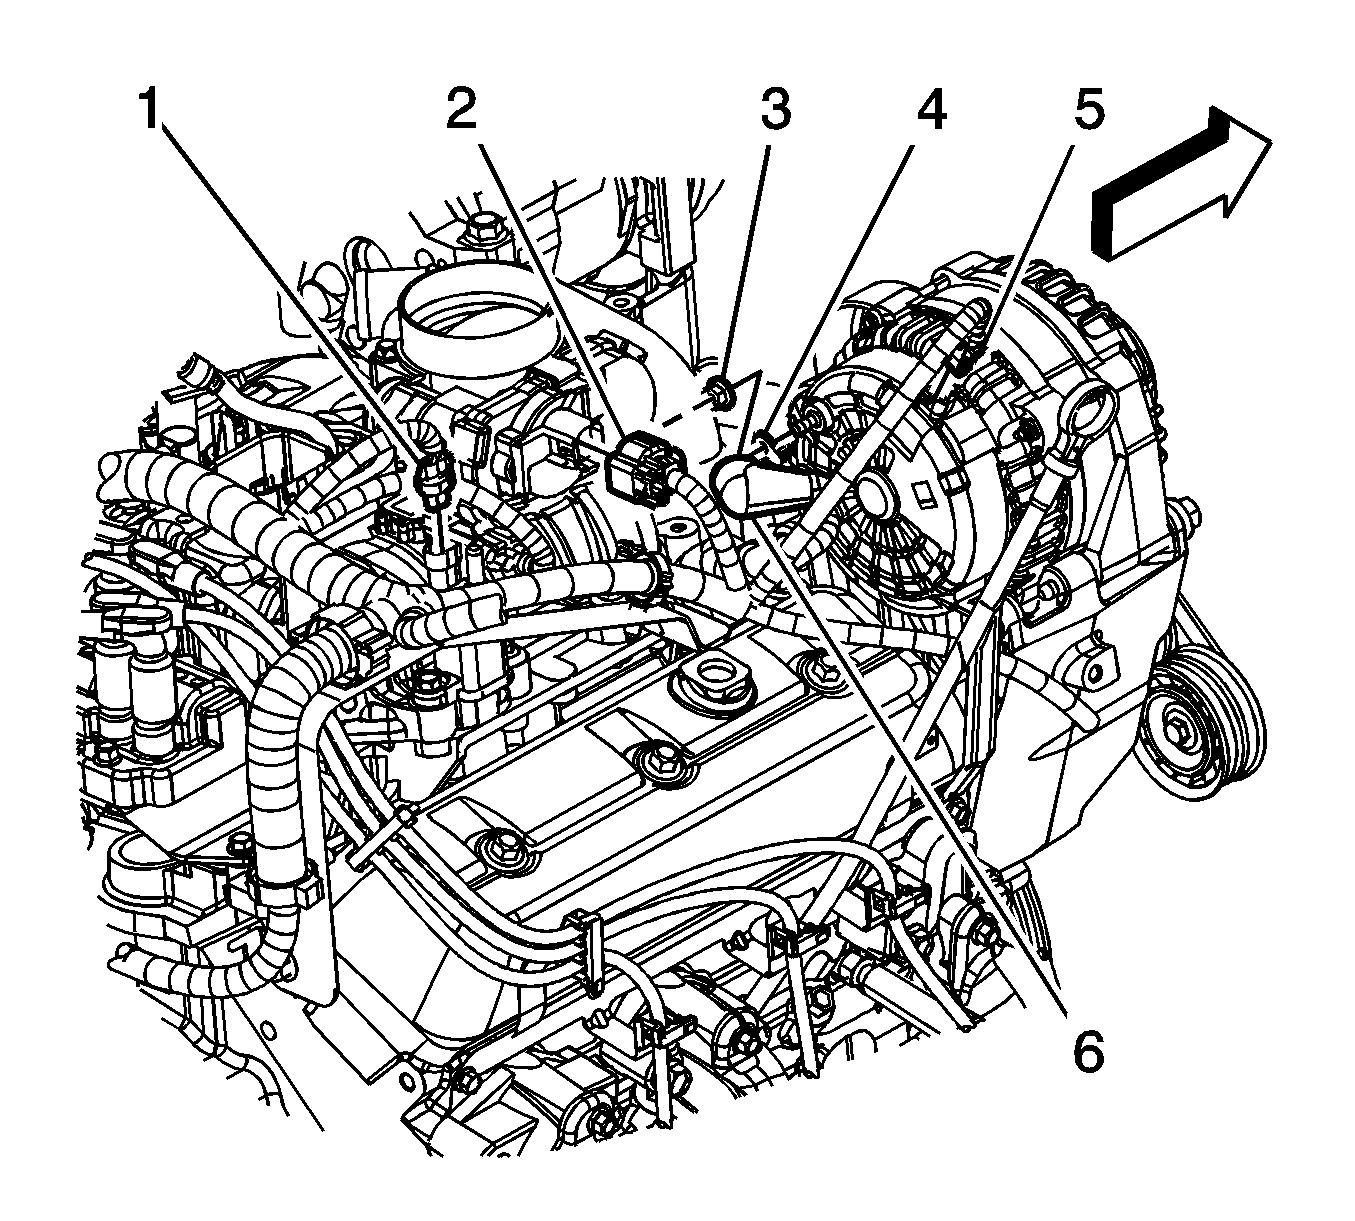
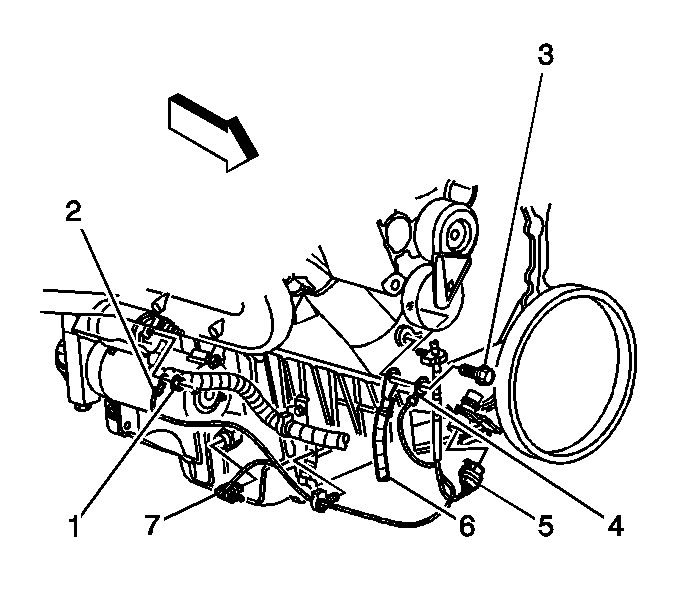
  17. Connect the power brake booster vacuum hose to the vacuum fitting.

  18. Object Number: 1876873  Size: SH
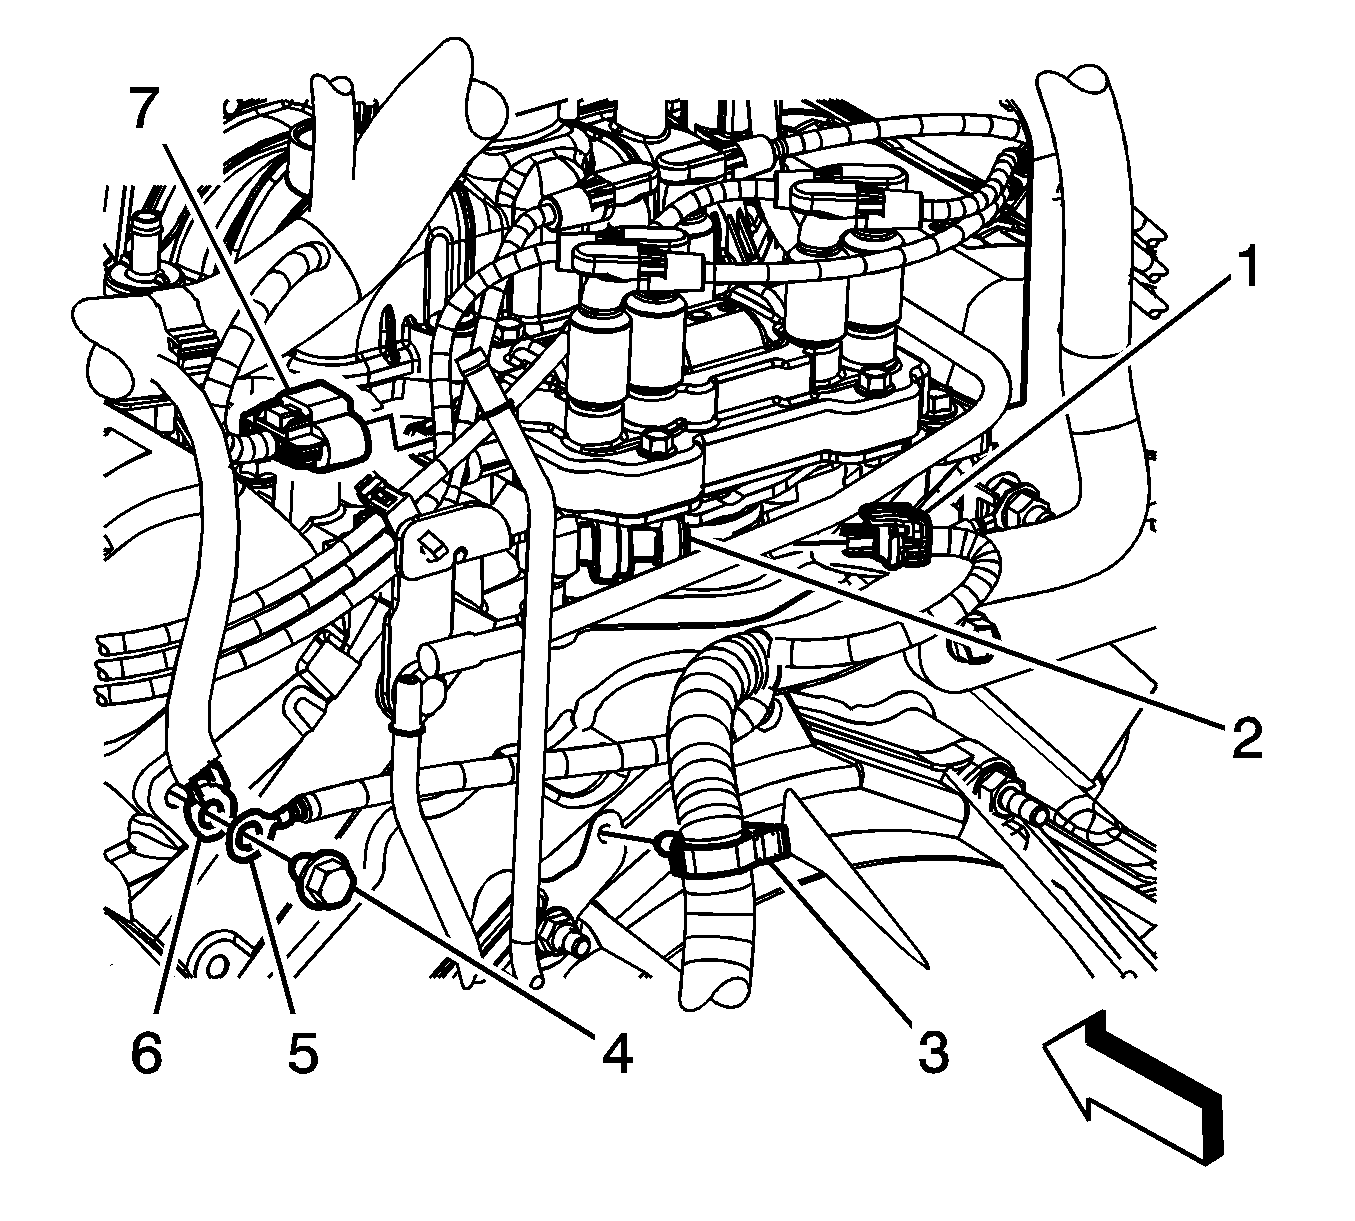
  19. Connect the engine wiring harness electrical connector (7) from the ignition coil.

  20. Object Number: 1876612  Size: SH
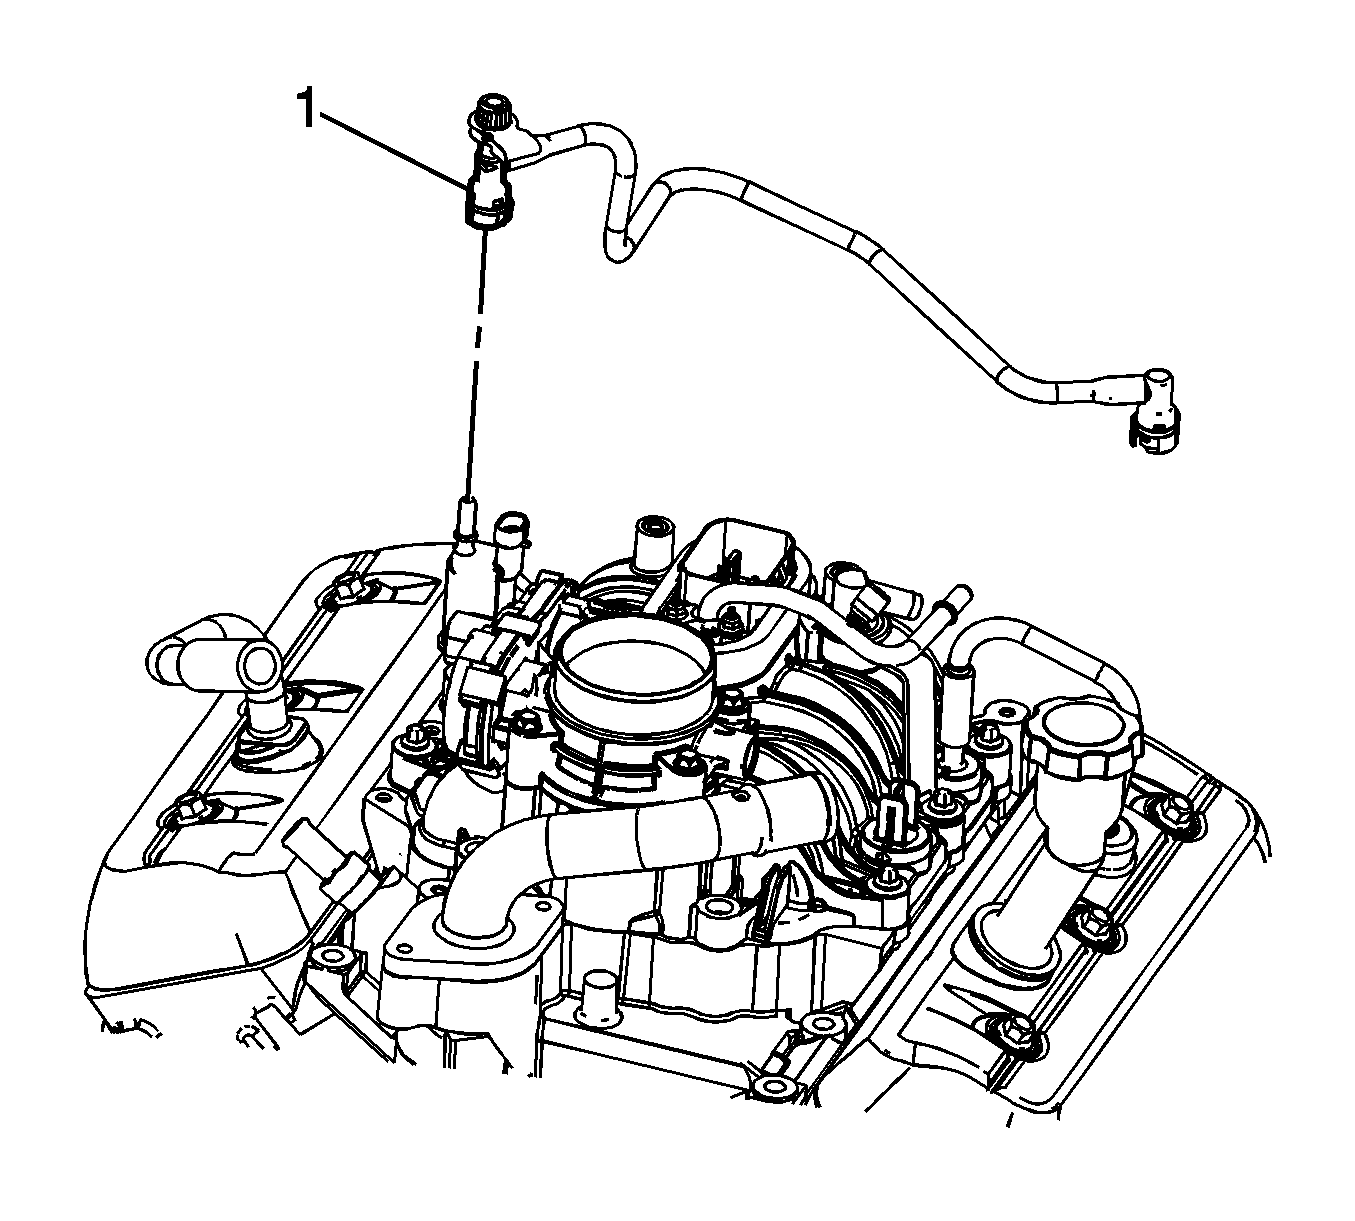
  21. Connect the EVAP canister harness (1) to the purge solenoid valve.
  22. Install the heater hoses. Refer to Heater Inlet Hose Replacement and Heater Outlet Hose Replacement.

  23. Object Number: 782176  Size: SH
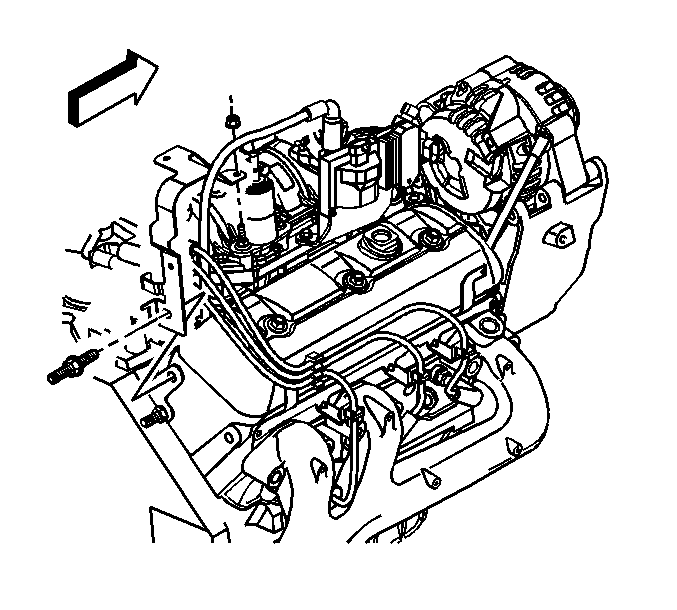
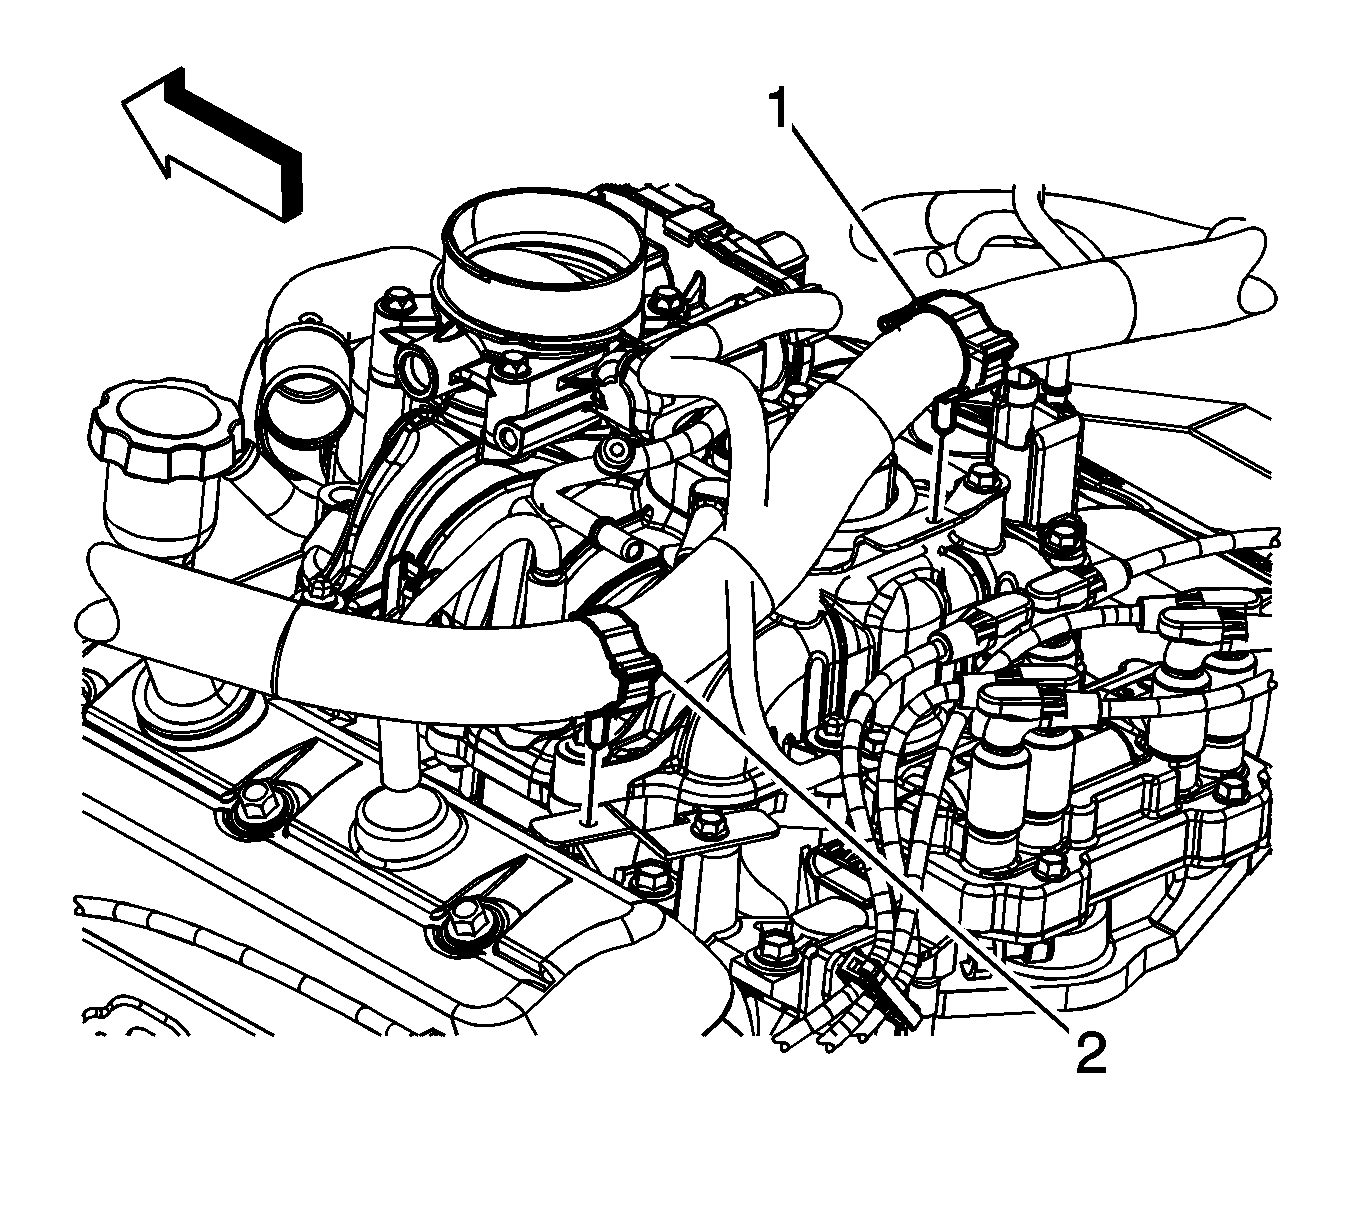
  24. Position the engine wiring harness.
  25. Install the stud holding the engine wiring harness bracket.
  26. Install the engine wiring harness rear bracket nut at the EVAP canister purge solenoid valve.
  27. Tighten
    Tighten the nut to 9 N·m (80 lb in).


    Object Number: 782670  Size: SH
  28. Position the bracket and wiring harness.
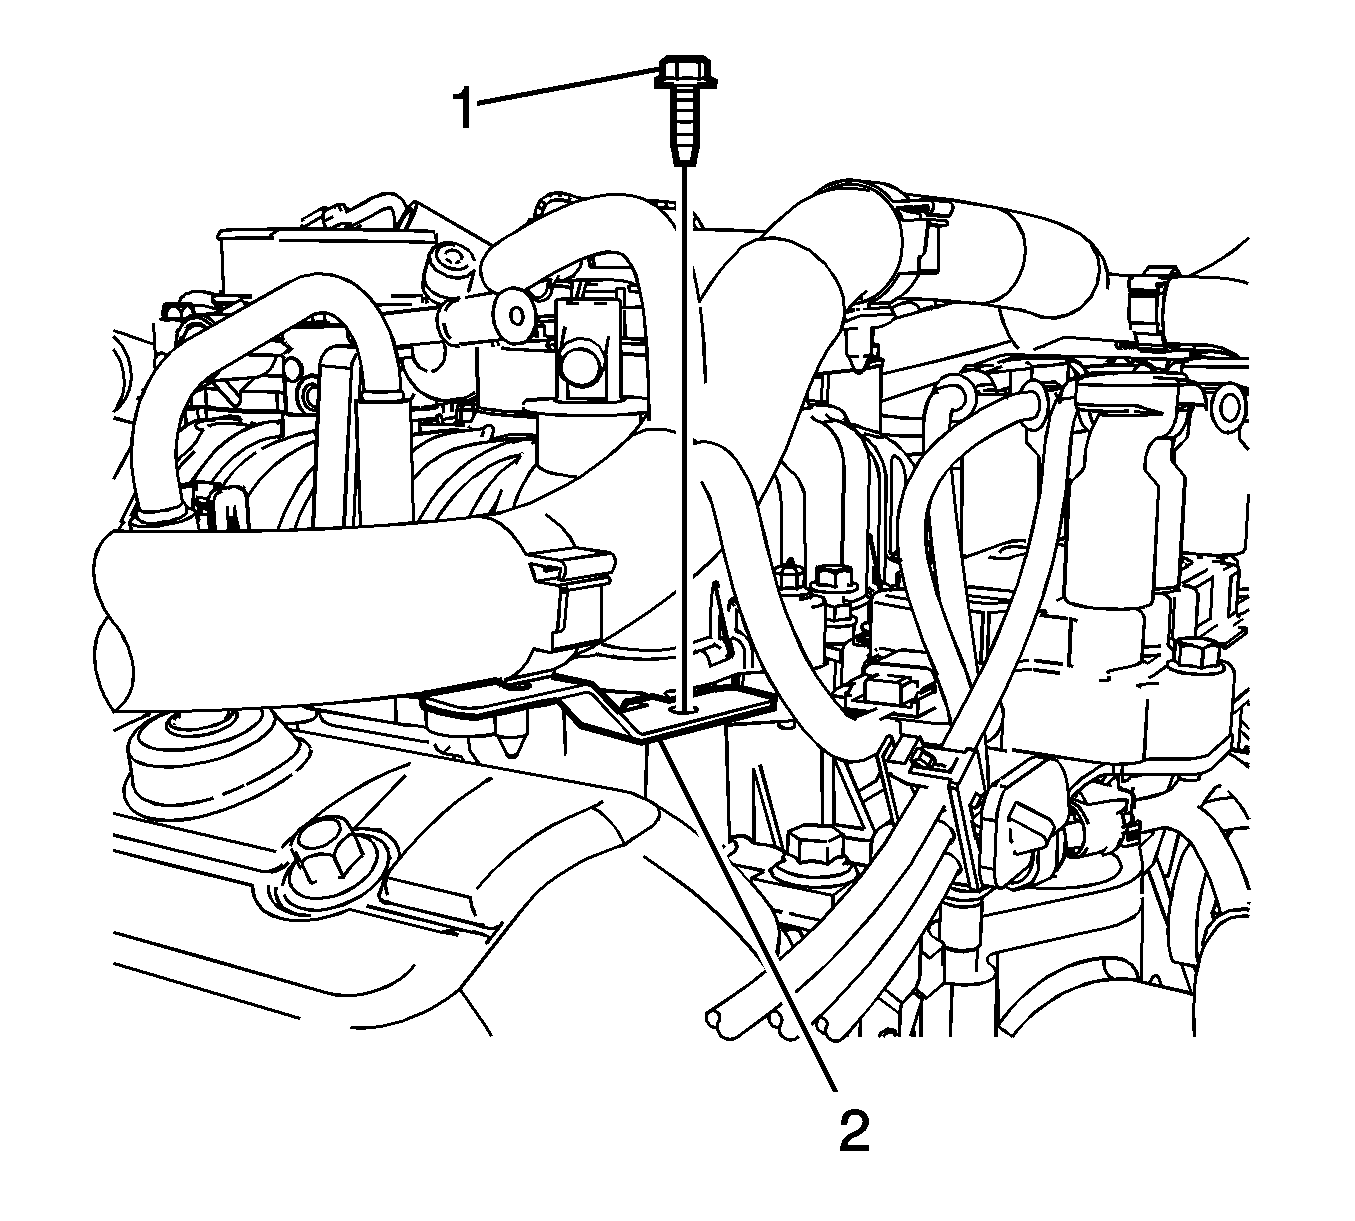
  29. Install the junction block bracket bolt.
  30. Tighten
    Tighten the bolt to 25 N·m (18 lb ft).


    Object Number: 2056546  Size: SH
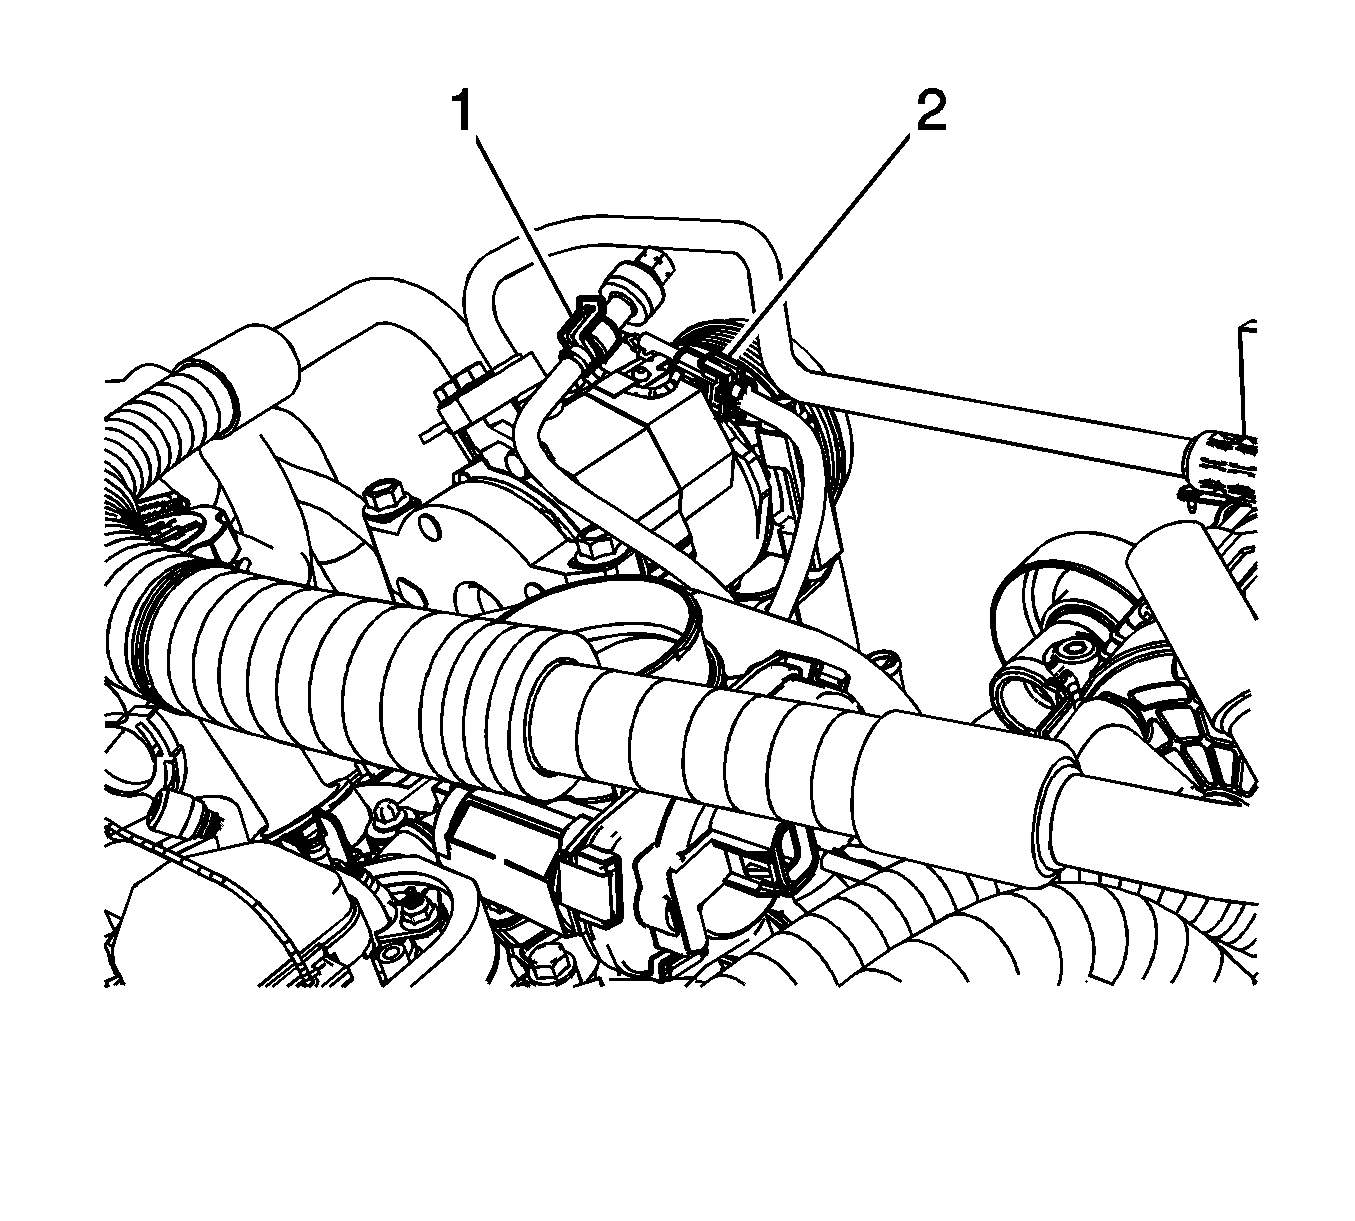
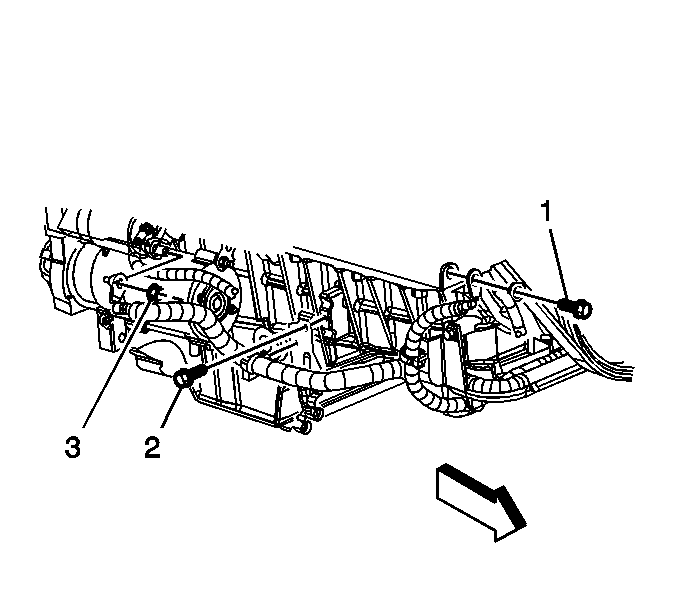
  31. Install the engine wiring harness bracket (2).
  32. Install the engine wiring harness bracket bolt (1).
  33. Tighten
    Tighten the bolt to 12 N·m (106 lb in).


    Object Number: 782680  Size: SH
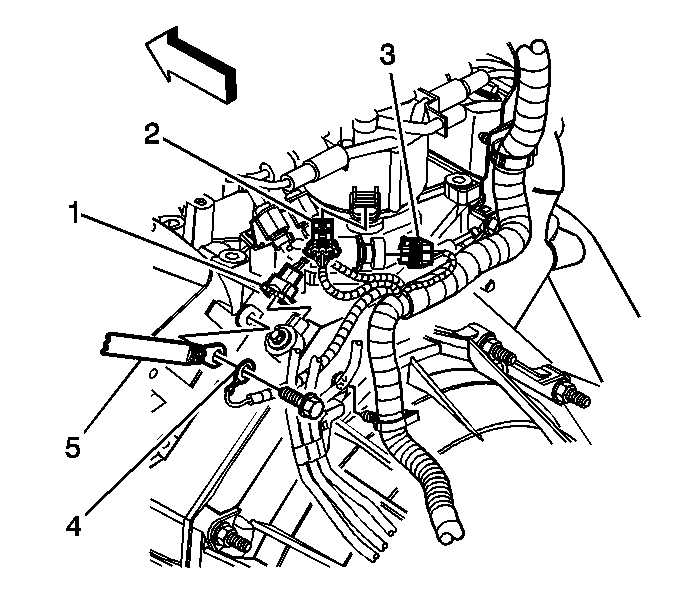
  34. Position the harness ground (4) and ground strap (5).
  35. Install the harness ground bolt.
  36. Tighten
    Tighten the bolt to 16 N·m (12 lb ft).

  37. Connect the following electrical connectors:
  38. • Knock sensor (1)
    • CMP sensor (2)
    • Fuel pump/oil pressure sensor (3)

    Object Number: 1876492  Size: SH
  39. Connect the engine wiring harness electrical connector (2) to the throttle body.
  40. Connect the following electrical connectors:
  41. • EVAP canister purge solenoid valve (1)
    • MAP sensor

    Object Number: 1876871  Size: SH
  42. Place the engine wiring harness rear bracket onto the upper intake manifold and install the bolts.
  43. Tighten
    Tighten the bolts to 10 N·m (89 lb in).


    Object Number: 1876870  Size: SH
  44. Install the engine wiring harness clips (1, 2) to the engine harness brackets.

  45. Object Number: 1878341  Size: SH
  46. If equipped, install the A/C hoses. Refer to Discharge Hose Replacement and Suction Hose Replacement.
  47. Connect the following electrical connectors:
  48. • The A/C compressor clutch (2), if equipped
    • The A/C pressure switch (1), if equipped

    Object Number: 367001  Size: SH
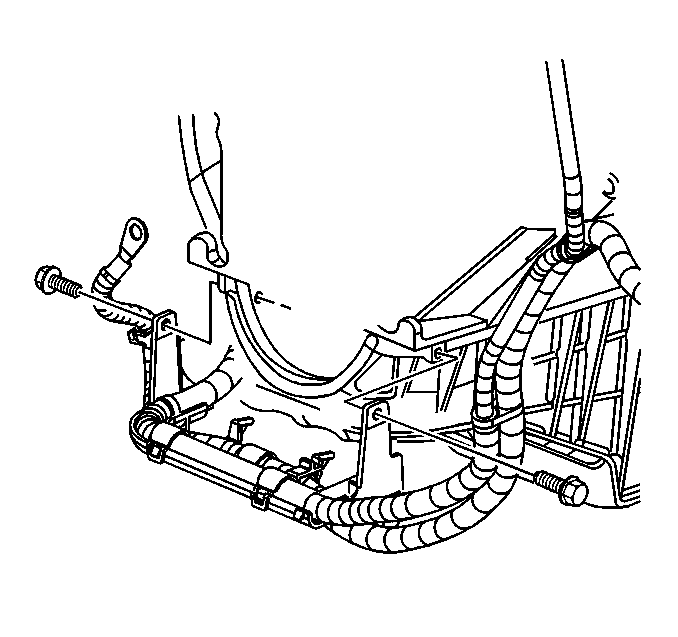
  49. Install the radiator outlet hose to the water pump.
  50. Install the radiator outlet hose to the surge tank.
  51. Position the radiator outlet hose clamps.

  52. Object Number: 367002  Size: SH
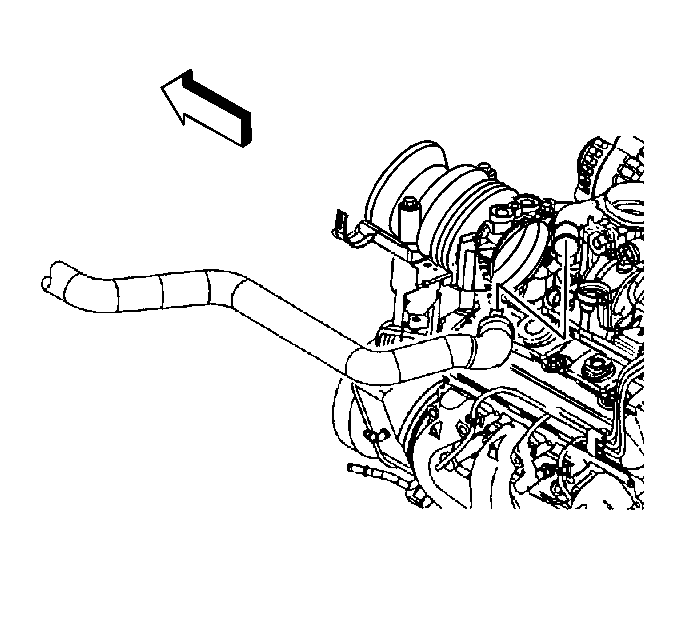
  53. Install the radiator inlet hose to the thermostat housing.
  54. Position the radiator inlet hose clamp.
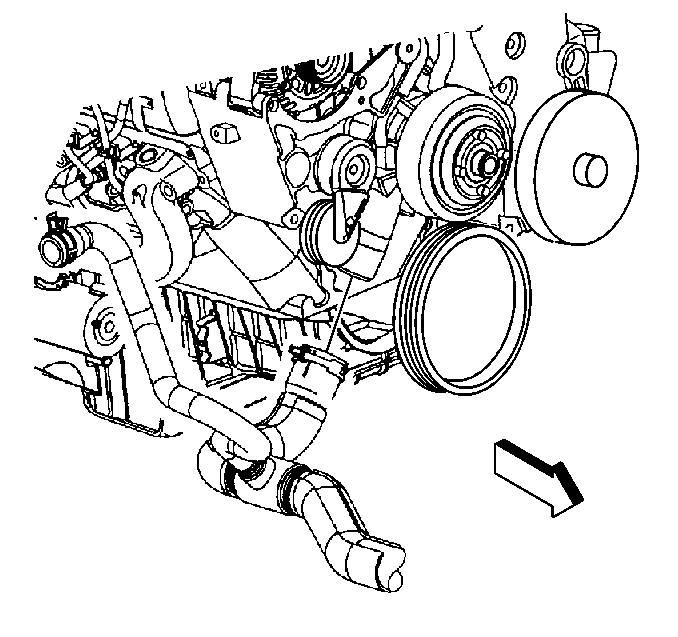
  55. Install the drive belt. Refer to Drive Belt Replacement.
  56. Install the lower fan shroud. Refer to Engine Coolant Fan Lower Shroud Replacement.
  57. Install the fuel pipes/hoses. Refer to Fuel Hose/Pipes Replacement - Engine Compartment.

  58. Object Number: 310799  Size: SH
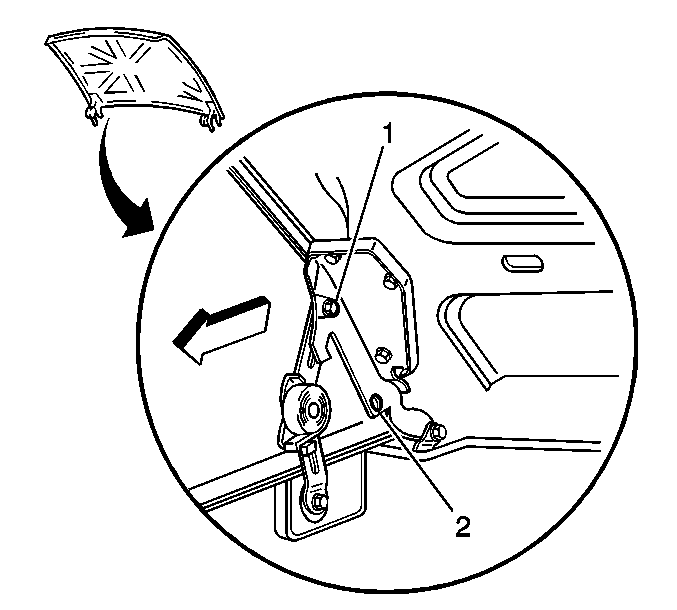
  59. Remove the hood hinge bolt from the service position (2).
  60. Lower the hood to the normal position.
  61. Install the hood hinge bolts.
  62. Tighten
    Tighten the bolts to 25 N·m (18 lb ft).

  63. Raise the vehicle.

  64. Object Number: 9096  Size: SH
  65. Install the transmission bolts.
  66. Tighten
    Tighten the bolts to 50 N·m (37 lb ft).

  67. If equipped, install the torque converter bolts.
  68. Tighten
    Tighten the bolts to 63 N·m (47 lb ft).


    Object Number: 782731  Size: SH
  69. Install the ground bolt (3) holding the negative battery cable (6) and ground cable (4) to the engine.
  70. Connect the CKP sensor electrical connector (5) and install the harness to the retainer clip.

  71. Object Number: 310250  Size: SH
  72. Install the battery cable bracket bolts.
  73. Tighten
    Tighten the bolts to 12 N·m (106 lb in).

  74. Install the catalytic converter. Refer to Catalytic Converter Replacement.

  75. Object Number: 869722  Size: SH
  76. Install the positive battery cable clip bolt (2).

  77. Object Number: 869720  Size: SH
  78. Install the transmission cover.
  79. Tighten
    Tighten the bolts to 12 N·m (106 lb in).

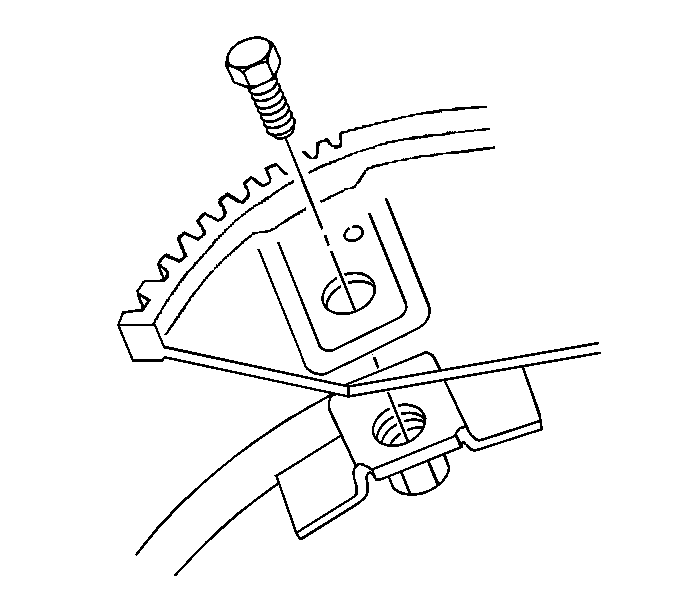
  80. Install the starter. Refer to Starter Motor Replacement.
  81. If equipped, install the engine shield. Refer to Engine Shield Replacement.

  82. Object Number: 309158  Size: SH
  83. If equipped, install the oil pan skid plate and bolts.
  84. Tighten
    Tighten the bolts to 20 N·m (15 lb ft).

  85. Lower the vehicle.
  86. Connect the negative battery cable. Refer to Battery Negative Cable Disconnection and Connection.
  87. Perform the engine prelube procedure. Refer to Engine Prelubing.
  88. Add engine oil supplement to the engine oil. Refer to Adhesives, Fluids, Lubricants, and Sealers for the correct part number.
  89. Fill the cooling system. Refer to Cooling System Draining and Filling.
  90. Recharge the A/C system. Refer to Refrigerant Recovery and Recharging.
  91. Note: After an overhaul, the engine should be tested. Use the following procedure after the engine is installed in the vehicle.

  92. Disable the ignition system.
  93. Crank the engine several times. Listen for any unusual noises or evidence that parts are binding.
  94. Start the engine and listen for unusual noises.
  95. Check the oil pressure gauge or light and confirm that the engine has acceptable oil pressure.
  96. If necessary, install an oil pressure gage and measure the oil pressure.
  97. Run the engine speed at about 1,000 RPM until the engine has reached normal operating temperature.
  98. Listen for sticking valve lifters, or other unusual noises.
  99. Inspect for fuel, oil, and/or coolant leaks while the engine is running.
  100. Perform a final inspection for the proper oil and coolant levels.
  101. Close the hood.