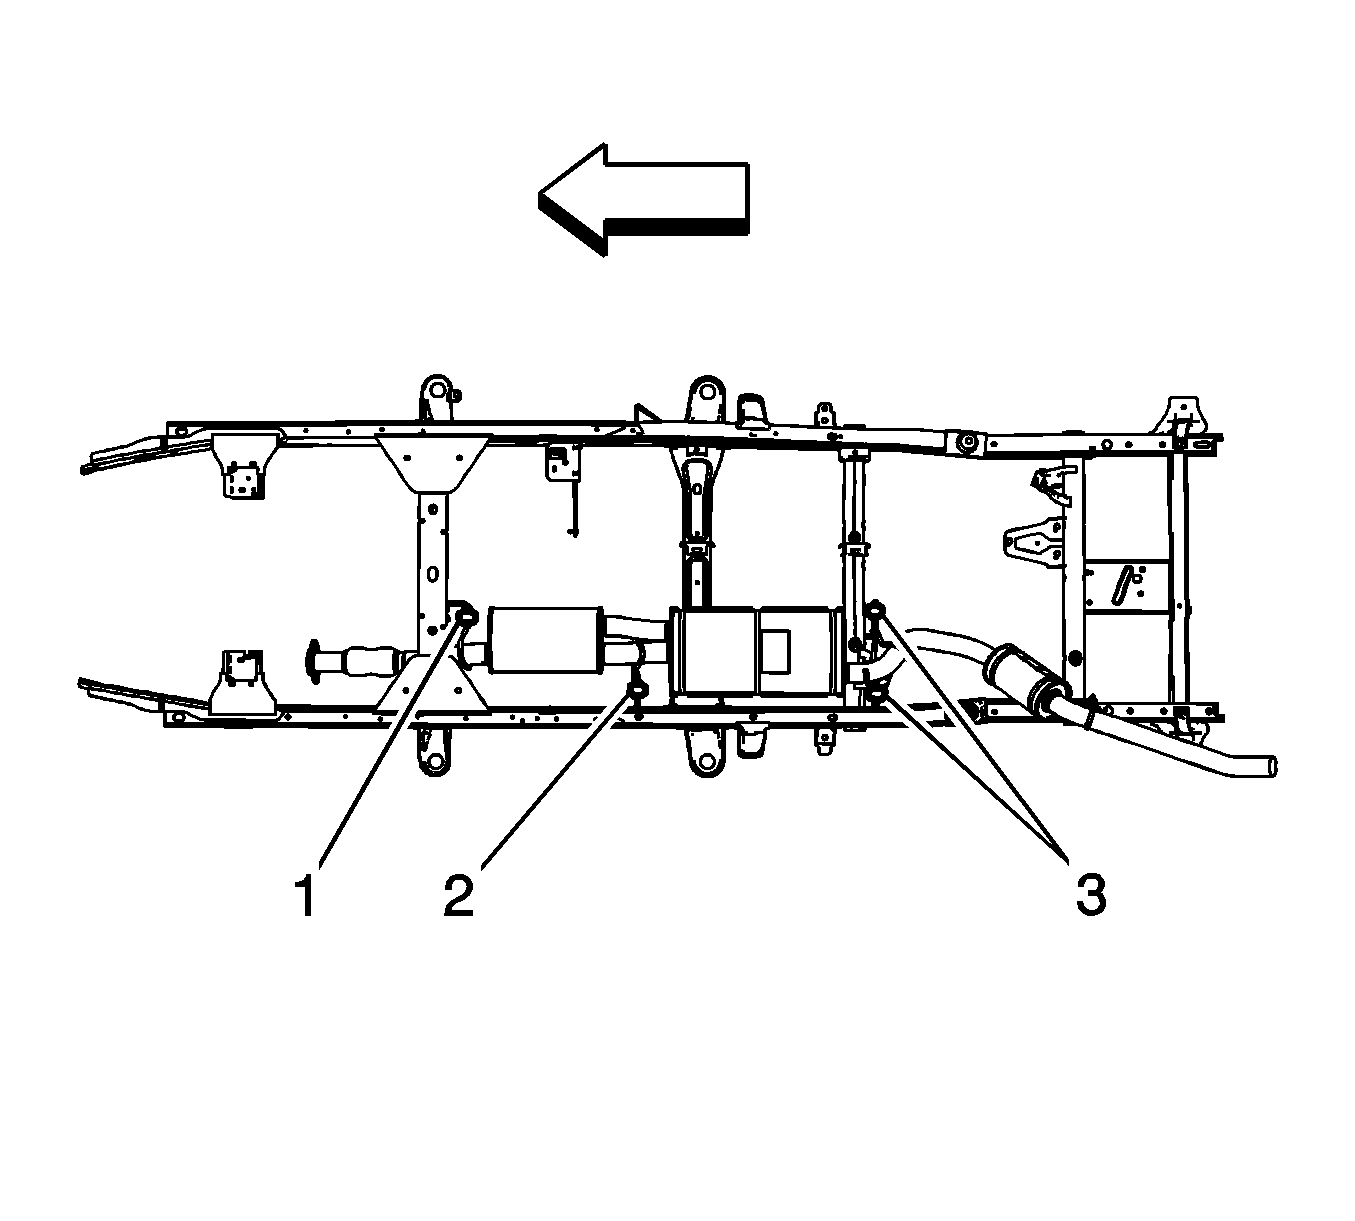
Exhaust Muffler Replacement 1500 Series w/4.3L, 4.8L, 5.3L, 6.0L
Removal Procedure
- Raise and suitably support the vehicle. Refer to Lifting and Jacking the Vehicle .
- Lower the spare tire.
- Remove the catalytic converter to exhaust muffler nuts.
- If equipped with a 4.8L engine, perform the following steps, otherwise proceed to step 7.
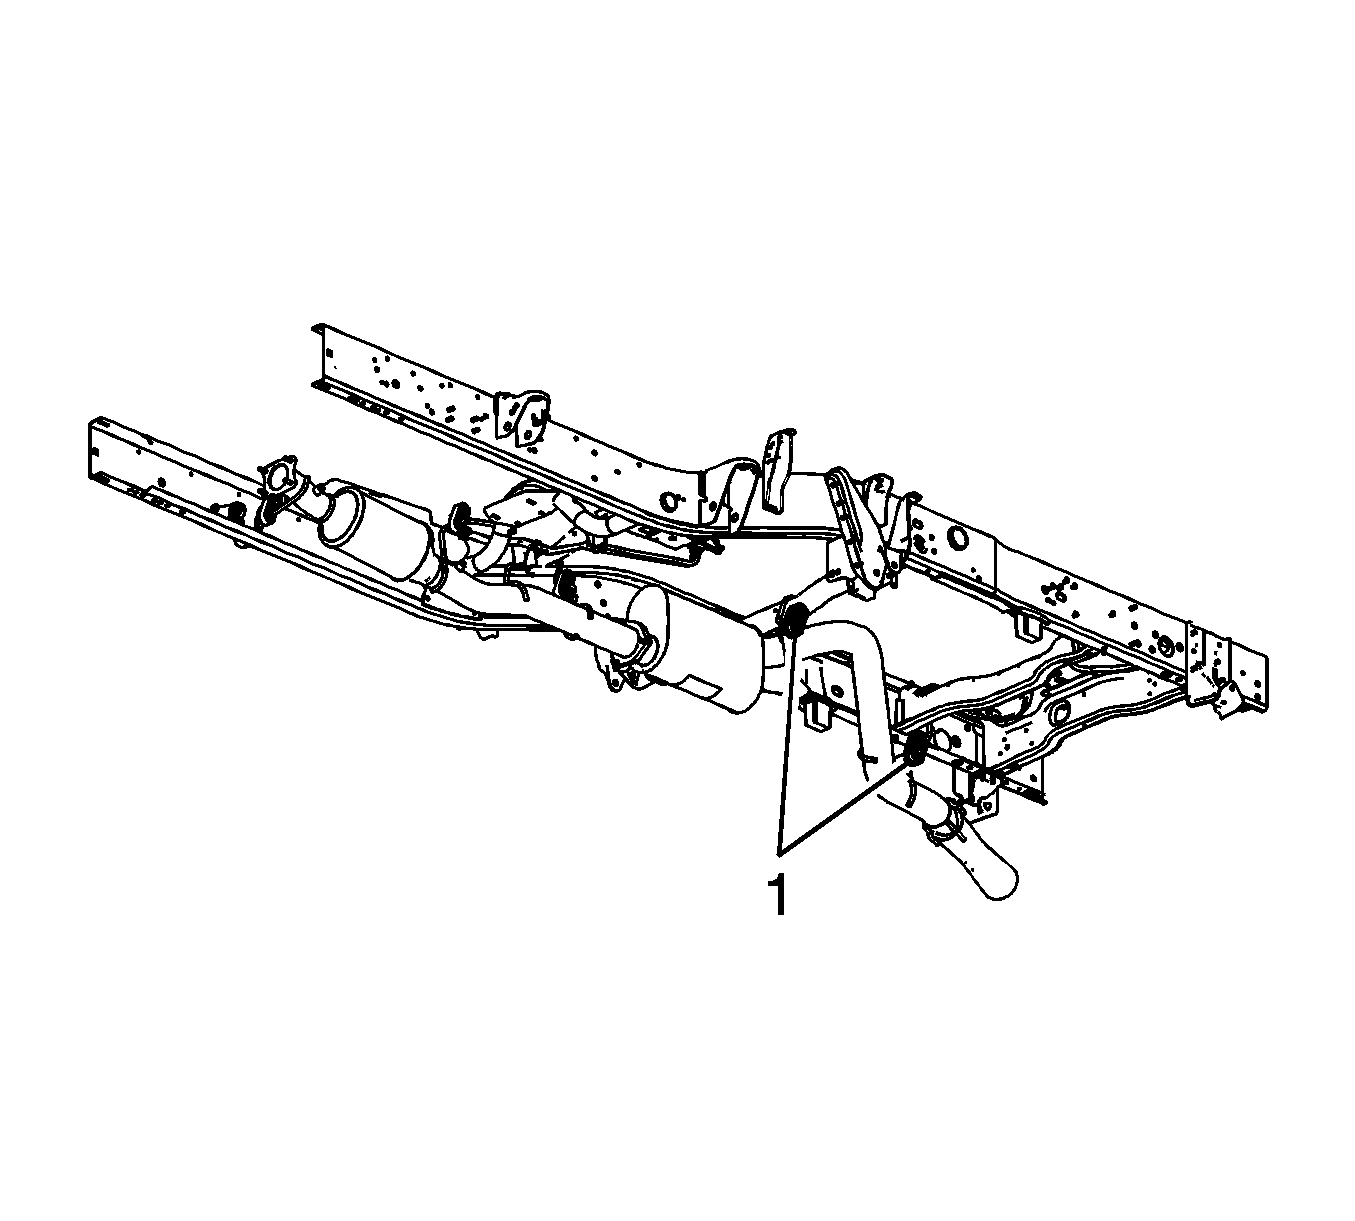
- Lubricate the 3 insulators where the muffler assembly hangers are inserted in order to ease removal.
- With the aid of an assistant, remove the insulators (1, 2) from the front and rear muffler assembly hangers.
- Remove the insulator (1) from the intermediate muffler assembly hanger and remove the muffler assembly.
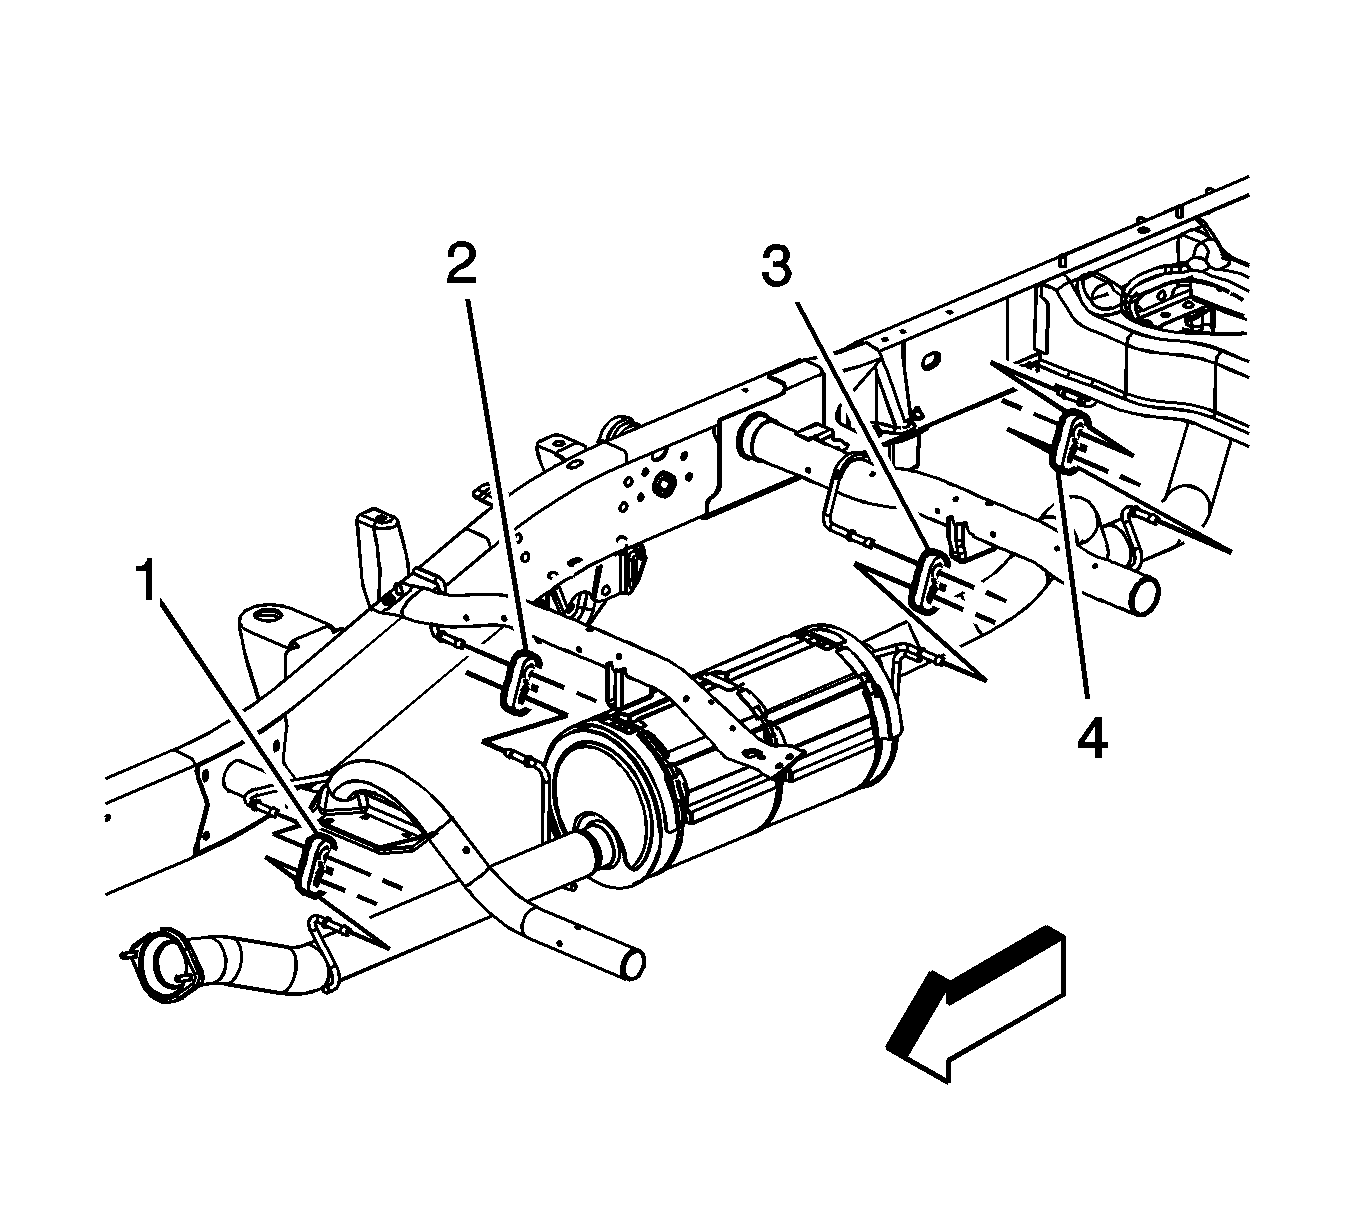
- If equipped with a 5.3L, or a 6.0L engine, perform the following steps.
- Lubricate the 3 insulators where the muffler assembly hangers are inserted in order to ease removal.
- With the aid of an assistant, remove the insulators (1, 2) from the front and rear muffler assembly hangers.
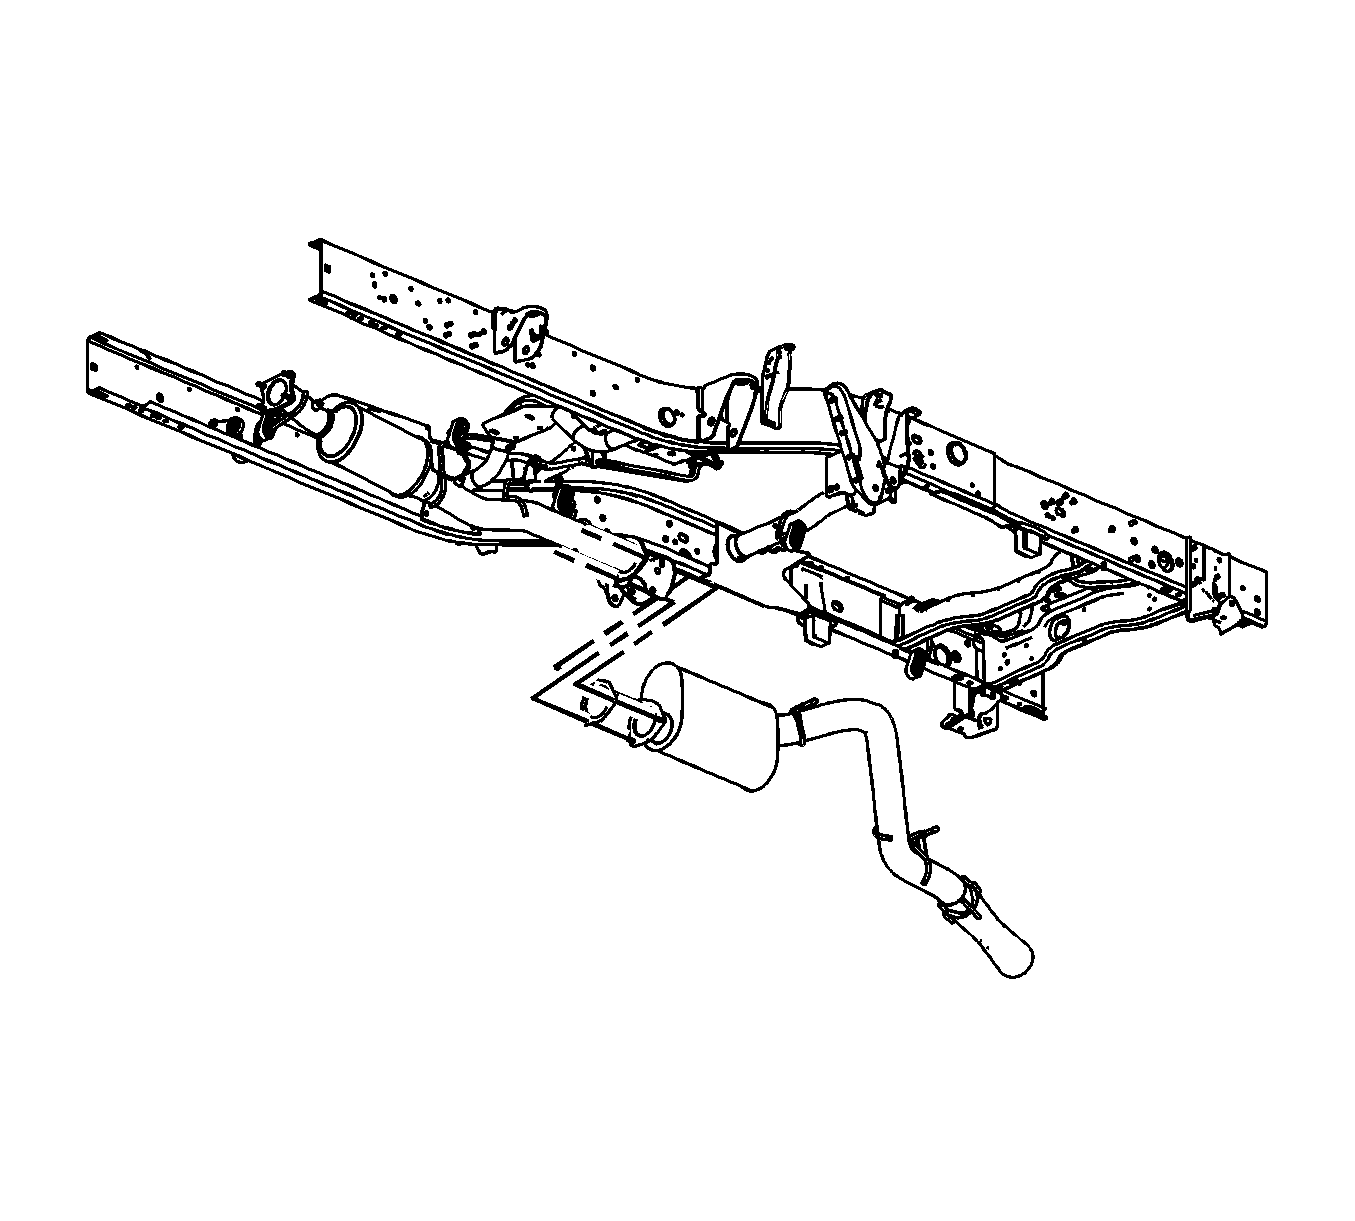
- Remove the insulators (1) from the intermediate muffler assembly hangers and remove the muffler assembly. Pull the muffler assembly rearward until the flange is able to clear the front frame crossmember, and remove the muffler toward the front of the vehicle.

Notice: During removal or installation, do not over extend the flex couple as internal damage may occur.
Installation Procedure
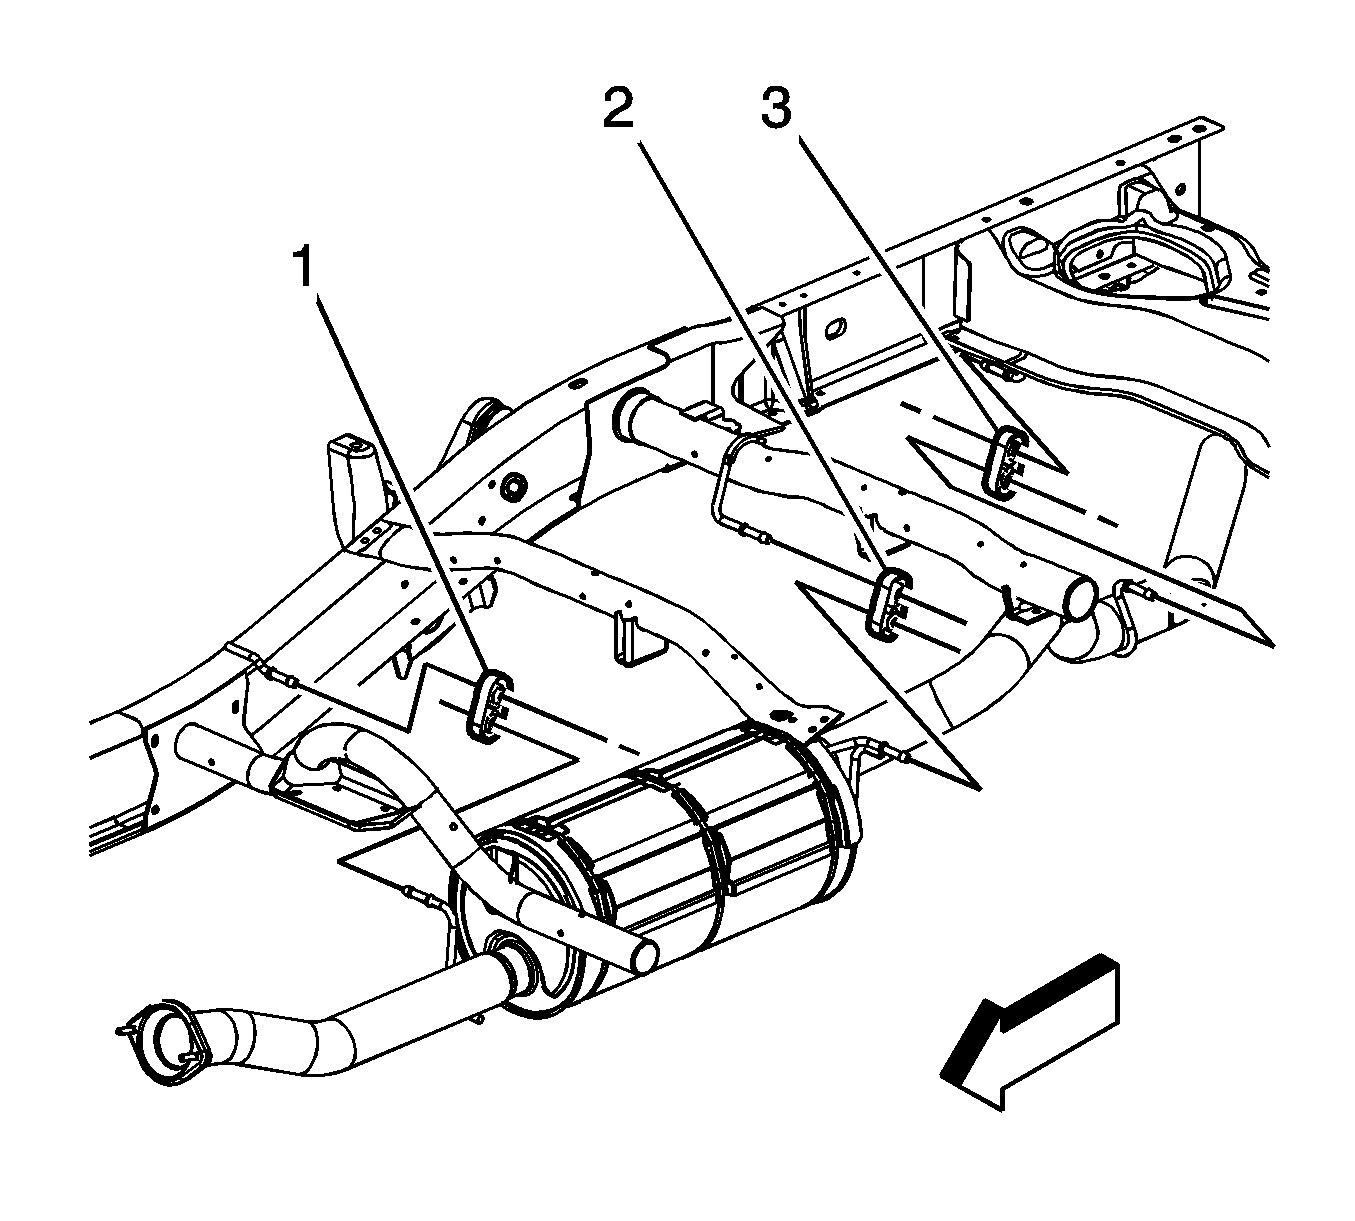
- If equipped with a 4.8L engine, perform the following steps, otherwise proceed to step 6.
- Lubricate the 3 insulators where the muffler assembly hangers are inserted in order to ease installation.
- With the aid of an assistant, position and install the muffler assembly.
- Install the insulators (1, 2) to the front and rear muffler assembly hangers.
- Install the insulator (1) to the intermediate muffler assembly hanger.
- If equipped with a 5.3L, or a 6.0L engine, perform the following steps.
- Lubricate the 3 insulators where the muffler assembly hangers are inserted in order to ease installation.
- With the aid of an assistant, position and install the muffler assembly.
- Install the insulators (1, 2) to the front and rear muffler assembly hangers.
- Install the insulator (1) to the intermediate muffler assembly hanger.
- Install the catalytic converter to exhaust muffler nuts.
- Return the spare tire to the original position.
- Lower the vehicle.
Notice: During removal or installation, do not over extend the flex couple as internal damage may occur.
Notice: Refer to Fastener Notice in the Preface section.
Tighten
Tighten the nuts to 45 N·m (33 lb ft).
Exhaust Muffler Replacement 2500/3500 Series w/6.0L
Removal Procedure
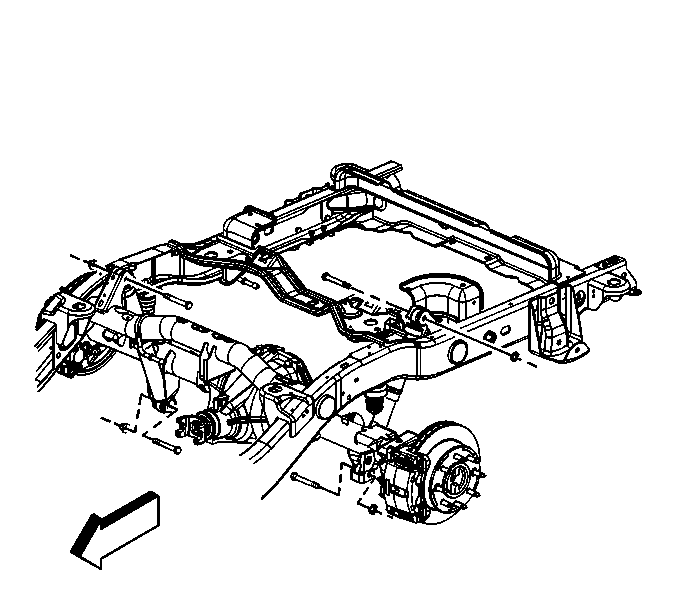
- Raise and suitably support the vehicle. Refer to Lifting and Jacking the Vehicle .
- Remove the spare tire, if necessary.
- Install adjustable jack stands under the rear axle, if necessary.
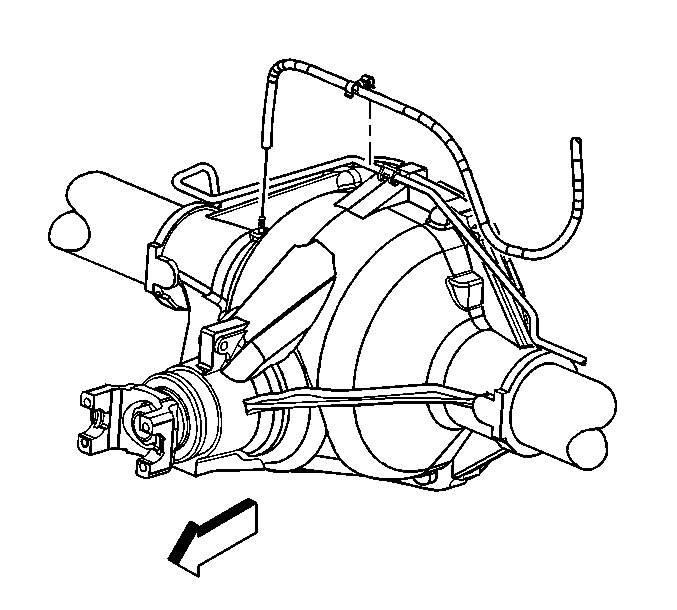
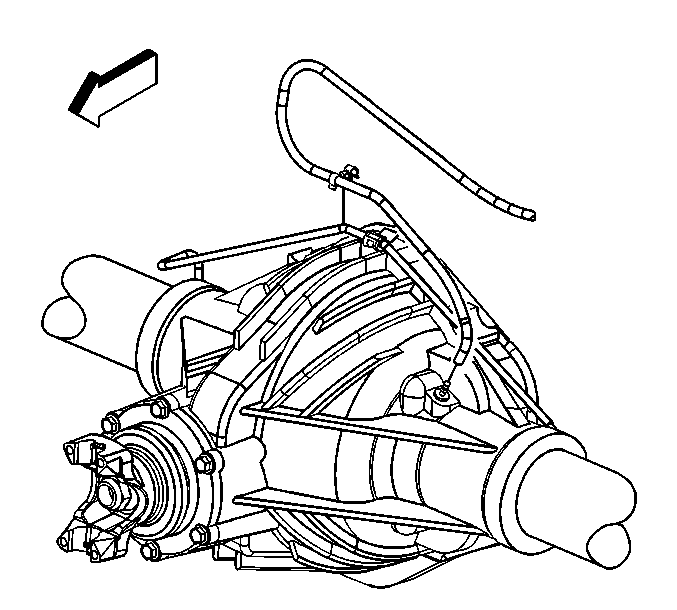
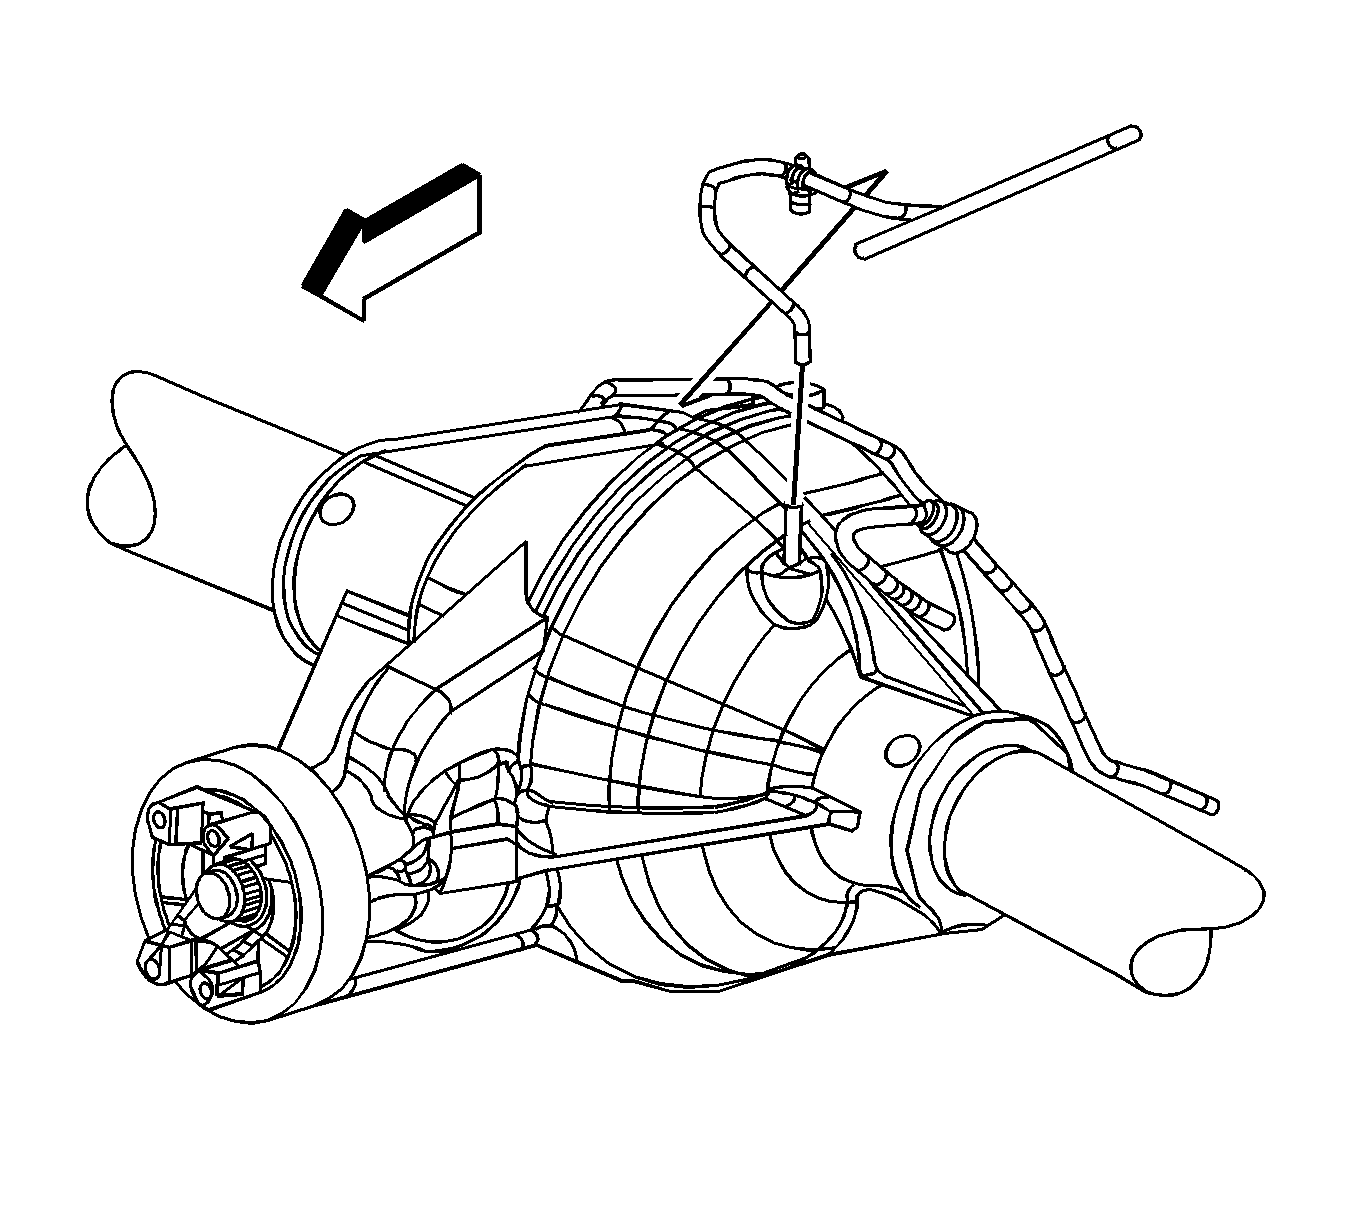
- If equipped with a 8.6 or a 9.5 inch ring gear, remove the rear axle vent hose from the rear axle, if necessary.
- Remove the vent hose swivel clip from the rear brake crossover pipe, if necessary.
- If equipped with a 10.5 inch ring gear, remove the rear axle vent hose from the rear axle, if necessary.
- Remove the vent hose swivel clip from the rear brake crossover pipe, if necessary.
- Remove the rear shock absorber lower bolts and nuts, if necessary.
- Lower the rear axle using the adjustable jack stands, if necessary.
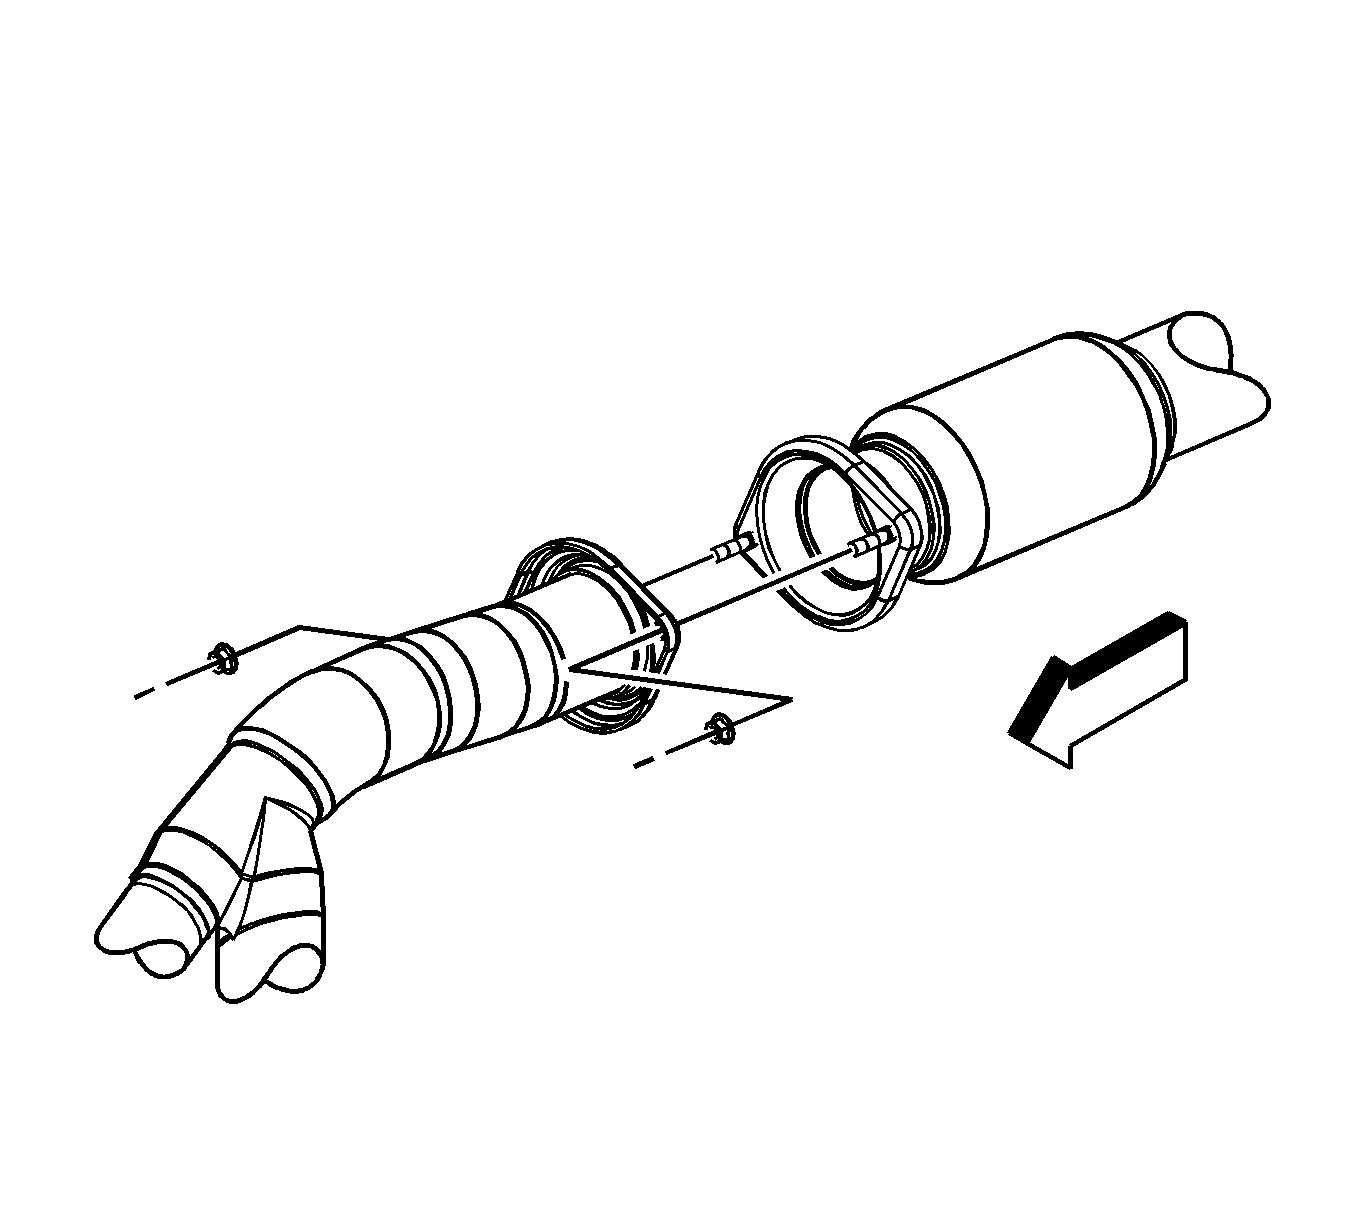
- Remove the muffler to catalytic converter nuts.
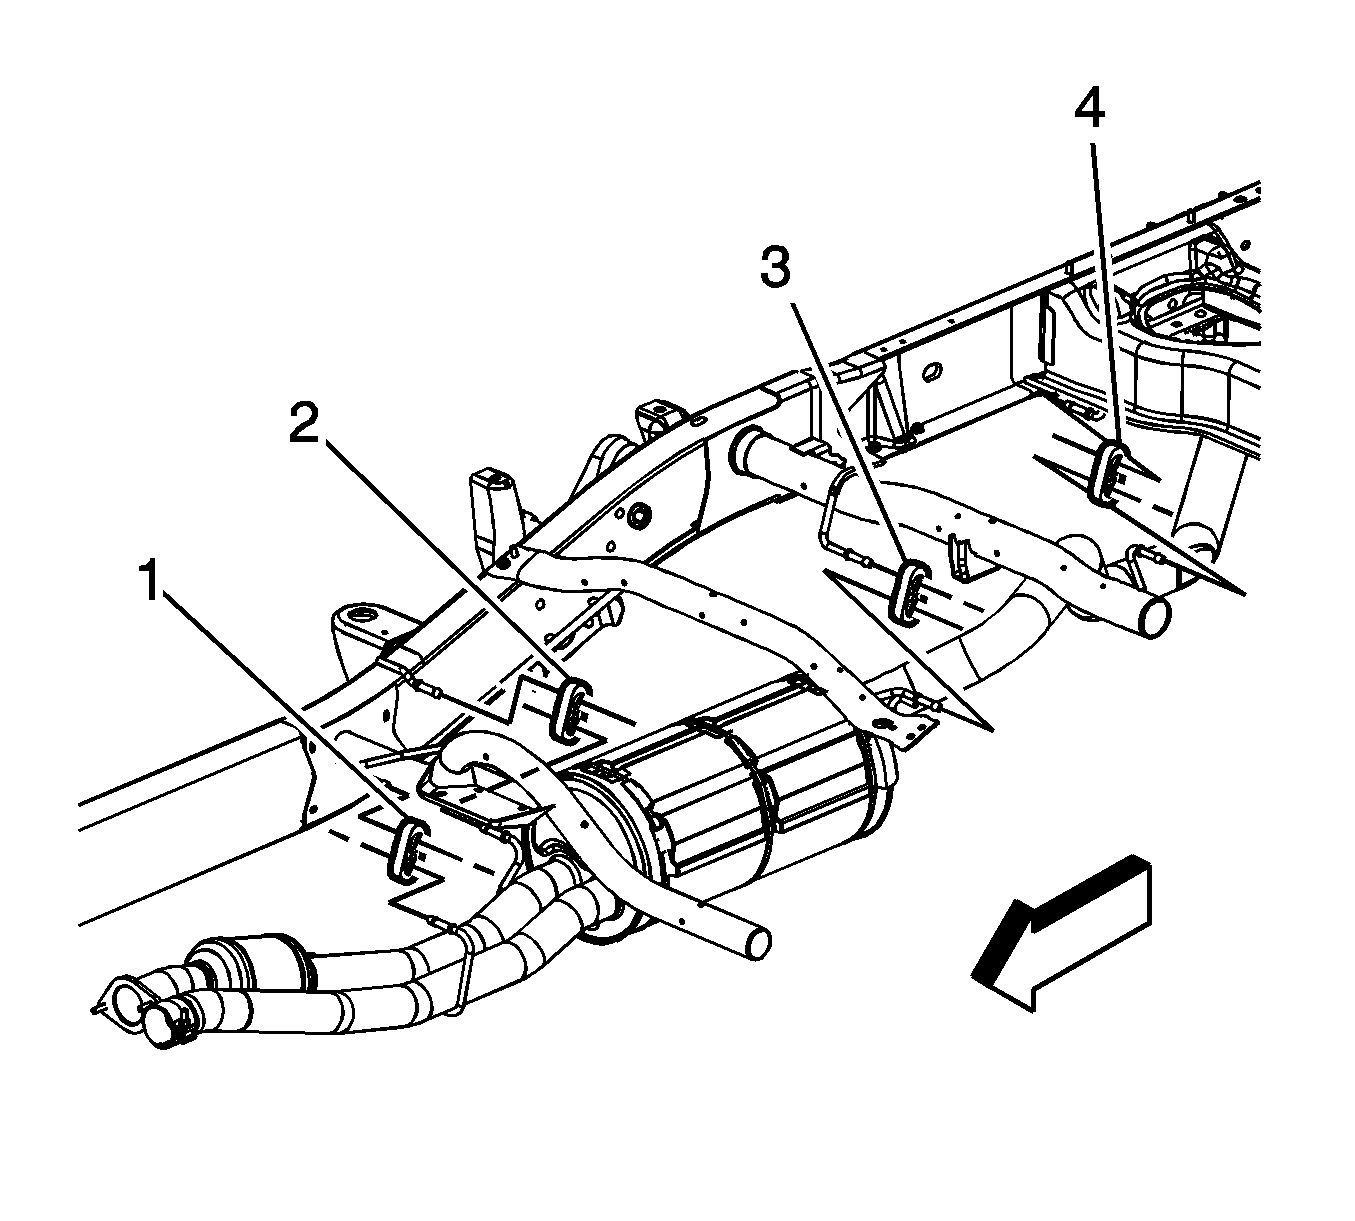
- If the vehicle is a non heavy duty (HD), perform the following steps, otherwise proceed to step 14:
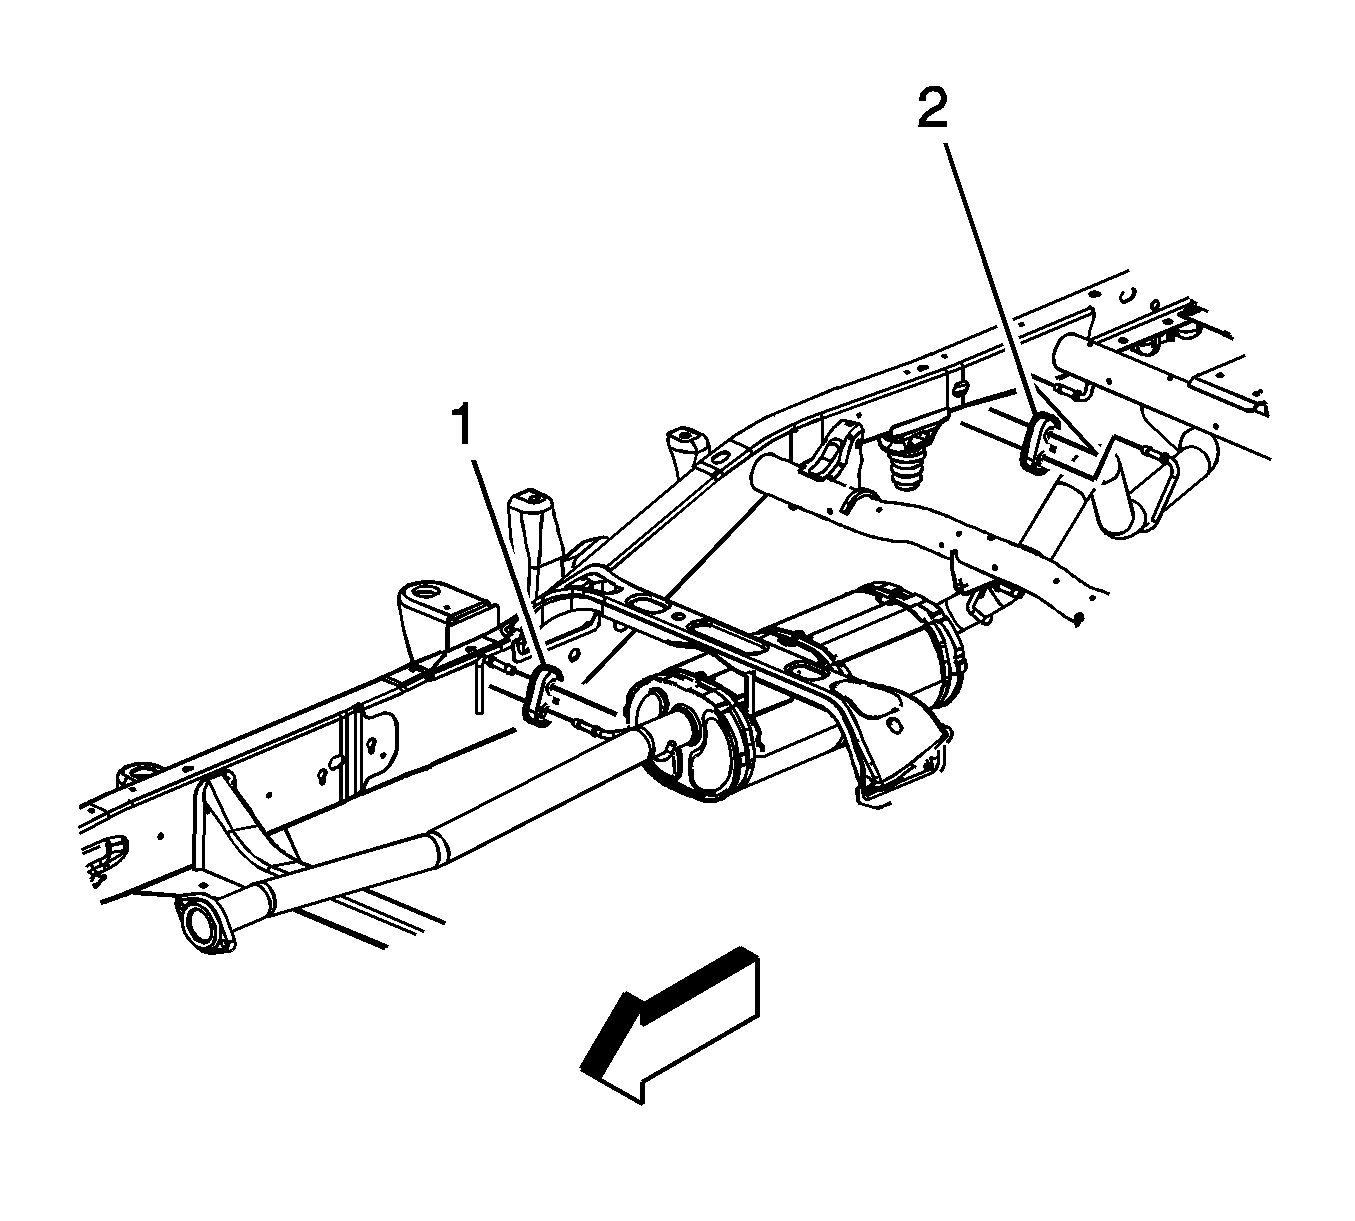
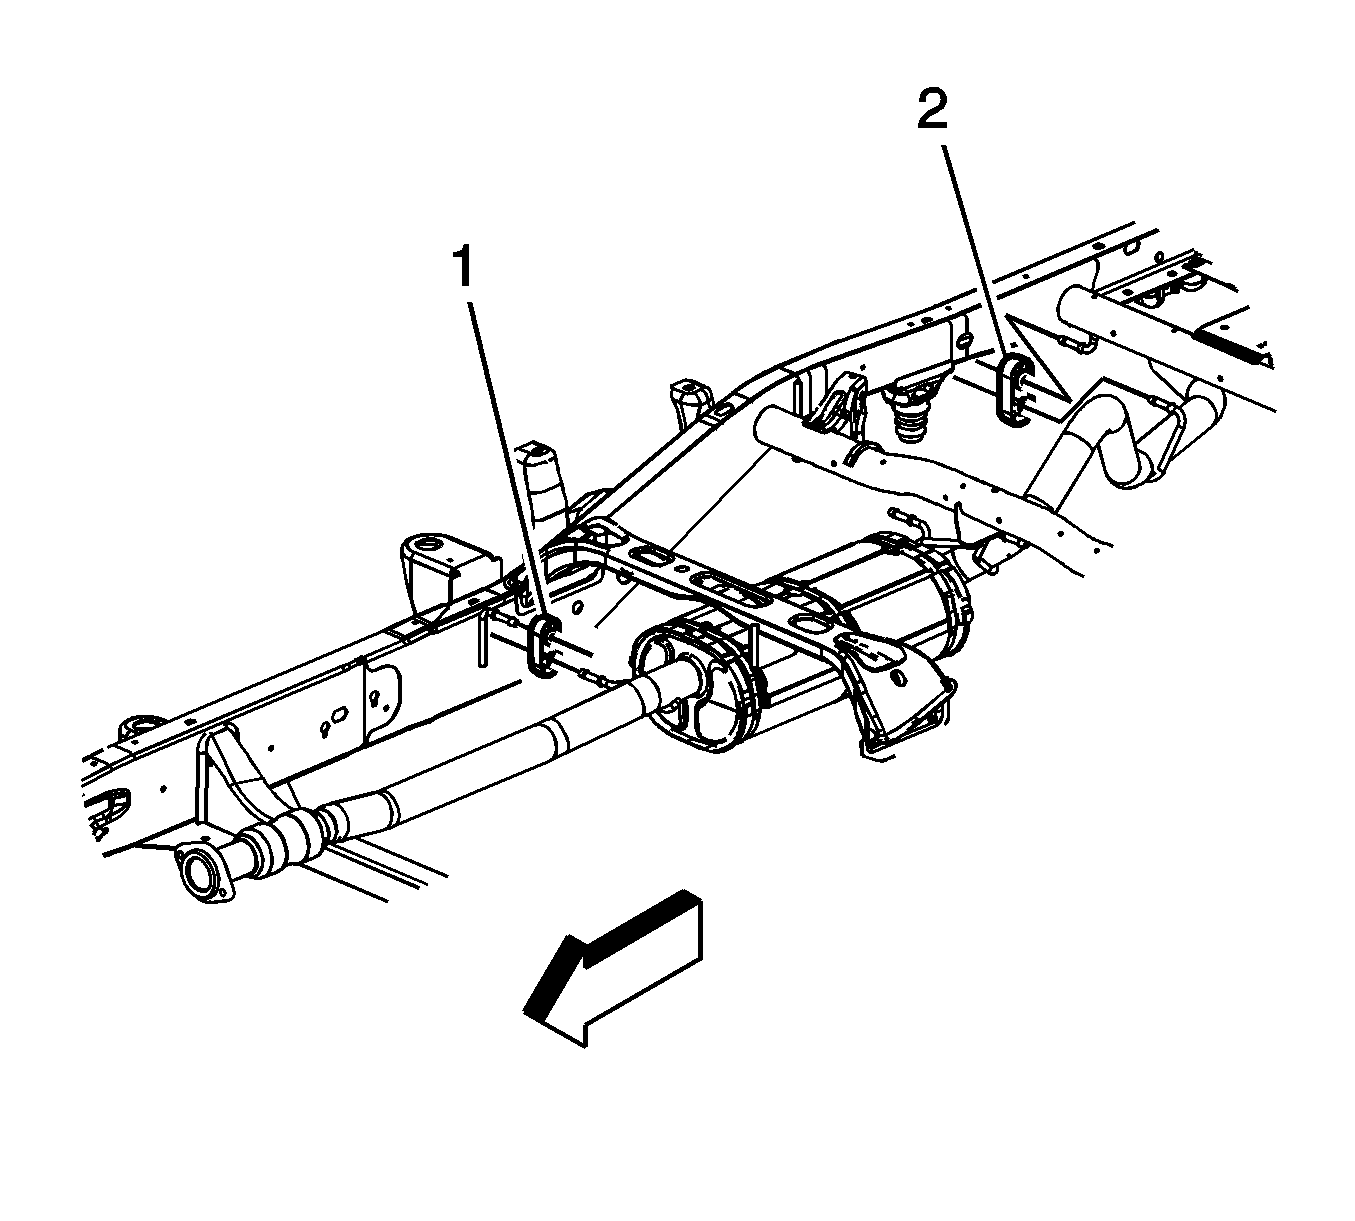
- Lubricate the 4 insulators where the muffler assembly hangers are inserted in order to ease removal.
- With the aid of an assistant, remove the insulators (1-4) from the front, intermediate, and rear muffler assembly hangers and remove the muffler assembly.
- If the vehicle is a heavy duty (HD) perform the following steps:
- Lubricate the 3 insulators where the muffler assembly hangers are inserted in order to ease removal.
- With the aid of an assistant, remove the insulators (1-3) from the front, intermediate, and rear muffler assembly hangers and remove the muffler assembly.
Installation Procedure
- If the vehicle is a non HD, perform the following steps, otherwise proceed to step 5:
- Lubricate the 4 insulators where the muffler assembly hangers are inserted in order to ease installation.
- With the aid of an assistant, position and install the muffler assembly.
- Install the insulators (1-4) to the front, intermediate, and rear muffler assembly hangers.
- If the vehicle is a HD, perform the following steps:
- Lubricate the 3 insulators where the muffler assembly hangers are inserted in order to ease installation.
- With the aid of an assistant, position and install the muffler assembly.
- Install the insulators (1-3) to the front, intermediate, and rear muffler assembly hangers.
- Install the catalytic converter to exhaust muffler nuts.
- Raise the rear axle using the adjustable jack stands, if necessary.
- Install the rear shock absorber lower bolts and nuts, if necessary.
- If equipped with a 10.5 inch ring gear, install the rear axle vent hose to the rear axle, if necessary.
- Connect the vent hose swivel clip to the rear brake crossover pipe, if necessary.
- If equipped with a 8.6 or a 9.5 inch ring gear, install the rear axle vent hose to the rear axle, if necessary.
- Install the vent hose swivel clip to the rear brake crossover pipe, if necessary.
- Remove the adjustable jack stands from under the rear axle, if necessary.
- Install the spare tire, if necessary.
- Lower the vehicle.
Notice: Refer to Fastener Notice in the Preface section.
Tighten
Tighten the nuts to 45 N·m (33 lb ft).
Tighten
Tighten the bolts to 95 N·m (70 lb ft).
Exhaust Muffler Replacement 2500/3500 - Cab/Chassis w/6.0L
Removal Procedure
- Raise and suitably support the vehicle. Refer to Lifting and Jacking the Vehicle .
- Remove the spare tire, if necessary.
- Install adjustable jack stands under the rear axle, if necessary.
- If equipped with a 8.6 or a 9.5 inch ring gear, remove the rear axle vent hose from the rear axle, if necessary.
- Remove the vent hose swivel clip from the rear brake crossover pipe, if necessary.
- If equipped with a 10.5 inch ring gear, remove the rear axle vent hose from the rear axle, if necessary.
- Remove the vent hose swivel clip from the rear brake crossover pipe, if necessary.
- Remove the rear shock absorber lower bolts and nuts, if necessary.
- Lower the rear axle using the adjustable jack stands, if necessary.
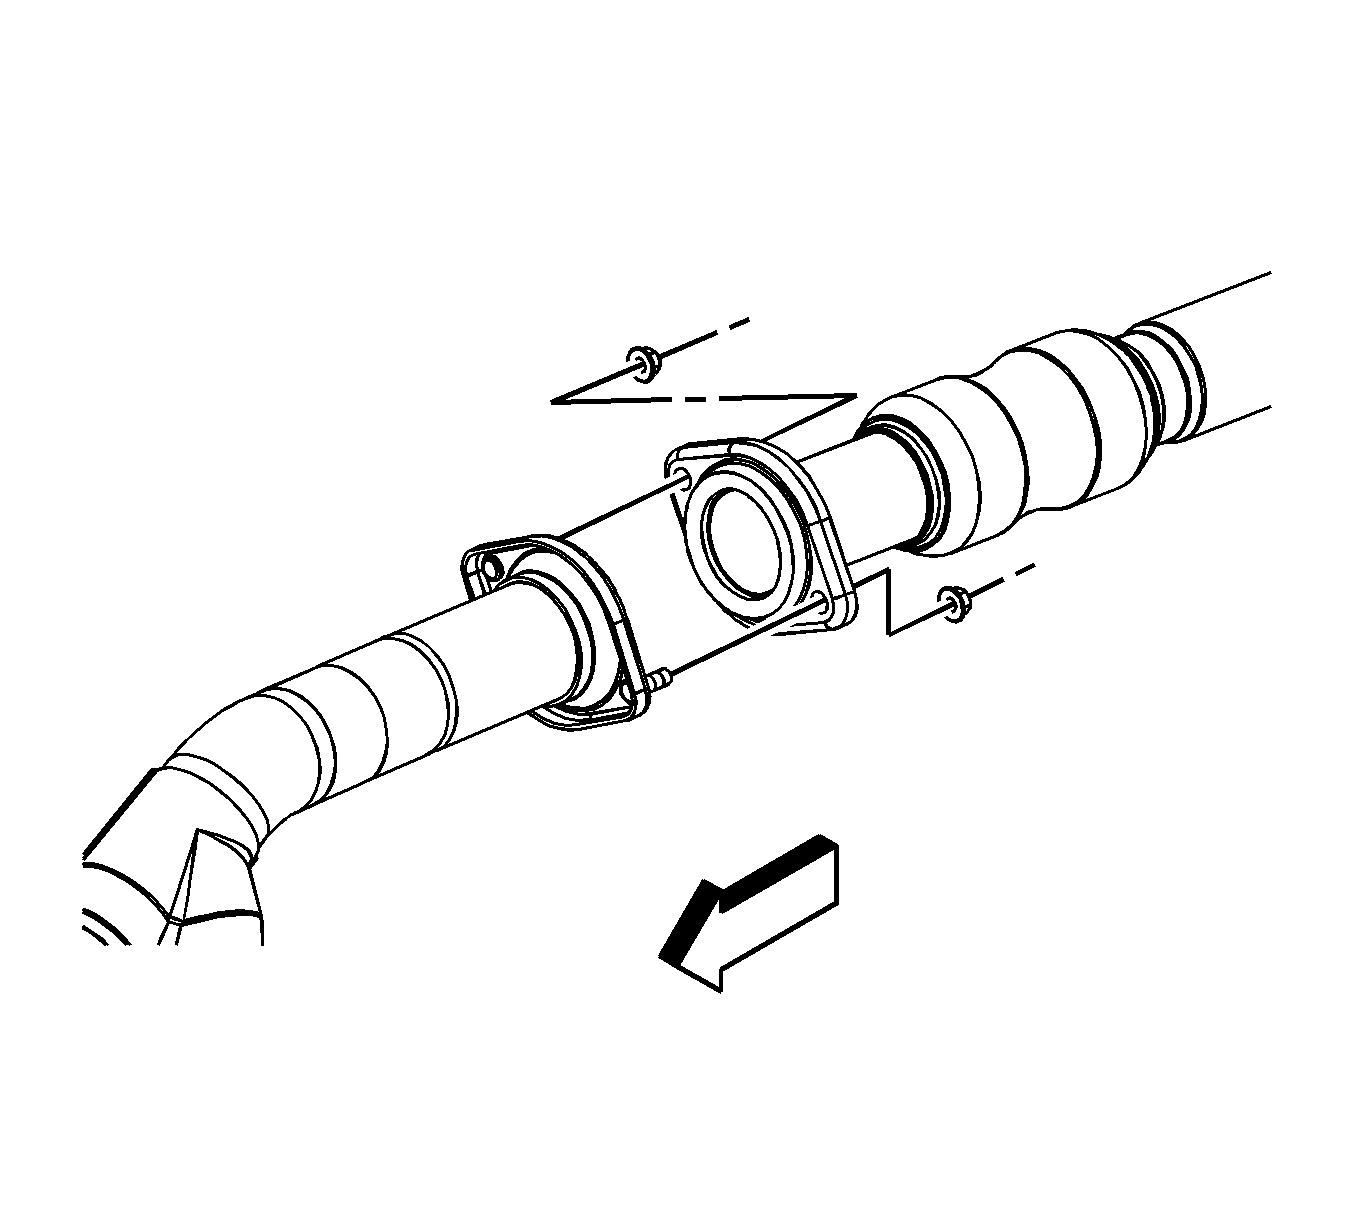
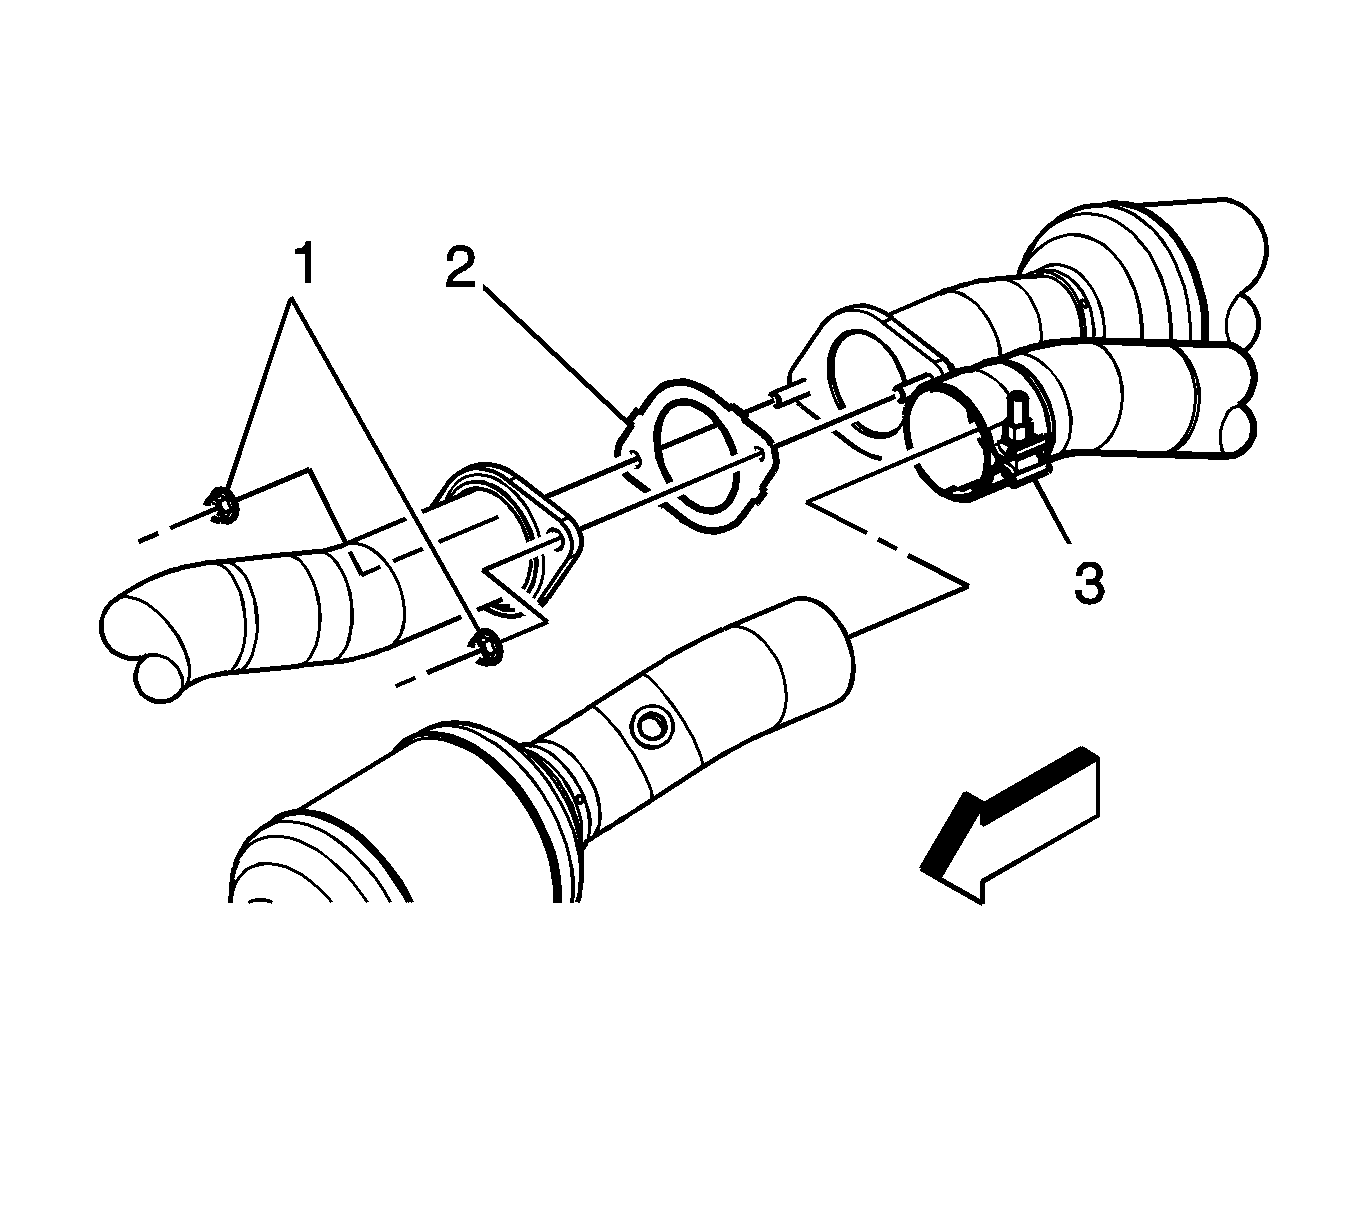
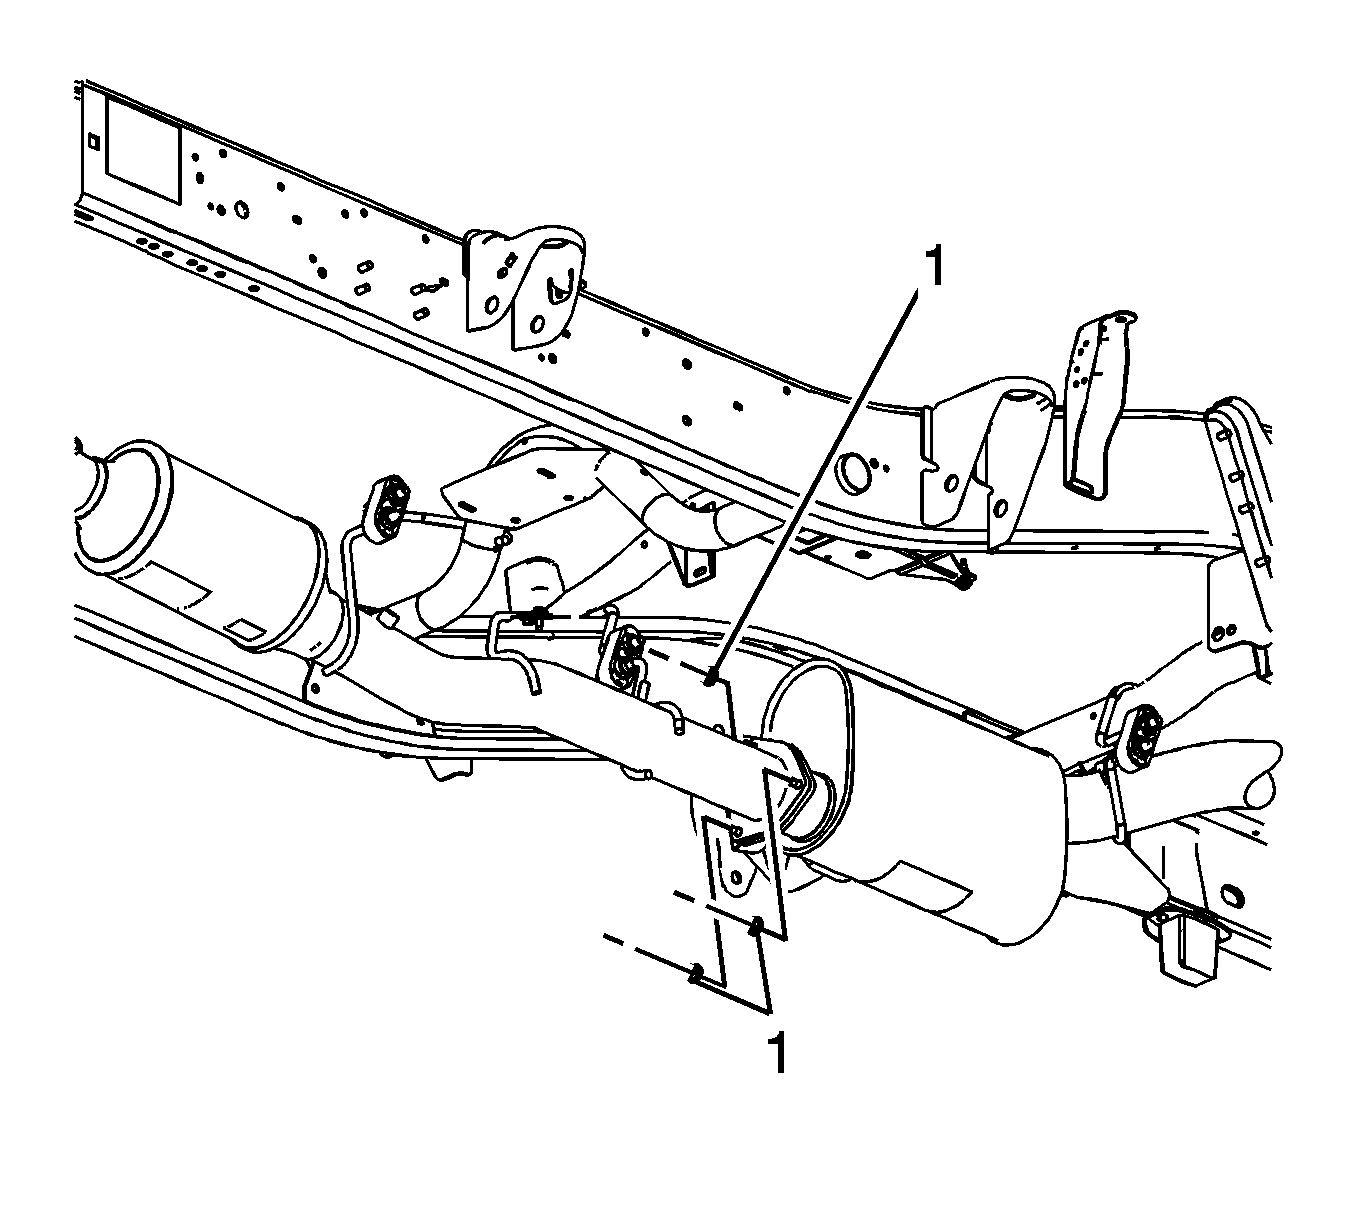
- Remove the exhaust muffler to exhaust manifold pipe nuts (1).
- Loosen the exhaust muffler clamp (3).
- Remove the heated oxygen sensor (HO2S). Refer to Heated Oxygen Sensor Replacement - Bank 2 Sensor 2.
- Lubricate the 4 insulators where the muffler assembly hangers are inserted in order to ease removal.
- With the aid of an assistant, remove the insulators (1-4) from the front, intermediate, and rear muffler assembly hangers and remove the muffler assembly.
Installation Procedure
- Lubricate the 4 insulators where the muffler assembly hangers are inserted in order to ease installation.
- With the aid of an assistant, position and install the muffler assembly.
- Install the insulators (1-4) to the front, intermediate, and rear muffler assembly hangers.
- Install the HO2S. Refer to Heated Oxygen Sensor Replacement - Bank 2 Sensor 2.
- Tighten the exhaust muffler clamp (3).
- Install the exhaust muffler to exhaust manifold pipe nuts (1).
- Raise the rear axle using the adjustable jack stands, if necessary.
- Install the rear shock absorber lower bolts and nuts, if necessary.
- If equipped with a 10.5 inch ring gear, install the rear axle vent hose to the rear axle, if necessary.
- Connect the vent hose swivel clip to the rear brake crossover pipe, if necessary.
- If equipped with a 8.6 or a 9.5 inch ring gear, install the rear axle vent hose to the rear axle, if necessary.
- Install the vent hose swivel clip to the rear brake crossover pipe, if necessary.
- Remove the adjustable jack stands from under the rear axle, if necessary.
- Install the spare tire, if necessary.
- Lower the vehicle.
Notice: Refer to Fastener Notice in the Preface section.
Tighten
Tighten the nuts to 47 N·m (35 lb ft).
Tighten
Tighten the nuts to 45 N·m (33 lb ft).
Tighten
Tighten the bolts to 95 N·m (70 lb ft).
Exhaust Muffler Replacement 1500 Series w/6.2L
Removal Procedure
- Raise and suitably support the vehicle. Refer to Lifting and Jacking the Vehicle .
- Remove the spare tire, if necessary.
- Install adjustable jack stands under the rear axle, if necessary.
- If equipped with a 8.6 or a 9.5 inch ring gear, remove the rear axle vent hose from the rear axle, if necessary.
- Remove the vent hose swivel clip from the rear brake crossover pipe, if necessary.
- If equipped with a 10.5 inch ring gear, remove the rear axle vent hose from the rear axle, if necessary.
- Remove the vent hose swivel clip from the rear brake crossover pipe, if necessary.
- Remove the rear shock absorber lower bolts and nuts, if necessary.
- Lower the rear axle using the adjustable jack stands, if necessary.
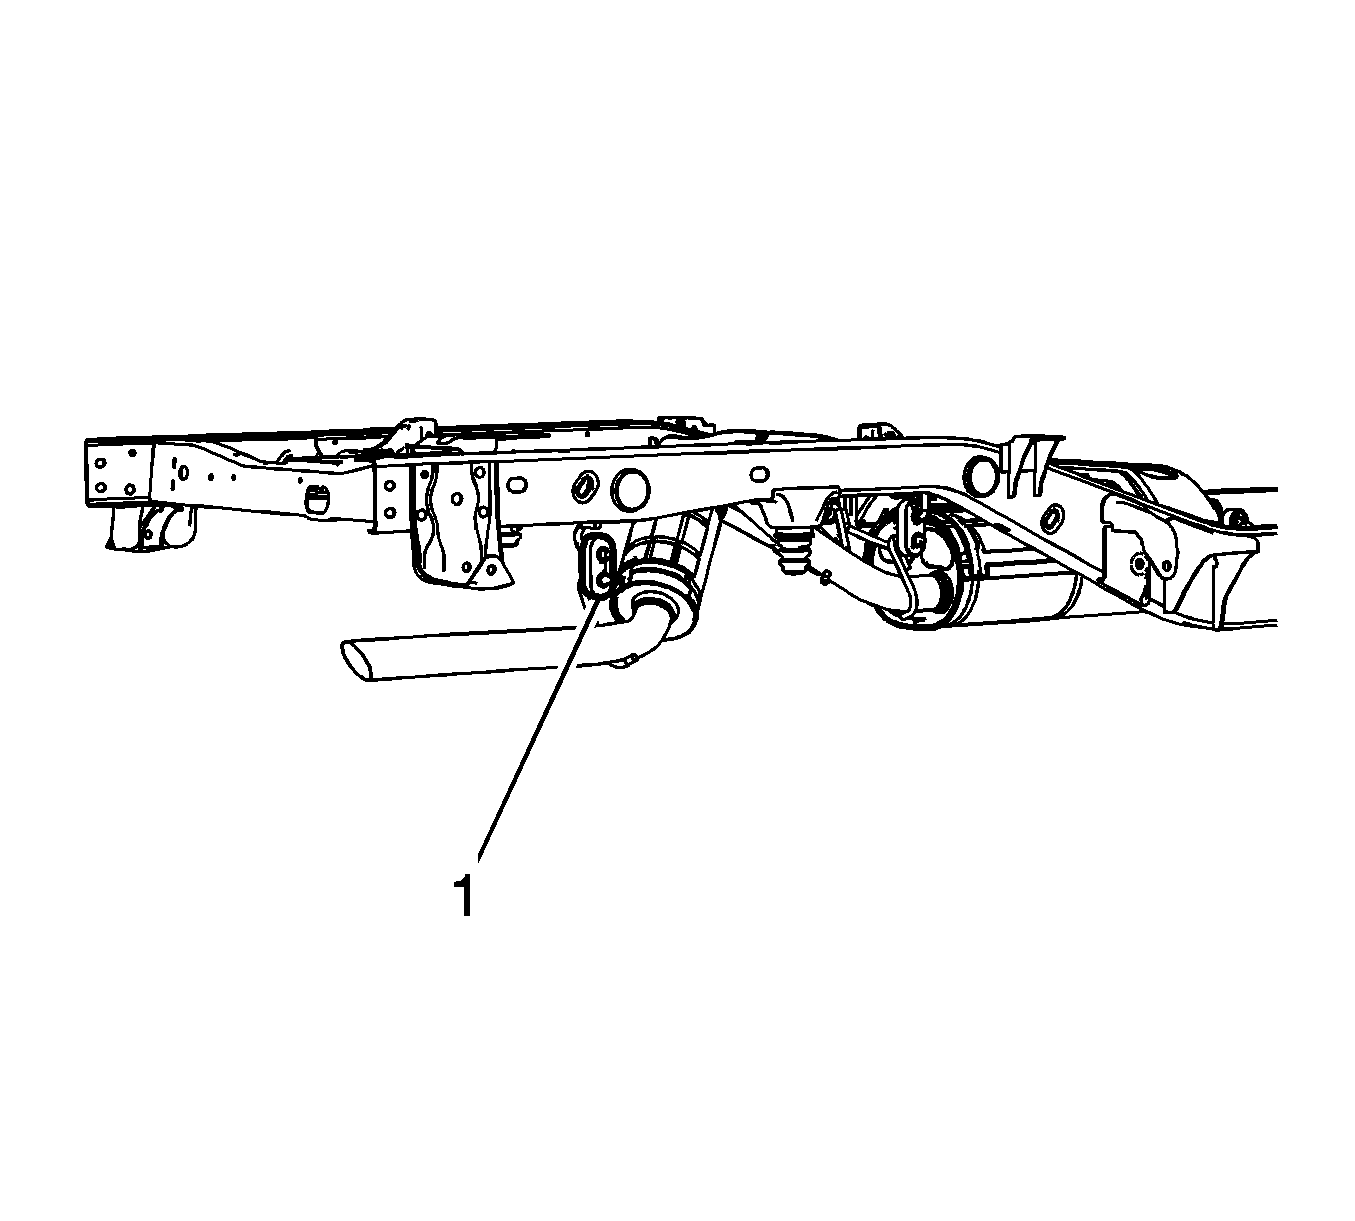
- Remove the catalytic converter to muffler nuts.
- Lubricate the 5 insulators where the muffler assembly hangers are inserted in order to ease removal.
- With the aid of an assistant, remove the insulators (1-3) from the front, intermediate and rear muffler assembly hangers.
- Remove the insulator (1) from the tail pipe hanger and remove the muffler assembly.
Installation Procedure
- Lubricate the 5 insulators where the muffler assembly hangers are inserted in order to ease installation.
- With the aid of an assistant, position and install the muffler assembly.
- Install the insulator (1) to the rear tail pipe hanger.
- Install the insulators (1-3) to the front, intermediate, and rear muffler assembly hangers.
- Install the catalytic converter to muffler nuts.
- Raise the rear axle using the adjustable jack stands, if necessary.
- Install the rear shock absorber lower bolts and nuts, if necessary.
- If equipped with a 10.5 inch ring gear, install the rear axle vent hose to the rear axle, if necessary.
- Connect the vent hose swivel clip to the rear brake crossover pipe, if necessary.
- If equipped with a 8.6 or a 9.5 inch ring gear, install the rear axle vent hose to the rear axle, if necessary.
- Install the vent hose swivel clip to the rear brake crossover pipe, if necessary.
- Remove the adjustable jack stands from under the rear axle, if necessary.
- Install the spare tire, if necessary.
- Lower the vehicle.
Notice: Refer to Fastener Notice in the Preface section.
Tighten
Tighten the nuts to 45 N·m (33 lb ft).
Tighten
Tighten the bolts to 95 N·m (70 lb ft).
Exhaust Muffler Replacement 6.6L
Removal Procedure
- Raise and suitably support the vehicle. Refer to Lifting and Jacking the Vehicle .
- Remove the spare tire, if necessary.
- Install adjustable jack stands under the rear axle, if necessary.
- Remove the rear axle vent hose from the rear axle, if necessary.
- Remove the vent hose swivel clip from the rear brake crossover pipe, if necessary.
- Remove the rear shock absorbers lower bolts and nuts, if necessary.
- Lower the rear axle using the adjustable jack stands, if necessary.
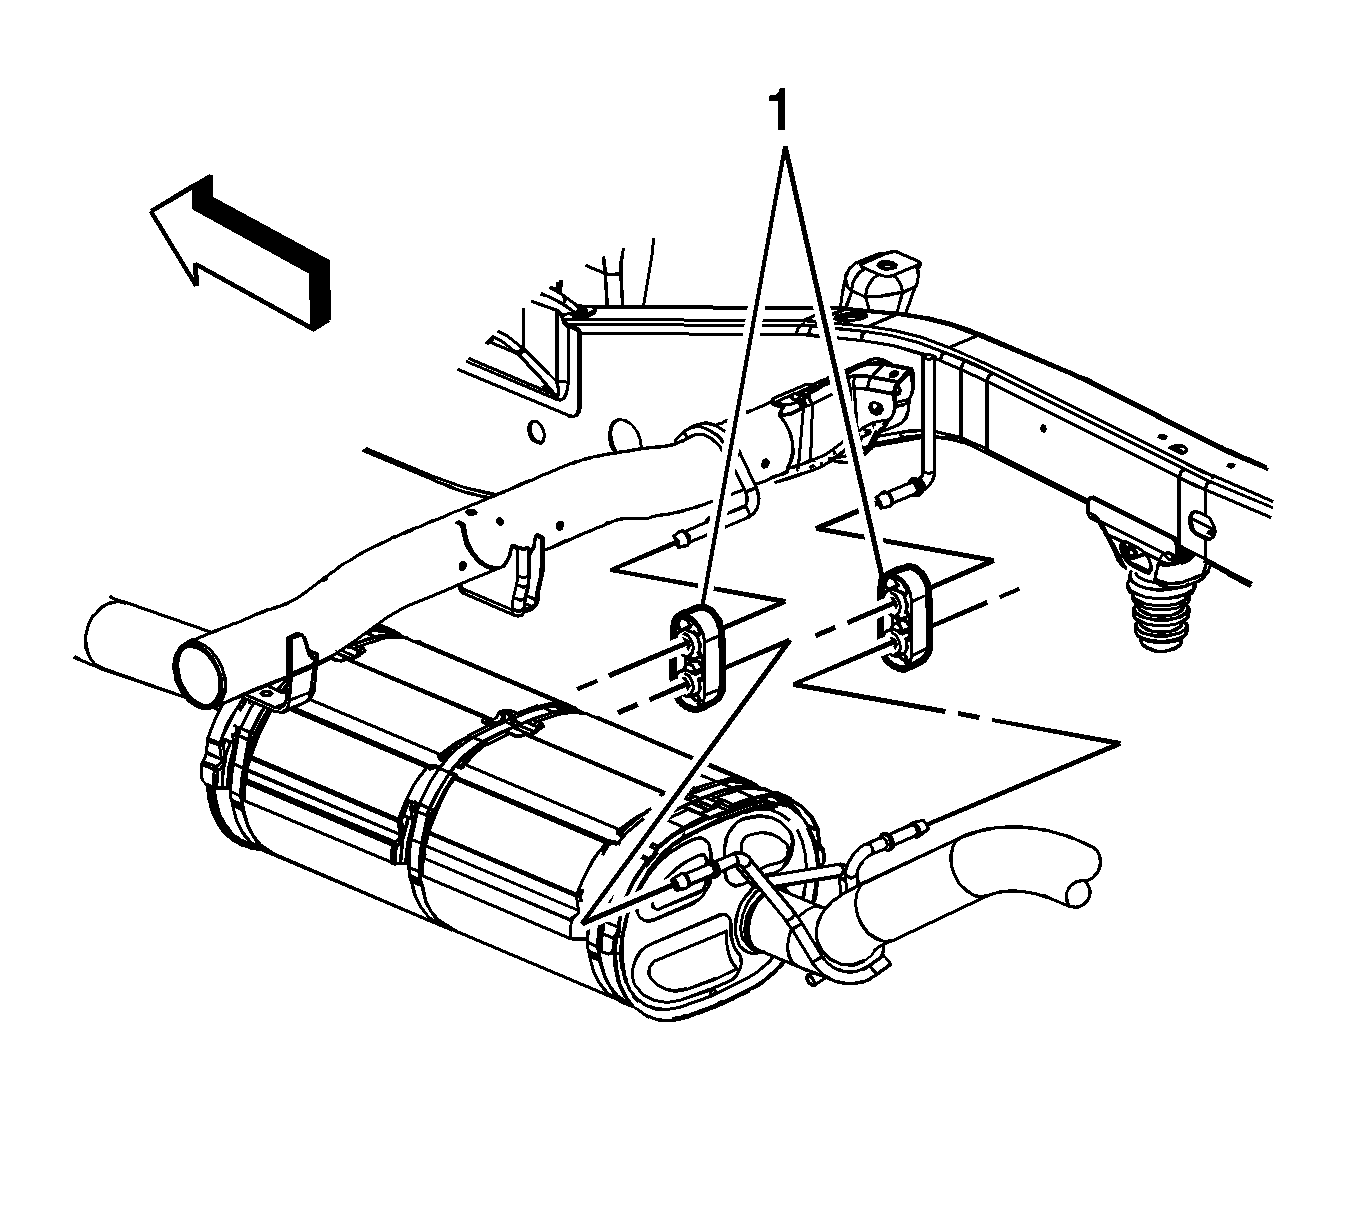
- Remove the exhaust muffler to exhaust particulate filter nuts (1).
- With the aid of an assistant, support the exhaust muffler.
- Remove the exhaust muffler hangers from the exhaust insulators (1).
- Remove the exhaust muffler. (2500/3500 crew cab shown, regular/extended cabs similar).
- Remove and discard the exhaust particulate filter to muffler gasket.
Installation Procedure
- Install a NEW gasket onto the exhaust muffler studs.
- Install the exhaust muffler to the particulate filter.
- With the aid of an assistant, support the exhaust muffler.
- Install the exhaust muffler hangers to the exhaust insulators (1).
- Install the exhaust muffler to exhaust particulate filter nuts (1).
- Raise the rear axle using the adjustable jack stands, if necessary.
- Install the rear shock absorbers lower bolts and nuts, if necessary.
- Install the rear axle vent hose to the rear axle, if necessary.
- Connect the vent hose swivel clip to the rear brake crossover pipe, if necessary.
- Remove the adjustable jack stands from under the rear axle, if necessary.
- Install the spare tire, if necessary.
- Lower the vehicle.
Notice: Refer to Fastener Notice in the Preface section.
Tighten
Tighten the nuts to 45 N·m (33 lb ft).
Tighten
Tighten the bolts to 95 N·m (70 lb ft).
