Brake Pressure Modulator Valve Replacement With JL4
Removal Procedure
Warning: Refer to Brake Fluid Irritant Warning in the Preface section.
Caution: Refer to Brake Fluid Effects on Paint and Electrical Components Caution in the Preface section.
- Disconnect the negative battery cable. Refer to Battery Negative Cable Disconnection and Connection.
- Raise and support the vehicle. Refer to Lifting and Jacking the Vehicle.
- Remove the 2 brake modulator shield mounting nuts, if equipped.
- Remove the brake modulator shield mounting bolt and the shield.
- Remove all dirt and debris from the electronic brake control module (EBCM) and the brake pressure modulator valve (BPMV) before loosening or removing any of the components.
- Disconnect the electrical connector from the EBCM.
- If equipped with AWD, remove the LF suspension torsion bar. Refer to Torsion Bar and Support Assembly Replacement.
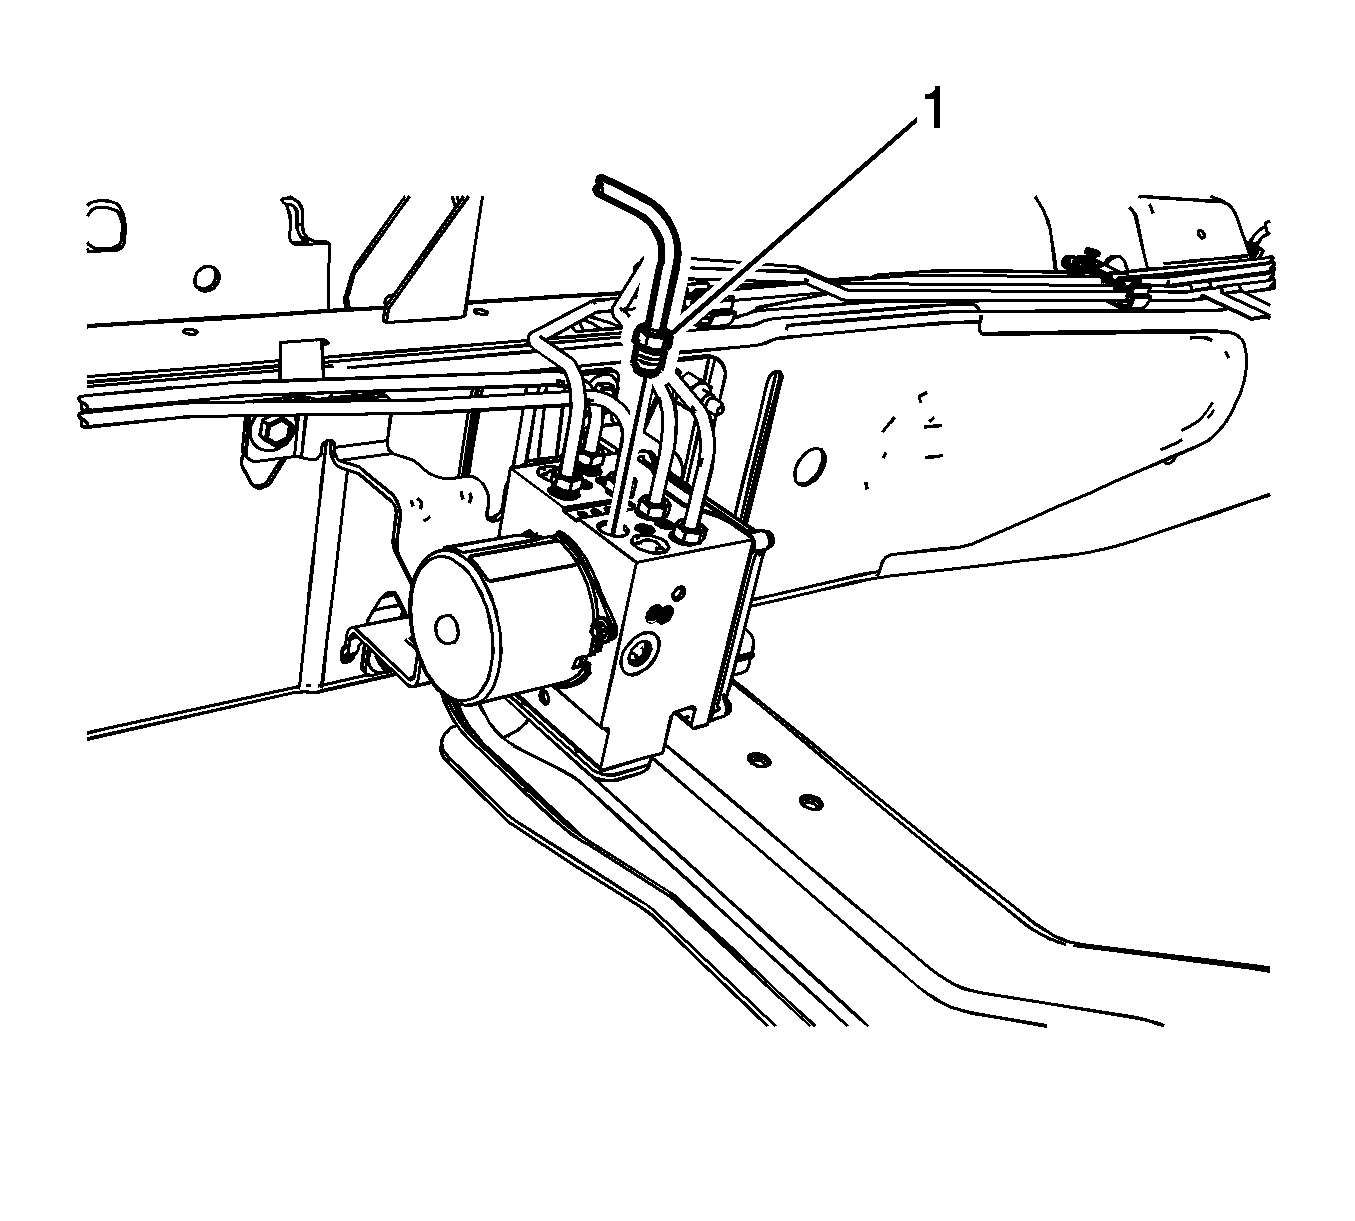
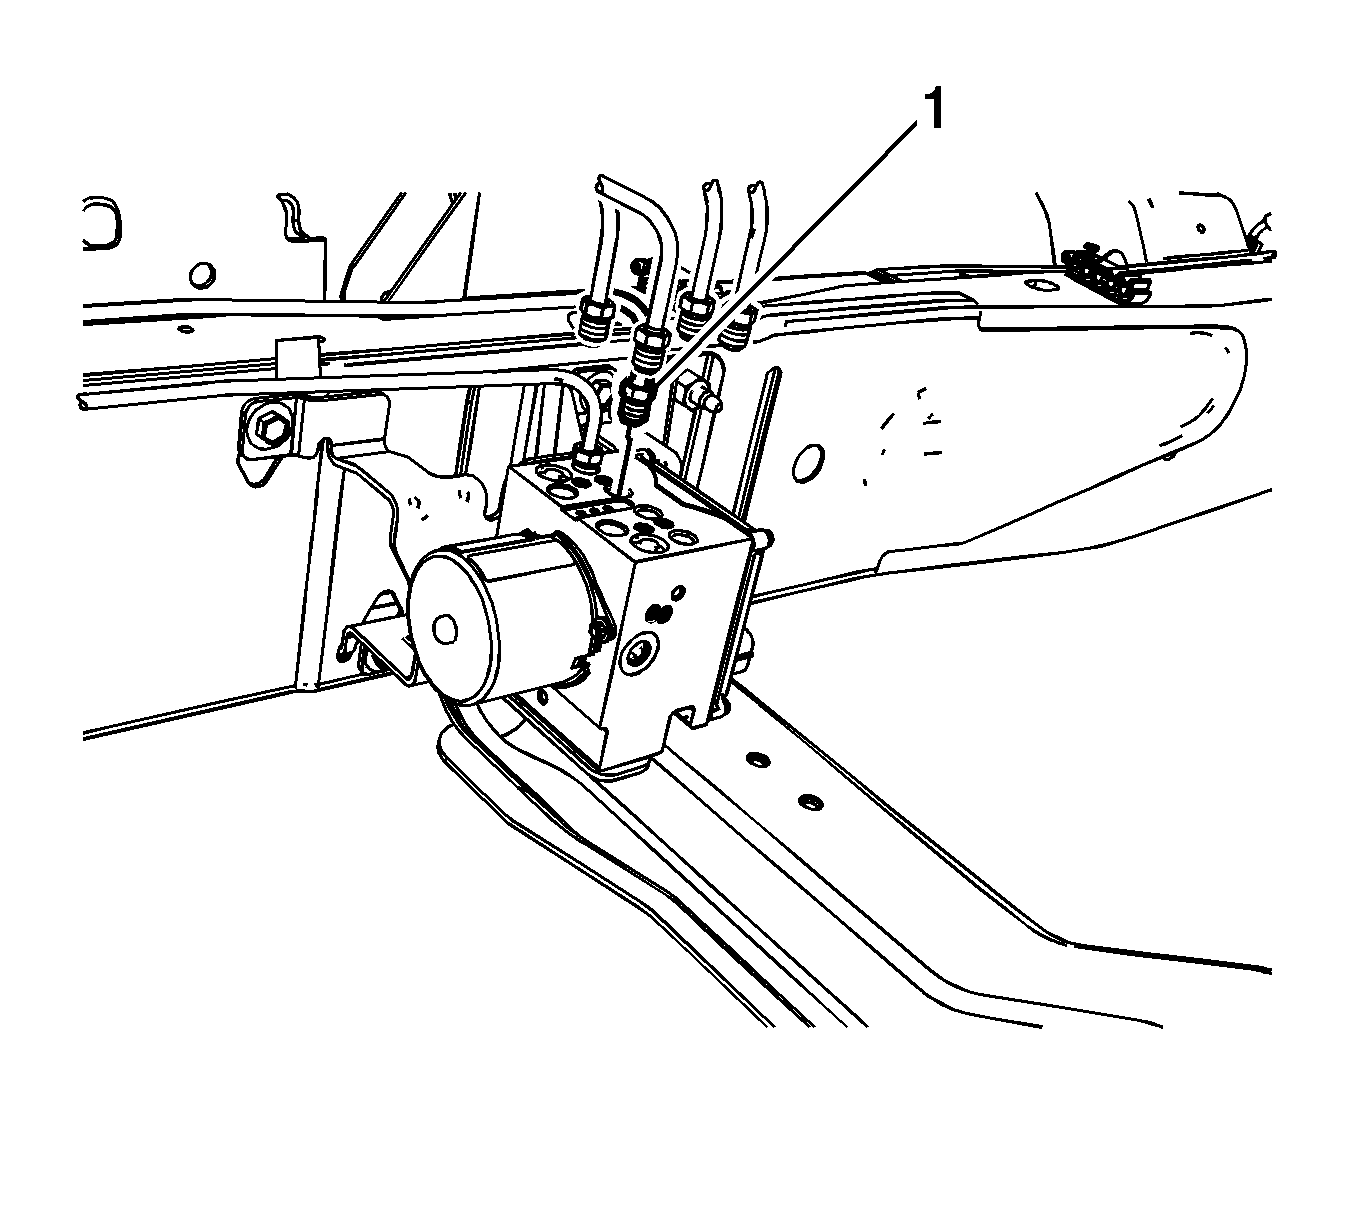
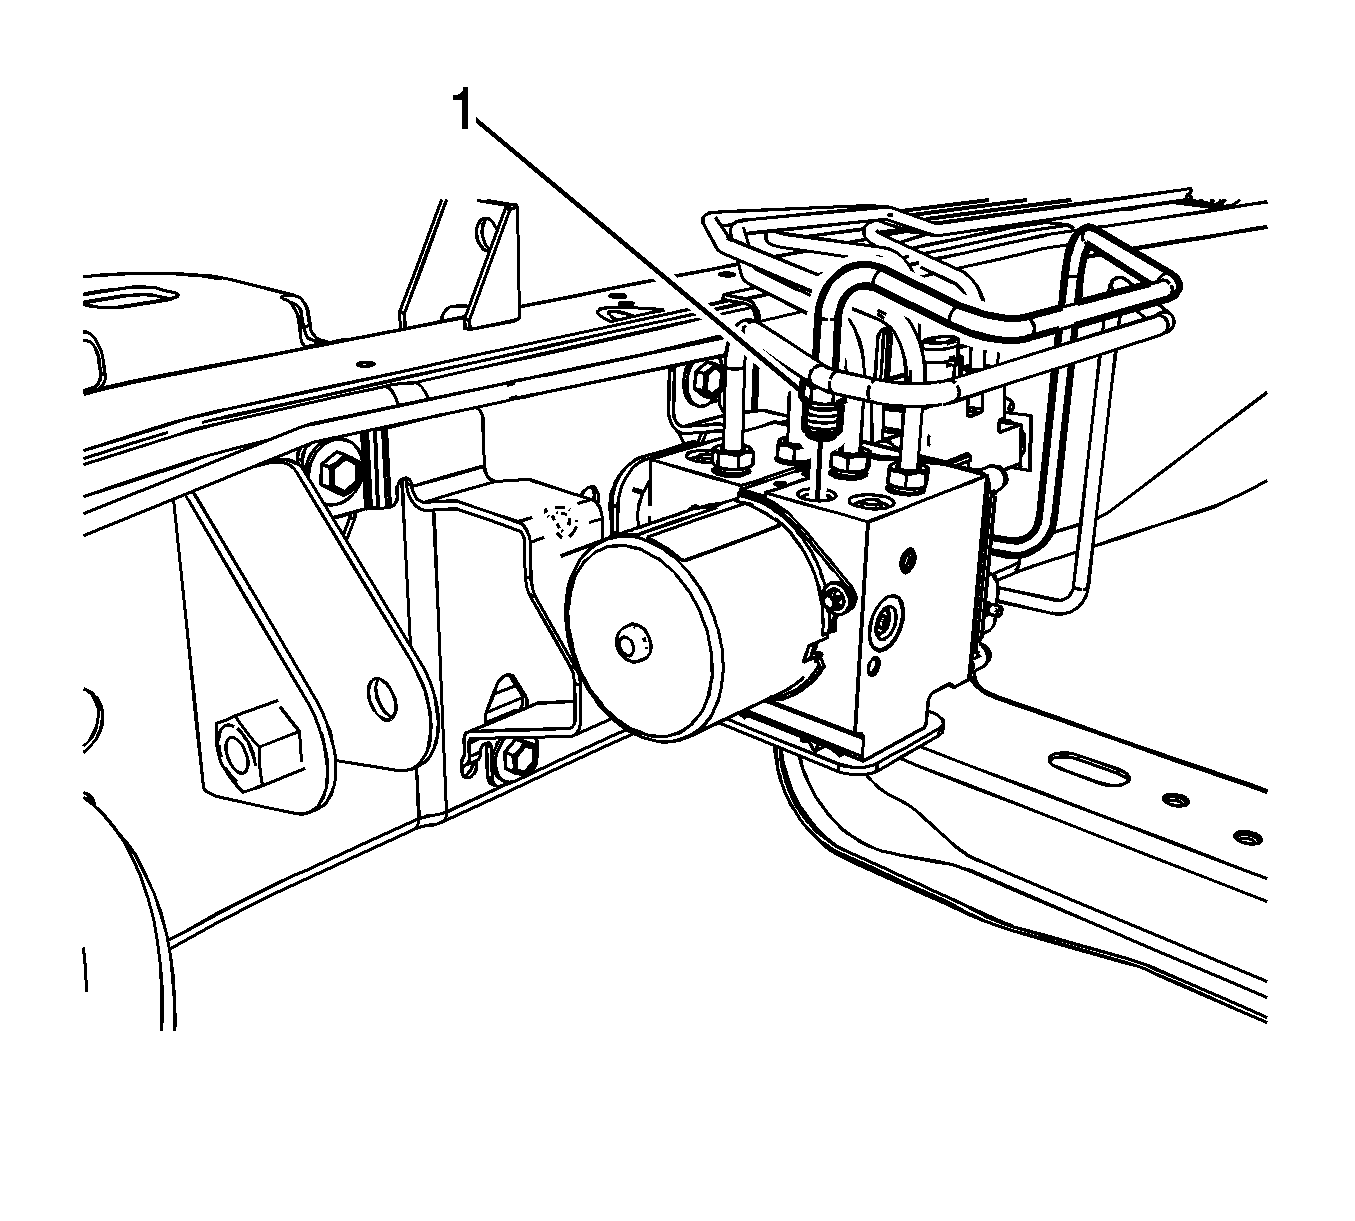
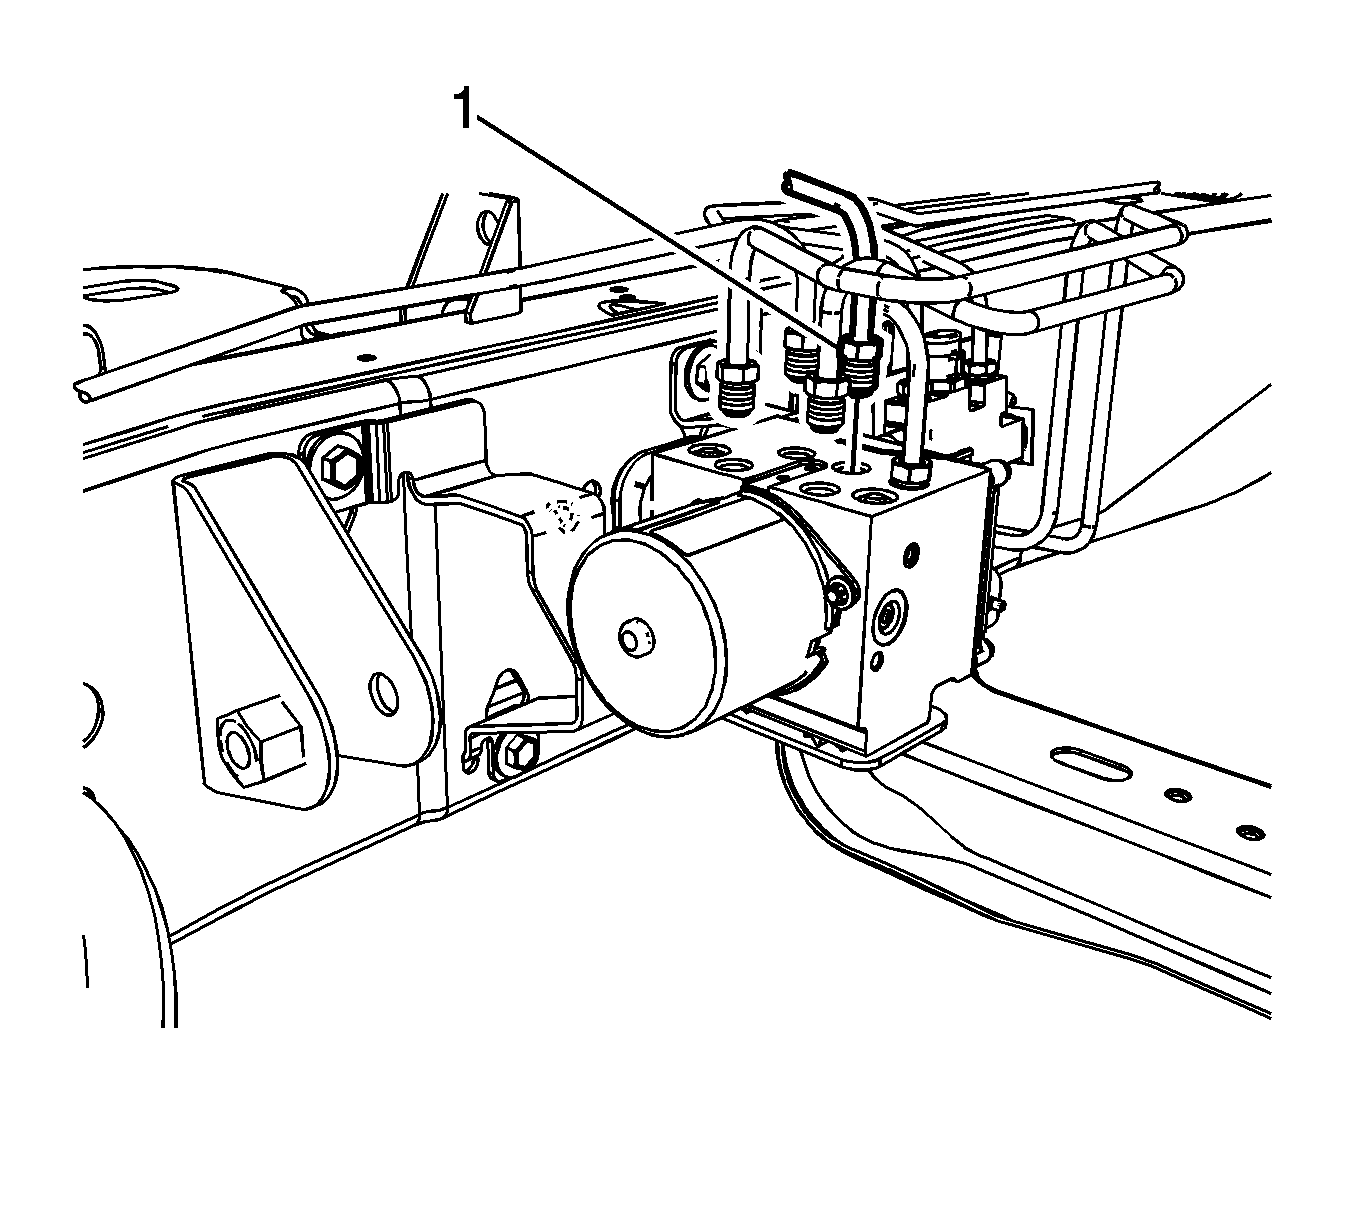
- Disconnect the rear master cylinder brake pipe fitting (1).
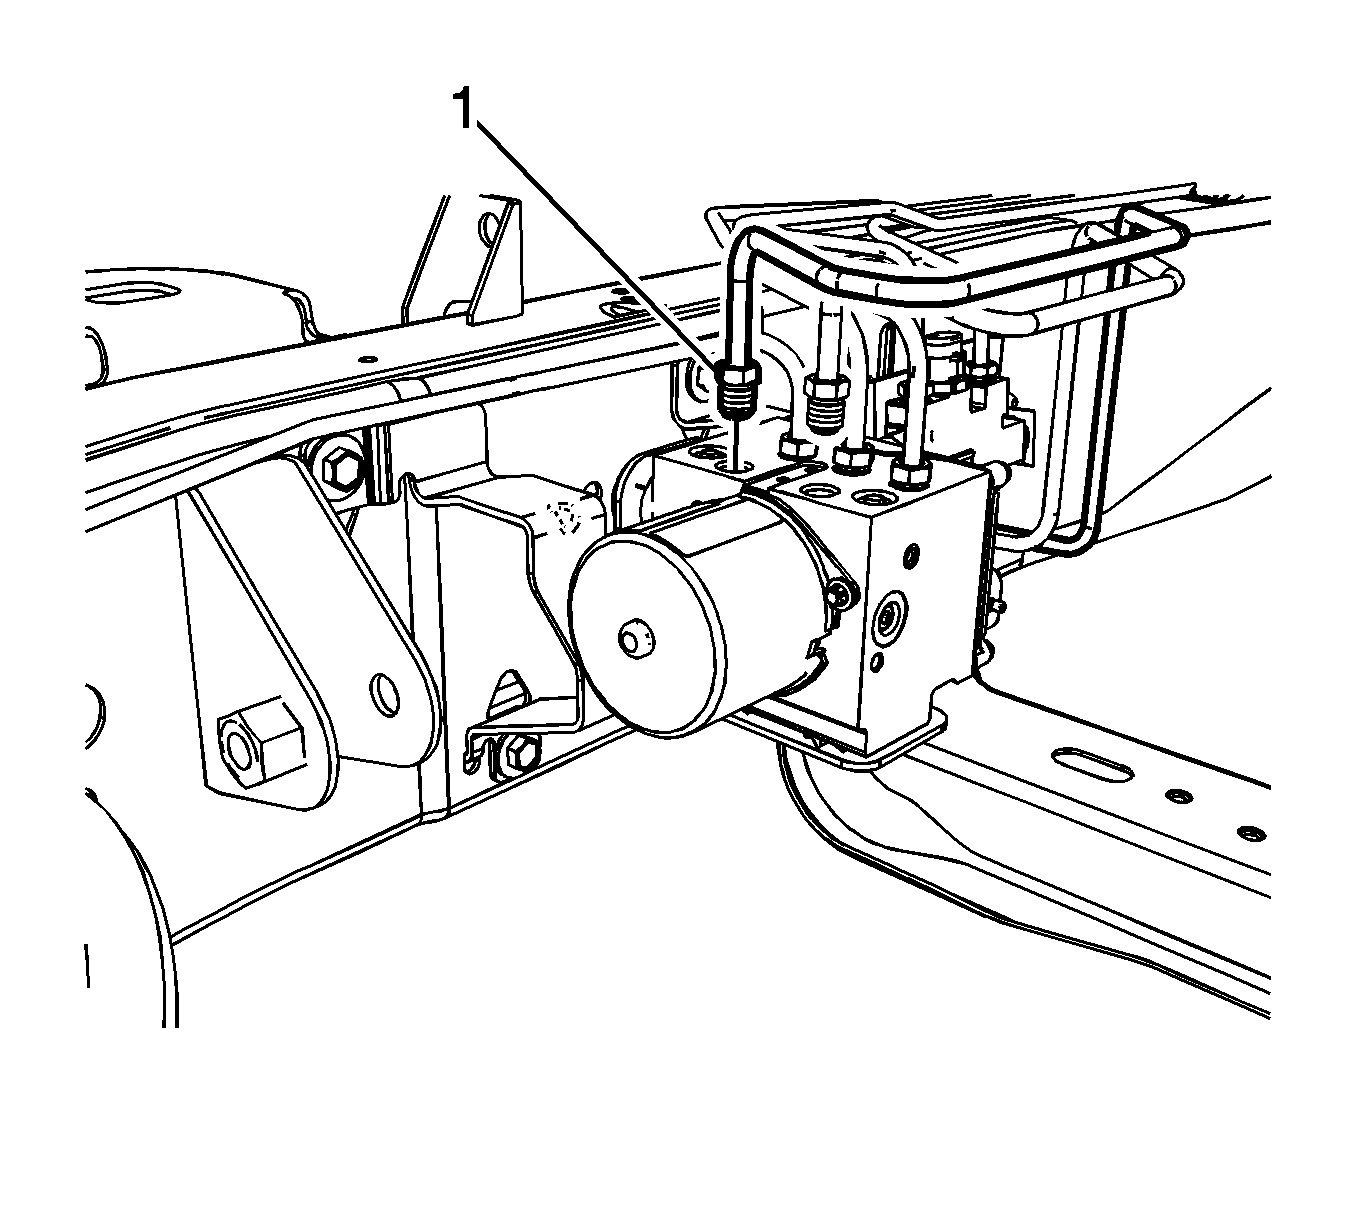
- Disconnect the front master cylinder brake pipe fitting (1).
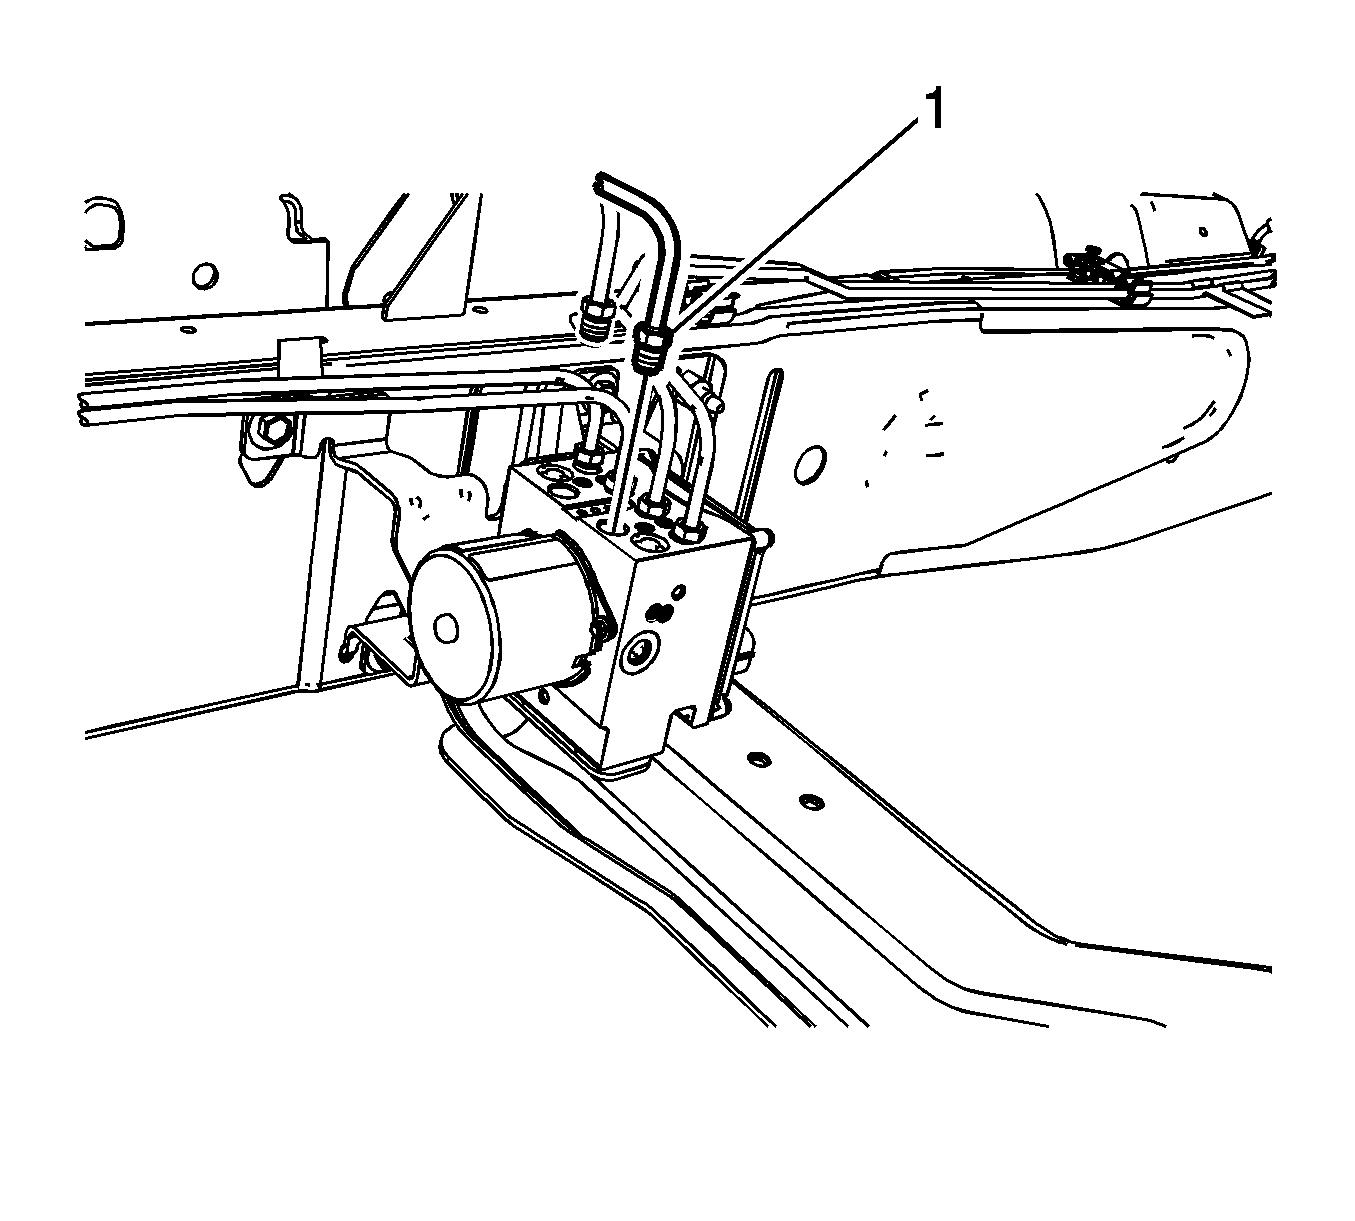
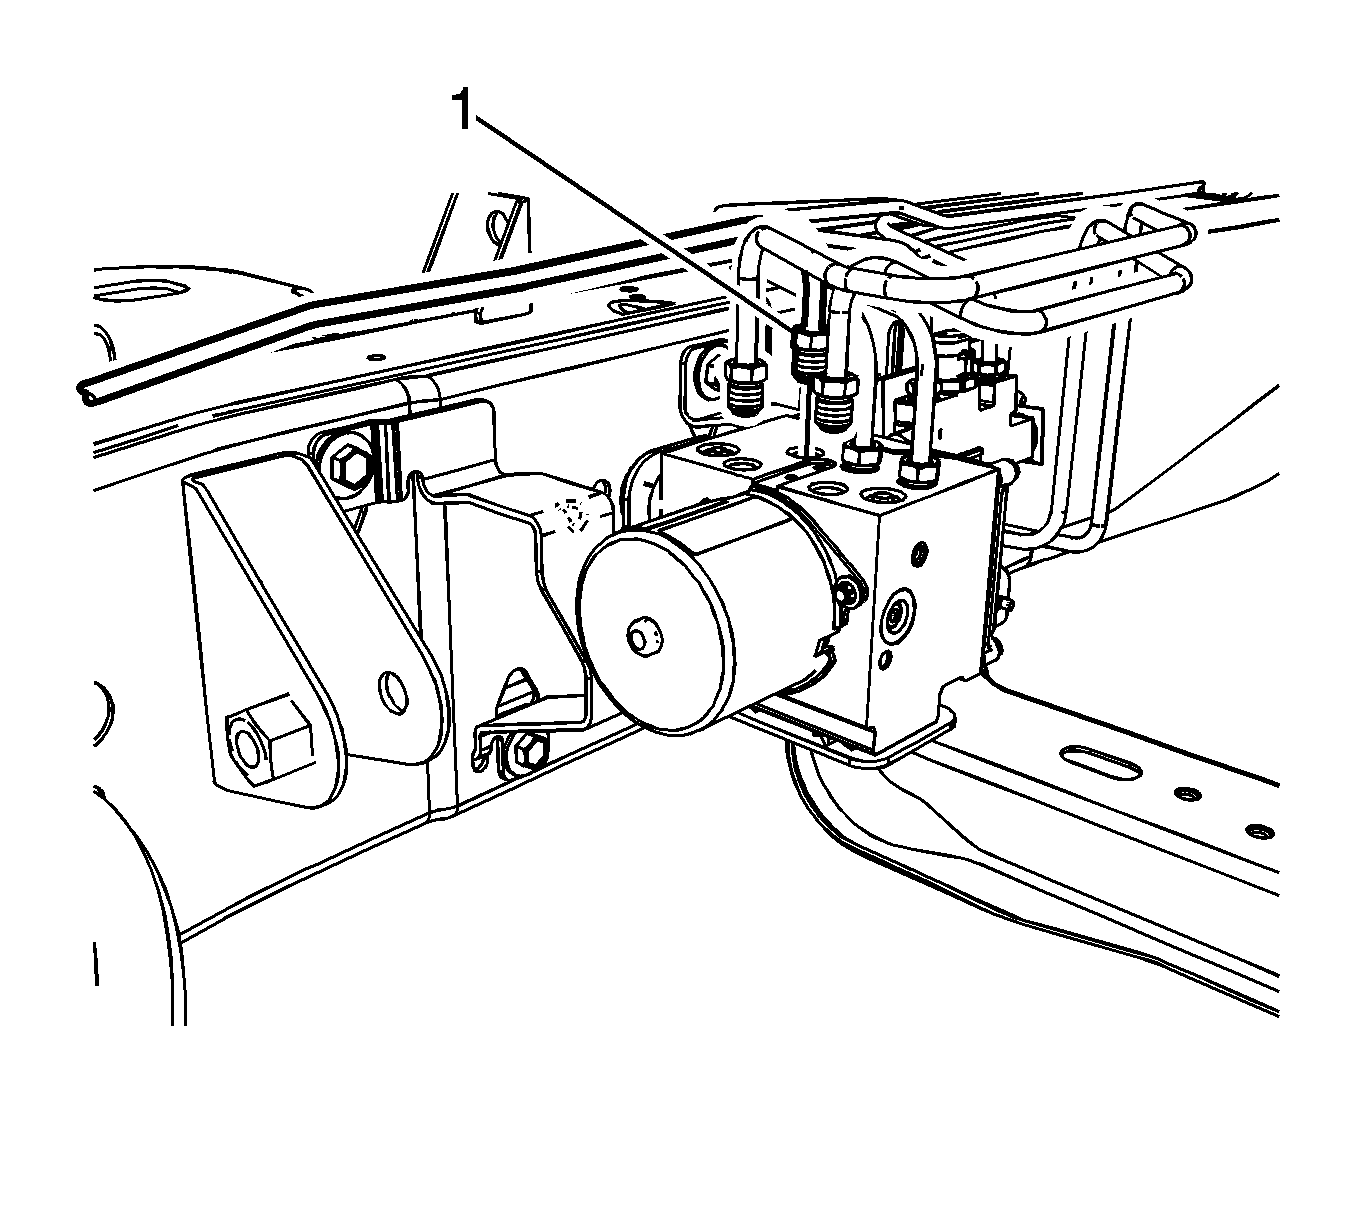
- Disconnect the LF brake pipe fitting (1).
- Disconnect the RF brake pipe fitting (1).
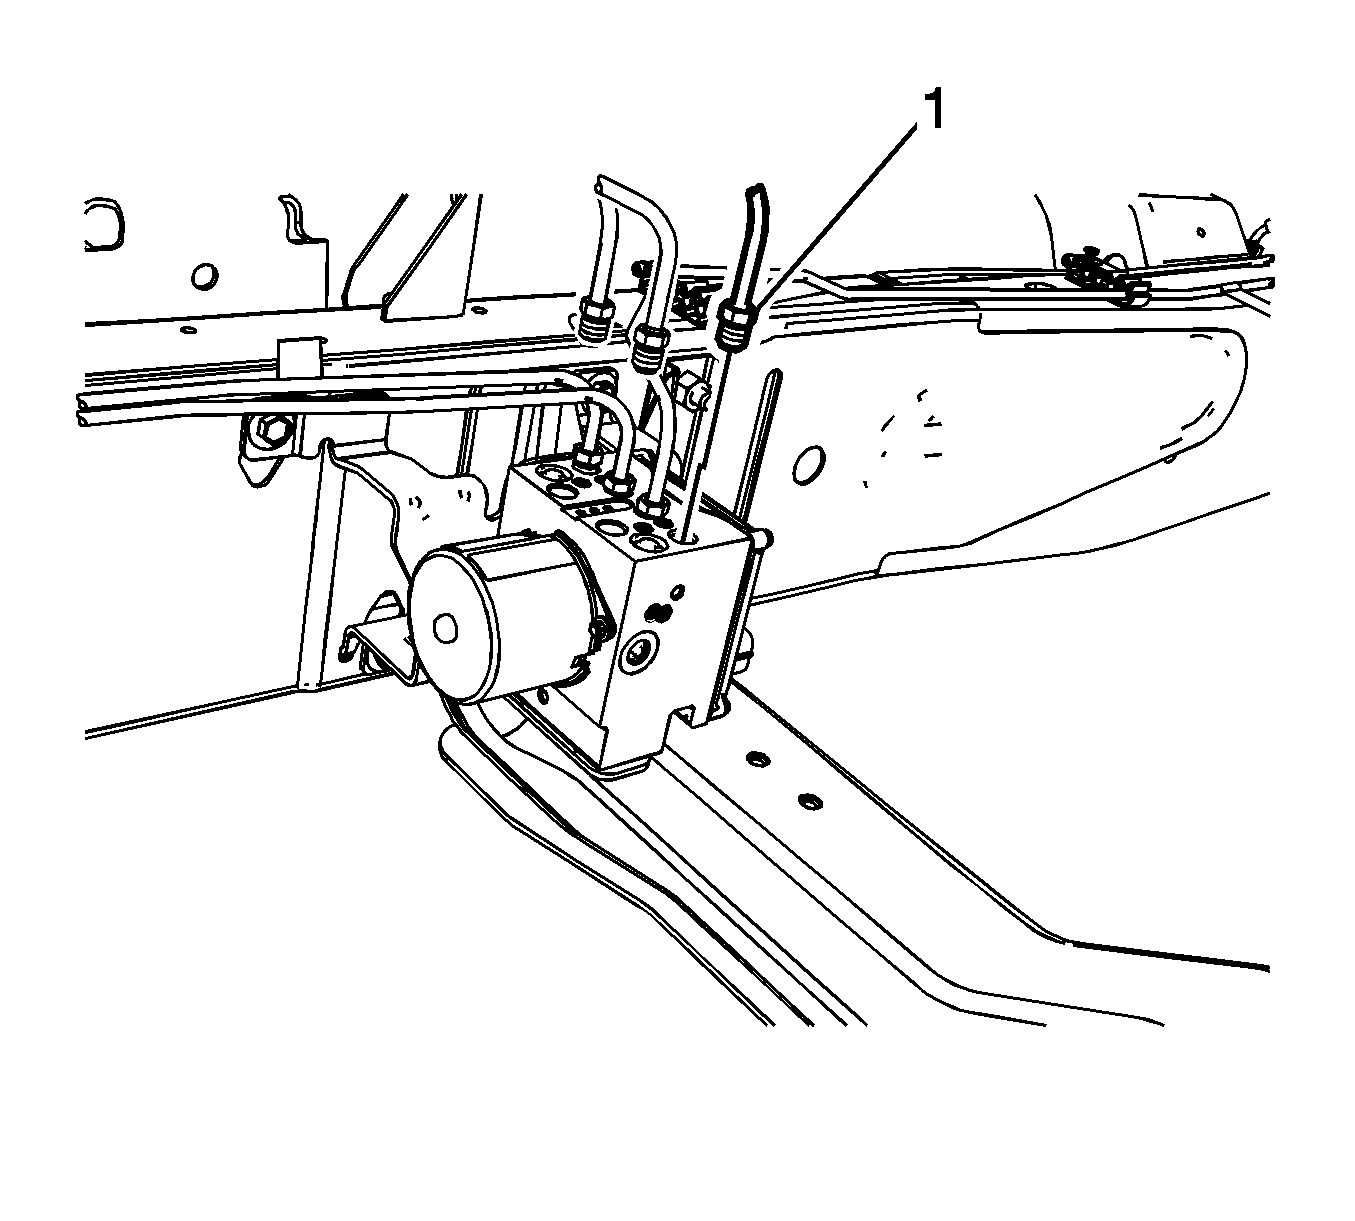
- Disconnect the LR brake pipe fitting (1).
- Disconnect the RR brake pipe fitting (1).
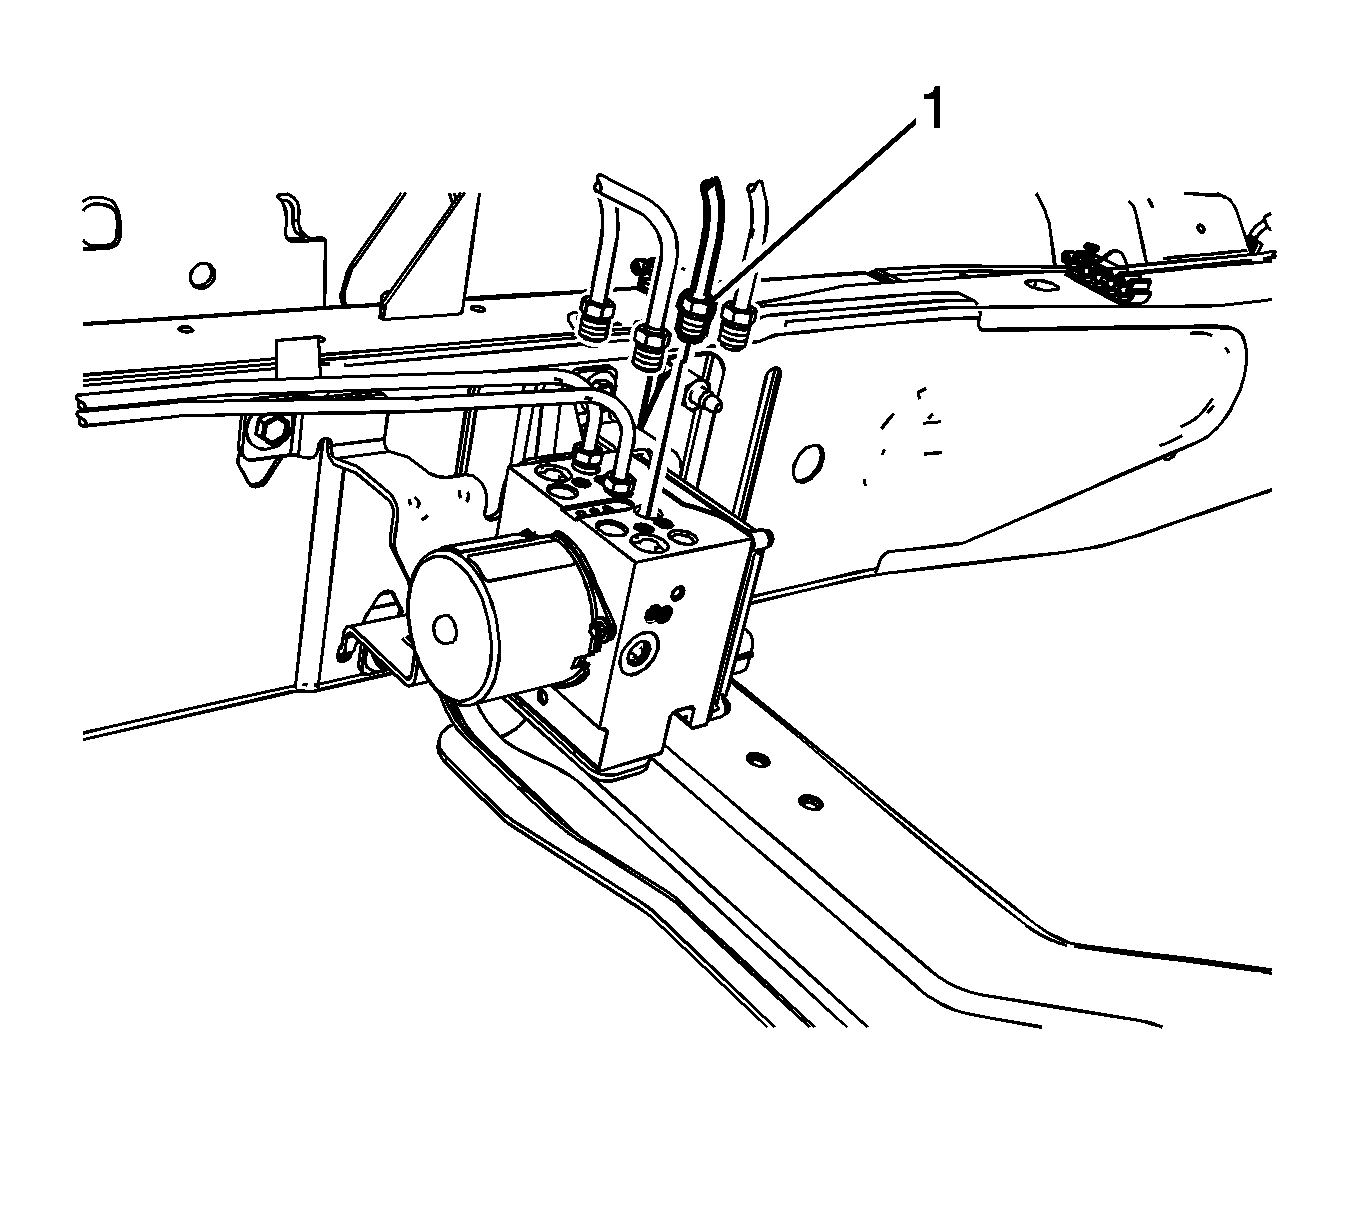
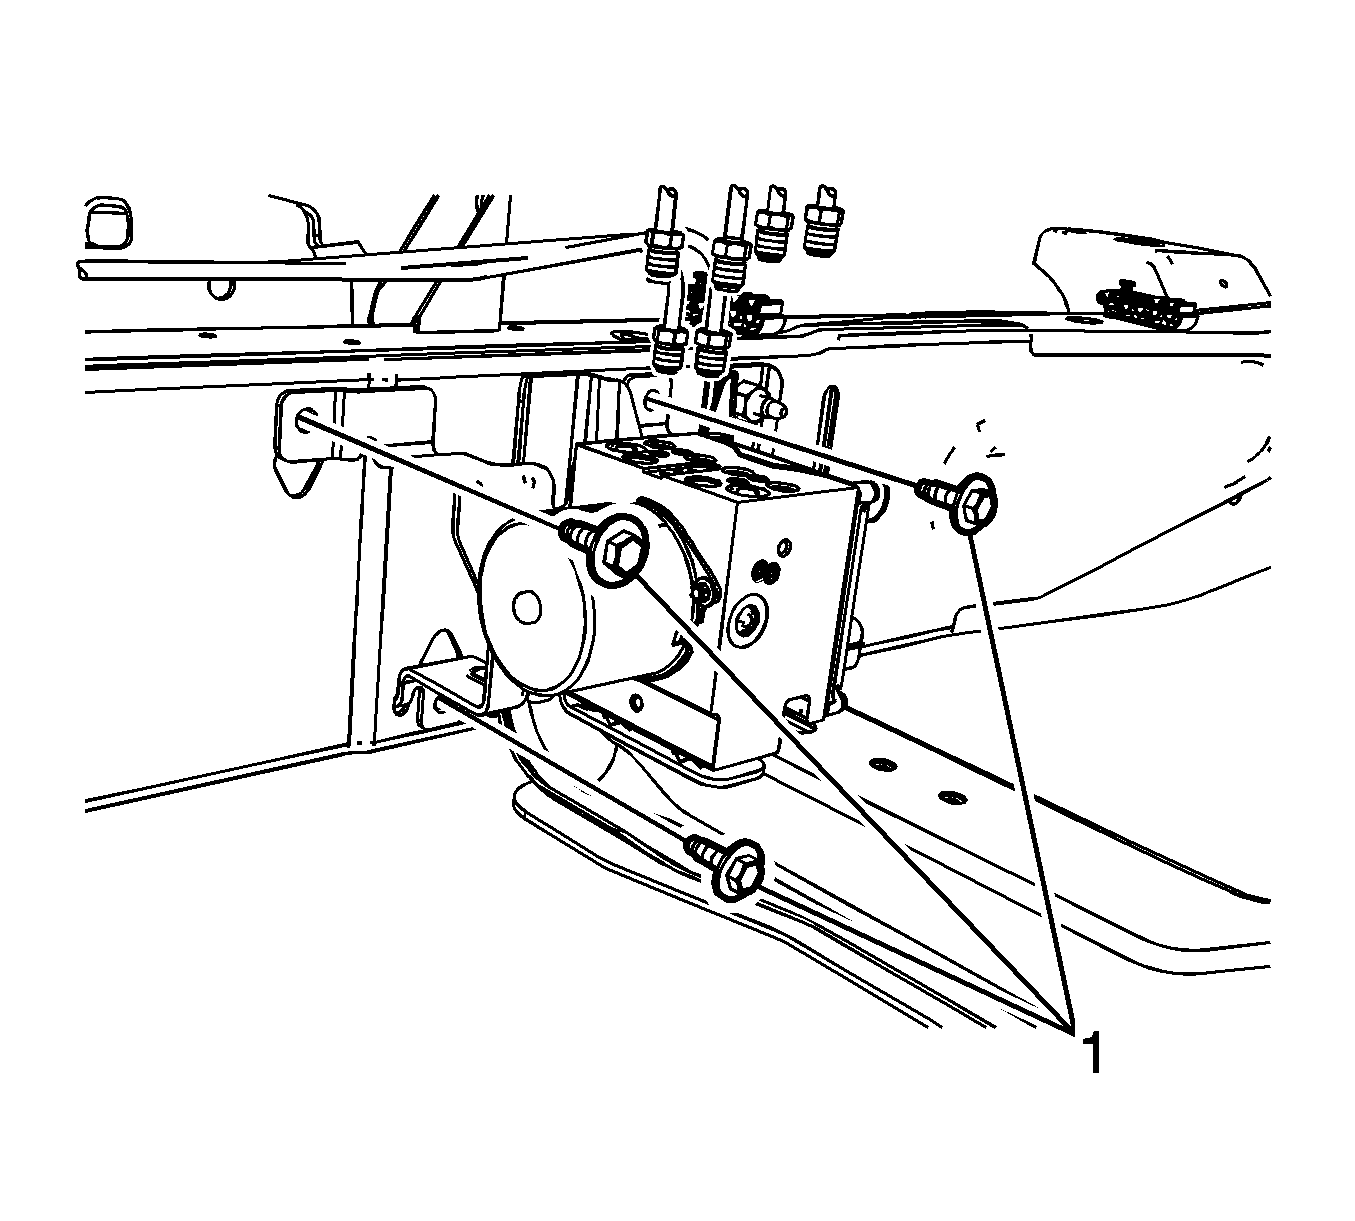
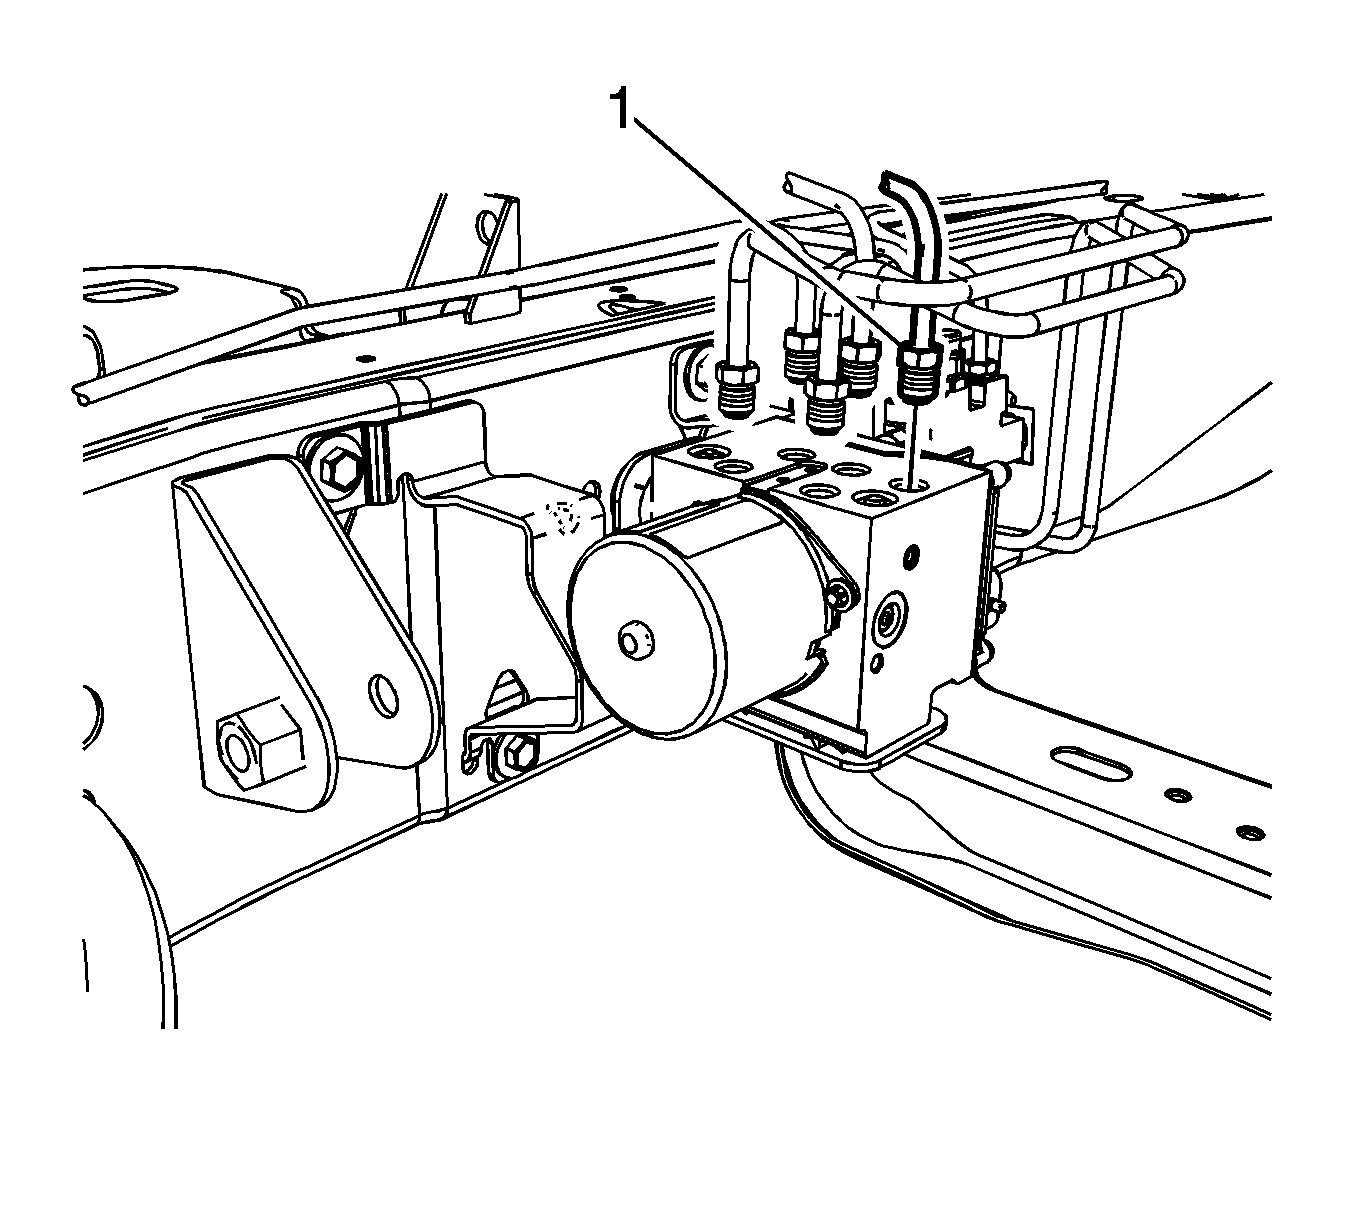
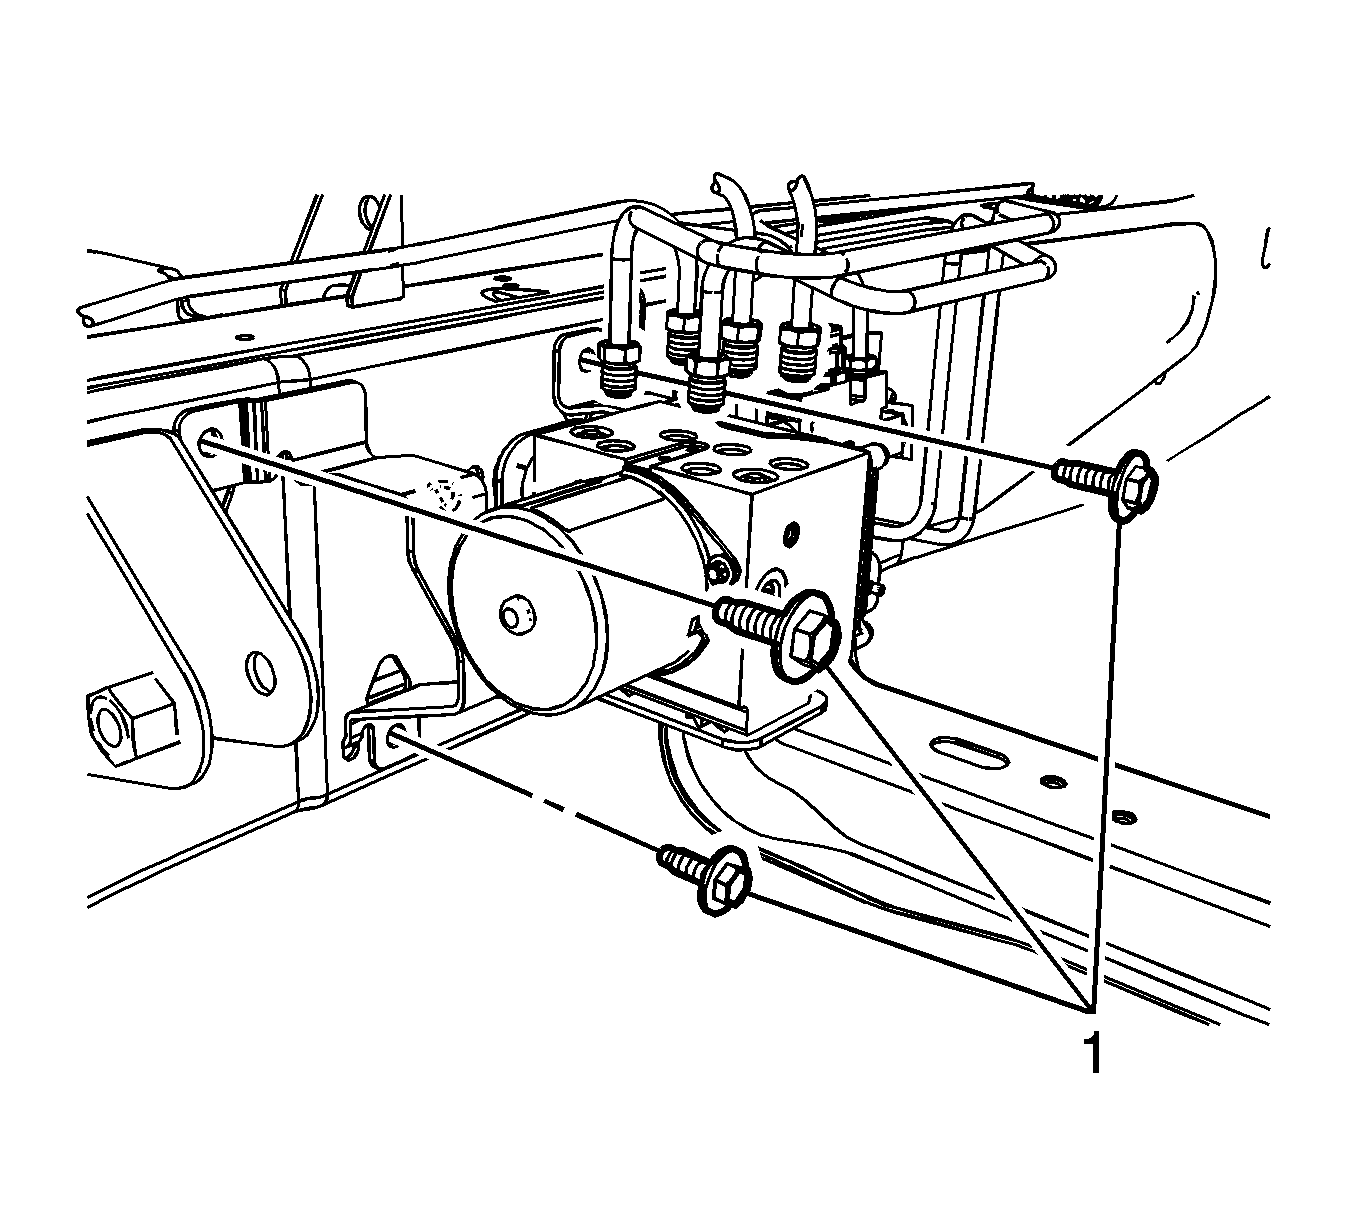
- Remove the BPMV bracket bolts (1).
- Remove the BPMV and bracket assembly from the vehicle.
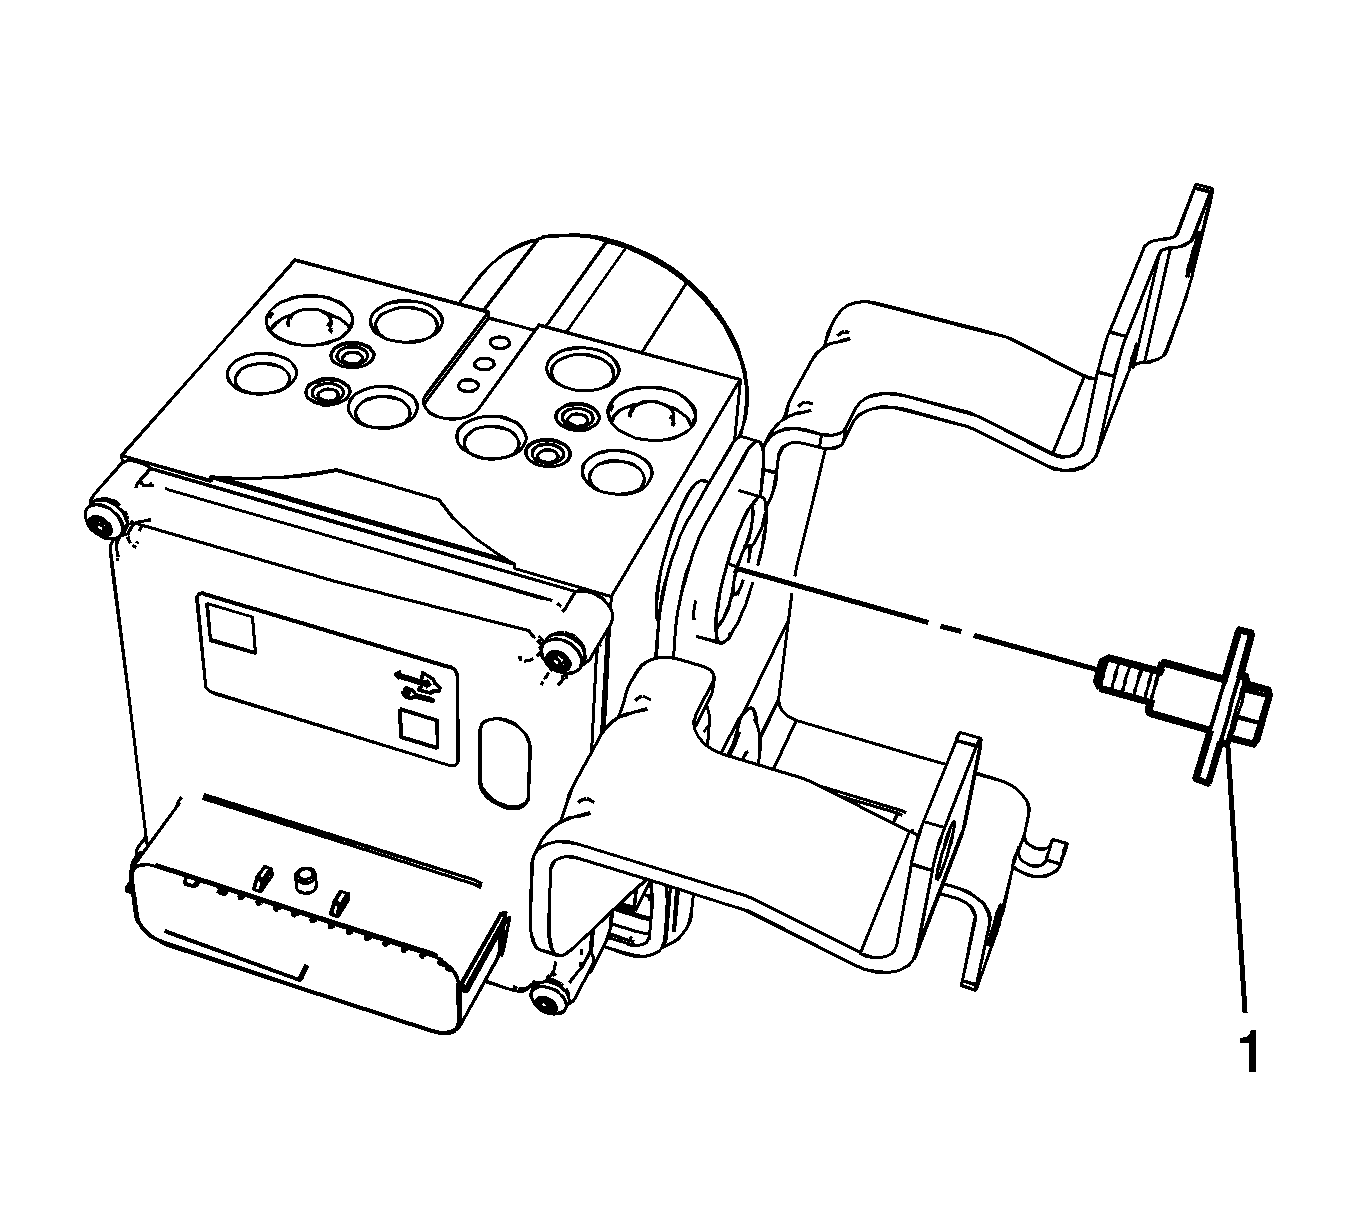
- Remove the BPMV bolt (1).
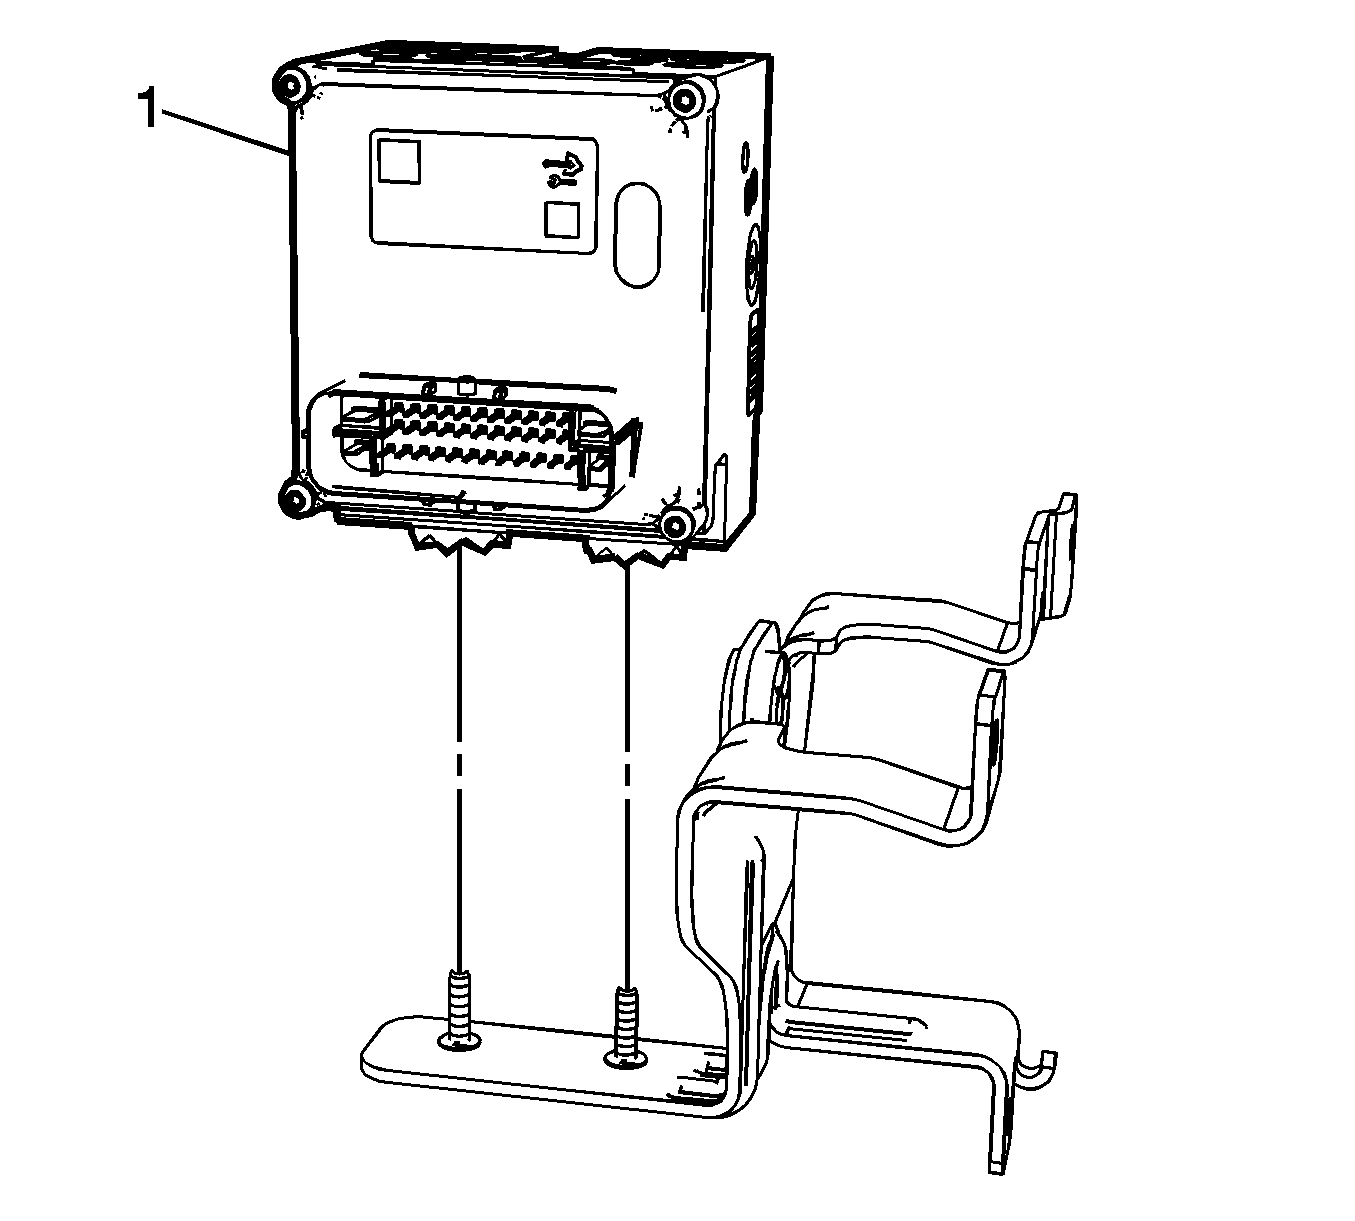
- Remove the BPMV assembly (1) from the bracket.
- If installing a new BPMV, remove the EBCM. Refer to Electronic Brake Control Module Replacement.
Cap the brake pipe fitting and plug the BPMV inlet port to prevent brake fluid loss and contamination.
Cap the brake pipe fitting and plug the BPMV inlet port to prevent brake fluid loss and contamination.
Cap the brake pipe fitting and plug the BPMV outlet port to prevent brake fluid loss and contamination.
Cap the brake pipe fitting and plug the BPMV outlet port to prevent brake fluid loss and contamination.
Cap the brake pipe fitting and plug the BPMV outlet port to prevent brake fluid loss and contamination.
Cap the brake pipe fitting and plug the BPMV outlet port to prevent brake fluid loss and contamination.
Installation Procedure
- Install the EBCM, if removed. Refer to Electronic Brake Control Module Replacement.
- Install the BPMV assembly (1) to the bracket.
- Install the BPMV bolt (1) and tighten to 11 N·m (97 lb in).
- Install the BPMV and bracket assembly to the vehicle.
- Install the BPMV bracket bolts (1) and tighten to 25 N·m (18 lb ft).
- Connect the RR brake pipe fitting (1) and tighten to 25 N·m (18 lb ft).
- Connect the LR brake pipe fitting (1) and tighten to 25 N·m (18 lb ft).
- Connect the RF brake pipe fitting (1) and tighten to 25 N·m (18 lb ft).
- Connect the LF brake pipe fitting (1) and tighten to 25 N·m (18 lb ft).
- Connect the front master cylinder brake pipe fitting (1) and tighten to 25 N·m (18 lb ft).
- Connect the rear master cylinder brake pipe fitting (1) and tighten to 25 N·m (18 lb ft).
- Install the brake modulator shield, if equipped.
- Install the brake modulator shield bolt and tighten to 25 N·m (18 lb ft).
- Install the 2 brake modulator shield nuts and tighten to 25 N·m (18 lb ft).
- If equipped with AWD, install the LF suspension torsion bar. Refer to Torsion Bar and Support Assembly Replacement.
- Connect the negative battery cable. Refer to Battery Negative Cable Disconnection and Connection.
- Bleed the antilock brake system. Refer to Antilock Brake System Automated Bleed Procedure.
Caution: Refer to Fastener Caution in the Preface section.
Brake Pressure Modulator Valve Replacement Without JL4
Removal Procedure
Warning: Refer to Brake Fluid Irritant Warning in the Preface section.
Caution: Refer to Brake Fluid Effects on Paint and Electrical Components Caution in the Preface section.
- Disconnect the negative battery cable. Refer to Battery Negative Cable Disconnection and Connection.
- Raise and support the vehicle. Refer to Lifting and Jacking the Vehicle.
- Remove the 2 brake modulator shield mounting nuts, if equipped.
- Remove the brake modulator shield bolt and the brake modulator shield.
- Remove all dirt and debris from the electronic brake control module (EBCM) and the brake pressure modulator valve (BPMV) before loosening or removing any of the components.
- Disconnect the electrical connector from the EBCM.
- If equipped with AWD, remove the LF suspension torsion bar. Refer to Torsion Bar and Support Assembly Replacement.
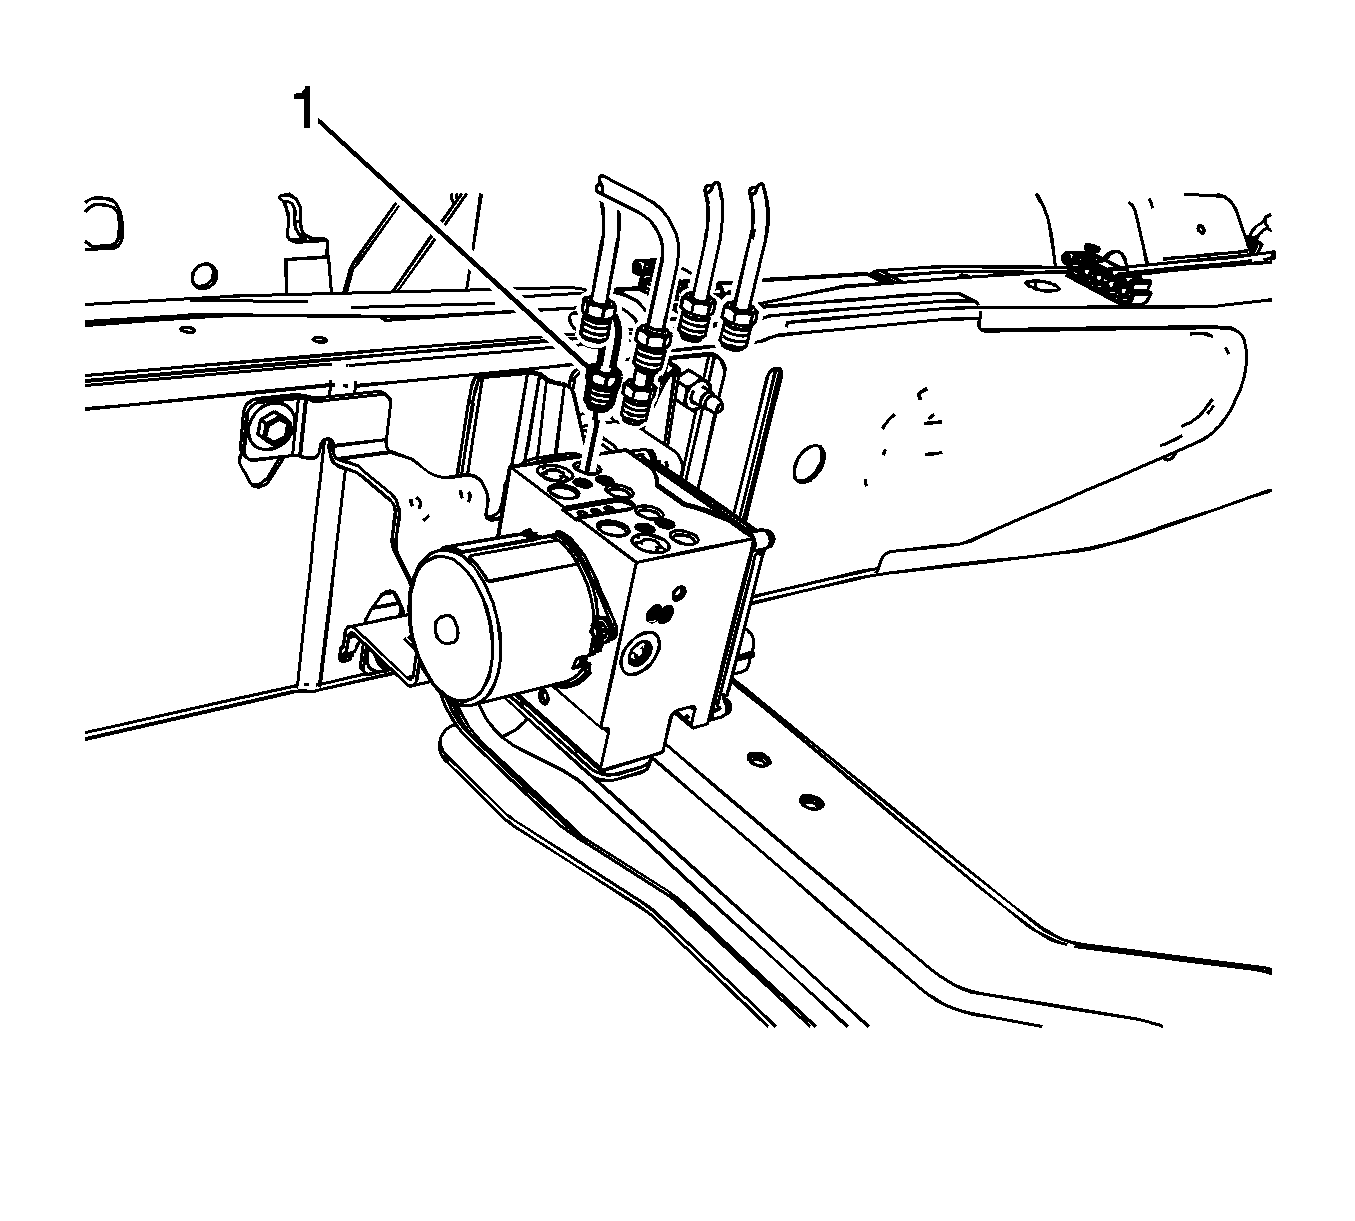
- Disconnect the front master cylinder brake pipe fitting (1).
- Disconnect the rear master cylinder brake pipe fitting (1).
- Disconnect the rear brake pipe fitting (1).
- Disconnect the RF brake pipe fitting (1).
- Disconnect the LF brake pipe fitting (1).
- Remove the BPMV bracket bolts (1).
- Remove the BPMV and bracket assembly from the vehicle.
- Remove the BPMV bolt (1).
- Remove the BPMV assembly (1) from the bracket.
- If installing a new BPMV, remove the EBCM. Refer to Electronic Brake Control Module Replacement.
Cap the brake pipe fitting and plug the BPMV inlet port to prevent brake fluid loss and contamination.
Cap the brake pipe fitting and plug the BPMV inlet port to prevent brake fluid loss and contamination.
Cap the brake pipe fitting and plug the BPMV outlet port to prevent brake fluid loss and contamination.
Cap the brake pipe fitting and plug the BPMV outlet port to prevent brake fluid loss and contamination.
Cap the brake pipe fitting and plug the BPMV outlet port to prevent brake fluid loss and contamination.

Installation Procedure
- Install the EBCM to the BPMV, if removed. Refer to Electronic Brake Control Module Replacement.
- Install the BPMV assembly (1) to the bracket.
- Install the BPMV bolt (1) and tighten to 11 N·m (97 lb in).
- Install the BPMV and bracket assembly to the vehicle.
- Install the BPMV bracket bolts (1) and tighten to 25 N·m (18 lb ft).
- Connect the LF brake pipe fitting (1) and tighten to 25 N·m (18 lb ft).
- Connect the RF brake pipe fitting (1) and tighten to 25 N·m (18 lb ft).
- Connect the rear brake pipe fitting (1) and tighten to 25 N·m (18 lb ft).
- Connect the rear master cylinder brake pipe fitting (1) and tighten to 25 N·m (18 lb ft).
- Connect the front master cylinder brake pipe fitting (1) and tighten to 25 N·m (18 lb ft).
- Install the brake modulator shield, if equipped.
- Install the brake modulator shield nuts and tighten to 25 N·m (18 lb ft).
- Install the brake modulator shield bolt and tighten to 25 N·m (18 lb ft).
- If equipped with AWD, install the LF suspension torsion bar. Refer to Torsion Bar and Support Assembly Replacement.
- Connect the negative battery cable. Refer to Battery Negative Cable Disconnection and Connection.
- Bleed the antilock brake system. Refer to Antilock Brake System Automated Bleed Procedure.
Caution: Refer to Fastener Caution in the Preface section.
