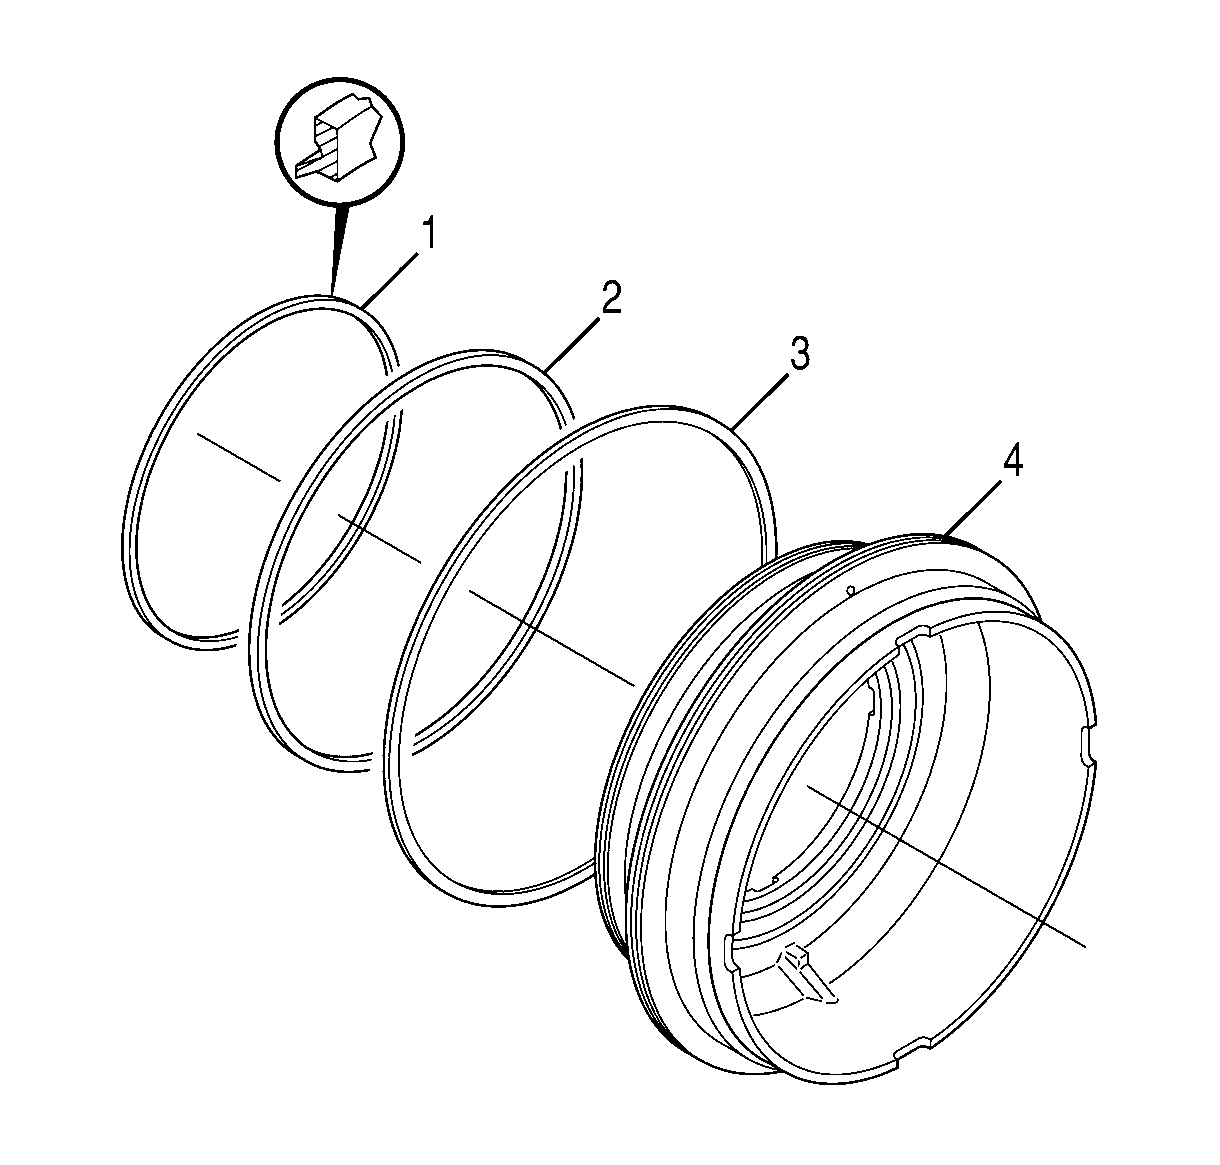
- Install piston sealrings (1), (2), and (3)
onto C2 clutch piston (4).
- Lubricate C2 balance piston seal (3), the piston ID and OD, and sealrings
(1) and (2) with petrolatum.
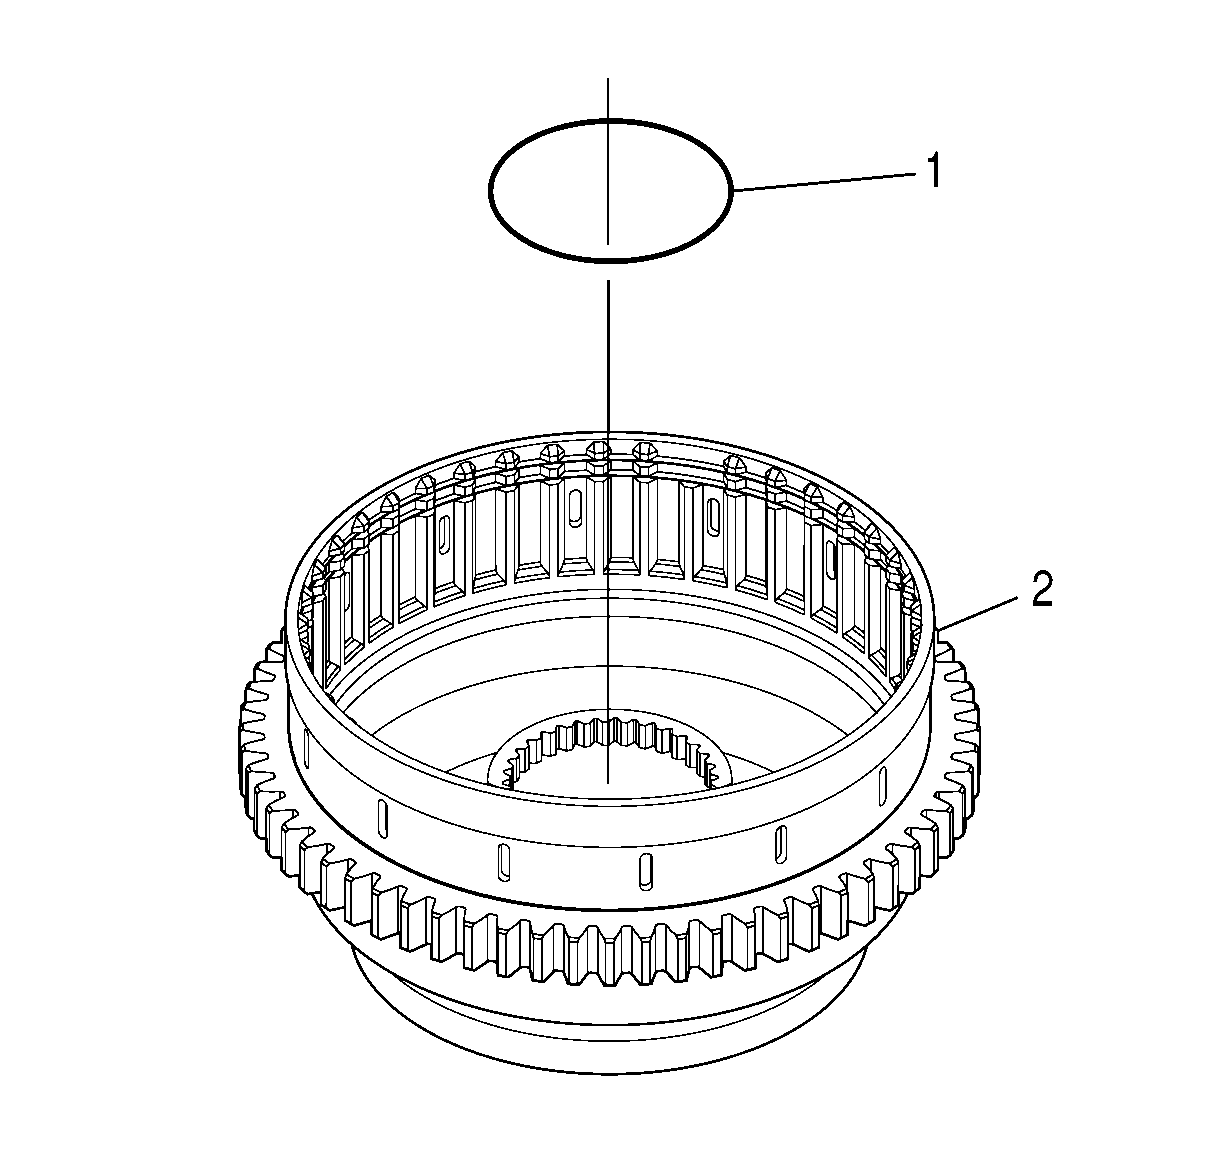
- Position
rotating clutch housing (2) on the work table so that the rear of the housing is
facing up.
- Install O-ring (1) into the bottom groove on the inner hub of rotating
clutch housing (2).
Notice: The C2 clutch piston and sealrings have been redesigned. The current and former
C2 clutch pistons and sealrings must be matched to the vehicle calibration. All MY03
calibration transmission must use the current C2 piston, P/N 29539653 and double overlap
joint sealrings, P/N 29538940. MY01 and MY 02 calibration transmissions require the
former C2 clutch piston, P/N 29538342, and butt joint sealrings, P/N 29538212. Mismatching
the C2 clutch piston and sealrings to a calibration causes hard and inconsistent 3-4
and 5-4 shifts.
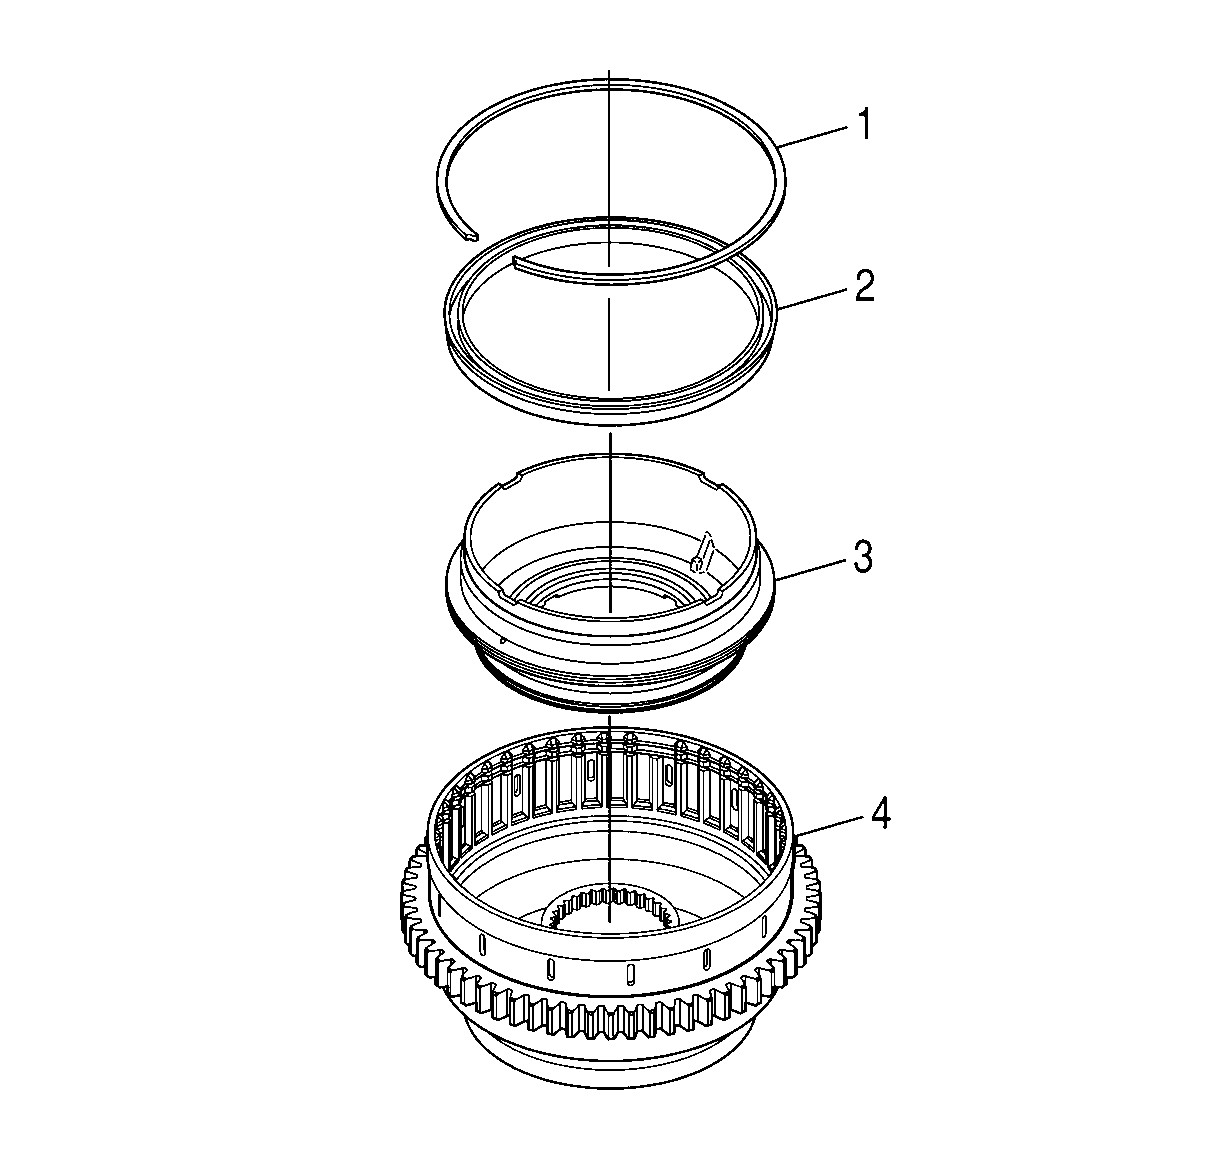
- Position C2 clutch piston (3) on the work table so that the rear of the piston
is facing up.
- Align C2 balance piston (2) so that the rubber seal is facing down.
- Install C2 balance piston (2) onto C2 clutch piston (3).
- Lubricate the rubber seals on C2 balance piston (2) with petrolatum.
- Install C2 clutch piston (3) with, C2 balance piston (2) attached, into
rotating clutch housing (4).
- Make sure the C2 clutch piston is seated on the rotating clutch housing.
- Push C2 balance piston (2) below the retaining ring groove on rotating
clutch housing (4).
- Install retaining ring (1) into rotating clutch housing (4).
- Make sure the retaining ring is seated completely around the rotating
clutch housing.
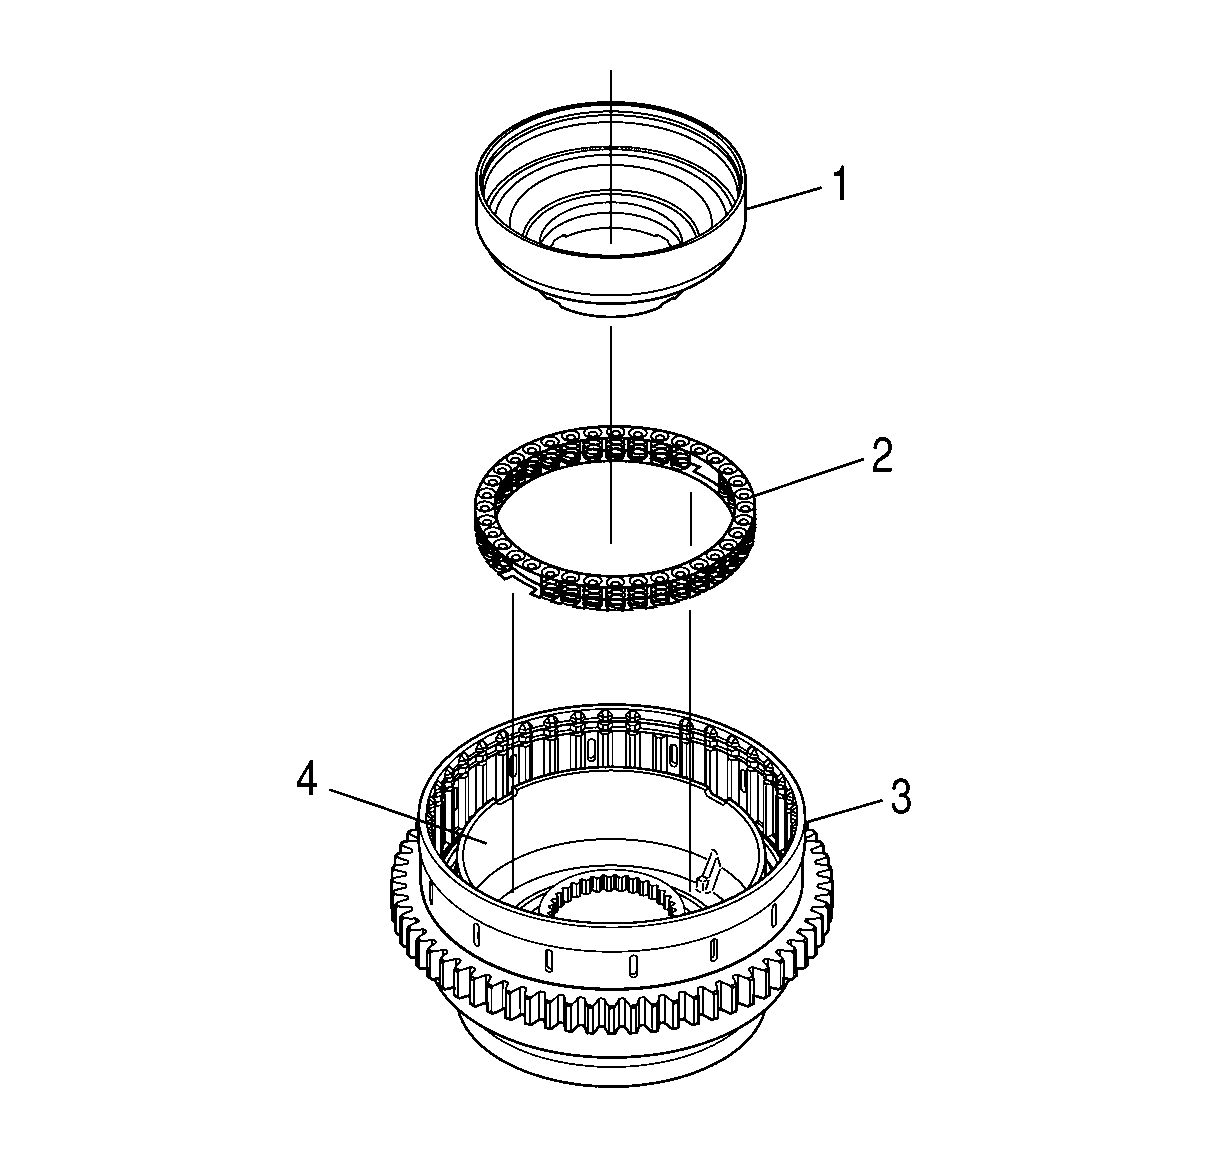
- Align C2 piston return spring assembly (2)
so that the notches of the spring assemblies are facing and aligned with the tangs
of C2 clutch piston (4).
- Install C2 piston return spring assembly (2) into C2 clutch piston (4).
- Align C1 piston housing (1) so that the rear of the housing is facing
up.
- Install C1 piston housing (1) into C2 clutch piston (4).
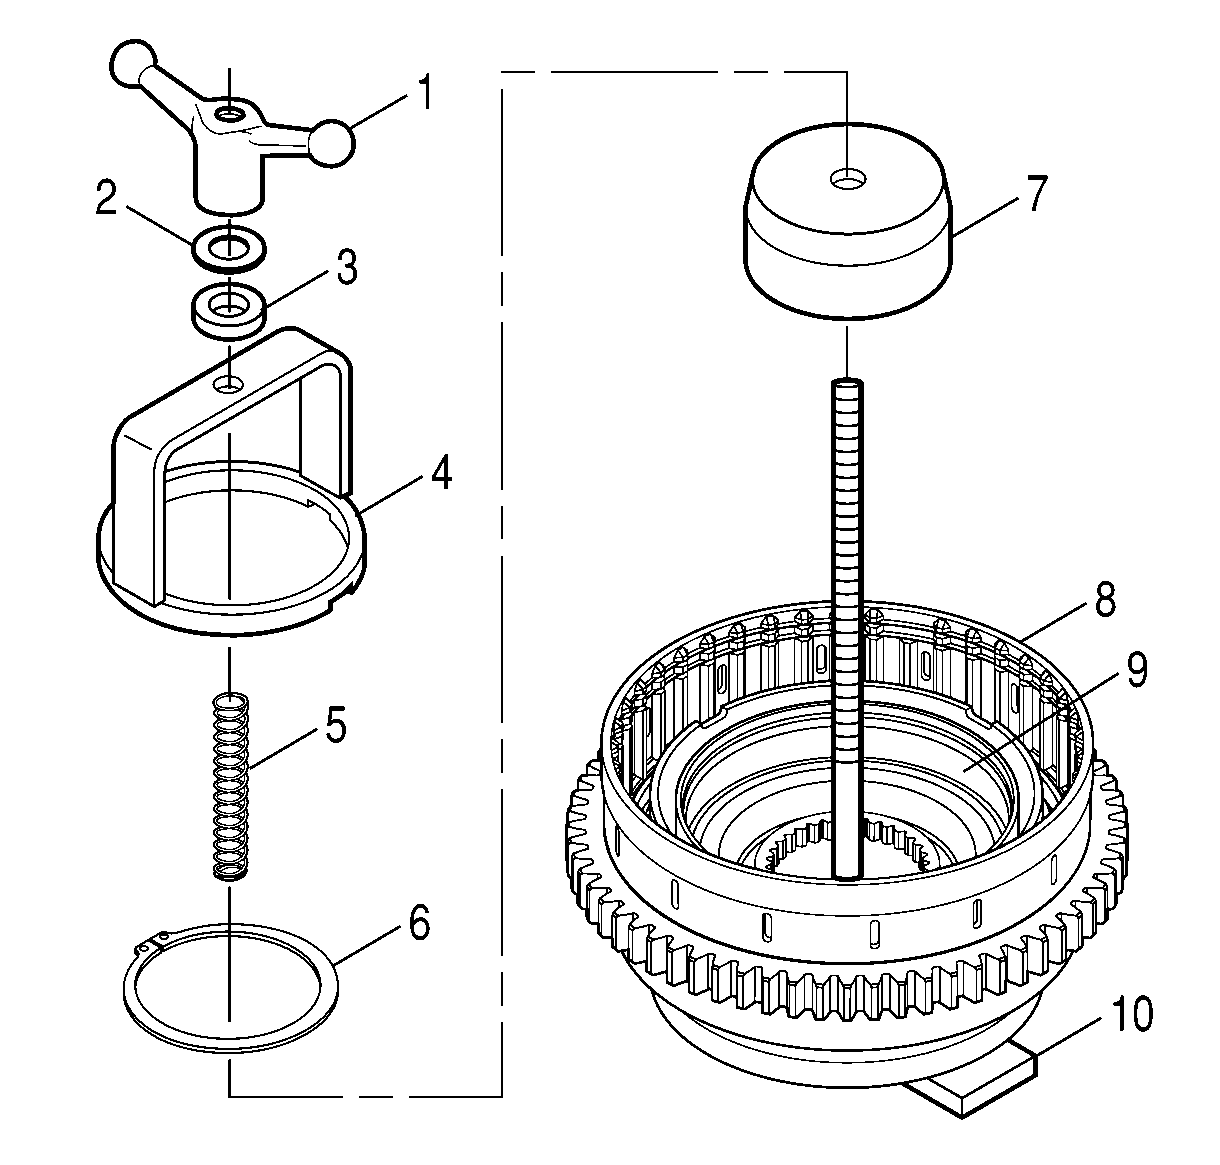
- Position rotating clutch housing (8) on
the base of J 24204-2
(10)
so that the rear of the housing is facing up.
- Install J 43776-1 (7) onto the shaft of J 24204-2
with the bowl down.
- Install retaining ring (6) onto the surface of J 43776-2 (7).
- Install spring (5) of J 43776
onto the shaft of J 24204-2
.
- Install J 43776-2 (4) onto the shaft of J 24204-2
.
- Align a notch of J 43776-2 (4) with the ball of the C1 piston housing.
- Install J 24204-2
ball
bearing (3) and washer (2) onto the shaft of J 24204-2
.
- Install J 24204-2
wing
nut (1) onto the shaft of J 24204-2
.
- Compress the C2 piston return spring assembly until the retaining ring
groove on the inner hub of the rotating clutch housing is visible.
- Install retaining ring (6) into the rotating clutch housing inner hub.
- Make sure the retaining ring is seated all around the clutch housing.
- Remove all J tools except for the base of J 24204-2
.
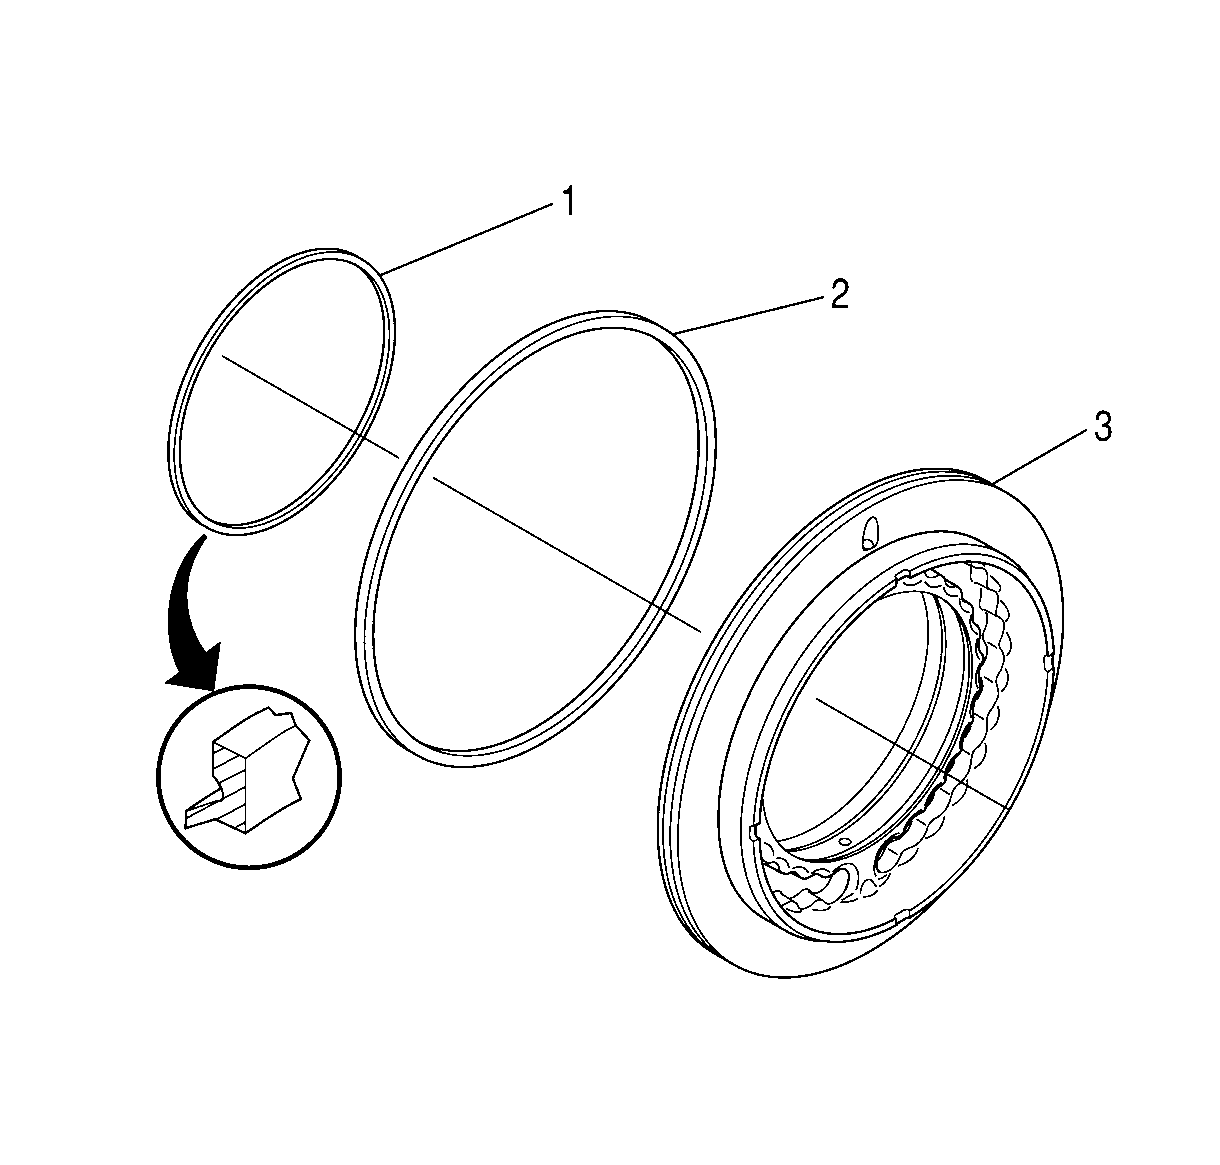
- Install C1 piston ID sealring (1) and C1
piston OD sealring (2) onto C1 clutch piston (3).
- Lubricate the sealrings with petrolatum.
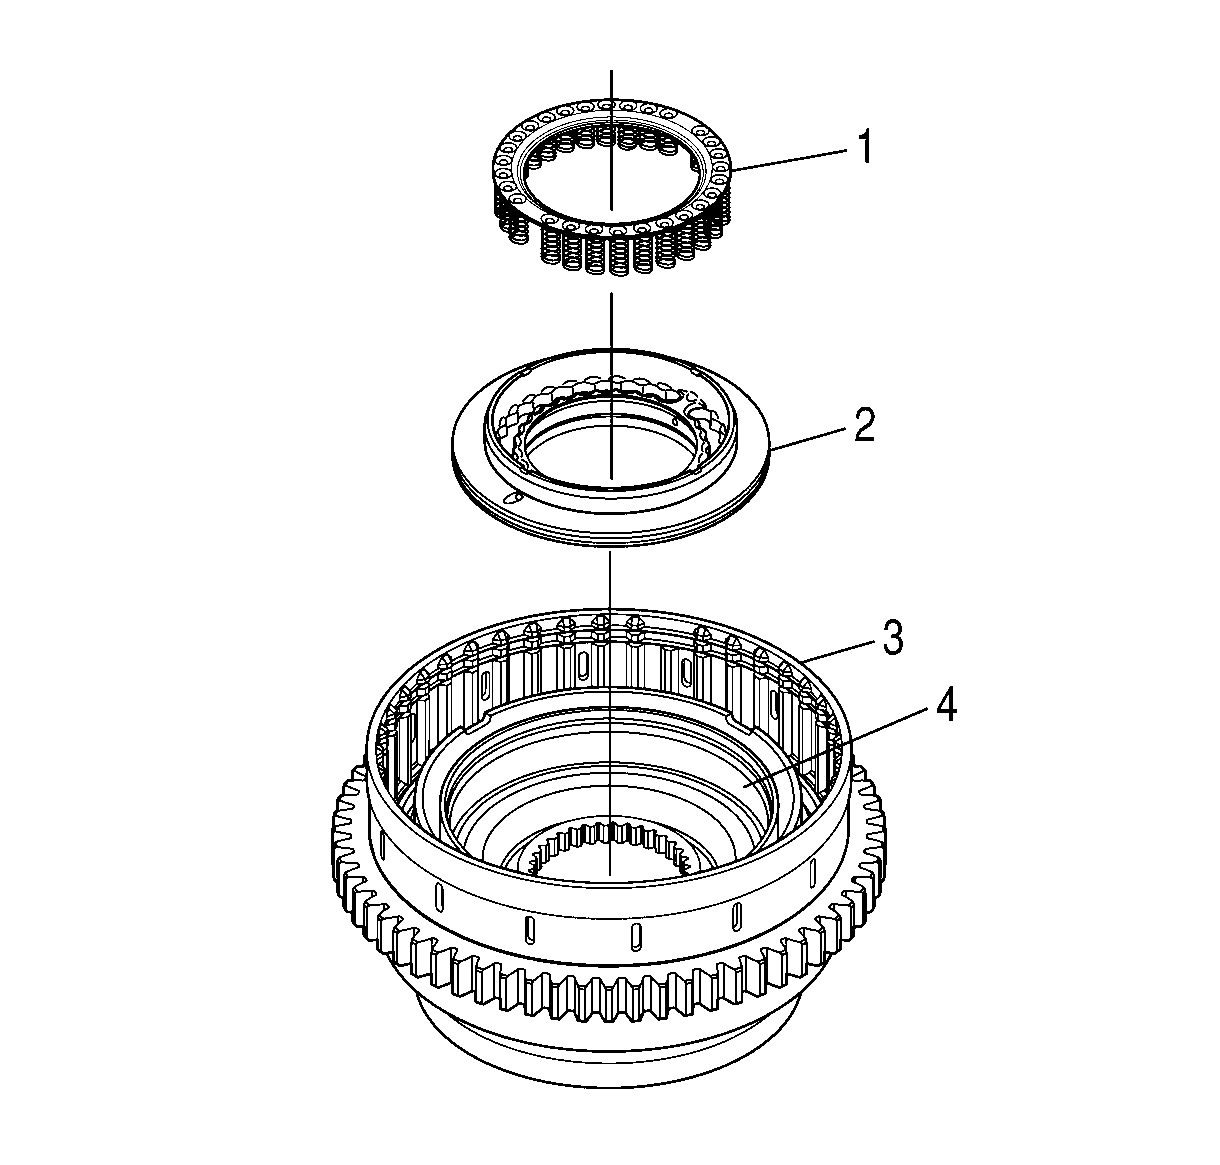
- Position rotating clutch housing (3) on
the work table so that the rear of the housing is facing up.
- Align C1 clutch piston (2) so that the spring indents are facing up.
- Install C1 clutch piston (2) into C1 piston housing (4).
- Make sure the C1 clutch piston is seated in the C1 piston housing.
- Align C1 piston return spring assembly (1) so that the springs are facing
and aligned with the spring pockets of C1 clutch piston (2).
- Install C1 piston return spring assembly (1) into C1 clutch piston (2).
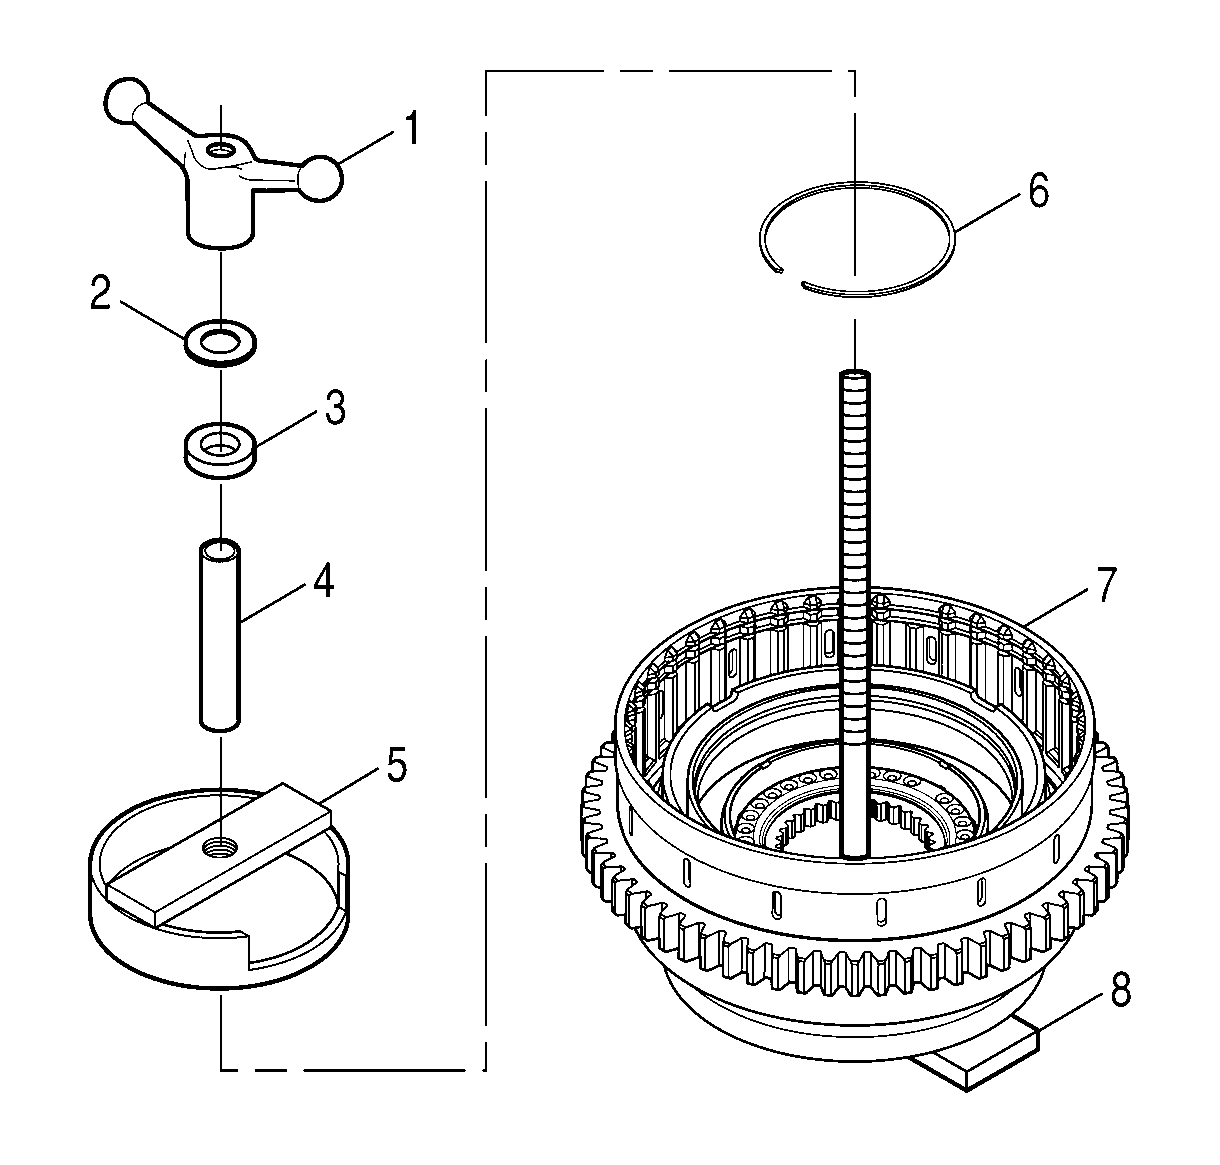
- Position rotating clutch housing (7) on
the base of J 24204-2
(8)
so that the rear of the housing is facing up.
- Install retaining ring (6) into the inner hub of the rotating clutch housing.
- Install J 43777
(5)
onto the shaft of J 24204-2
(8).
- Center J 43777
on
the C1 piston return spring assembly.
- Install J 43777
extension
(4) onto the shaft of J 24204-2
.
- Install J 24202-2 ball bearing (3) and washer (2) onto the shaft
of J 24204-2
.
- Install J 24204-2
wing
nut (1) on the shaft of J 24204-2
.
- Compress the C1 piston return spring assembly until the retaining ring
groove on the rotating clutch housing inner hub is visible.
- Install retaining ring (6) into the rotating clutch housing inner hub.
- Remove all J tools.
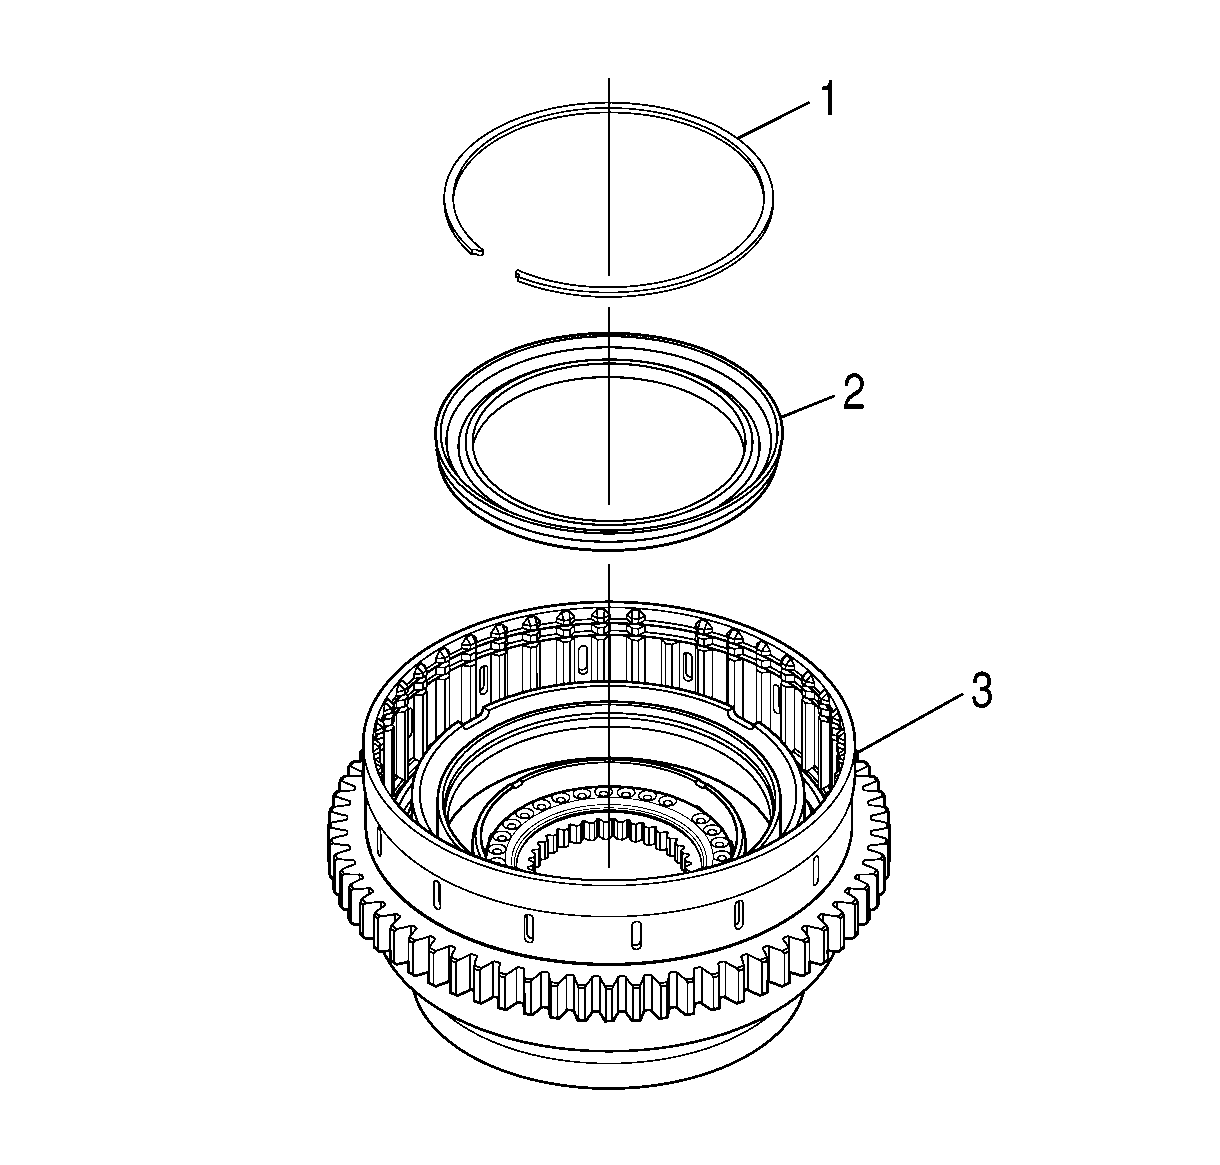
- Position rotating clutch housing (3) on the work table so that the rear of
the housing is facing up.
- Lubricate the rubber seals on C1 balance piston (2) with petrolatum.
- Align C1 balance piston (2) so that the rubber seal is facing down.
- Install the C1 balance piston between the C1 clutch piston and the C1
piston housing.
- Press C1 balance piston (2) into the C1 piston housing until the C1 balance
piston is below the retaining ring groove on the C1 piston housing.
- Install retaining ring (1).
- Make sure the retaining ring is seated in its groove.
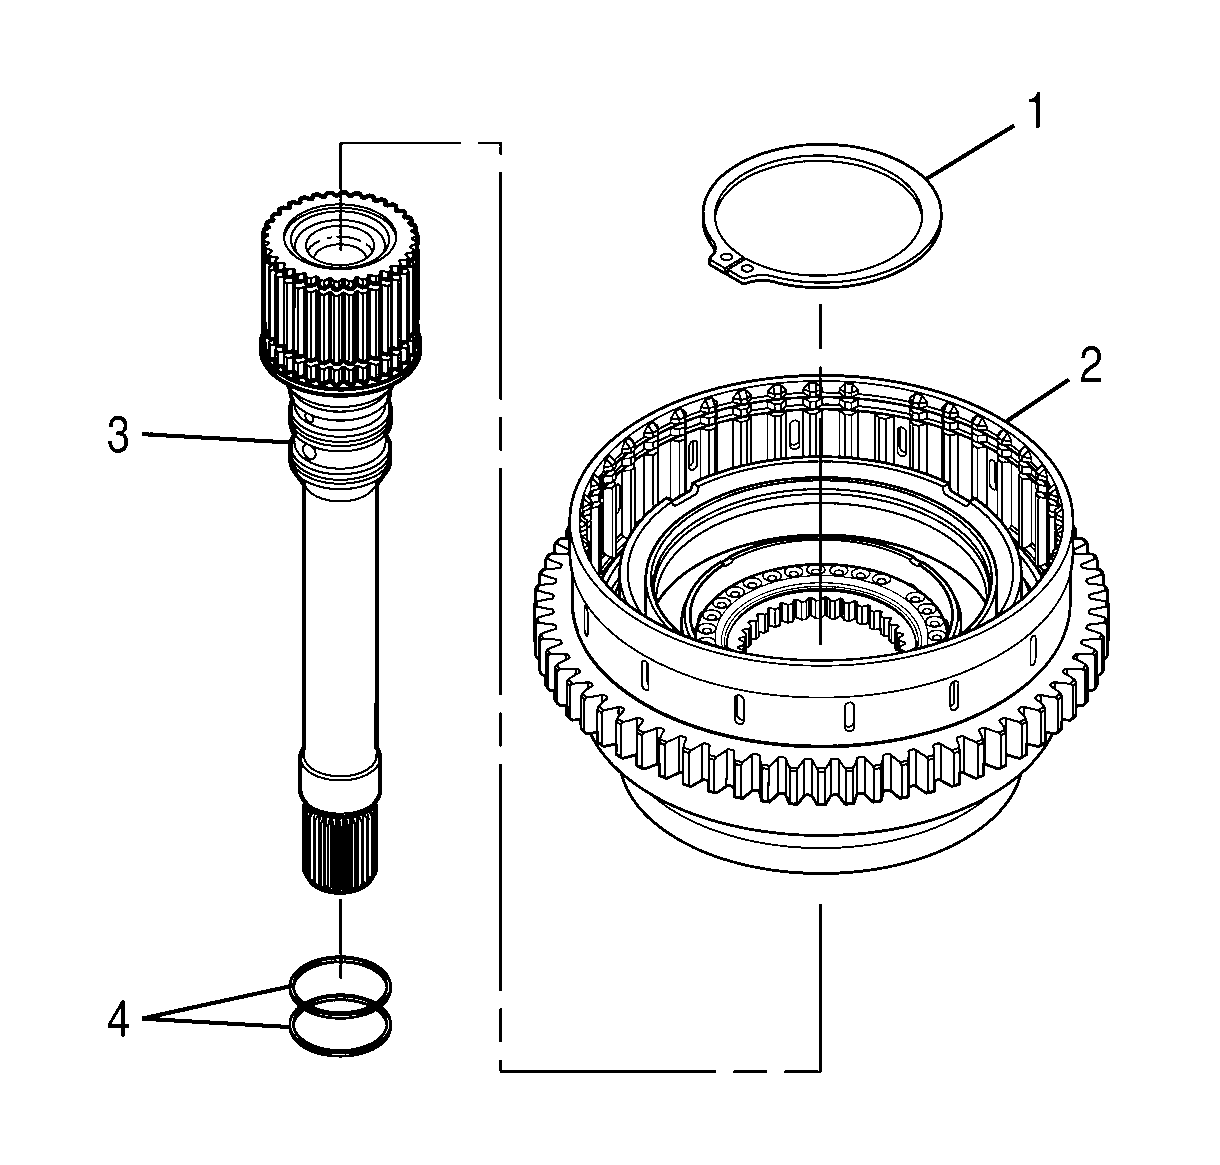
- Install two butt joint sealrings (4) onto
turbine shaft (3).
- Position turbine shaft (3) on the work table so that the rear of the shaft
is facing up.
- Align rotating clutch housing (2) with the rear of turbine shaft (3) so
that the rear of the clutch housing is facing up.
- Install rotating clutch housing (2) onto the rear of turbine shaft (3).
- Install retaining ring (1) onto the turbine shaft.
- Make sure the retaining ring is seated completely around the turbine shaft.
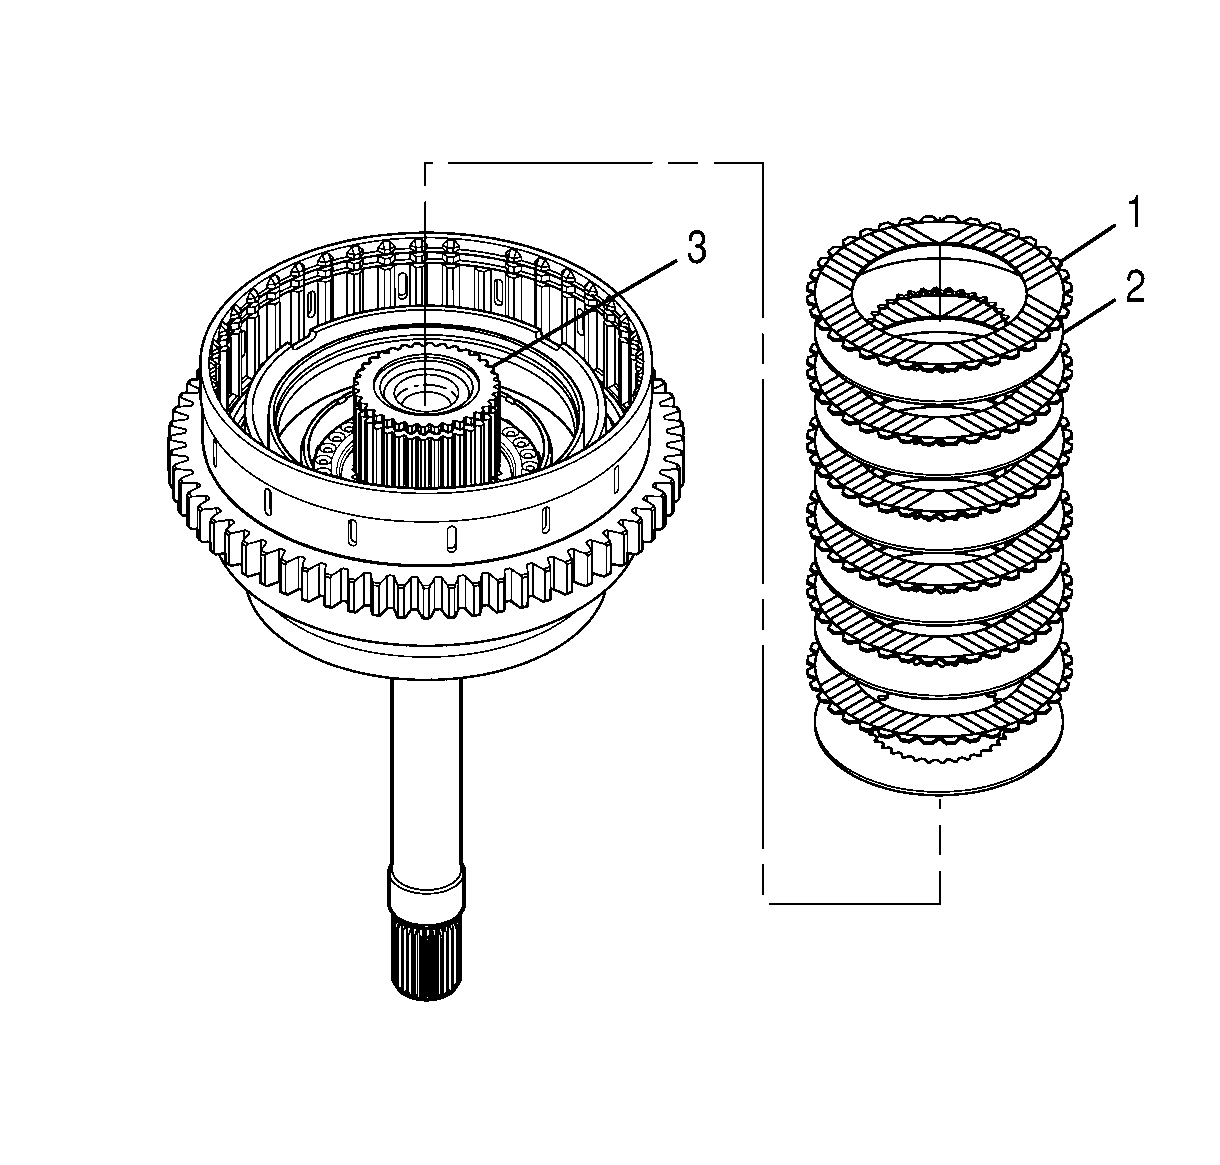
- Starting with a C1 clutch reaction plate, alternately install six C1 clutch
reaction plates (2) and six C1 clutch friction plates (1) onto turbine shaft (3).
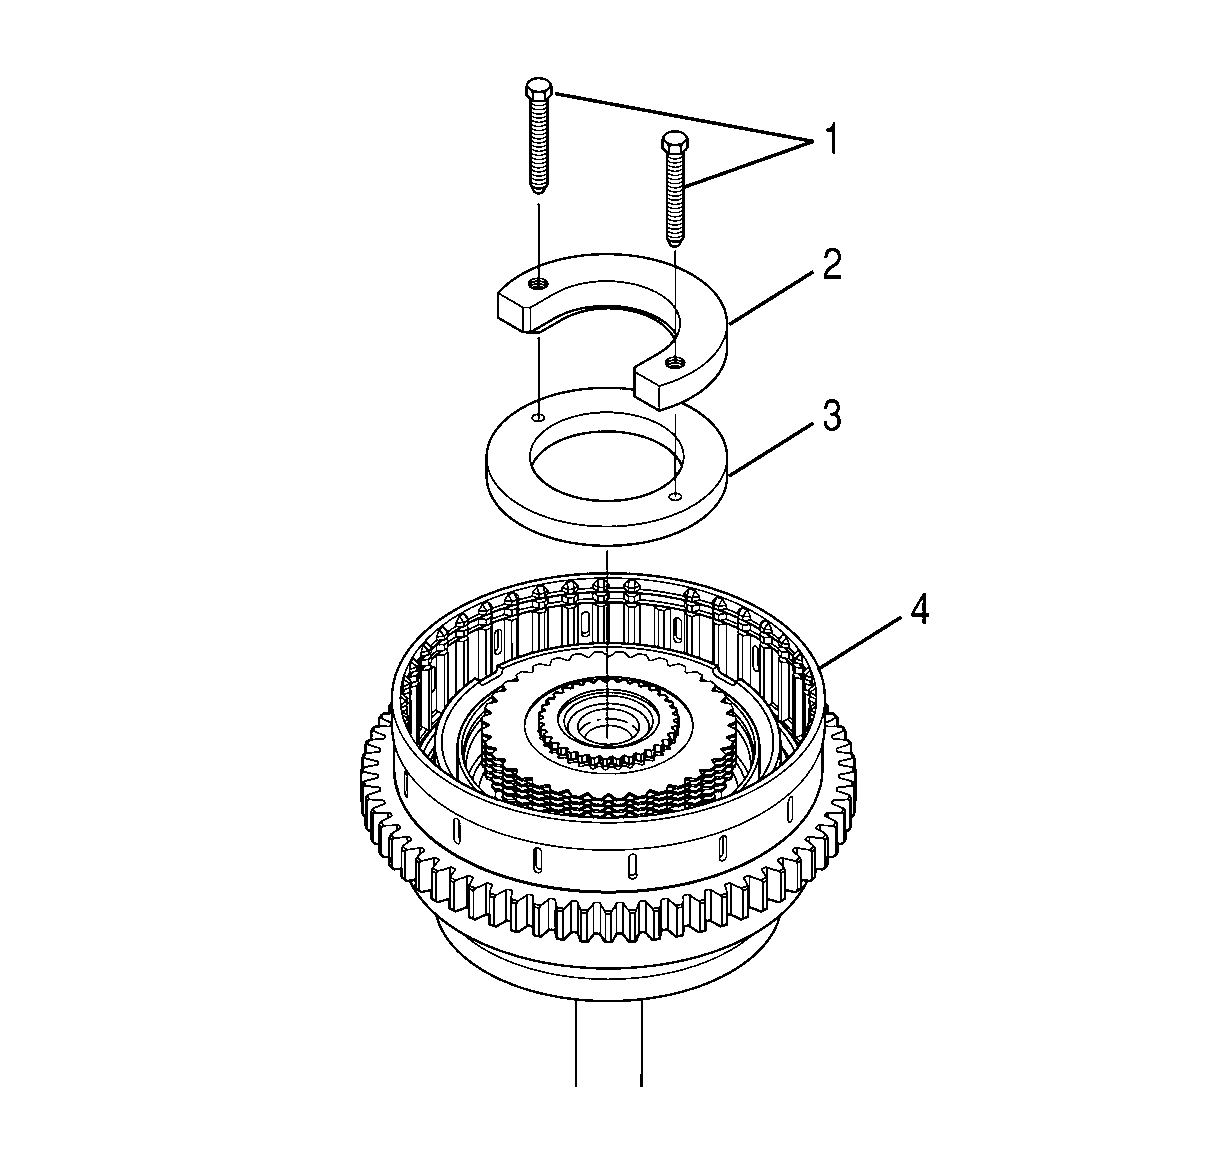
- Align
J 44525-2 (3) with the turbine shaft so that the countersunk holes of J 44525-2
are facing up.
- Install J 44525-2 (3) onto the turbine shaft.
- Align J 44525-1 (2) with the turbine shaft so that the inner ridge
of J 44525-1 is facing down.
- Slide the inner ridge of J 44525-1 (2) into the turbine shaft retaining
ring groove.
- Align the holes in J 44525-1 (2) with the countersunk holes of
J 44525-2 (3).
Notice: Refer to Fastener Notice in the Preface section.
- Hand install two bolts (1) of J 44525
into the holes of J 44525-1 (2).
Tighten
Tighten the J 44525-1 bolts (1) to 1.8 N·m (16 lb in).
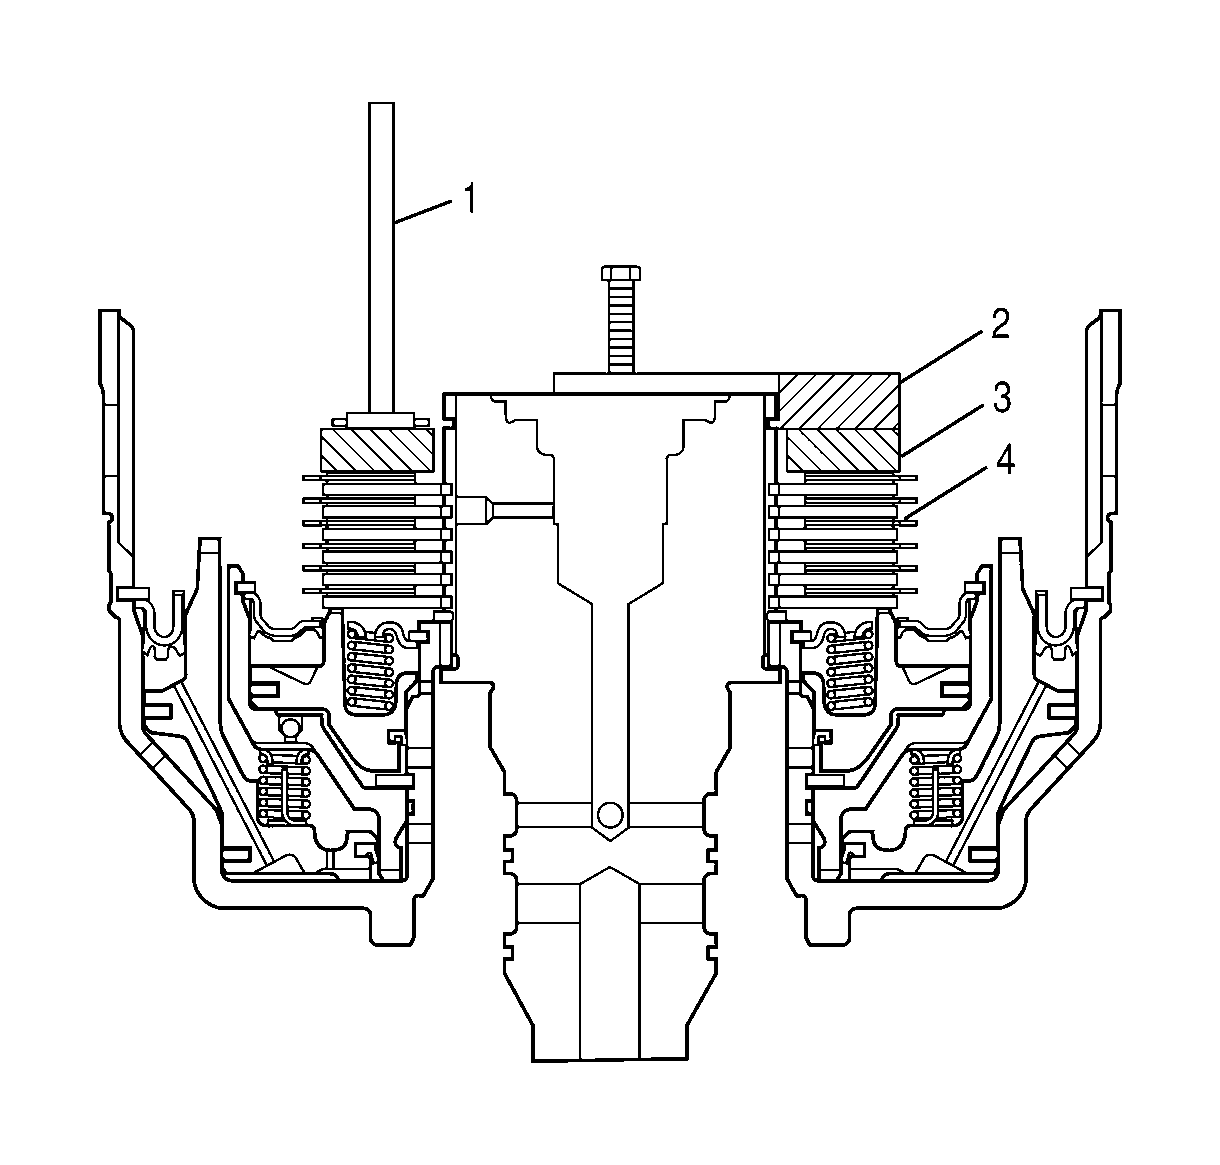
Important: The shift quality of the transmission depends
heavily upon selecting the correct C1 clutch backplate.
- Do the following for each tab of J 44525-3 (1):
| • | Place the flat surface, tabbed end, of J 44525-3 (1) onto the top
surface of J 44525-2 (3). |
| | Important: At most, two of the different tabs will fit
into the retaining ring groove.
|
| • | Try to slide the tabbed end of J 44525-3 (1) into the retaining
ring groove on the turbine shaft. |
| • | If a tab fits into the retaining ring groove, record the four digit ID
number located on the stem of J 44525-3 that is associated with the tab. Refer
to
Selective Components Specifications
to
determine the correct backplate. |
- Select a C1 clutch backplate as follows:
| • | If no tab of J 44525-3 fits into the retaining ring groove, select
the C1 clutch backplate with ID No. 6221 or 8521. |
| • | If one or more tabs of J 45525-3 fit into the retaining ring groove,
select the C1 clutch backplate with an ID No. corresponding to the highest number
recorded in the previous step |
- Remove all J tools from the turbine shaft.
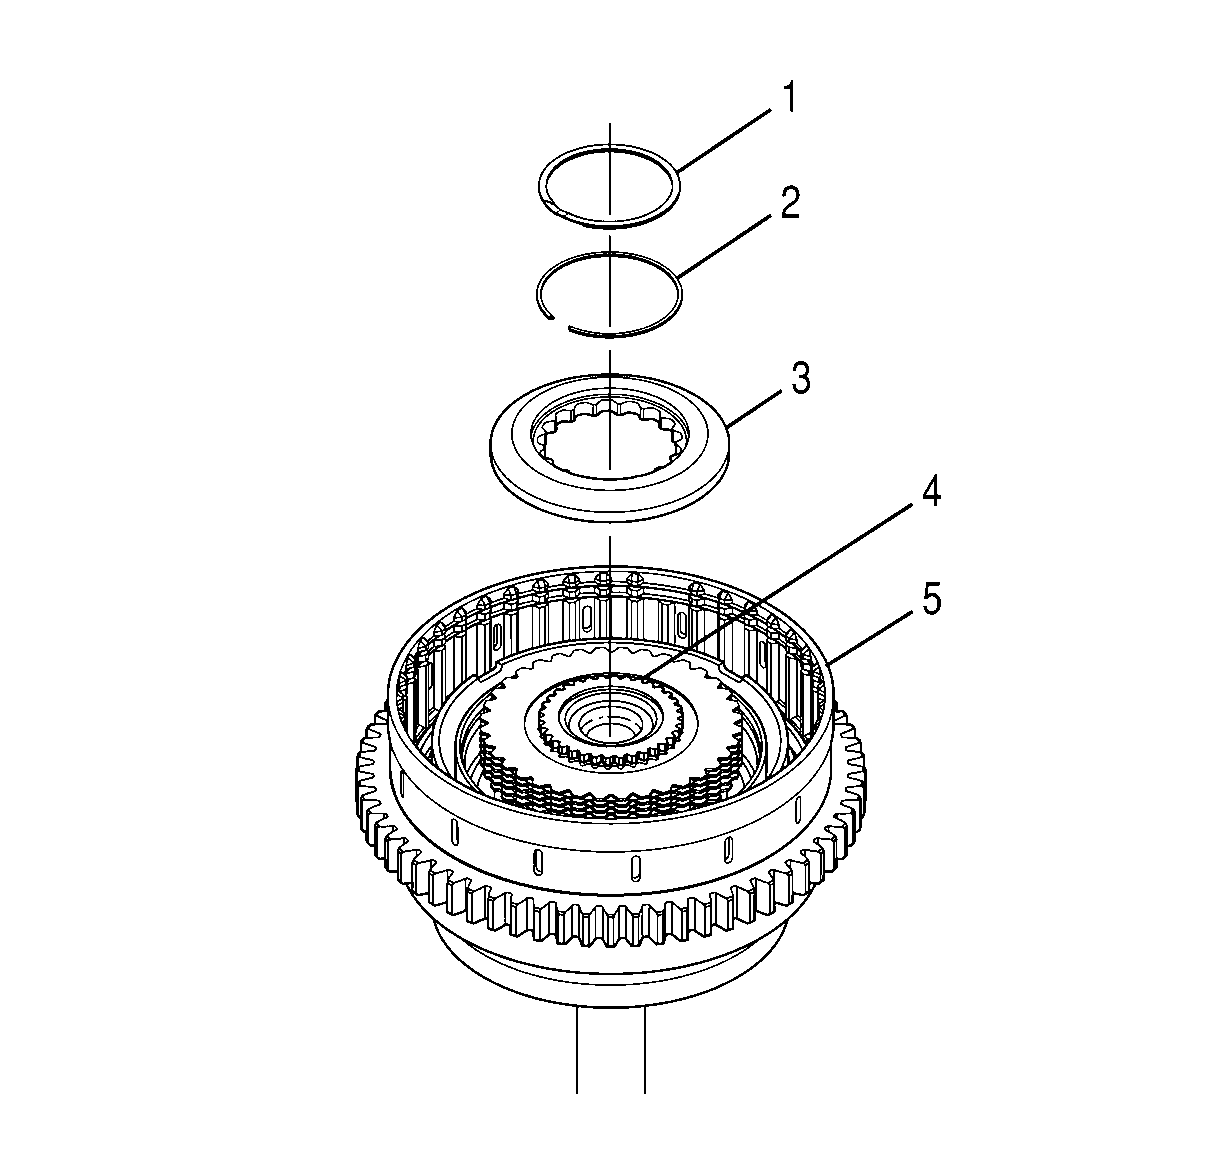
- Align selected C1 clutch backplate (3) so
that the beveled edge of the backplate is facing up.
- Install the C1 clutch backplate onto turbine shaft (4).
- Install retaining ring (2) onto turbine shaft (4).
- Lift C1 clutch backplate (3) and install spiral retaining ring (1) into
C1 clutch backplate (3).
Notice: Installing
the thrust bearing assembly onto the rear of the turbine shaft in the wrong direction
may cause permanent damage to the transmission. The blue stripe must be visible.
- Align thrust bearing assembly (2) so that the blue stripe on the thrust bearing
assembly is facing away from turbine shaft (3).
- Install thrust bearing assembly (2) into turbine shaft (3).
- Make sure the blue stripe on the thrust bearing assembly is visible.
- Center C1 clutch plates (4).
- Install C1 drive hub (1) over C1 clutch plates (4).
- Make sure C1 drive hub (1) has seated on thrust bearing assembly (2).
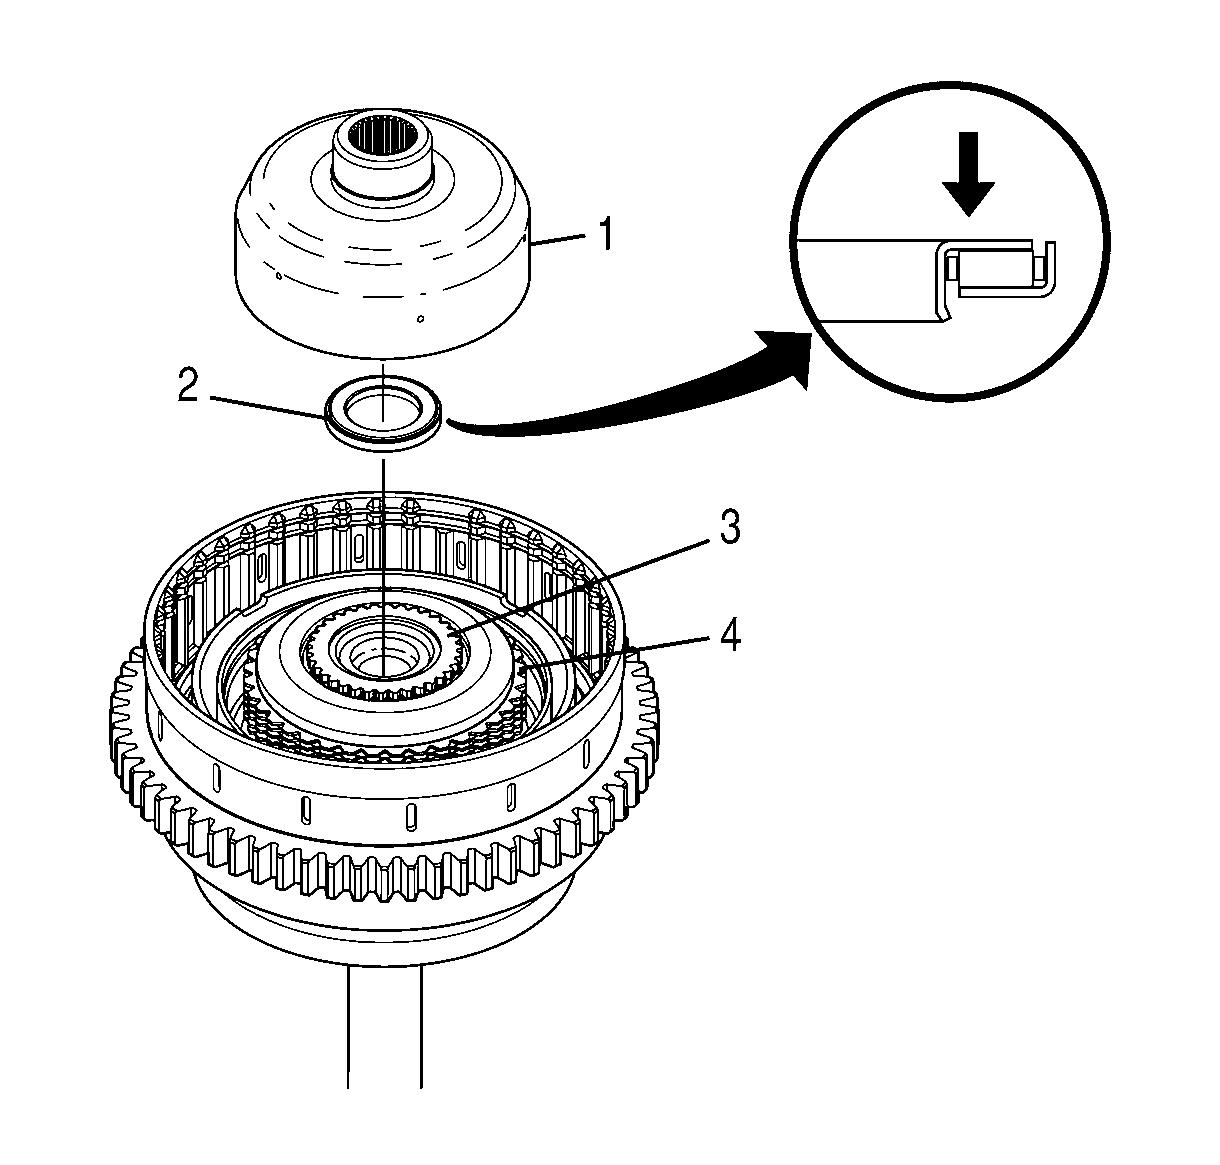
Notice: Installing the thrust bearing assembly onto the rear of
the 1-2-3-4 drive hub in the wrong direction may cause permanent
damage to the transmission. The blue stripe must be visible.
- Align thrust bearing assembly (2) so that the blue stripe on the thrust bearing
assembly is facing away from C1 drive hub (3).
- Install thrust bearing assembly (2) onto rear of C1 drive hub (3).
- Make sure the blue stripe on the thrust bearing assembly is visible.
- Align C2 drive hub (1) so that the smaller end is facing up.
- Install C2 drive hub (1).
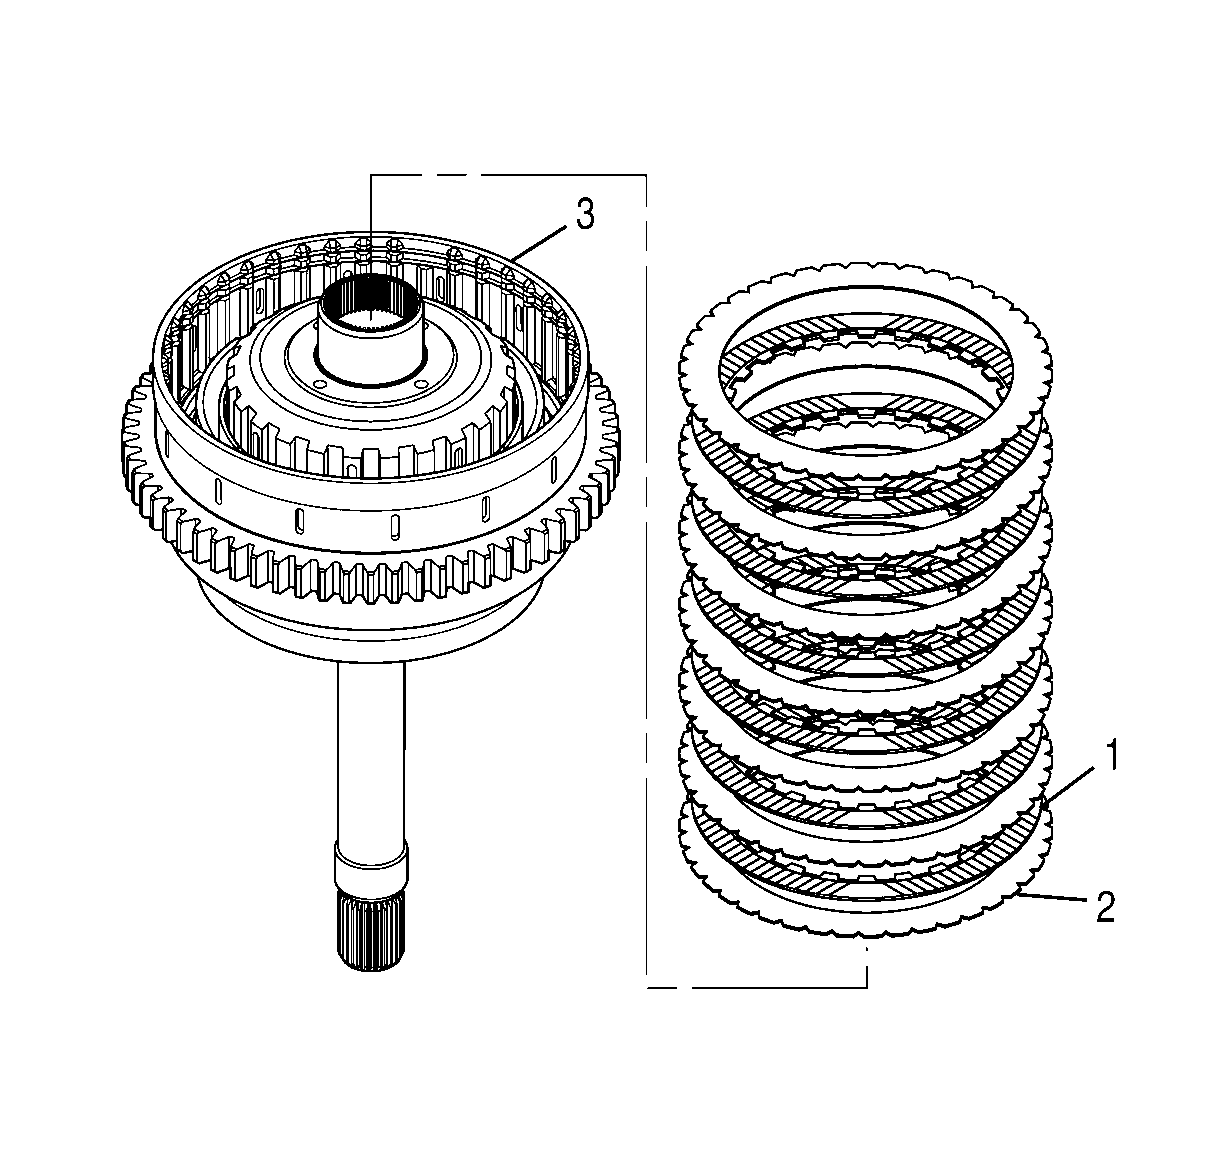
- Starting with a C2 clutch reaction plate, alternately install seven C2 clutch
reaction plates (2) and six C2 clutch friction plates (1) into the rotating clutch
housing.
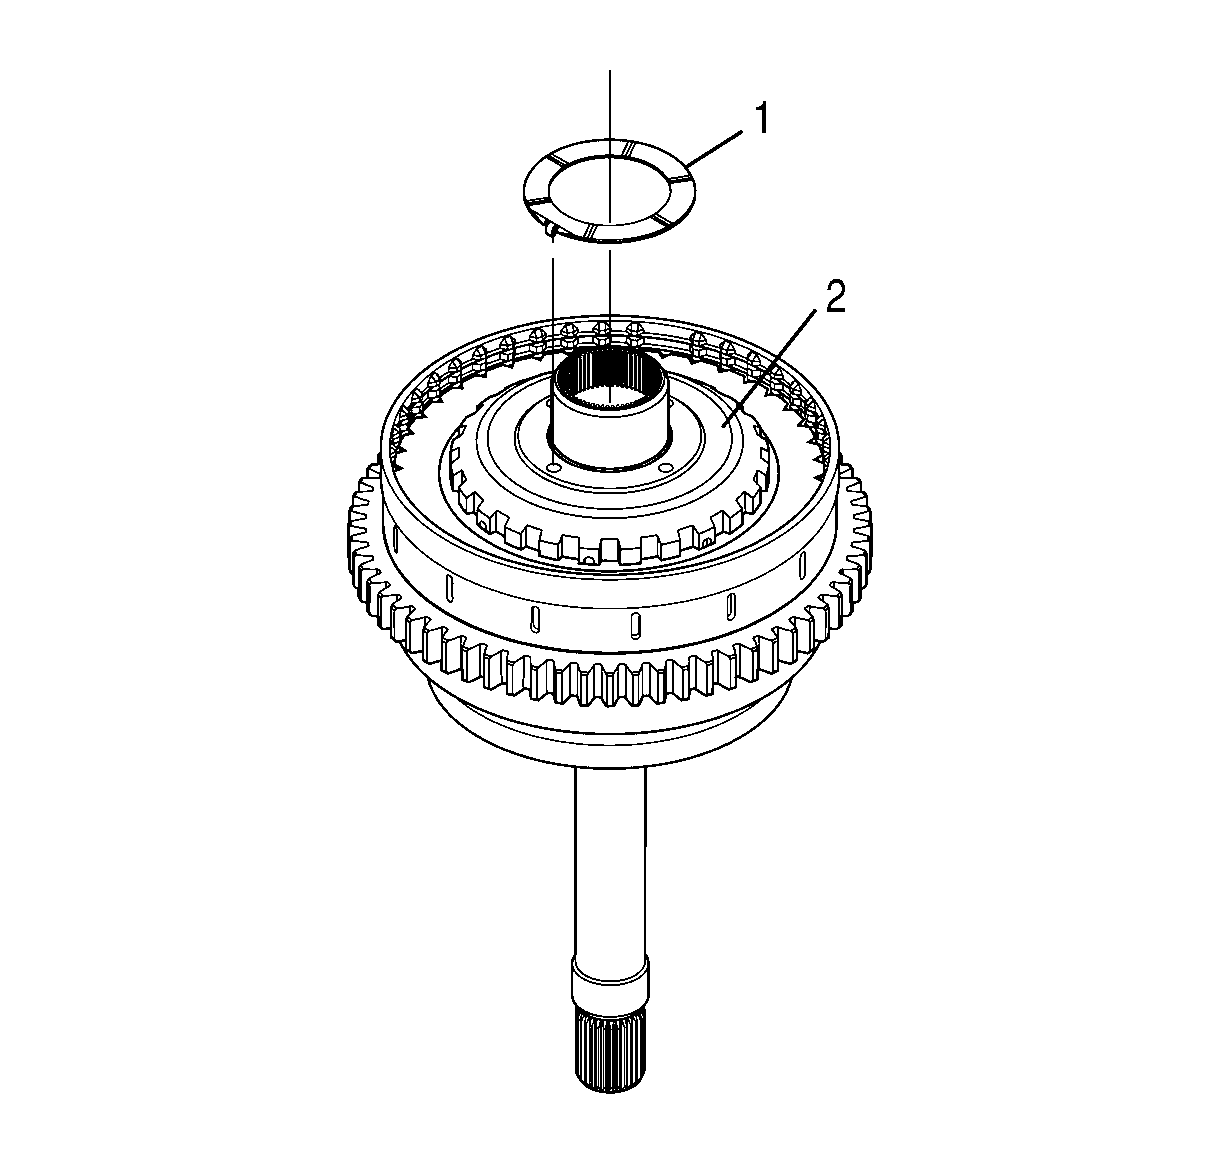
- Align the tangs of bronze thrust washer
(1) with the holes in C2 drive hub (2).
- Install bronze thrust washer (1) onto C2 drive hub (2).
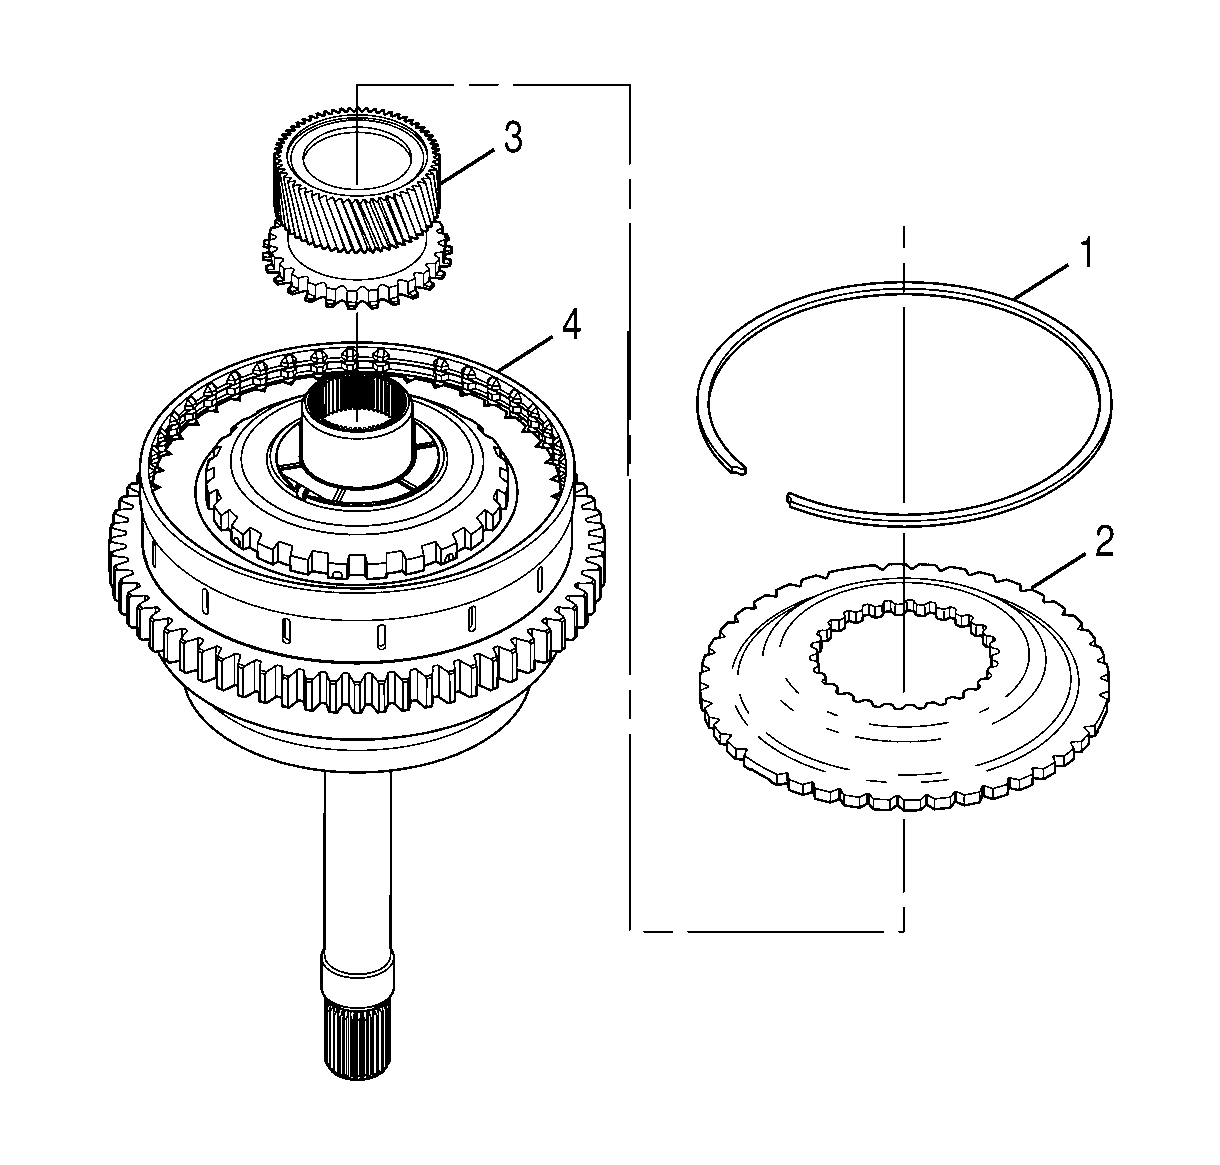
- Align P1 sun gear (3) so that the gear teeth
of the sun gear face the concave face of P1 drive flange (2).
- Install P1 sun gear (3) into P1 drive flange (2).
- Make sure the splines are engaged.
- Holding the sun gear and, align the double wide splines of P1 drive flange
(2) with the double wide spaces on rotating clutch housing (4).
- Install P1 sun gear (3) with P1 drive flange (2) into rotating clutch
housing (4).
- Install retaining ring (1) into rotating clutch housing (4).
- Make sure the retaining ring is seated all the way around the rotating
clutch housing.


