Removal Procedure
- Disconnect the battery negative cable. Refer to Battery Negative Cable Disconnection and Connection in Engine Electrical.
- Raise the vehicle. Refer to Lifting and Jacking the Vehicle in General Information.
- Remove the oil pan drain plug and drain the engine oil into a suitable container.
- Remove the oil filter.
- Remove the oil filter adapter. Refer to Oil Filter Adapter Replacement .
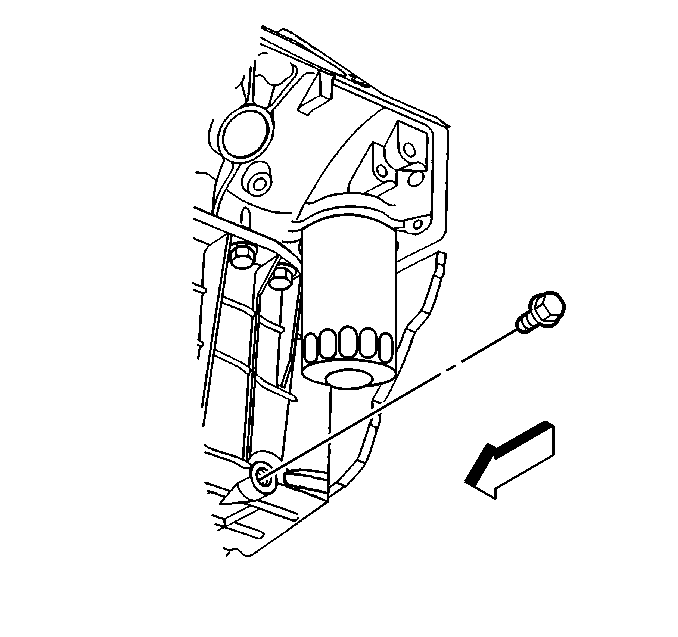
- Remove the bolt holding the bracket for the starter wire and the transmission cooler pipes.
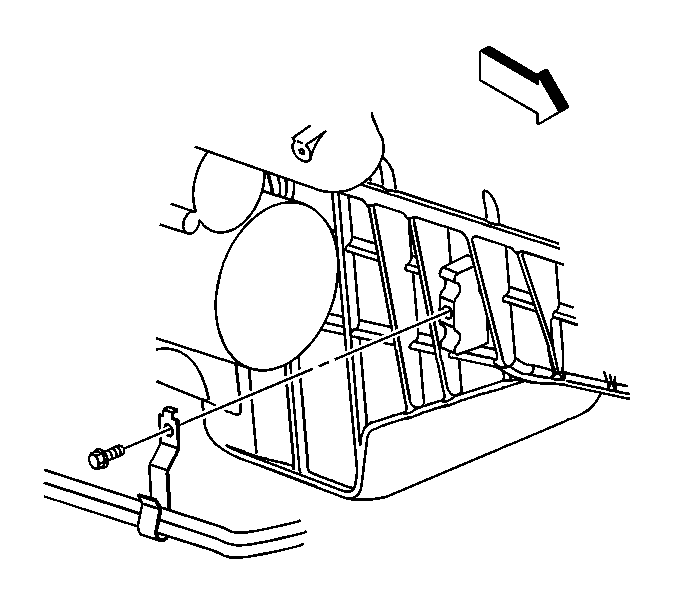
- Remove the crankcase position (CKP) sensor wiring harness from the retainer.
- Remove the starter. Refer to Starter Motor Replacement in Engine Electrical.
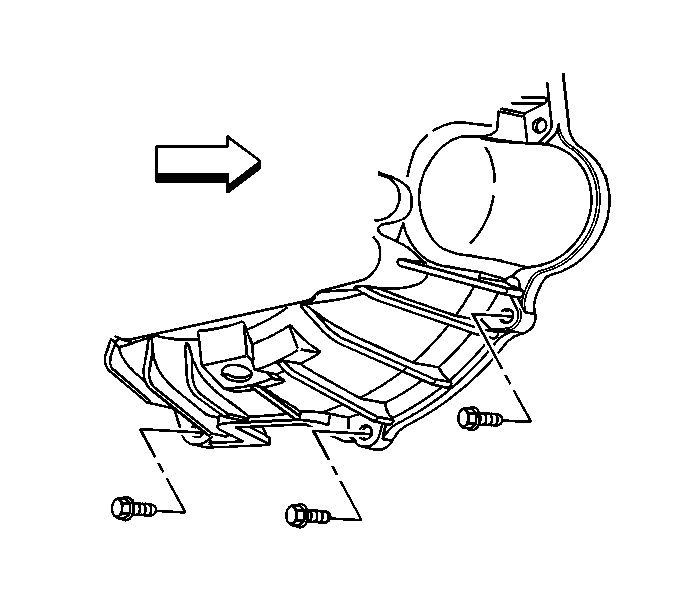
- Remove the transmission cover.
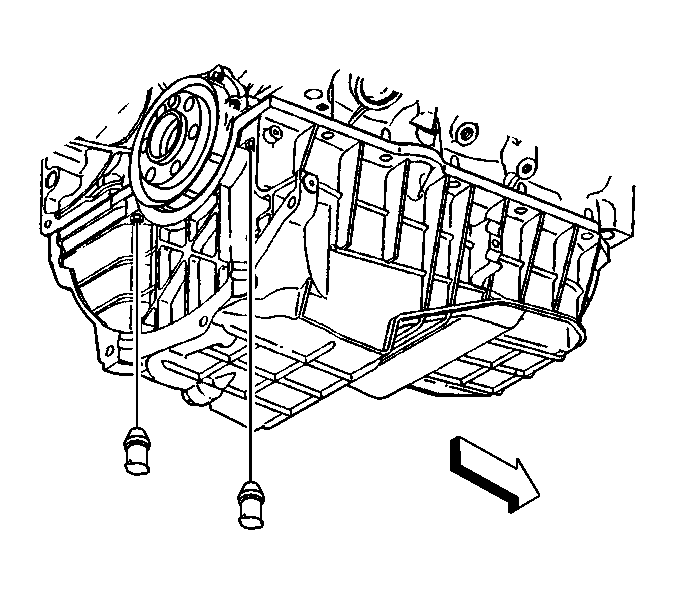
- Remove the access plugs for the oil pan rear nuts.
- Remove the transmission to oil pan bolts.
- Remove and discard the engine oil level sensor (if applicable).
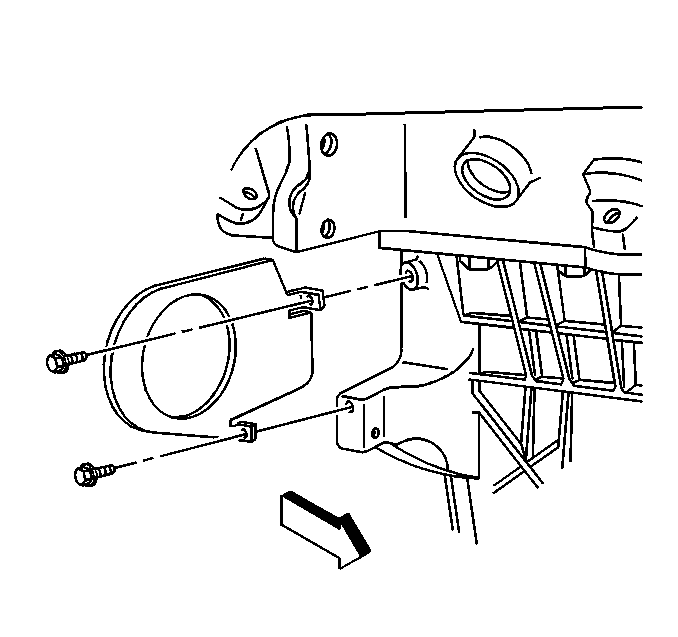
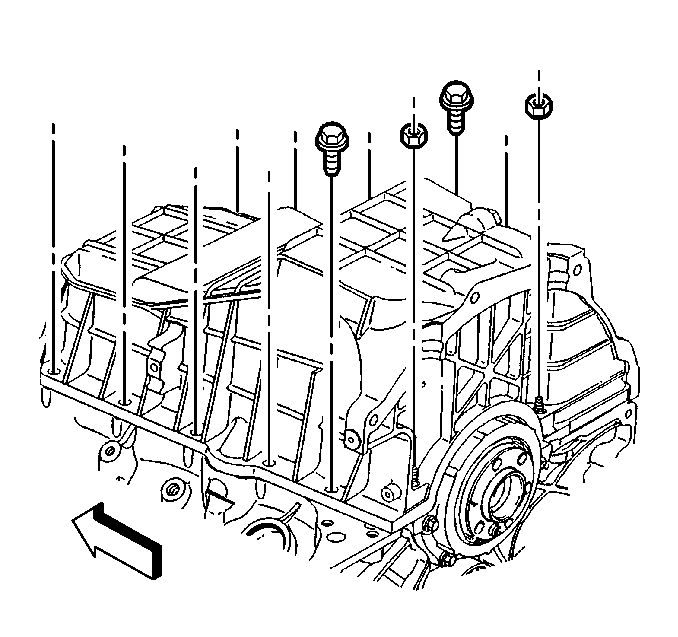
- Remove the oil pan bolts and nuts.
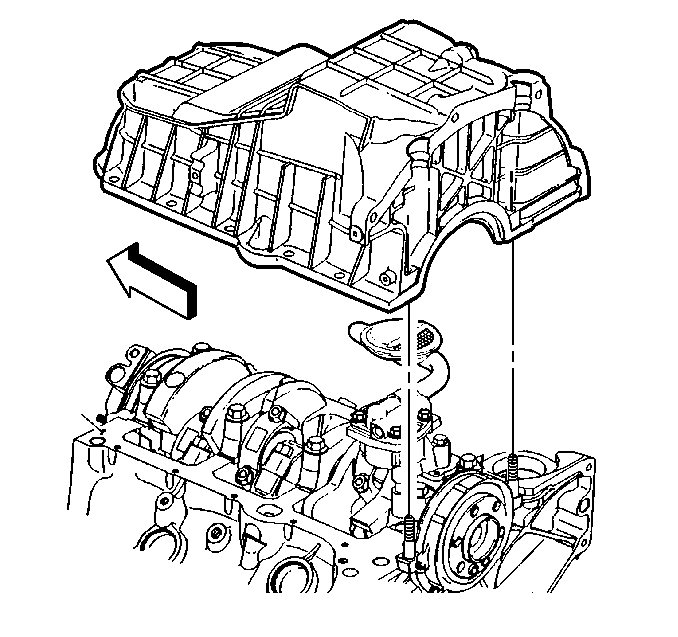
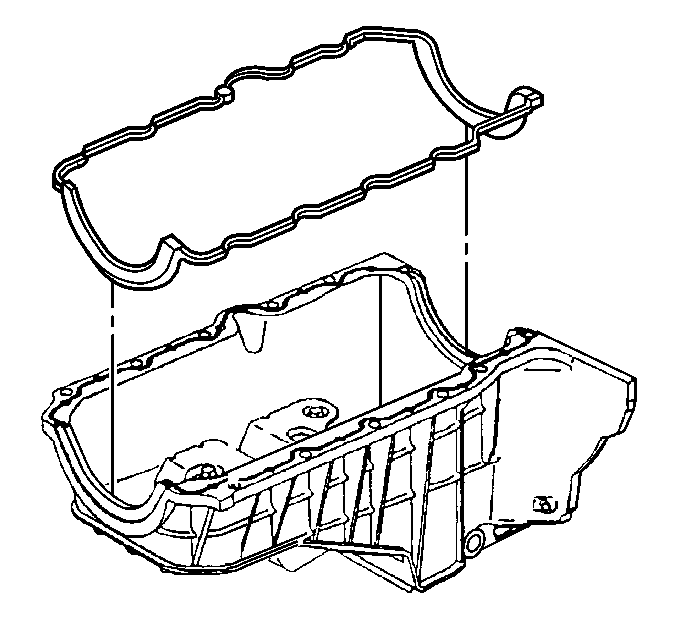
- Remove the oil pan.
- Remove the oil pan gasket.
- Discard the oil pan gasket.
- Clean all sealing surfaces on the engine and the oil pan. Refer to Oil Pan Cleaning and Inspection in Engine Unit Repair Manual.
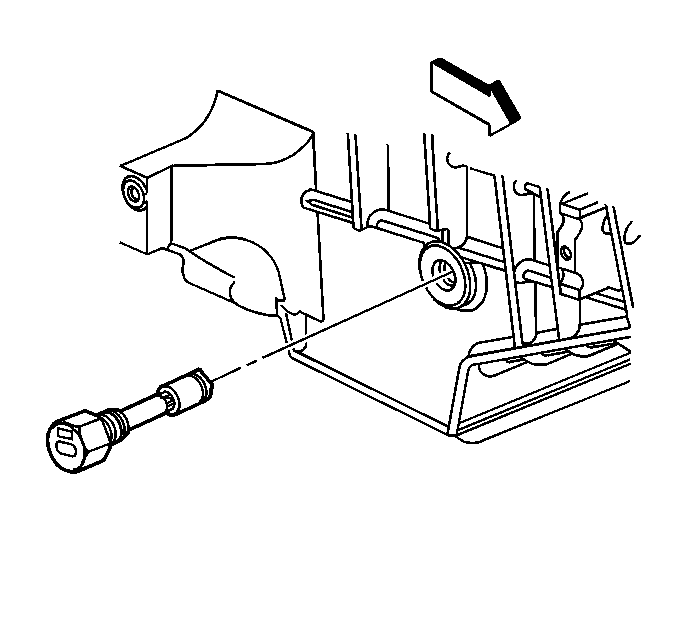
Important: The low oil level sensor is not reusable. Use a NEW low oil level sensor.
Installation Procedure
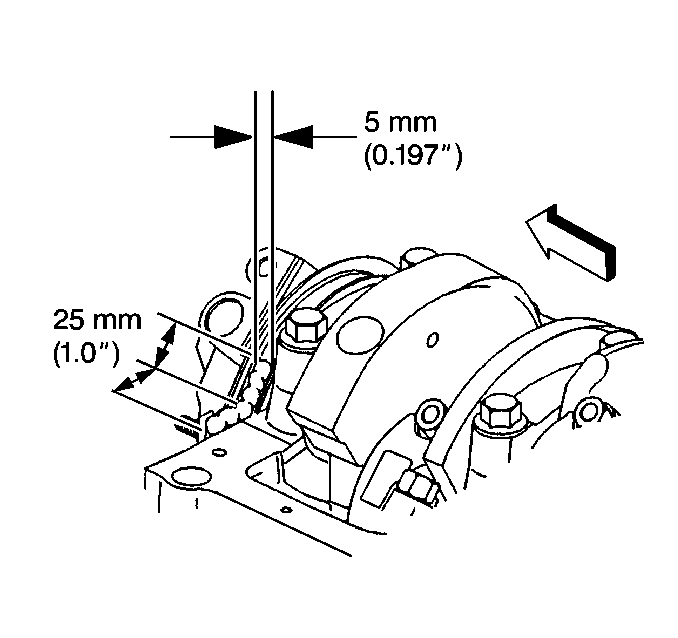
- Apply a 5 mm (0.197 in) wide and 25 mm (1.0 in) long bead of adhesive GM P/N 12346141 or equivalent to both the right and left sides of the engine front cover to engine block junction at the oil pan sealing surfaces.
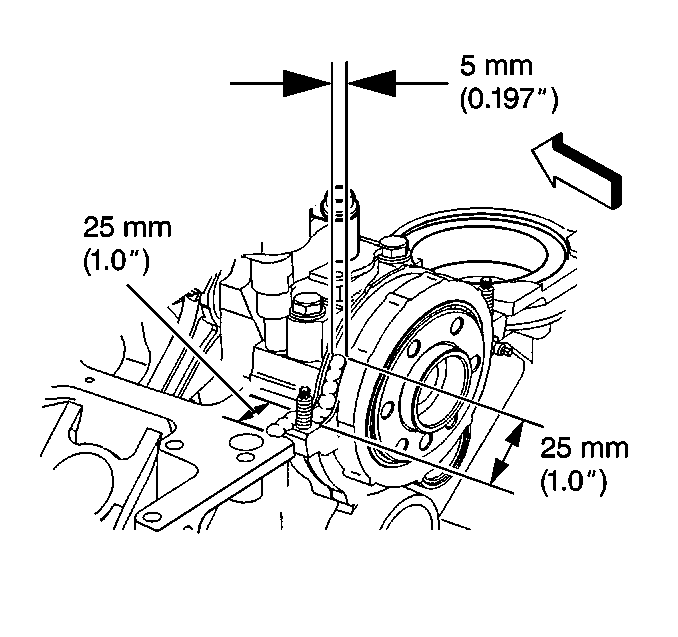
- Apply a 5 mm (0.197 in) wide and 25 mm (1.0 in) long bead of adhesive GM P/N 12346141 or equivalent to both the right and left sides of the crankshaft rear oil seal housing to engine block junction at the oil pan sealing surfaces.
- Install the NEW oil pan gasket into the groove in the oil pan.
- Install the oil pan onto the engine block.
- Slide the oil pan back against a suitable straight edge.
- Install the oil pan bolts and nuts, but do not tighten.
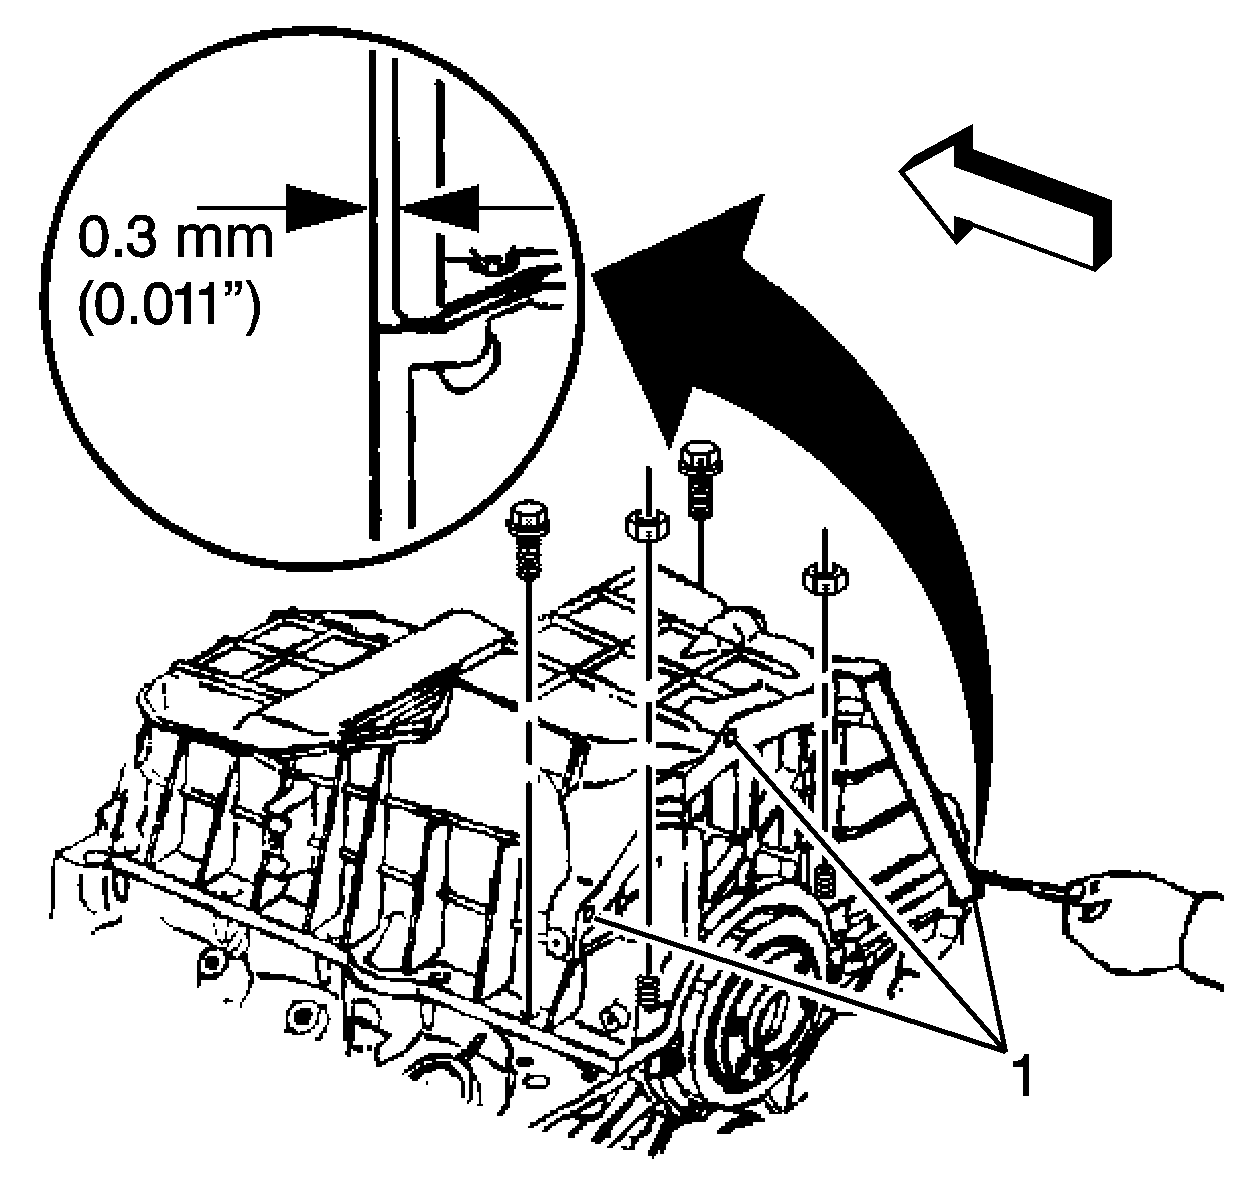
- Measure the pan-to-transmission housing clearance using a feeler gauge and a straight edge.
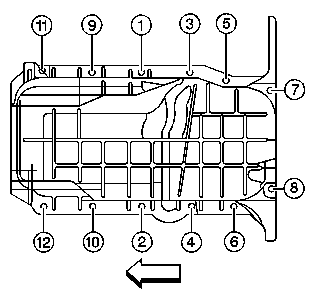
- Tighten the oil pan bolts and nuts in sequence (1-12).
- Measure the clearance between the 3 oil pan-to-transmission housing measurement points in order to ensure proper alignment.
- Install a NEW oil pan drain plug seal (O-ring) onto the oil pan drain plug.
- Install the oil pan drain plug into the oil pan.
- Install the NEW engine oil level sensor (if applicable).
- Install the transmission to oil pan bolts.
- Install the transmission cover.
- Install the access plugs for the oil pan rear nuts.
- Install the starter motor. Refer to Starter Motor Replacement in Engine Electrical.
- Install the bolt holding the bracket for the starter wiring harness and the transmission cooler pipes.
- Install the CKP sensor wiring harness in the retainer.
- Install the oil filter adapter. Refer to Oil Filter Adapter Replacement .
- Install the oil filter and the oil pan drain plug. Refer to Engine Oil and Oil Filter Replacement .
- Lower the vehicle.
- Fill the crankcase with engine oil. Refer to Engine Oil and Oil Filter Replacement .
- Connect the battery negative cable. Refer to Battery Negative Cable Disconnection and Connection in Engine Electrical.
Notice: Any time the transmission and the engine oil pan are off of the engine at the same time, install the transmission before the oil pan. This is to allow for the proper oil pan alignment. Failure to achieve the correct oil pan alignment can result in transmission failure.
Important: Always install a NEW oil pan gasket.
The oil pan gasket and oil pan must be installed and the fasteners tightened while the adhesive is still wet to the touch.
Important: The oil pan alignment must always be flush or forward no more than 0.3 mm (0.011 in) from the rear face of the engine block.
Press the oil pan gasket into the grooves of the engine front cover and crankshaft rear oil seal housing.
Notice: Use the correct fastener in the correct location. Replacement fasteners must be the correct part number for that application. Fasteners requiring replacement or fasteners requiring the use of thread locking compound or sealant are identified in the service procedure. Do not use paints, lubricants, or corrosion inhibitors on fasteners or fastener joint surfaces unless specified. These coatings affect fastener torque and joint clamping force and may damage the fastener. Use the correct tightening sequence and specifications when installing fasteners in order to avoid damage to parts and systems.
Use a feeler gauge to check the clearance between the oil pan-to-transmission housing measurement points. If the clearance exceeds 0.3 mm (0.011 in) at any of the 3 oil pan-to-transmission housing measurement points (1), then repeat the step until the oil pan-to-transmission housing clearance is within the specification. The oil pan must always be forward of the rear face of the engine block.
Tighten
Tighten the oil pan bolts to 25 N·m (18 lb ft).
Tighten
Tighten the oil pan drain plug to 25 N·m (18 lb ft).
Tighten
Tighten the engine oil level sensor to 13 N·m (115 lb in).
Tighten
Tighten the bolts to 47 N·m (35 lb ft).
Tighten
Tighten the transmission cover bolts to 12 N·m (106 lb in).
Tighten
Tighten the bracket bolt to 9 N·m (80 lb in).
